
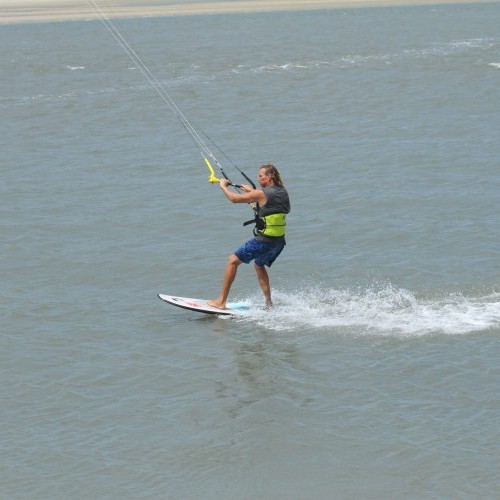
Riding Downwind
Technique / Intermediate


Introduction
There is no better place to start than the beginning, so what do we kiters mean by riding downwind?
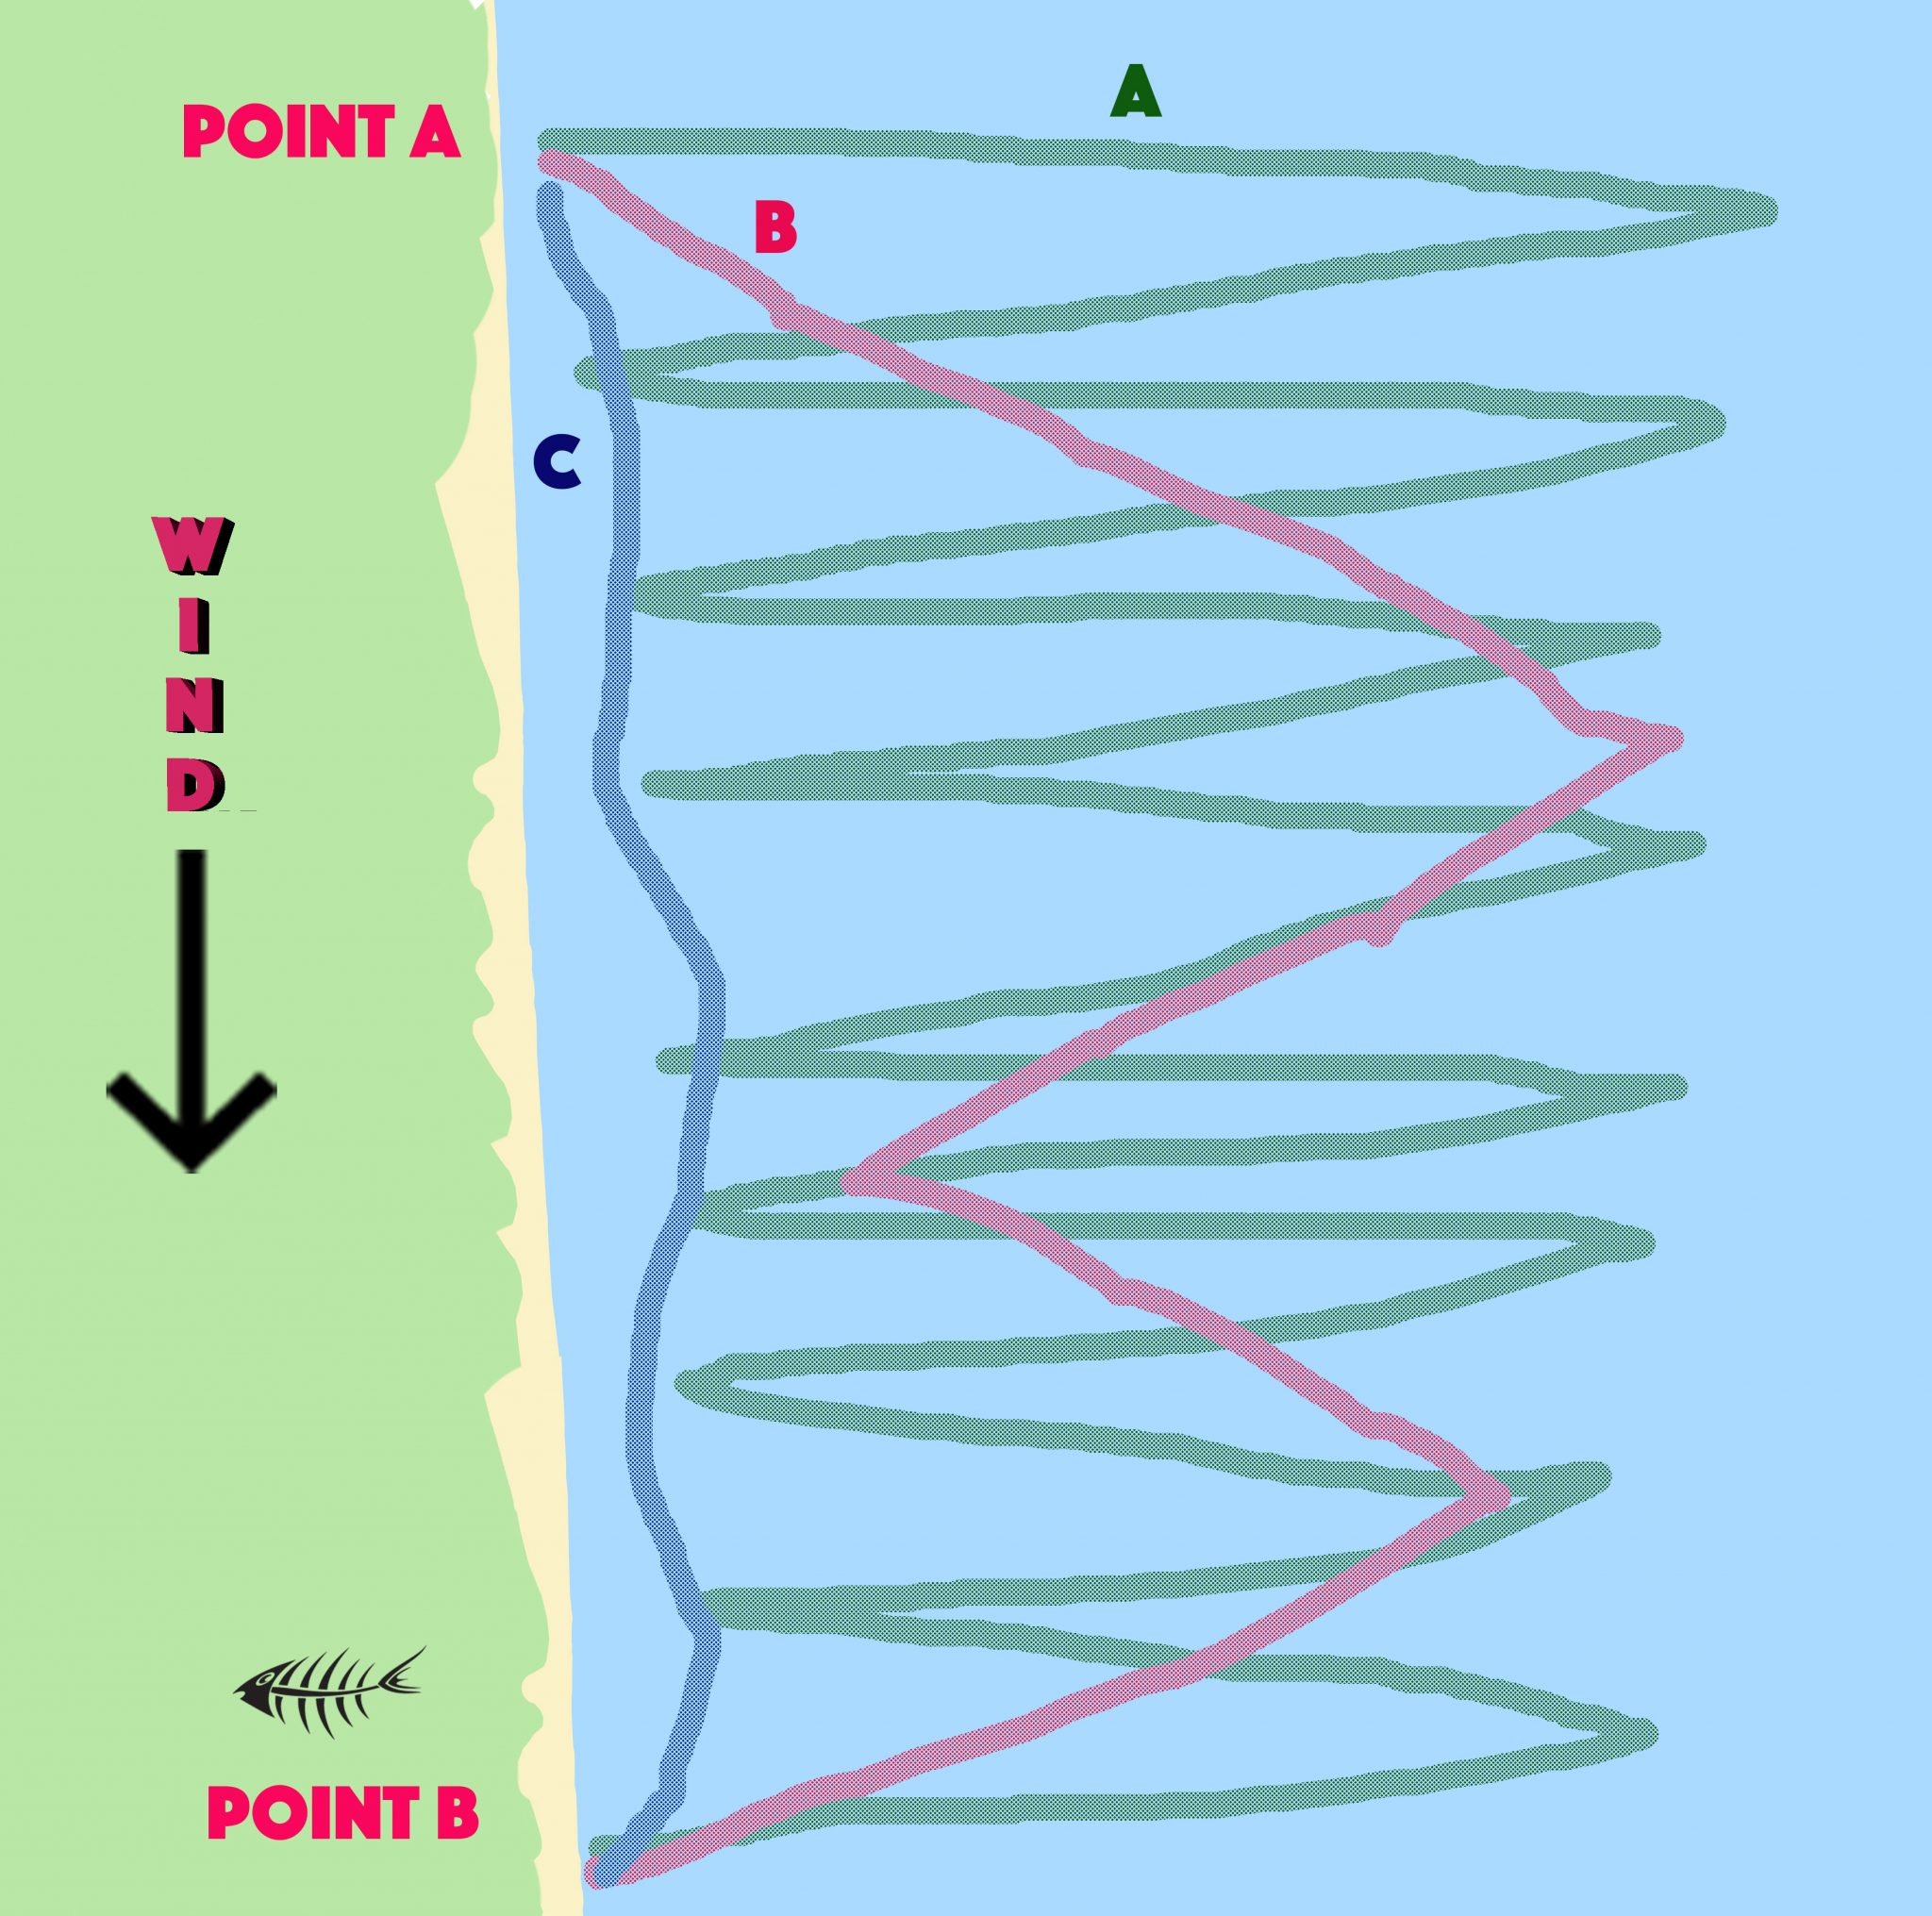
Simplest way to think of it is to imagine that you want to go from point A to point B. For theory’s sake, if you look at Pic 1 you can see that the kite school, Point A, is on a beach with the wind blowing cross-shore. The idea is to launch at the kite school and then ride down the coast to the restaurant at Point B. Due to the cross-shore wind direction, lunch is downwind of your starting point. We can probably all agree that riding upwind on an edge isn’t going to get us to our tasty grilled snapper. This means that any angle more off the wind than riding perpendicular across the wind will eventually get us to lunch, from a couple of degrees zig zagging (a) down the coast to 45 degrees off the wind on a broad reach (b), to riding straight down wind parallel to the beach (c) and everything in-between. It’s all a question of angles from 91 to 180 degrees.


Please note that this is a simple theoretical diagram and that the wind could be from many directions, and each one will determine how you can make your way downwind. If the wind is onshore, for example, you’d happily make your way to the restaurant without having to point off the wind at all!
Down-winding is just a loose term for riding “off” the wind or “with” the wind to some extent. The real question lies in how we can ride down wind effectively and efficiently. The funny thing is when we all learn to kite, the holy grail is to ride upwind, so why is it that once we master the be all and end all, doing what came so naturally, going down-wind, is suddenly so challenging? Surely it should be as simple as rolling downhill on a bike? The answer lies in a multi-faceted, multi-tasking smorgasbord of variables, possibilities and one could say opportunities such as wind strength, kite size, board size and volume, speed, apparent wind and dare we say – rider ability.
As we’re all well aware the simple fact of the matter is that as soon as we turn off our edge and further downwind we lose tension in our lines and everything comes to a grinding halt. However, before we look at why that happens and the myriad of ways that we can stop it happening, let’s just spare a moment’s thought for how we turn the board off the edge and more downwind.
Pointing Off the Wind – How To
We’ll keep this brief and bare in mind that regardless of kiting craft it’s pretty much the same idea. For this we will assume that we have enough power in our kite to be happily riding without the need to work our kite, otherwise known in our formative times as Park & Ride Heaven.
In a way if you were to undo all the good work that sets you up on a strong edge, then you’ll be most the way to flattening the board off. And once the board is flat, with no edge and power in the kite you will officially be riding, however gently or temporarily, off the wind towards the kite. This is the real edge and release of kiting and it has sweet football association to do with popping and the world to do with bearing off the wind! That’s right, all you have to do is release your edge and bingo, off the wind you go....


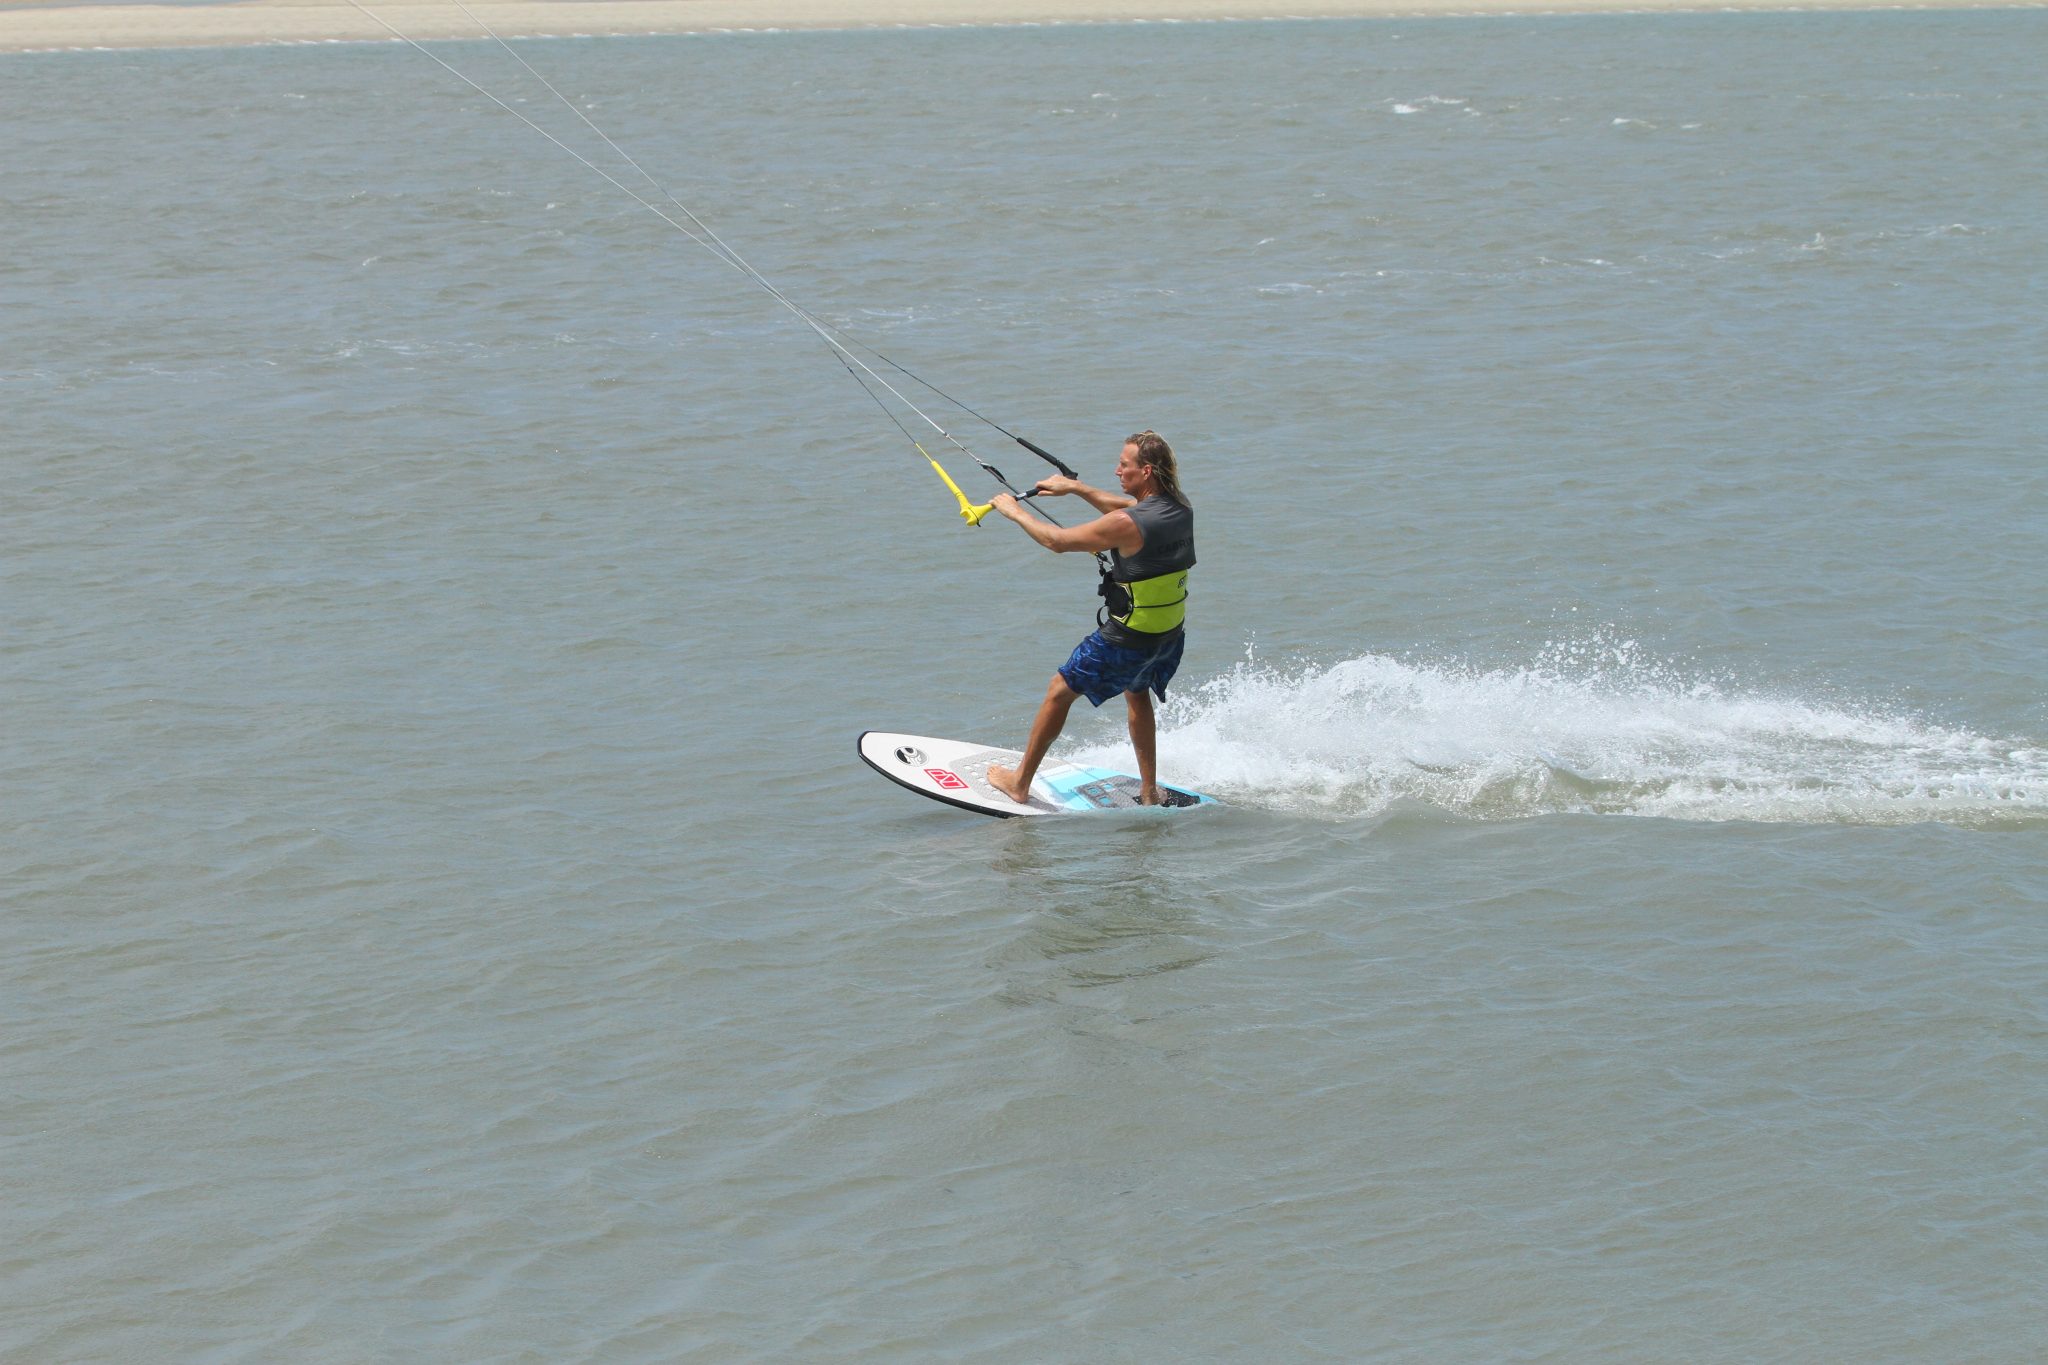
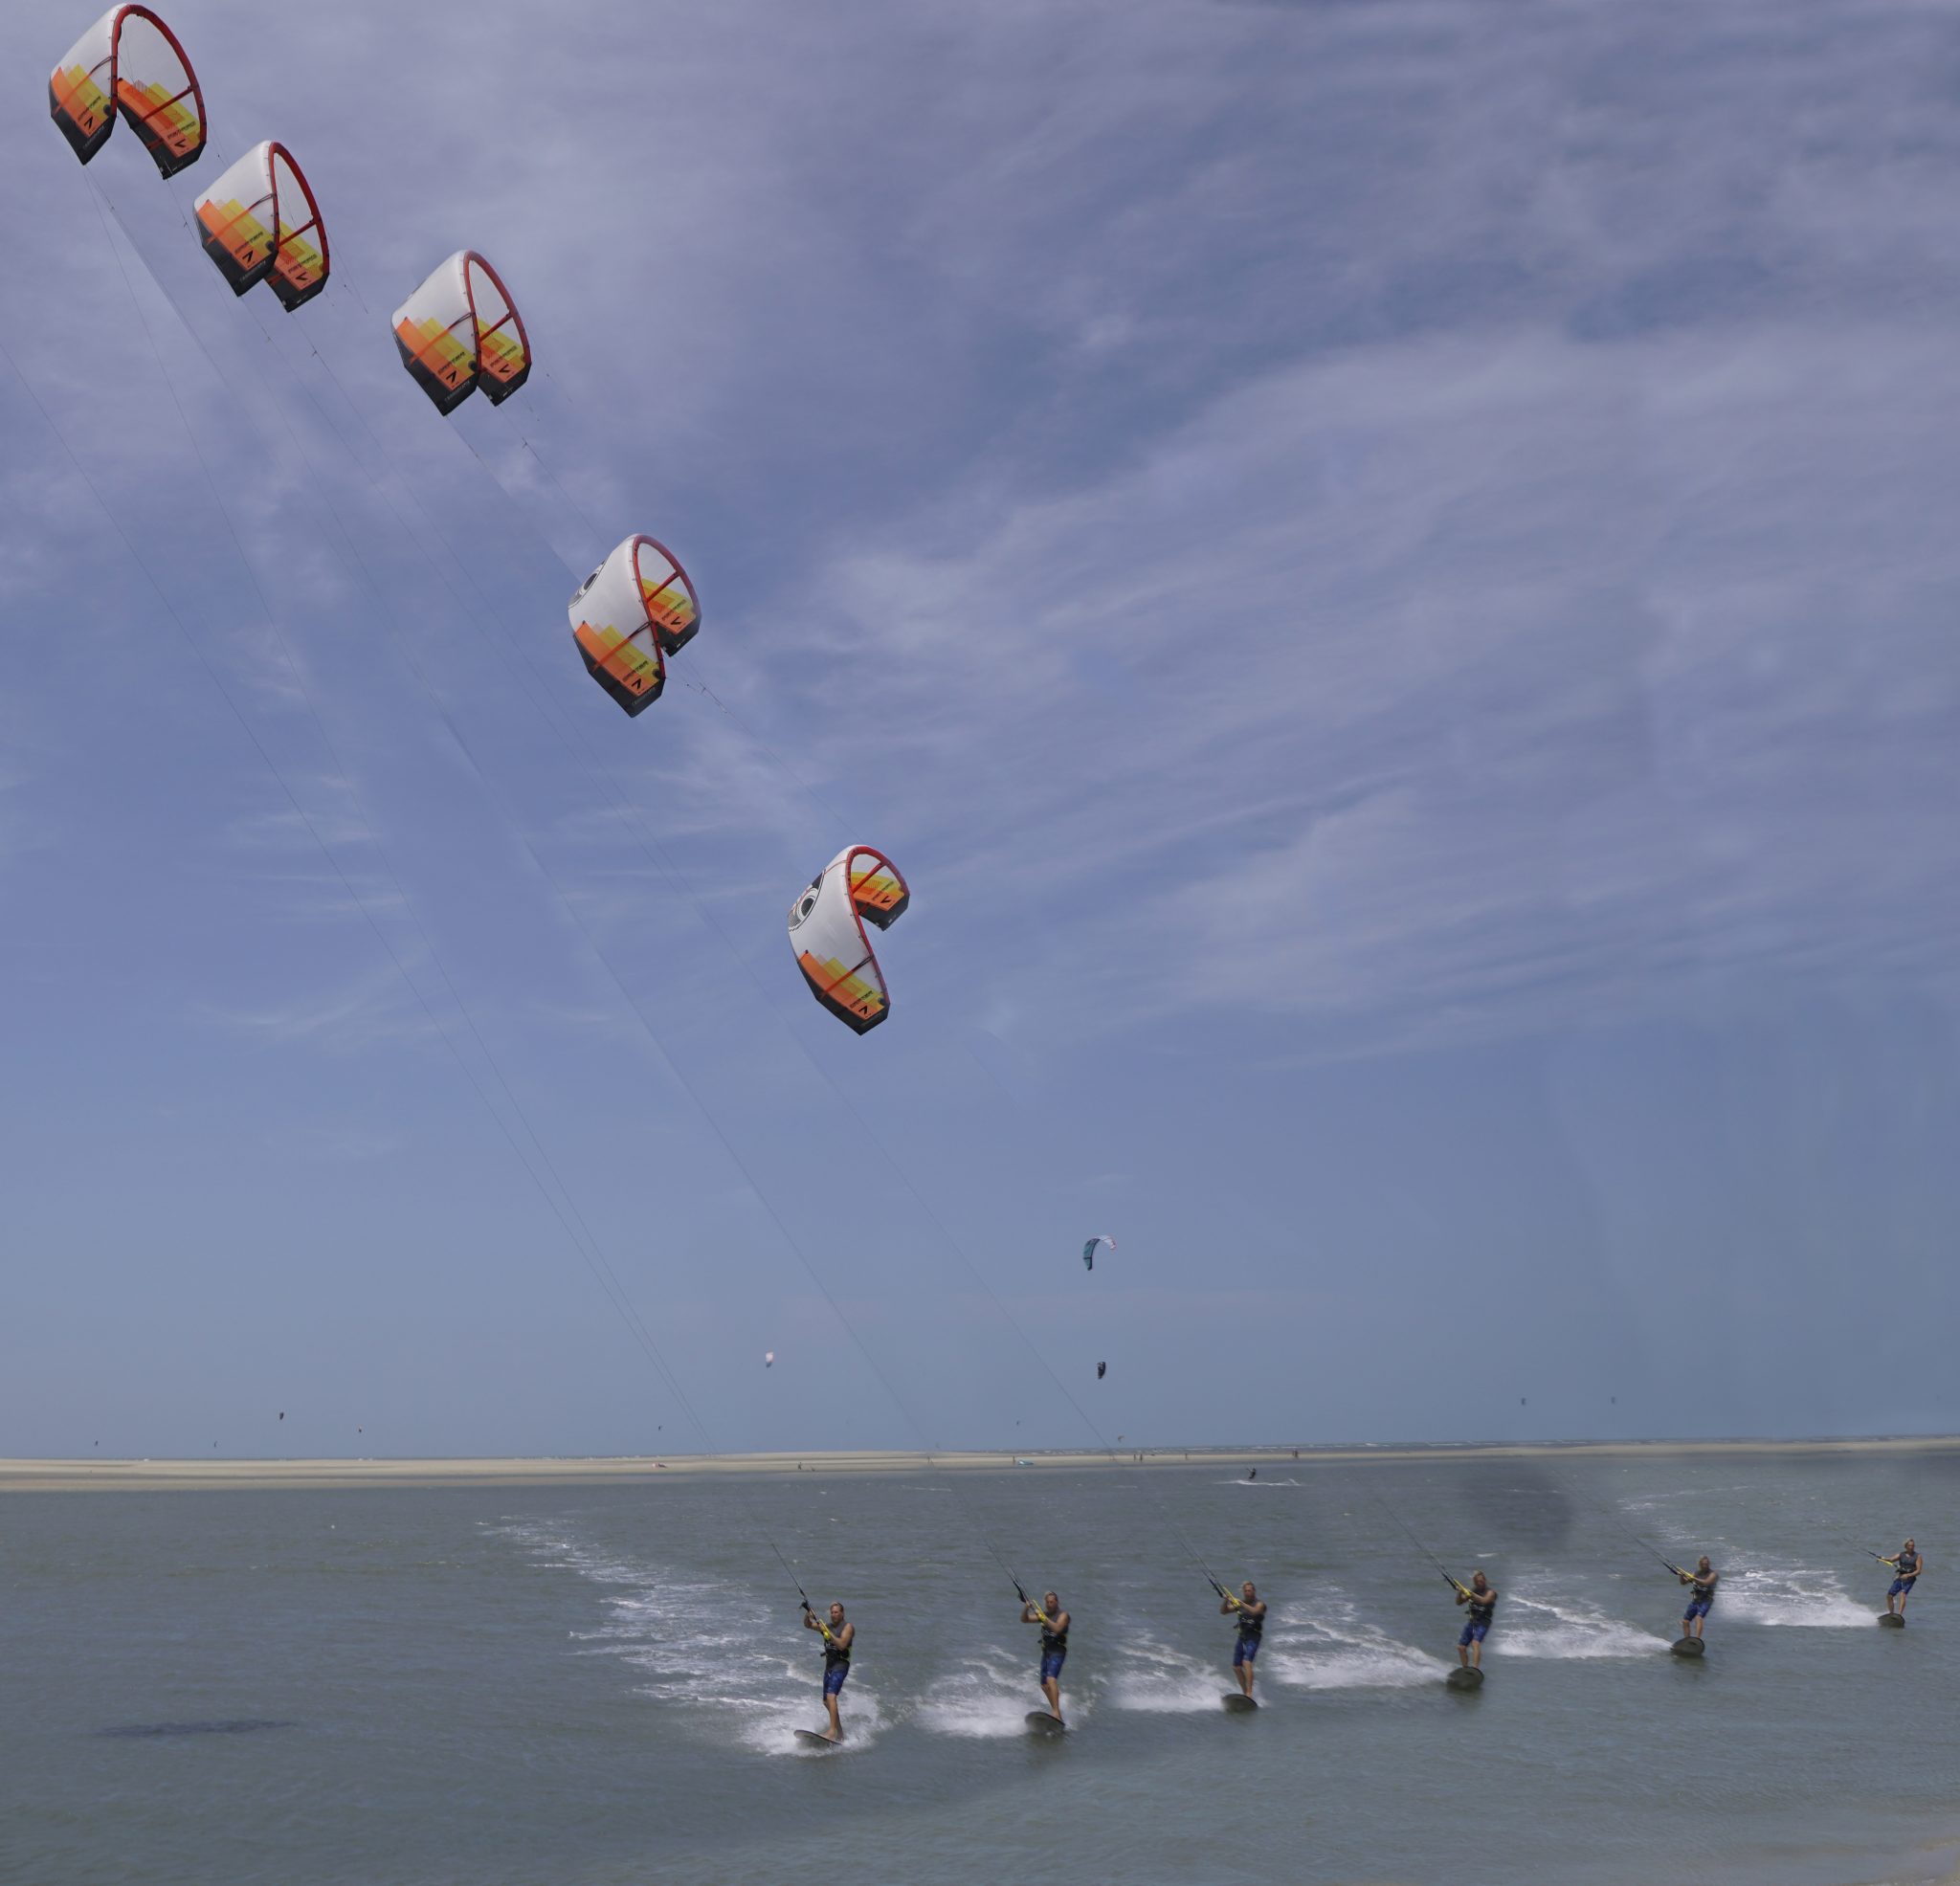
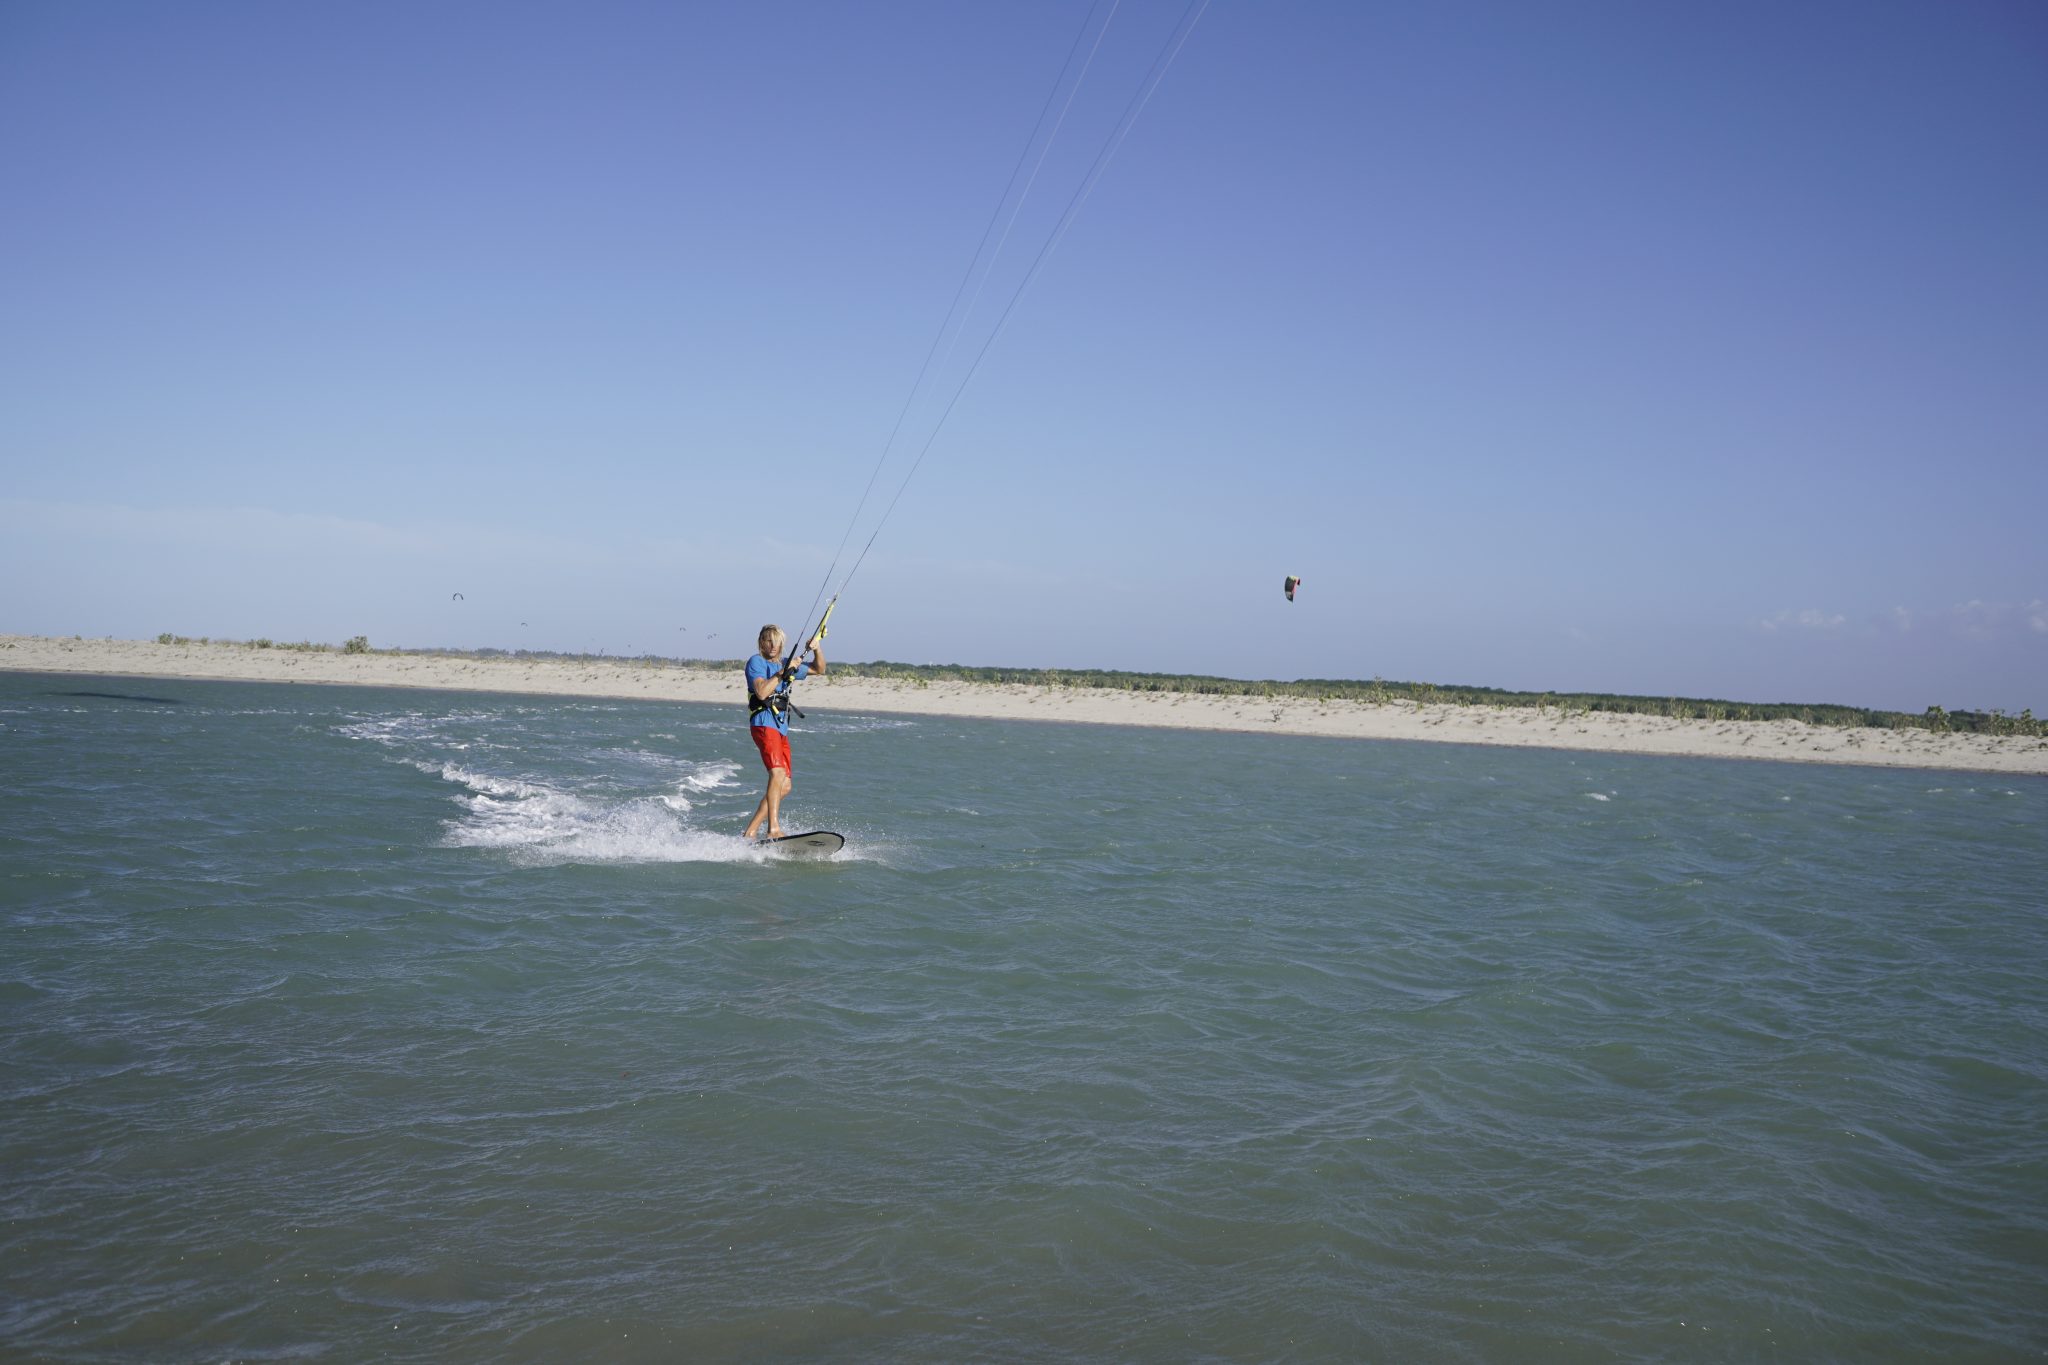
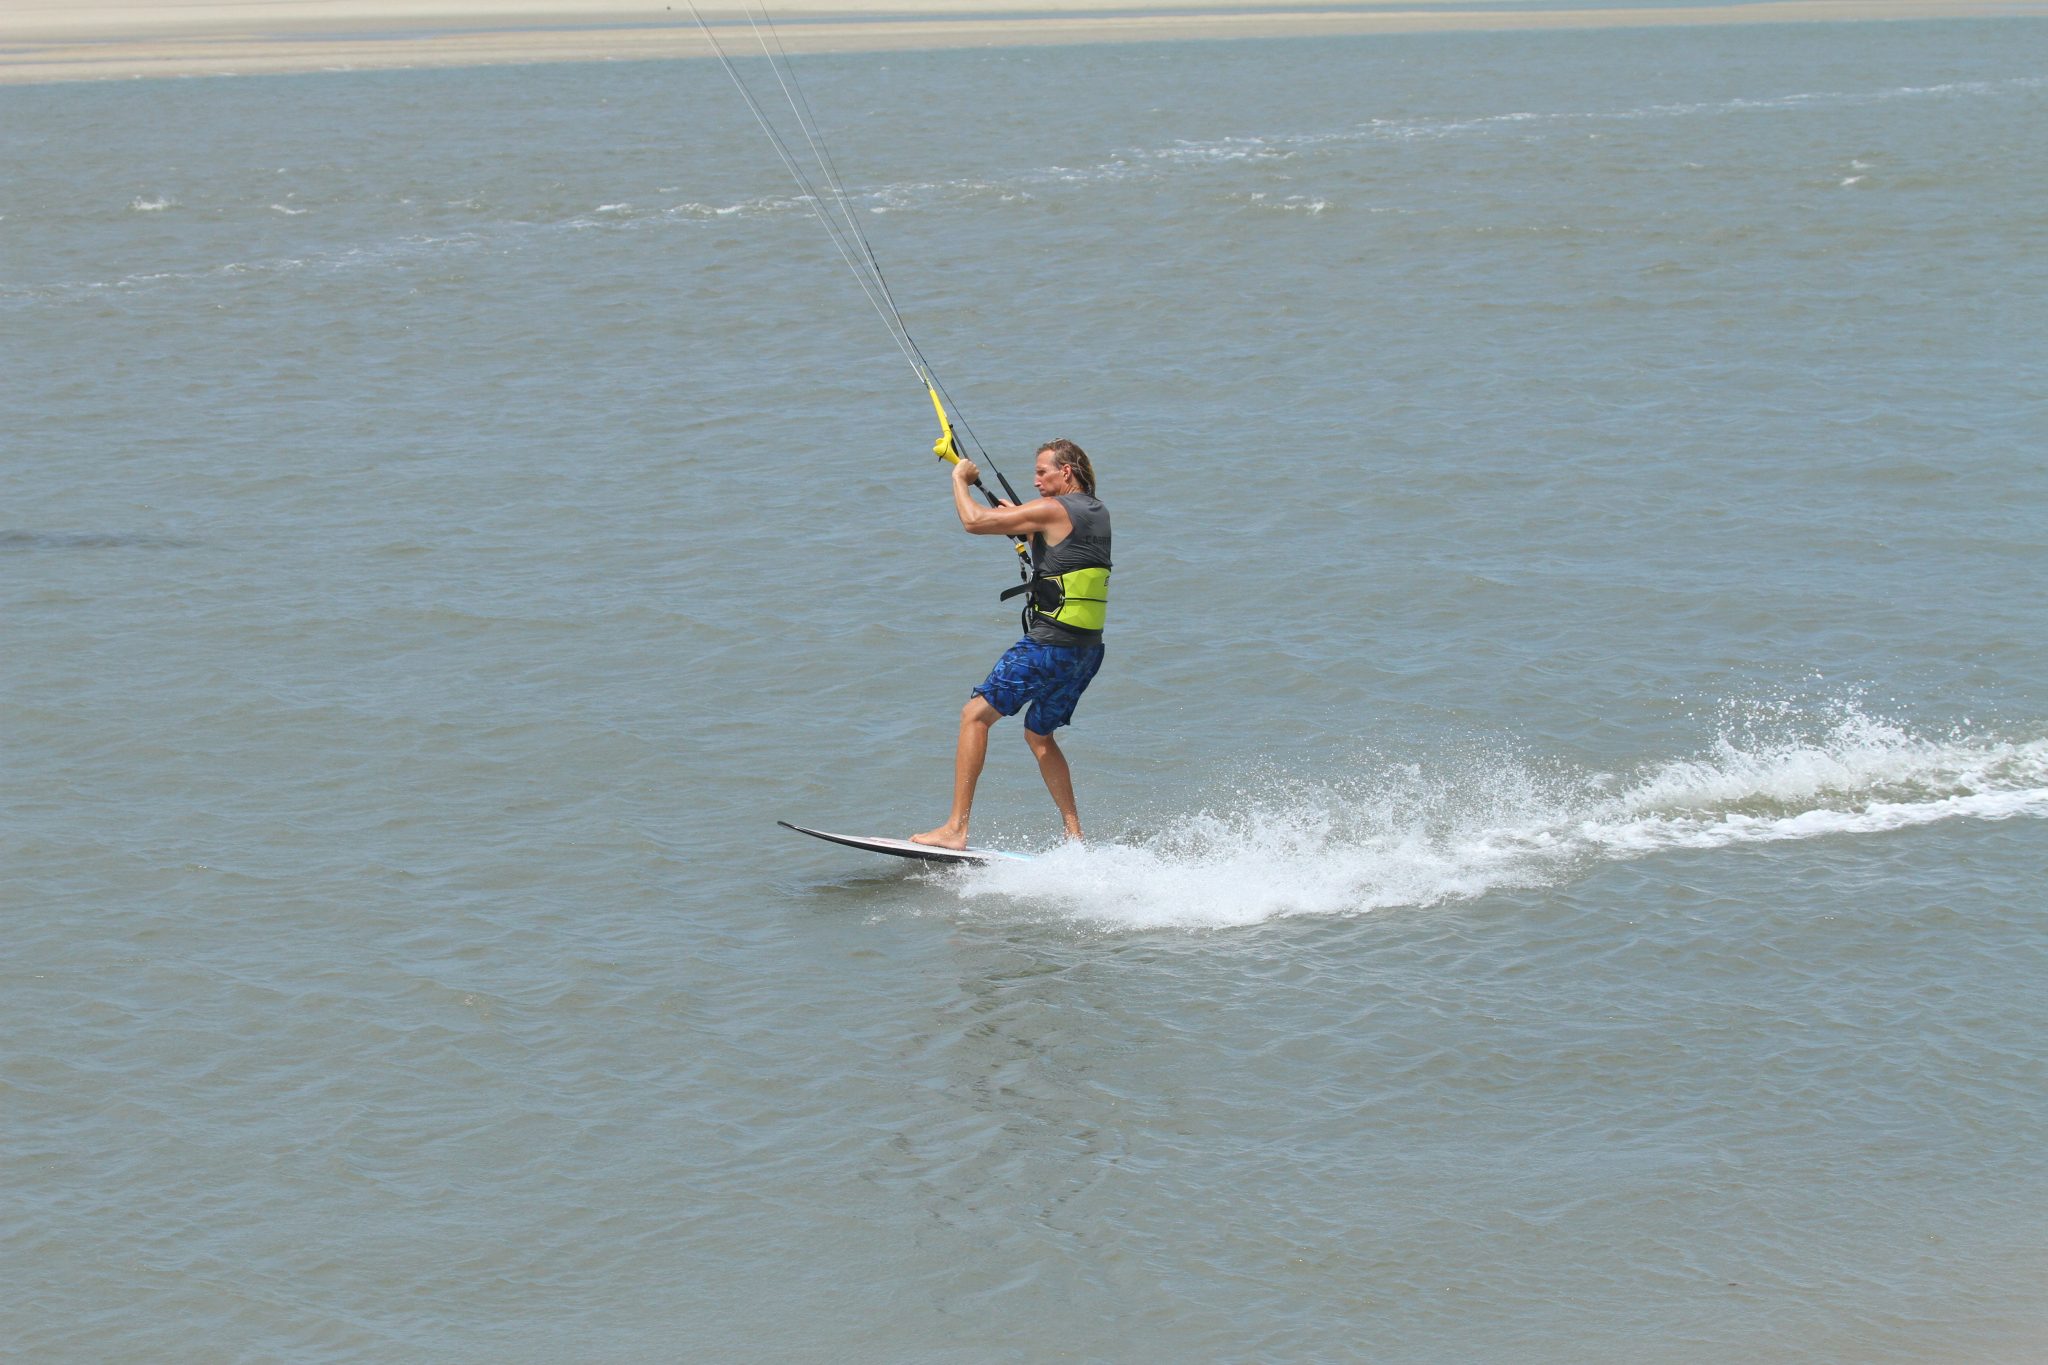
In Pic 2 Christian is riding upwind on an edge. He’s not hammering hard upwind but he’s happily making ground. On a twin tip he would be resisting, looking upwind, whilst on a surfboard his feet are upwind of the centre line of the board sinking the upwind rail, looking upwind and he’s edging with his bodyweight upwind of the board. You can see that his hips and bum are out over the water and his front shoulder is twisted and slightly lowered. Yet again it’s the same on a twin tip. Assuming that he’s flying the kite correctly, the result is an edge.
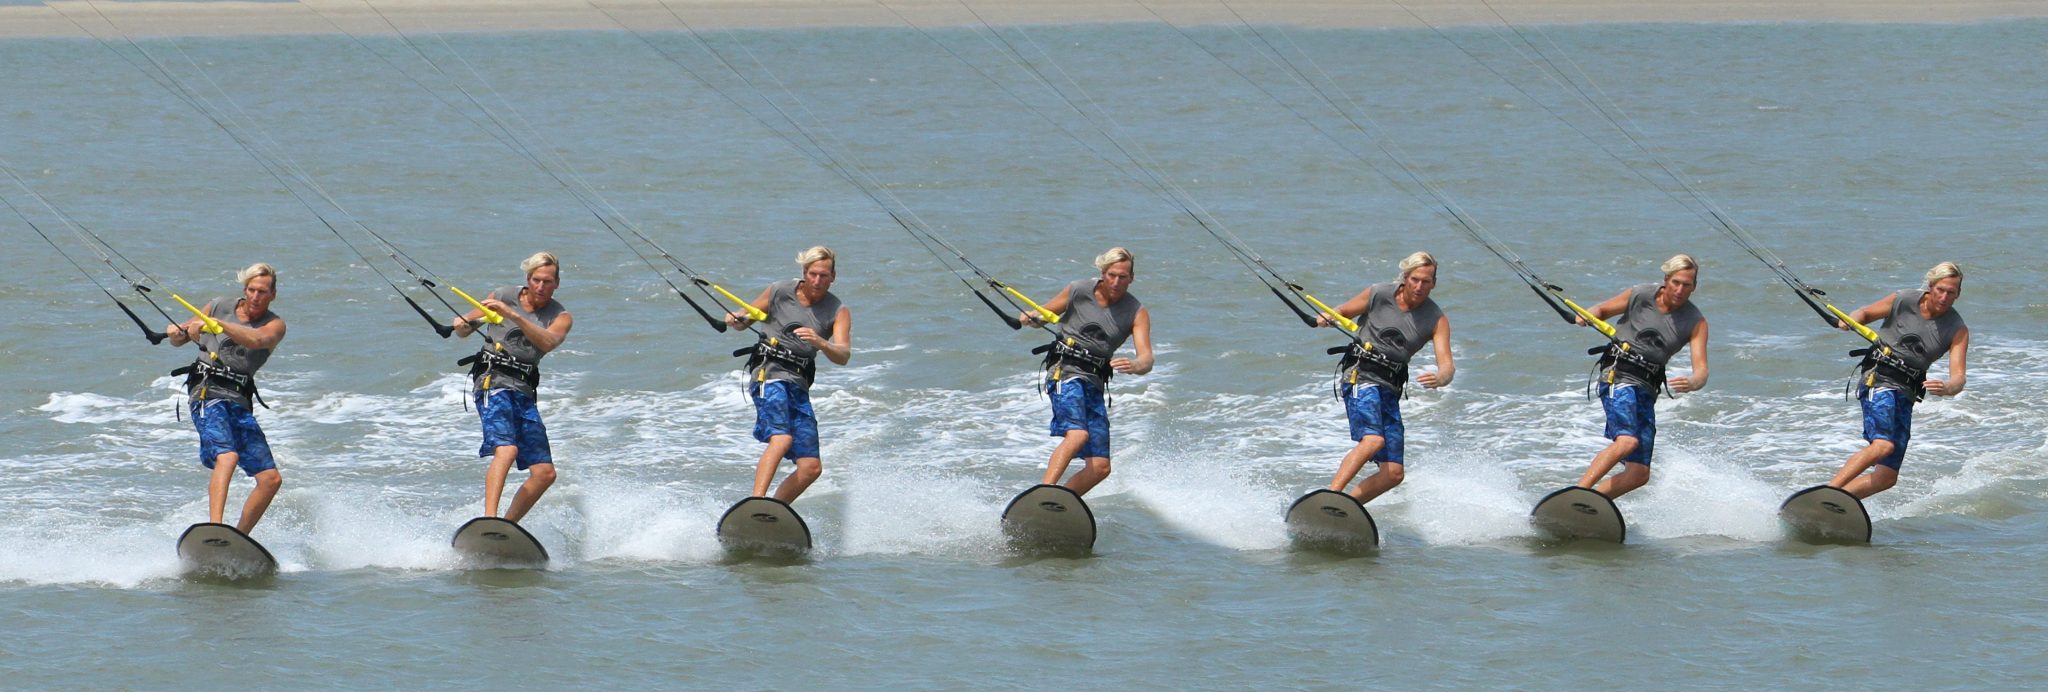
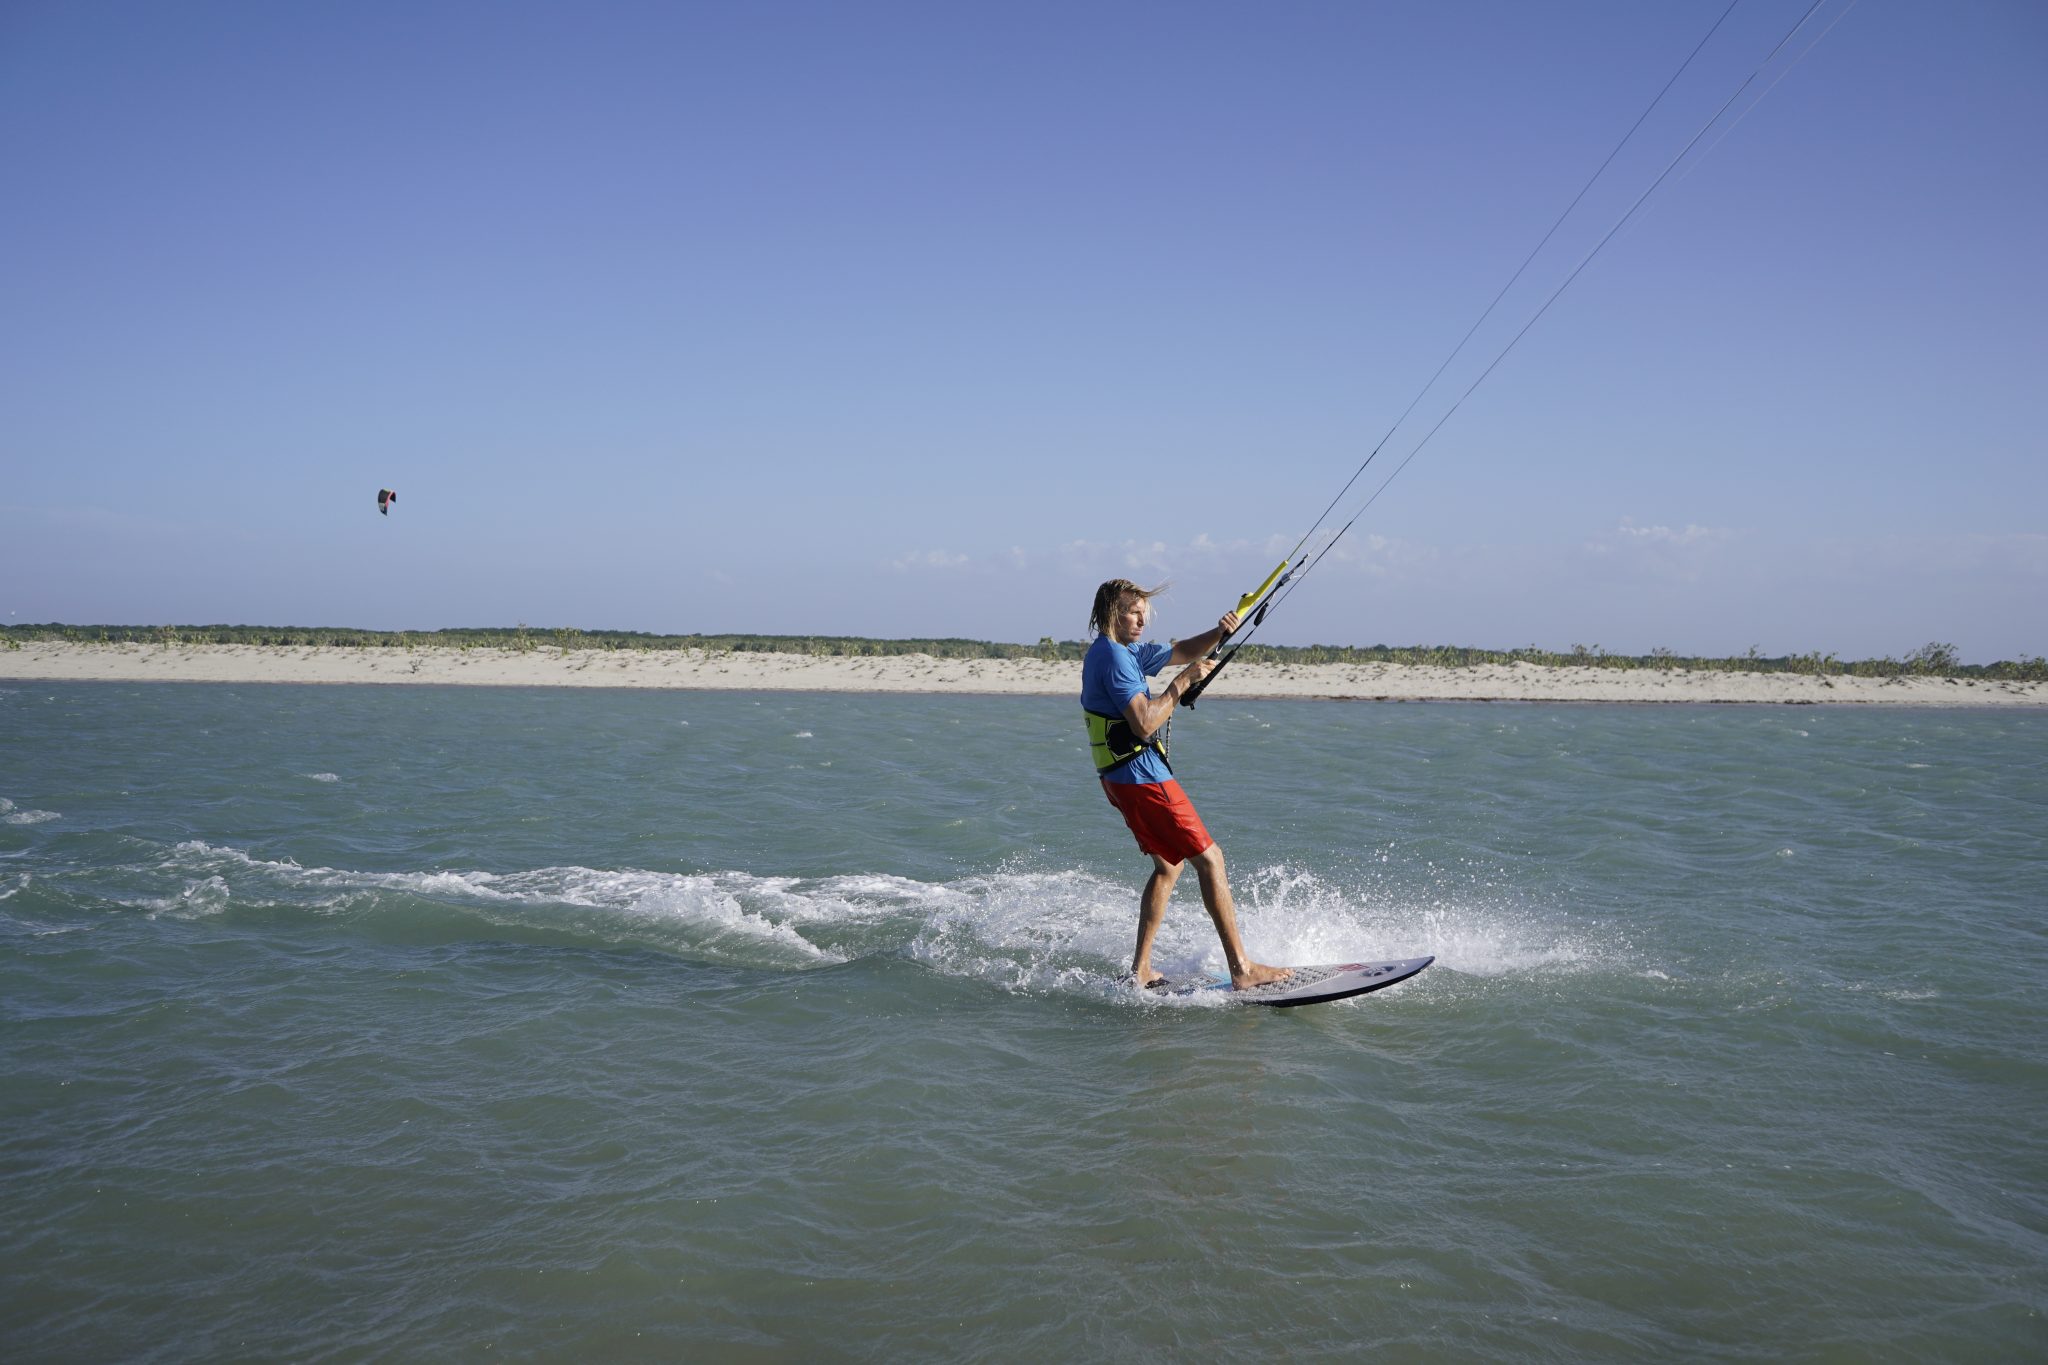
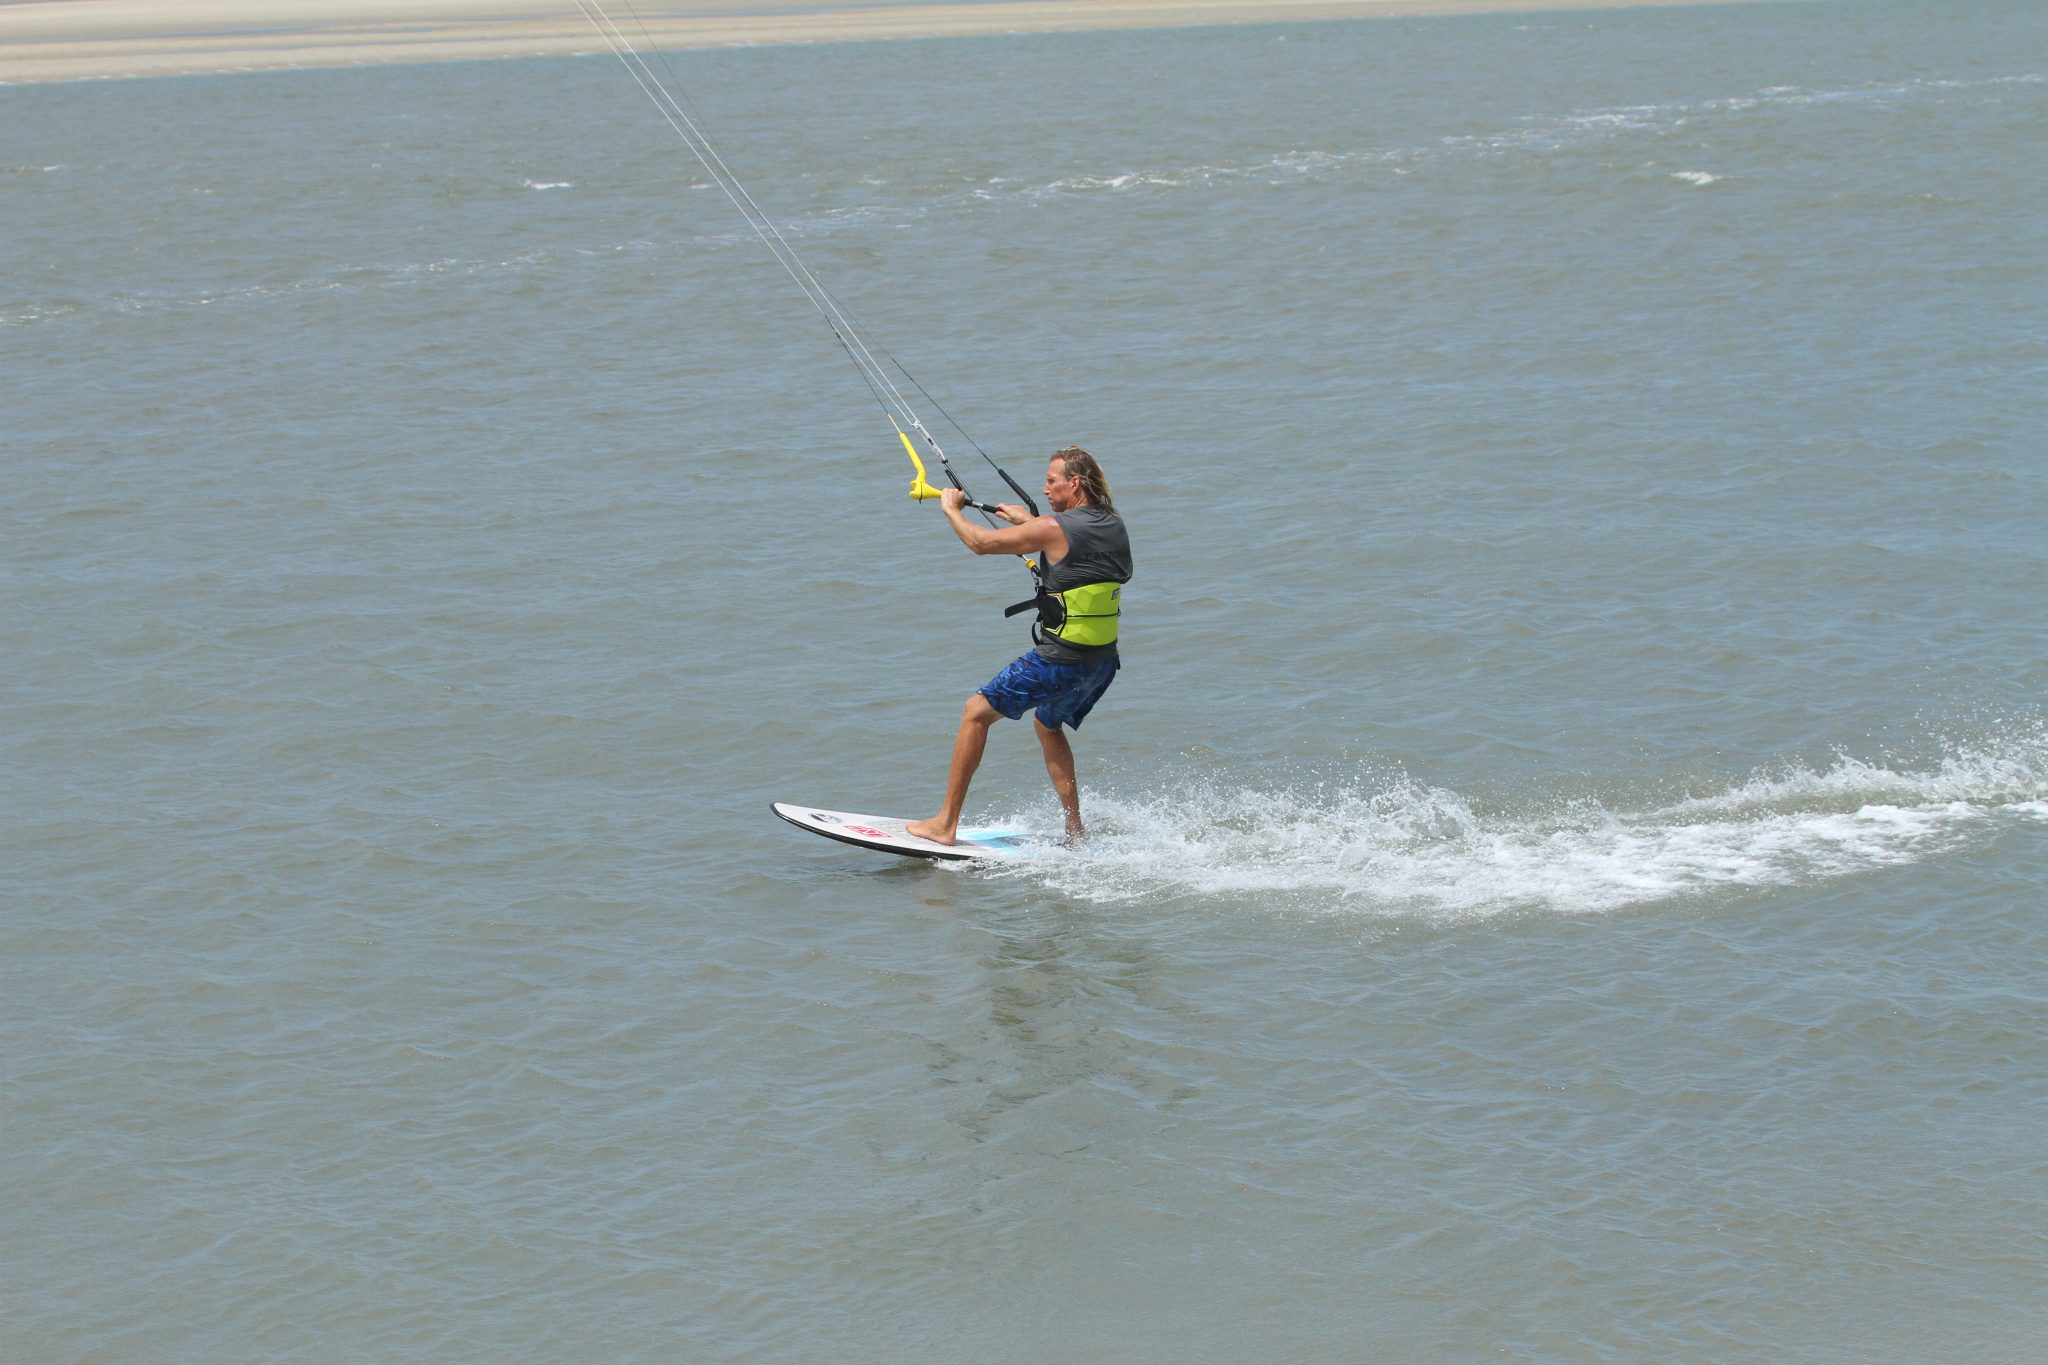
Now let’s look at Pic 3 in which Christian has “released” his edge and is now travelling off the wind. The most obvious difference is that he is now standing with his weight over the board, and as such there is absolutely no edge, zilch, nada.
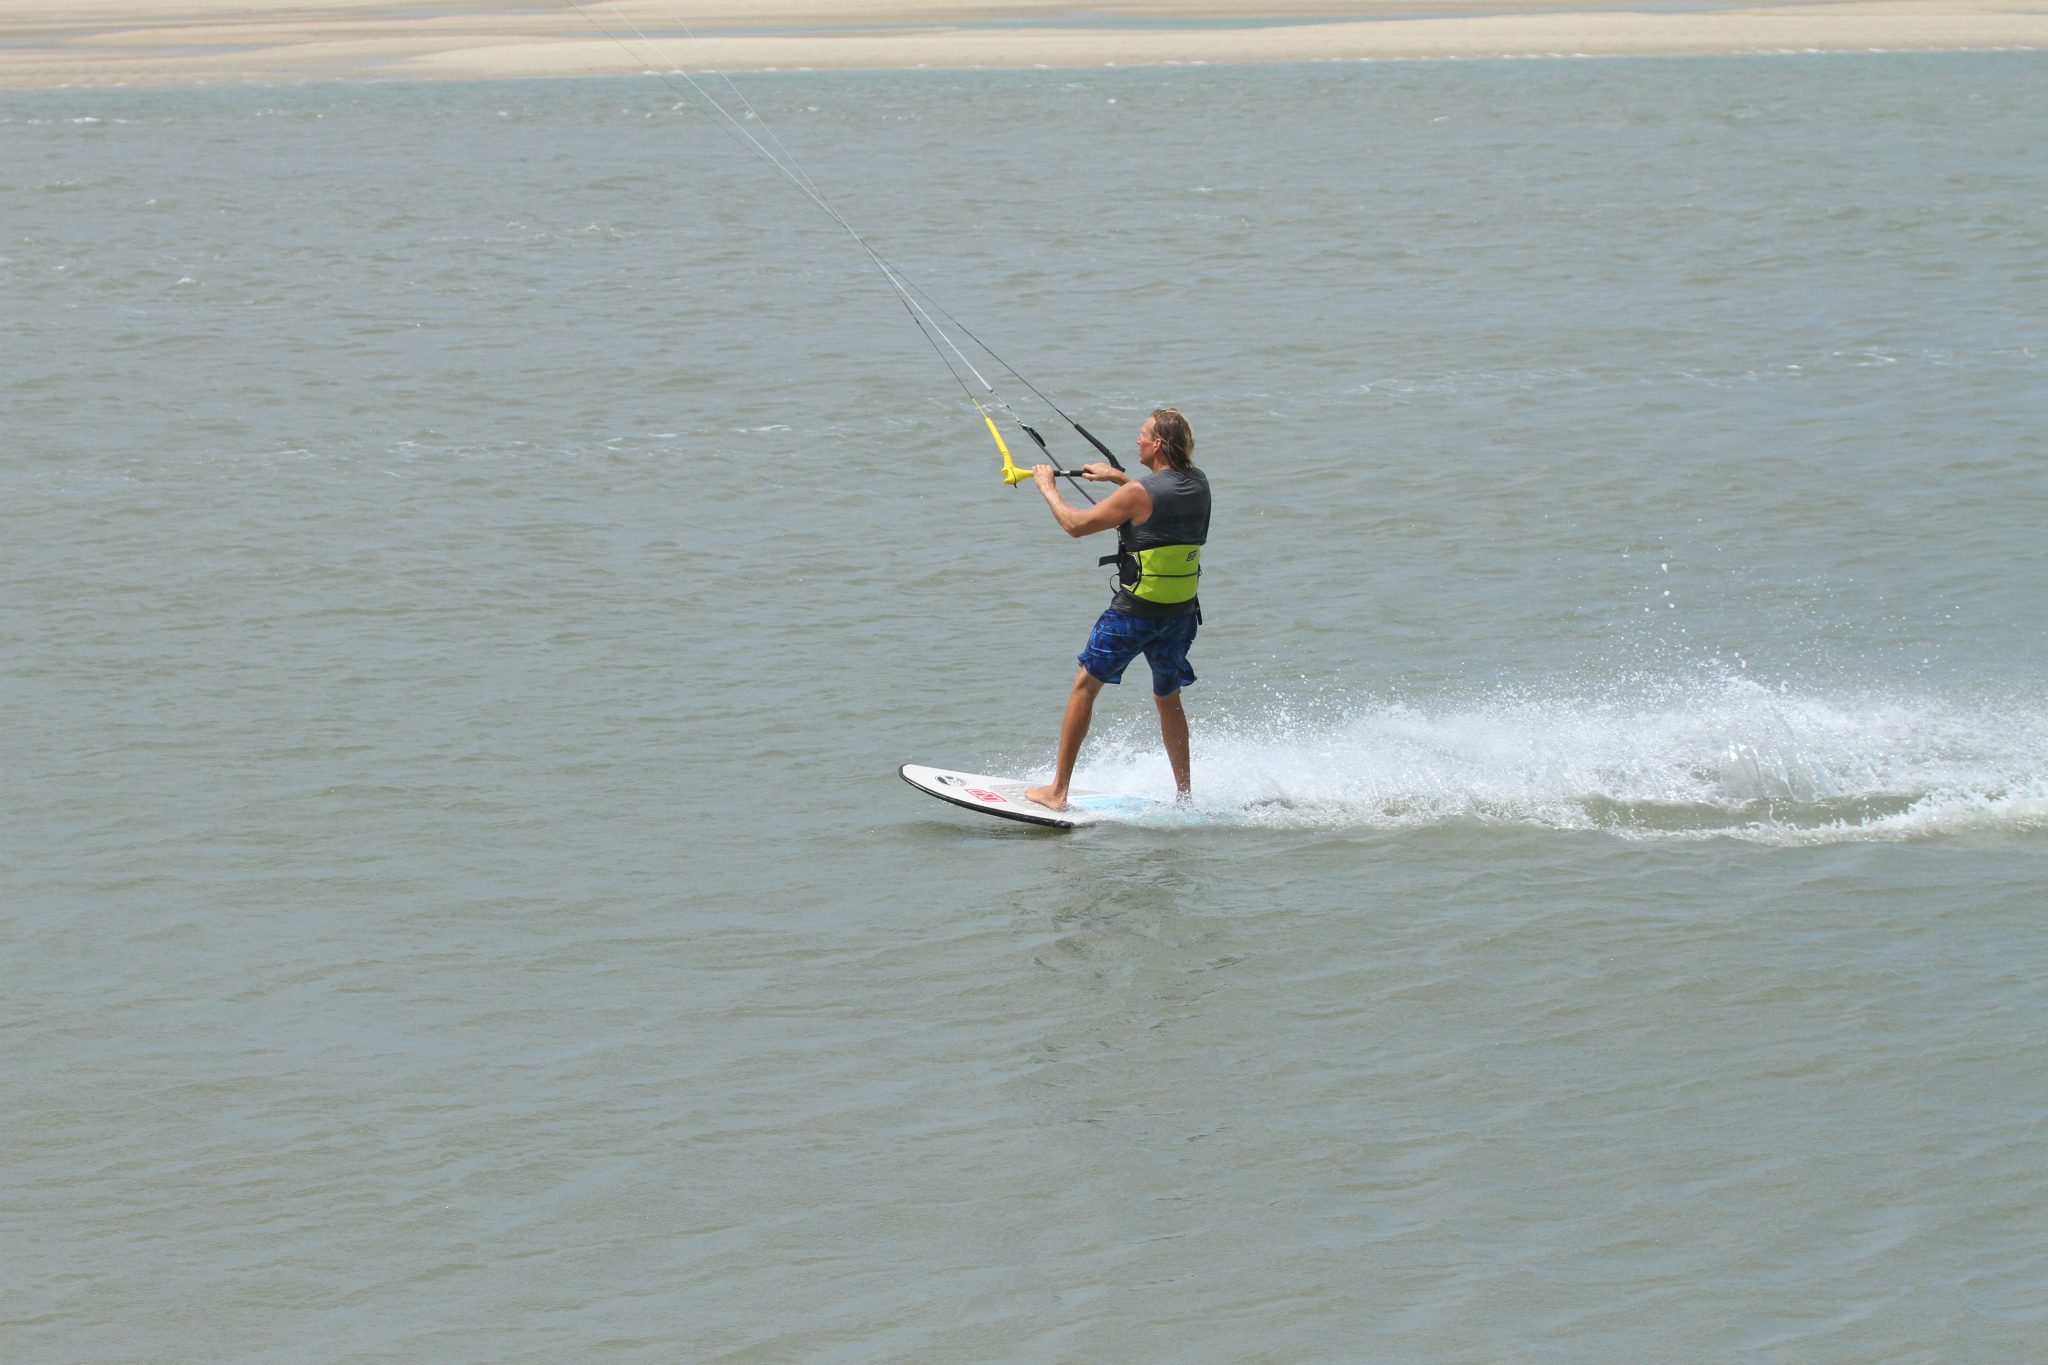
To get from the previous photo to this one and successfully release your edge you need to soften your knees. Not to sit, but to stop resisting, so that you’re no longer trying to drive your weight against the edge or rail of the board. As you soften and flex your knees allow your weight to swing over the board, so that your hips and shoulders follow. Lift the kite slightly, so you can use it to lift you up onto your feet. As your weight moves inboard you can weight your back foot, the whole foot, not just the heel and stand onto it slightly, although you still need to keep some weight on the front foot. By literally standing more upright your board will not have carved but it will have flattened and from this point onwards it’s a subtle matter of using your feet to steer the board further off the wind should the desire or need arise.
You can see Christian using the kite to lift him over the board in Sequence 1.
One important note to remember. If you lift the kite to help you inboard, you’ll need to dive it again as you turn off the wind otherwise you’ll end up underneath it with no power...


You can see this all in real time in Video 1...
Before moving on it’s important to understand that many kiters find it simple to go down wind toe side. In fact, when people first try a down winder it’s often so much easier for them to relax their toeside edge than it is their heelside edge. The principal is much the same, if you stop edging and stand more over the board, the kite will happily pull you off the wind once you’ve released your toeside edge.
Sequence 2 shows the workings of standing up on your toeside edge. Yet again you can see Christian lifting the kite to help pull him up and inboard, which flattens it off. The really important part of toe side is to keep enough weight on your front foot, as it’s tempting to lean too far back and thus put the brakes on. Video 2 shows this in real time.
As such down-winding will at first be considerably easier with your favoured foot forward, regardless if you’re heelside or toeside, and the main reason being that you’ll feel comfortable with a bit of weight forwards, whereas on your “weaker” side you’ll lean back more.
Now that we’ve had a quick refresher on how to turn downwind let’s ponder what often happens next.
You Slow Down!!! Why?
Quick answer, you have lost tension in your lines. This is not always the case and we’ll look at that in a mo. However back to saggy lines. Once your board turns towards the kite, you’re moving towards it and as such tension is lost. Normally when you’re riding the quick fix is to get back on an edge. That won’t cut the mustard here though as your stomach is grumbling and lunch is waiting downwind. This is where a whole host of options present themselves, and which one you choose will depend on the variables at play!
At its most simple, riding downwind or off the wind is balancing the angle you ride off the wind against the power that you have at your disposal. So, if you’re maxed and hanging on for dear life it should come as no surprise that you can fly off down wind. We’ve all experienced this, completely out of control waiting for the inevitable cartwheel. Think about those speed loonies in the ditch in Lüderitz, Namibia. They’re able to point off at about 140 and are now riding at nearly 58 knots, which isn’t far off our Motorway speed limit in the UK! They’re able to do this because they’re hanging onto a lot of cloth in a lot of wind. Fair dinkum, we know that with way too much power we can get to lunch pretty sharpish.
However, the majority of us won’t willingly be planning to downwind with that much power and speed, especially riding strapless, and that’s why we need other methods to help us point further downwind, so that we’re not slaloming 100km to get 5 km down the beach - we’ve all been there:) It is good to know though that if the wind picks up we can just follow the kite as if we’re wakeboarding.
With the power that many of us ride with we’ll soon be grinding to a halt in need of some ooomph, lest we resort to carving back up onto our edge. Realistically this article is about how to keep tension in your lines while making the best possible progress downwind and how to mix it up a bit so that your body doesn’t wave the little white flag when you’re still miles from home. We’re going to look at a few methods to help us get down before lunch gets cold.
The Angle Game – How to keep Tension in your Lines
As we’ve said it’s all about angles. You can try this for yourself when you’re powered up. You can most likely ride a few degrees off the wind quite happily, but if you point the board any further off the wind you lose power. This angle game should always be your first port of call. It shows you how far downwind you can go, if at all, with the kite you’ve got in the given wind strength and the size of your board. If you can’t go enough off the wind with the power you’ve got it’s time to add something to the mix.

No 1. Working the Kite
Theoretically this is the simplest solution. This is what makes kiting so unique. In a boat or on a windsurfer where the mast is fixed to the hull, you have to turn the craft to pick up speed and garner extra power. Whereas we can move the kite independently of where we’re going, and generate power, it’s truly unbelievable. For sure because we want to go off the wind we will turn the board down wind, heelside or toeside, but we can then work the kite – something we should all be pretty comfortable with.
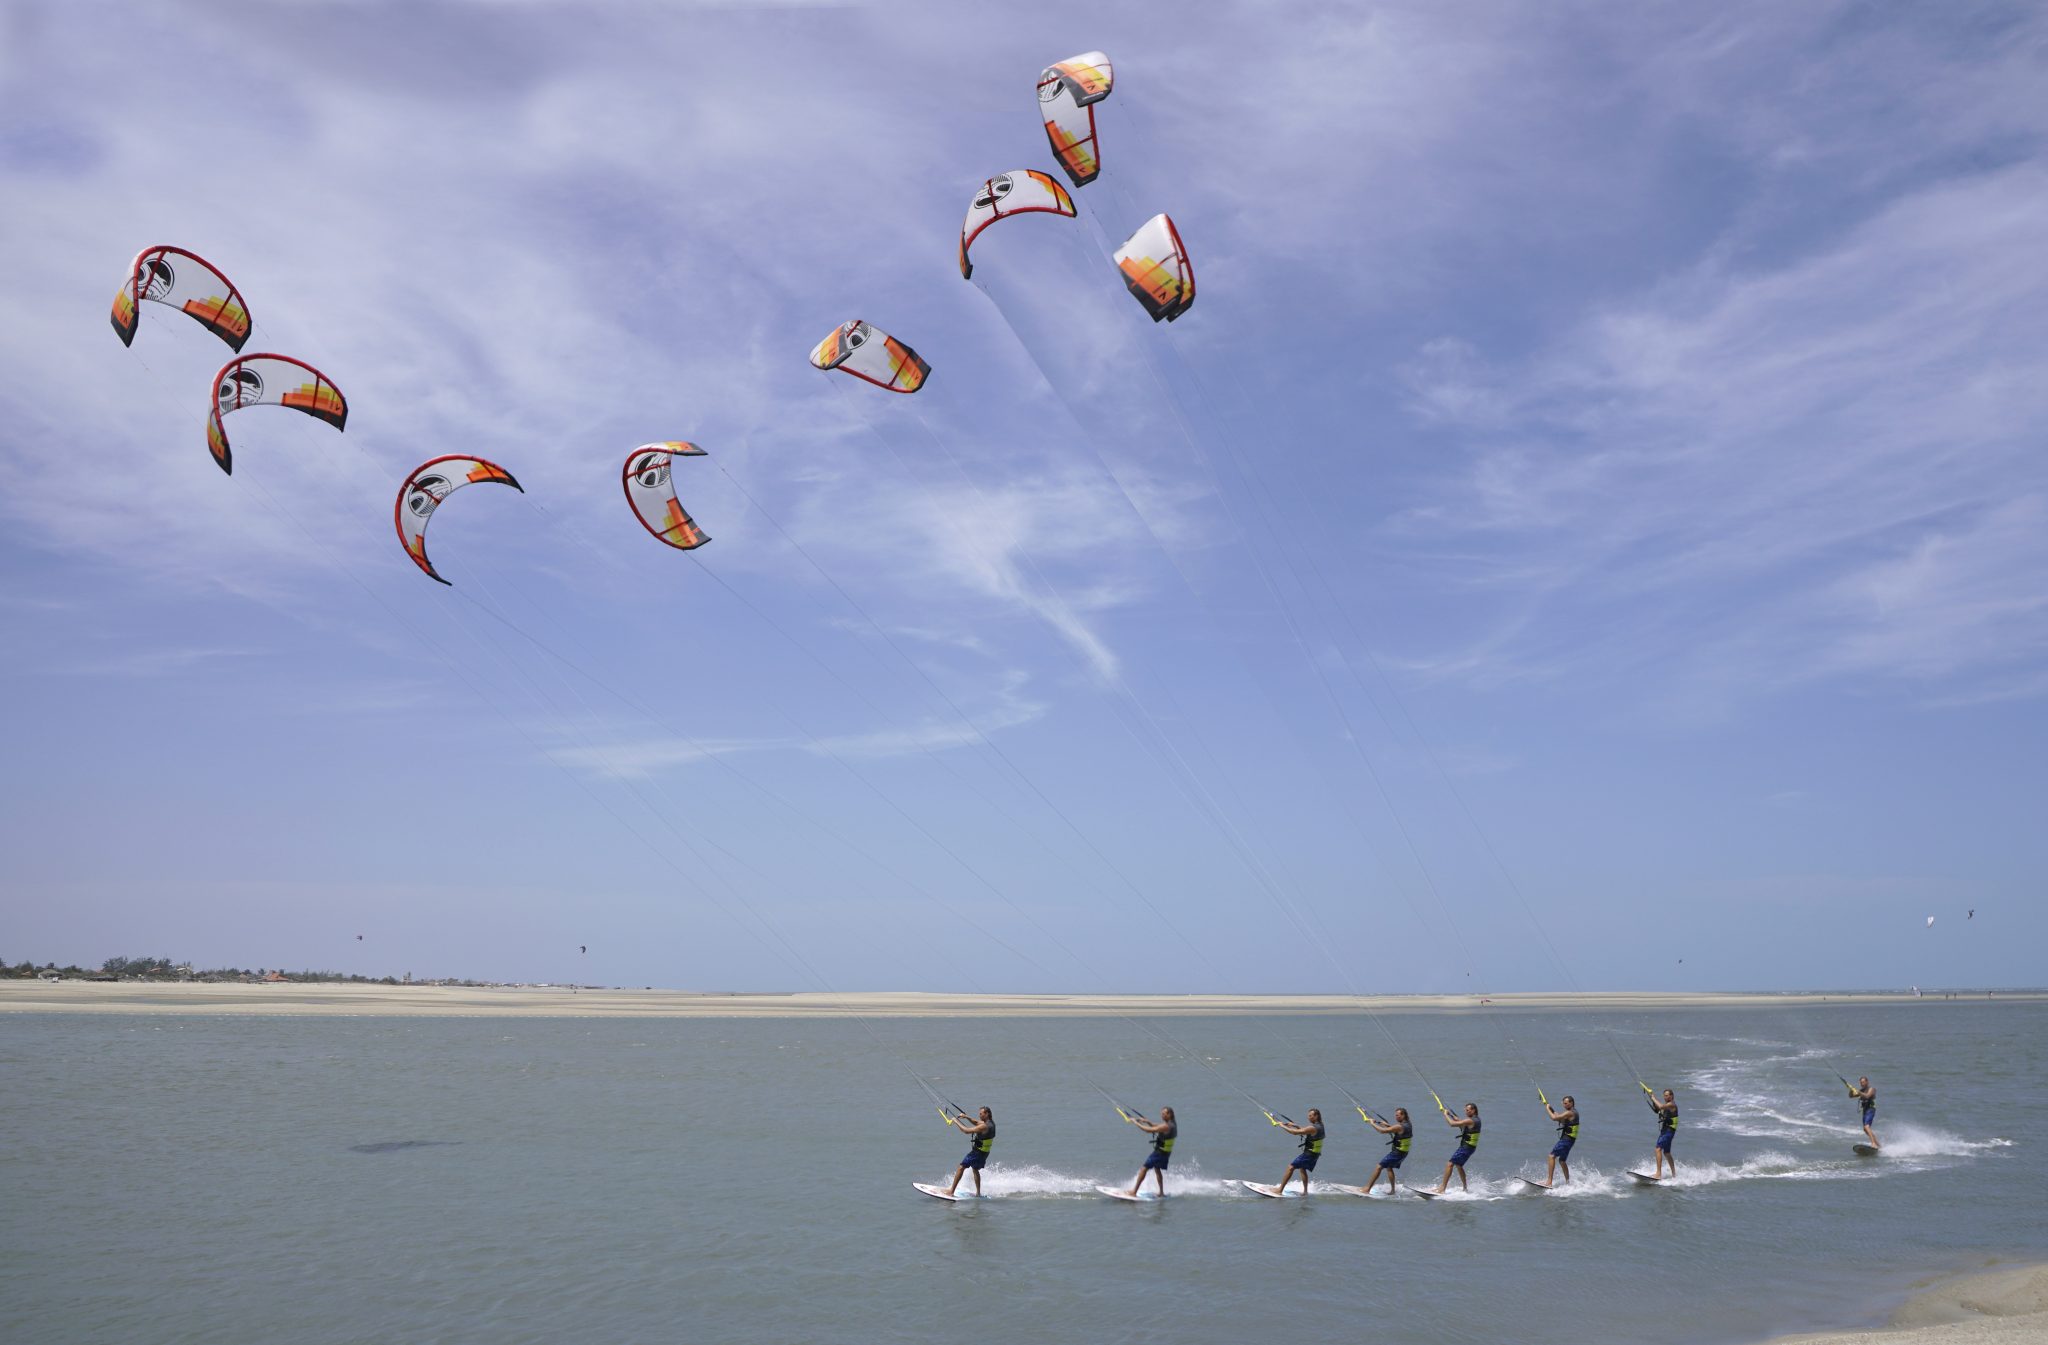
Have a look at Sequence 3 to see how the kite should be moving. Here Christian is riding toe side. If he was riding heelside the kite would be doing exactly the same.
Christian is diving the kite quite aggressively to get it going down and then he’s taking it all the way back up, almost past 12 o’clock. This way he gets maximum movement, using as much of the window as possible, which equals maximum pull. He’s watching the kite, so he knows where it is and this will help him to follow it – down wind. Seeing as the kite will be pulling you downwind it’s important to have your weight a bit further back, whilst not sinking the tail of the board and thus creating drag. Simplest way to do this is to get your hips and derriere back, but don’t lean your shoulders and head back. This way you’ll be stable but the board will be trimmed nicely from nose to tail and can plane happily.
Video 3 shows Christian working the kite whilst riding heelside.
For this method to work you need to ponder how not to stall the kite and how best to work it. You’re still moving towards the kite so even though it’s pulling you will be losing power. The temptation is to pull the bar, but with little tension you’ll stall the kite and drop it, so make sure you keep it on the sweet spot. Secondly to make sure the kite turns aggressively without stalling, use both hands – push & pull, fulcruming around the sweet spot. You’ll need some patience, as with less tension the kite may be slower to turn than you expect, so have faith in your input.


And finally, you must resist two very natural urges. When you dive the kite, you will feel a surge of power. Don’t let the bar out when you feel it, use the power. Then if you’re losing tension it’s oh so tempting to turn back on an edge. If you really, really need extra tension, better to lean back and slow the board than turn upwind. The caveat here is if you’re about to drop the kite, then it’s better to head up and save yourself.
Video 4 showcases is the toe side version of this technique.
Top Tip
At first don’t take the kite too low. If you keep the kite above the 10 and 2 o’clock marks you give yourself room to manoeuvre if it doesn’t work.
When you steer the kite back up, make sure it can breathe as this is when you’re most likely to stall it. If it’s not coming up, push the bar out a touch.
Pros & Cons of Working the Kite
On the plus side this method is least likely to get you in trouble, you can see what the kite is doing and you have time to react if you feel all power go.

Against working, well it’s the most physical method as you’ll be working your arms like there’s no tomorrow. And the power will constantly be on and off, as you dive and lift, and as such you’ll have to alter your body weight forwards and backwards, which is also tiring.
Final thought here. If you’ve got plenty of wind you’ll have no problem going well off the wind here, without too much drama, so it’s a keeper. However, forget ye not that if the wind is light, you’ll get the least angle off the wind and as such you will be zig zagging your way down wind slowly. As such to avoid the sore leg burn of lactic acid, it’s worth turning frequently and sharing the burden between both legs.
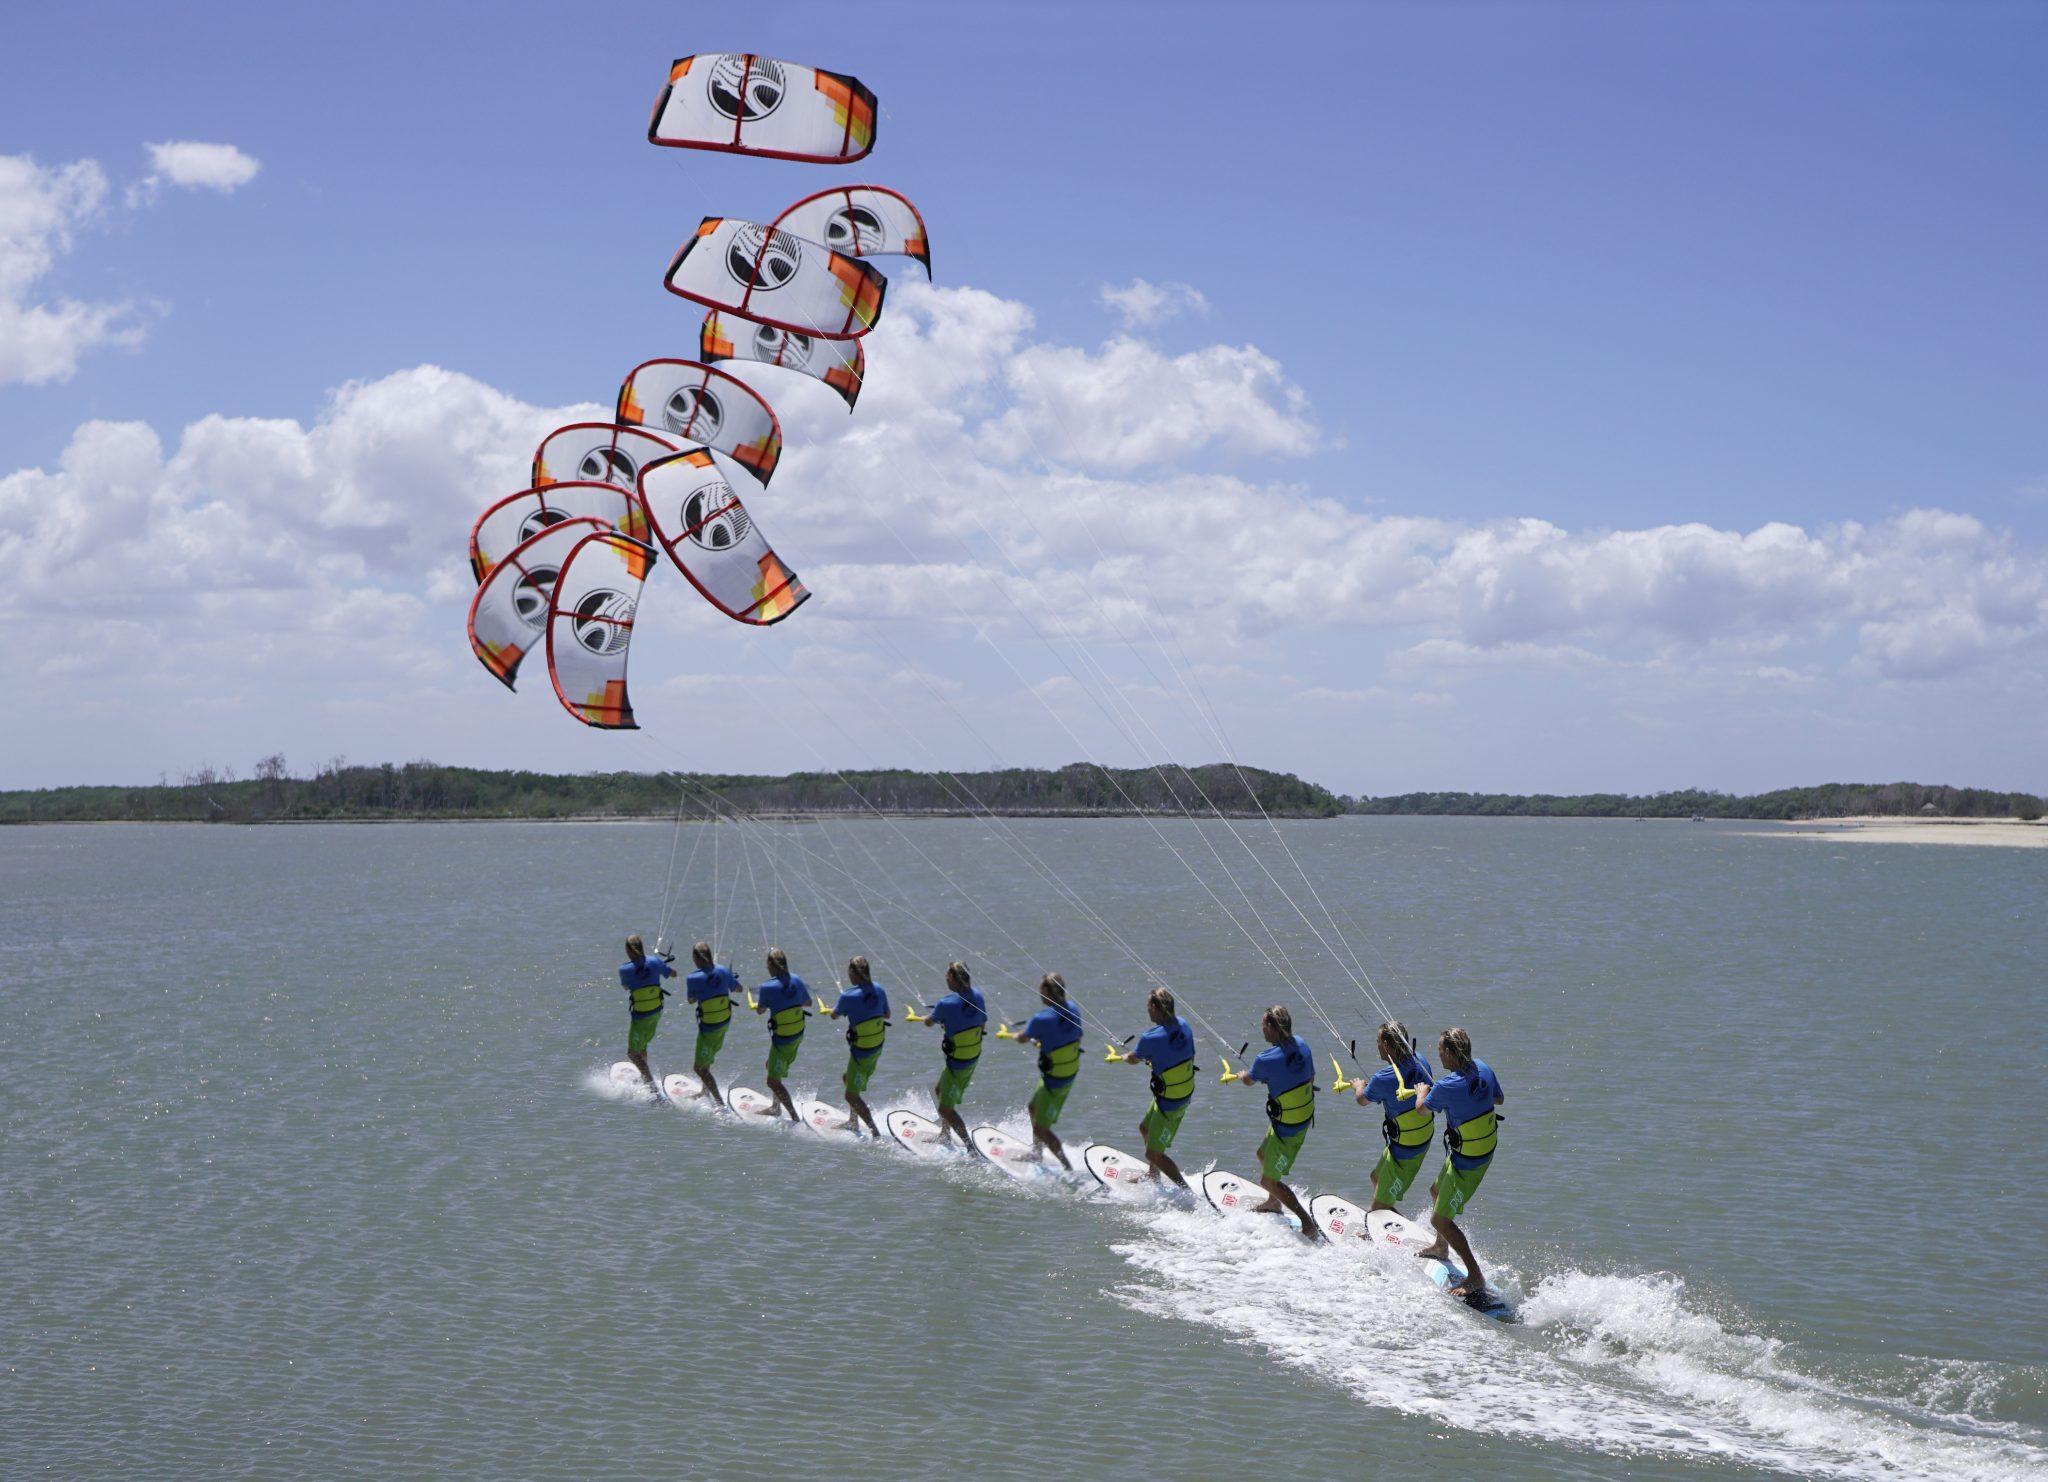
No 2. Downlooping the Kite
This next method to get a bit more oomph on your way down wind is an extension of the underturn, so having that in the bag before trying this will help... Downlooping the kite is a very effective way of getting well off the wind whilst maintaining speed. By downlooping, we mean that you will be looping the kite with your front hand, so that it rotates down and forwards in front of you in the forward half of the window. As far as the board and body are concerned it’s much of a likeness. However, you will be able to point further off the wind so you may need to open your shoulders more so that you’re looking towards the kite and it can be more comfortable if you point your front foot a tad more towards the nose. Pointing your back foot forwards is also an option but not a must.
Looking at Pic 4 Christian is riding right foot forward and heelside, he has the kite high and has turned the board off the wind. Keeping the kite high is a must here as you need room to downloop the kite and the higher the kite is, the less pull it generates, so you can play with this depending on power. You’ll also be much more balanced on the board with the kite pulling from a bit higher, once it gets too low you may lean back too much and fall off the back of the board. For a downloop Christian will be using his front hand, so he moves it slightly forwards on the bar and his back hand is also slightly out, not centred. This way he can use both hands and achieve maximum leverage.
Now onto Pic 5 with the board already pointing off the wind there won’t be any surprises as long as you are positive with your bar movement. Much like working the kite, the secret to a good loop is using both hands in a push and pull movement. The way in which you push and pull is vital. Your aim is to get the bar parallel with the centre line, so that the knuckles of your back hand are pushing against it. You can see that Christian’s bar end is bending as it touches the centre line. As with any form of moving the kite you must concentrate on not steering the bar, using it like a giant steering wheel. It may feel that you’re doing a lot but it won’t have the desire defect of shortening one line whilst extending the other. This positive movement will get the kite turning down, and the downloop started.
Finally, Pic 6 this is from the same sequence and you can see how far Christian has already travelled, yet he still has the bar push-pulled to the max. Due to the nature of moving towards the kite, you won’t have as much tension, it can all happen slower than you expect, so it’s important to keep commitment on the bar. It’s also better to turn the kite too much, rather than too little. As long as the kite is high you can keep it going straight into another downloop.
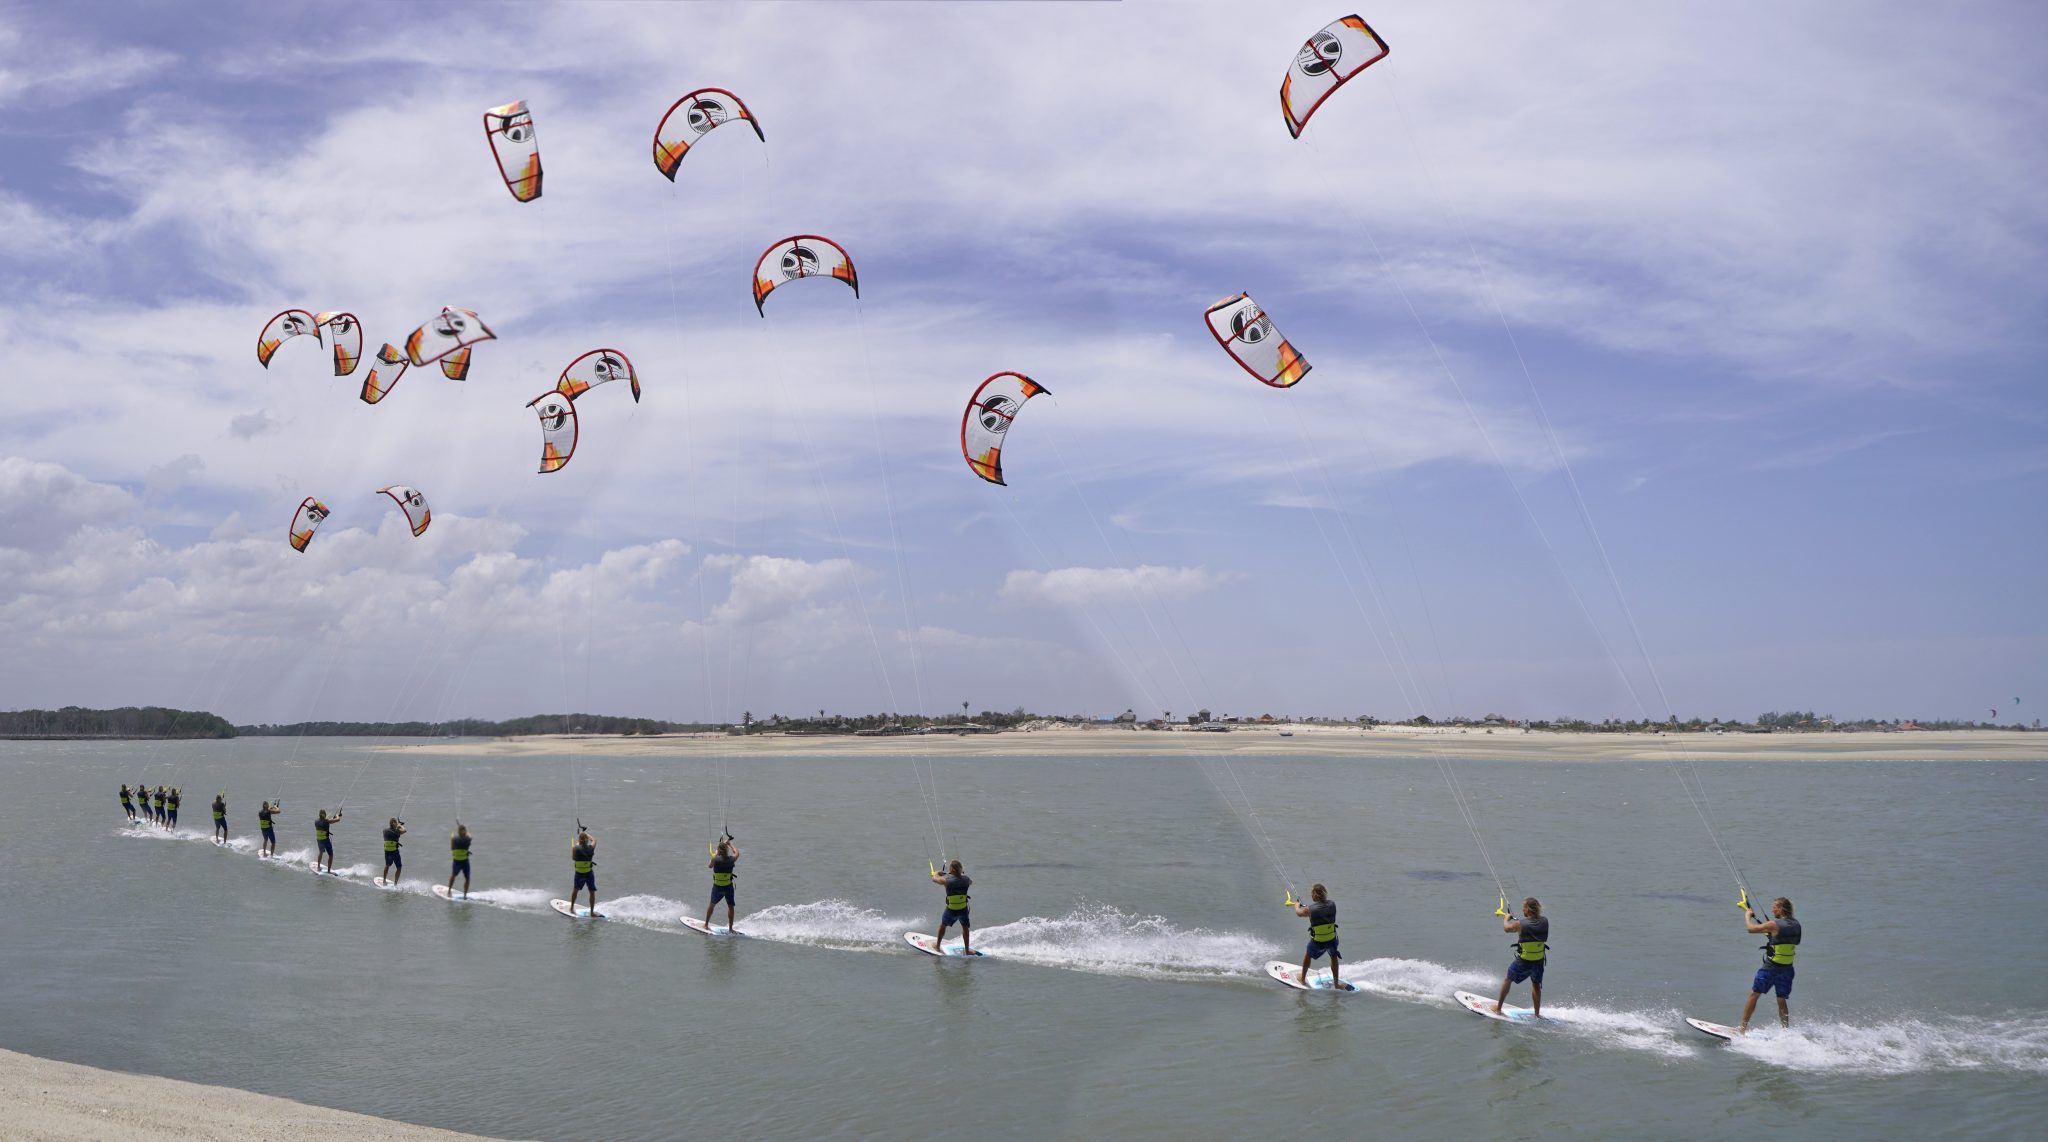
Have a look at Sequence 4 Here Christian is heelside left foot forwards.
Top Tips
If you bang out a few downloops in a row, as your lines twist more and more after each rotation your bar will become unmanageable as the tension of lines increases, so be sure to untwist you bar regularly. Personally, we never do more than two in a row without untwisting.
As you become more confident you can actually steer the kite around the downloop, choosing how big or small the loop is depending on how much power you need, and therefore choosing in which direction it pulls you.
Finally have a look at the two video clips. Video 5 is heelside downwind with downloop. As with working the kite you can happily downloop toeside. Video 6 shows up close the bar movement for downlooping and the body position for successfully cracking it out whilst riding toe side off the wind.
Pros and Cons
The pros of Downlooping:
- Takes you further off the wind in less wind than working the kite.
- You’re going towards the kite as it loops, so although it’ll generate pull, it will be easy to control.
- You can sheet the bar out a bit if there is too much pull whilst keeping the kite turning giving you more control.
- Less physical/tiring than working the kite.
The cons of Downlooping:
- As with the underturn if you drop the kite whilst downlooping with some speed, you are very likely to roll and invert the kite. As such there is the potential for getting your lines crossed and at the very worst of gift wrapping your kite. At first this may not be a method you want to try miles out to sea.
- If you are slightly under-powered there is a limit as to how off the wind you can point the board.
- You will have to untwist your lines as you go.
Final thought – This is a great weapon if the wind is cross onshore, as you can use the downloops to pull you back towards the beach. Beware though, your back leg will be on fire...
No 3. Kite-looping the Kite
Next on the list is the trusty kite loop. Fear not, there will be no suggestion of getting air and pulling the trigger to get you downwind, although it would work. A kite loop is the opposite of a downloop. As we just witnessed, in a downloop the kite moves forwards, the same way as you are going. A kiteloop moves the kite back, into the half of the wind window behind you. This means that the kite is pulling slightly against the direction you are travelling, which means that it has the potential to produce more power and pull you yet further off the wind – perfect.
This method is slightly more advanced in the fact that you do need a strong and balanced stance on the board and have the ability to adjust/steer the board, depending on how much power is produced. Even if your board is flat and pointing off the wind, a kiteloop can surprise you with a tad more power and a slight change of direction as it pulls you back...

Let’s have a quick look at Pic 7 in which Christian is riding left foot forwards. First off, knowing that he can turn even further off the wind and have more pull from the kite Christian almost carves his board off the wind so that he can get off the wind more quickly. This means getting his weight centred over the board and once again raising the kite. Having the kite high has the same advantages as before, more room to move it, and potentially less power if this is your first time. Here Christian is riding downwind right to left, so his back hand is his right hand. This is the hand that will pull, so he’s moved it down the bar.
Onto Pic 8 to loop the kite Christian now pulls with his aforementioned back hand and pushes with his front hand, fulcruming the bar on the sweet spot. The same technique applies here, the idea being to get the top bar end and your knuckles up close and personal with the centre line, guaranteeing that the kite will turn and loop as planned. Judging by Christian’s kite face he’s given it plenty of beans. Notice how he is definitely standing lower, centre of gravity dropped, having flexed his legs more. This is in anticipation of having more pull and therefore being more dynamic to hold the power.
A final note for this example. Christian is powered up, he’s not flogging in light wind. In anticipation of a hefty pull from the kite he actually turn the board further off the wind. The windier it is the further he’ll turn. You could actually turn back towards the kite so that you’re now going downwind in the other direction!!! This means that if you get the full-on turbo boost you’ll move towards the kite, accelerating whilst also keeping control.
Then, in Pic 9 having received the whip from the kite Christian keeps steering the bar and keeps the power on. That is to say he keeps the kite sheeted in on the sweet spot. Yes, we’re banging on about this, and although you can briefly sheet out a bit to stop yourself becoming over-powered, you must not leave the bar out. If you do the kite will stop turning and you’ll possibly dunk it in the wet stuff. And don’t forget that your lines will be twisting so you’ll need some untwisting to follow.
Sequence 5 clearly shows the kite going up and round, relatively high in the window. Even so Christian gets a decent pull and speed and is travelling considerably more than he did in the previous two methods.
Your final thought here is to maintain tension on the lines. This may sound somewhat silly seeing as that’s why we looped the kite, but as we will have accelerated there is a chance that as the kite climbs we’ll be moving faster than it is. The danger here is that we overtake the kite, or perhaps undertake it describes it better. Either way if the kite gets stuck at 12 o’clock while we motor on beneath it, all tension will be lost and the kite will flutter down like a leaf in autumn. To conquer this, you’ll either need to loop the kite again or dive it down with the front hand, and turn back towards your original downwind path.
Top Tips Kite Looping
- Prepare for more power by carving the board fully downwind or a few degrees through the wind so you’re almost pointing at the kite as it loops.
- Once it loops regain tension by turning back to your forward downwind path and fly the kite.
- Video 7. Gives you the real-world view of a heelside downwind incorporating the kiteloop.
- Pros & Cons of Kite looping Downwind
Pros:
- Guaranteed more power.
- Can point even further downwind.
Cons:
- Easy to run under your kite and drop it upwind of you.
- Need to untwist your lines.
- In stronger wind, more likely to get pulled off the board as the turbo kicks in.
- On some tacks when you’d rather broad reach off the wind, for example in cross on conditions, it may pull you too far back the other way.
The Killer Combo – Both Loops
If you really want to turn the Pirellis to Jellies and get downwind at a good angle as fast as you can when it’s not too windy this is just the ticket. By mixing downloops and kite loops you’ll have no trouble keeping the tension in your lines, you’ll have no need to untwist your lines and you can alter your course downwind depending on which loop you pull, kiteloop to go back a bit the other way, downloop to continue forwards. All in all, this is the ultimate method with a cherry on top.
The crux of combining them is to always make sure that you have both tension in your lines and the kite high enough before pulling the kite into either loop. At times you may need to turn the board slightly against the rising kite as it comes out of a loop.

You can see it’s no different to what you’d imagine in both Sequence 6, starting with a kiteloop, followed by a tight downloop and then another kiteloop. If that’s a bit confusing, Video 8 will shine some light!
The great thing with this combo is that there is no rule as to when you pull one or the other loop, it just needs to match where you want to go and how much power or speed you need. There is no need to do one after the other, a few of one followed by one or a few of the other. Give it a go and see how you get on:)
Top Tips for Combo Loops
- Make sure that you have the kite back up high before pulling for the next loop.
- You need tension to pull the next loop, so you may have to alter the angle of your board, more downwind, slightly back for the kite loop and slightly less downwind for the downloop.
- Start doing this with your favoured foot forwards.
- Experiment and you’ll find the balance.
Pros
- No untwisting
- Natural military rhythm with kite, left right
- Can steer where you want to go, more kiteloops take you back a bit more, downloops forwards a bit.
Cons
Fast and furious....
Final thought on the Combo. As this method can take you pretty much dead downwind in a drunken kind of way, and due to the fact the you can create oodles of pull, power and speed, it’s worth pondering that this may be a task best taken with one foot forward to start with. For example, if you prefer riding left foot forward you can literally just ride that foot forward as long as possible. With the kite looping both ways you’re really riding a mixture of toeside and heelside whilst the kite loops each side of you.
Final words
What can sometimes make kiting seem difficult is the constant need to adapt to the ever-changing environment within which we practice. The wind is rarely constant, buffeting us with gusts and tricking us with lulls. The sea is alive, altering state and surprising us with random chop and waves. Traffic and obstacles need avoiding. It’s never a level playing field. Hopefully with the new skills that you can learn from this you will have a myriad of solutions to deal with whatever Mother Nature throws your way the next time you’re heading down wind.
This technique article was in Issue 70 of IKSURFMAG.
Related


By Christian and Karine
Christian and Karine have been working together as a coaching team, running improver to advanced kitesurfing clinics since 2003.
