
Popped Back Roll to Toeside
Technique / Intermediate
Introduction
Now that you've got your popped back rolls in the bag from issue 95, it's time to add the killer combo, a toeside landing. This is a classic move; it feels fabulous, looks brilliant, and is a fundamental stepping stone to much more. If you fancy some freestyle in the future, it's a must, and even if you don't, you'll learn so much about rotation control and improve your pop and landings that you'll be ready for a whole host of embellishments.
The back roll to toeside is just that; your back roll should be the same, whilst the landing is an add-on. Without starting on the common problems, we say this because the misconception of this move is that you should rotate faster and further to get yourself around to toeside, one-and-a-half back rolls, so to speak. In fact, the more controlled your back roll, the more straightforward the toeside landing will be. We should mention that a solid toeside is very beneficial on the side you'll be landing! Ok, let's see how you'll piece this together.


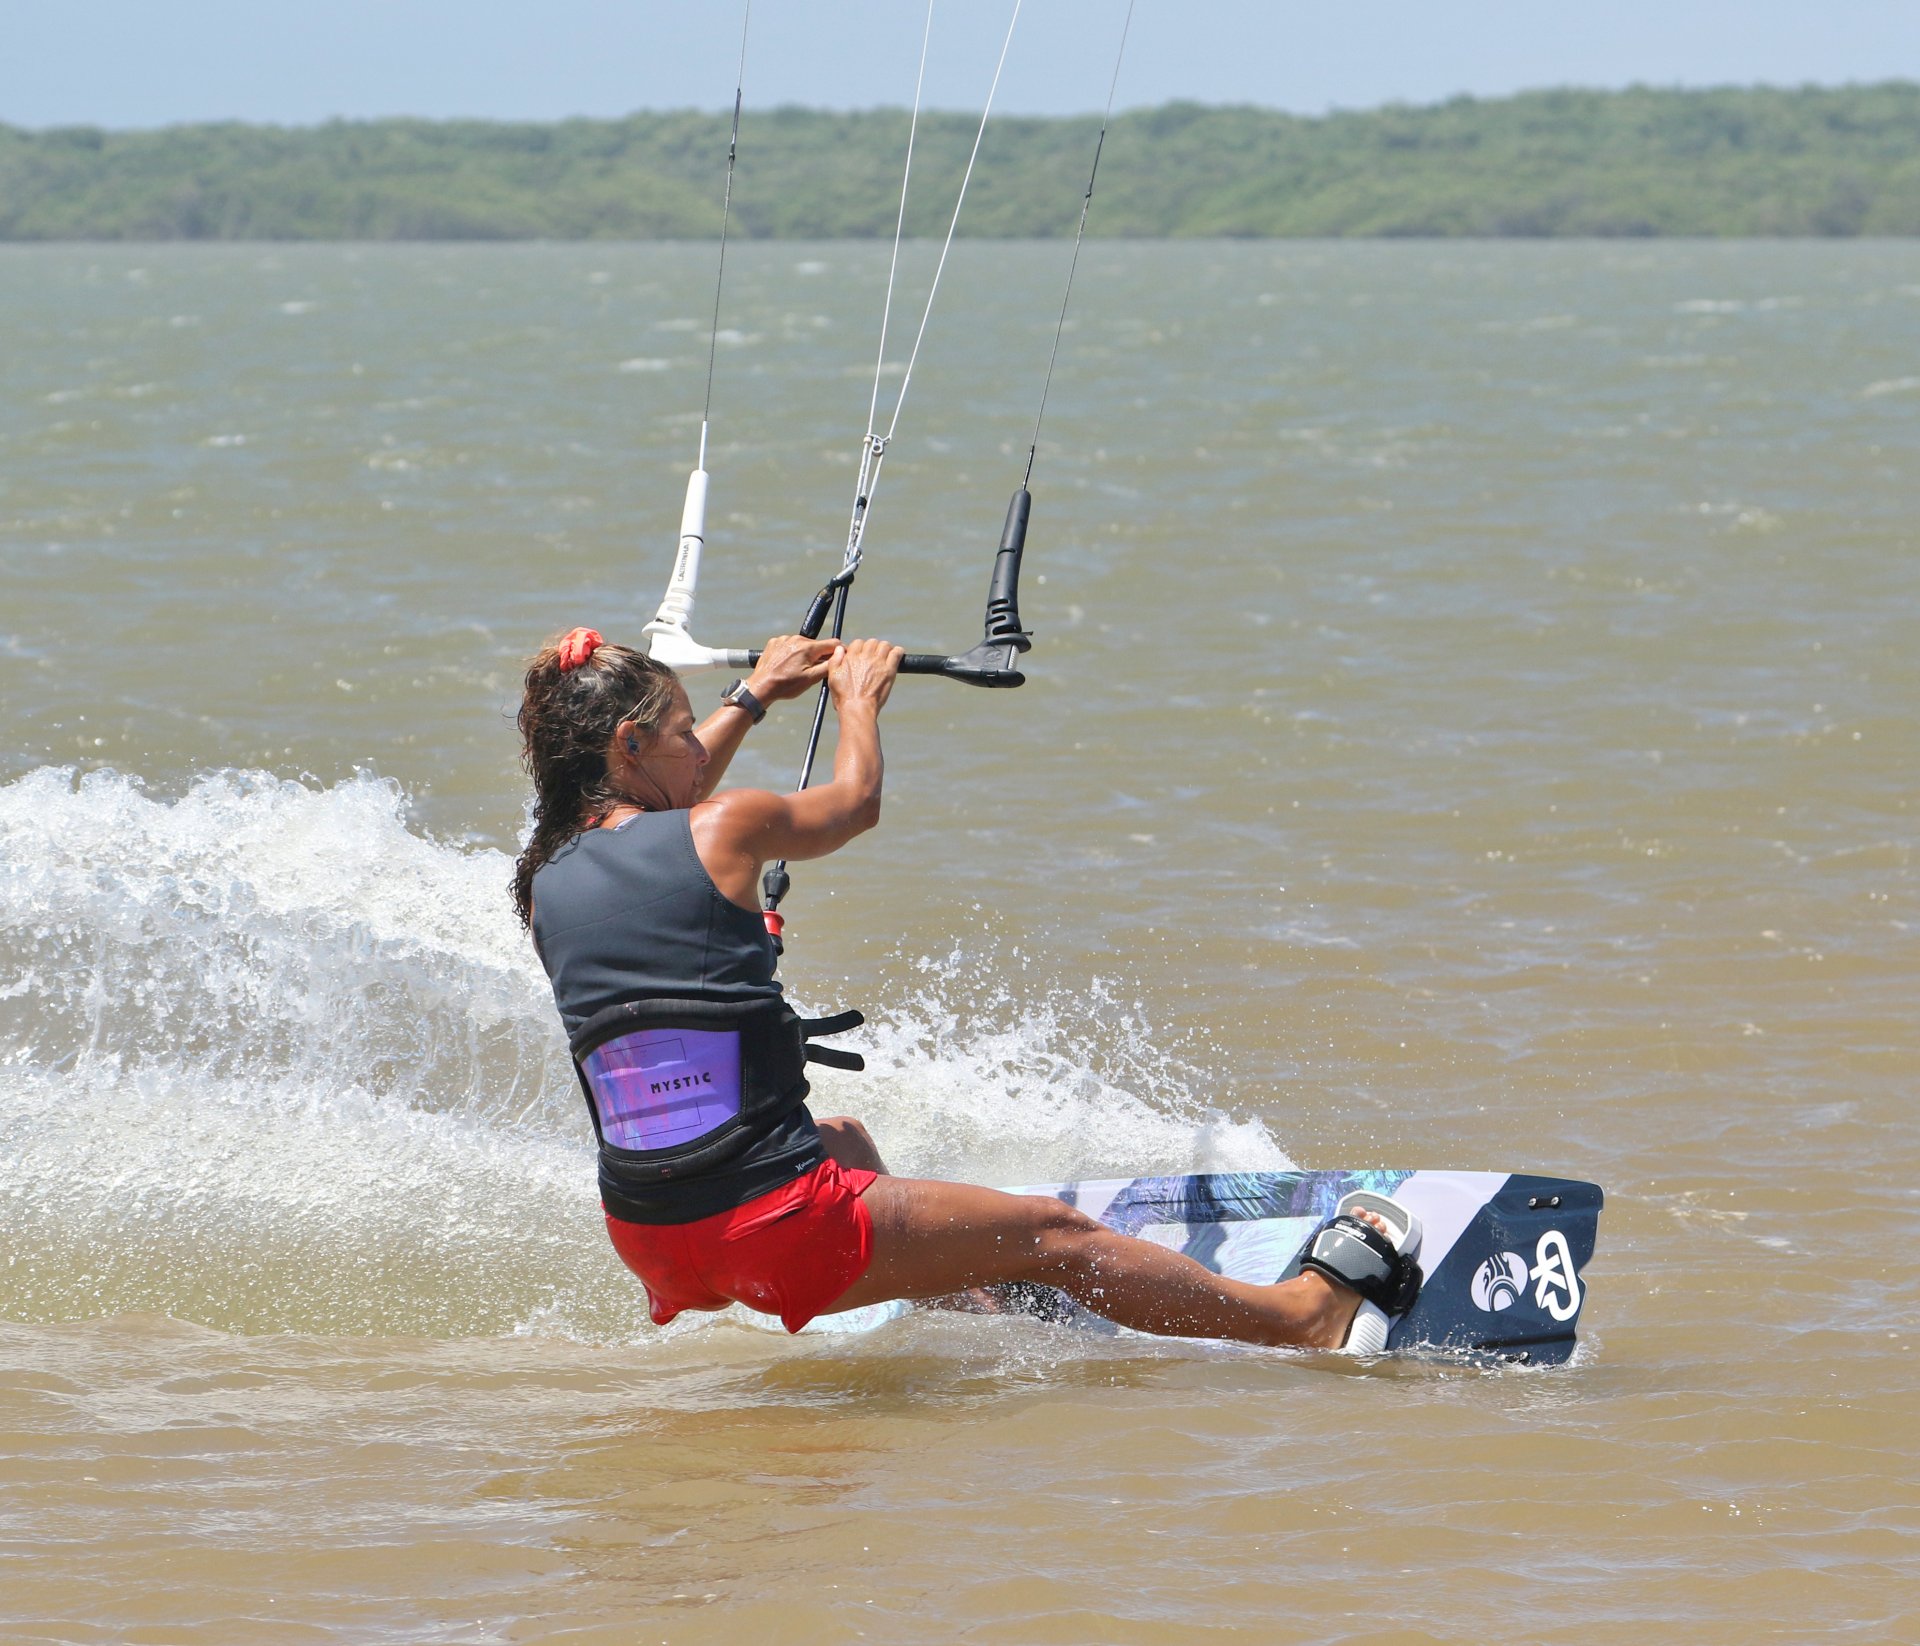
Approach Pic A.
If your popped back roll is under control, you should have this nailed. However, a quick reminder won't hurt. With your bar trimmed enough that you can easily reach it, search out some flattish water. Park your kite around 11 or 1 o'clock and move your hips back towards your back foot to get your weight on the curvy tail part of your board, your default popping stance. Just as per your popped back roll, it's essential that you bear away into the move. This should be from an edge, so that you have tension before bearing off. All the same reasons apply, and if you want time to think about when to add the toeside, it's even more important that you can take off before you turn completely into the wind. You can see that Karine's back knee is soft, which releases her edge and allows her to push her board off the wind. With her weight back, she's performing a little wheely, so her board is ready to carve back up while her bum and shoulders remain upwind of the board. Her bar is on the sweet spot, and her kite is parked at 1 o'clock.
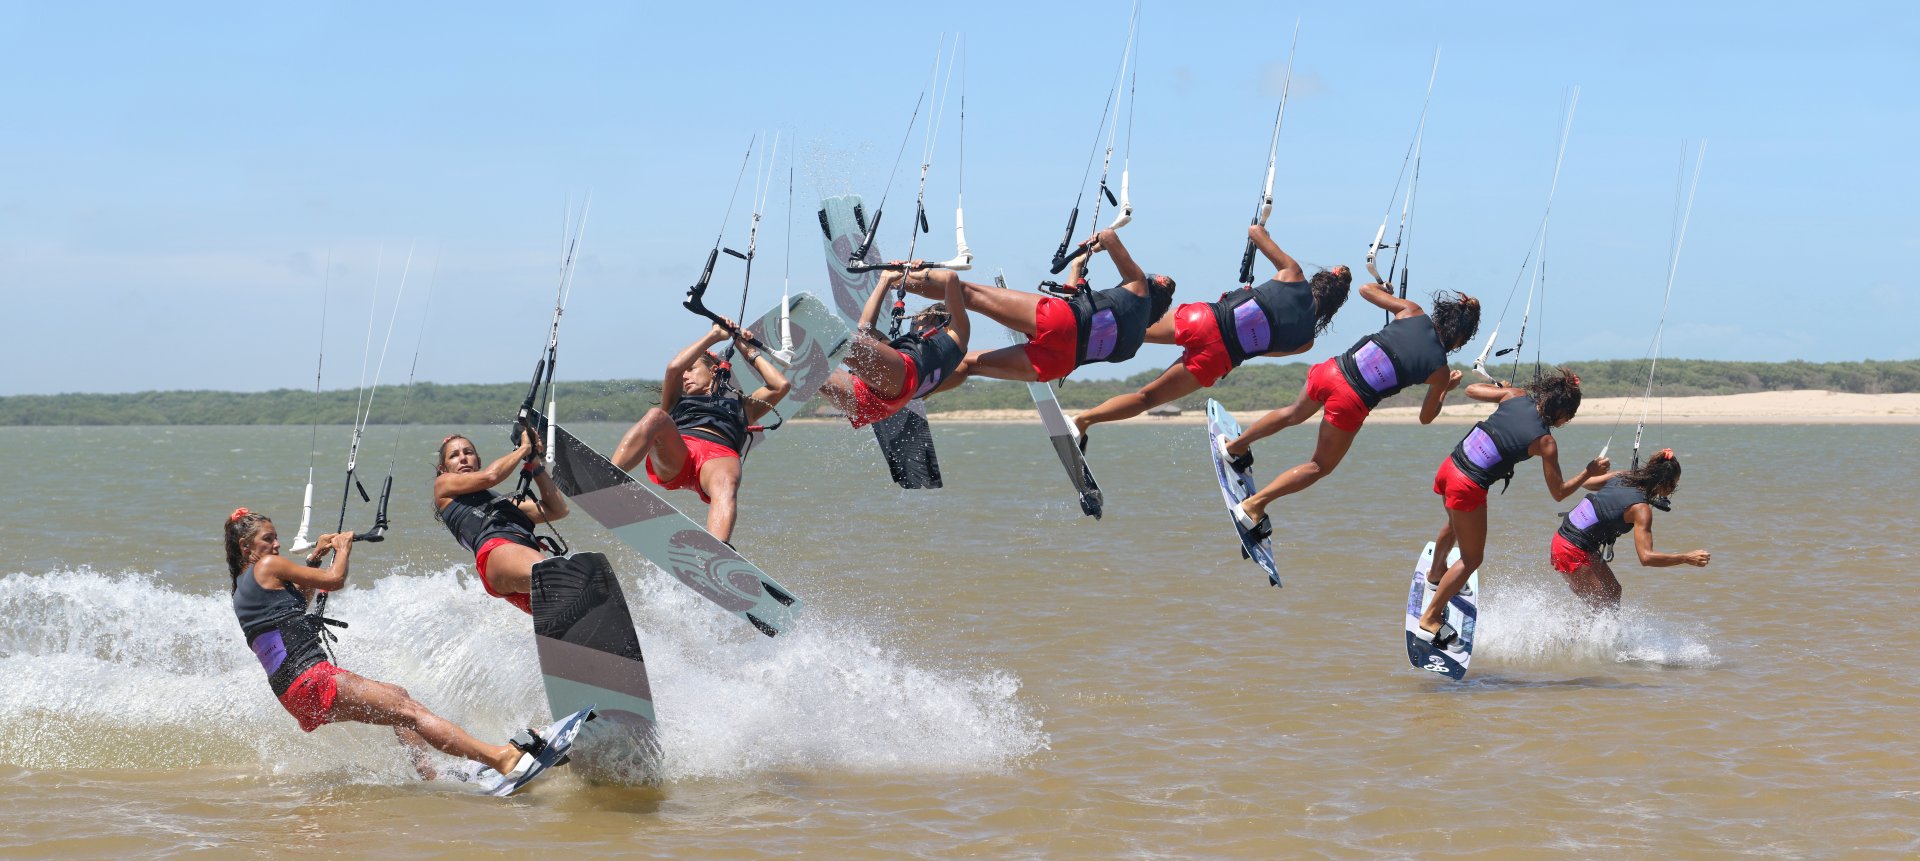
The Carve Pic B.
Once again, this should already be in your armoury. Your aim is to get back onto your edge so that you have something to stamp against to launch yourself up and around. Your weight is back, so as soon as you drop your bum and bury your edge, the board will carve up. All the while, you need to resist the urge to pull on the bar or send the kite, both of which will pull you off your edge. Looking at Karine, her weight is back, her kite is still at 1 o'clock, her bum low and upwind of her board, and as such, she can apply pressure through her back leg, hence the plume of water as she drives against her board. Her shoulders are still parallel with the water, which helps apply the pressure through her back leg. If you lean back, you'll soften your back leg and likely pull on the rear hand. Karine's bar is out on the sweet spot, and she's looking forwards, using the board to turn, not her head.
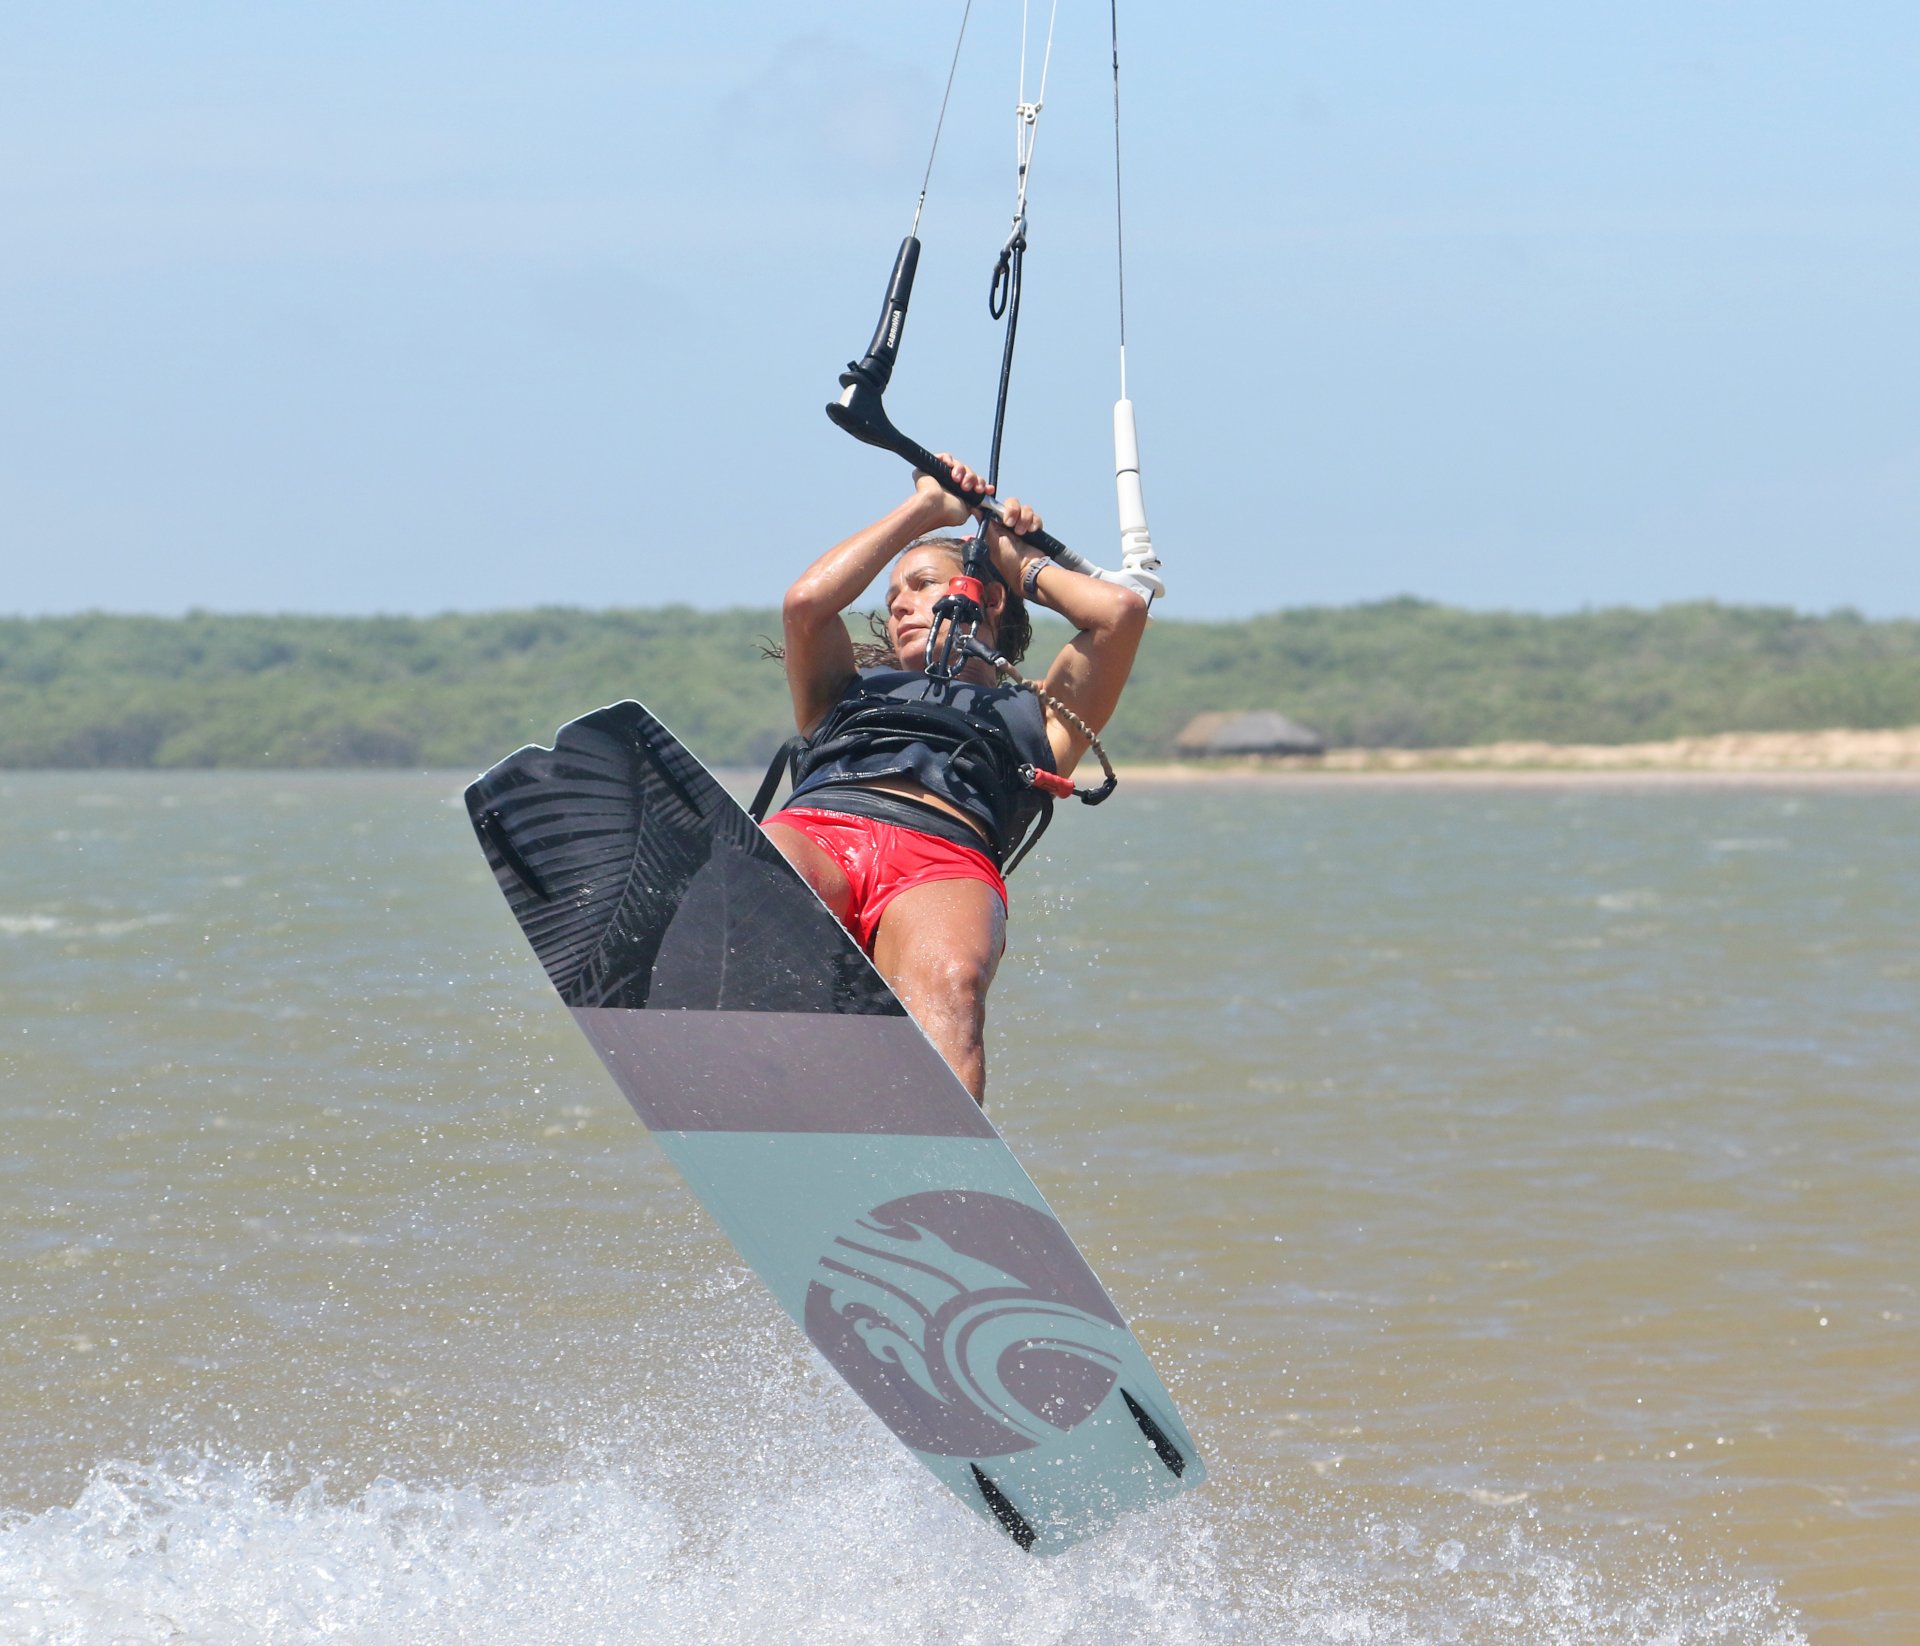
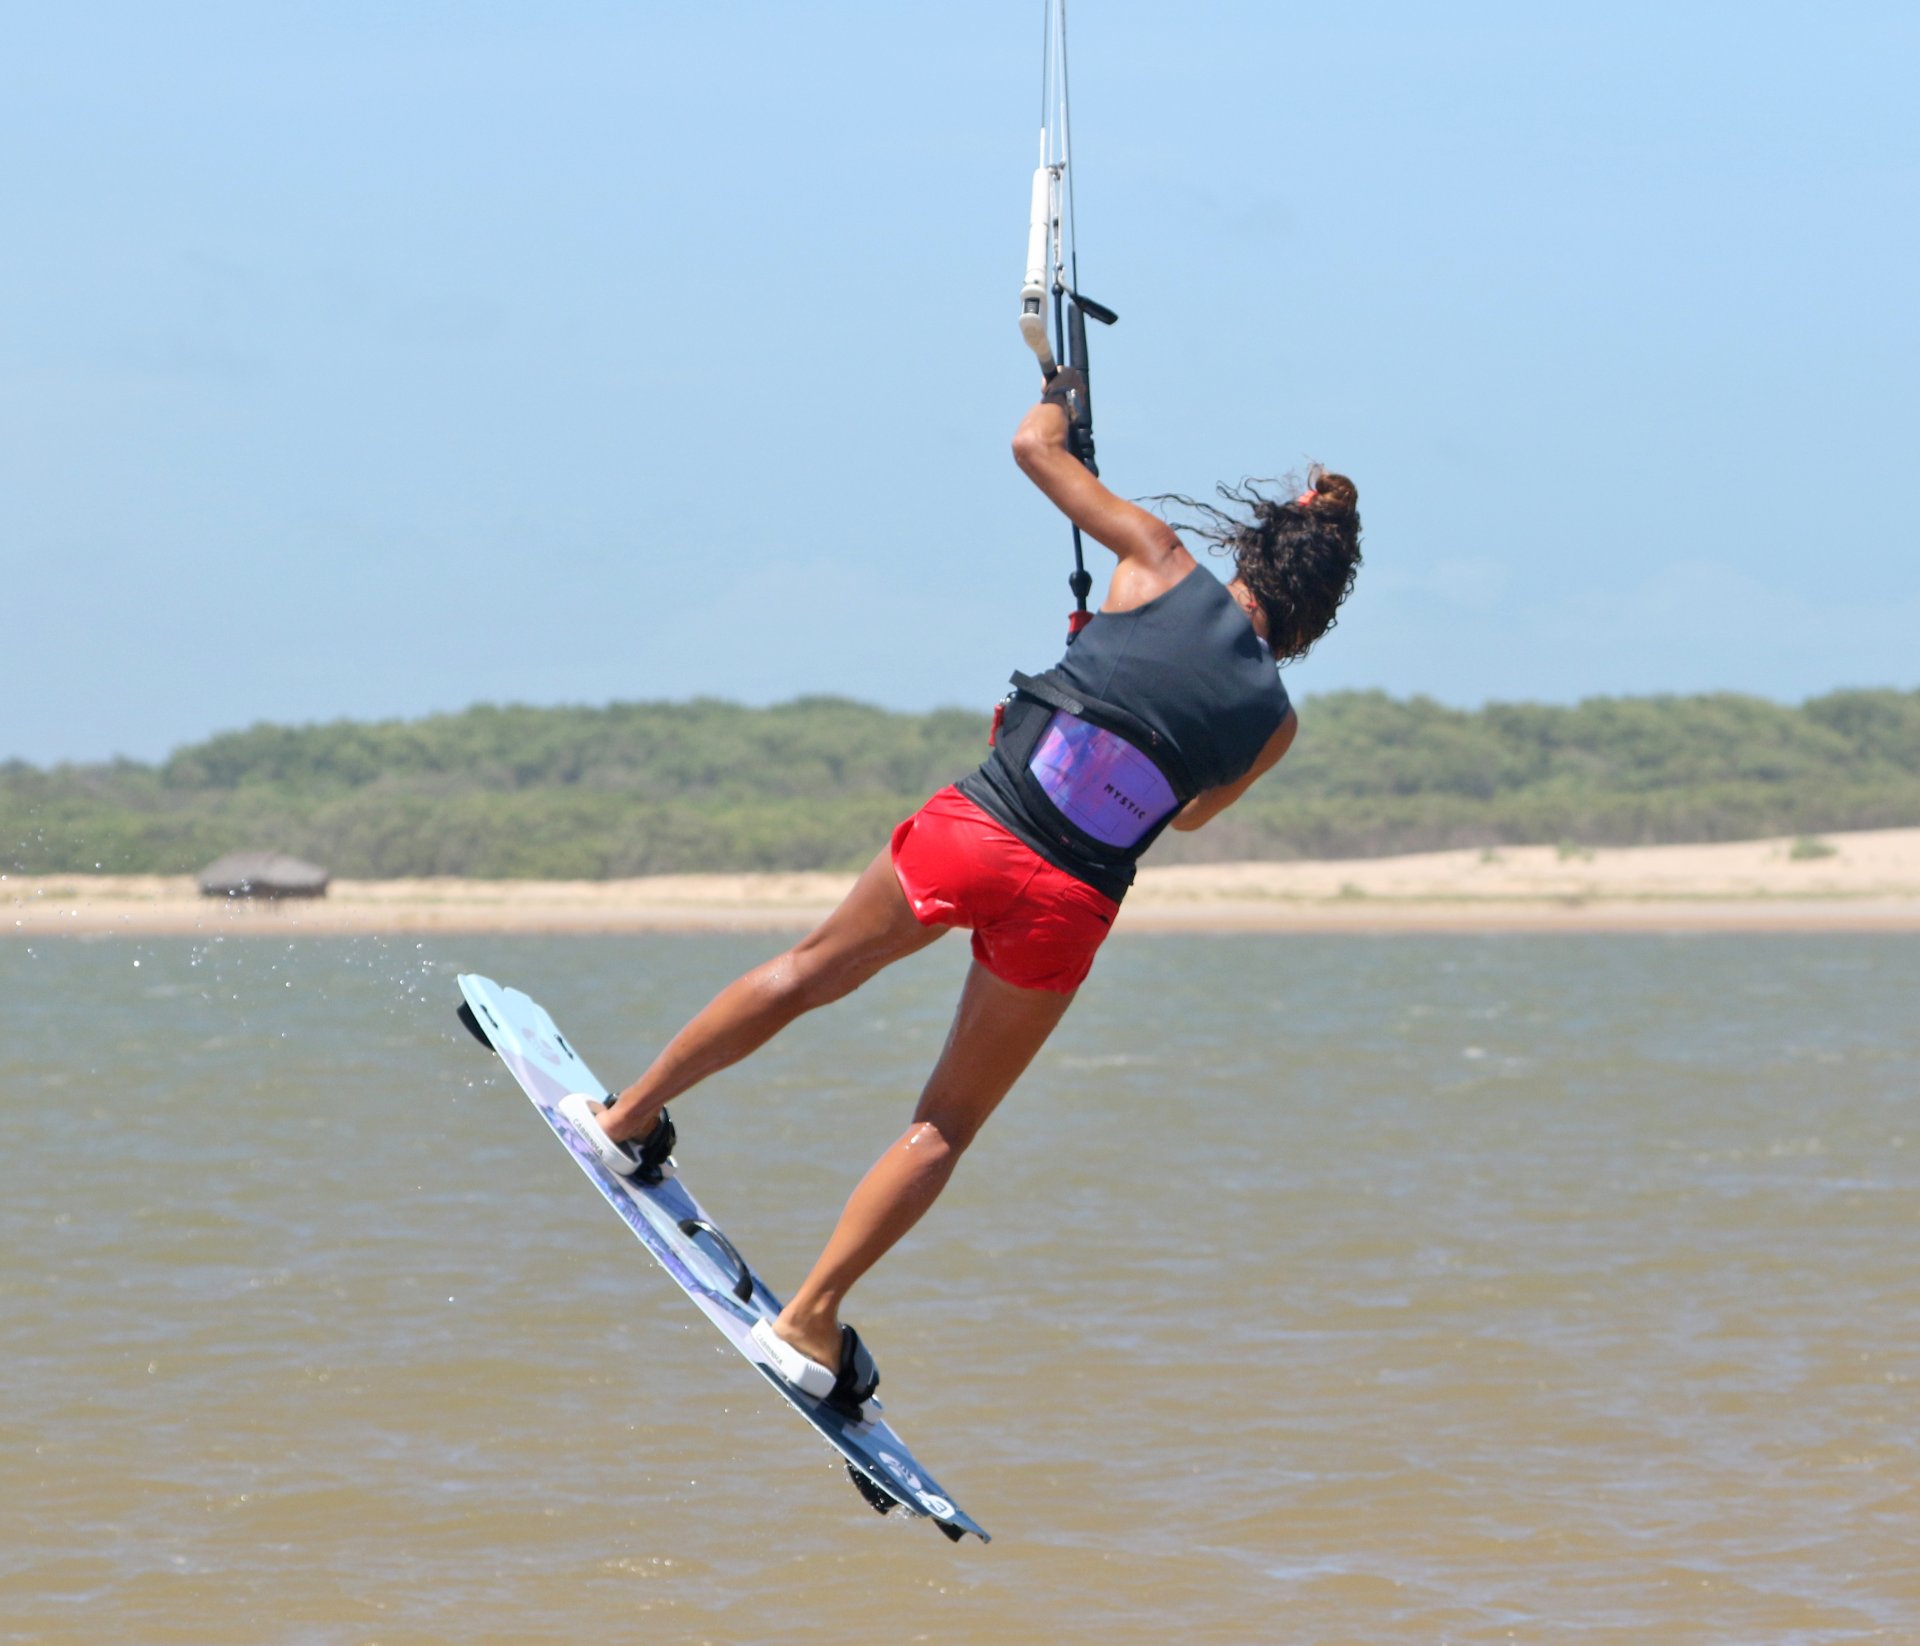
Pop & Rotation Pic C.
Nothing will happen unless you make the call. It's all about keeping the resistance and then stamping against it without compressing first. We always talk about extension; this is what makes you go up, the rotation has already started due to your carve. Once you've kicked off and you're on the up, you can then turn your head. This is more about seeing where you are and being able to anticipate, even if it does also help with your rotation. It's imperative that you kick off before pulling on the bar. Pull too early, and you won't be able to stamp against your edge. You can see in the pic that Karine is extended from her head to her feet. Her shoulders, hips and board are all turning together, and she has now turned her head so that she can see where she is.
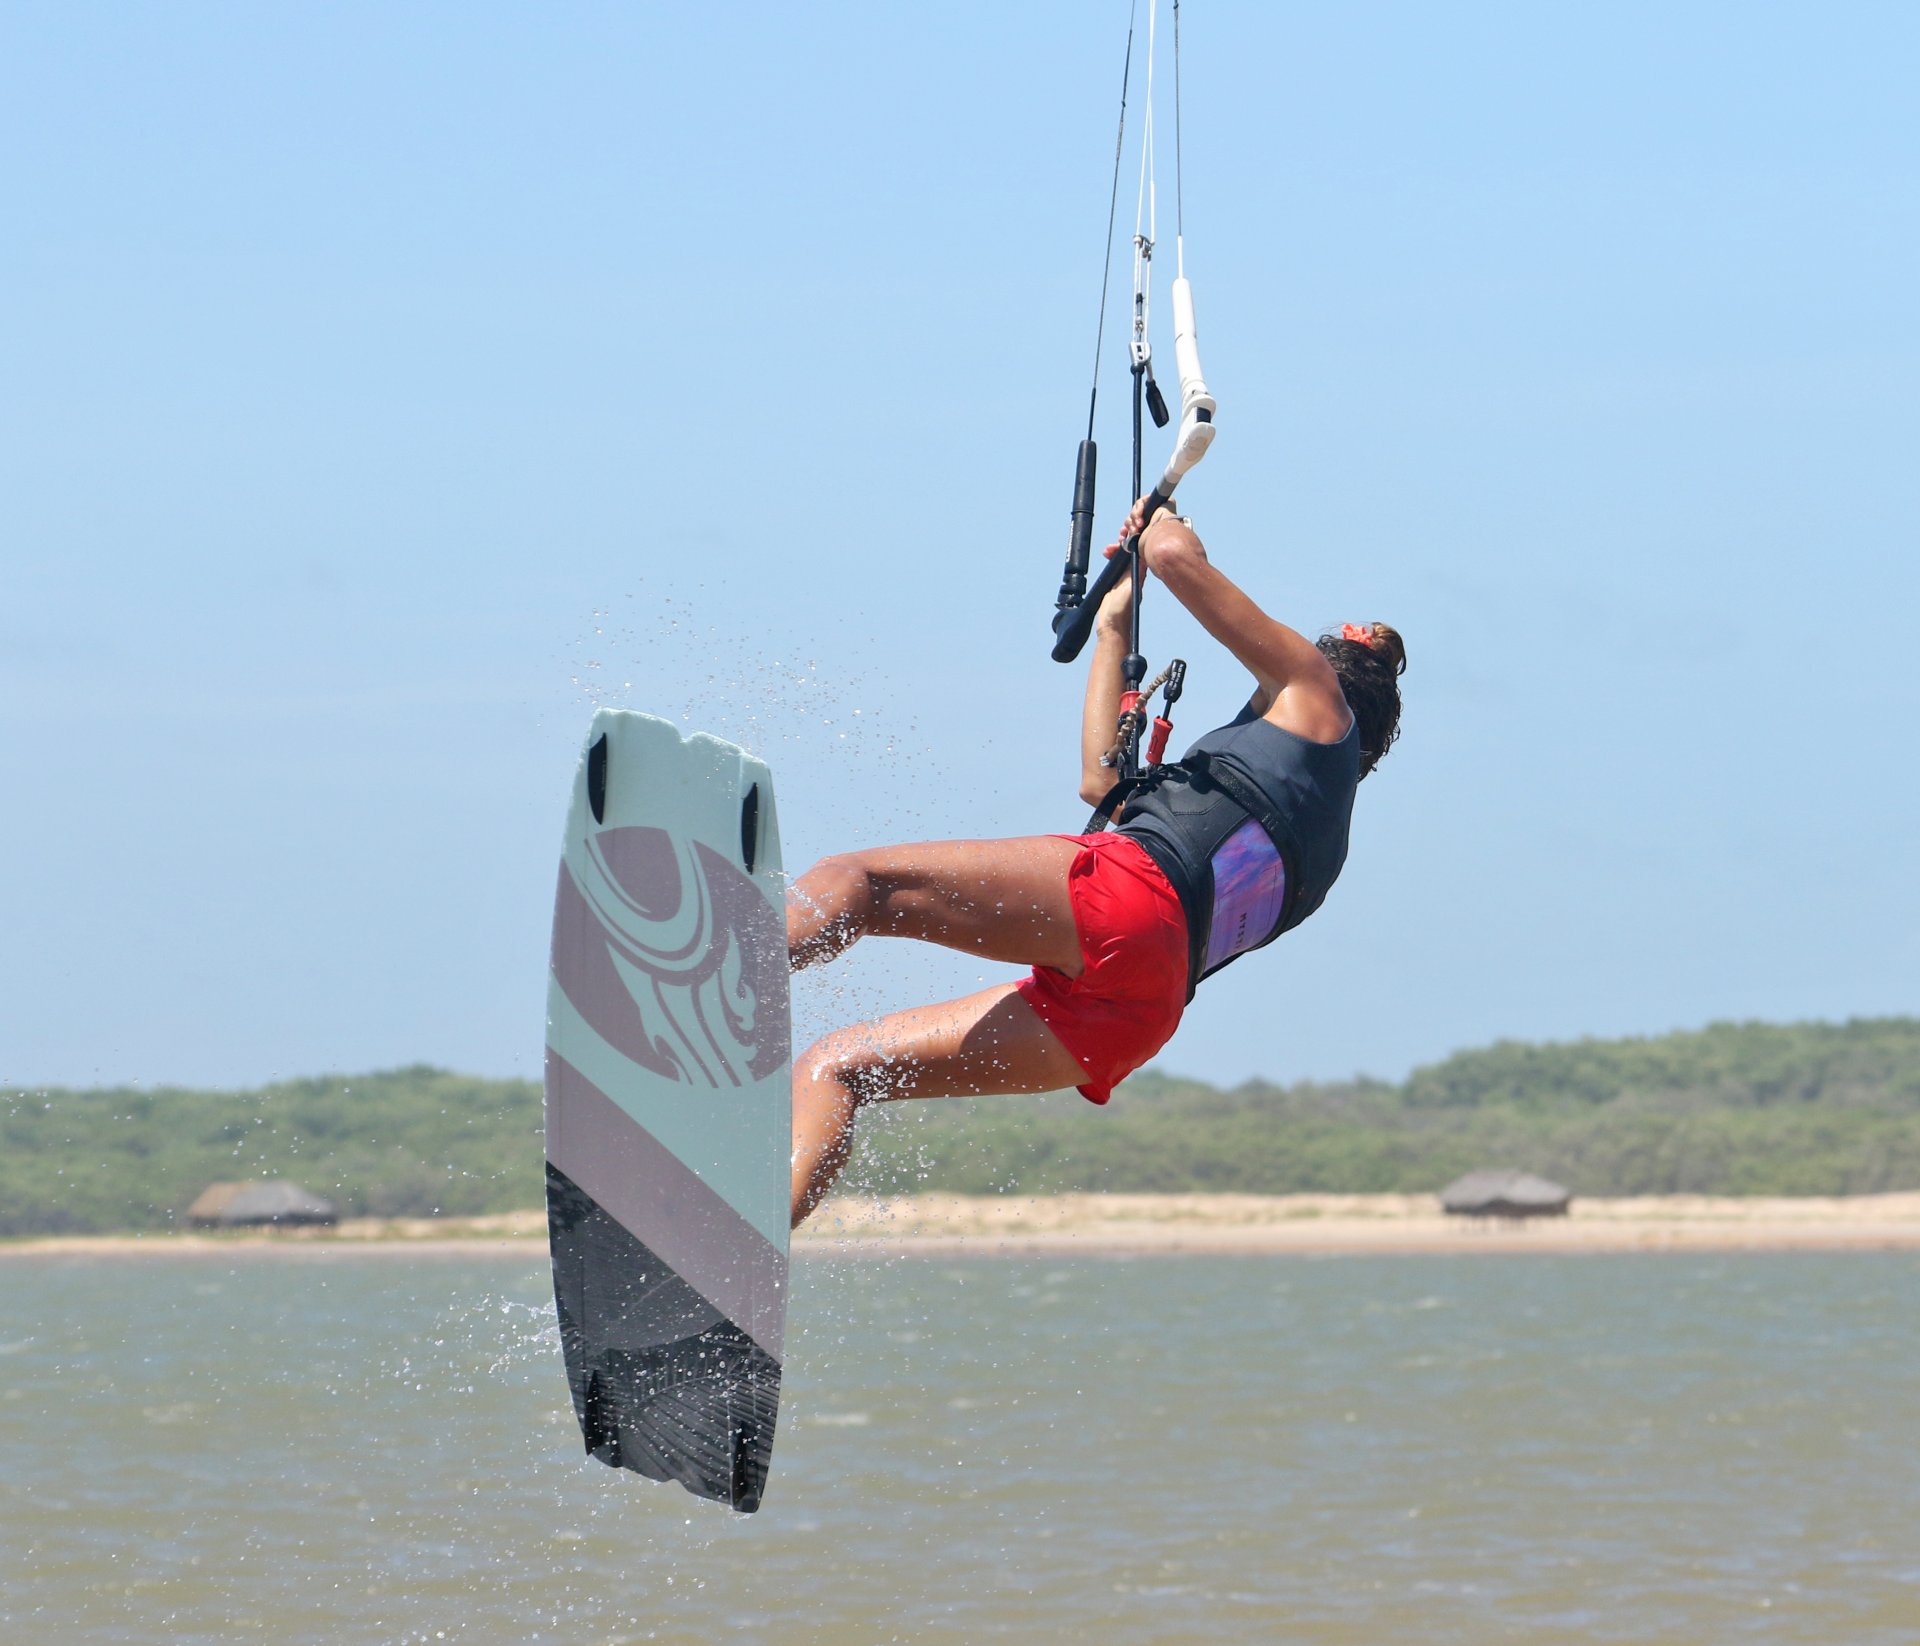
Look Pic D.
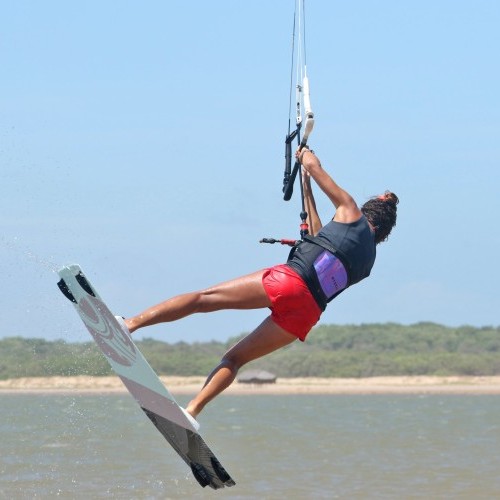
In the popped back roll, we talked about airtime, how there's so little, and it's over in a flash. However, you've likely found that as you've banged out more and more, time does, in fact, move more slowly, and you have more of an idea of when you're coming around. This is only possible if you turn your head and, dare we say, keep your eyes open. You've also possibly felt that magical millisecond moment of float. This signals that you're not spinning but have successfully popped, and as such, your rotation is controlled. If you look at Karine, she has just passed that moment, knowing that everything is ship shape and on track. If you didn't know any different, this photo could be from a back roll to heelside. Karine is looking where she thinks she'll land; she's dropped her front shoulder and can get some weight onto her front hand. She would then drop her undercarriage for a smooth landing. But not today, sunshine - you're going toeside!!!
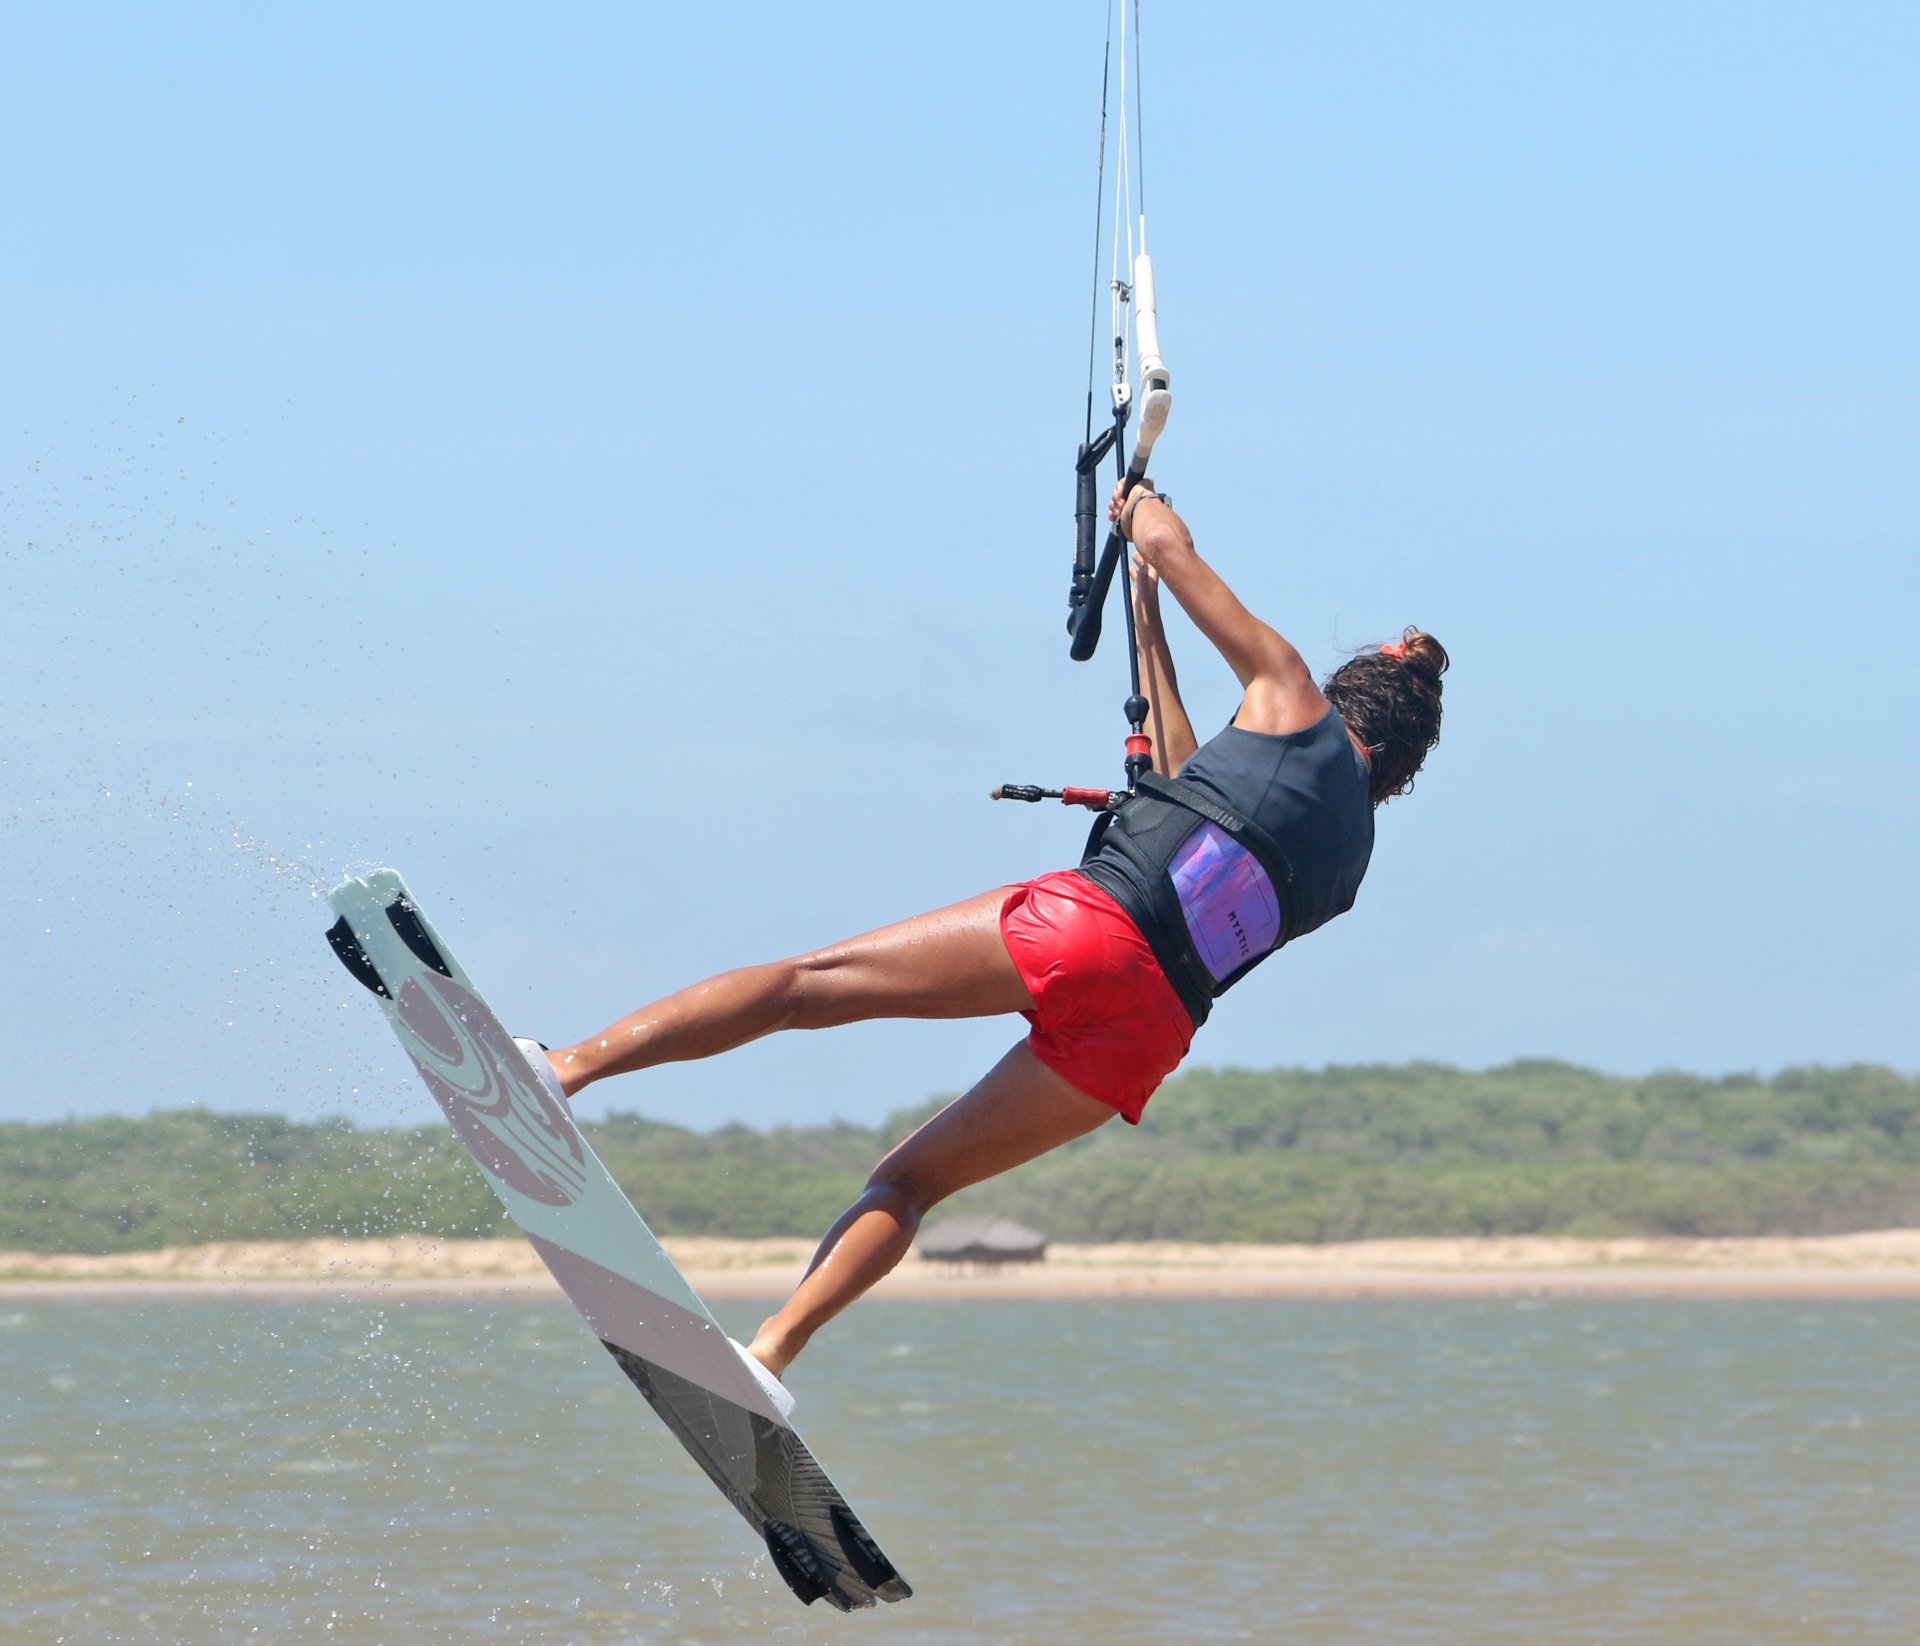
Leg Through Pic E.
This is where it all changes. Rather than letting your legs and board drop, you're going to bring your back leg through so that you can land toeside. Before we do that, we should ponder how you'd like to land toeside. Ideally, you don't want to land on an edge, so you'll be aiming to land slightly off the wind. As such, this is the way you should be looking, downwind. Now back to your back leg. The movement is very similar to switching to toeside on the water or popping to toeside. The impetus comes from your lower body, legs and hips, whilst your upper body stays put. With your front shoulder down and your eyes focused downwind to stop your rotation, you should be able to bring your back leg through, lifting your front foot and twisting your hips. Here Karine lifts her back foot through, extending her leg to push the board across in front of her - all the while looking where she wants to go.


Stay Open Pic F.
As your leg comes through to toeside, the next job is to make sure that you don't turn your body upwind. If you do, it will encourage you to over-rotate and land on an edge. The trick is to keep your shoulders open. By this, we mean that your chest will be facing forwards, even as your hips twist under it. The simplest way to keep your upper body from moving is to release your front hand and push it forwards out in front of you. This way, you counter the momentum of your lower body. In the photo, you can see that as Karine releases her front hand, she makes an effort to keep it forward.
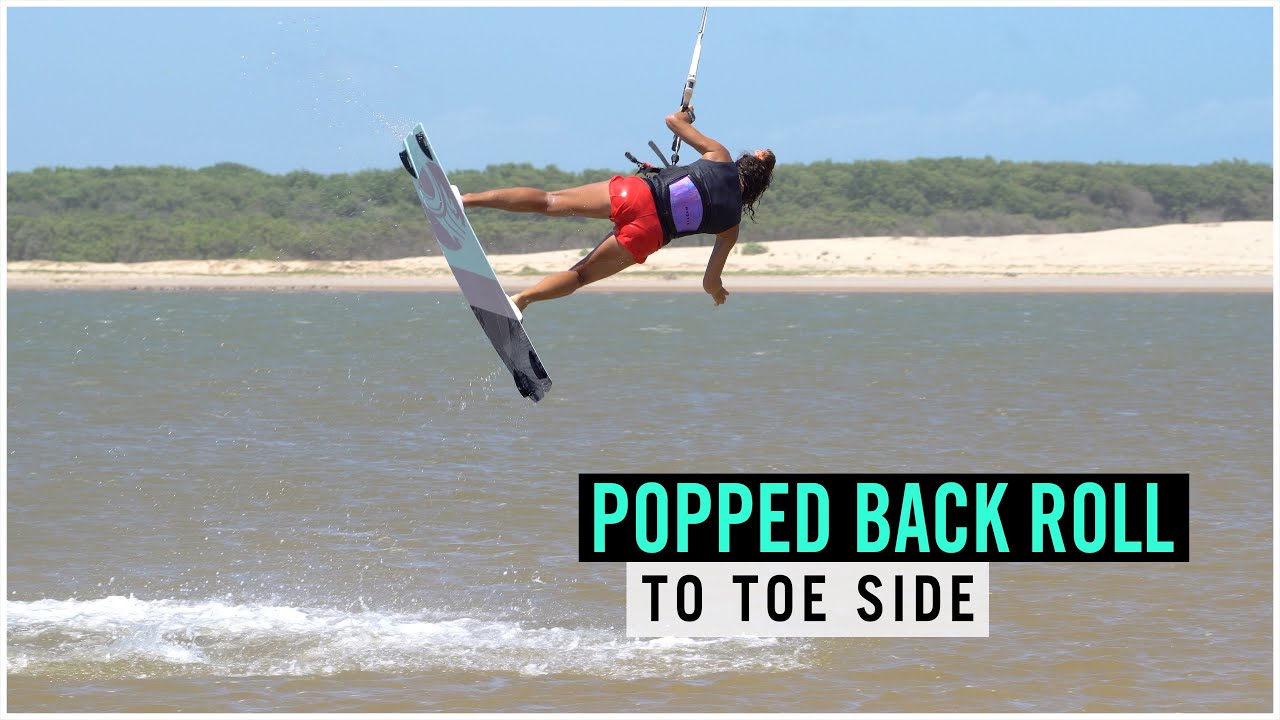
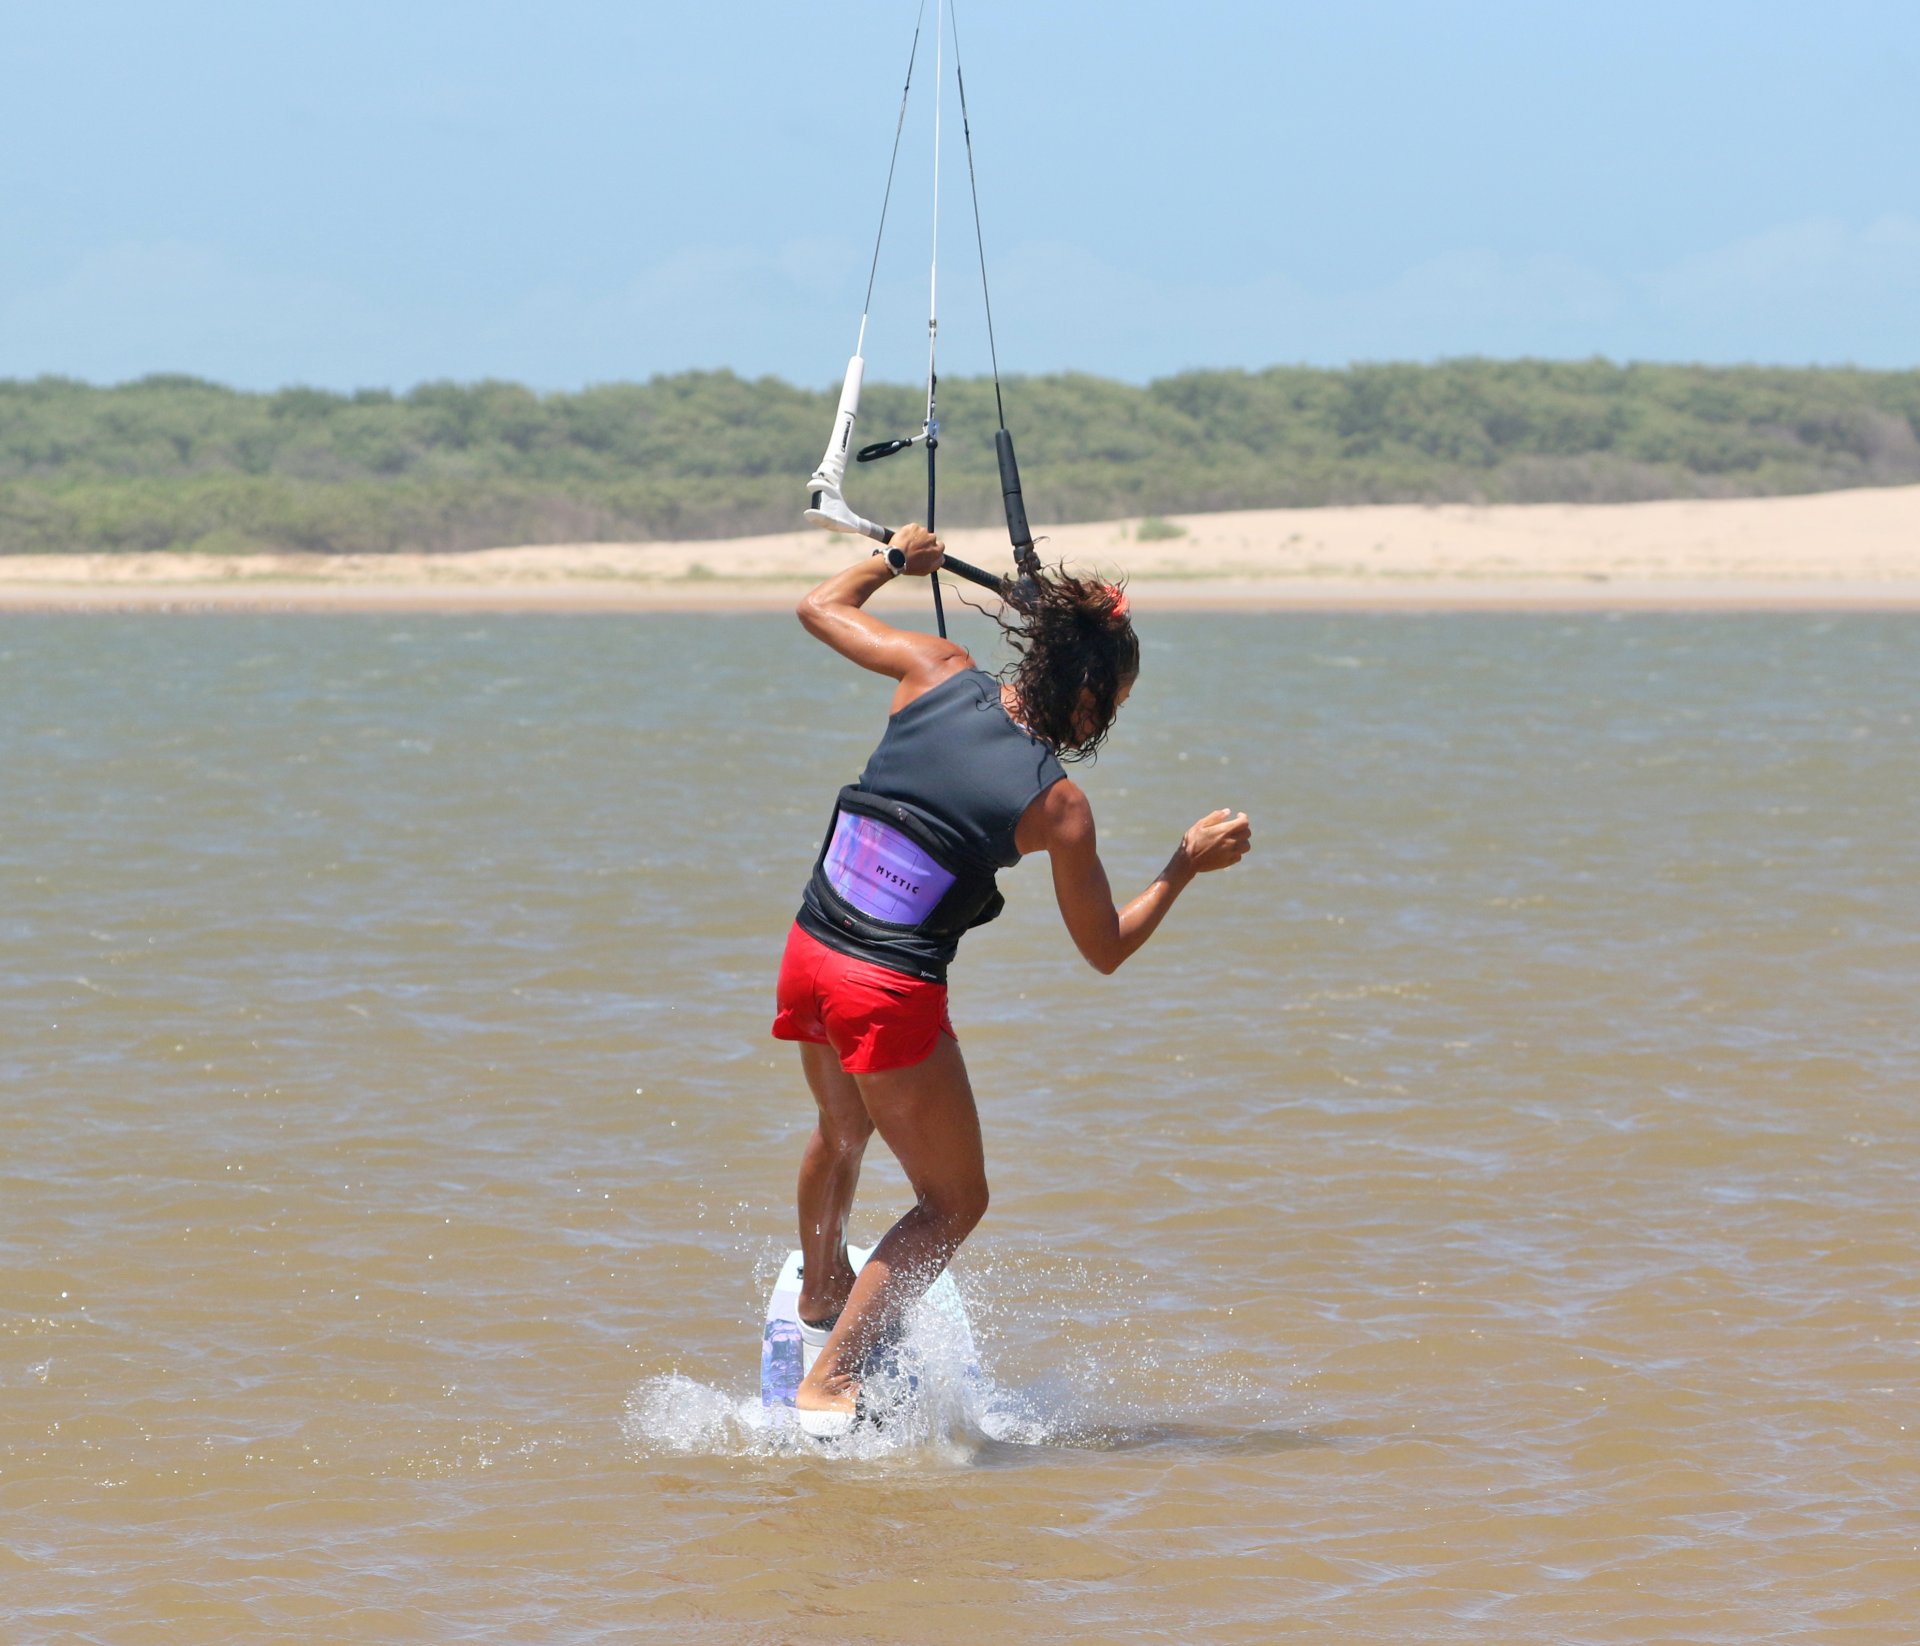
Tail First Pic G.
A tail first landing is preferred as it will be softer and should be achievable due to the nature of the move. With your leading shoulder dipped and your leg coming up and over to toeside the new tail will be happy to engage first. As you land, concentrate on keeping your shoulders open and on holding your free hand forwards. This will help you continue onto your default toeside, flatter on the board, rather than twist upwind straight onto an edge. Karine lands tail first and absorbs the impact with her back leg. She keeps her free hand forward, and therefore her shoulders open and, as such, can land flat rather than on an edge. Once you're balanced, you can carve up onto your edge.
Top Tips
A good up and round are key, so try a few popped back rolls first to get your bearings. Landing downwind will be so much easier if you make sure to bear away enough before popping. And we can't emphasise enough the importance of keeping your shoulders open as you bring the board through. Remember, it's not one-and-a-half back rolls; it's a back roll with a toeside landing:)
Have a look at the sequence to see a step-by-step visual, and check out the video for the full month.
Common Problems
Over-rotating and landing on your edge. Avoid the temptation to sneak your kite up too high, as this will encourage you to spin around your lines. Rather keep your kite still and concentrate on your pop.

If you're struggling to get your pop. Don't forget to bear away.
If you find that you're coming around to toeside but have no height. Chances are you're stalling the kite during your rotation. Either trim in a bit more or make an effort not to pull the bar right in after you stamp.
If you're getting round but find yourself landing in a compressed ball. This is a result of pulling your leg through crunched up. Make sure to extend your front leg as you bring it through. You'll be surprised by the difference.
Keystones
- Bear away
- Pop up and around
- Turn head and look for the landing
- Lift extended front leg through
- Shoulders open and front hand forward
This technique article was in Issue 97 of IKSURFMAG.
Related


By Christian and Karine
Christian and Karine have been working together as a coaching team, running improver to advanced kitesurfing clinics since 2003.
