
Boned Inverted Back Roll Transition
Technique / Intermediate

Introduction
There are literally hundreds of ways to turn around in kiting. The trusty transition can be anything from a cooling sit down to a multi-rotational kite looping mishmash and anything in between. The good news is we have plenty to challenge us and no excuses not to add another one to our repertoire. Today it's the boned inverted back roll transition, which we hope you'll agree has the potential to add a lorry load of style to an all too frequent change of direction.
Before attempting this, it would be prudent to have a command of the necessary foundation, a well-honed back roll transition, or BLT, as formerly known. There are two main challenges to cracking this transition. The first is that it'll be over considerably quicker than you can say its name. So, there's a lot to get aligned in a short space of time. The second is keeping the kite in a position from which you can dive it and pull yourself out of the move, which is further complicated with smaller kites. You'll be releasing your front hand post take off, leaving what will be the hand you need to dive to finish, your new front hand, on the bar. That said, it'll be worth the effort, so let's crack on.


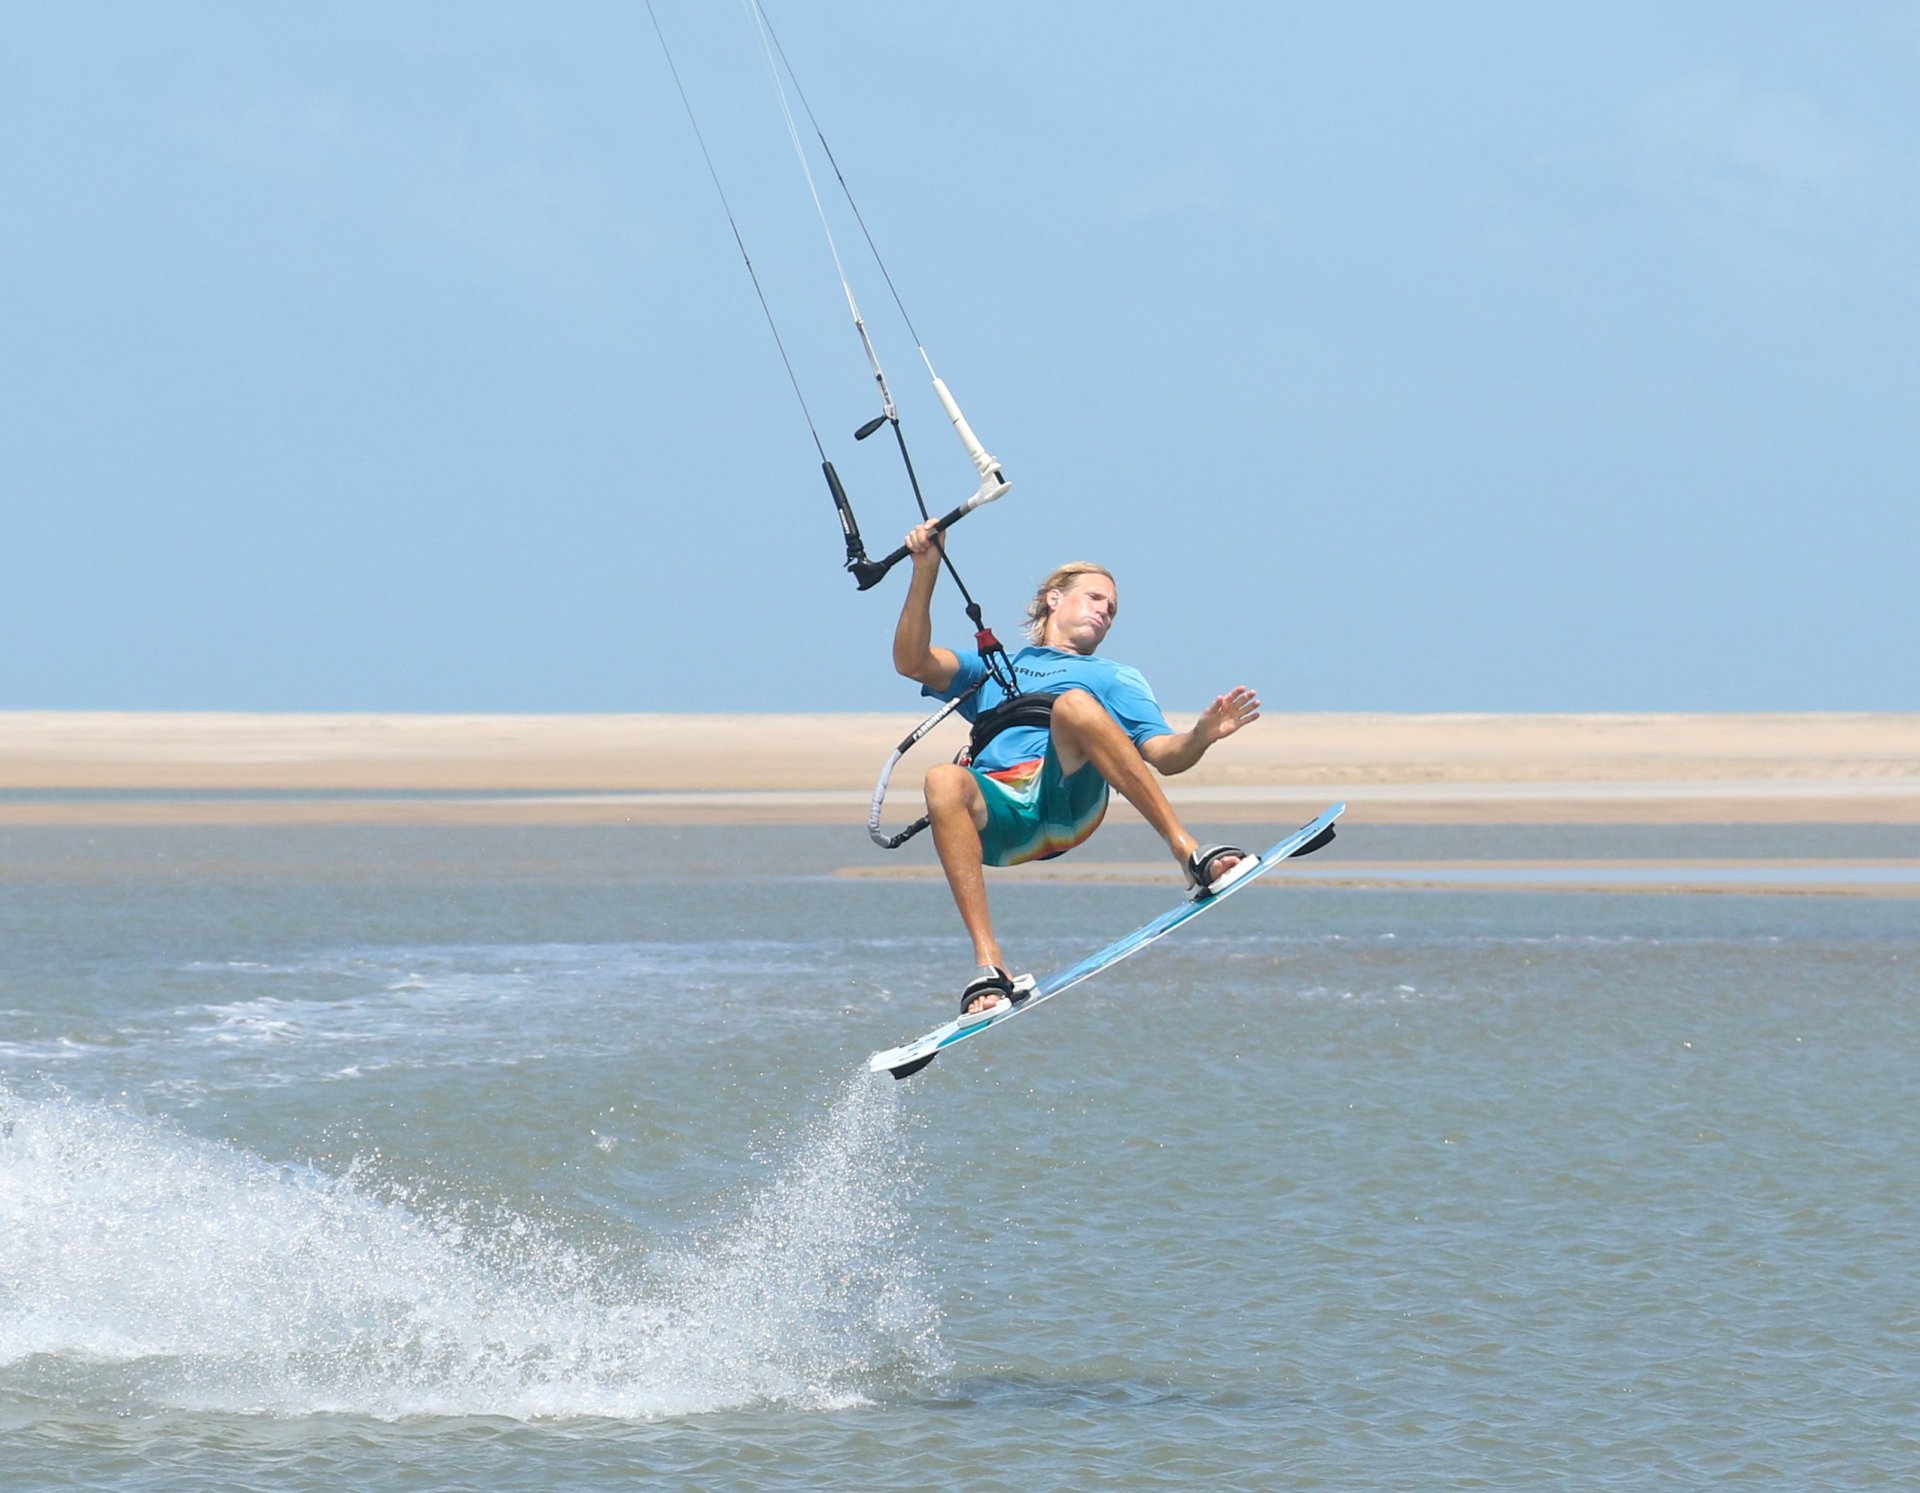
Your Approach Pic A.
As we have alluded to, kite control and position make such a transition tricky to nail. Back rolling is one thing, grabbing is another, and once you add a bit of inversion and tweak out your front leg, it's more than easy to rely on the bar for some comforting support. The result? A kite drifting casually around the edge of the window into a position from which no amount of dive will give you any chance of keeping your locks dry and coming out of the move with gusto. The good news is that there is a solution, actually two. The first one is your approach. You should approach with a bit more speed than you might for a standard air gybe or BLT. The reasoning behind this is that as long as you're moving when you come down, you can glide out of this if you land flat and pointing off the wind. Assuming that the kite doesn't drift too far, you have time to get some power on before gurgling down below the surface. So, approach as if for a slow jump, kite at 11 or 1 o'clock, decent edge, but not holding too much power, and weight biased toward your back foot to help encourage some rotation on take-off. Here you can see that Christian is coming in on a decent, yet not massive edge. He's looking upwind, kite at 11 and bar on the sweet spot, while keeping a bit of speed.
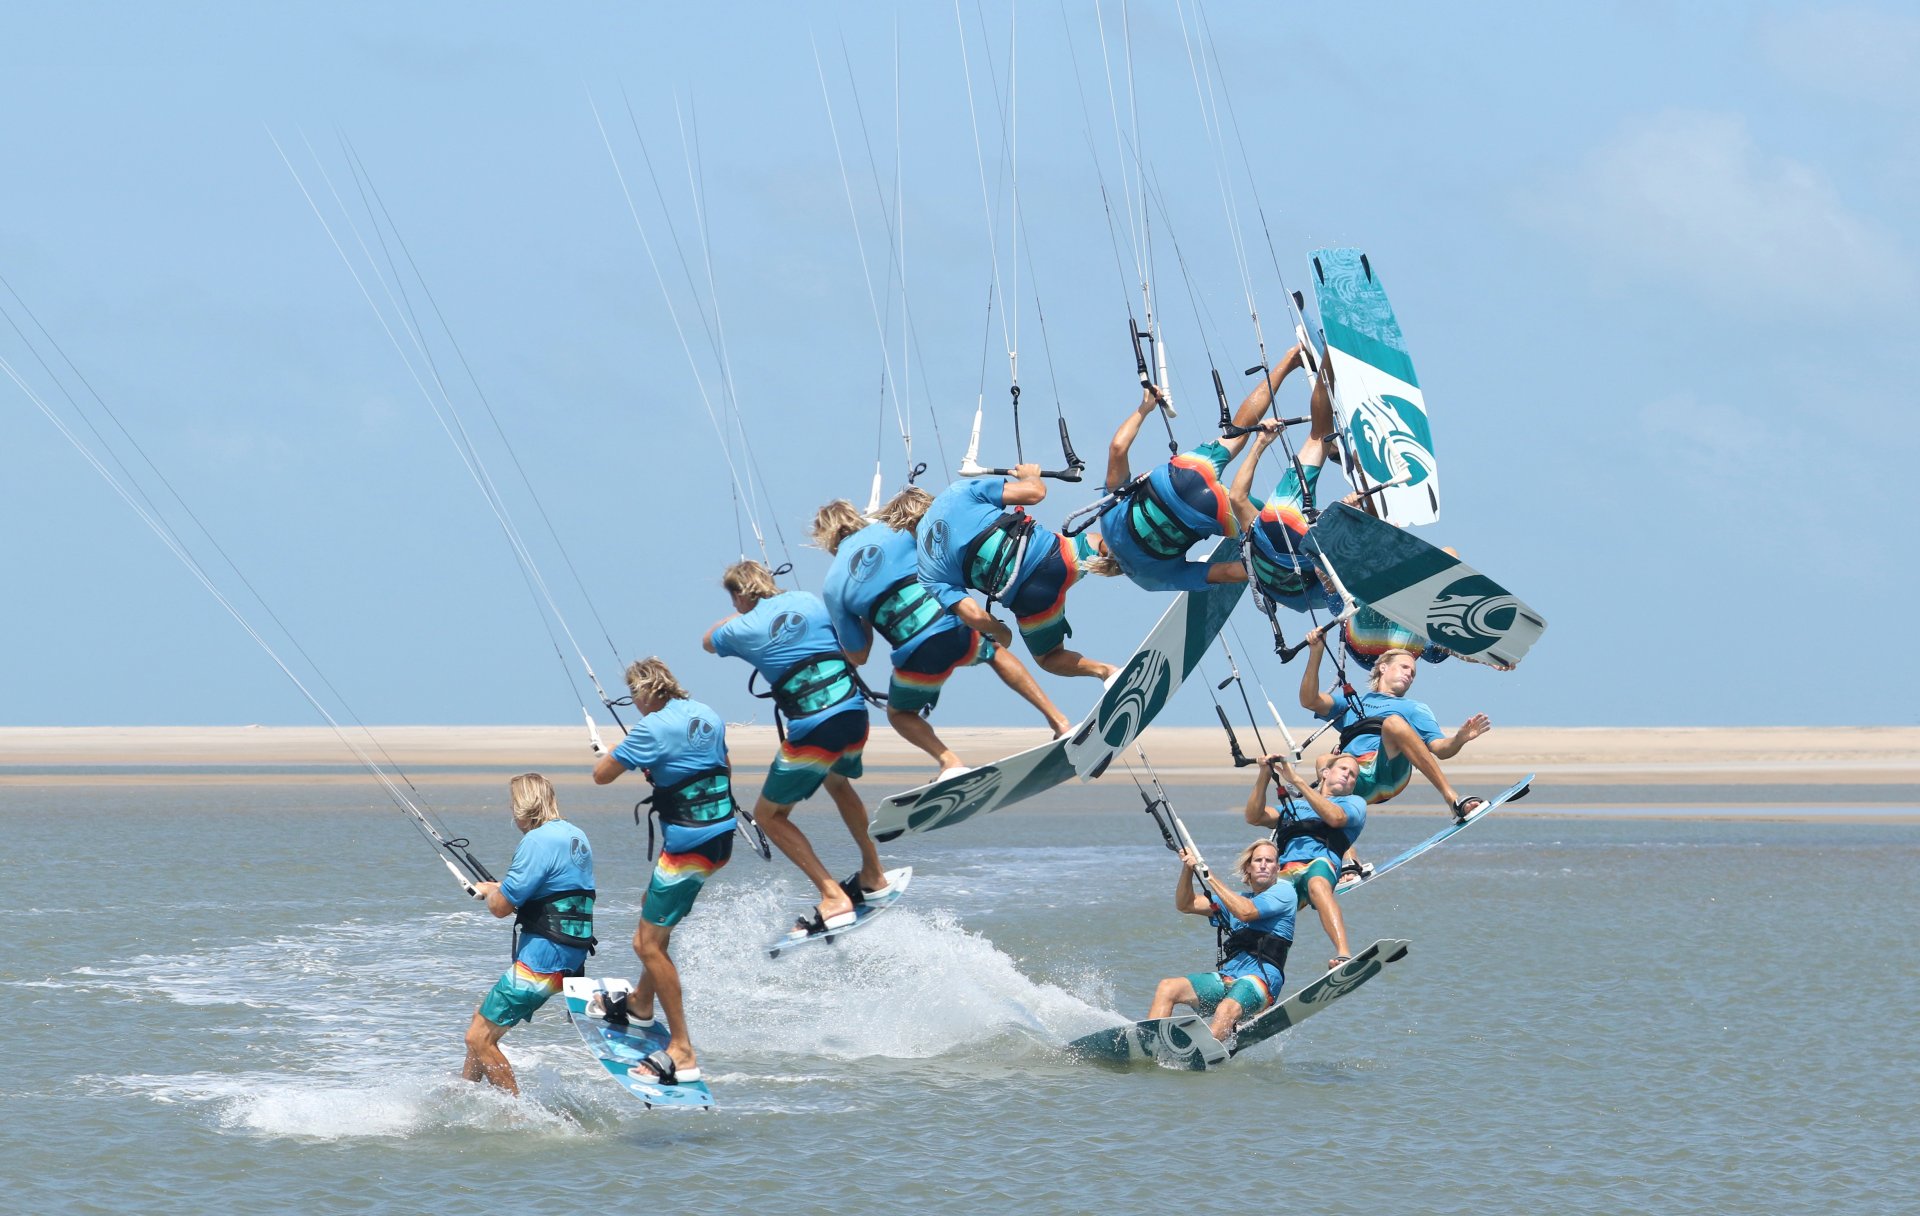
The Send Pic B.
And here comes number two, your second get-out-of-jail card! Your send should be a positive steering of the kite up to just past 12 o'clock. The usual applies, as the kite starts to power, you should feather the bar out to follow the sweet spot, which will also enable you to drop your bum low and resist the lift from the kite. So far, so normal. However, the difference is in the levelling. Normally you'd level the bar and stamp. Here you'll tweak the kite forwards, so the bar goes past level. In this scenario, Christian has sent, feathered, dropped and is about to kick off. BUT, you can see that he has steered the kite forwards a touch. Thus, you don't just stop the kite from going any further back, you actually want it to move a touch forward again!
Your Launch Pic C.
The process. A hefty kick followed by a helpful pull on the bar. You need to make sure you give a serious kick against your edge to counter that extra speed that you carried in and give yourself enough carve to start your back rotation. As soon as you have, pull the bar in, and now you should level it to stop the kite from moving any further forward! In preparation for the inversion, you need to be dropping your shoulders back and lifting your knees. This is a fulcrum movement around your hook. Use your hands to push your shoulders away from the bar, keeping your midriff tight so that your legs start to lift. Looking at Christian, his bar is now level, and he's turned his head into his rotation. He's pushing his shoulders away from the bar, dropping his head back and using this leverage to bring his knees up and board up.
Juggling Pic D.
As you rise and rock back, both your hands have separate yet simultaneous tasks. Release your front hand and reach out towards the nose of your board as you lift both knees. At the same time, use your back hand to let the bar out to the sweet spot. This is essential, as it will allow you to invert and will prevent you from supporting yourself on the bar and steering the kite back. Christian is lifting his knees, his head is rocking back, hand reaching out, and he's let the bar out towards the sweet spot. So far, so good.

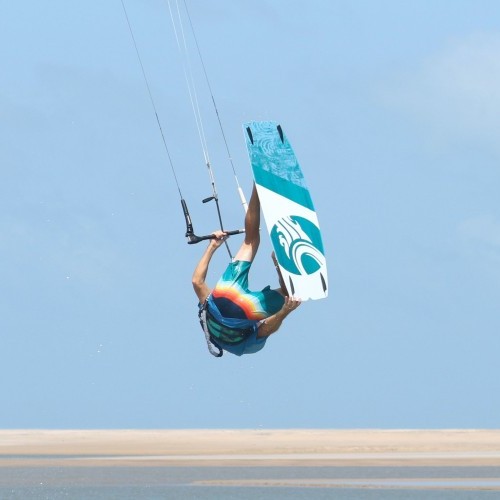
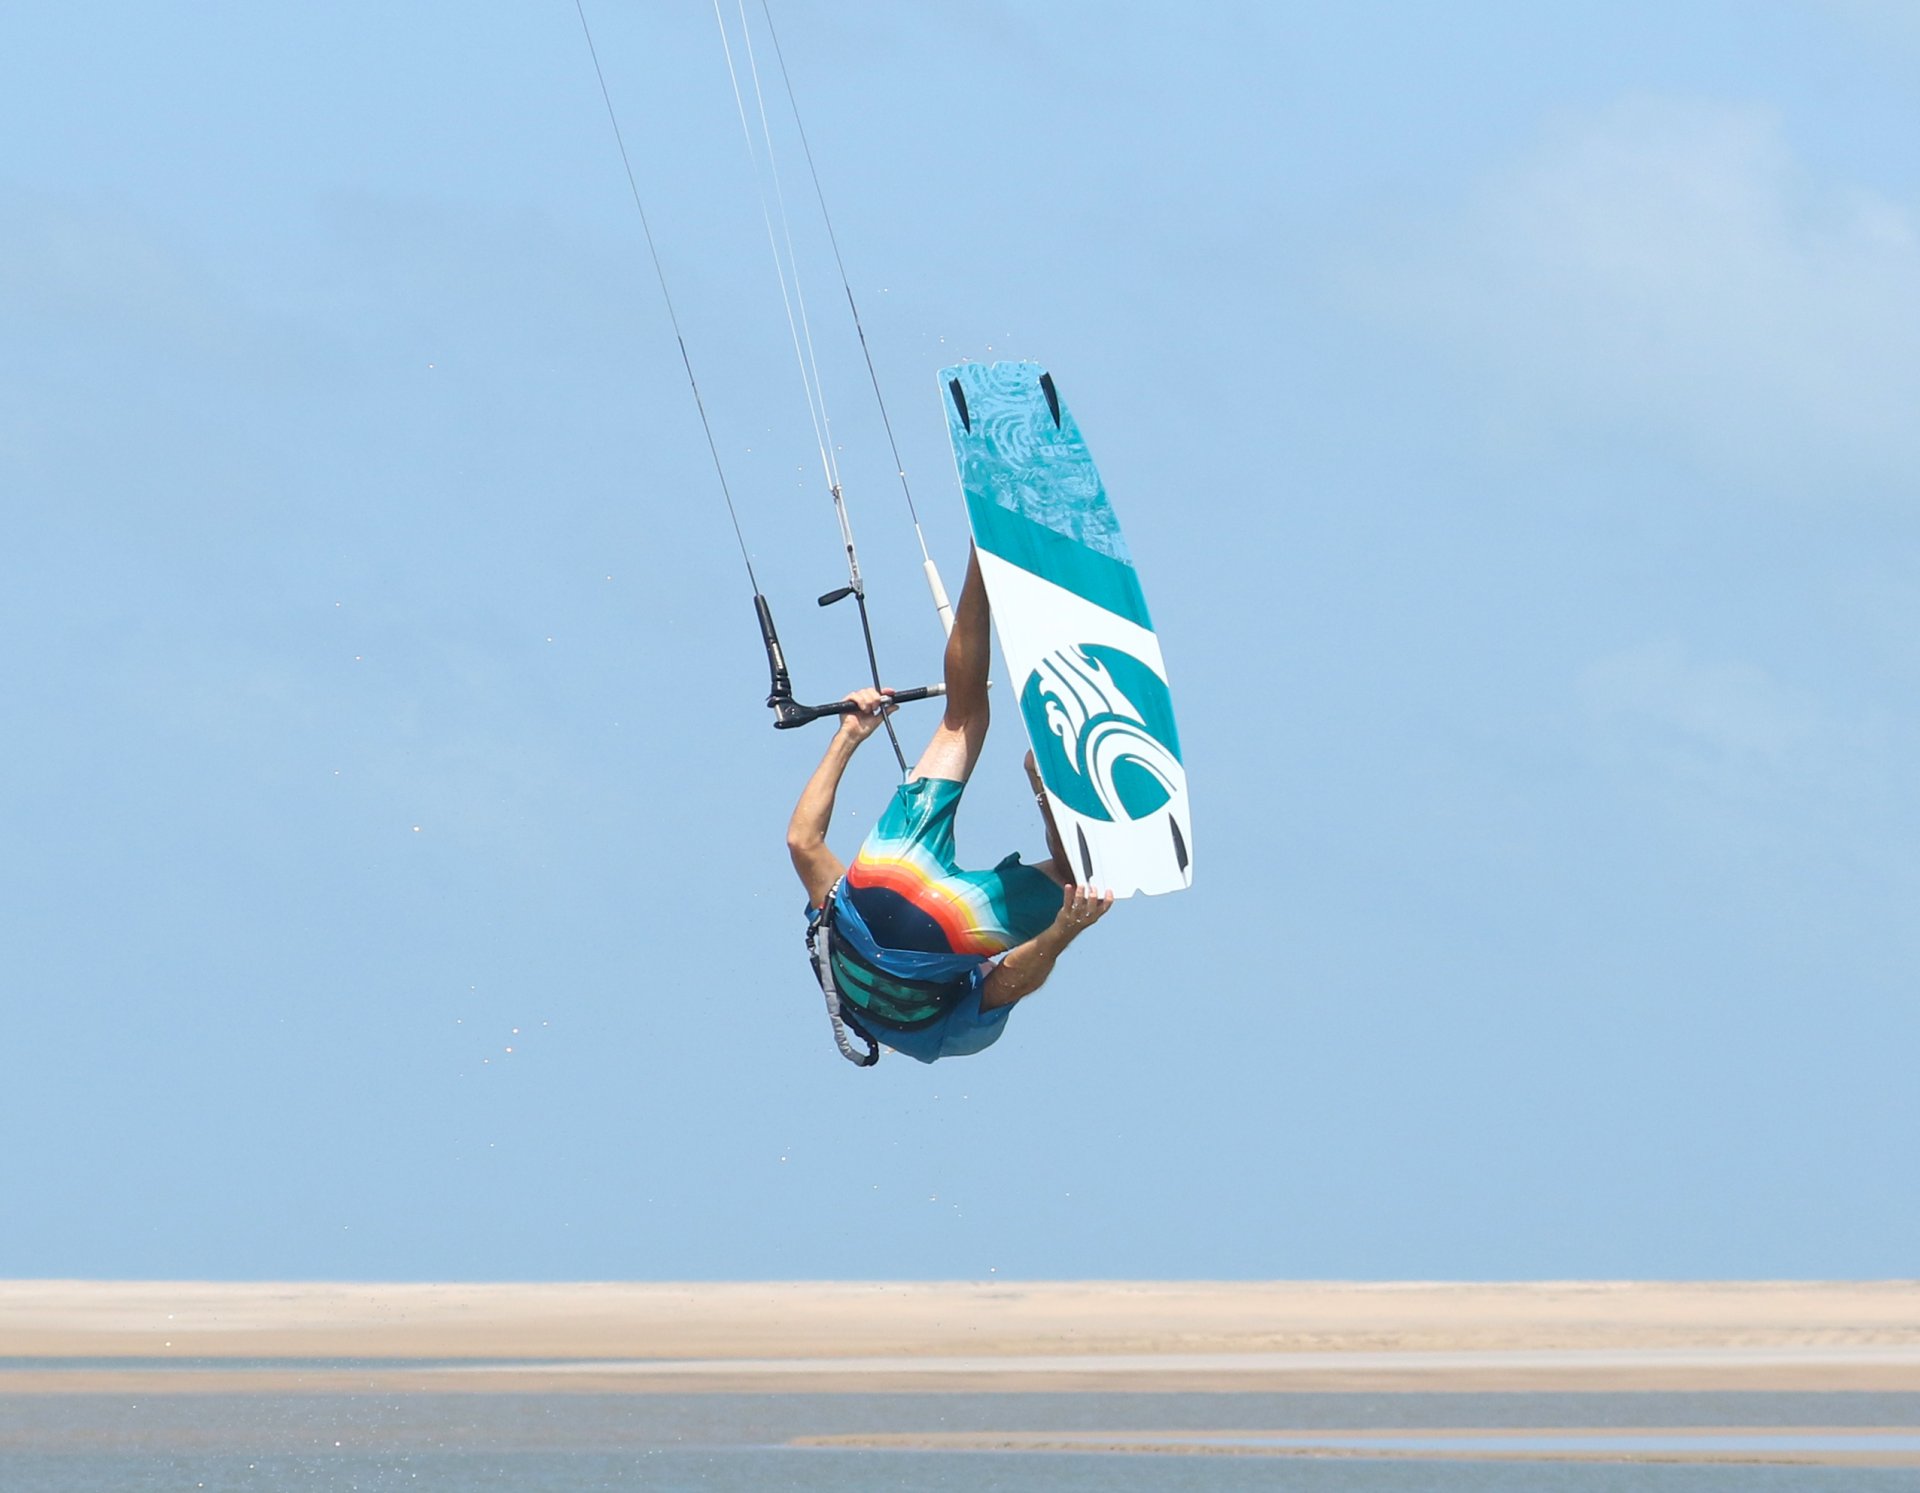
The Money Shot Pic E.
This is your goal. Grabbing the nose of the board, keeping your front leg bent and in close, while boning out the other one, pushing it up towards the heavens. So how do you arrive here from the previous still? It's all about your front shoulder. Up until this moment, your rotation should have been quite slow. However, once you have the grab, you can turn your head, looking down at the water. This will drop your leading shoulder and lever your board up. The trick is to recognise when the board is lifting and, at the same time, extend your back leg to bone it out. The further you drop your shoulder, the higher you'll point your board. Lest we forget, your bar should still be on the sweet spot whilst you make every effort not to hang on it. The main takeaway from Christian in this shot is his bar, level and on the sweet spot, holding the kite nice and steady above him.

Gravity Pic F.
How long you can hold your grab depends on how much float you have but also on the position of the board. As soon as the board comes through the vertical, it will fall victim to the forces of gravity and start to drop. As soon as it does, it's your cue to return your seat to its upright position, buckle up and prepare for landing. Let your legs drop under you but try to keep your knees bent, which will give you a fraction more time to position the board. Release your grab. As your head returns to its rightful position above you, look at where you'd like to land and get your free hand on the bar and dive the kite. In his upright position, Christian has both hands on the bar and is diving his kite with meaning, holding the board up on bent knees whilst focusing on where he thinks he'll land.
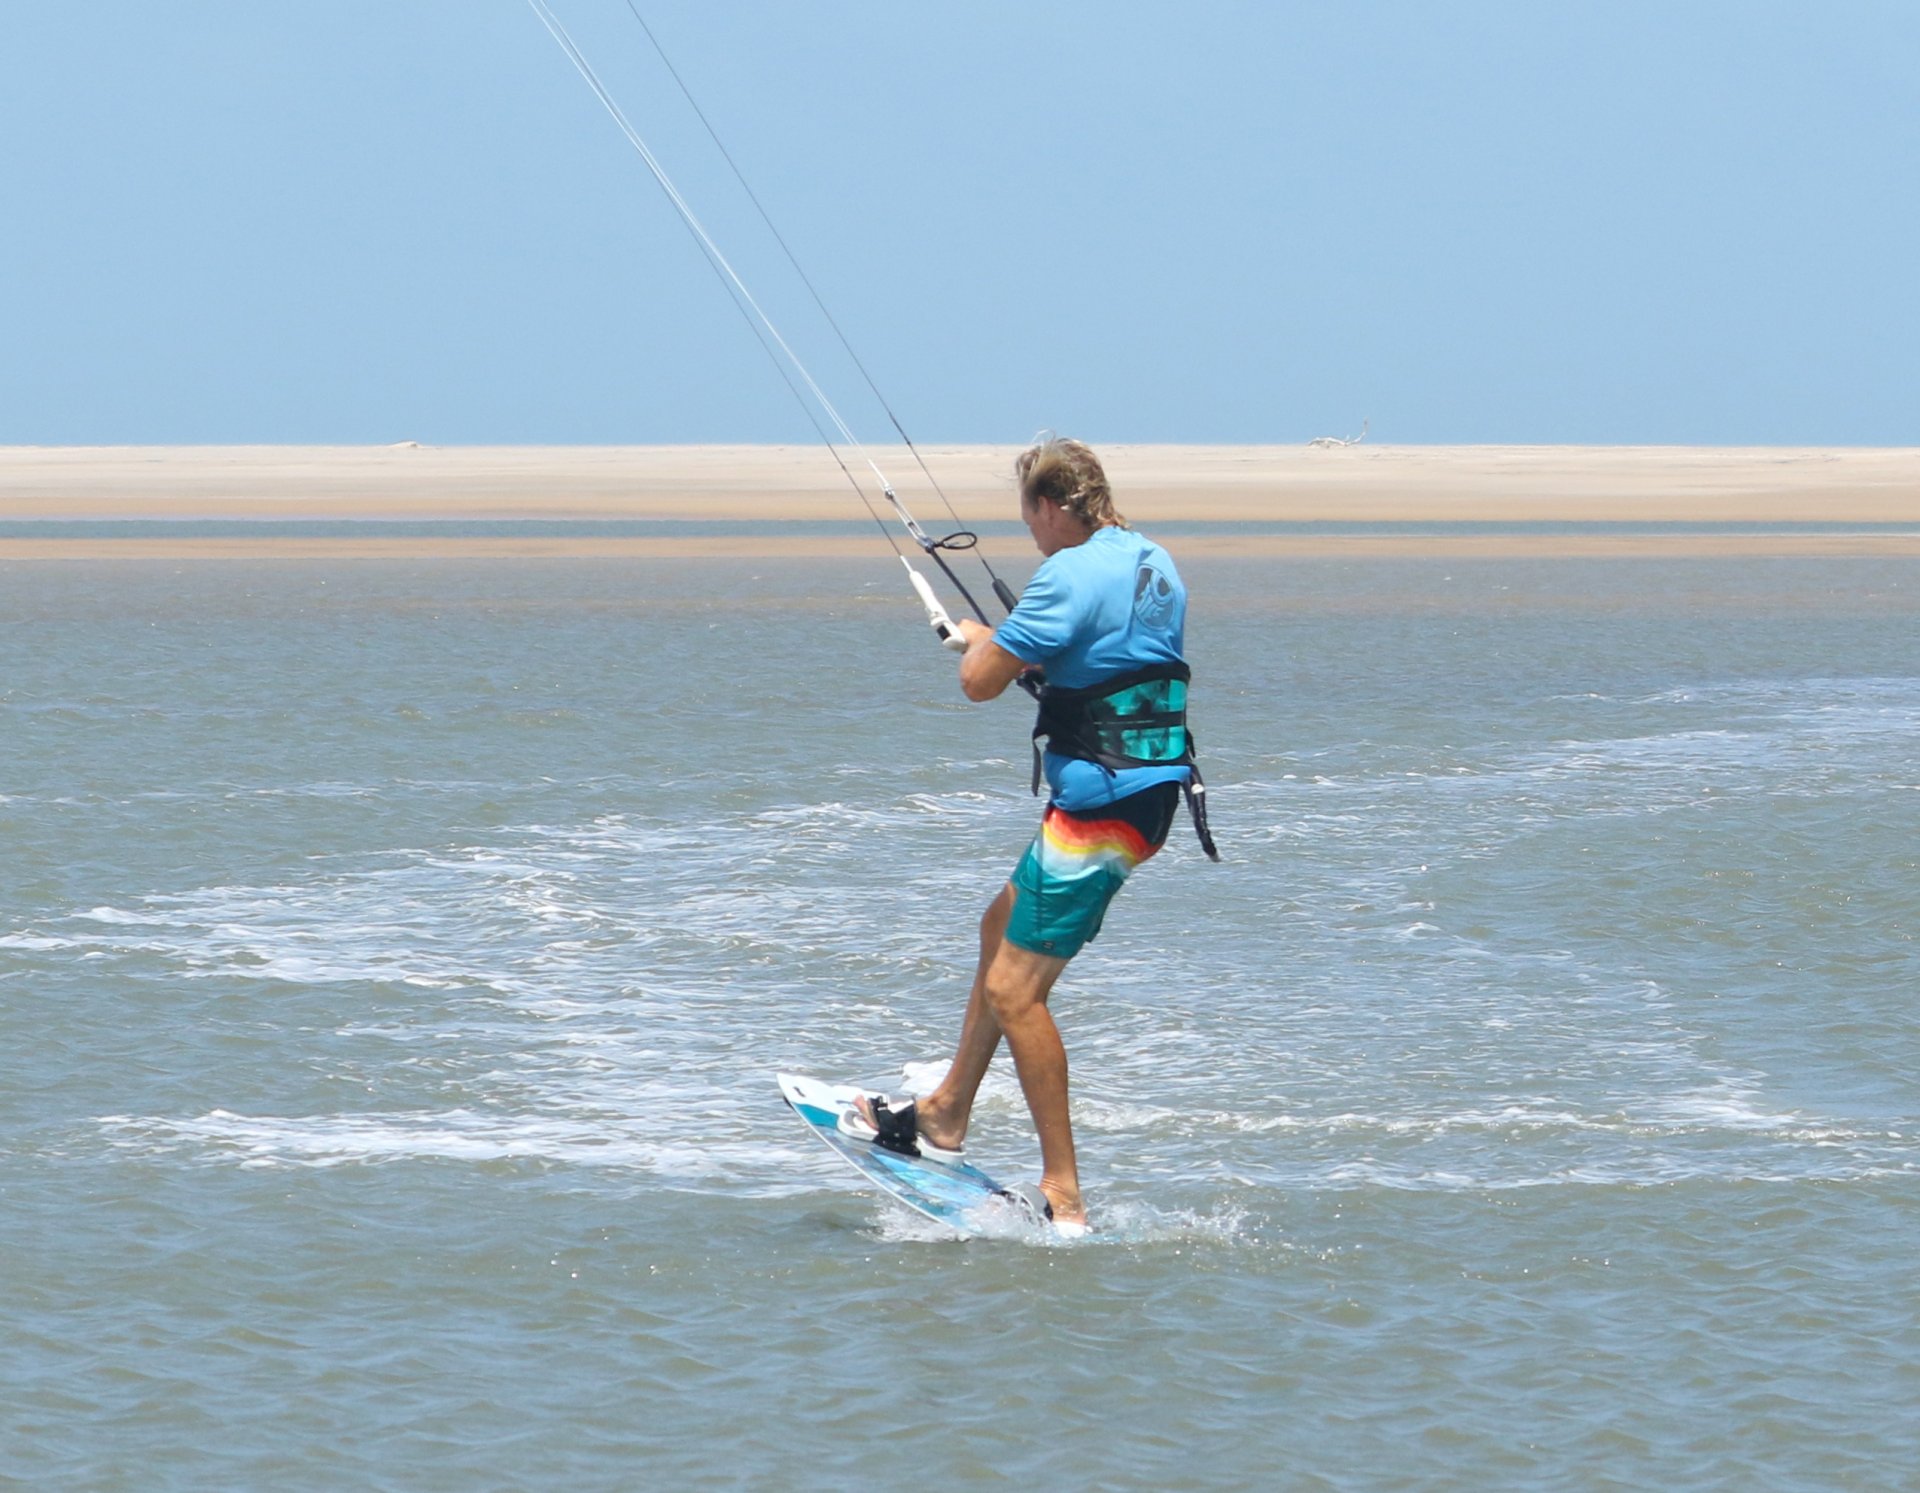
Touch Down Pic G.
Your landing is the result of what went before. If the kite didn't drift too far, it will now pull hard as it dives from up high. As the kite pulls, you can follow the power and aim your board towards it. Touching down tail first on a flat board means that you'll move as long as there is some momentum. And don't forget; if you dived your kite hard, you will need to level your bar again, otherwise it's going straight in the drink. Christian comes down to a relatively soft reception and levels his bar to keep his kite dry.
Top Tips
The cliché, a sum of all its parts, does fit this move rather well. Even if you can back roll, invert, bone and combine them all, the move itself is still a challenge. As such, we can't recommend strongly enough that you get all the ingredients sorted first before combing them into this final tasty morsel.
You can practice the forward redirect with a normal air gybe first, just to get used to the amount you need. It's actually a fun technique that can lead to a plethora of new tricks.
As with all things back roll, a slow rotation is key. If you're spinning into this, you'll struggle to get yourself upside down and boned out, as there won't be enough time.
OK, have a look at the sequence and watch the video to see how we mix all the ingredients into one! 🙂
Common Problems
Unquestionably the biggest problem will be the kite drifting too far back and, as such, you'll struggle to finish the move. The redirect is key, but even so, if you keep the bar pulled in, your kite will move. Feel the sweet spot.
If it's working a treat, but your board isn't boning up. This is the result of scissoring your feet in order to extend your leg. Resist the sensation to bring your extended leg "through". Instead, hold your grab and push both feet up.
Keystones
- Send and redirect forward
- Kick and level
- Fulcrum back and grab
- Shoulder down, bone up
- Level, level, level - dive

This technique article was in Issue 97 of IKSURFMAG.
Related


By Christian and Karine
Christian and Karine have been working together as a coaching team, running improver to advanced kitesurfing clinics since 2003.
