
Air Gybe to Toeside
Technique / Intermediate
Introduction
Rather than being an extension to one of the most popular transitions, the Air Gybe landed to toeside is in fact a very good way to learn an Air Gybe. Why? The answer is all about playing to your strengths. Most of us have a stronger or preferred side, the foot that we like to have leading. This side was the no doubt the first direction we managed to consistently go up wind on, then it opened it arms further and offered us our first jump. In fact even as most kiters progress towards the advanced ranks, they still harbour a favourite.
Now when it comes to learning the air gybe you need to do it both sides, that’s a given. However the taking off and jumping part will invariably be on one’s good side. Only problem is that once its time to descend and sail away it all goes wrong. You are forced into landing on you not so preferred side and as a result feel rather wrong footed. However if you try and land toeside you’ll effectively be landing preferred foot forward, genius.


If you’re not sure what an air gybe to toeside is take a look at Video 1. In essence it is a small jump performed with minimal speed, but instead of redirecting the kite forward as you come down and continuing, you dive the kite back the other way, land toeside and sail back towards whence you came.
To state the obvious it will help no end if can jump and ride toeside, preferably in opposite directions! As a bonus have a read of our Air Gybe in issue 3.
What’s Hot?
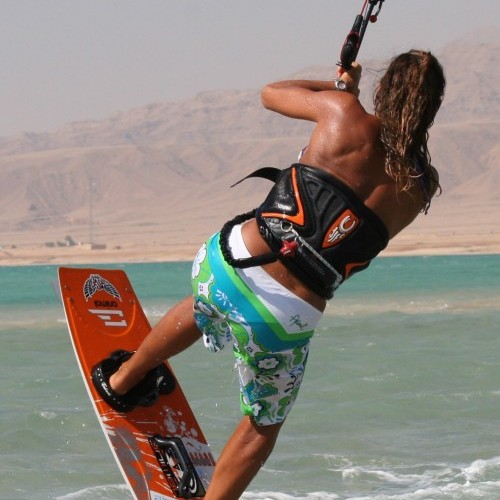
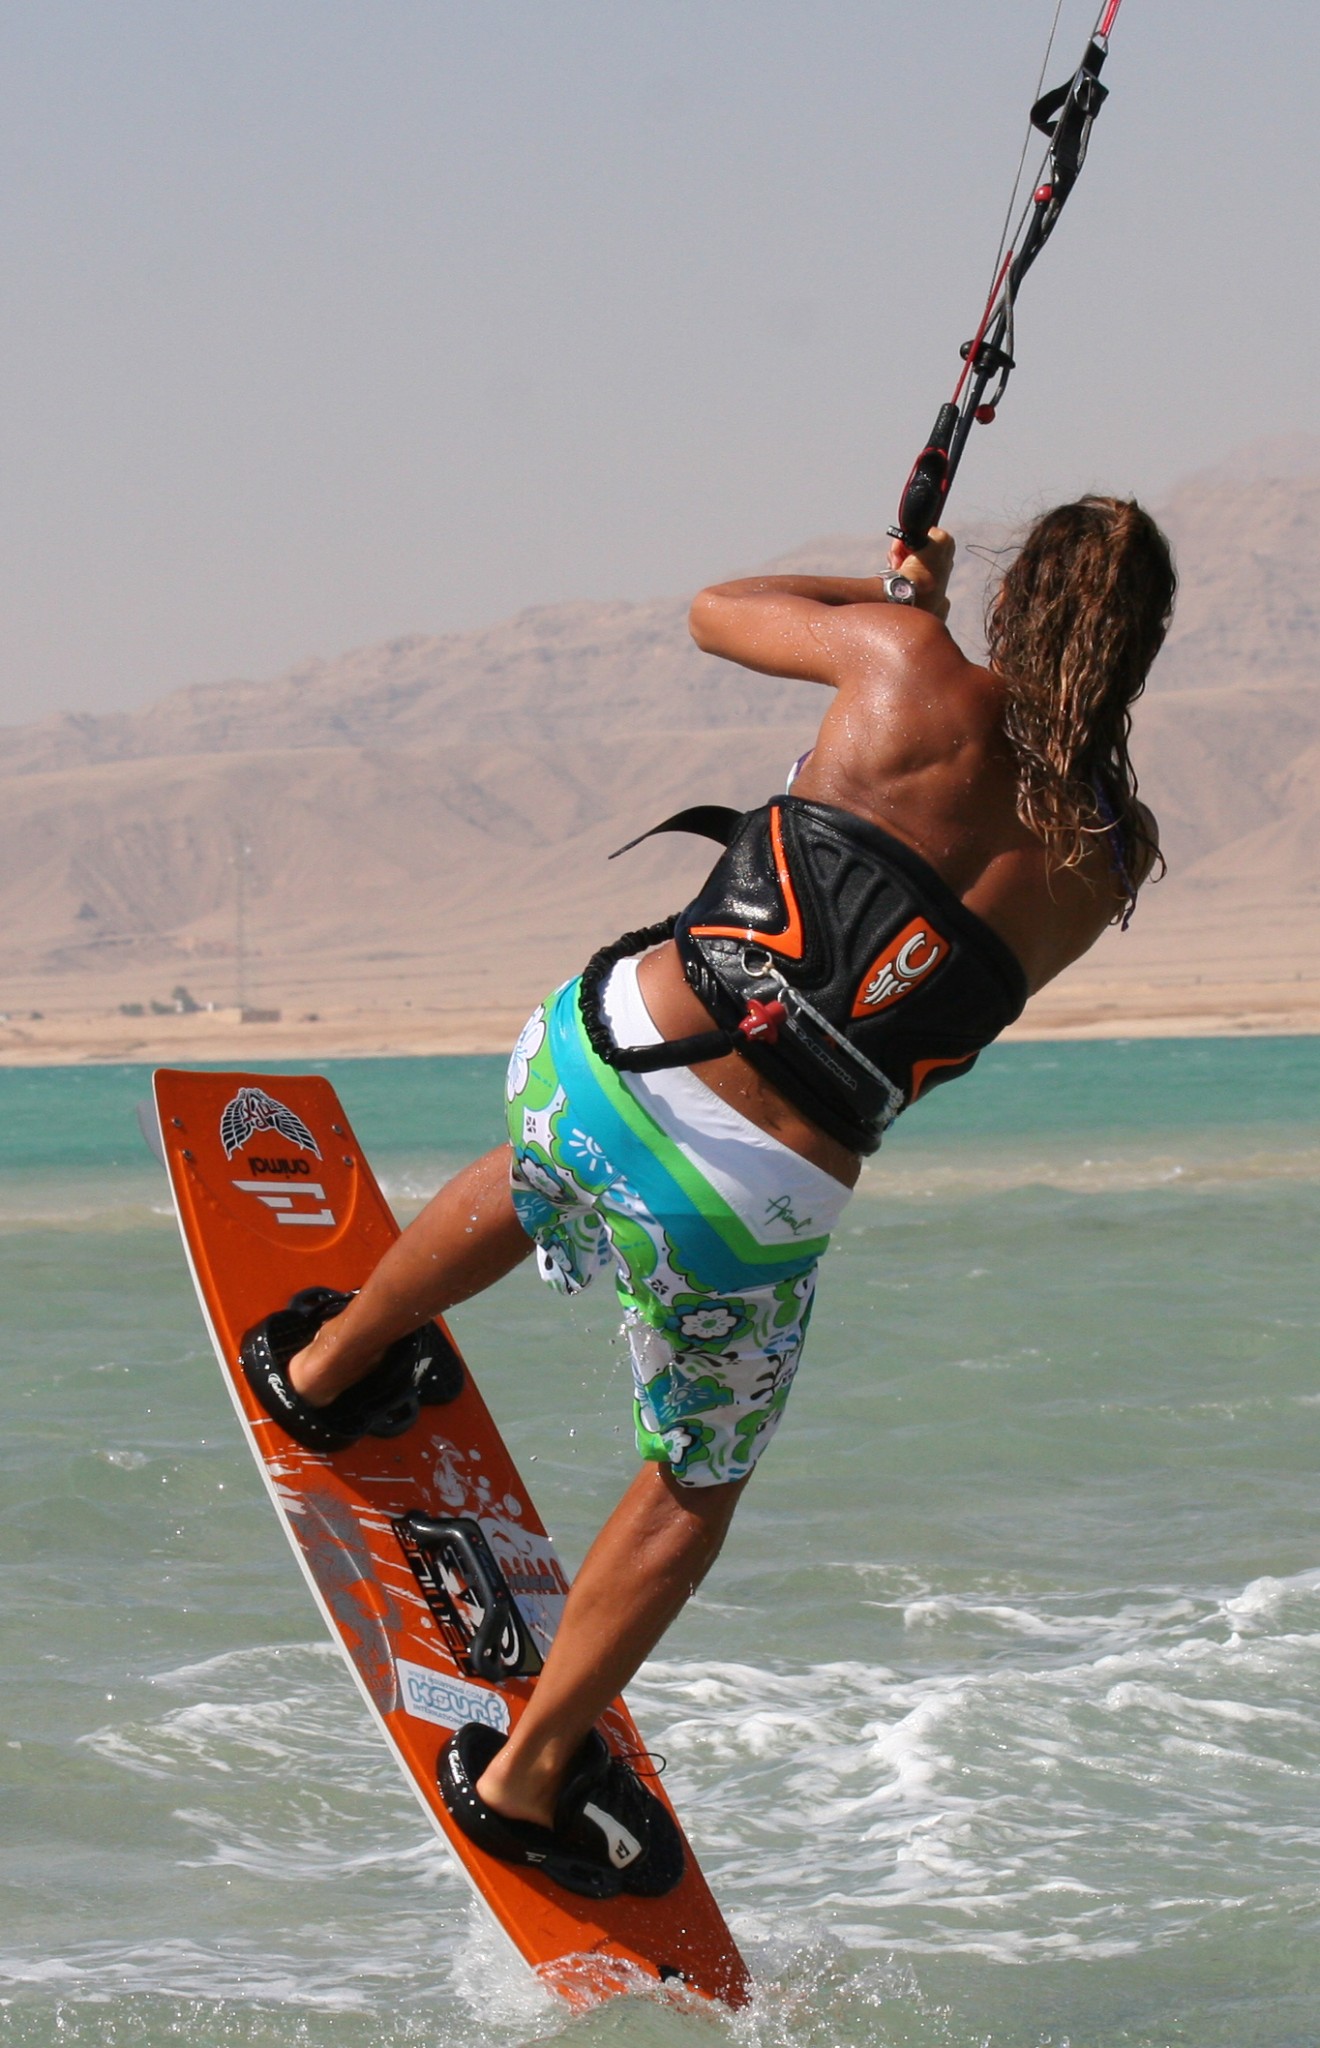
For this move, there are five absolutely crucial parts, which when combined correctly will give the goods. If you would like a view from downwind have a gander at Video 2. For the record if you haven’t guessed Karine’s favoured foot is her left one, so she’s jumping going left and landing coming right.
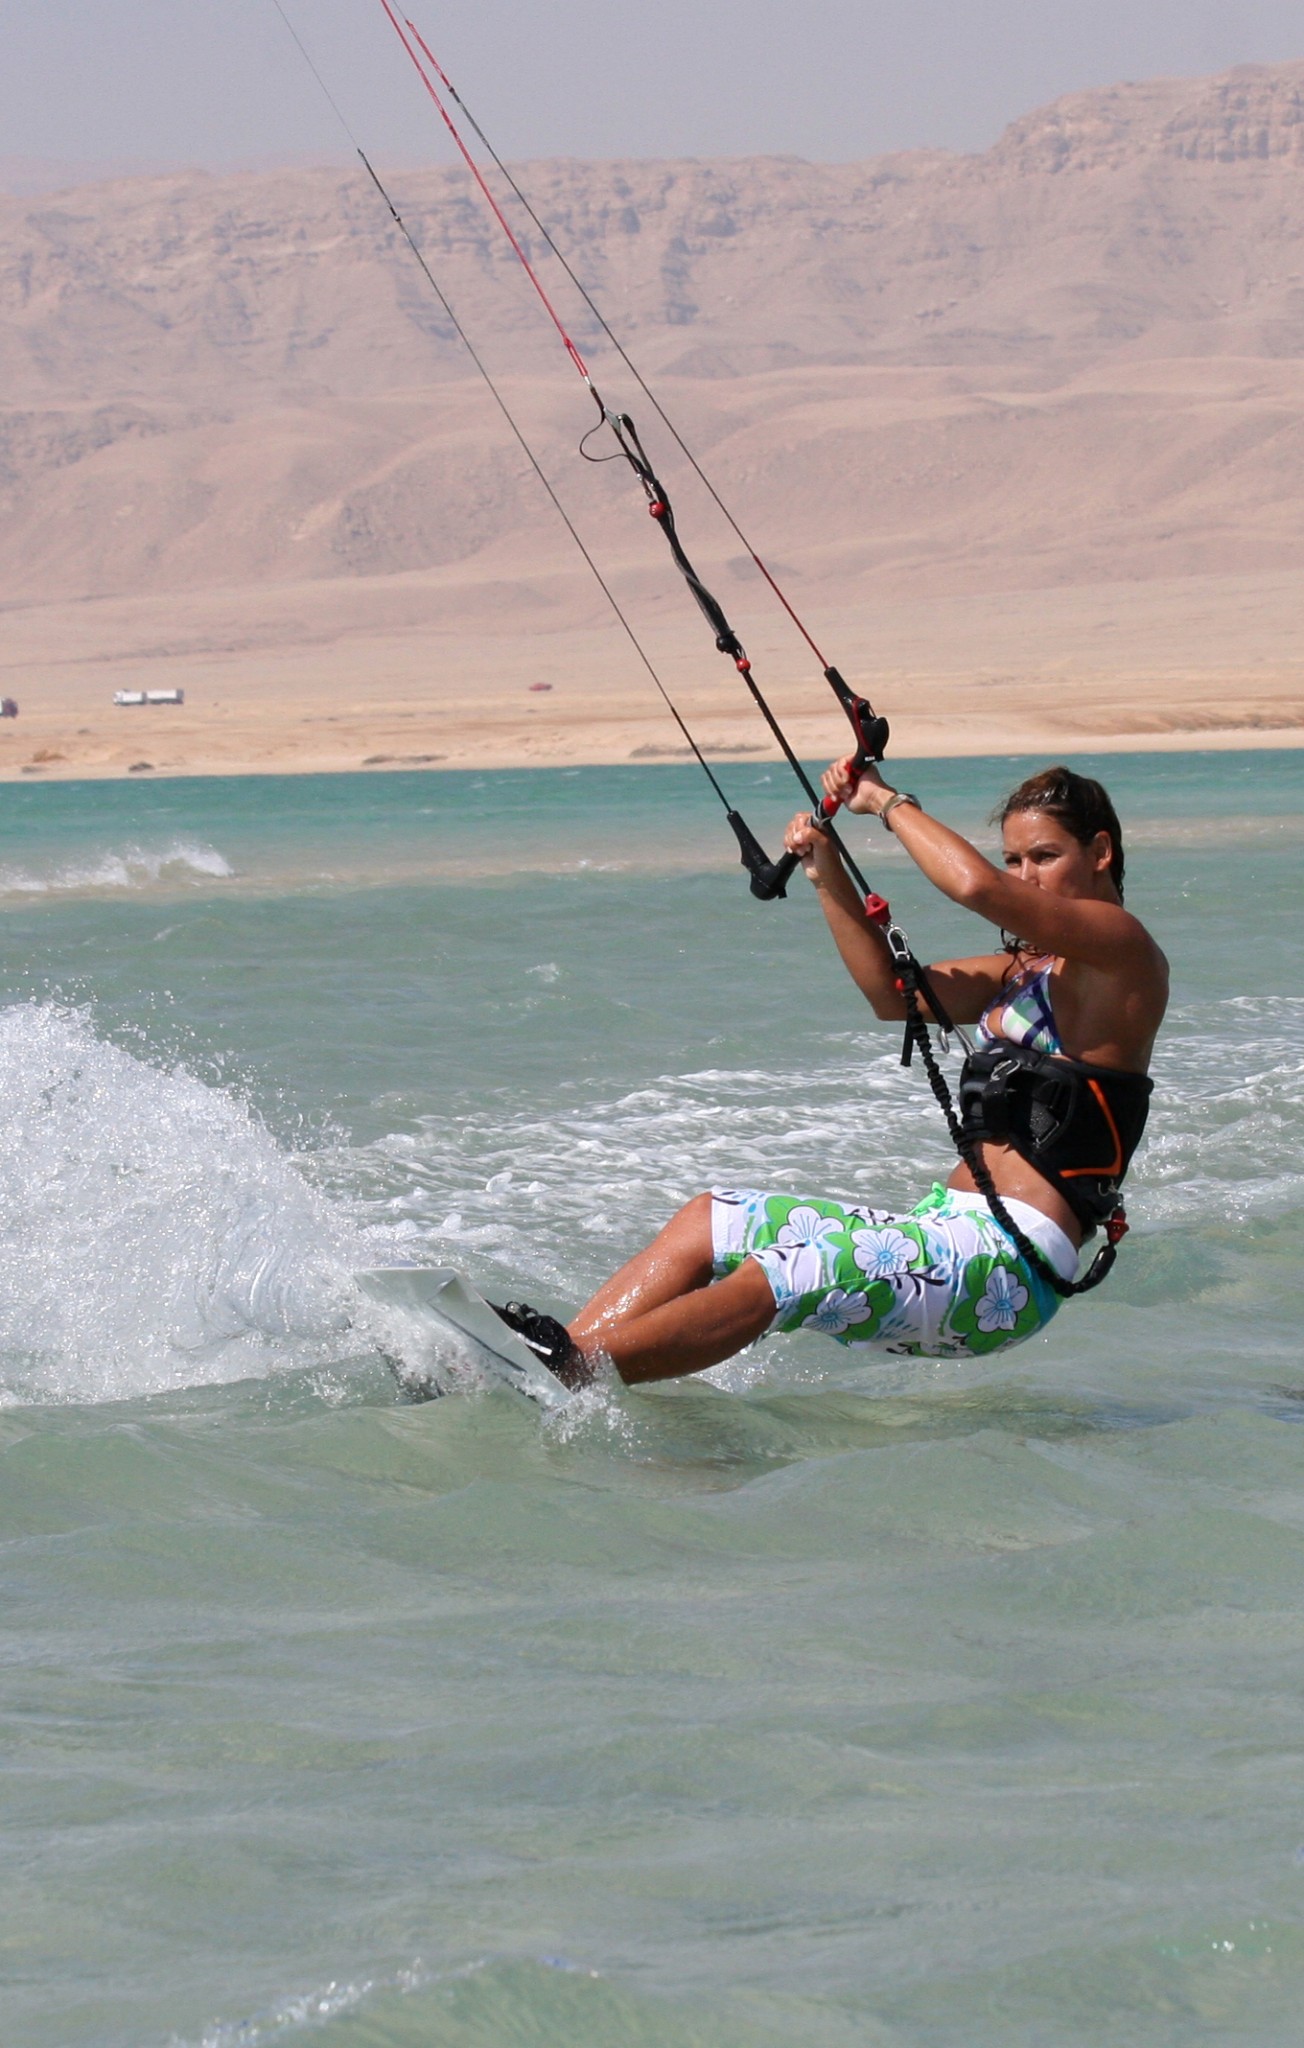
1. The Approach
This part of an air gybe differs from that of a normal jump because you don’t want to be flying through the air at high speed. If you do, your momentum will be carrying you forward, and therefore it’ll be jolly hard to land travelling in the opposite direction. Much like trying to get a car into reverse whilst still moving forward at speed, but potentially less expensive.
In Pic A. you can see Karine carving up in preparation for her take off, similar to a jump. The difference however is that before sending the kite, Karine carved hard into wind. This way she scrubbed off any unwanted speed so that when she takes off she will only go up and not forward. Looking at her bar its evident that she sent the kite back aggressively by pulling hard on her back hand, as opposed to steering it slowly up.


You should still approach the air gybe on an edge and with some speed, as you need power in the kite. The kite should be positioned at around 11.15 or 12.45. Then carve hard into wind by looking over your front shoulder, twisting your hips upwind and pushing down on your back foot. As you slow you should then send the kite hard with the back hand.
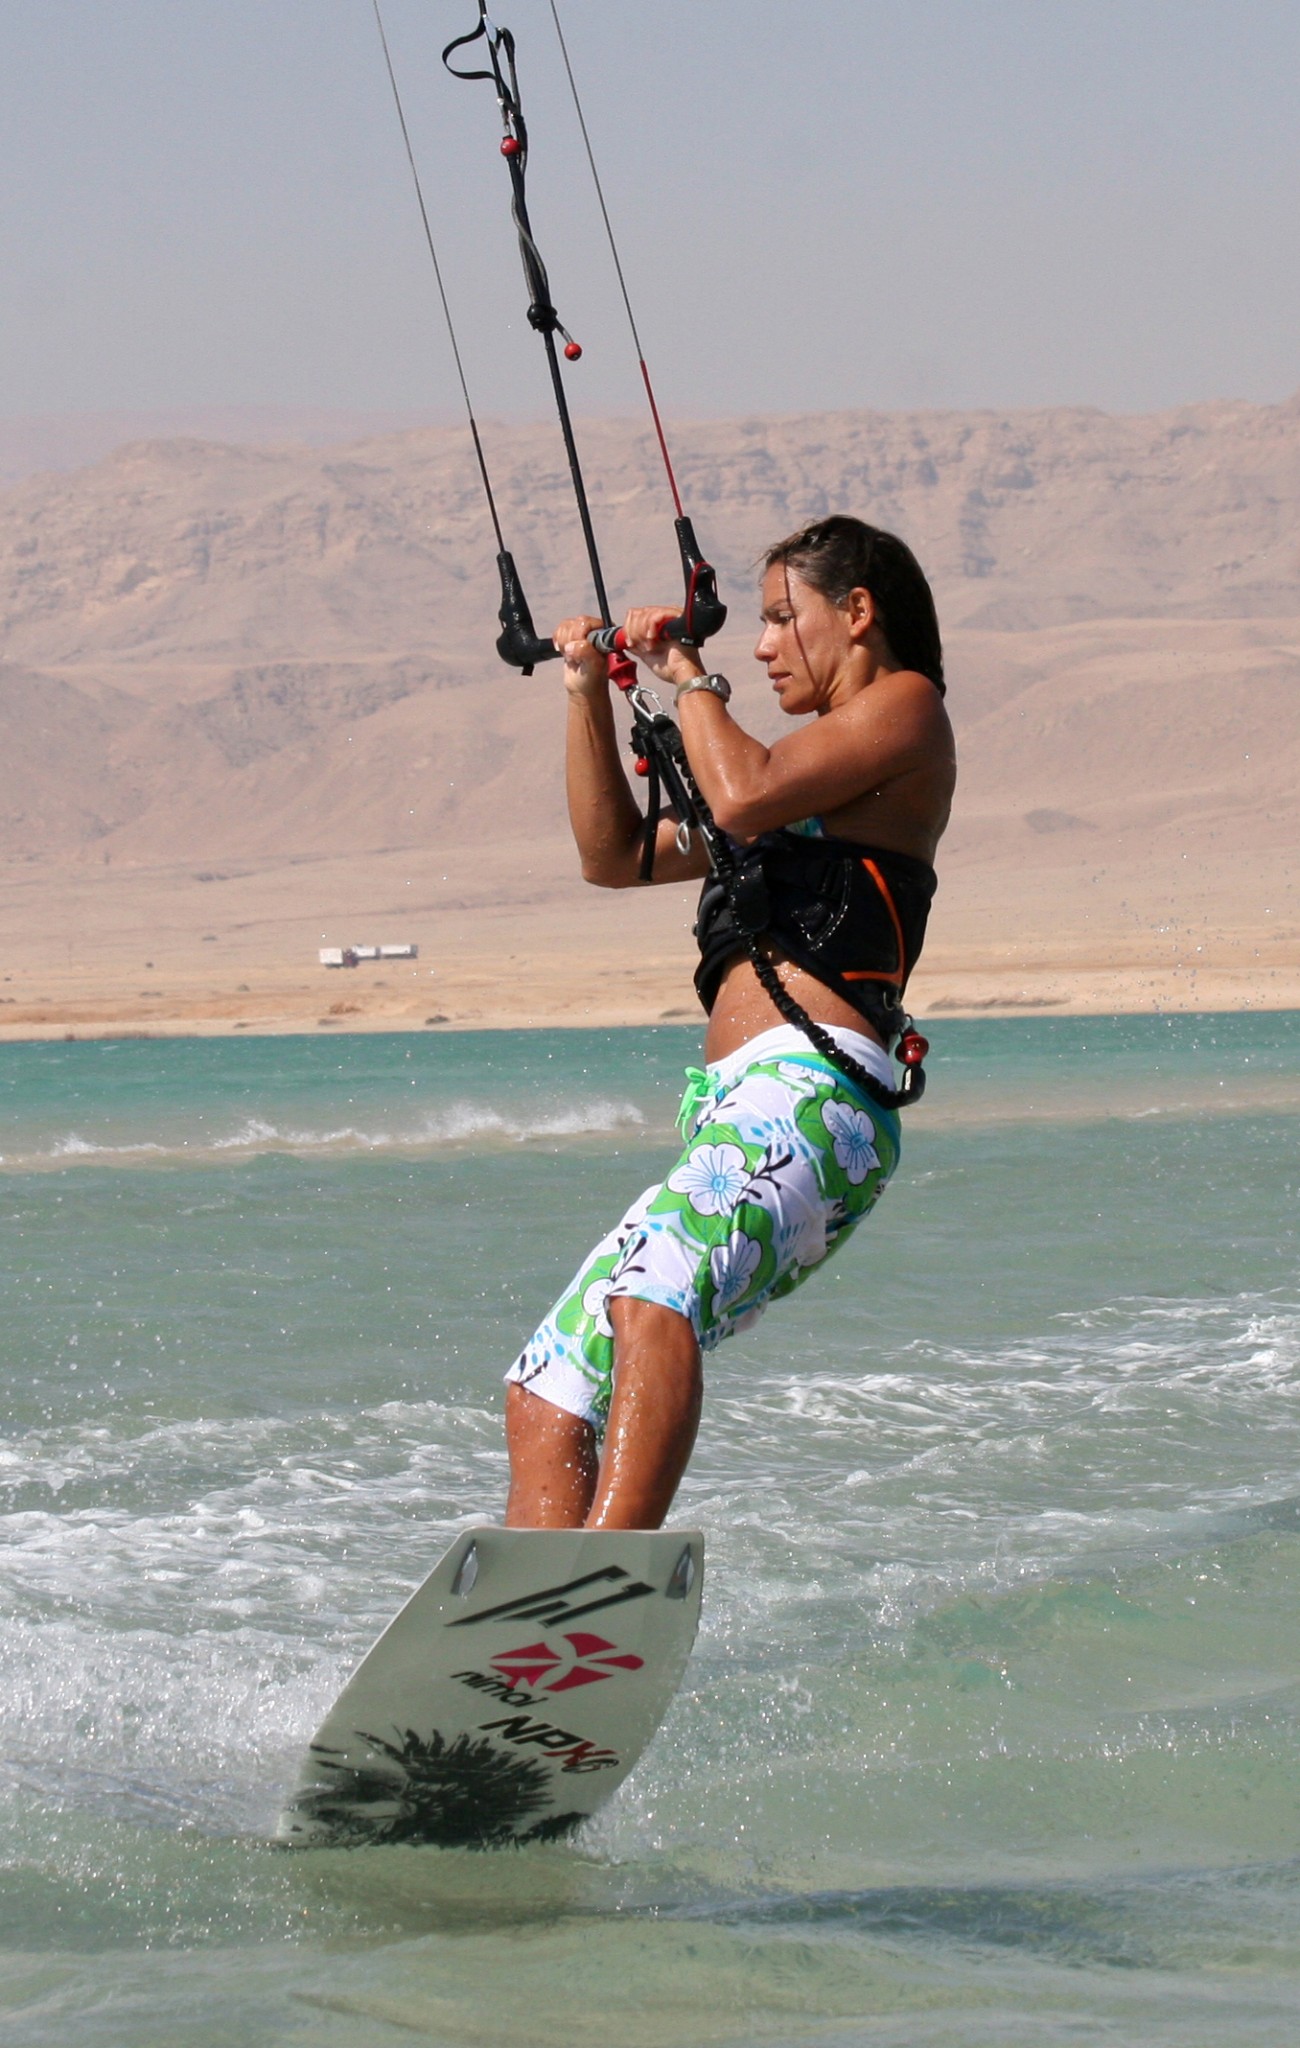
2. The Take Off
The next part of the air gybe is very different from the jump. As already mentioned your aim is to go up and not along. Without the speed it can happen that you just stop and sink. To avoid this you’ll need to stir some good old-fashioned pop into the pot.
In Pic B. Karine is just taking off. Looking from top to toe you can firstly see that her head is looking straight downwind as that is the direction she hopes she’ll go, not forward. Secondly you can see that she has her bar pulled right in and it is parallel to the water. This will give her a bit of lift and with tension on the lines she can stop the kite going too far back. Finally look at her back leg, which is fully extended. She has kicked down hard off her back foot by suddenly extending her leg against the edge of the board, jumping up into the air and giving the kite a helping hand to get her airborne.
Even though you send the kite hard you need to pre-empt the take off rather than wait to be lifted up off the water. So once you have sent the kite, as soon as you feel it start to lift, rather than resist more, jump up off you back foot to get into the air. As you do this you can then bring your hands to your hips, which not only gives you some extra lift but also brings the bar parallel with the water, which stops the kite flying too far past 12 o’clock.
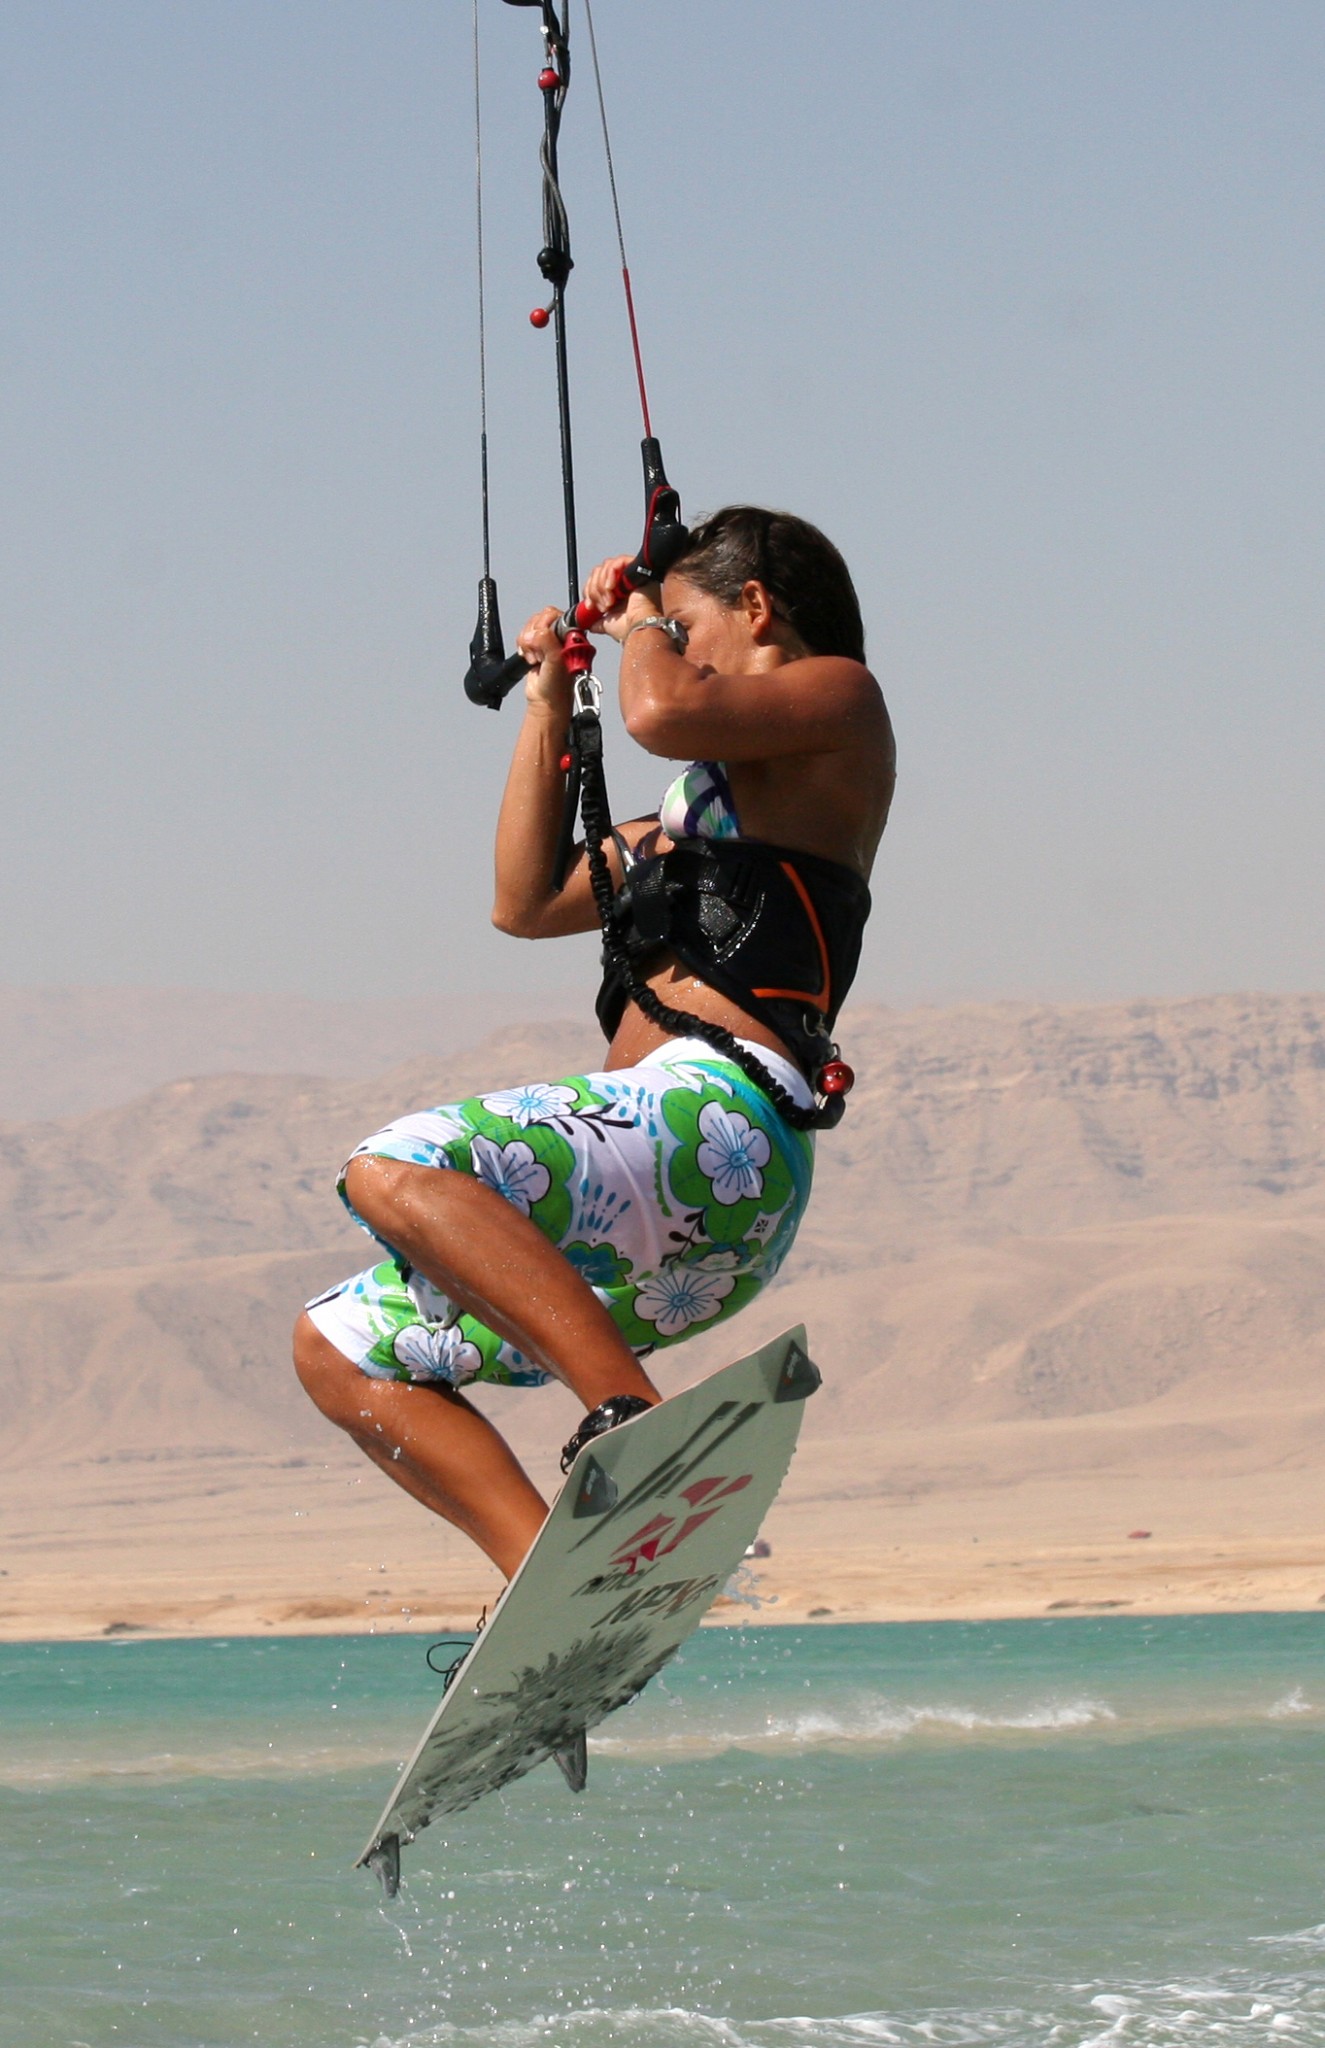
3. The Big Chill
Once you start going up it’s all about patience. Your job here is to get into a balanced floating position and wait, nothing more, nothing less, until you start to drop. So it may be a second or it may be three depending on how much height you have.


Pic C. clearly shows that Karine still has her hands to her hips. The kite is therefore still above her, and the lines are tight so it will respond when Karine needs it to. Karine is still looking downwind, as she is floating that way, even though her body is still twisted slightly up wind from the take off. Karine has pulled her legs up, knees towards hands, so that she is small and balanced in the air.
Effectively this is your ready position. Here you have control of the kite, and you are stable, so that when the time comes to move the kite and change body position it can all happen in a jiffy.
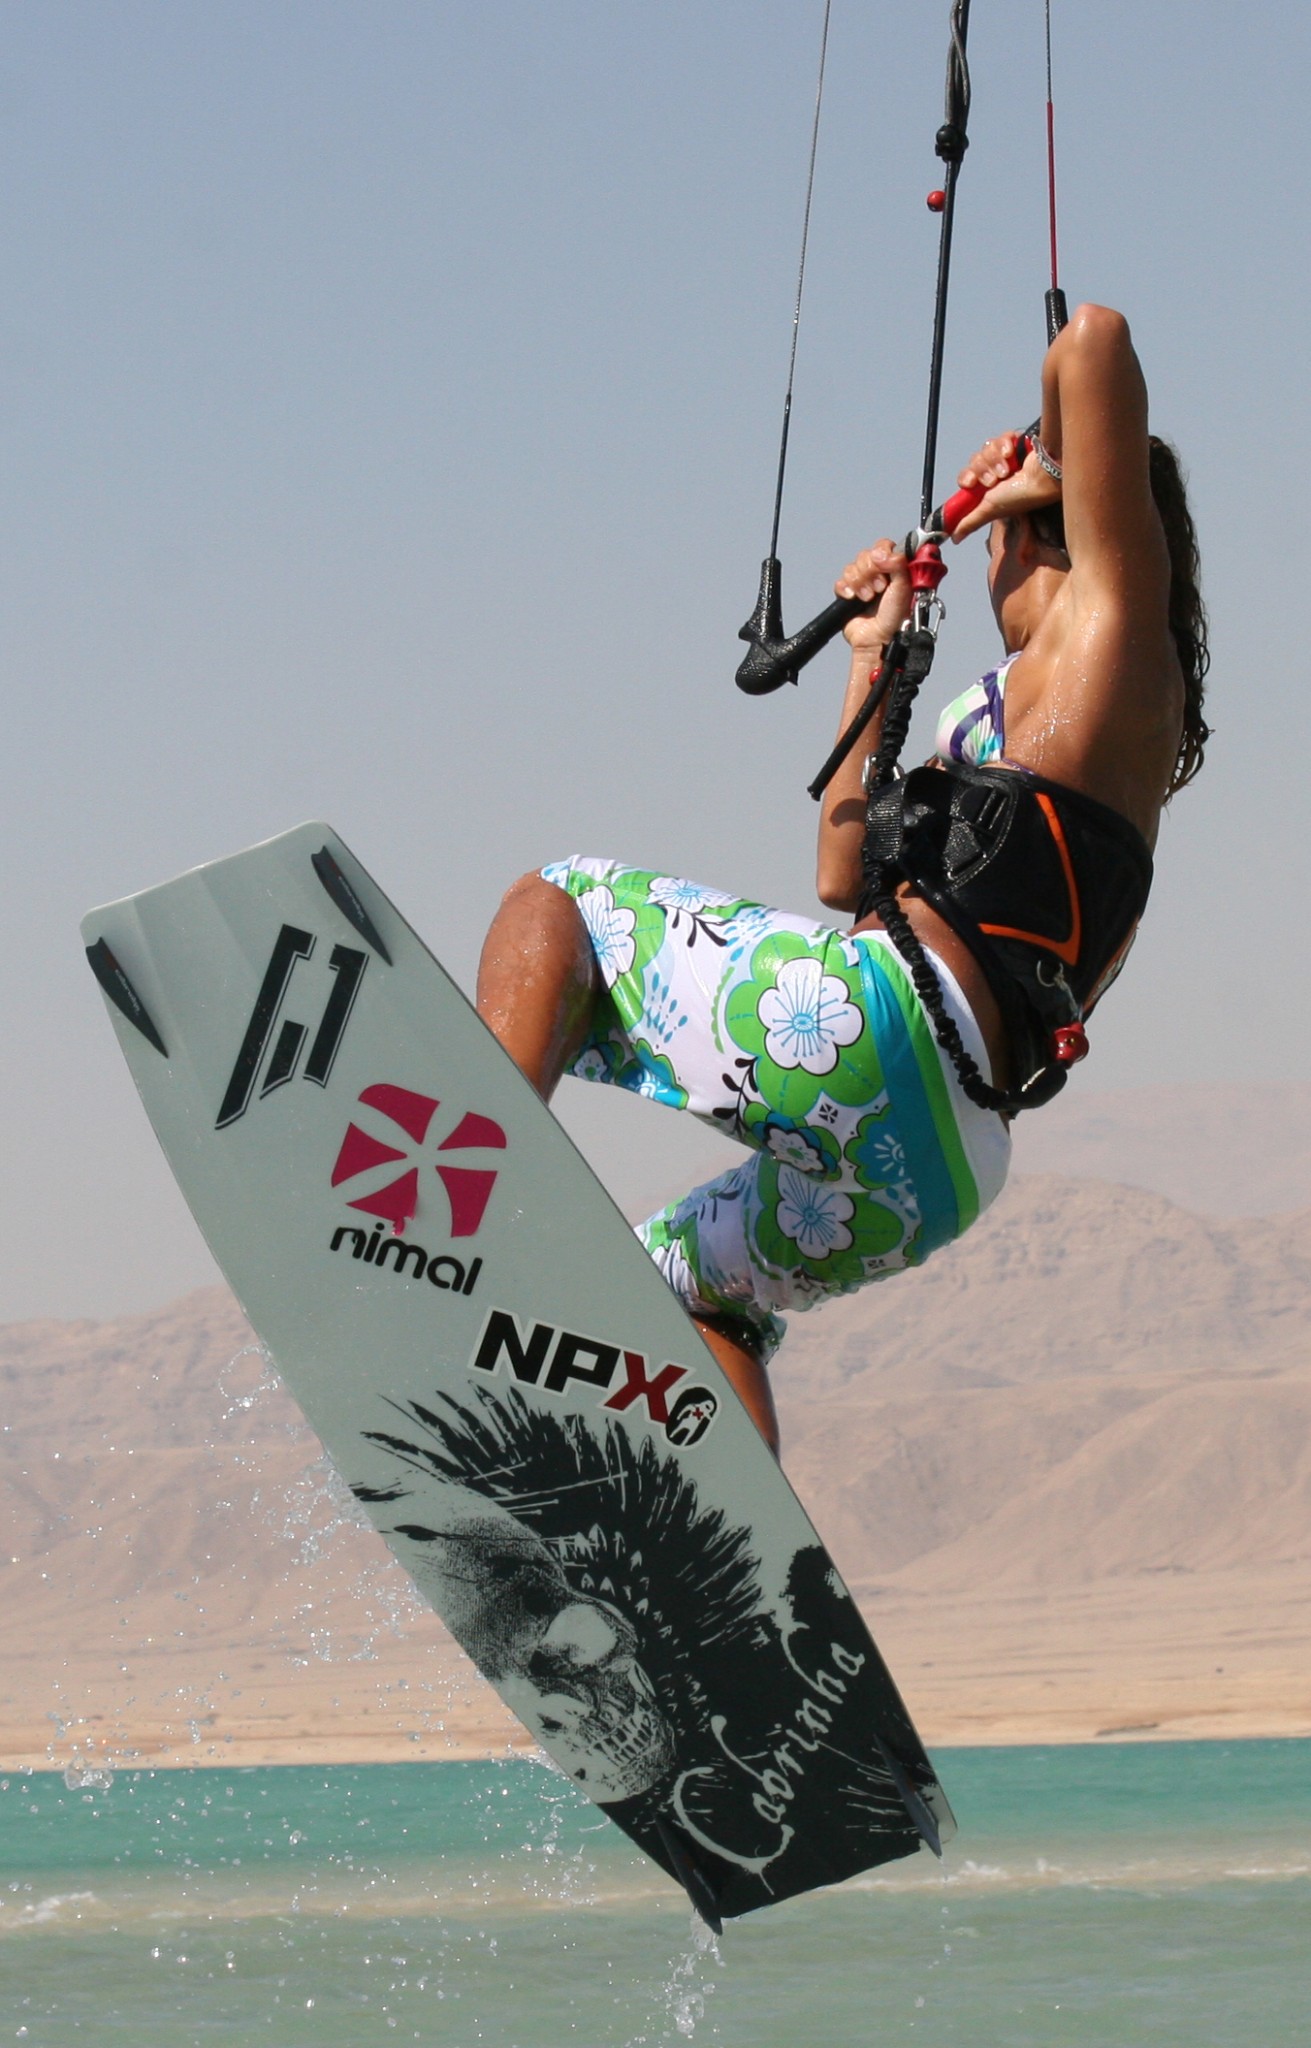
4. Dive Captain
Once you feel yourself dropping from the sky its all hands to deck. This is the make or break moment where most people falter, and the key is commitment, the whole 9 yards.
In Pic D. Karine has felt the lift go and knows that she is on her way down. To make sure she has enough power to move and not sink on landing she needs to dive the kite hard, really pulling down on her right hand and keeping the bar in so that the kite will turn. Knowing that this will pull her gently the other way she turns her head to look where she’ll be going. Her knees are still up for balance.
To land moving you need the kite to be pulling from downwind of you, so you need to dive it with real aggression, so that it flies down through the window. Because the kite will be above or slightly behind you, it will respond slowly even if you give the bar a good tug. If you are gentle and steer the kite down, it will travel around the edge of the window, giving you no support or pull and you’ll just plop down into the depths.


5. The Toeside Bit
If you are jumping on your strong side and hoping to land on your strong toeside side, this bit will be a lot easier than you can imagine. Think of it as landing dead downwind with your strong foot forward, and then carving onto your toes.
Pic E. Karine does two things to get herself around to toe side that we would all do on the water to get to toeside. Once she has dived the kite and feels a tiny bit of pull she twists her shoulders around, pivoting her left shoulder up and over as her right shoulder turns down and around towards the wind. By dropping her right shoulder it also makes it easier to land tail first, which will in turn allow her to pivot around her back foot and carve out on her toes.
With your strong foot naturally wanting to come forward, by turning your shoulders you allow it to do so. Sweet.
Time to Try
Before looking at the sequences and then hastily making your way out to sea, a couple of words of warning. Firstly do make sure that you have some depth under you. If you get this wrong and the kite flies too far behind you won’t get spanked, but you will fall like a stone. So some cushioning H2O will keep your posterior happy. Secondly don’t try this next to the beach or anything else vaguely solid. You may pendulum under your kite and swing slightly further than you reckoned, yet again treating your behind to a bruising reception.
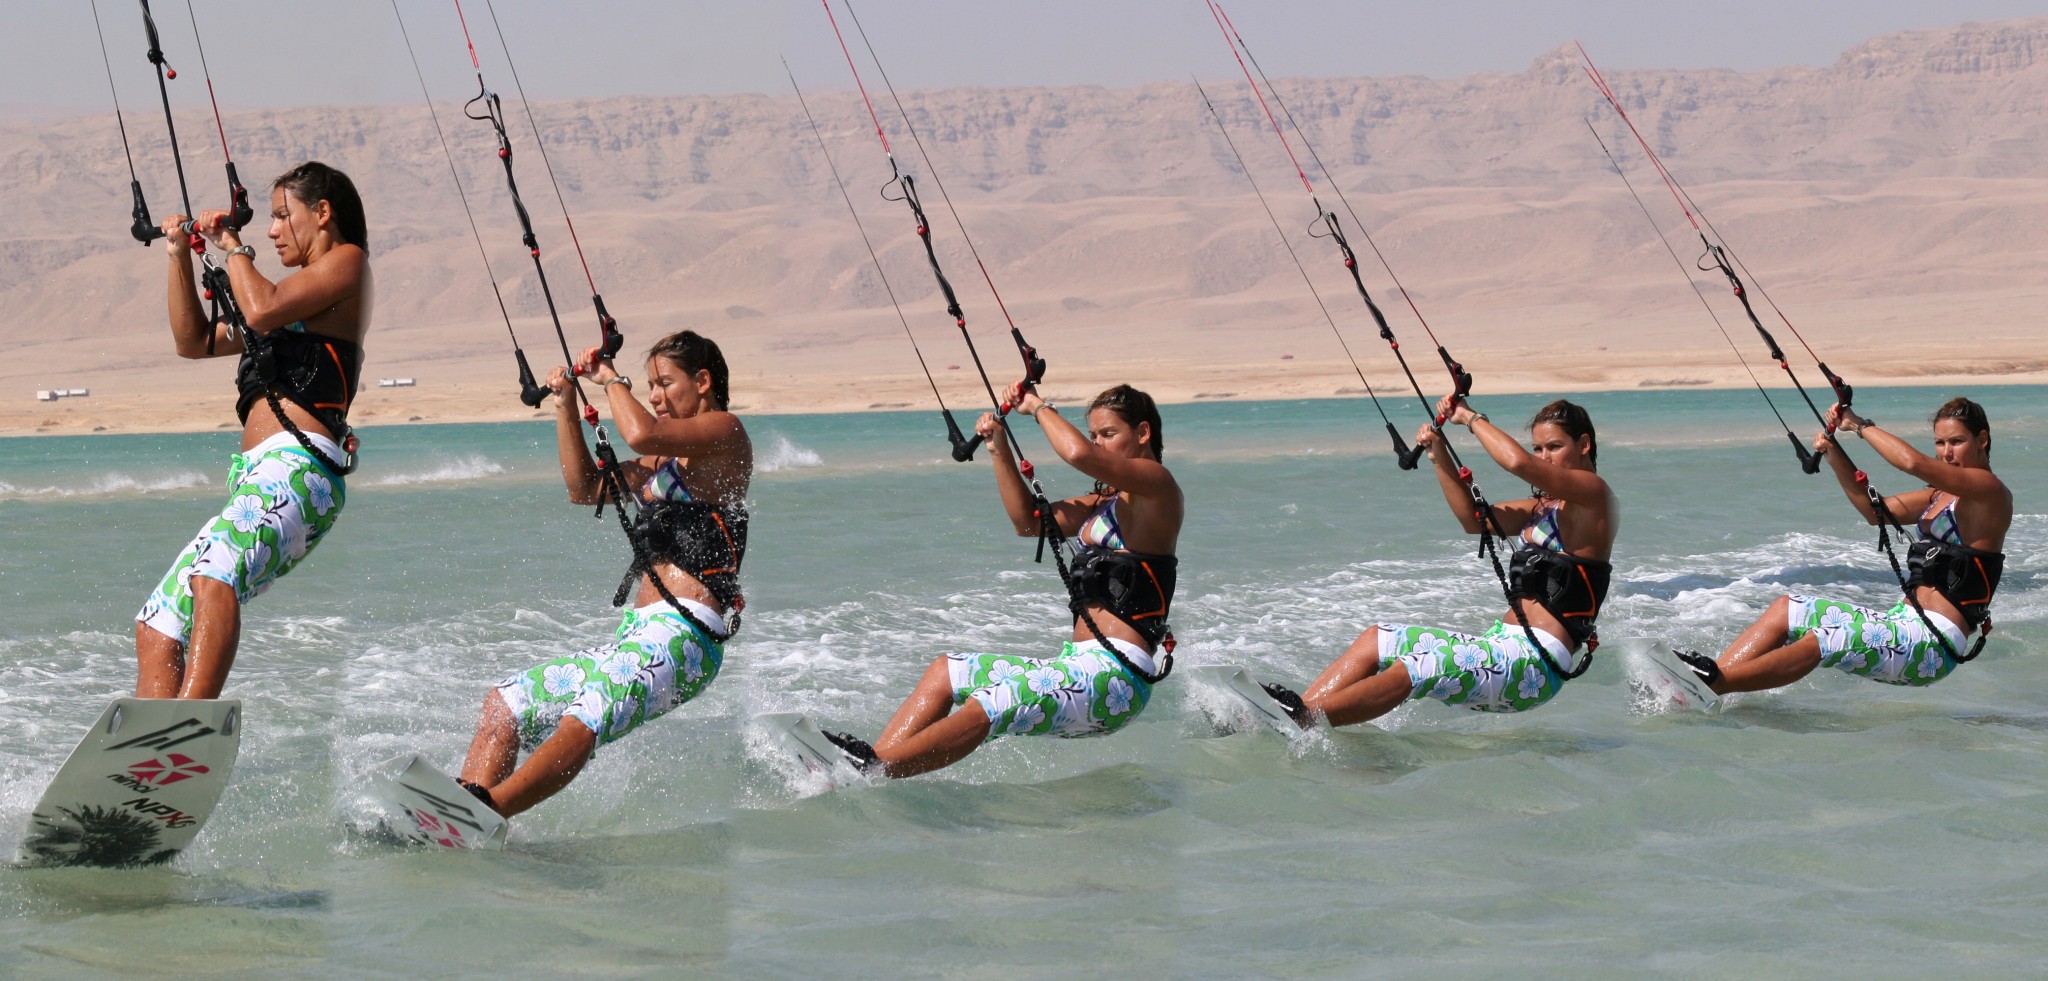
Following Sequence 1
- Pics 1 & 2. Merrily trooping along on her edge Karine carves up into wind with her weight low and sends her kite.
- Pic 3. As soon as she starts to feel the lift Karine suddenly extends her back leg, stamping her back foot down against the edge of the board.
- Pic 4. As her body starts to push up she pulls down on the bar and levels it out.
- Pic 5. Karine centres her head and shoulders and is on the way up with the kite pretty much above her.
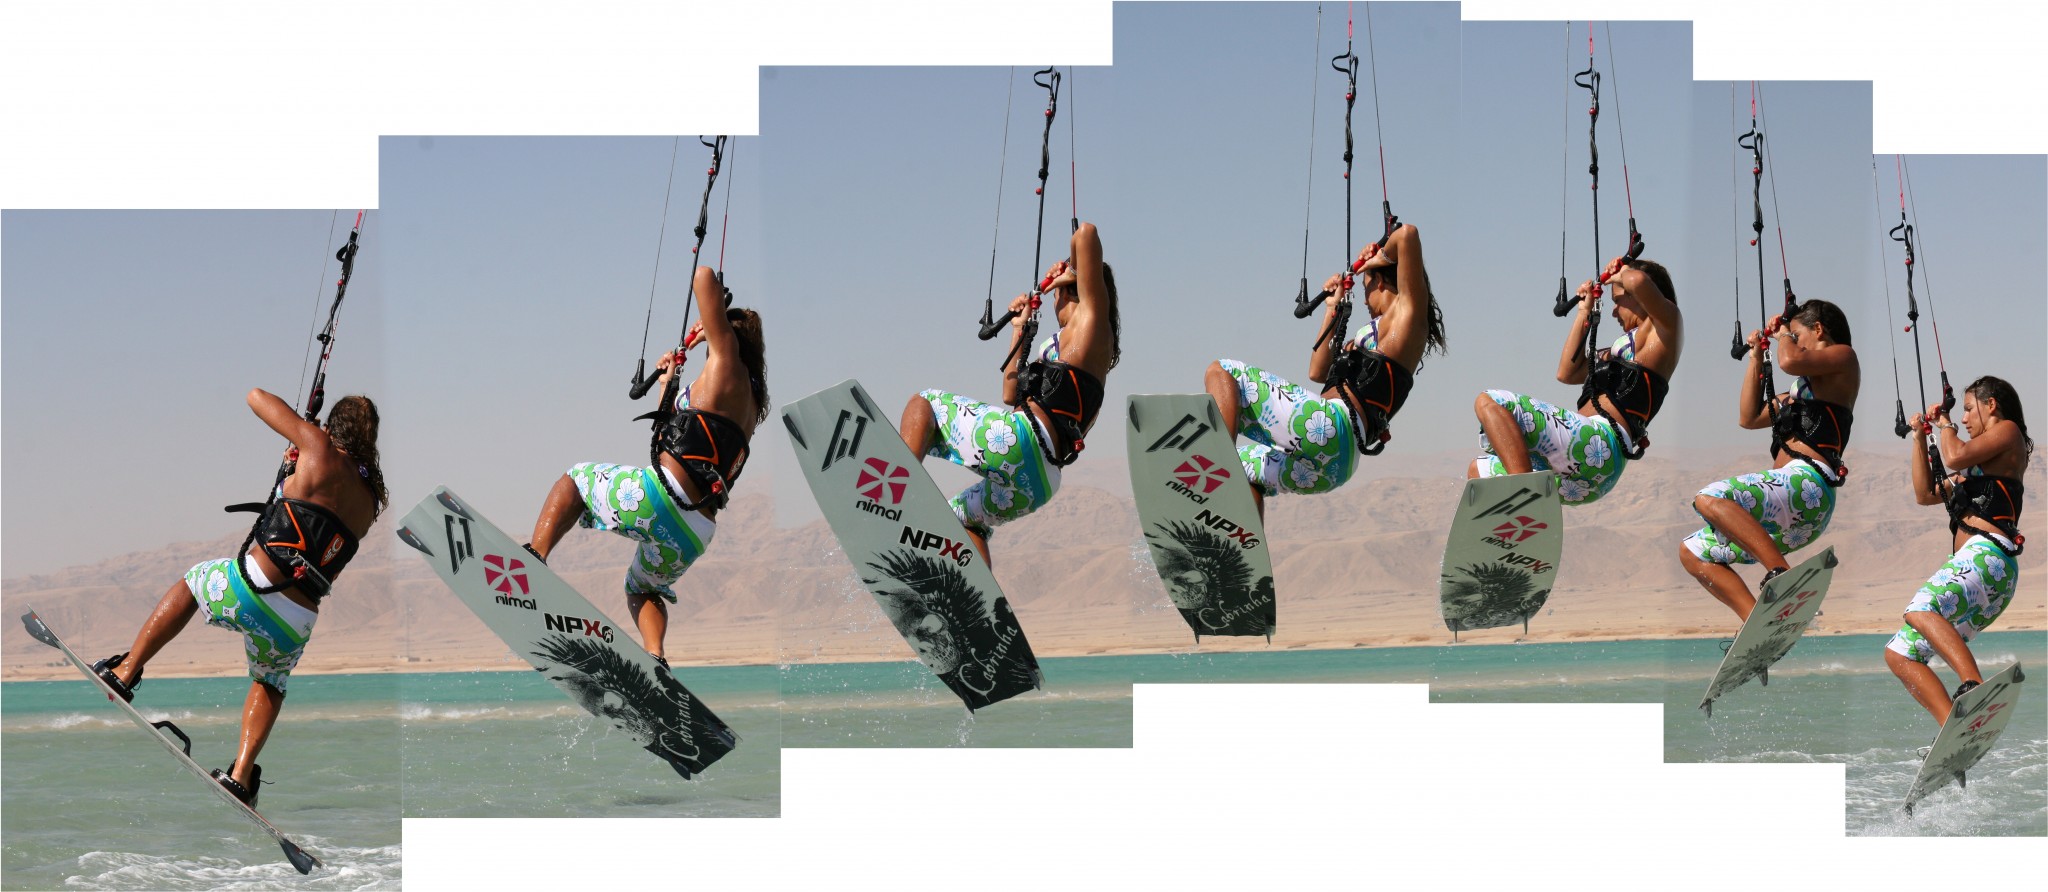
Following Sequence 2
- Pics 1, 2 & 3. As Karine goes up she keeps the bar in and lifts her knees up and waits keeping the kite above her.
- Pic 4. Still floating but feeling that the kite is no longer lifting her Karine turns her head to look where she wants to go when she comes down. Knees still up, bar still in.
- Pic 5. As soon as she starts to drop Karine dives the kite hard with her new front hand to be, in this case the right one. She still keeps her knees up and the bar pulled in.
- Pics 6 & 7. As the kite dives down through the window Karine drops her right shoulder and twists her shoulders and hips to allow her left foot to swing forward.
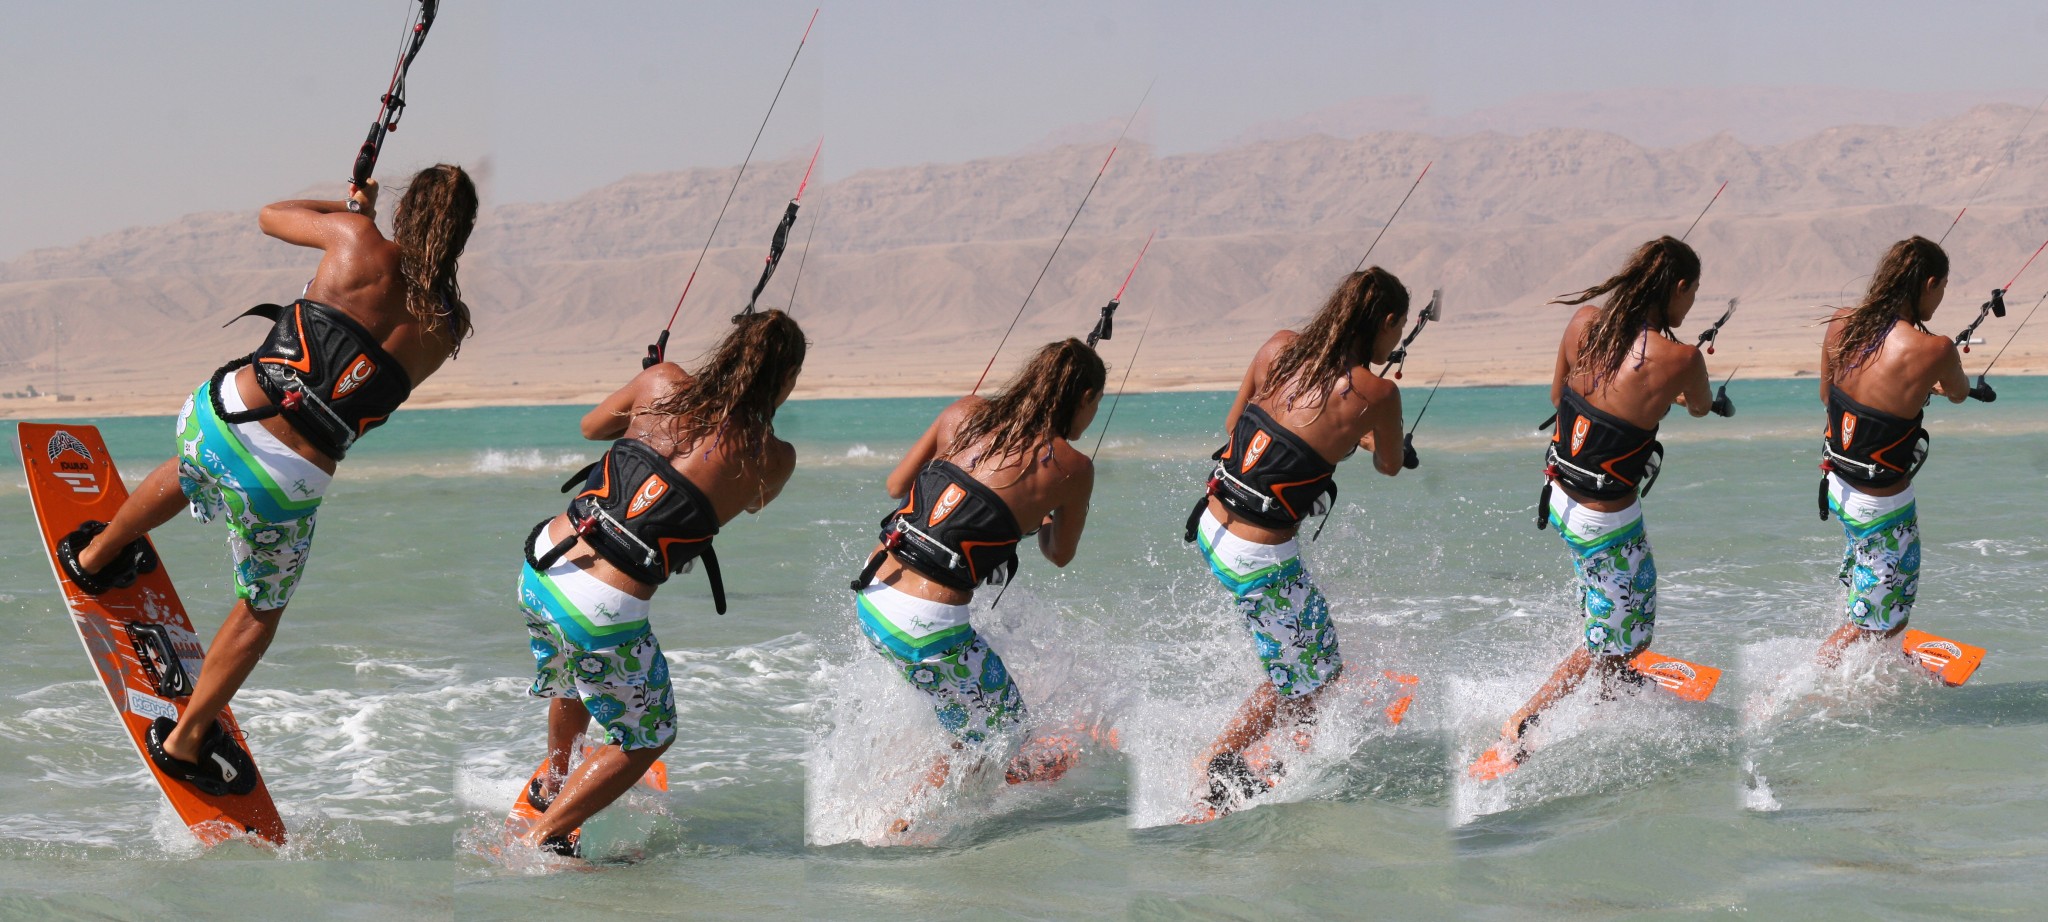
Following Sequence 3
- Pic 1. With her right shoulder down her right foot drops ready for the landing. In this position Karine can push her left knee forward allowing her left foot to come around.
- Pic 2. As the back of the board touches down Karine pivots around it and her right foot, dropping her weight upwind. She still has her bar pulled in and the kite is still diving down
- Pic 3. Karine absorbs the landing with her knees but keeps her head focused on where she wants to go.
- Pic 4. Karine stands up onto the board and steers the kite up and forward to pull her along.
- Pics 5 & 6. Karine relaxes into her familiar toeside riding position and heads off to try something else. The entire time since take off she has kept the bar in close and therefore been able to steer the kite whenever and wherever she needed.
Common Problems
Trying to turn to toeside to early in the air. If you do this you’ll land on an edge rather than a flat board and will stall rather than glide away.
Kite too far behind you after take off. This generally means that you did not pre-empt the jump and instead waited for the kite to pull you up. Can also be the result of not keeping the bar in and level.
If you floating down and sink, your not diving the kite hard enough as you come down. It needs to be an aggressive yank to pull you out in a downwind direction.
If your getting pulled over the front and all else is well, you are probably landing with too much weight forward, remember to drop you new front shoulder and land tail first.
Keystones
- Edge then send
- Pop early
- Hands to hips, knees to hands
- Wait
- Dive really hard
This technique article was in Issue 17 of IKSURFMAG.
Related


By Christian and Karine
Christian and Karine have been working together as a coaching team, running improver to advanced kitesurfing clinics since 2003.
