
Toe Side Hand Drag
Technique / Beginner


Introduction
A while back we took you through the heelside holiday shot. Seeing as things are warming up and liberty in the sense of ocean dips is returning for many, it must surely be time to enjoy the simple (ish) things. Casually gliding atop the wet stuff on your toes, caressing the water as you take the opportunity to smell the roses. Take it all in, look the business and enjoy, much like an afternoon at Henley, boater on head and Pimm’s in hand.
What we’re looking for here is a solid toeside, with a firm stance so that we can get leant over nicely against the kite, which will give you stability and the comfort for distance. We’re not after the quick tickle of facing upwind, bending over and reaching down to the water as we stick our posteriors up to the heavens. Not quite as easy as 1, 2, 3 but with a bit of practice you’ll be notching up the nautical miles in the smoothest of manners.


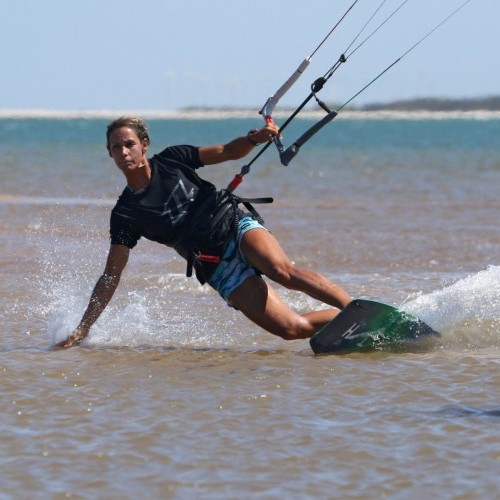
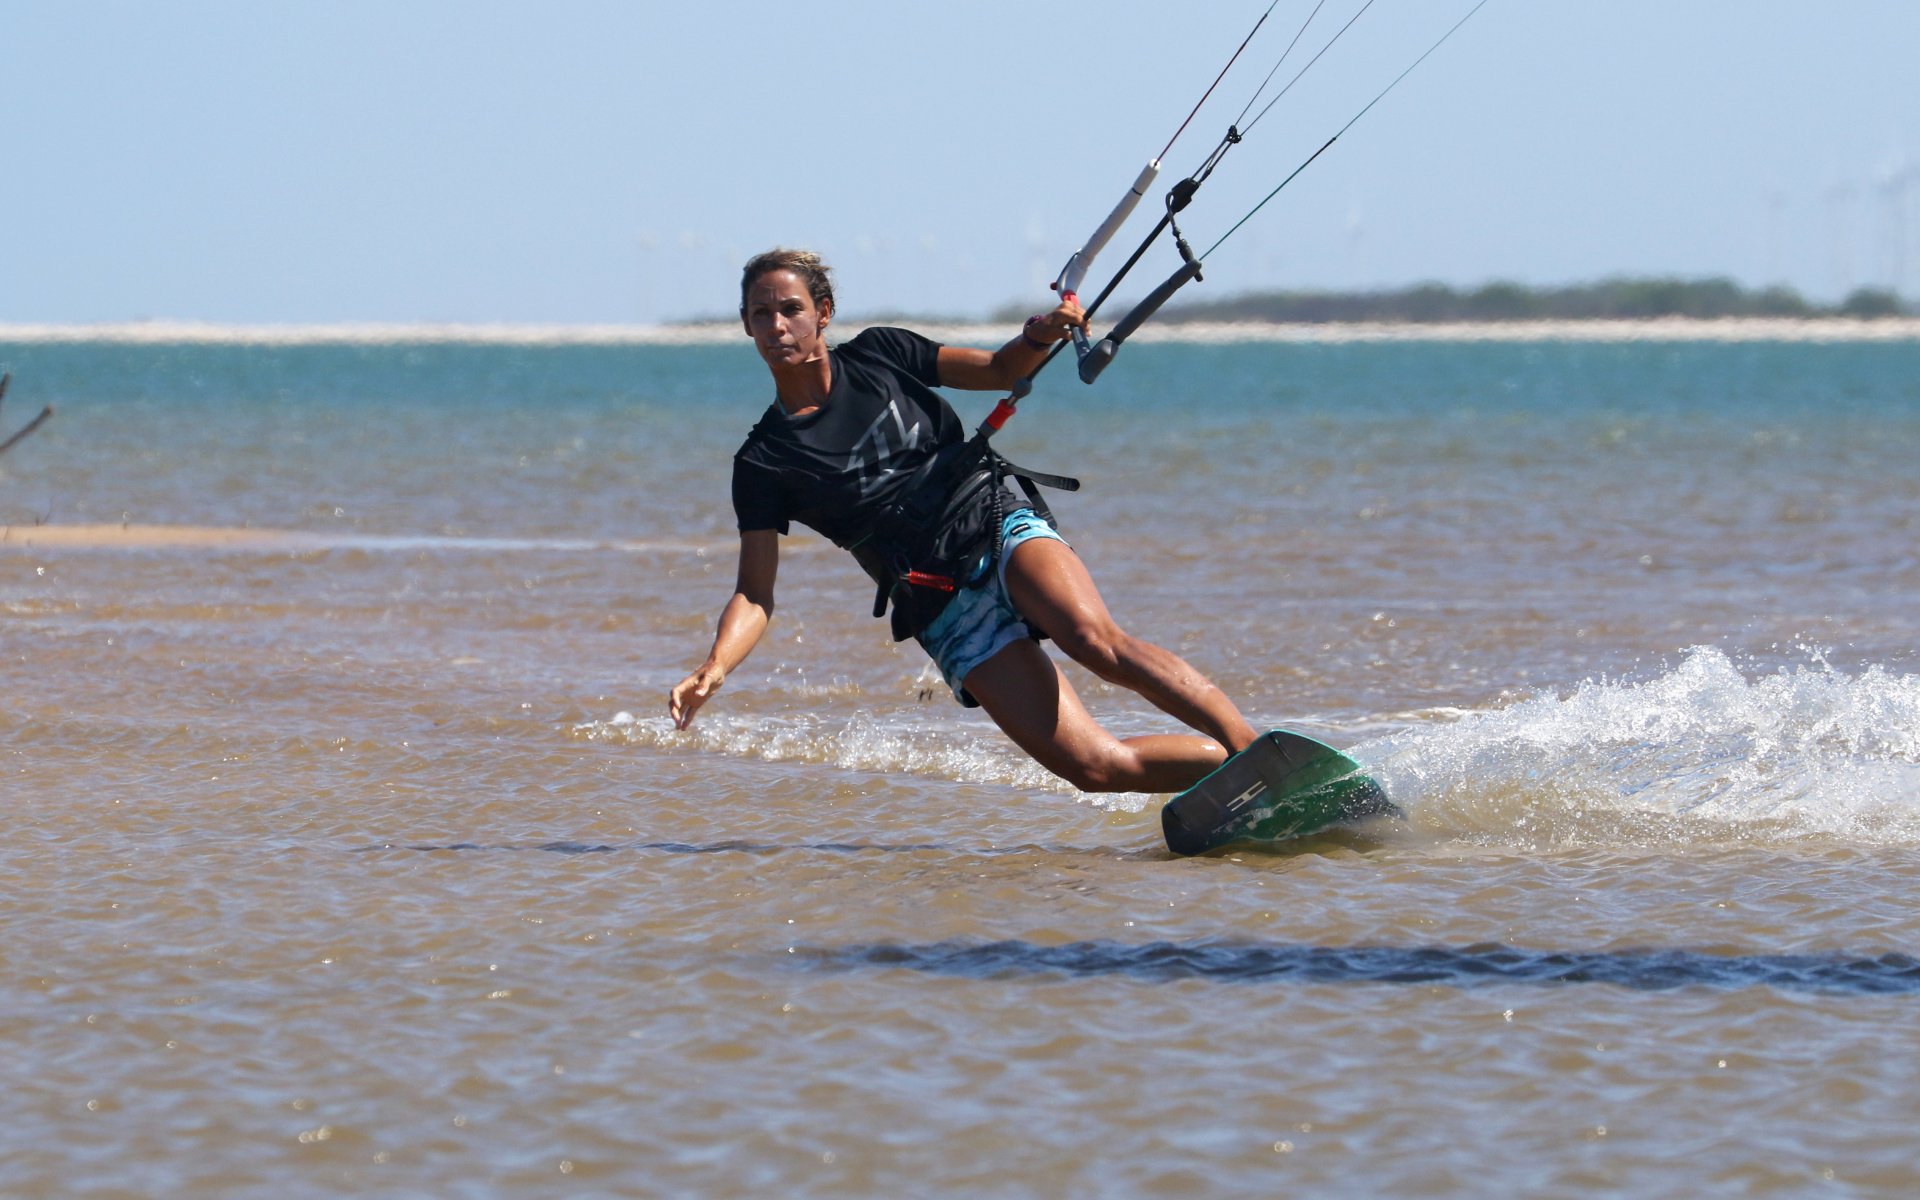
Toe Side Matters Pic A.
As such the first port of call is a quick toeside refresher. The aim is to get on a comfortable edge, using as much of the board as possible, so that you have maximum resistance with minimum drag, and a platform to drive against. Assuming that you have enough oomph in the kite to park and ride on your heelside, you should have ample for your toes. If we look at the Pic A and work through a few point.
1. Trim. To get in c comfortable and dynamic position on your toes you need to be able to control the kite with 2 hands. This means that your sweet spot needs to be trimmed in a touch. This way if you need to work the kite a little you can, and even more importantly it means that you won’t be pulling manically on the bar, strangling the kite and stalling it. You can see Karine has a fair bit of trimmed applied so that she can reach the bar with her front hand. This way she can keep the power on and balance it against her edge.
2. Stance. Your ankles let you move your weight across onto the balls of your feet. Flex them and your knees drop across to the upwind side of the board. Perfect. One caveat, if you’re riding a wide board it won’t be so simple. Knees should be both driving forwards, pointing to where you’re going, both legs bent. This means that your back foot will need to rotate slightly in the strap. If it’s painfully tight this will be tricky. Hips, they’re working with your knees, facing forwards, which helps move your weight forwards, distributing it between both feet, keeping the board down and minimising drag! Shoulders. Much like your hips they’re open, actually trying to twist and be facing the bar, so the opposite of facing upwind. This helps in reaching the bar and keeping your weight forwards. And finally, your head. Karine is looking forwards, she’s not staring up into the wind. She’s looking over her dropped front shoulder.
This combination places the bar, you, your weight and the board in the perfect position to edge upwind. With the board between you and the kite, you are able to push against your feet and drive against the board, adding tension and increasing power. As soon as you break at the waist and bend into wind your board will flatten and you can no longer resist.
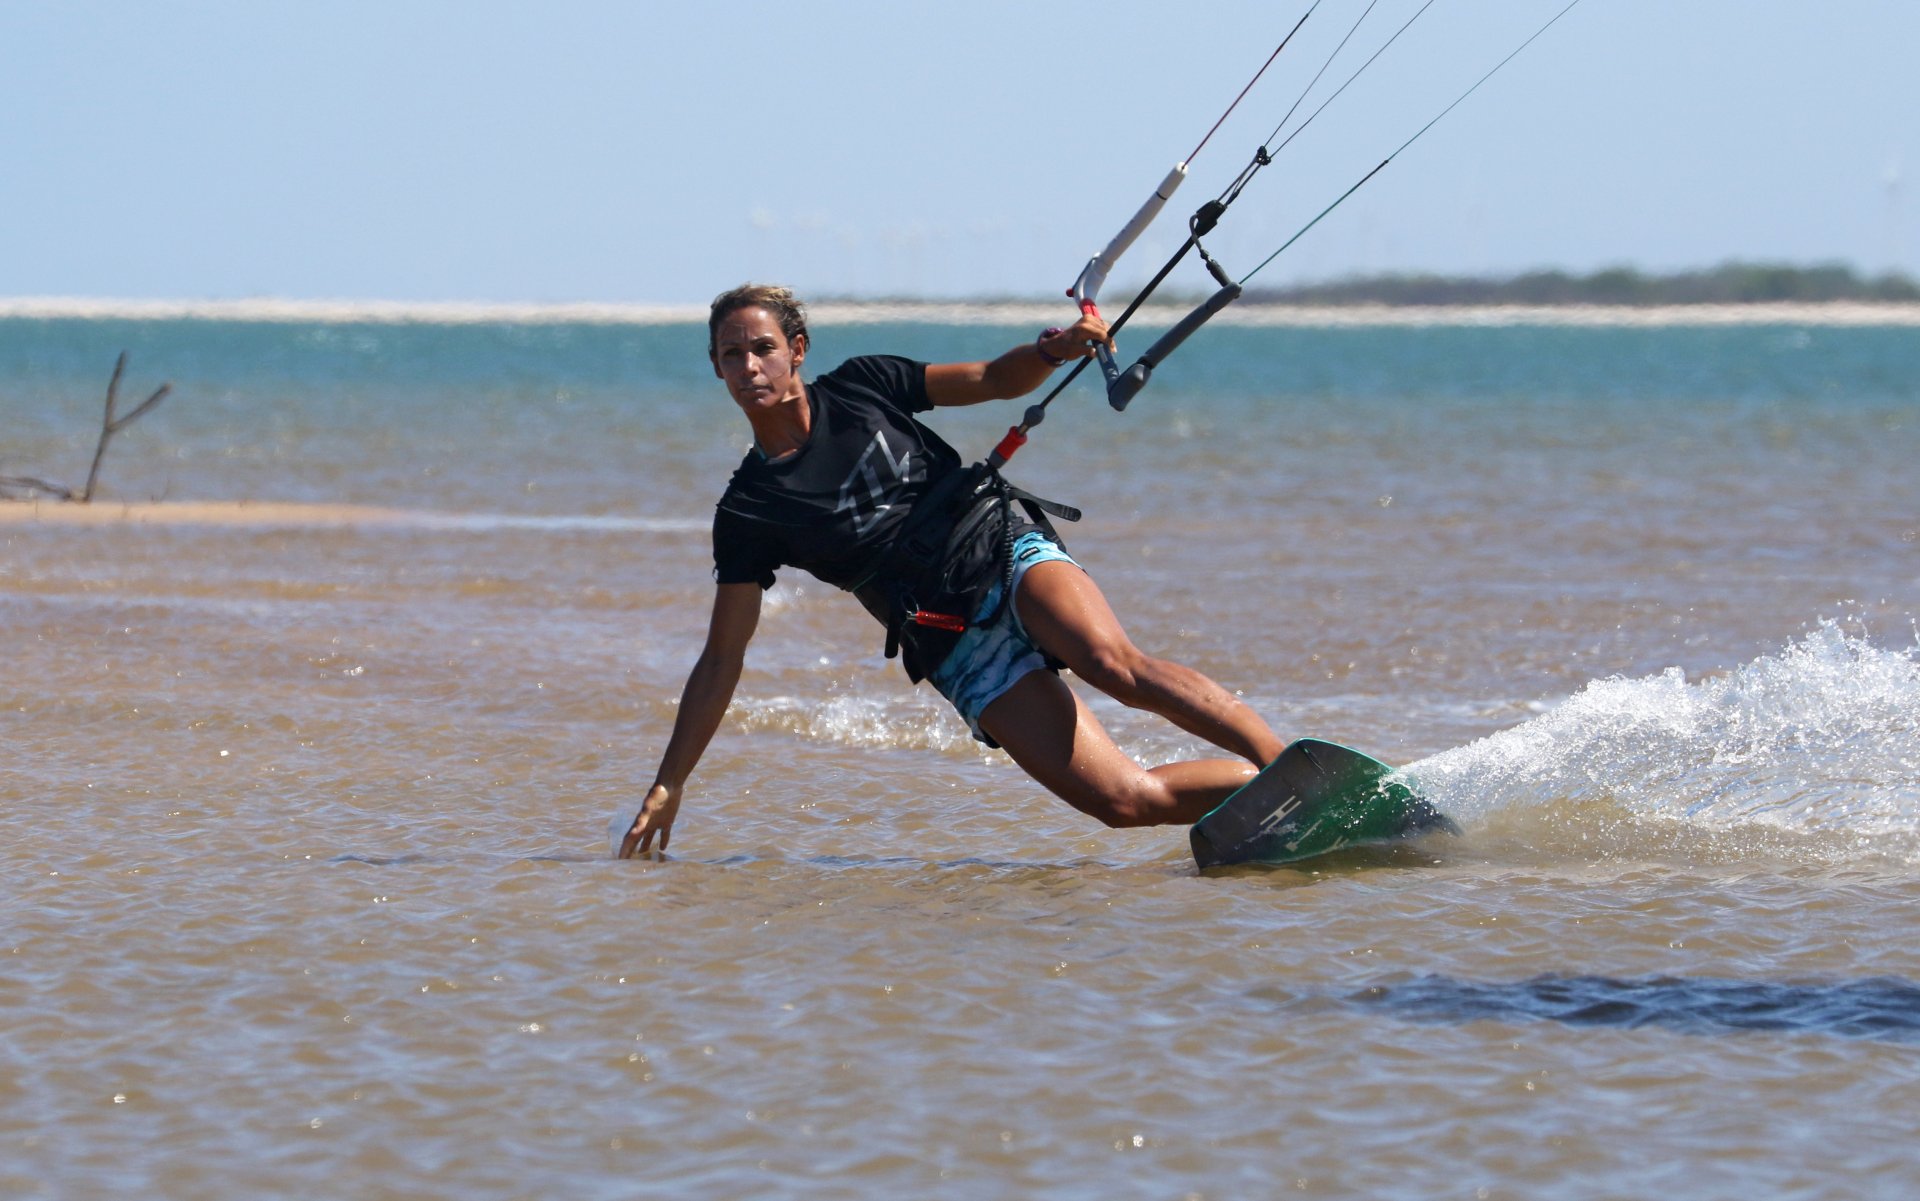
One Handed Pic B.
Next stop is controlling the kite with one hand whilst riding toeside. This is a skill that you already have, whether walking up the beach or body dragging back to your board. The only difference is that you need to keep the power on by keeping the bar on the sweet spot. You can either butt your back hand up against the centre line, or even split your first two fingers around the centre line if it’s tubing. With the kite just above the 45 degree mark get on your dynamic edge with two hands on the bar. Once you’re comfortable just relax your grip on your front hand. As long as your back wrist stays strong and keeps the bar where it is and at the angle it is at, nothing happens. If you feel the kite lift, raise your wrist and push down with the inside of your hand, just as you would body dragging. Now that you feel in control, release your front hand but keep it near the bar as Karine has in the photo. Your aim is to release the hand while nothing else changes, edge, body position, line tension. You are tricking your board and kite into believing that all is just as it was a few seconds earlier.


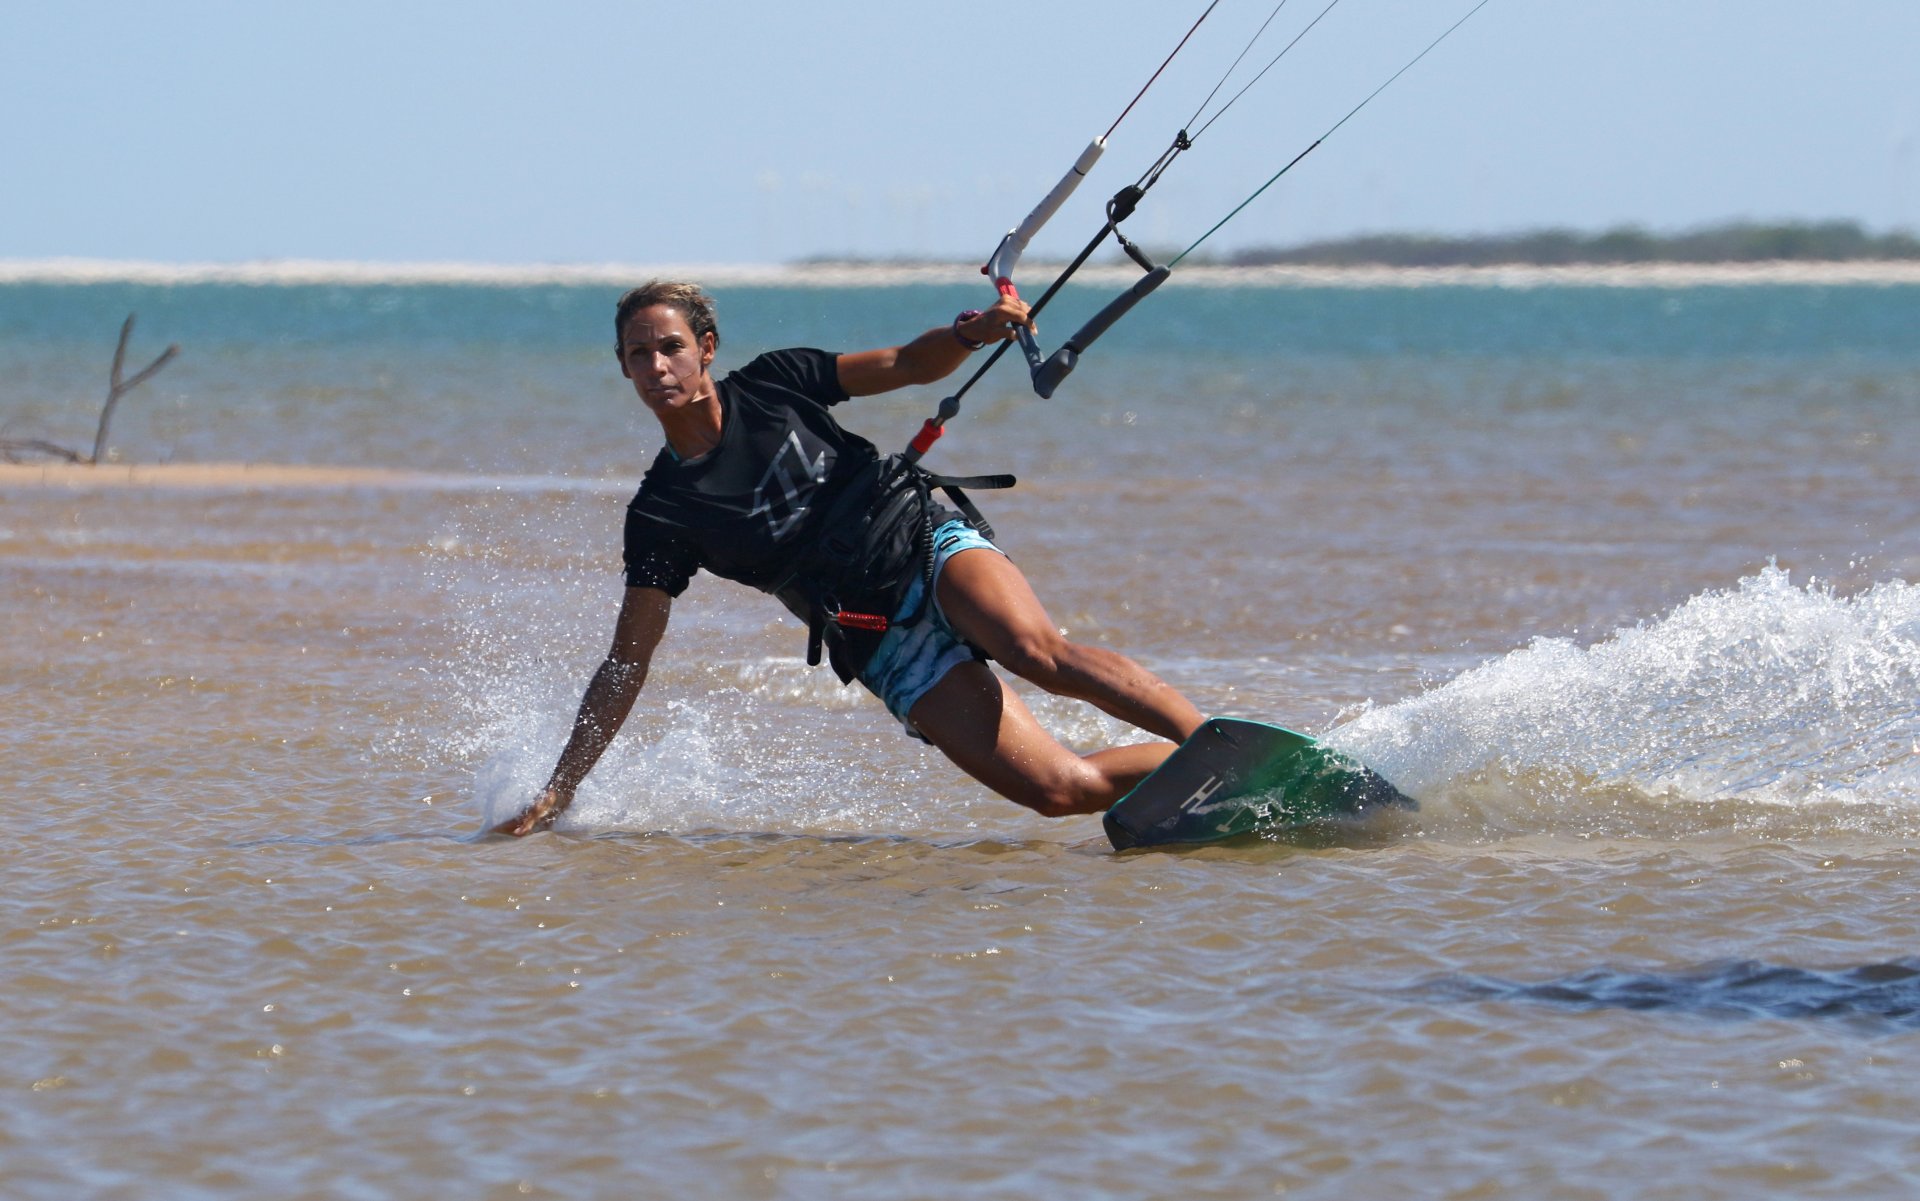
A Purposeful Arm Part 1 Pic C.
Now that your hand is off you can actually use it to help you. Rather than simply dropping it down and swinging it behind you, hold it out and in front of you. Point to where you want to go. This way your free hand and arm are leading you. The advantages are twofold. With your arm held forwards it helps keep your hips and weight forwards, whilst also keeping your hips and shoulders open to the direction of travel. Basically, it prevents you from turning upwind and dropping your weight onto the tail of the board. You can see that Karine still has the bar held in on the sweet spot with her back hand. The kite is not rising, and she keeps her weight forwards, loads of edge in the water, and she’s pushing through her legs to keep the board away from her, driving it upwind and onwards.
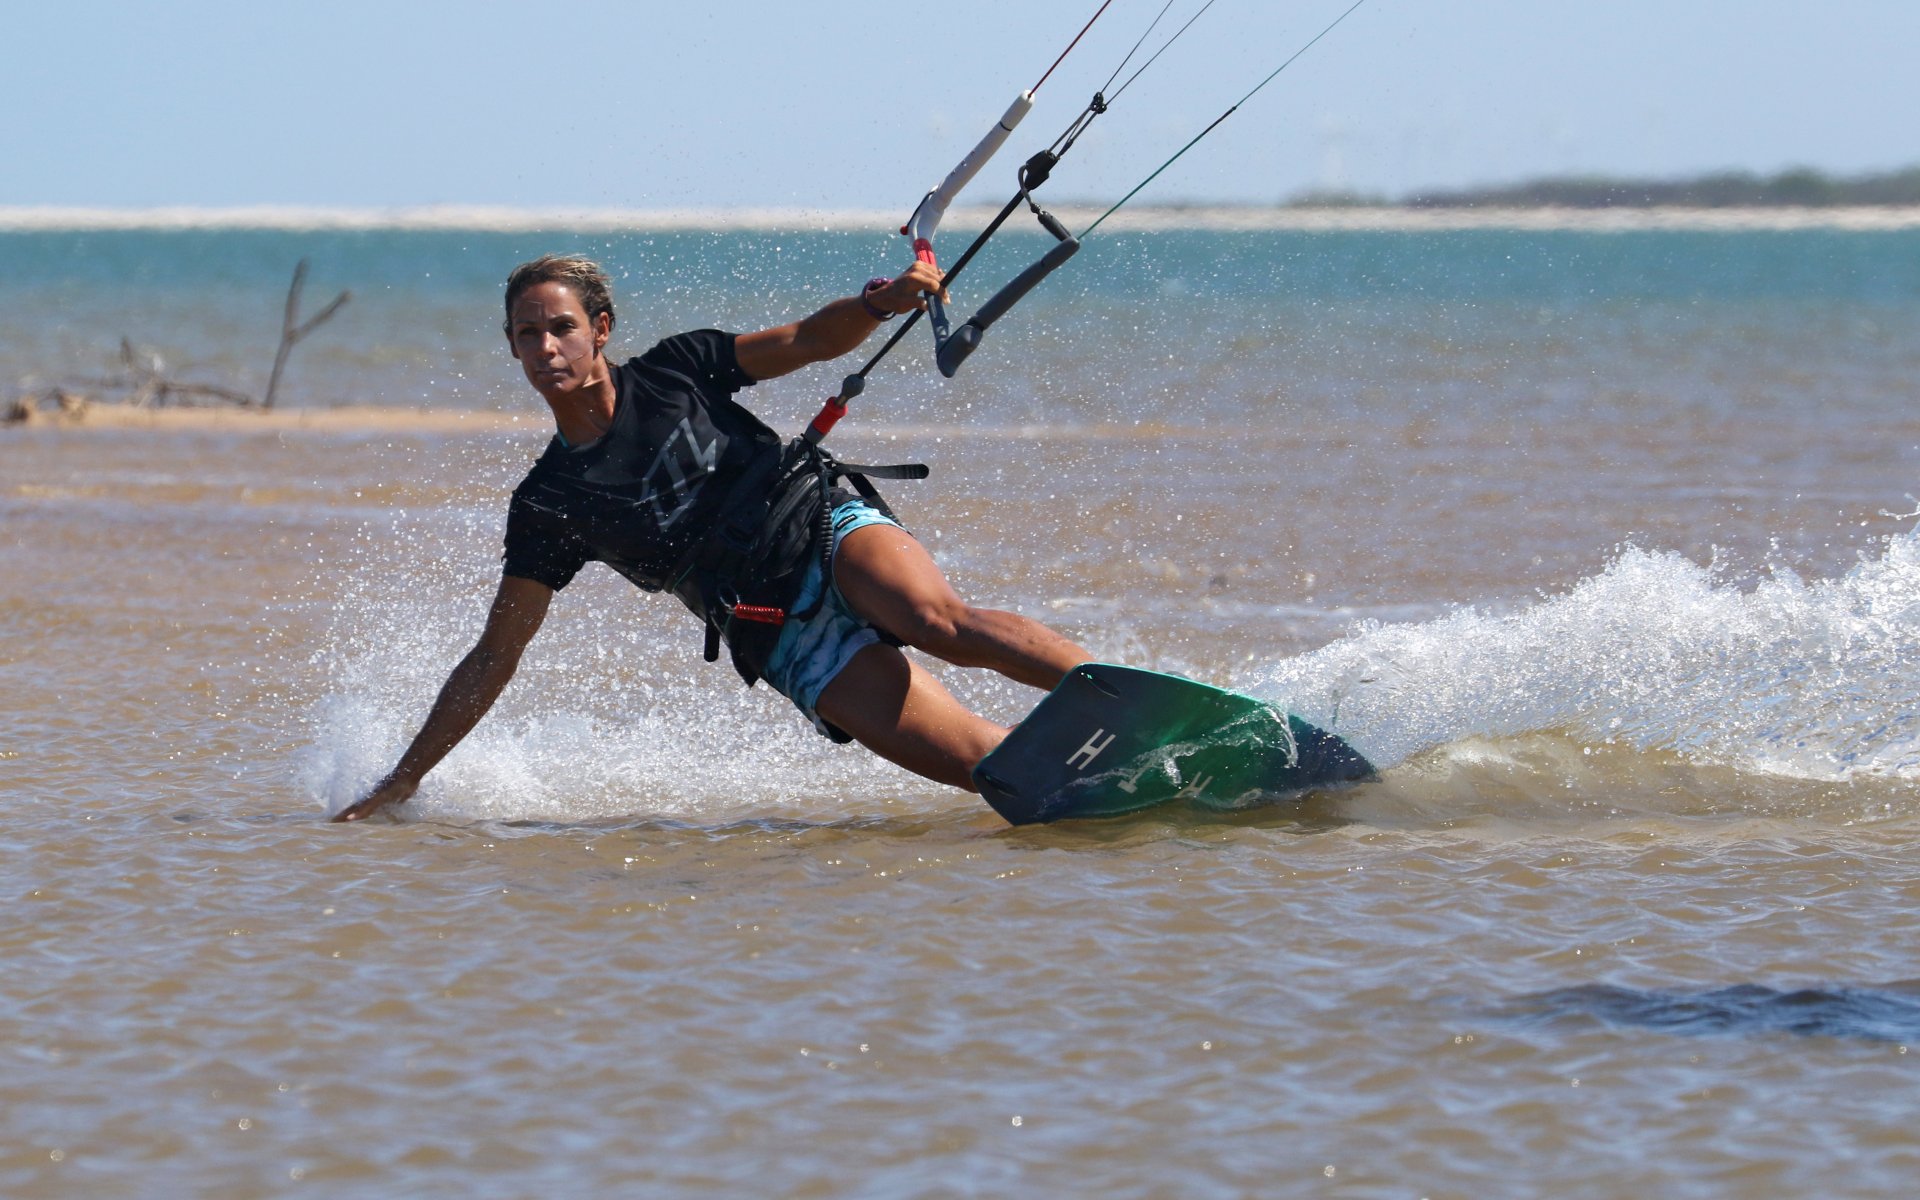
APA Part 2 Pic D.
As long as you’re comfortable with you arm held forwards and you’re still moving, you can concentrate on keeping everything as it is, except your free arm. Now you can straighten it out to the side. Chances are, as with Karine in the pic, that you may not be low enough to stroke the water yet, but just keep your weight forwards and the legs driving.
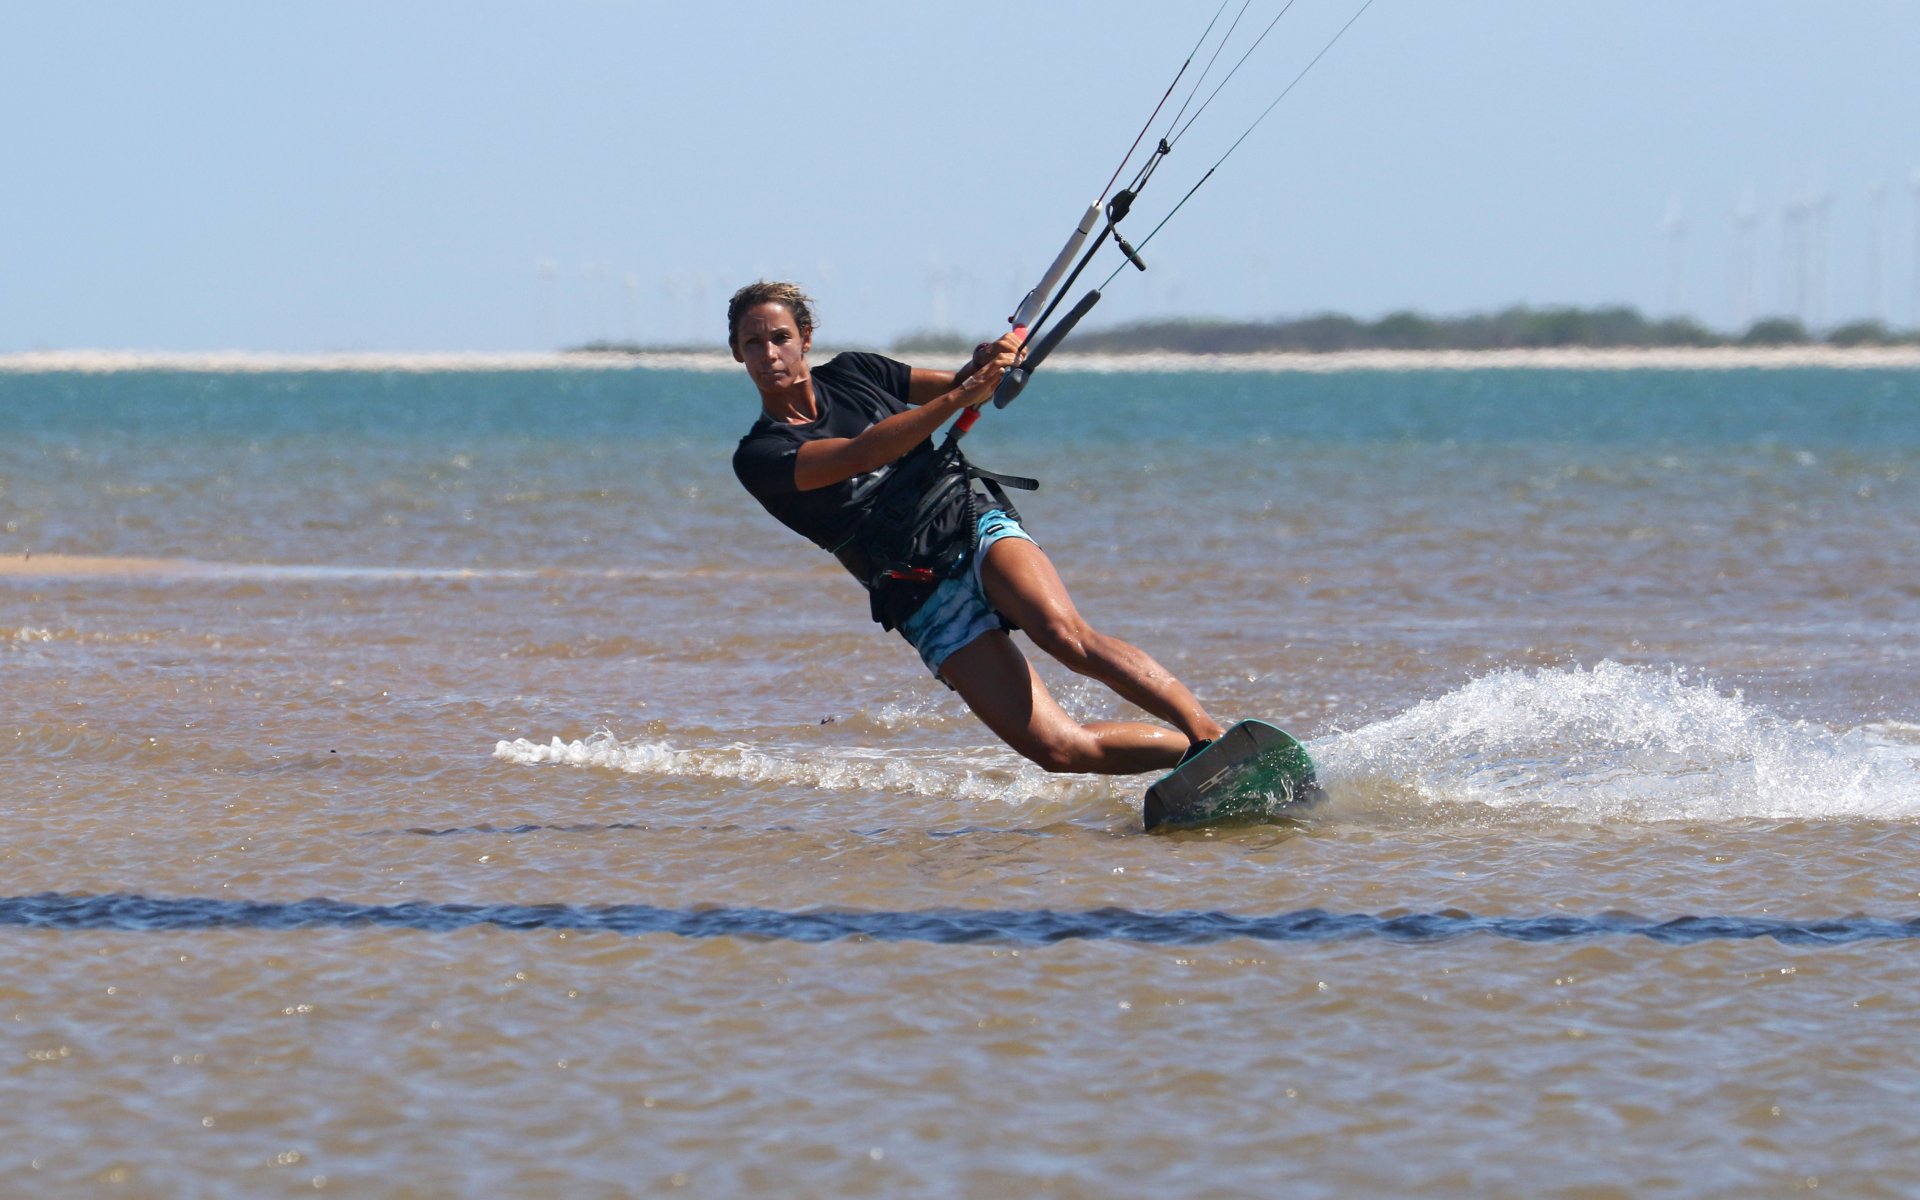
Ground Floor Please Pic E.
This is what you’re looking for. The idea being that as long as you haven’t really changed your position you can now lower yourself, not your hand, down. If you compare this image with the previous image you can clearly see that Karine has let her bar out a smidgen. She’s still edging the same, she has the same body position, she’s driving against the board, but by feathering the bar out, she has dropped further away from the kite and can now reach the water. You’re trying to do this through feel, not by looking at the water as that will encourage you to bend and change position. Only let the bar out incrementally, bit by bit, and once you feel the water hold it where it is and keep driving with your legs to keep tension on the lines so that the kite pulls against you and against your edge and therefore supports you.
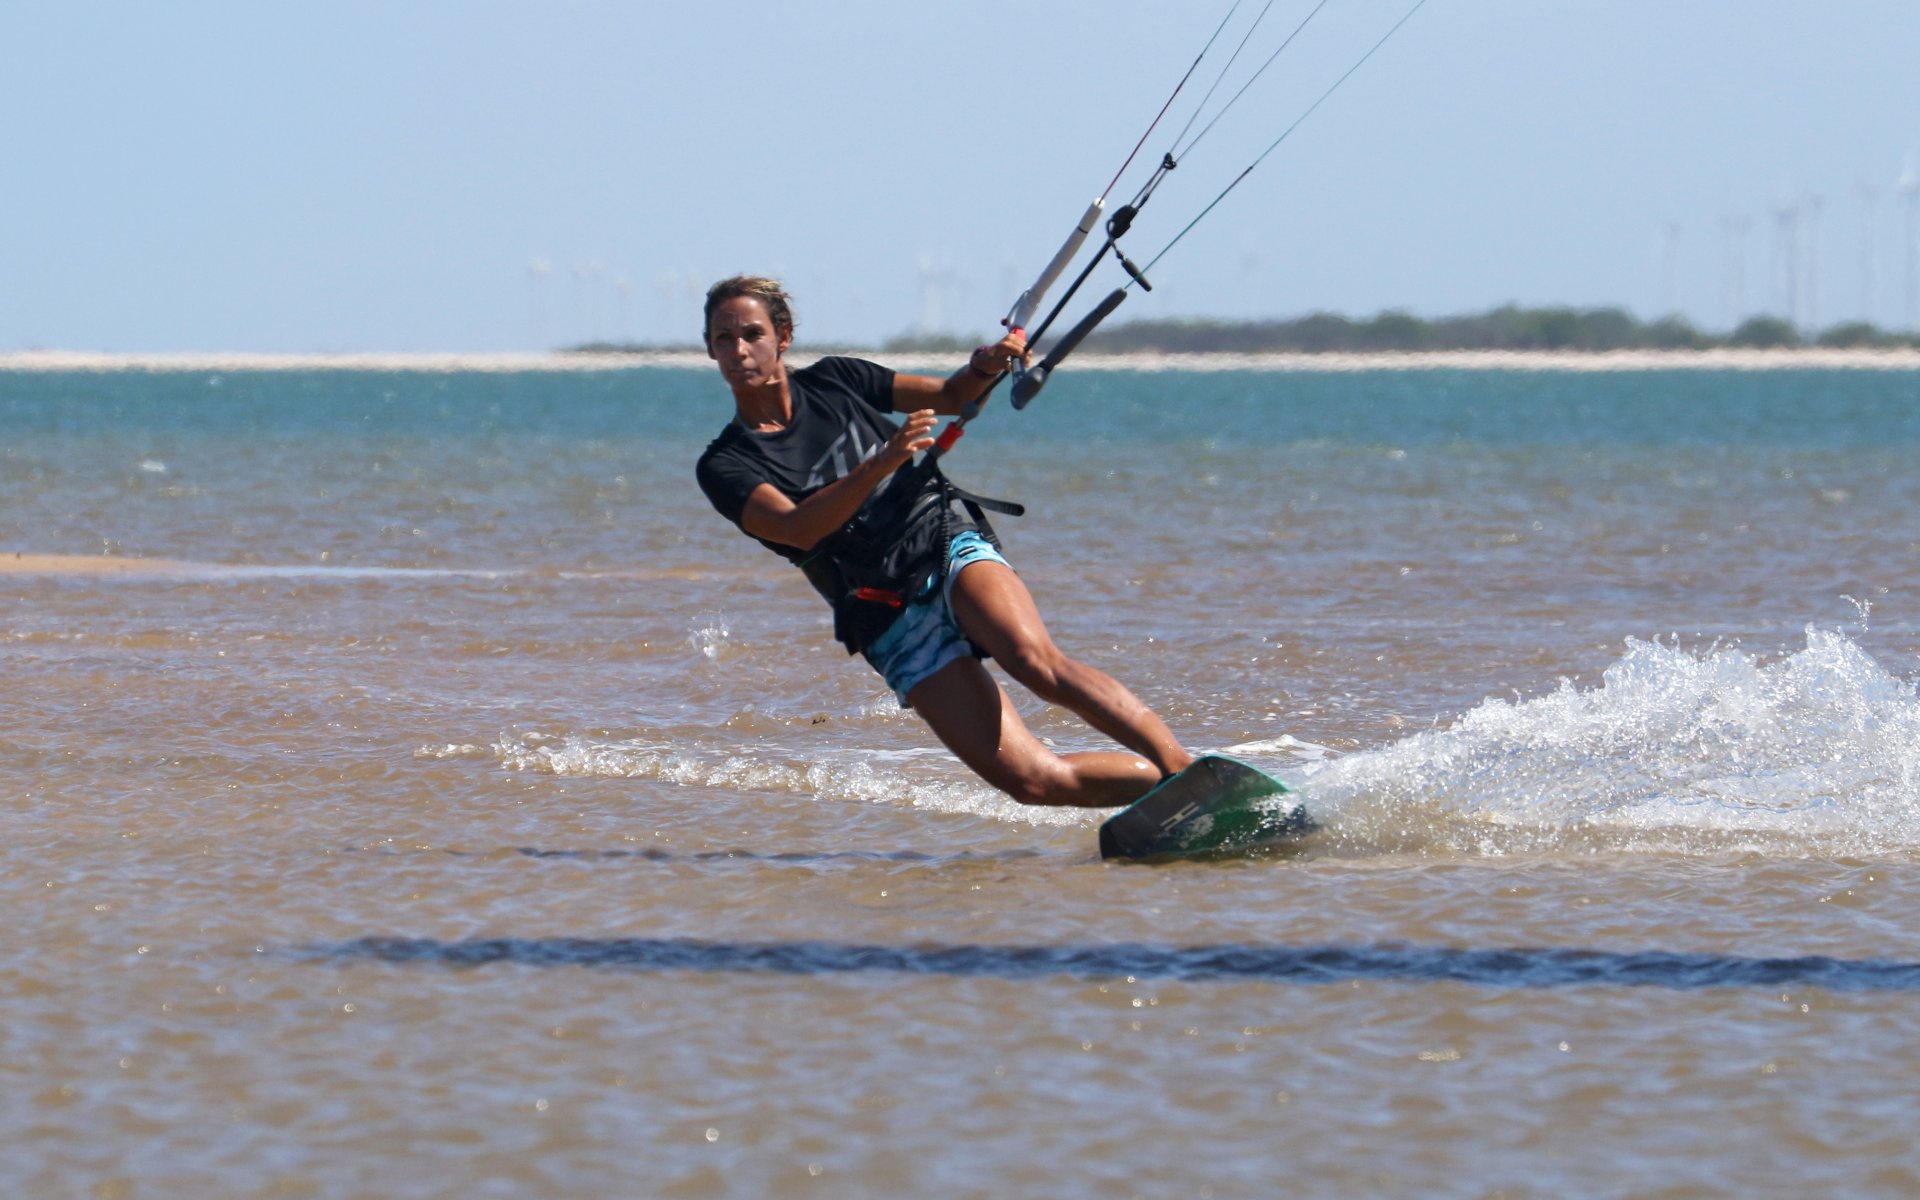
Balance It Pic F.
From here on its back to the balancing act of power against edge. If you feel that you’re slowing or dropping too low, you may can pull on the bar. If a gust pulls you up or you accelerate you can ease the bar out. The more comfortable you get the more you can lower yourself down. The lower you get the more important it becomes to hold a bit of extra power in the bar and to really resist with your legs. Whilst nothing else changes. Yet again if you compare this image to an earlier one, the only difference is Karine’s body angle. The rest from head to toes is identical – a solid and dynamic toe side. The only word of warning is that the faster you go and the more you drag your hand, your arm will move back, so concentrate on keeping your hips and weight forwards.
Top Tips
This move is very much condition based. To learn it you’ll be much happier with a larger slower kite, less gusty wind and flatter water. If the kite is too small and fast, it’ll be eager to move up from the smallest input. Whilst if the wind is up and down, you’ll find balancing the power tricky. And every bit of chop will try to slow you down and bounce you out of your stance. If possible, make it simpler with less variables.

If there is a mantra for learning this, it’s “one thing at a time”! Get settled and only then relax your grip, remove your hand, extend your arm... This way it’s easier to keep your position.
Common Problems
It’s quite possible that when you first try this you’ll slow to a stop. The usual reason for this is stance. You might well be concentrating on edging and not braking at the waist, but if you lean back over the tail of the board with a straight front leg, you’ll carve up into wind and slow down. Even if you get two hands back on the bar and work the kite, you’ll have so much drag with your tail deep that it’s game over.
Assuming that you are concentrating on the stance it’s most likely because you’re letting the bar out when you take one hand off, or that you haven’t trimmed the kite (in fear of depowering it) and as a result are stalling the kite. So, make sure you have the sweet spot close enough, and keep the bar on it as you release you front hand.
If you feel that you have no power once you’re toeside, it’s because your board is flat and therefore you have no edge to keep the tension in the lines and the power on. Don’t worry about reaching for the water, rather concentrate on flexing your ankles, getting your knees across and keeping your bum down.
And finally, if you’re losing control, and picking up too much speed and heading off downwind! You’re either yanking the bar in whilst powered, or you’re flat. Trim it in, work those ankles and make sure that you’re heading upwind.
Keystones
- Upwind edge with trim
- Ankles and knees, drive against board
- Hips and shoulders open
- Free hand forwards, then down
- Lower by feathering bar out
This technique article was in Issue 81 of IKSURFMAG.
Related


By Christian and Karine
Christian and Karine have been working together as a coaching team, running improver to advanced kitesurfing clinics since 2003.
