
Twin Tip Beach Start
Technique / Beginner

Introduction
Come on, admit it, it’s something we all want to do. Casually stroll up to the water’s edge, drop the board, hop on and sail off into the great blue yonder with hardly a hair out of place and a completely dry derriere. So here it is, the beach start. As with all great moves, it’s not just stylish but brilliantly practical. It’s one thing cooling yourself down post pumping in hot climes and bikinis n’ boardshorts. But keeping dry and warm on your first run can be a great warm-up and total blessing for those of us in cooler parts of the world.
Couple of things to take into consideration before giving this a go. You need room to safely dive your kite, to get on the board and be pulled towards the kite, and just in case, enough room to crash your kite. This brings up the question of wind direction. If it’s blowing dead onshore, you’ll need to walk a good distance out if it’s shallow enough. Should it get deep too quickly, leave it for another day or another spot. Diving your kite into a sharp palm tree or scooting up dry shingle on your nose is overrated! Water depth and, therefore, the seabed, are also important. The beach start works best in anything under knee-deep. The deeper, the harder. This may well tempt you into very shallow water, but if the bottom is hard or rocky, there will be unpleasant consequences should it all go Pete Tong. Common sense should prevail.


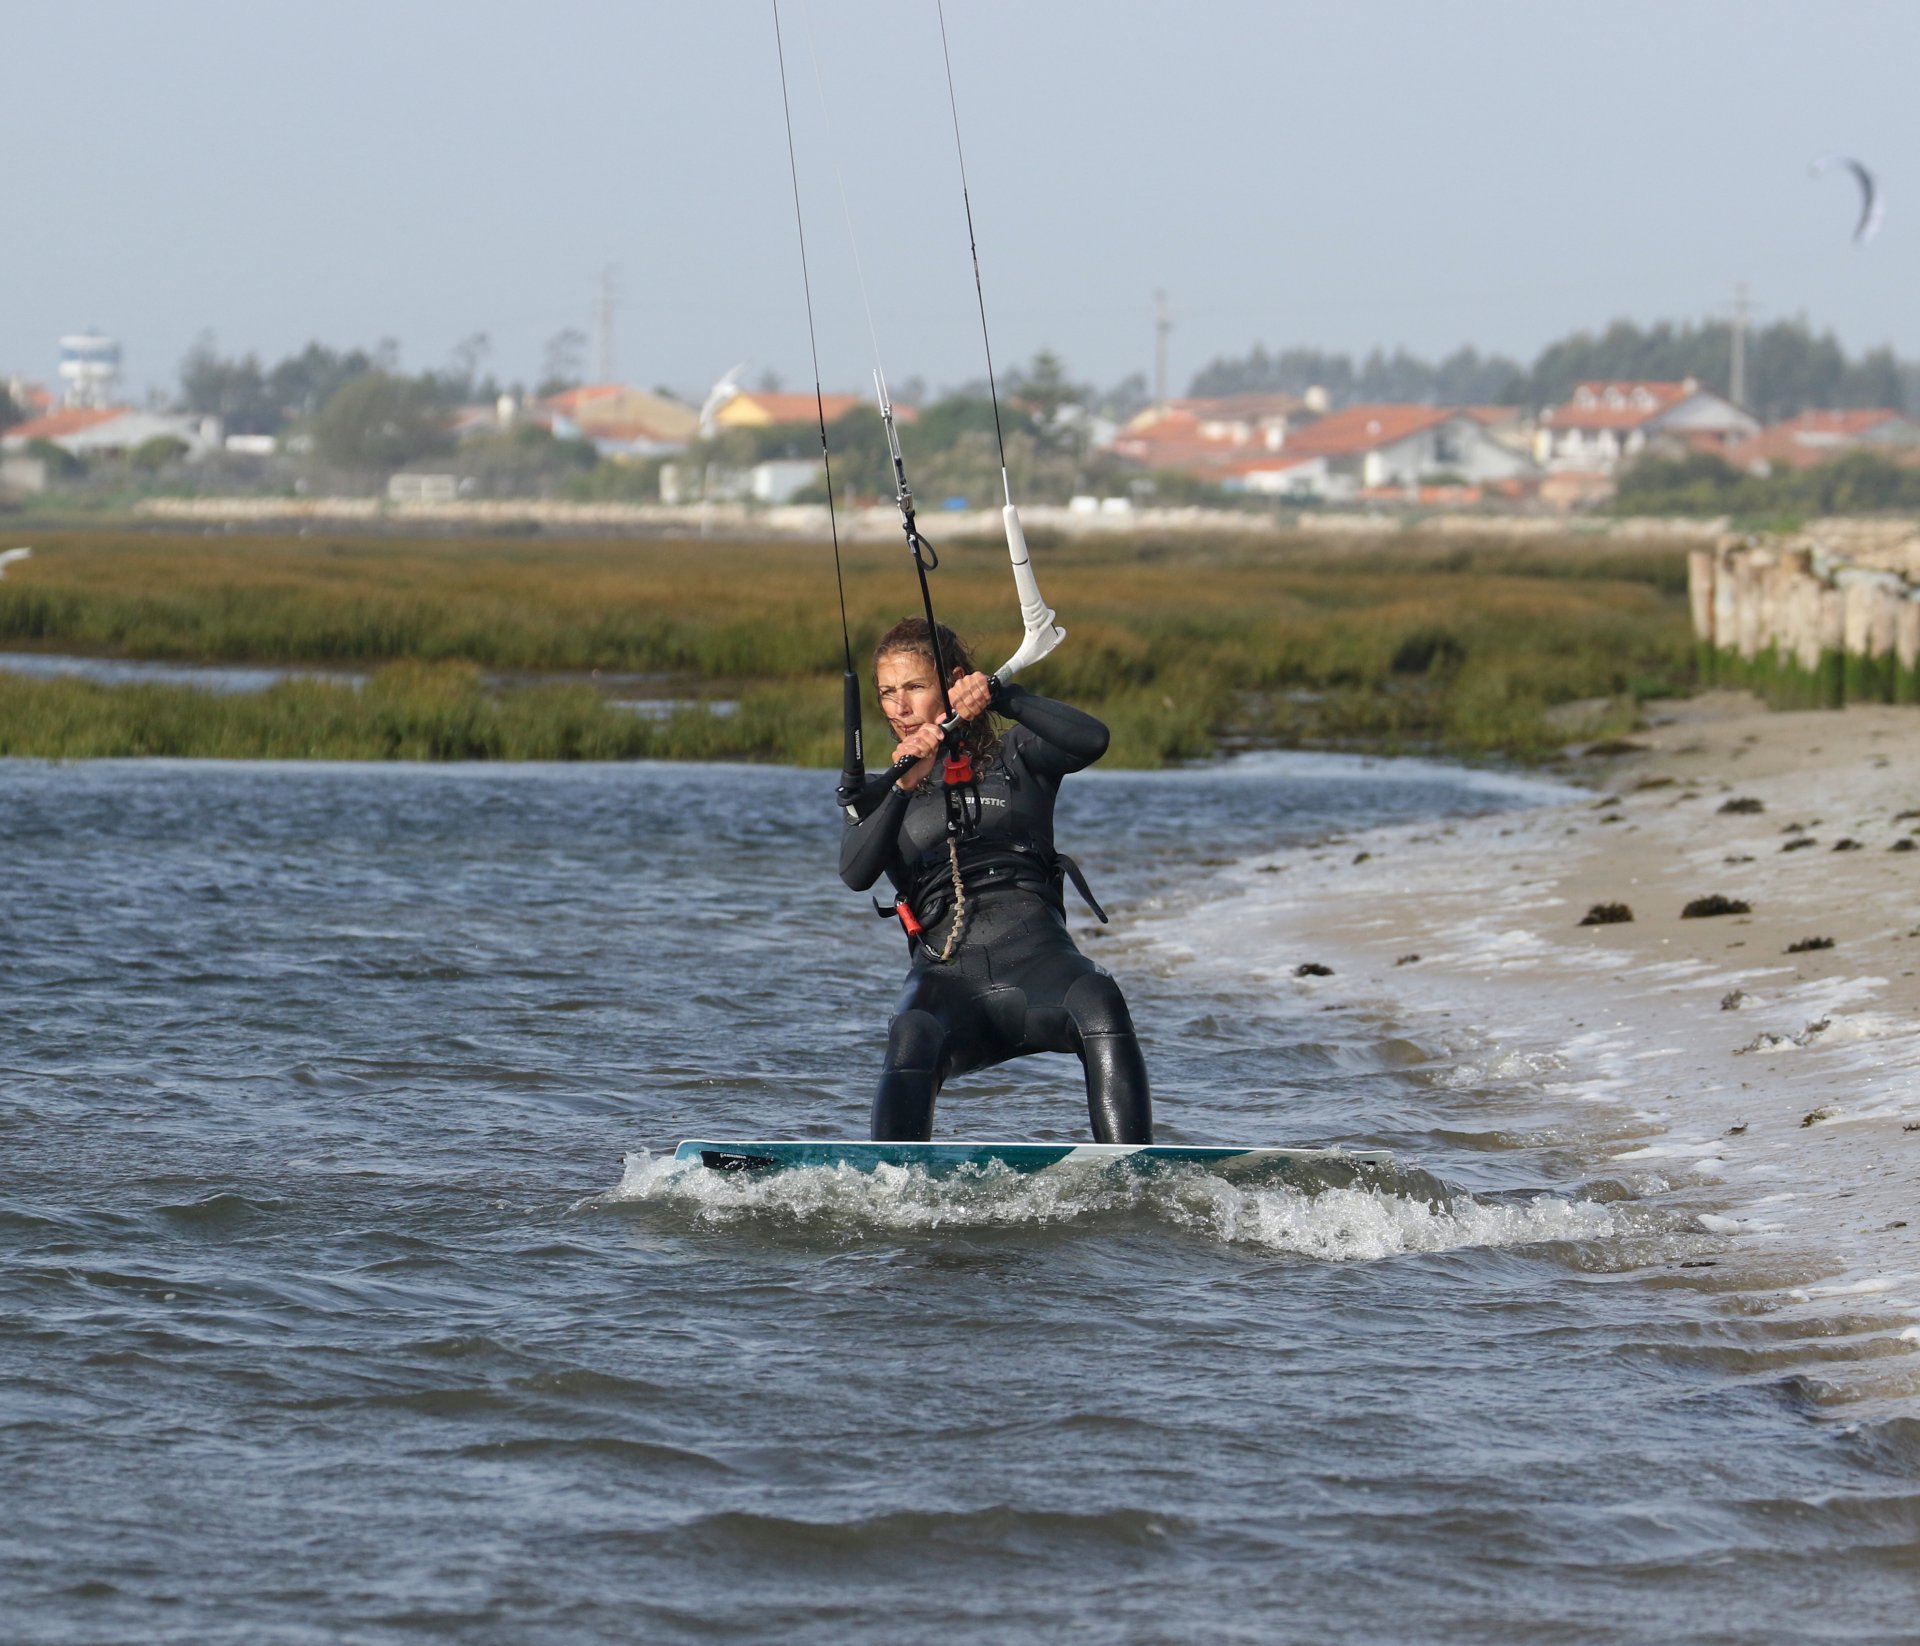
Right, Mum and Dad chat over, let’s see how the beach start works. In the photos, the wind is blowing cross with the tiniest bit of on. The bottom is soft sand, and shelves off quickly.
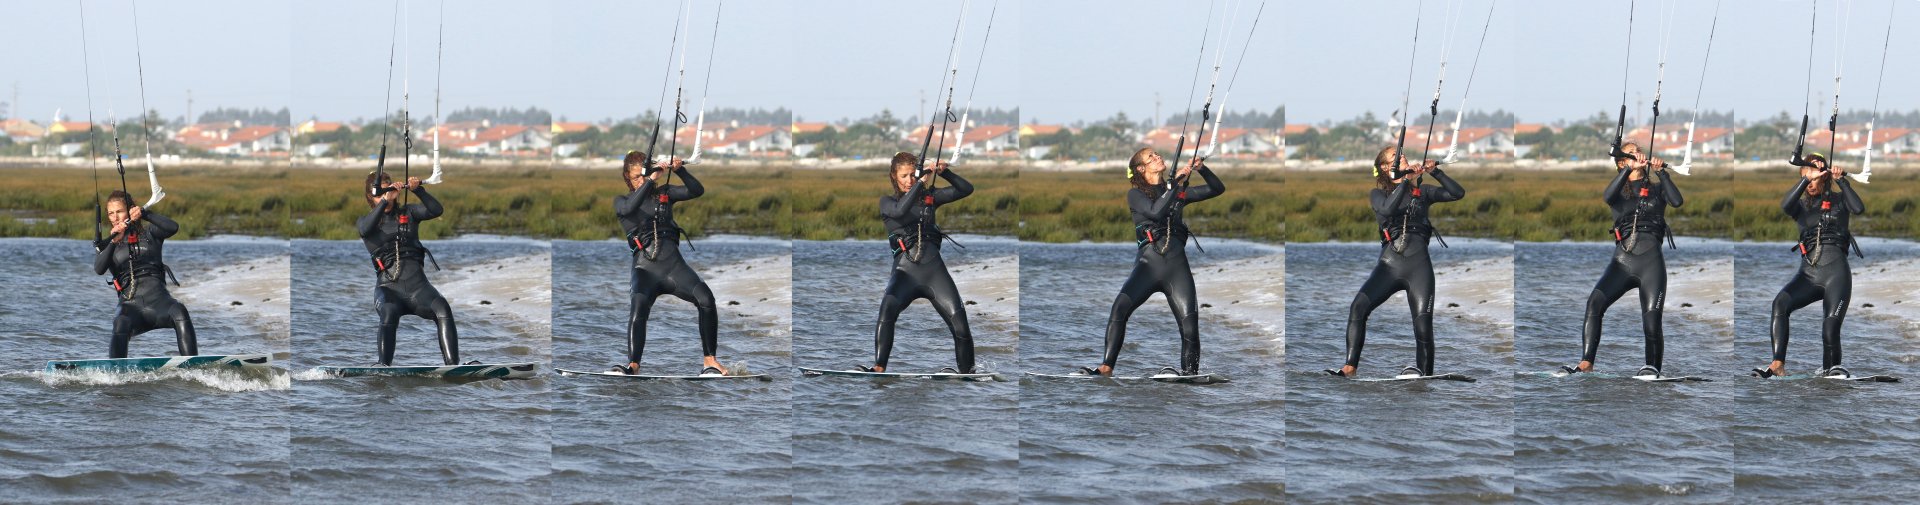
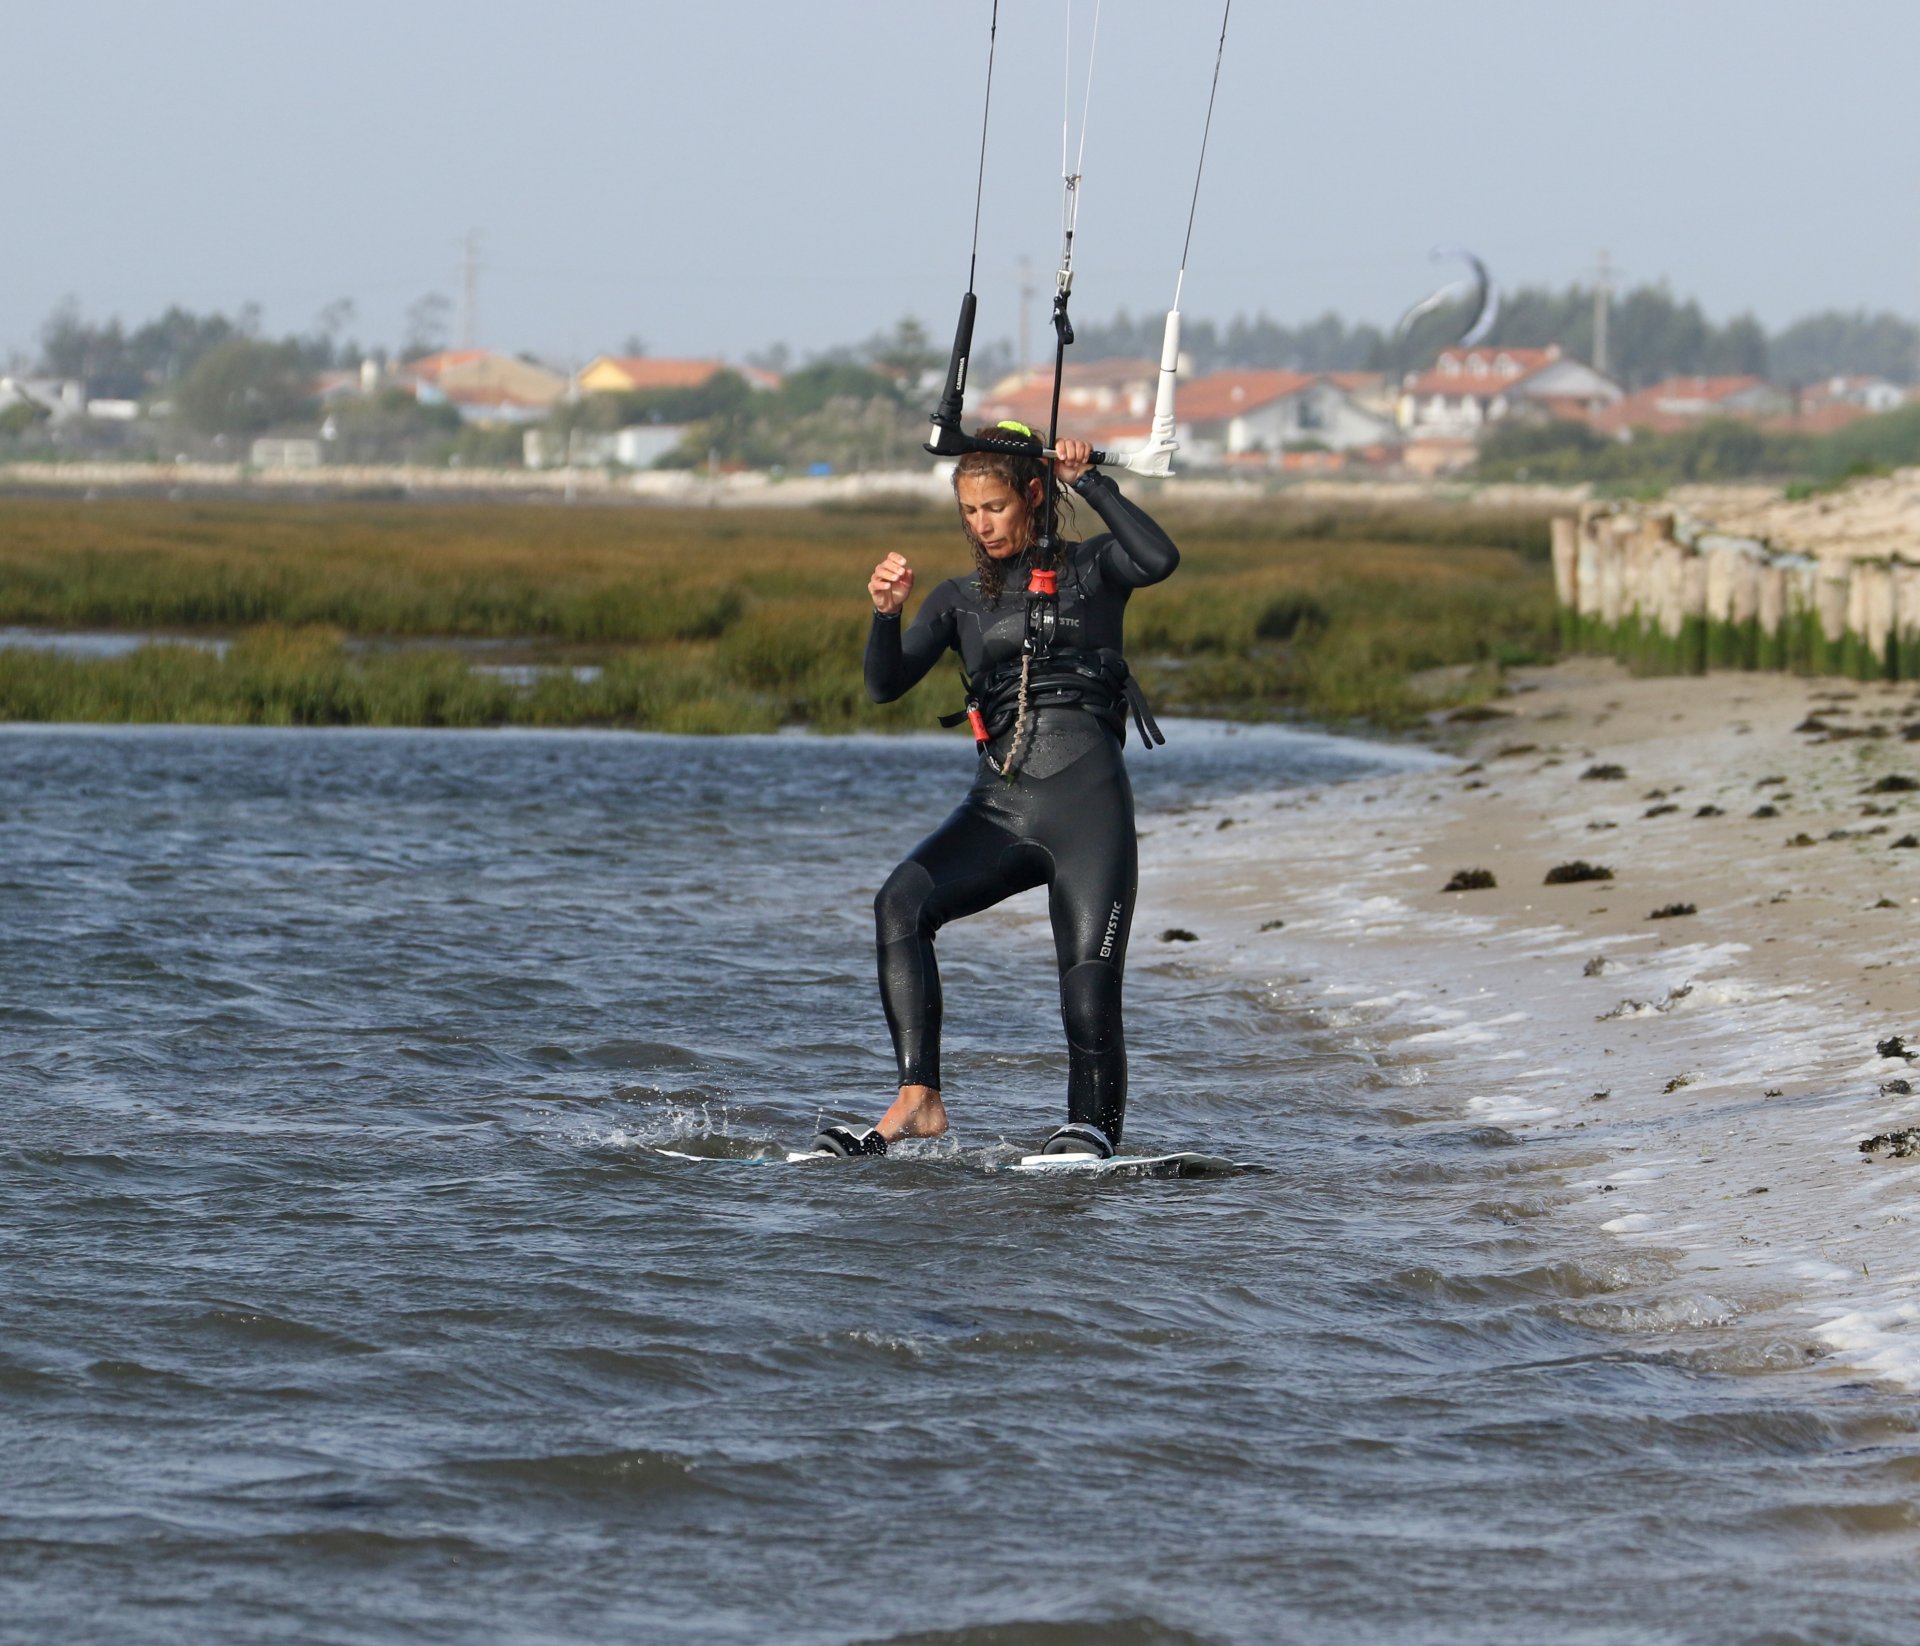
Walking In Pic A.
Best way to walk in is likely the way you normally would, front hand holding the board, whilst your rear hand controls the kite and flies it away from the beach at around 1 or 11 o’clock. The easiest way to hold the board is by the front foot strap. This will make it easier to place the board where you want it. Once you’re in a few centimetres of water, you can drag the board in front of you as you crab out. Karine has her rear hand centred on the bar. Her sweet spot is relatively far out, as she will need power, lift and support from the kite. She’s holding her board by the front foot strap, and she’s walking out to calf-deep water. You can happily wait in this position if you need to let someone pass or some white-water wash through.
Board Drop Pic B.
Whilst positioning your board, it’s always good to keep the kite forwards. This way, if anything happens or a gust hits, you can let go of the bar, and the kite will drop around the edge of the window with no risk of getting lofted in shallow water. You want to drop your board angled upwind close to your front foot. If you twist your upper body to look upwind, you can then drop the board. Holding your board by the front strap means that the tail is in the water, and therefore the board won’t flip as you release it unless it’s very windy. The other advantage of holding the board this way is that you can just drop it, you don’t need to bend low or squat down. As such, you’re far less likely to accidentally pull on the bar. You can see how Karine has twisted her body upwind, her kite is still around 1 o’clock, and she’s let go of the foot strap so that the board drops down close to her front leg, pointing as if she was riding upwind.
Front Foot First Pic C.
Your aim now is to get your front foot in the strap. You may find this simpler with some support from the kite. If you pull gently on the bar, the kite will support you. You can do this with either one or both hands on the bar. Gently moving the kite to 12 will also support you. Watch your front foot into the strap. It won’t go all the way in without some pressure, especially if you have neoprene on your feet, but try to get your heel over the pad. In the photo, you can see that Karine has slowly moved the kite up to 12 and pulled the bar in for some support. She’s looking at her strap and watching her front foot in. As you do this, the front of the board may sink. At this point, it’s not a problem. If it does, gently lift your toes and bring your knee up so that your board is close to the surface.
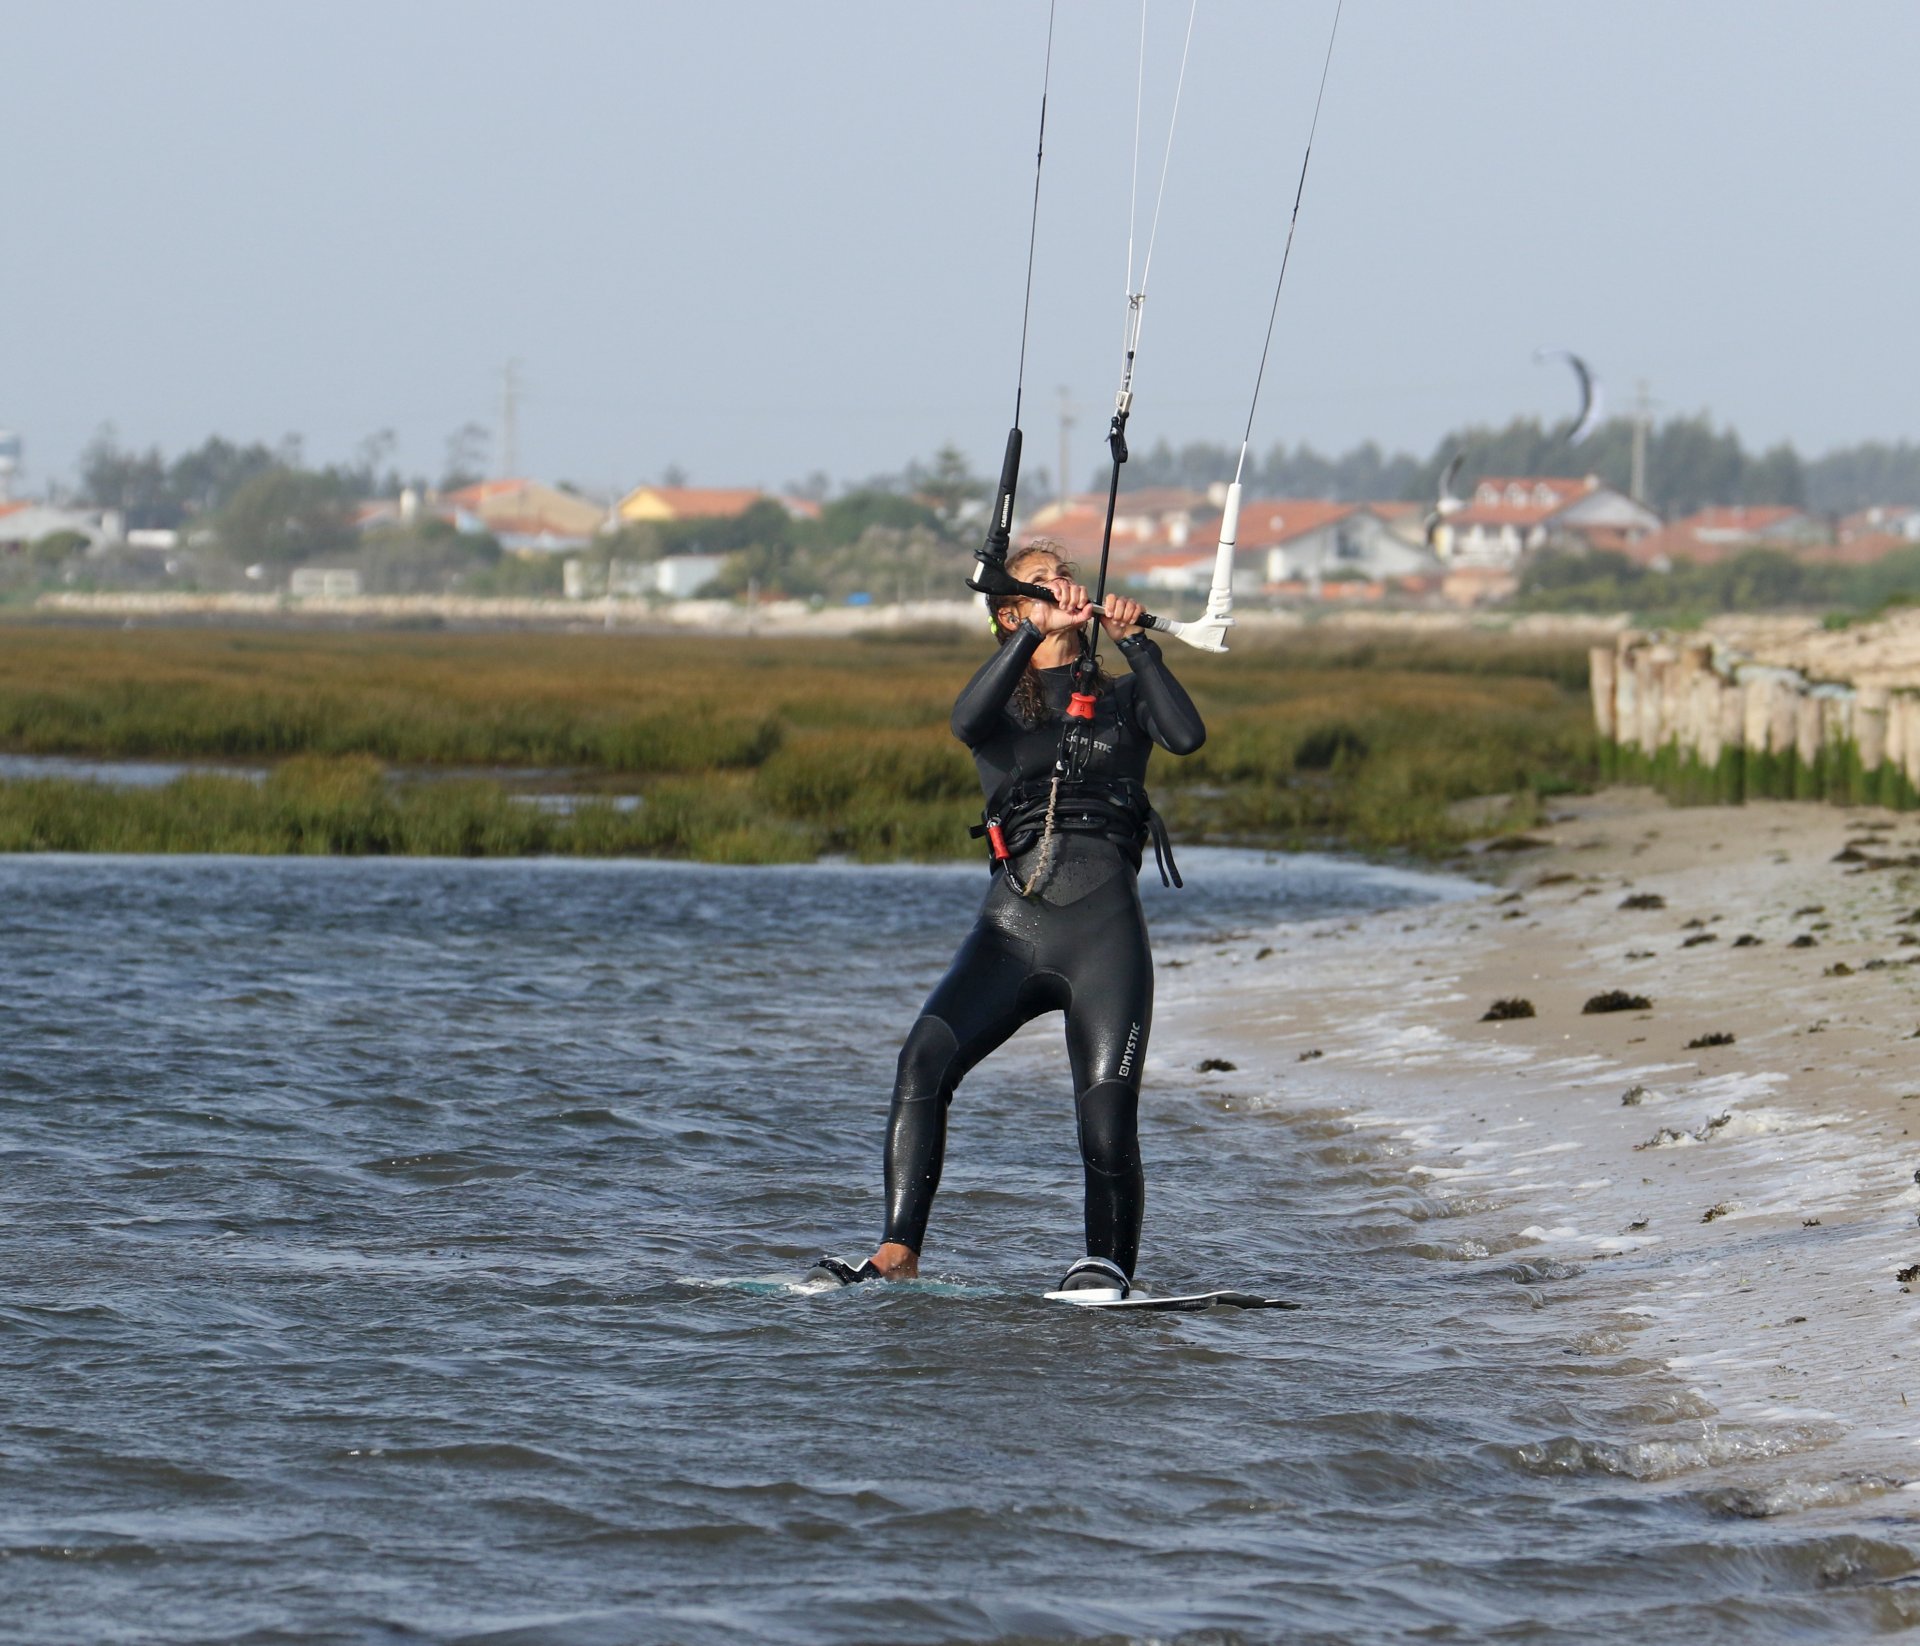
Kite Back Pic D.
With your front foot in, you’re ready to rock. It’s fair to say that the wind affects this next bit considerably. Standing on one leg with a bit of help from your kite is relatively simple in constant wind. However, if the wind is gusty, you will find that the odd little hop to keep balance is needed. It shouldn’t look like you’re changing out of your wetsuit in the shallows, but you’ll unlikely have the poise of Nureyev. With both hands narrow on the bar, you want to move the kite slowly back to either 1 or 11 o’clock, whichever is away from the direction you intend to go. Keep the bar pulled slightly in to stop the kite bouncing about. And keep your toes up to keep your board in place. The reason to move your kite back is so that you can use it for lift to help you get on the board without sinking it. If you start at 12 o’clock you can only dive the kite down into the window, which is likely to end in tears. Looking at Karine, she’s pulled the bar in a touch as she moves the kite back to 11 o’clock. Her hands are narrow on the bar. She’s watching the kite, and even though the nose of her board is submerged, she keeps her toes and forefoot up so that it can’t go anywhere.


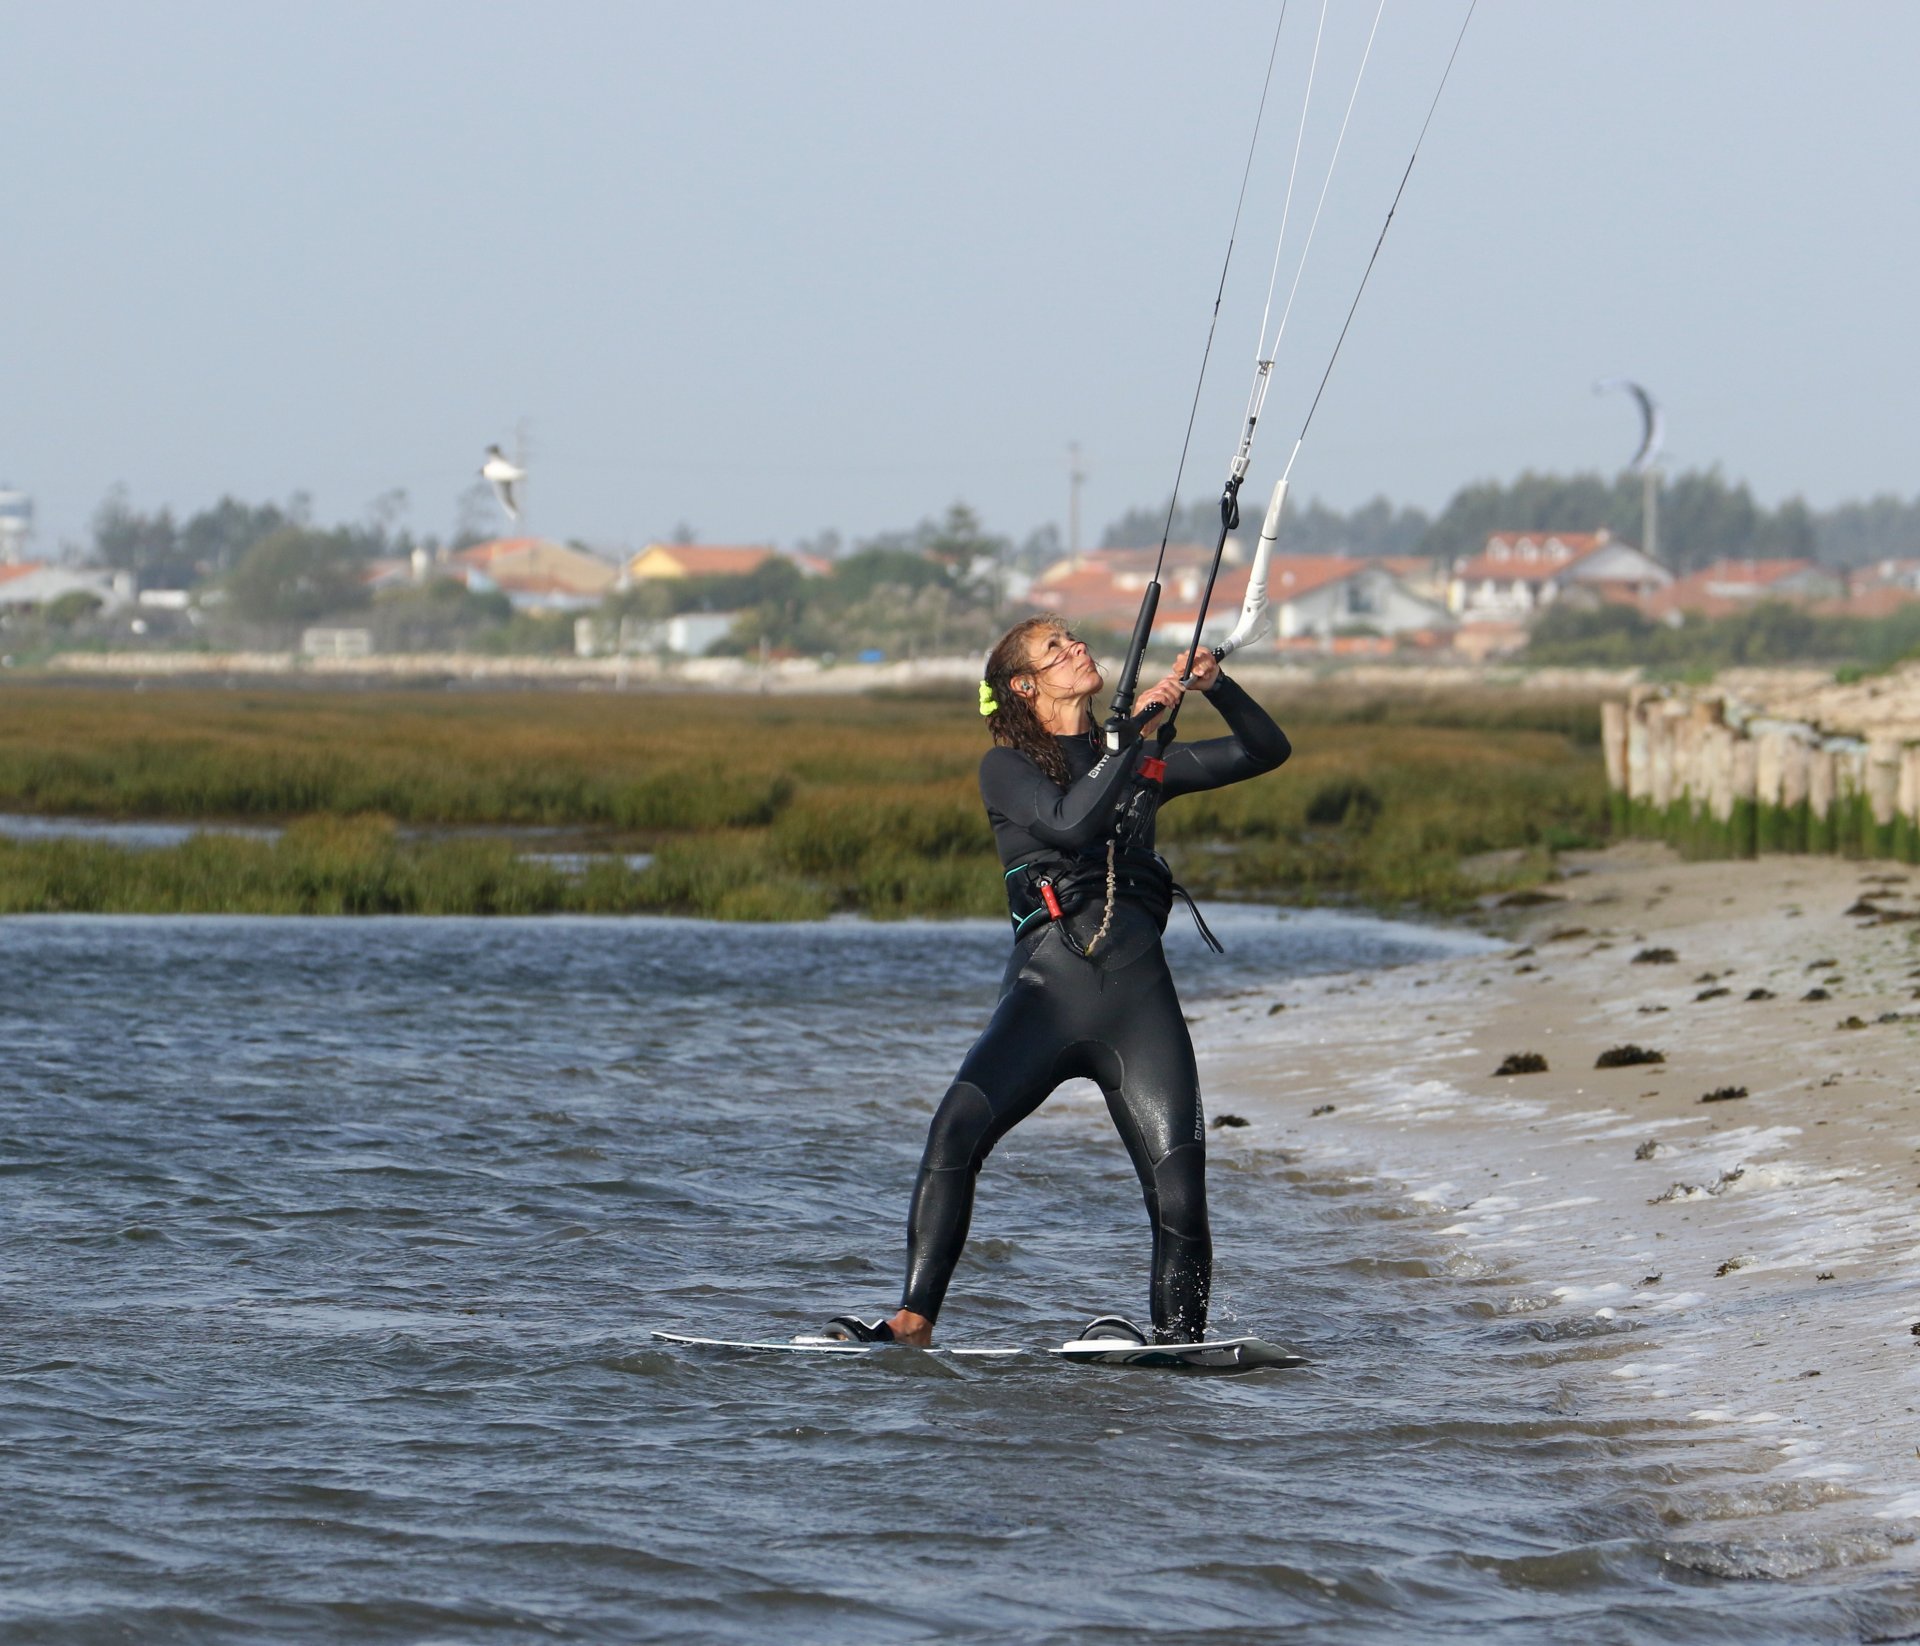
Green Light Pic E.
With the kite in position, it’s best not to hang around. Your aim is to positively steer the kite forwards so that it moves from, in this case, 11 to 1 o’clock. As it turns, it will go up, giving you lift, which you can use to hold you and prevent the board from sinking as you step onto it. In the photo, Karine is steering her kite forward with a very positive action. She wants to get it moving. She’s watching her kite so that she can see once it’s turned and starts moving forwards. In anticipation of what’s to come, she lifts her front foot, holding the nose and toeside edge above the water.
Up and On Pic F.
Once the kite turns and starts to move, it will lift on your harness. If you watch your kite, you’ll know when it starts to move across the window. As it does, you can level the bar, as you don’t want it to dive down. You can control the lift by sheeting in or out and use it to support you by sitting in your harness so that you can lift your back foot into the strap without pushing the nose down underwater. Karine has swapped her gaze from kite to board and is watching her back foot into the strap. She’s pulled in on the bar to take the weight off her front foot, and she’s levelled the bar to stop the kite diving. With the bar level, the kite will still move, but it won’t turn down.
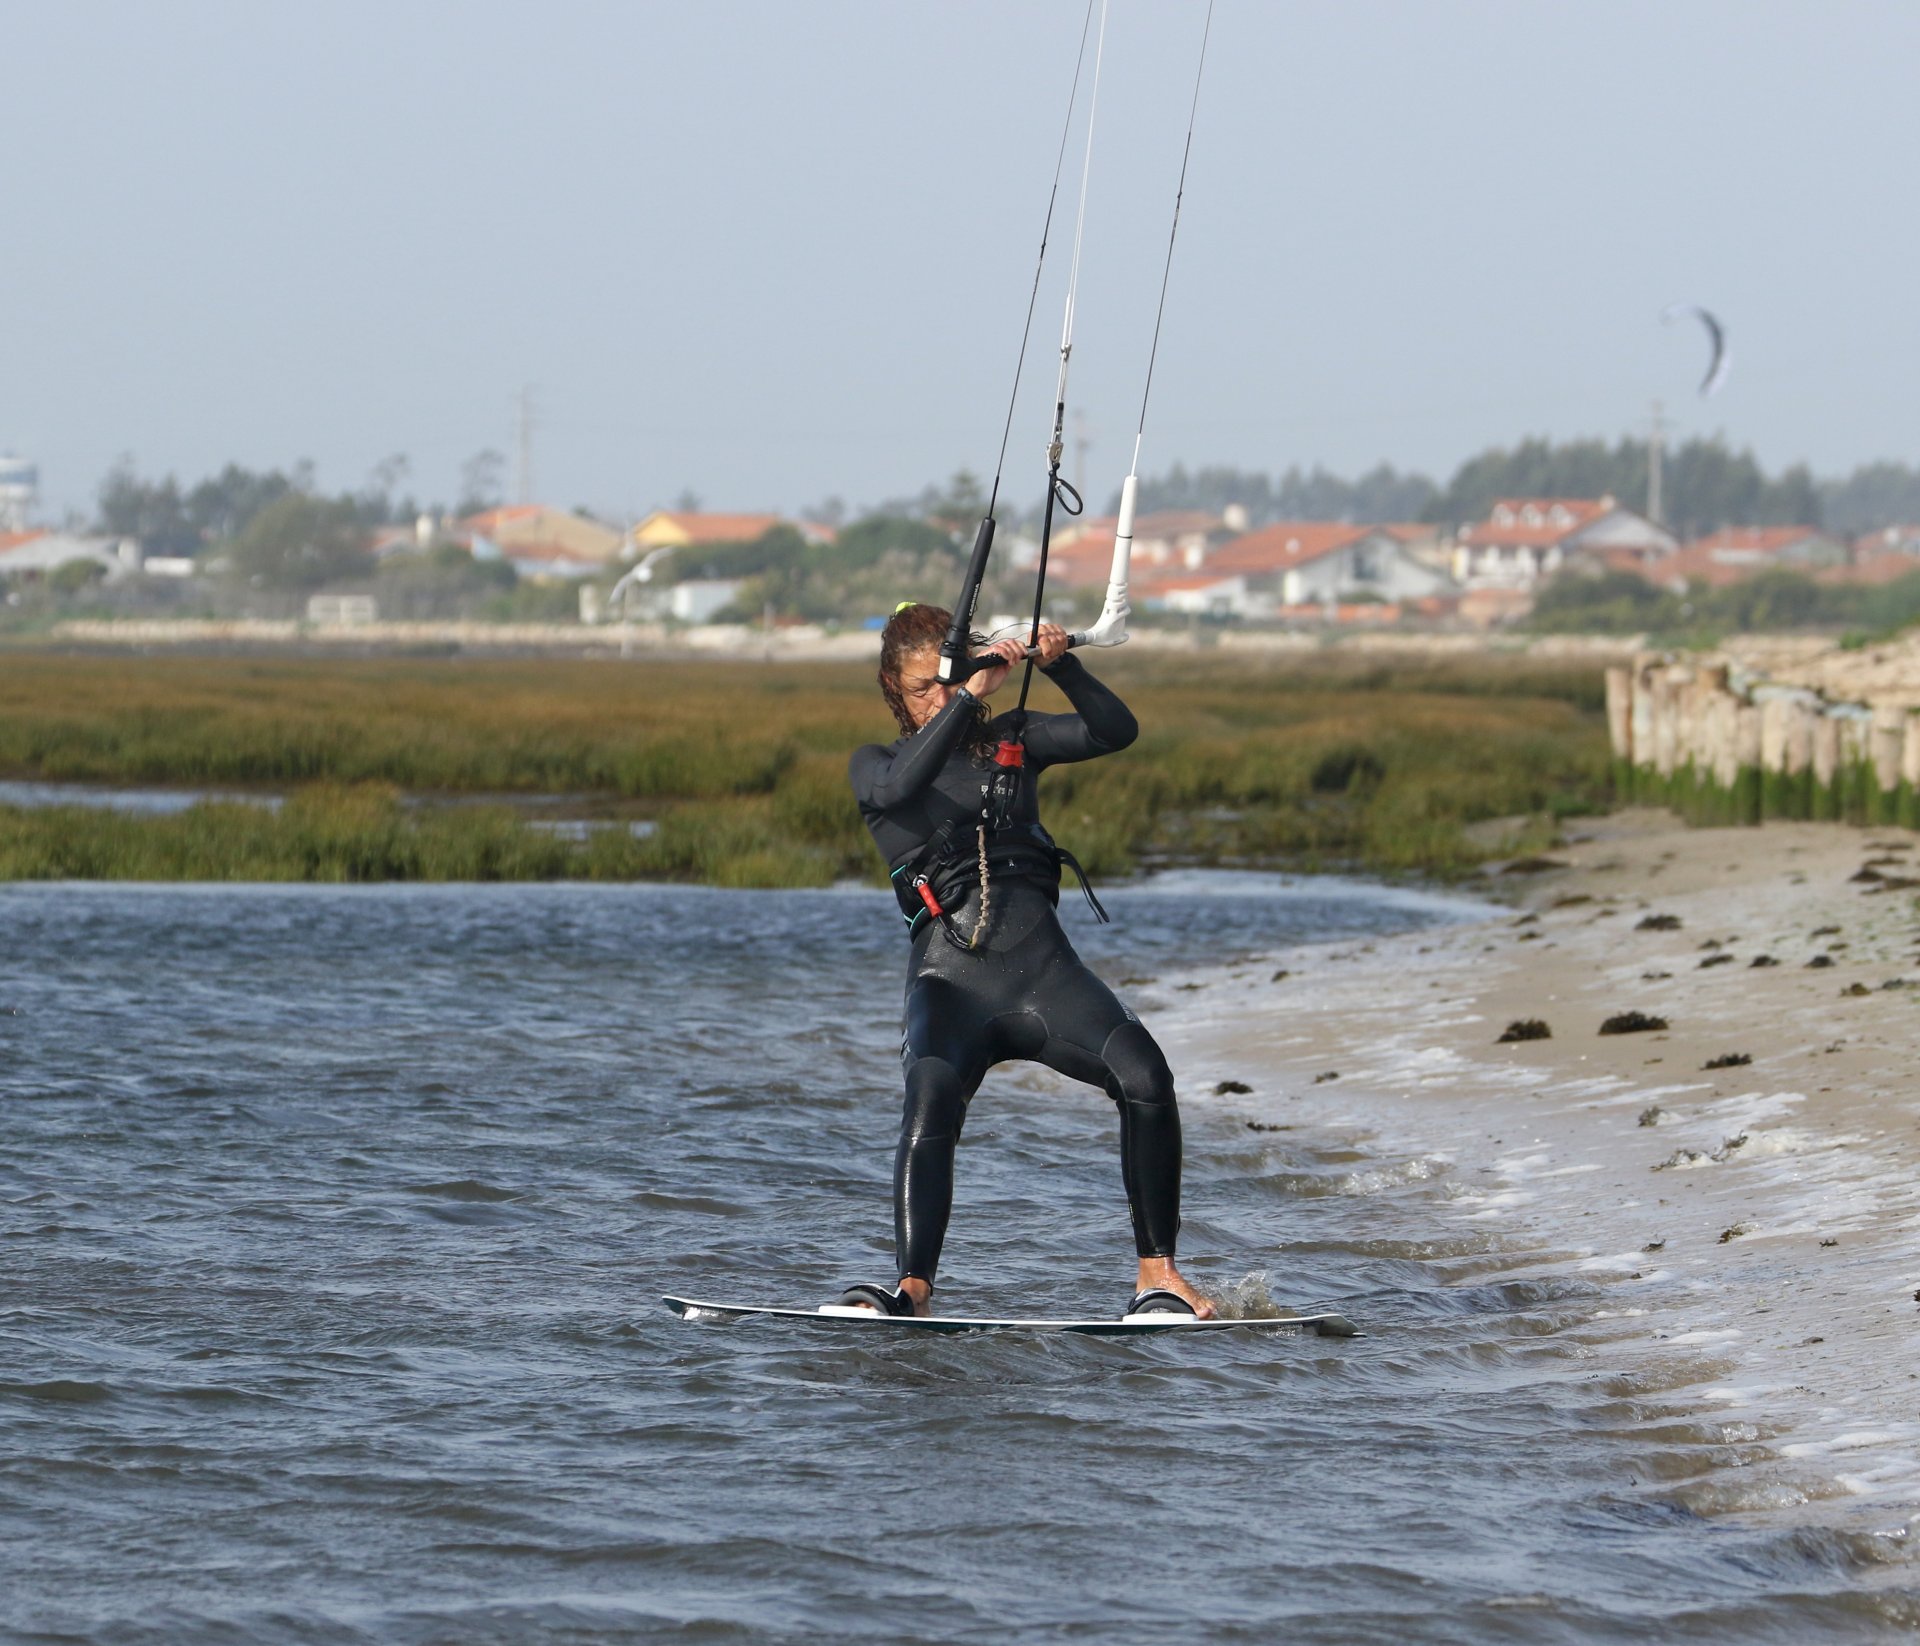
Edge and Go Pic G.
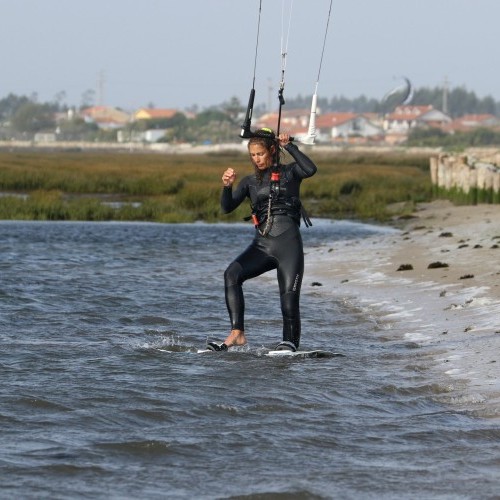
Once your back foot is in, it’s full steam ahead. Drop your weight onto your heels and twist to look upwind. This will push your hips back and set you into your riding position. As you do this, you can dive the kite. You’ll be in a good position to take the power as it comes on. You can see that Karine has dived the kite, dropped her weight upwind and back, directing the board where she wants to go. Bingo.
Top Tips
Although it’s not always possible, finding some shallow flat water will make life easier. If you’re fighting a shore break and moving water, learning will be tricky.
If you ride with your straps tight, try loosening them a little for your first attempts, as it will make slotting your feet in easier. However, if they’re too loose, you won’t be able to hold the nose up, so don’t go mad.


Be gentle when you turn the kite to get the hang of things. This will probably result in little or no lift. However, as the kite moves, you can sit into the water and then dive again to start. Once you’ve built your confidence, you can steer the kite more quickly to get the up and over 12 o’clock lift.
Have a look at the sequence and check out the full video to get yourself prepared…
Common Problems
Having a hard time keeping your balance. Use the kite. It’s there to support you. And make sure the board is not too far away from you when you drop it. If you’re stretching and reaching, you won’t be balanced.
Not getting any lift to step the back foot up. Two solutions. Make sure you take the kite back before starting. Only if your kite starts at 11 or 1 will you generate lift. If you start at 12, you’ll only get forward or downwind power. If the kite is behind you but still no lift, you’ll need to be more aggressive with your steering forwards. Remember, it can be aggressive, but only momentarily before you level the bar to straighten up the kite’s flying line.
Always sinking the nose and getting pulled over the handlebars. Sure sign that your kite isn’t starting behind you. Take it back first.

Keystones:
- Front strap and kit forwards
- Front foot first
- Kite slowly back to 11 or 1 o’clock with bar slightly in
- Positive steering forwards to generate lift
- Watch back foot in, drop weight and dive kite
This technique article was in Issue 92 of IKSURFMAG.
Related


By Christian and Karine
Christian and Karine have been working together as a coaching team, running improver to advanced kitesurfing clinics since 2003.
