
Learning to Loop Part 2 – Toe to Heel Downloop Transition
Technique / Beginner

Introduction
If you've joined the ranks of under-turners and downloopers from our Learning to Loop #1, it's time to build more confidence, practise more, get more comfortable, and while you're at it, add another string to your bow. This time around, it's a veritable killer combo. Your mission, should you choose to accept, is to marry a toe to heel carve with your new best friend, the downloop.
We're starting with the toe to heel for a number of reasons. The toe to heel is the logical follow-on and extension of a slide turn. As such, it's the more intuitive carve. It's likely the first carve you learnt, perhaps even by chance, when a toeside attempt didn't quite go to plan. It's quite natural to relax your edge, flatten your board and start the carve from toeside. The real beauty of a toe to heel and the reason why it fits so well with your downloop is that you exit heelside. Should the kite pull more than expected, you'll be in a strong position to control it, finish your carve and ride out.


As you already have the know-how on the mechanics of the loop and practise with the slide turn, we'll be looking at the intricacies to make this a most smooth and satisfying transition.
When to loop? The downloop is all about timing; when to pull the trigger. The answer remains the same, both when you have less resistance from your edge and when you're in a strong position ready for the pull.
Kite Position. Rule number three from the last video still applies, and here it's pretty much identical to the slide turn. Your kite needs to be high, but it can't be at 12 because you're riding. You'll approach with your kite around the 11 or 1 o'clock mark.
Right, let's have a look at the finer points…
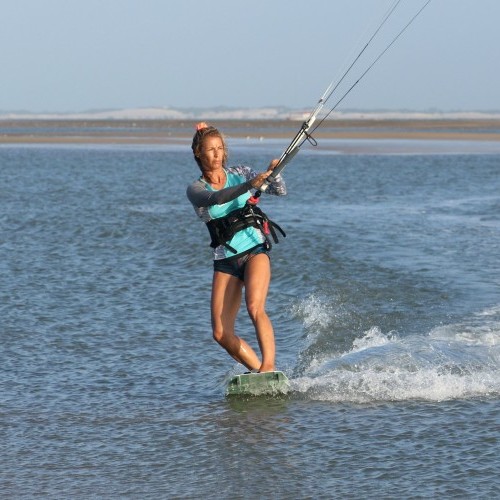
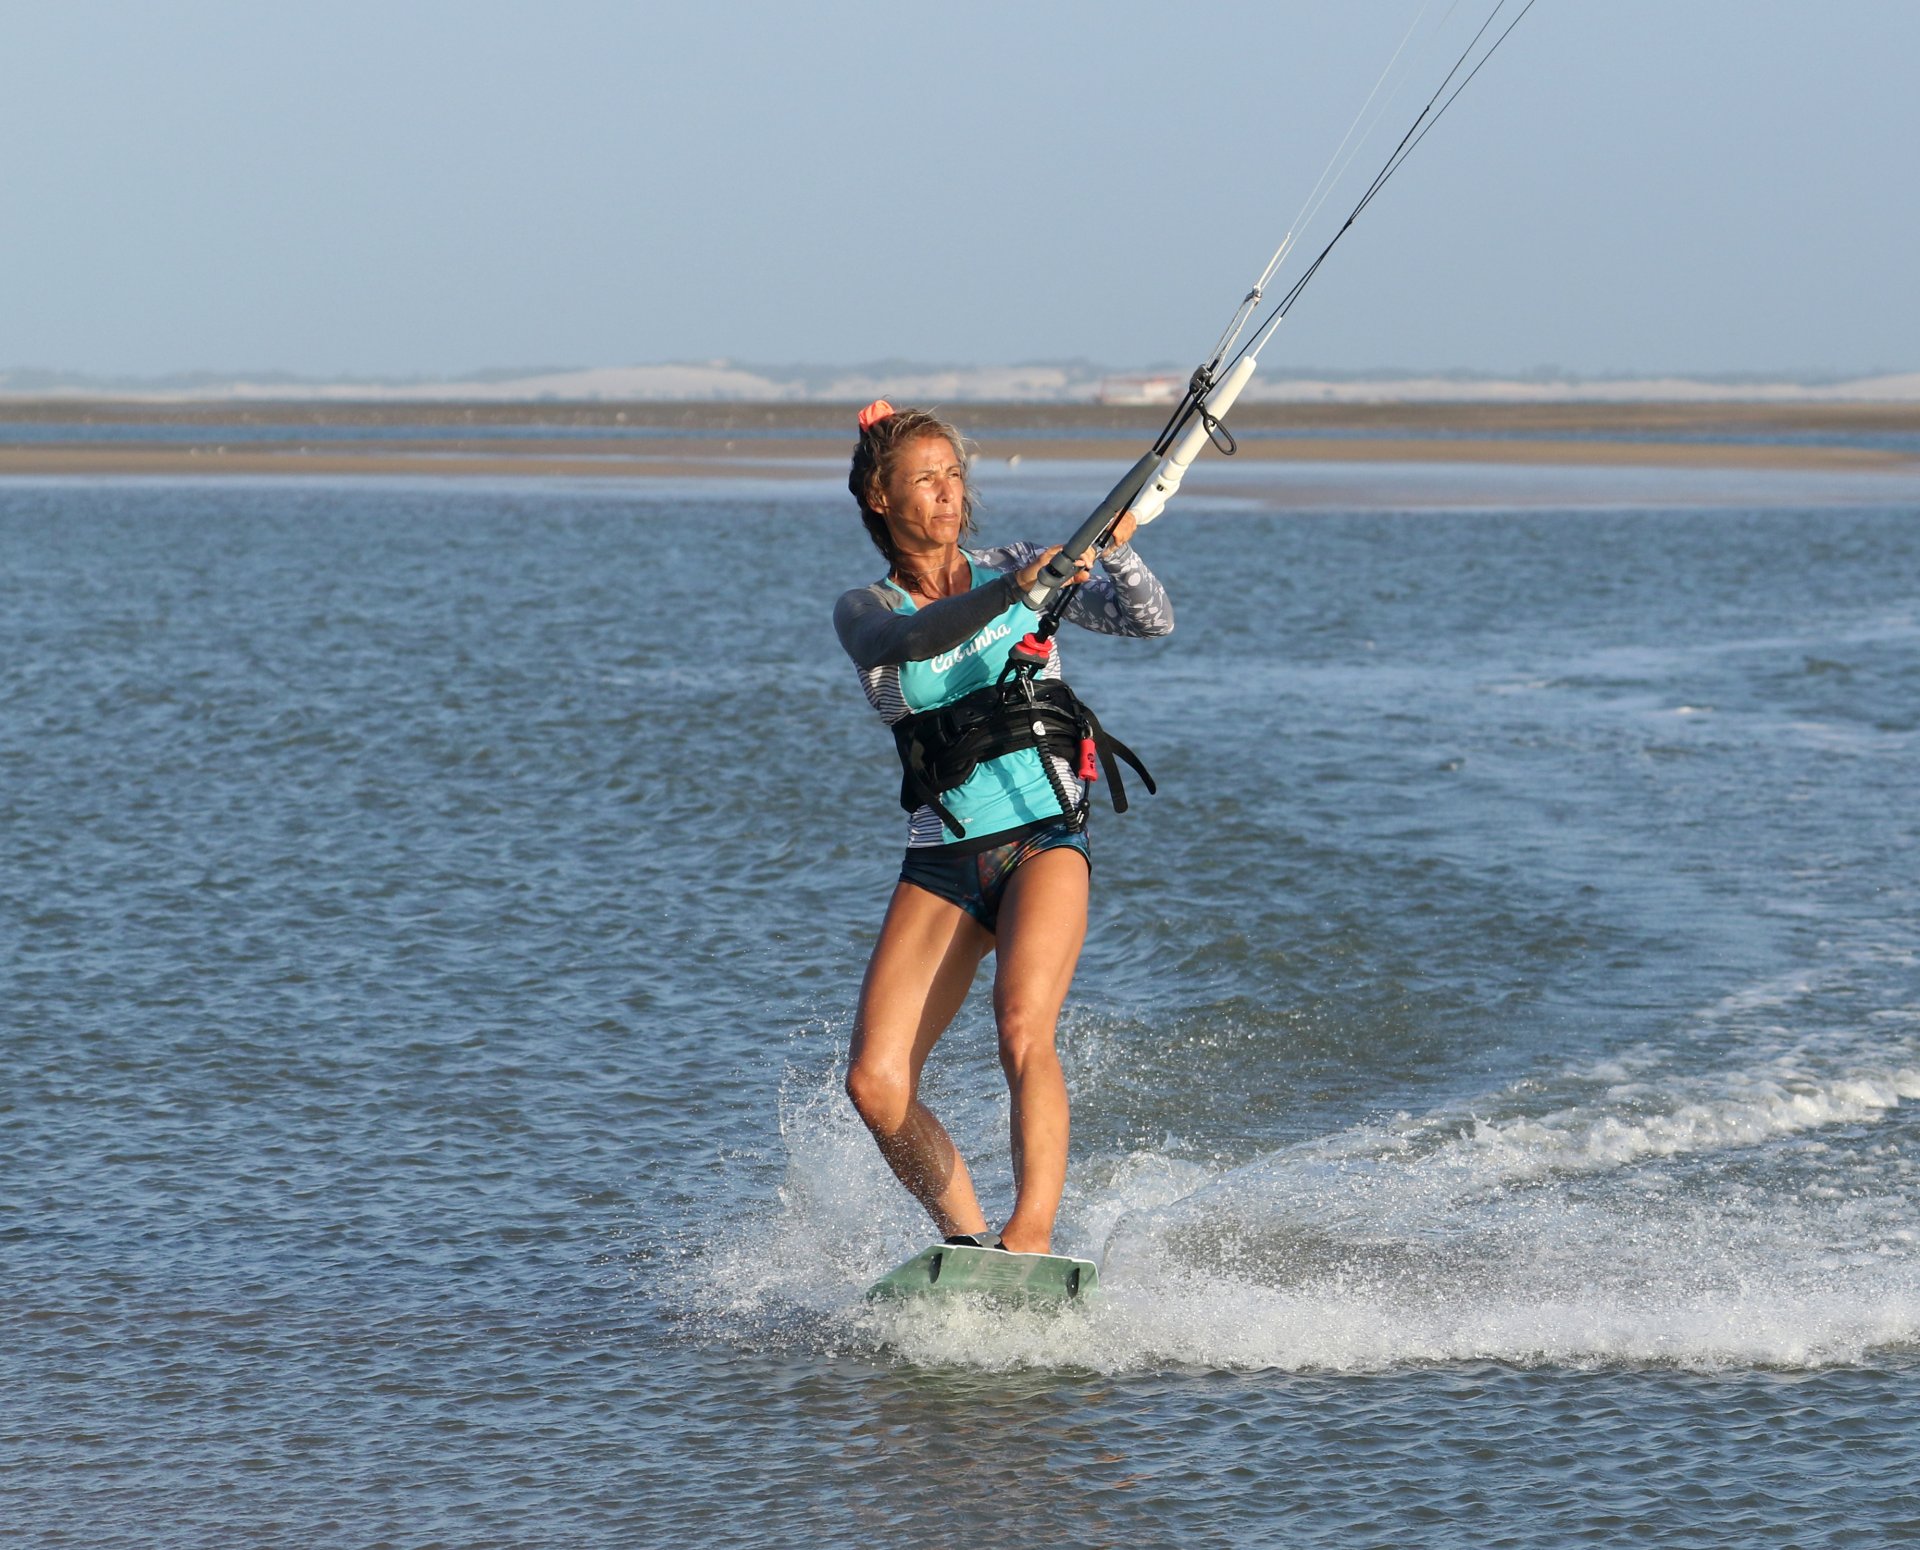
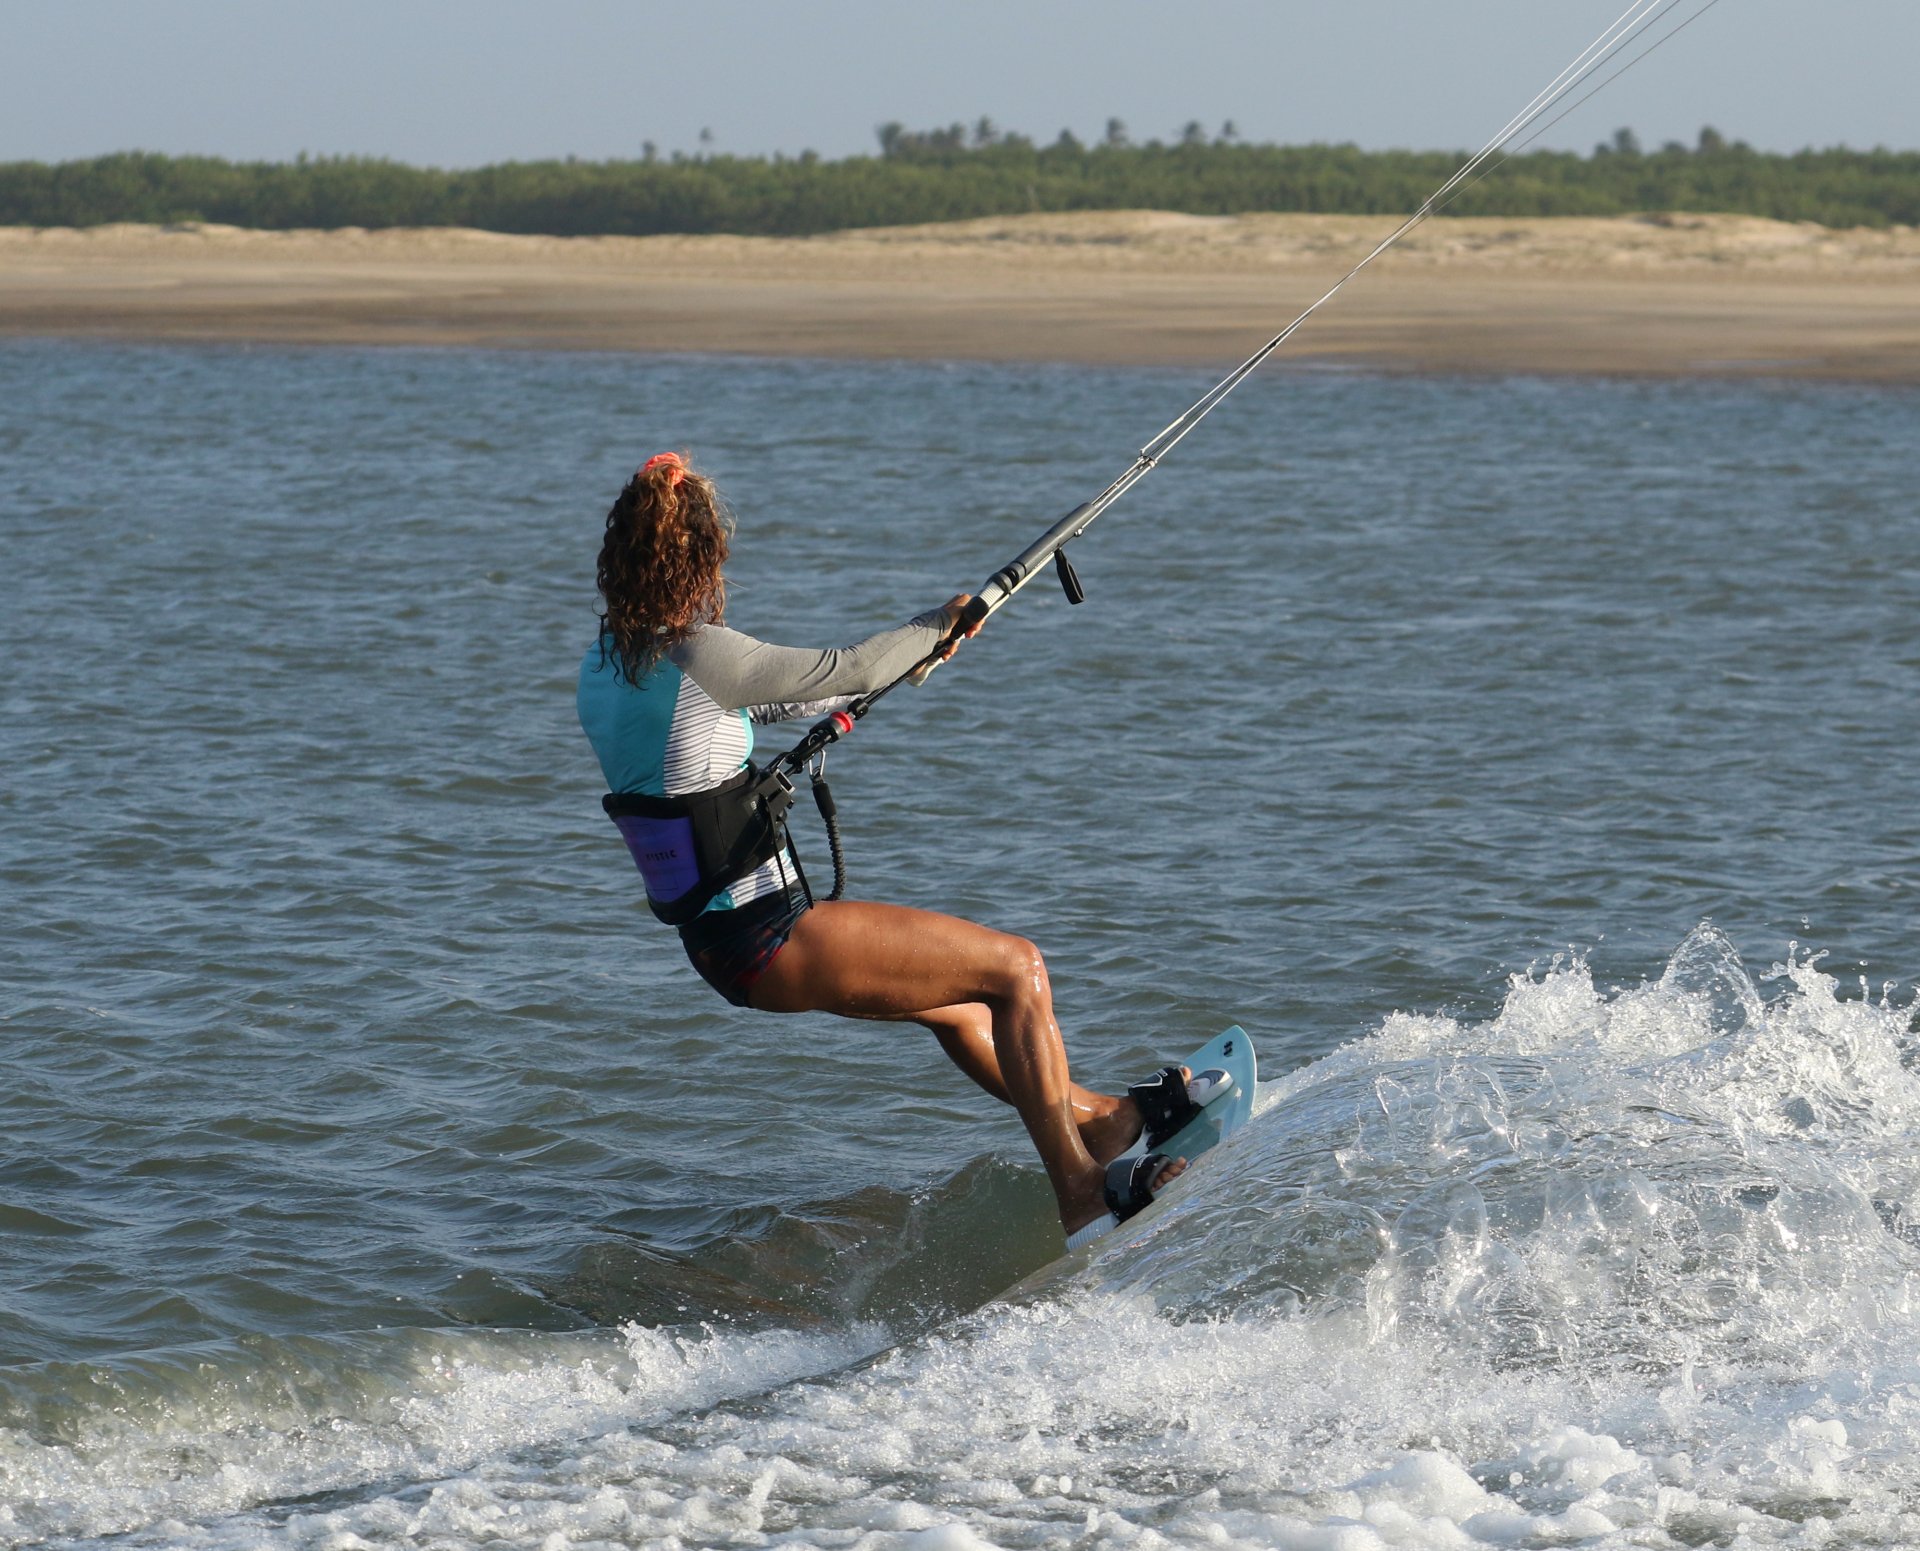
Approach & Check Pic A.
To get yourself ready, you need to be on a good toeside edge. This way, you'll be in control of your board and your kite. Regardless of where you have your kite, pre-carve, you want to position it around the 11 or 1 o'clock mark. This way, the kite is high enough to downloop, whilst you'll still be able to edge. You also need to have your bar trimmed in sufficiently that you can reach it with both hands. Before you do anything else, check that the coast is clear and that you've got enough space downwind. Once you're ready, you'll want to slow down a touch so that you're not rushed. Ease the bar out a little to control your speed. Here, Karine is on a good edge, weight centred and riding upwind. Her kite is at 1 o'clock, and bar is trimmed close even though she is riding with one hand. She's had a good look in her mirrors and has eased her bar out a touch to slow down.


Kite Up & Relax Pic B.
Now that you know there's space and you've slowed down a little, it's time to get the ball rolling. First thing is to get your front hand on the bar (if it isn't already), as you're really going to need it for the downloop. As you reach for the bar, the kite will likely pull you up slightly over the board, which is no bad thing as it will relax your edge. In the early stages, once you've got both hands on the bar, you can then drift the kite up a tad higher to give yourself more room for the downloop. This will also help lift you over the board in preparation for your carve. In the photo, you can see that Karine has reached her front hand onto the bar and has drifted her kite up. This has brought her weight up over the board and relaxed her edge.
Flatten Board Pic C.
To initiate the carve, your first job is to flatten your board. Rather than trying to get immediately from one edge to the other, think of it as transitioning from your toe edge, over a flat board, before rolling onto your heels. This way, you'll have time to think. However, don't confuse flattening your board with turning it off the wind. Keep your weight centred and your hips facing forward. Karine has let the kite pull her up over the board and off her edge, flattening her board whilst maintaining the same body position.
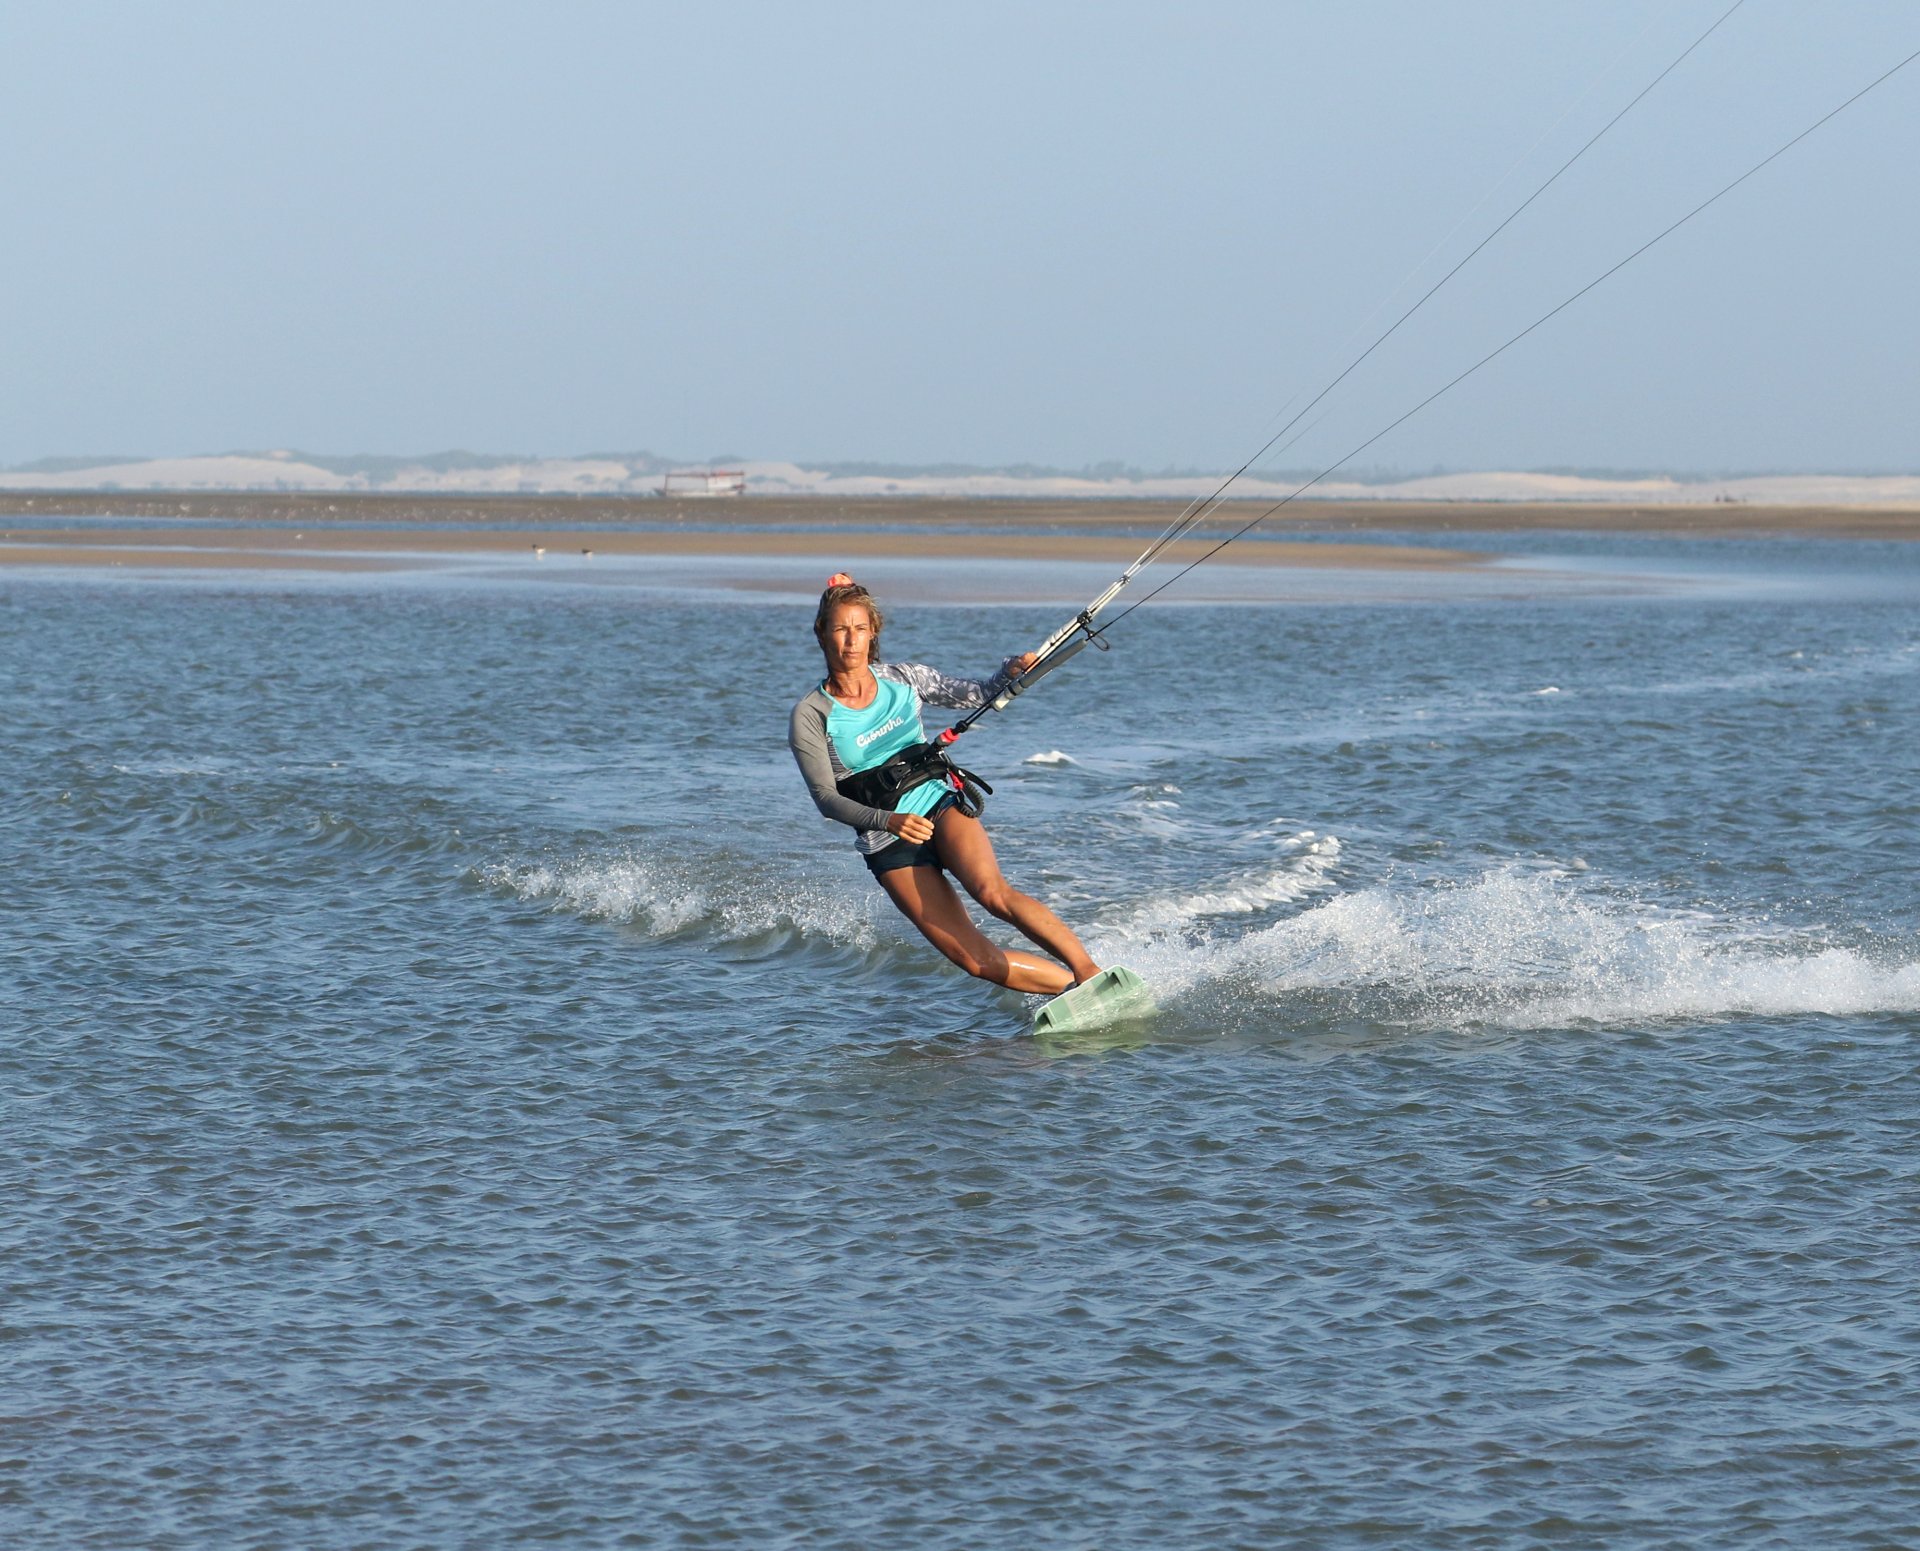
Carve Pic D.
To get the board carving, sit back over your trailing foot. This will put weight onto the tail of the board and onto your heels. The curvy tail will steer your board into the carve. This doesn't have to be aggressive. As long as you weight your rear heel, the board will turn. Look at your kite. This will turn your head, shoulders and hips so that you go with the board as it turns towards the kite. You can see that Karine has dropped her weight back over the tail of her board, bending her back leg and sitting onto her heels. Watching her kite encourages her to turn and face where the board is going.
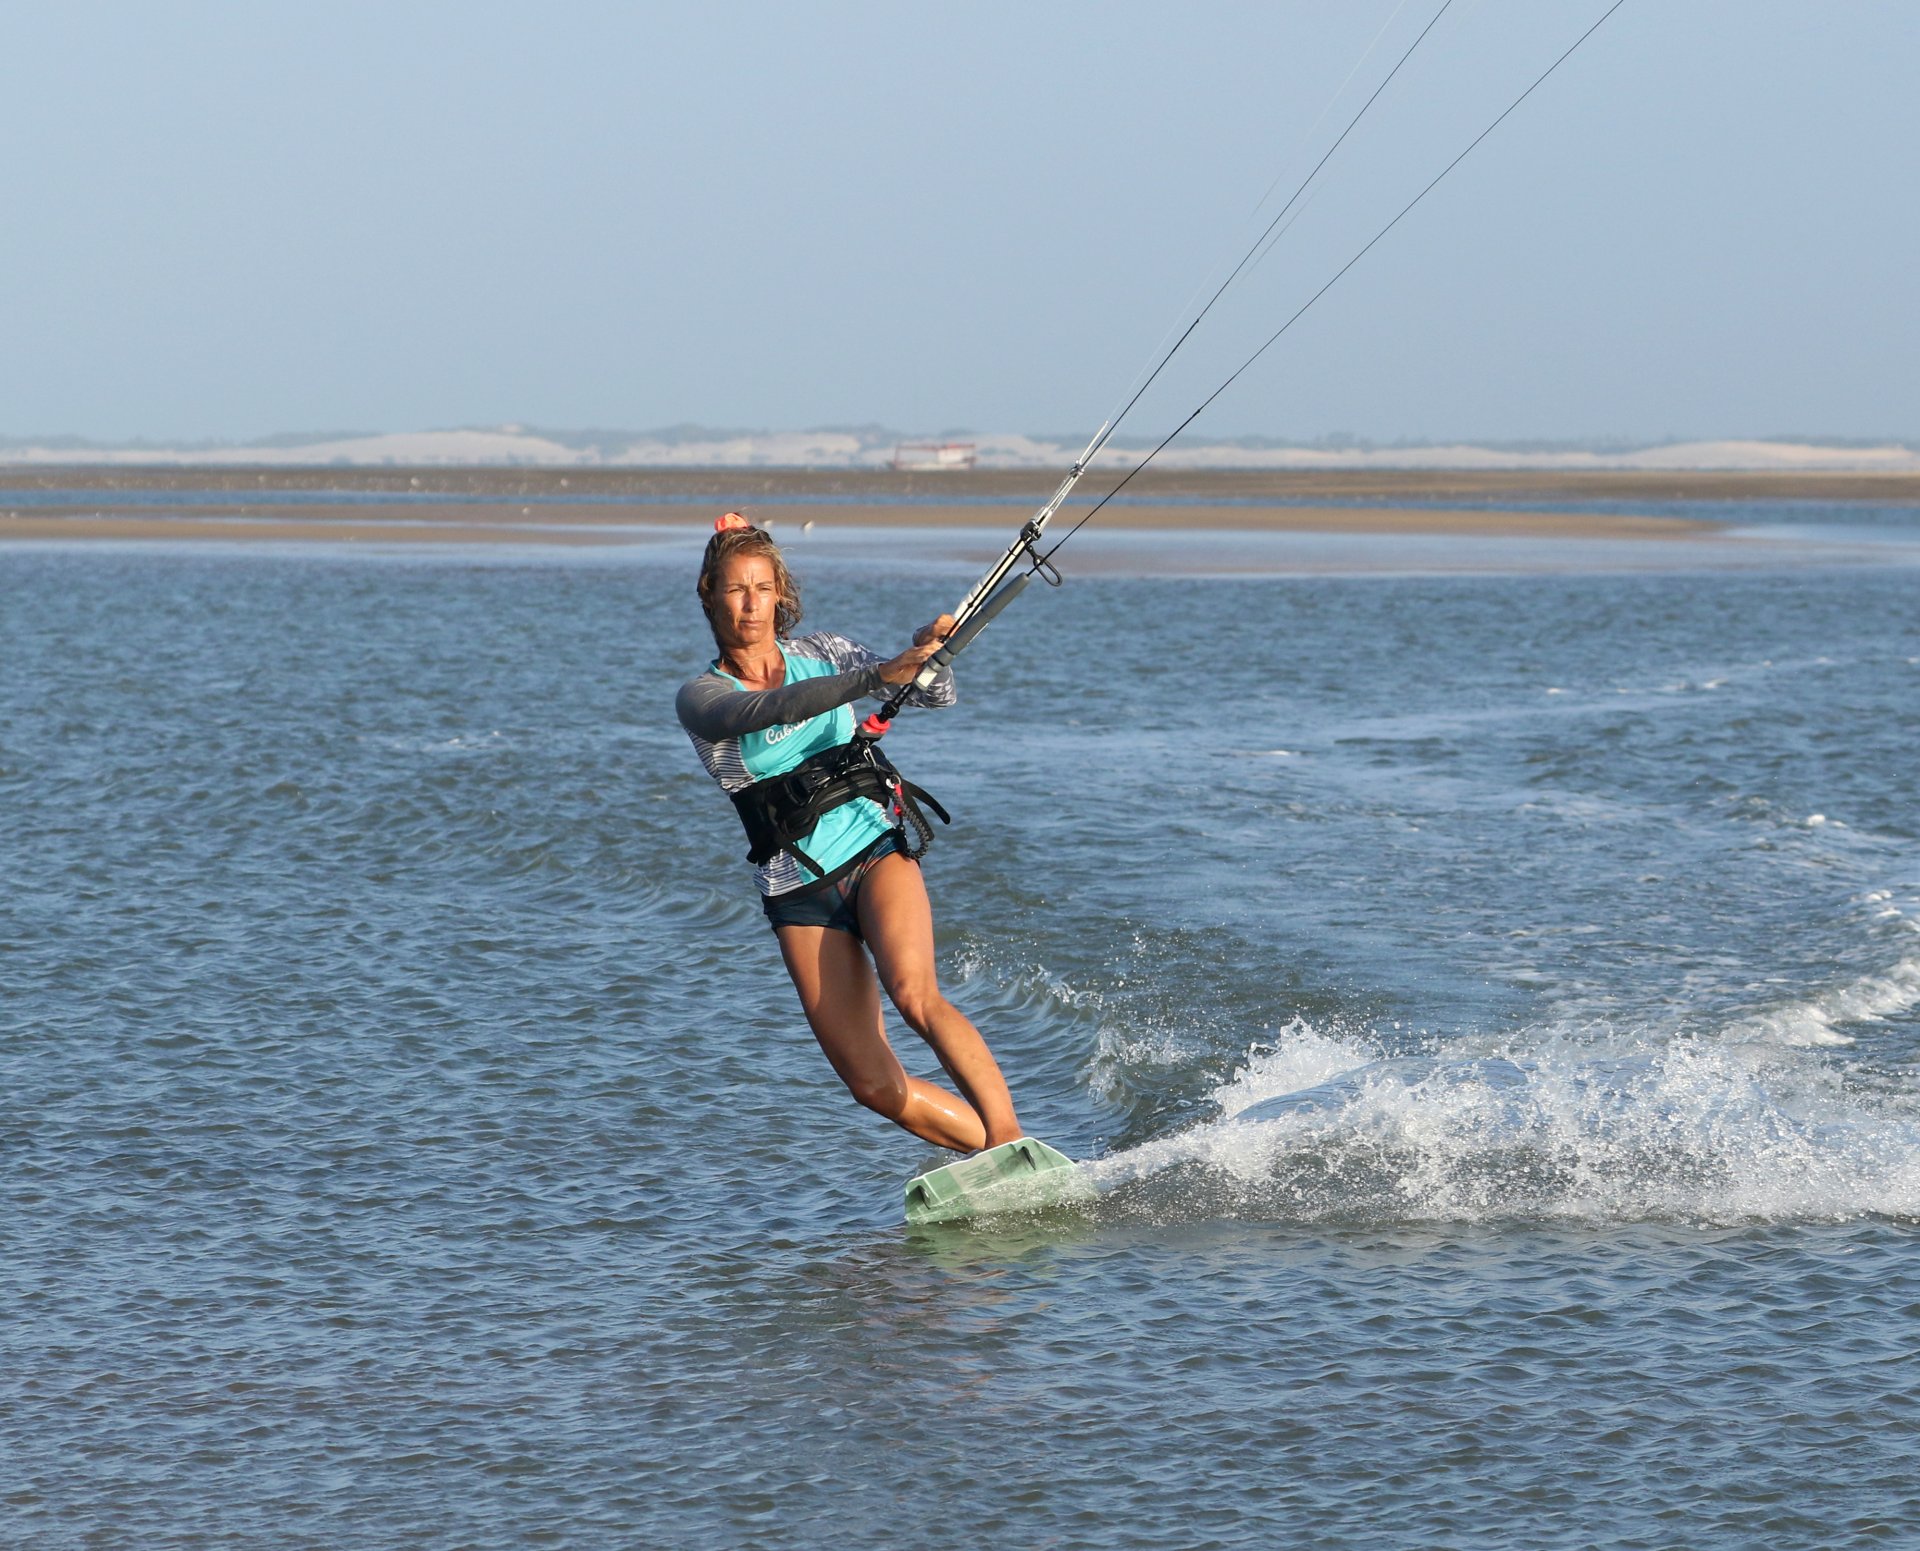
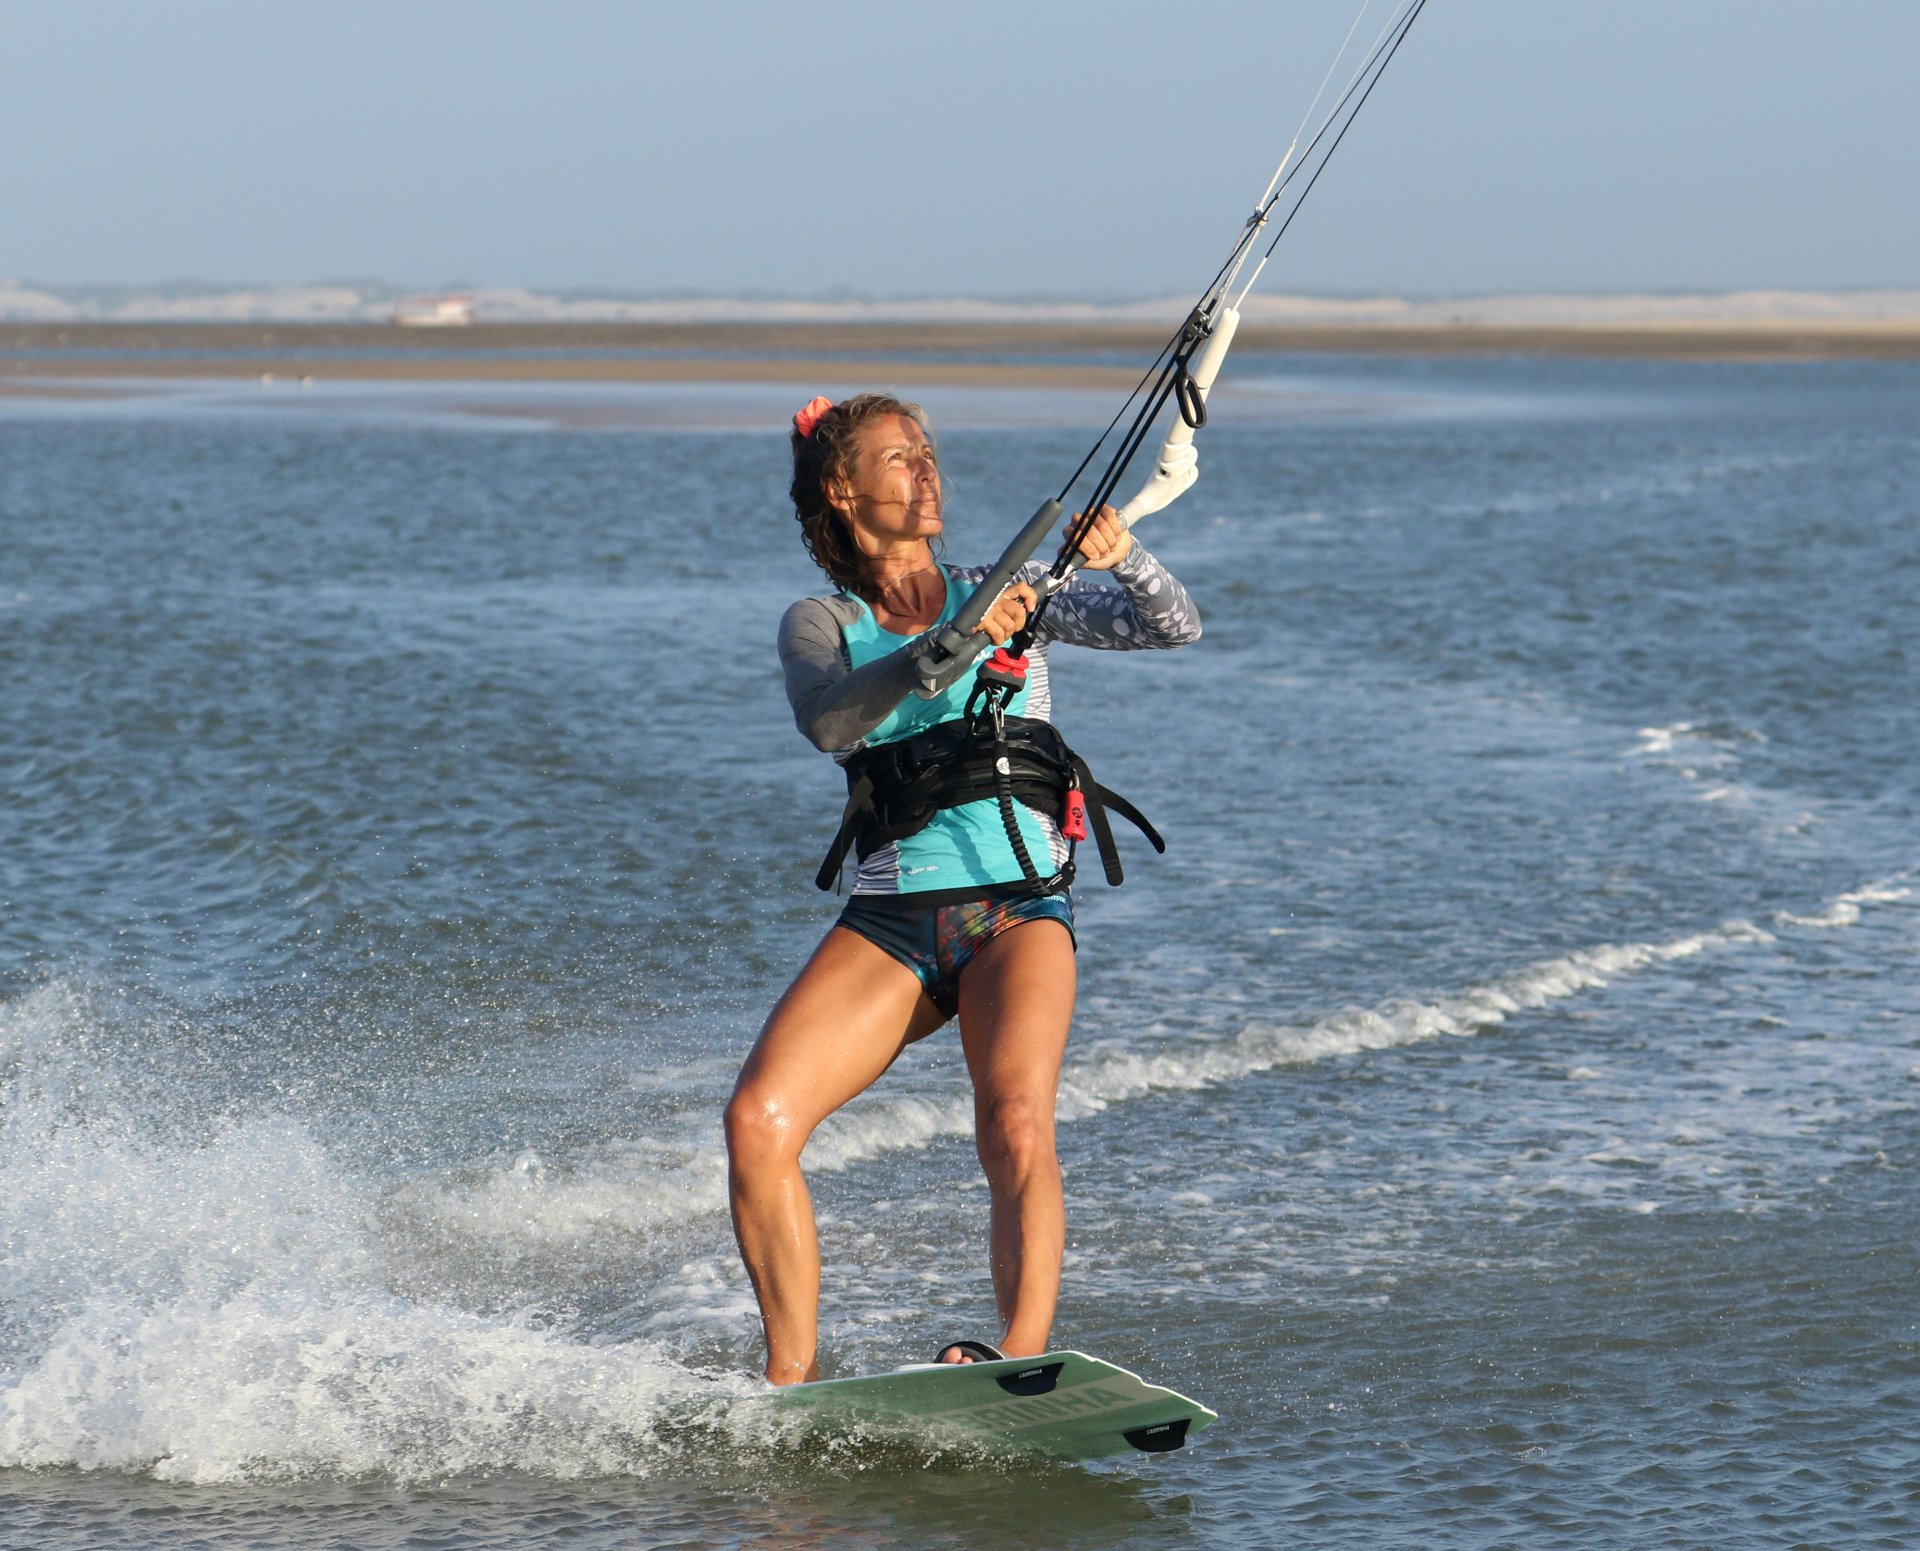
The Full Monty Pic E.
The moment you've been waiting for. With the board carving downwind, you now have no edge and less tension. You also will have your weight back over the tail of the board, so you're in a strong position that will make the board turn and from which you can take some power. In short, you're ready! It's time to loop. You know the score, exactly as you did for the slide turn, a committed pull with your front hand and push with your back hand to initiate the downloop, keeping your bar on the sweet spot. Karine has her weight back and is in a strong position, effectively the position that she will ride out in. She's got her eyes on the prize, watching her kite as she gives it the beans on the bar.
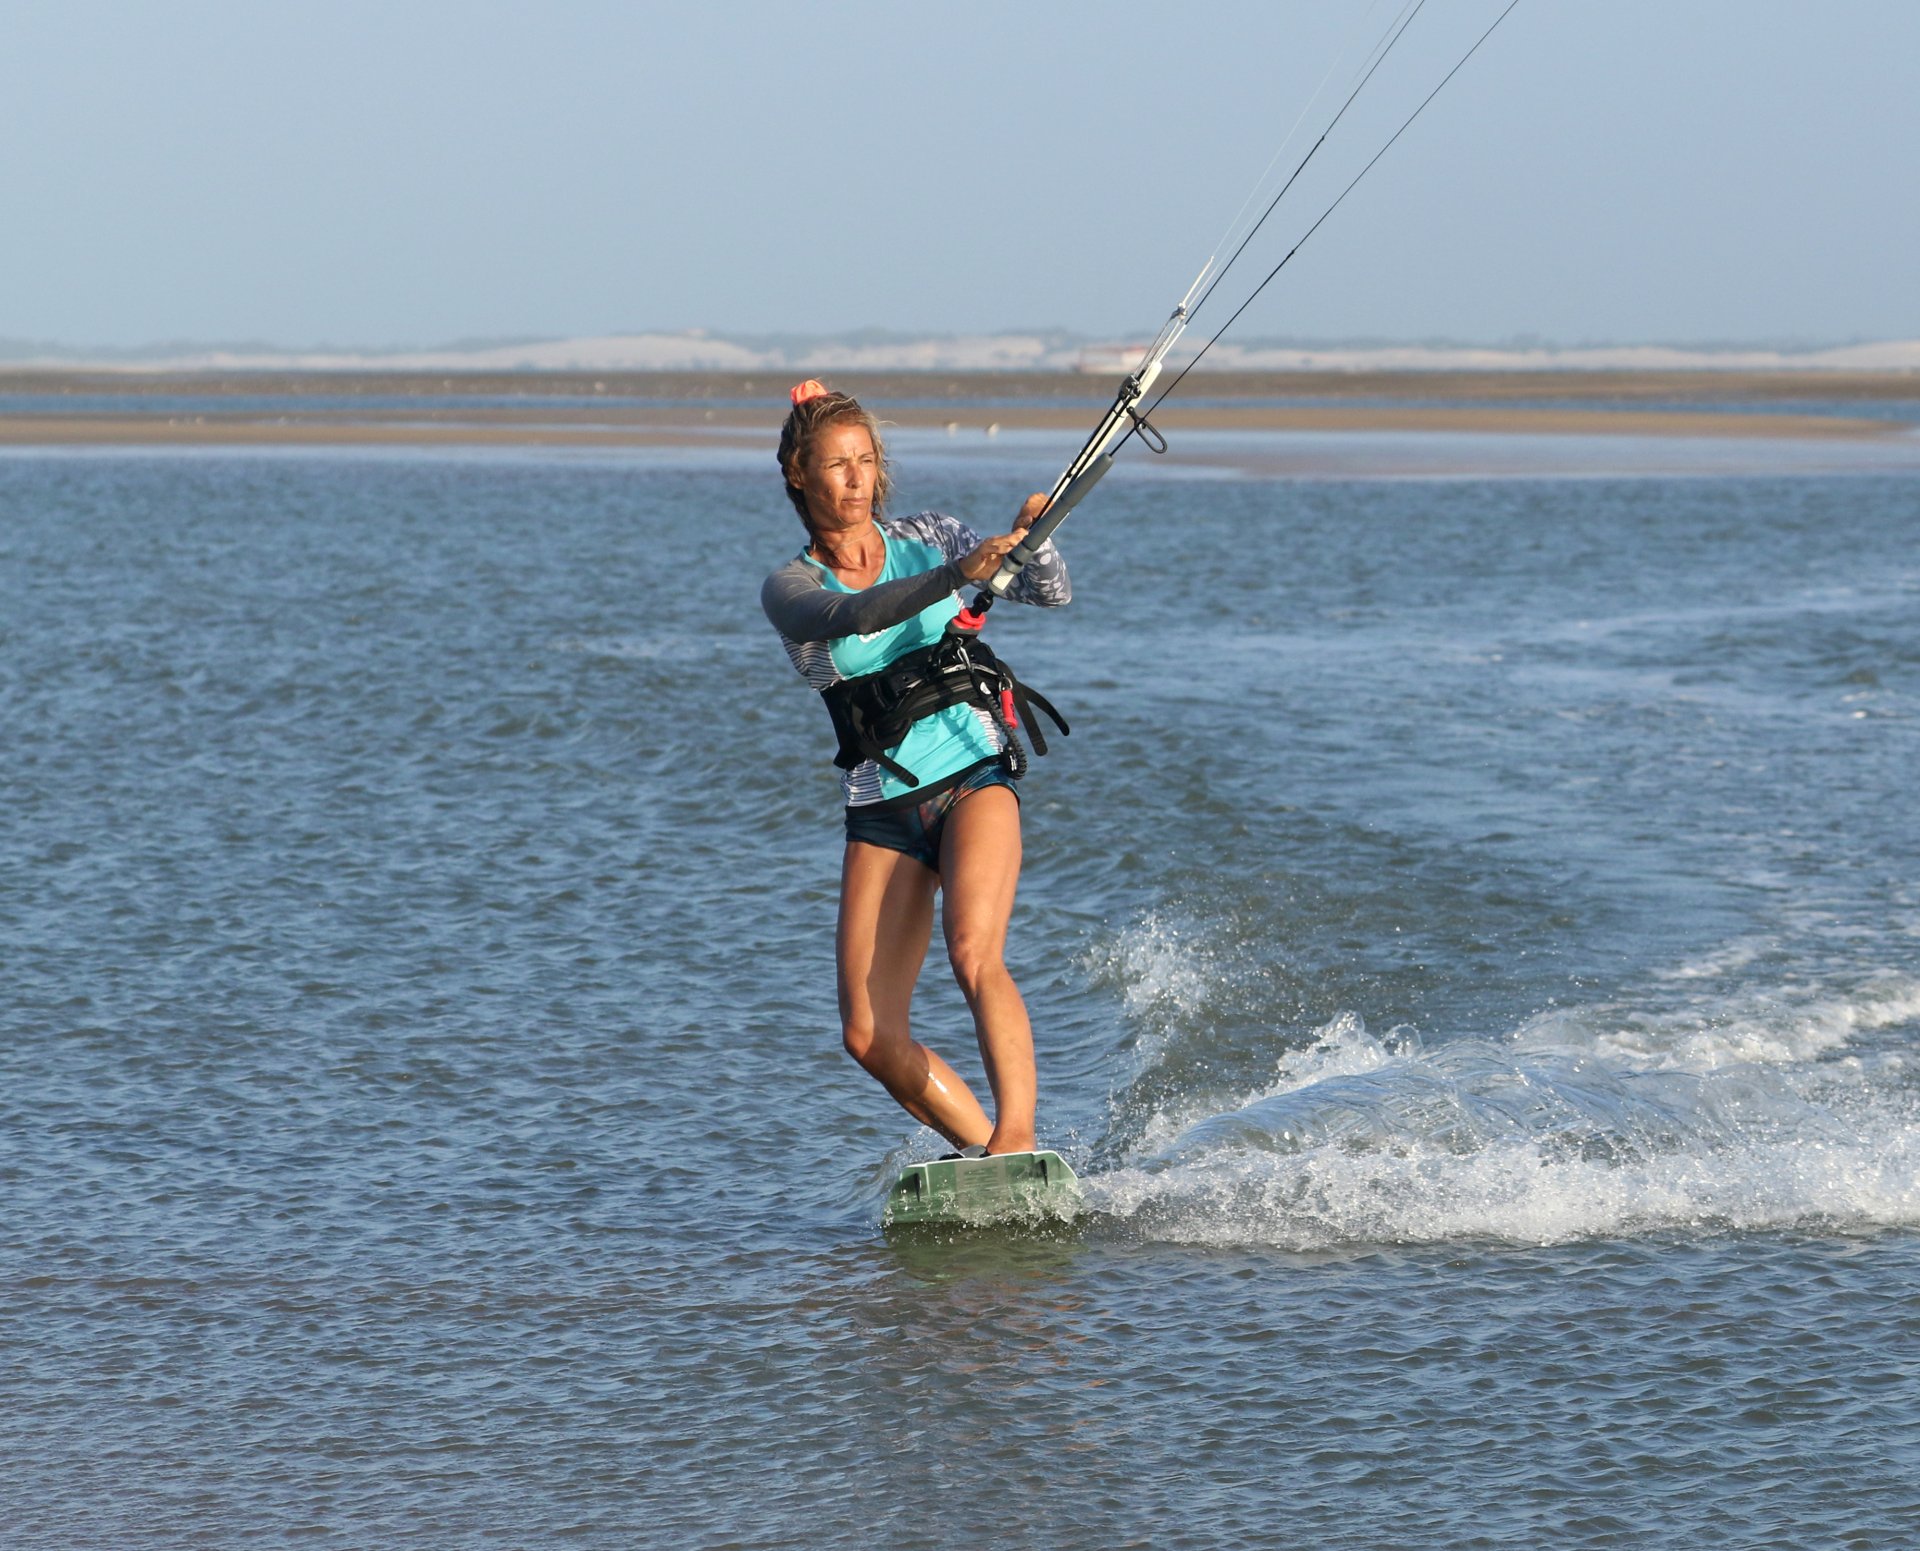
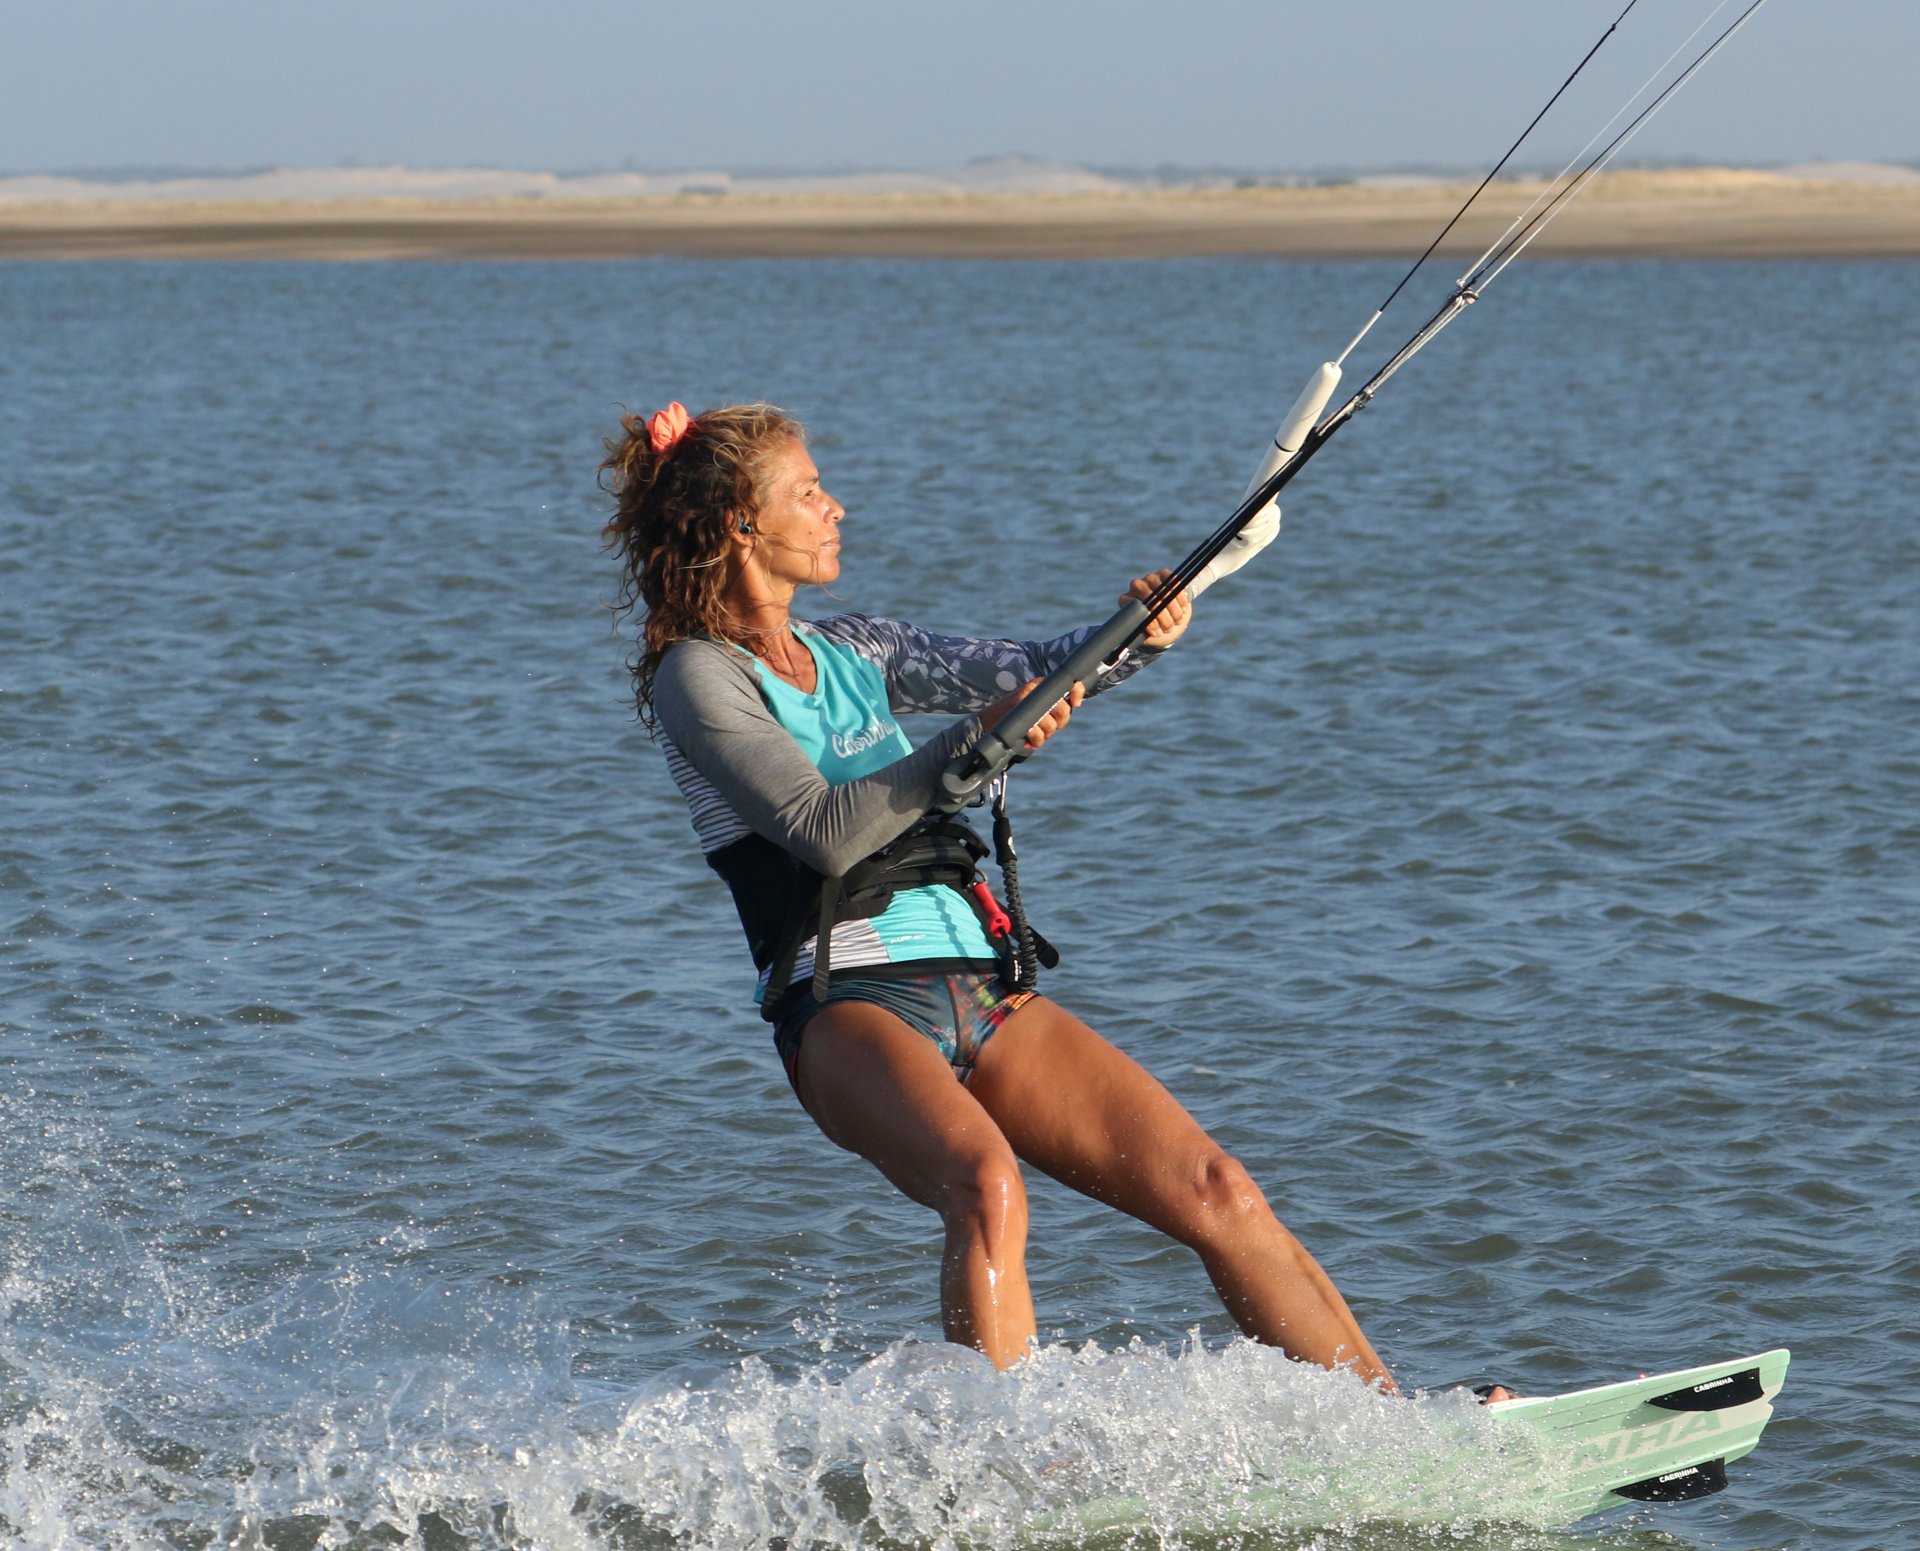
Lock In Pic F.
Just as before, once your kite starts its downloop, you need to stay 200% committed. Keep the bar exactly where it is to keep the kite turning. Resist the temptation to dump power as the kite pulls and watch the kite so that you know where it is and so that you can follow the pull. Your position on the board is already set, so as the kite pulls, you're able to keep your weight back and on your heels and as such the board will continue to carve. Karine is watching her kite, with her bar still giving it the full Monty whilst she carves with her weight back. Perfect!


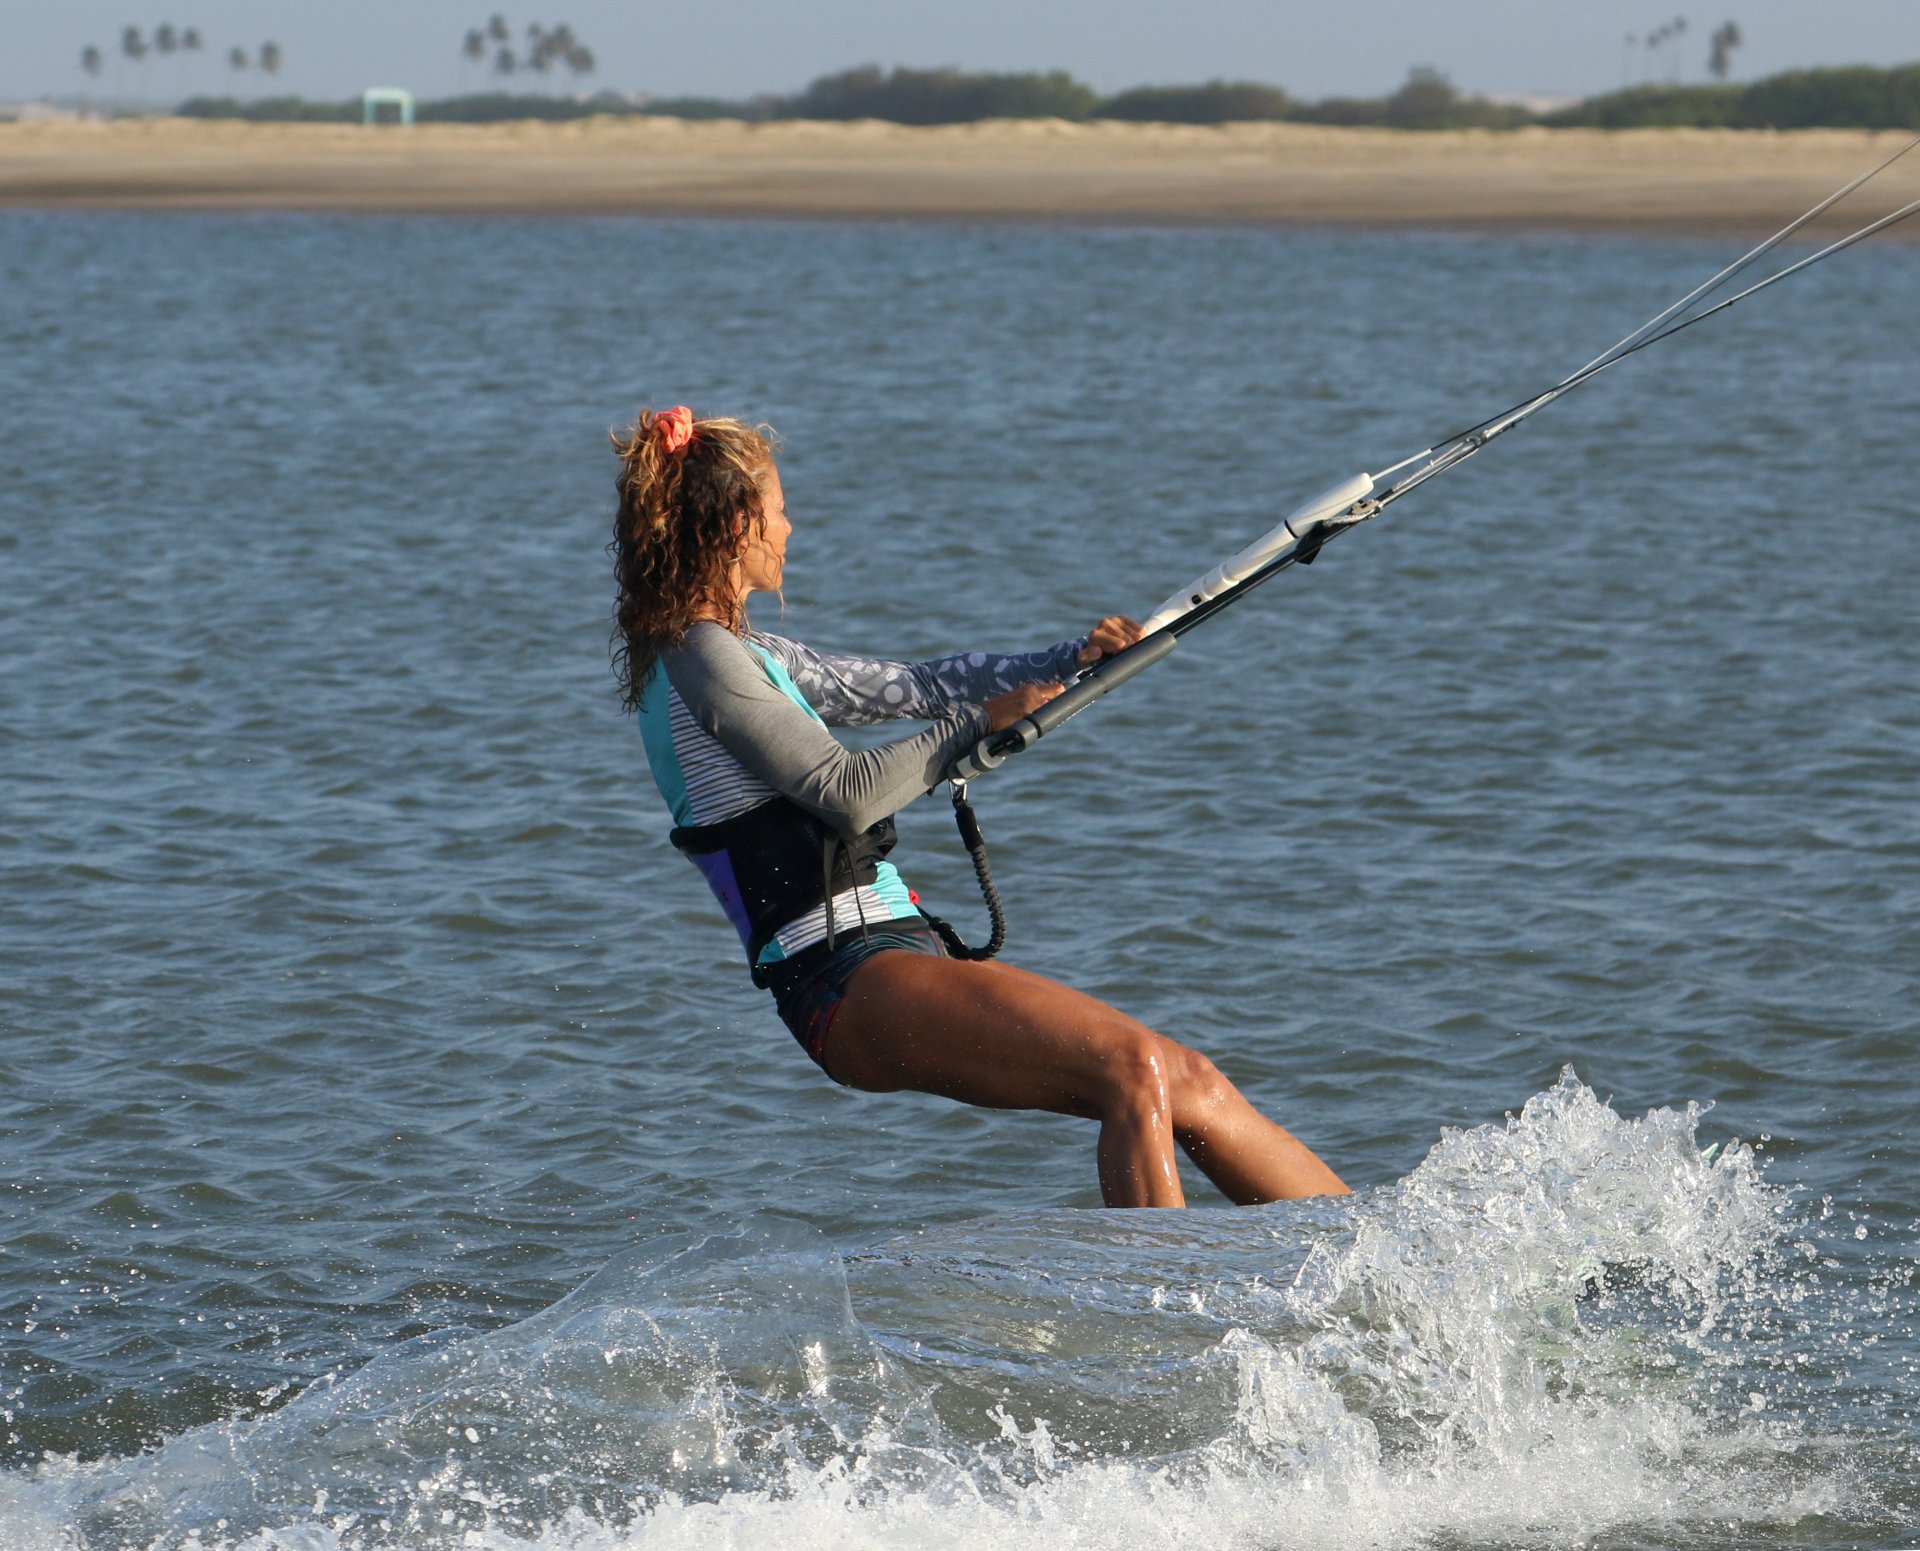
Keep Watching Pic G.
As your kite comes through the loop, it will continue to generate power. Keep your eyes on it whilst turning your head to look where you want to go. The kite should be leading you out. Stay committed and keep your weight low and back to continue carving. Karine is doing just that.
Level Pic H.
Following your slide turn practice, you should now have a better feel for the timing and position of when to level your bar so that the kite doesn't fly all the way back up to 12 o'clock, but rather pulls you forward in the new direction. The same applies here. As you carve around watching your kite, aim to finish your downloop by levelling your bar. If you get the timing right, you'll keep the kite flying forward so that you turn your head to look upwind, sheet out a touch to let the kite breathe, and fly to the edge of the window and then turn yourself and the board back onto your upwind edge. You can see by her kite lines that Karine has not turned her kite all the way back up. She's levelled her bar as the kite starts to rise out of the downloop, she's looking upwind where she wants to go, and she's sheeted the bar out to get the kite flying forward. Job done. Remember, there's no rush; once you're settled, in control and comfortable, you can untwist your lines.
Top Tips
For your first few attempts, concentrate on getting the kite high and making sure that you flatten the board off to get rid of your edge.
It's easy to be so concentrated on the kite that you forget to carve and thus get way more power than may be considered appropriate. So, take your time, flatten, breathe, drop your weight and only then pull the trigger on the downloop.
Do make sure that you have plenty of space when you try this. You need room to fail as well as succeed, so don't try this too close to anyone or anything.

You can learn this with very little power in the kite, which is preferable to both you and the kite for your first few goes.
Now, have a look at the sequence for the full run-through and check out the video…
Common Problems
If you find that you're getting pulled violently as the kite starts to loop, chances are that you haven't flattened the board. If you're off your edge, you won't have much resistance, and therefore, the kite won't pull too aggressively, and you'll go with it. If you're still edging against it, you'll be in for a surprise. The same applies if you loop too late! If you carve around onto your heels and then loop, you'll be edging against it.
Crashing the kite. With the kite high, the bar movement is more intuitive; however, as the kite turns, it is easy to twist your arms, try and follow the kite with the bar and lose yourself. Remember to lock yourself in the initial push/pull position until you feel the power in the kite subside as it heads back up.
Keystones
- Edge in
- Kite high and flatten the board
- Drop weight back over the rear foot and lower bottom to carve on heels
- The full push-pull, look where you want to go
- Finish turn onto heelside edge and let kite breathe

This technique article was in Issue 101 of IKSURFMAG.
Related


By Christian and Karine
Christian and Karine have been working together as a coaching team, running improver to advanced kitesurfing clinics since 2003.
