
Learning to Loop Part 5 – Jump Transition Down Loop Part 2
Technique / Beginner

Well distinguished readers, here we are, part two of the jump transition down loop. We’ll take it as given that you’re here after progressing from the prequel, and if you’re not but feeling somewhat gung-ho, we won’t stand in your way - but it never hurts to read the instructions first….
In the simplest terms possible, today's aim is to go earlier than before. How much earlier? In keeping with tradition, baby steps and achievable chunks, we’re going to start off just a tad earlier. You may have already pre-empted your landing, as suggested in the later stages of Part 1, so that the kite dives before you land, even though it loops after you’ve touched down. If you haven’t yet, this is the perfect place to start.


This is because it’s not just about going earlier. It’s also hugely about what you do with your bar, or rather, how you instruct your kite to turn. You must start gently, moving the kite forward before starting to dive it, and then be far more aggressive on the bar to down-loop it. It’s almost a two-step movement, but we like to think of it as a progressive loop.
Before we discuss the details of this move, we should establish what we’re after in a jump transition down loop, as there are two quite different moves and outcomes.
The first is for the purists and first-timers. The objective is to exit the move smoothly, the kite pulling you out of complete control, adding to the fluidity of your jump transition. This requires the kite to pull before you land, but it won’t complete its loop until after you’ve landed and are carving back onto your heels. This gives you a constant and very useable pull, looking super style-y whilst also being unbelievably functional.
The second is what you can aim for once you’ve got the first one nailed firmly into your box of tricks. Tearing through the loop whilst still in the air. This also looks incredible and feels just oh so incredibly, yeah, but there is a but. Once your kite finishes its down loop and you’re still flying, you’ll end up with a lot of slack and will likely stutter slightly before regaining your edge and regathering some tension on your lines. As such not the most practical of moves, but oh boy, it’s all about the feeling. And even more importantly, it’s also about getting dialled with your first-ever loop in the air!!!
OK, let’s get our breath back, and with the above in mind, look at what you’ll be doing and when you’ll be doing it in order to get a fluid and smooth down loop air gybe, which is option one.


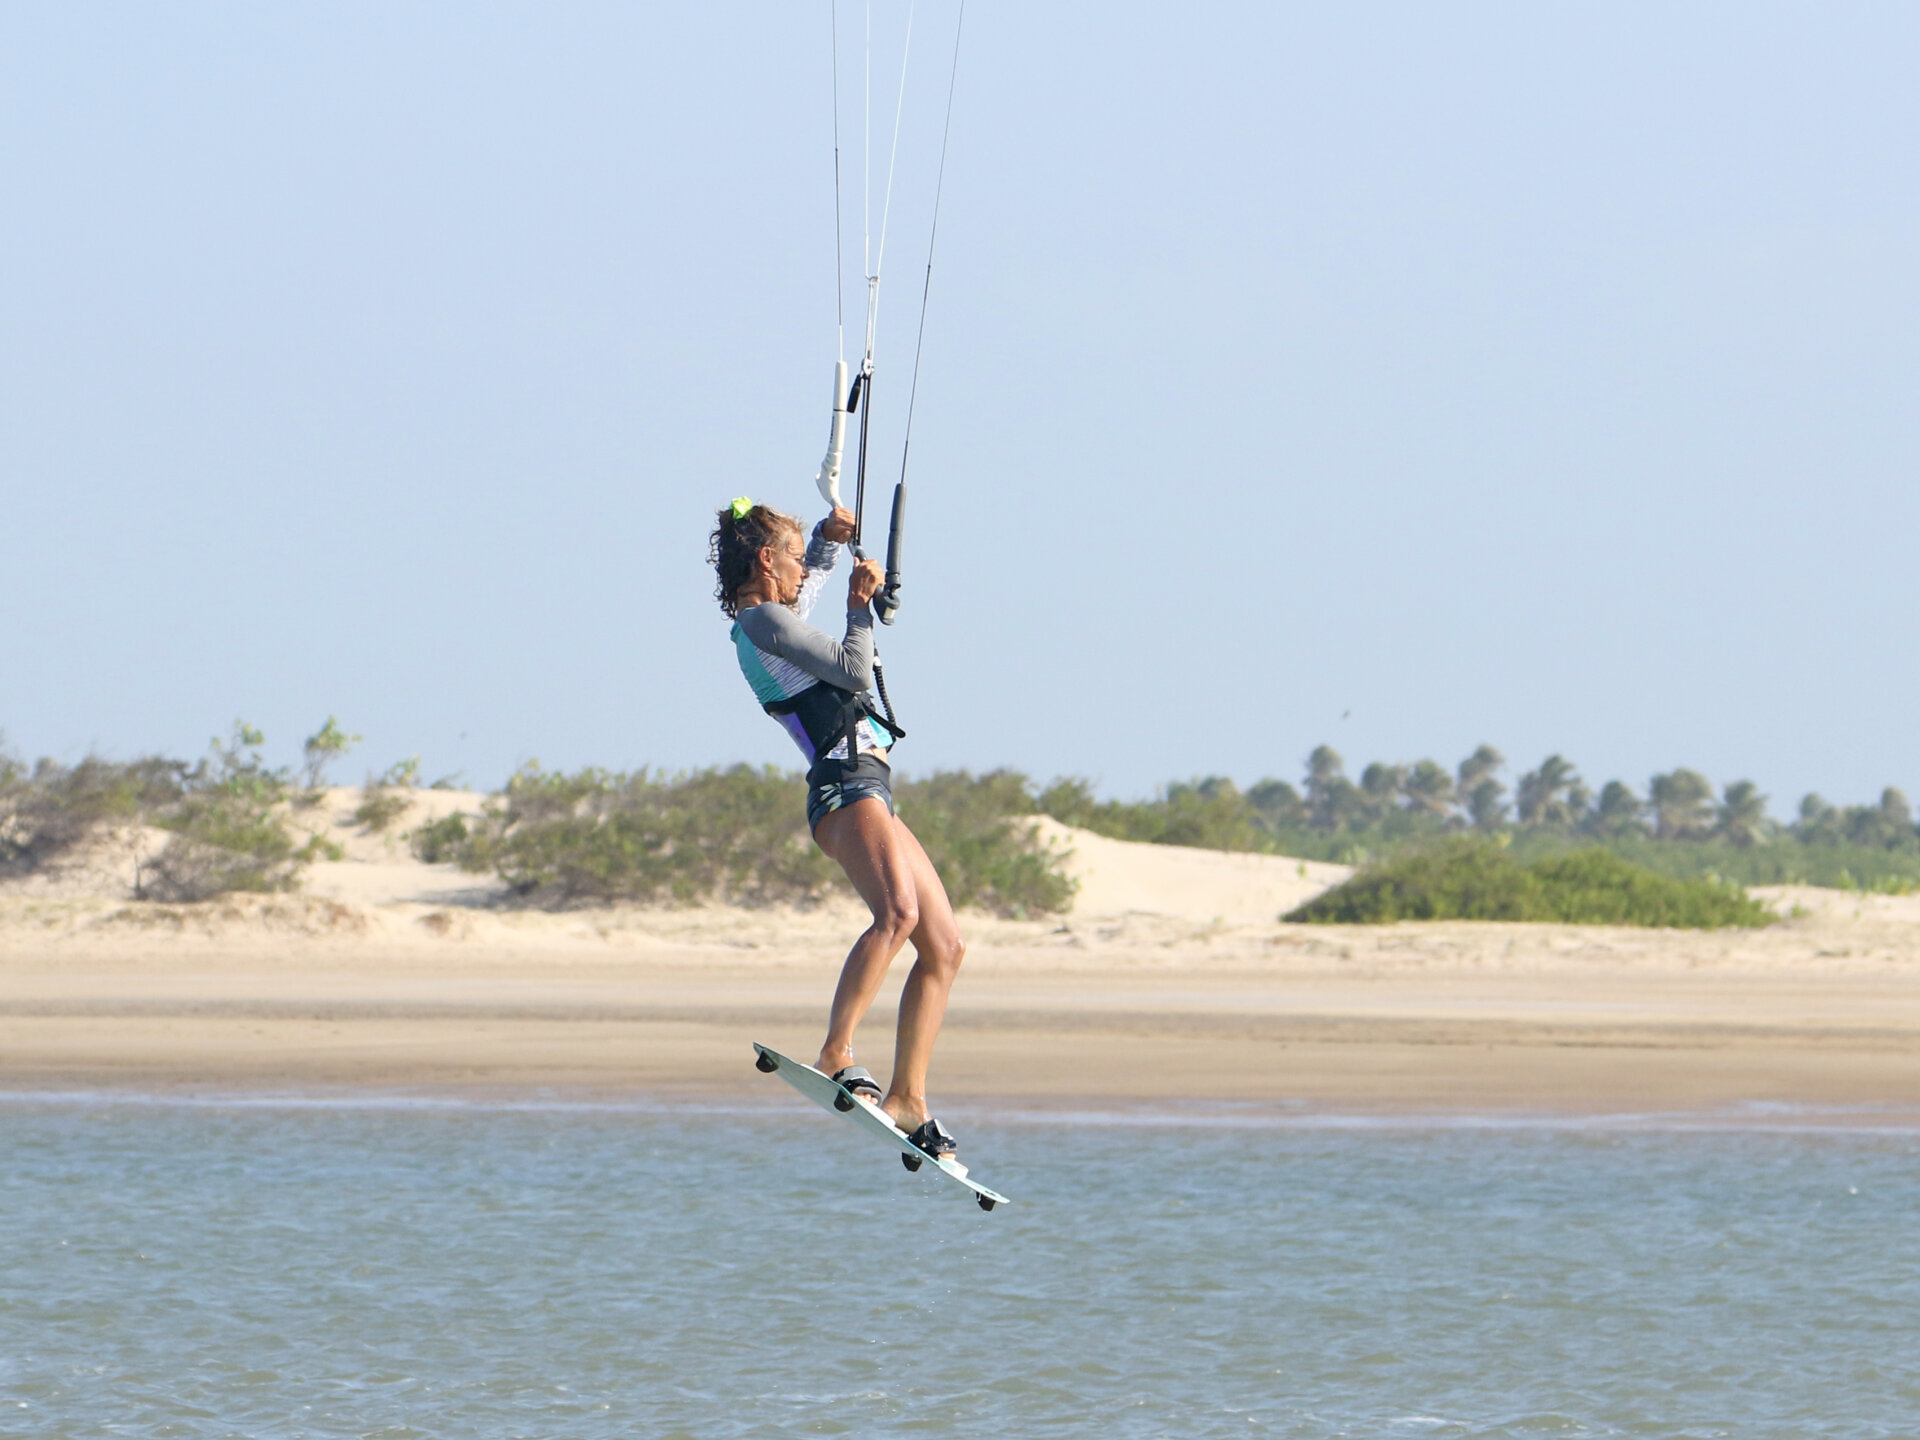
Approach and Check Pic A.
This time round, you’re going for a little more height. Nothing extreme, but in order not to be rushed, you want more time to get your bearings and prepare. Check that the coast is clear! You can approach with a little bit more speed, comfortably powered and on a good edge. It’s still a jump transition, so treat it as one. You’ll give the kite a short, sharp send, but this time, it doesn’t matter if the kite goes past 12 o’clock as you’ll have time to reposition it! You can see that Karine has a solid edge and is aggressively resisting as she sends the kite up.
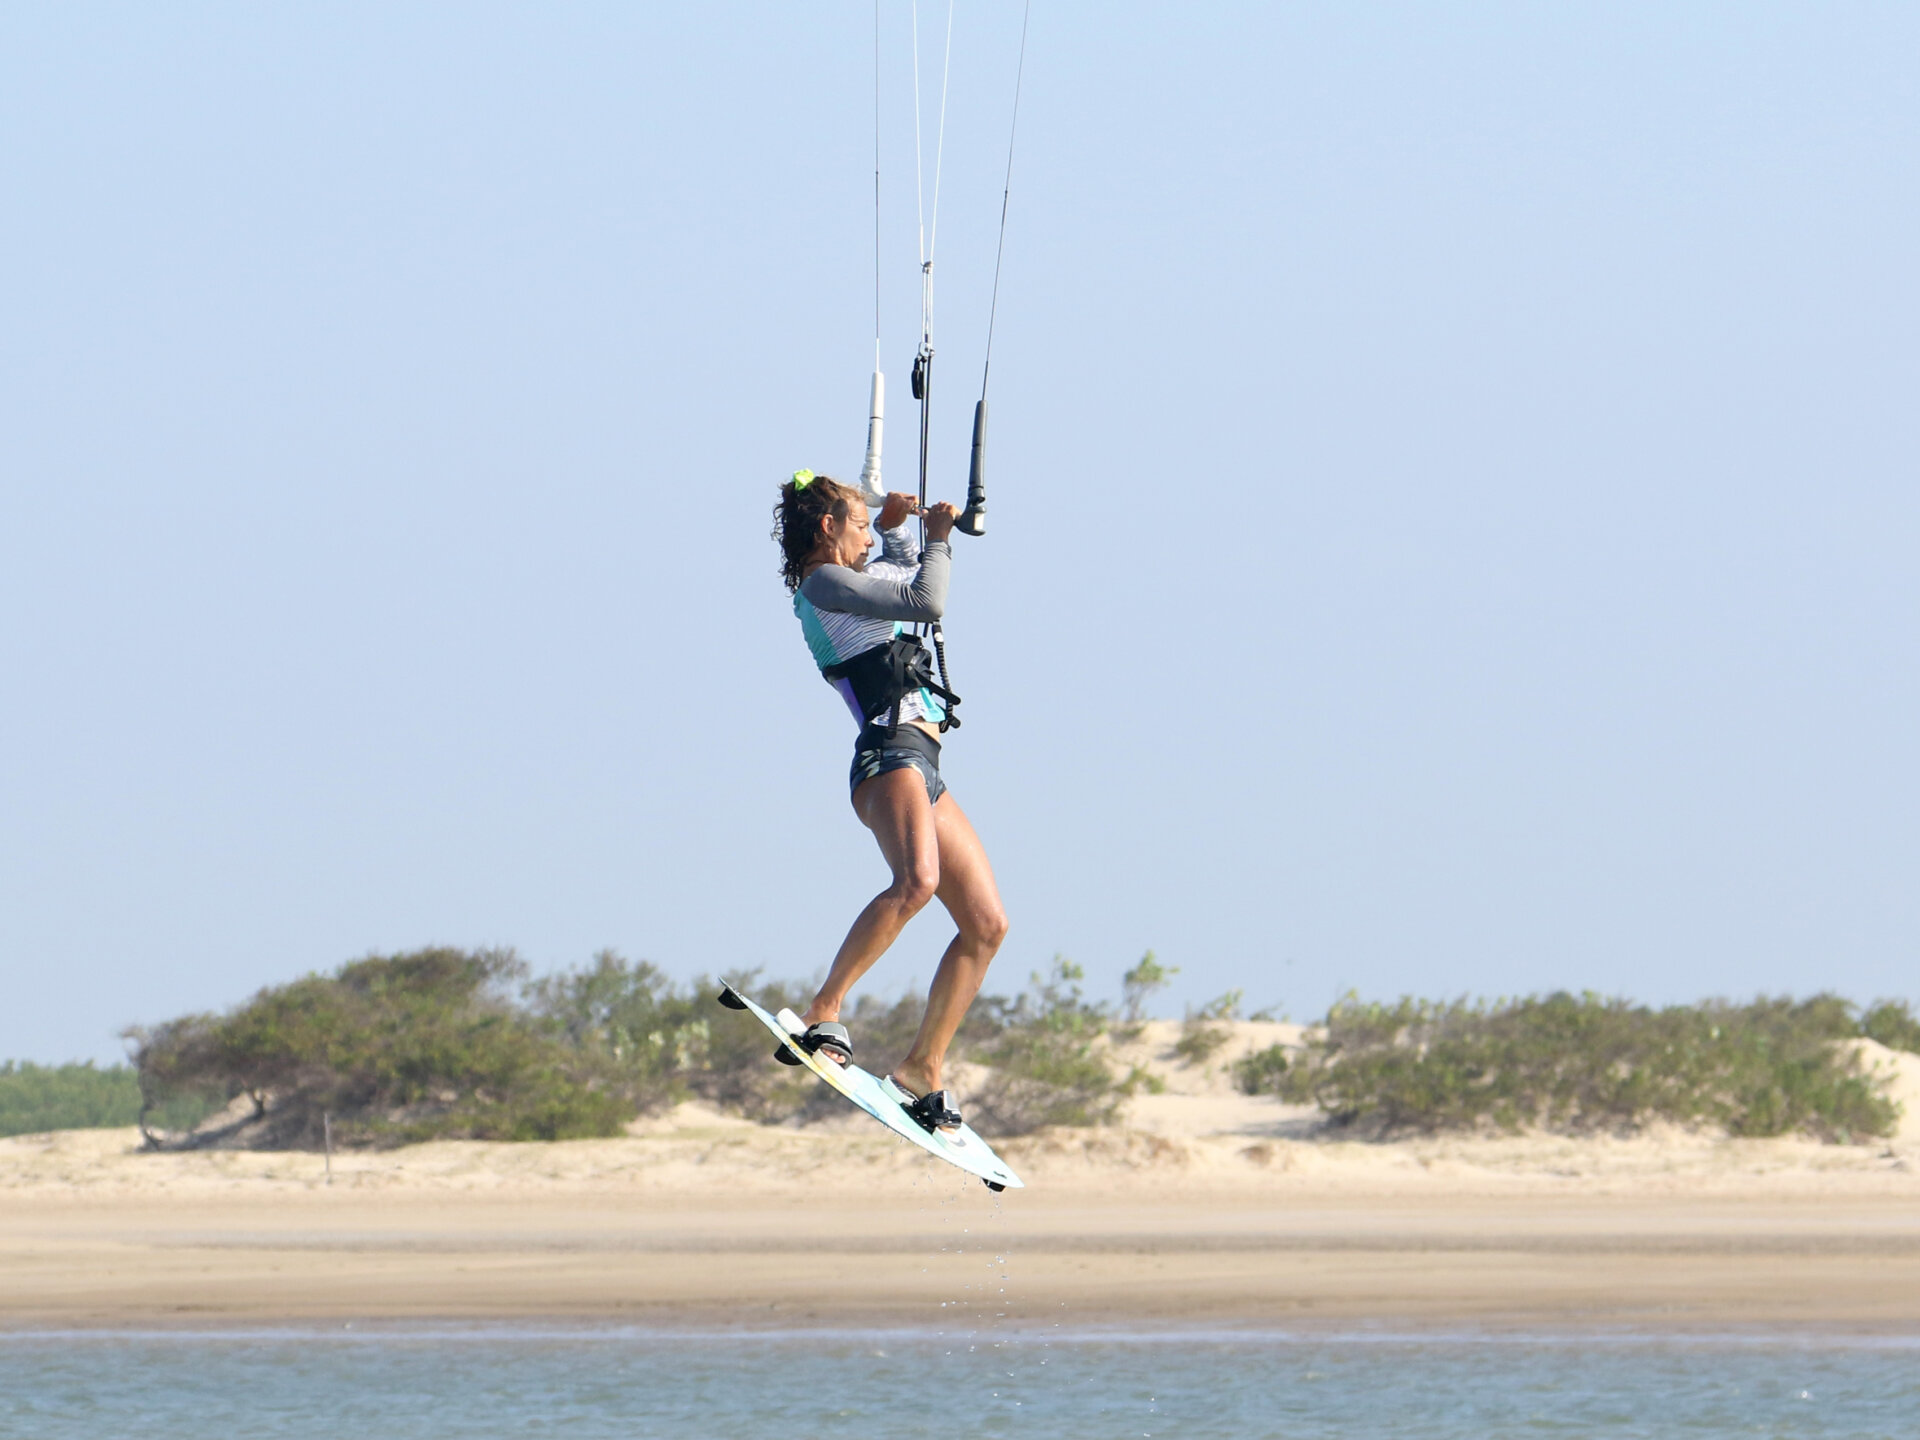
Level & Chill Pic B.
Once you’ve kicked off, it’s all about stopping the kite from going any further back and waiting patiently for the moment. The first port of call is to level your bar. This won’t bring the kite forward, but it’ll sure as hell stop it moving further back. With a tad higher, the kite will stop somewhere just behind you. In this position, it’ll support and float you. Keep yourself steady, look where you’re going and wait. Nothing else should be happening on the way up. Here Karine has the bar in and level, she’s lifted her legs a tad and is looking forward to where she’s going.
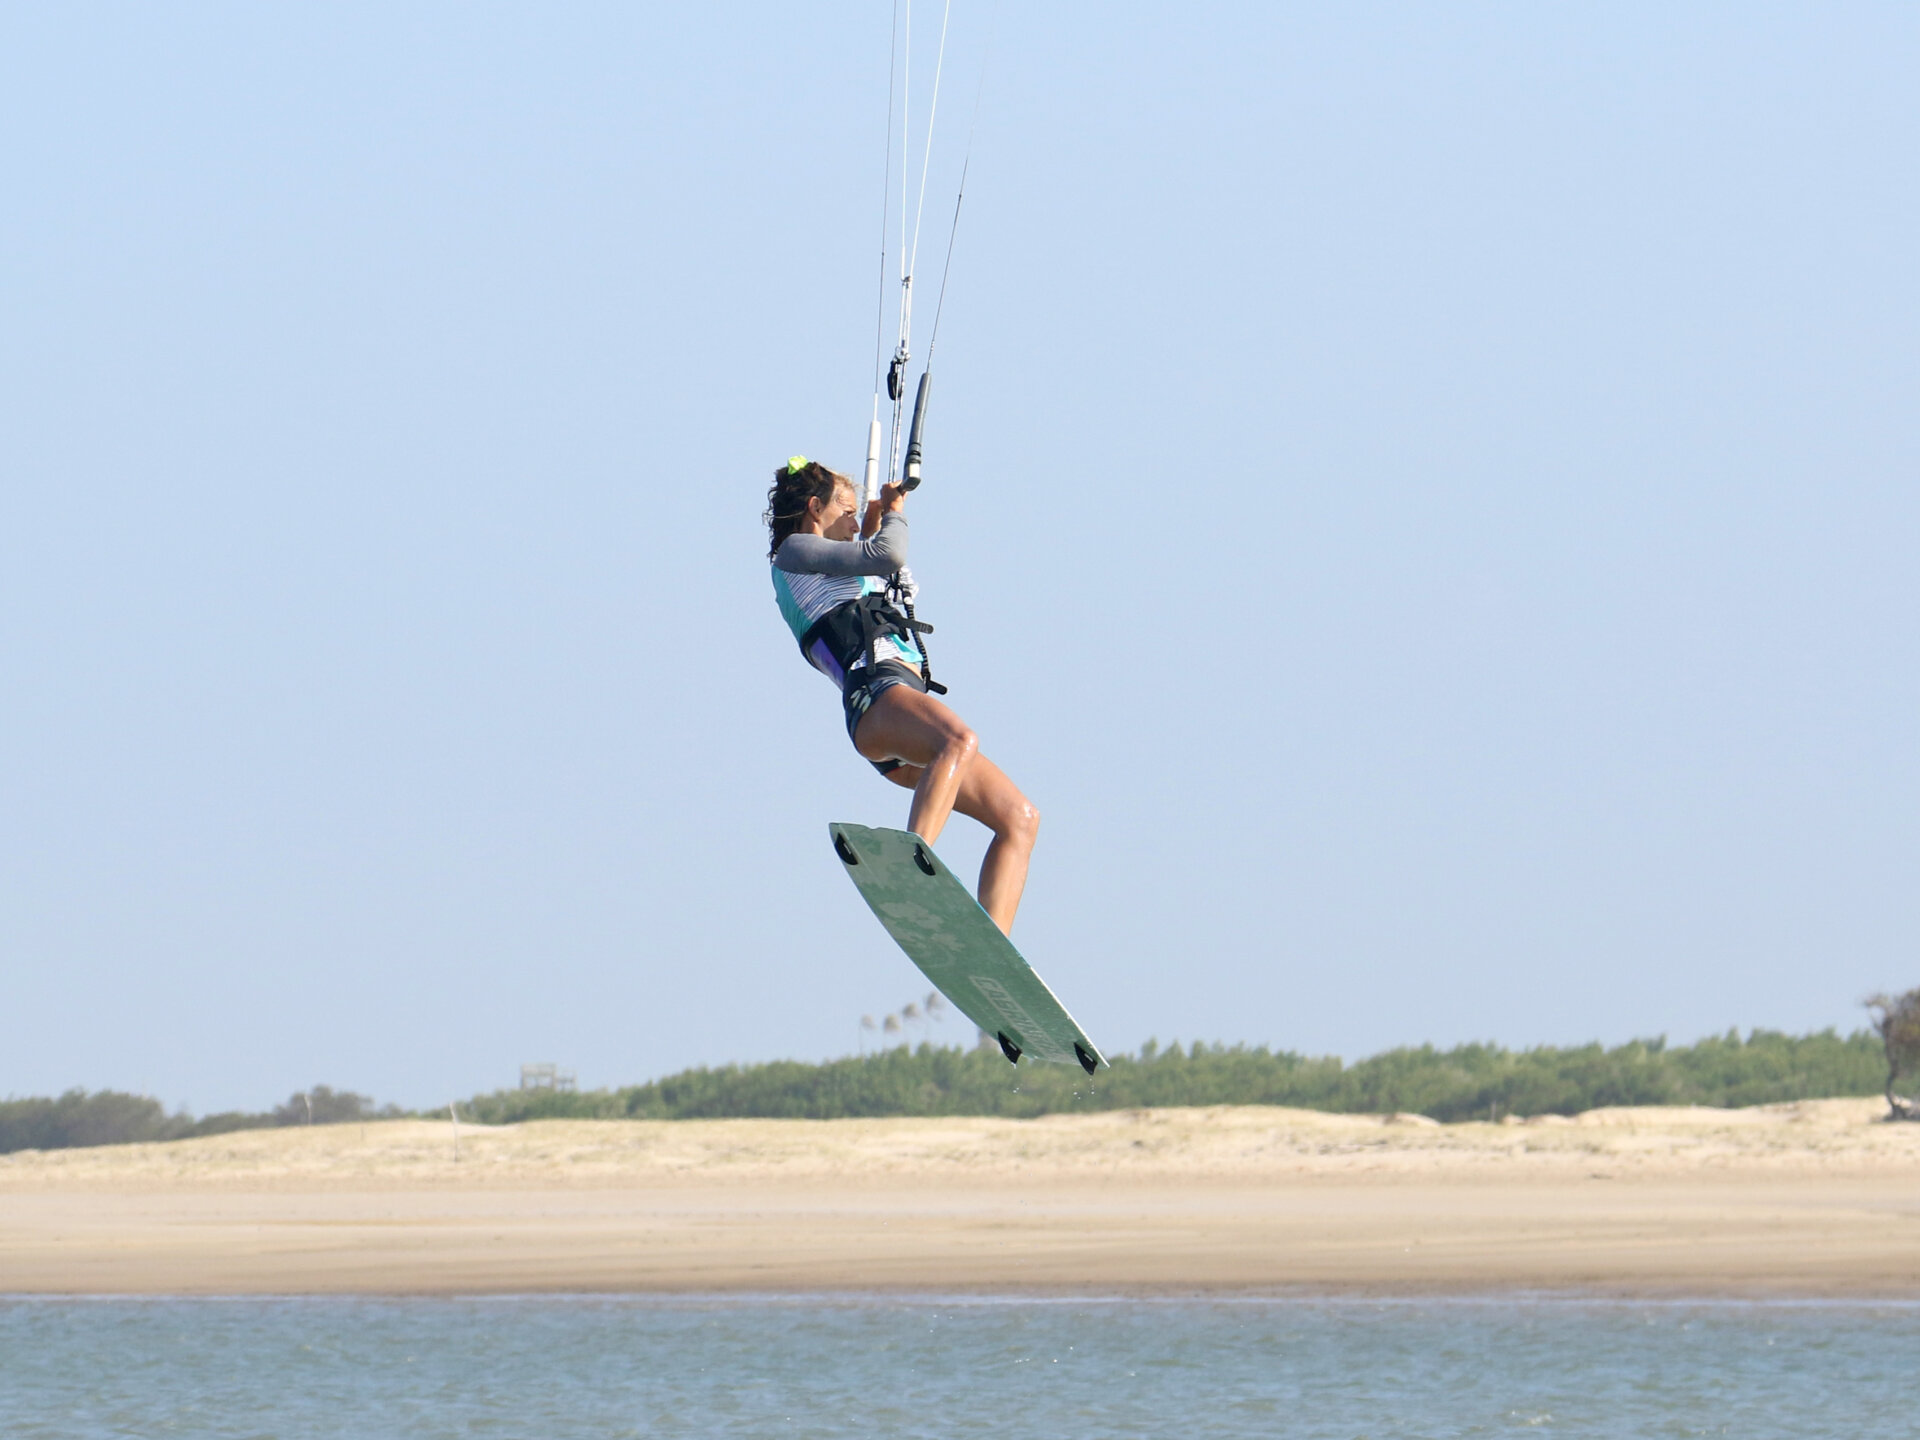
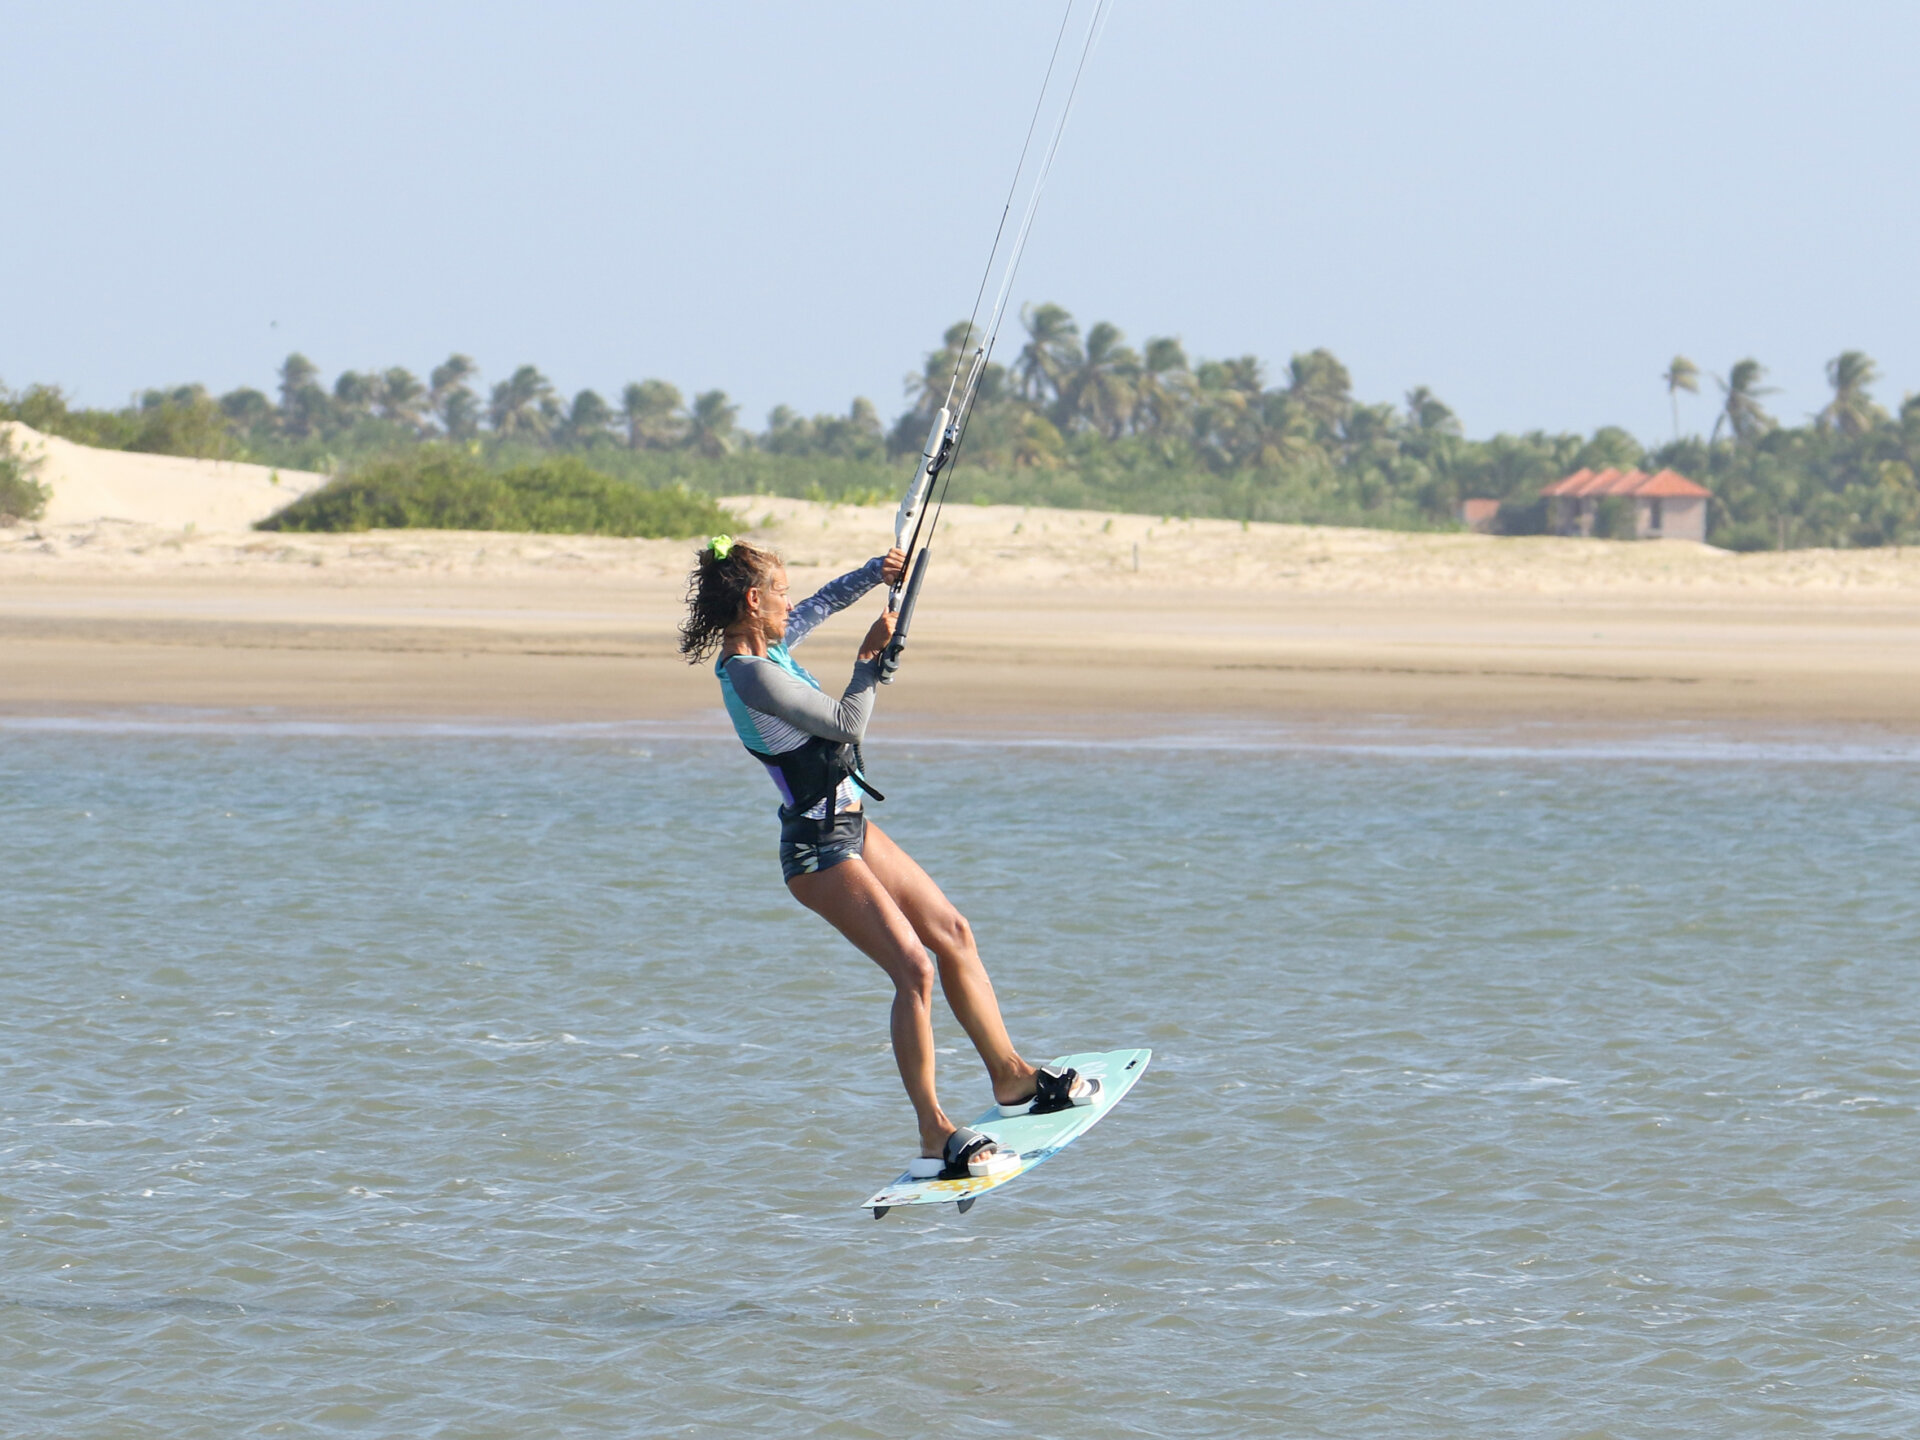
Progressive Start Pic C.
When you start to drop, it’s time to get things underway. This is where the progressive steering comes in. If you just give it the beans, your kite will down loop too quickly and go from the wrong place. The result is you’ll have no pull out of the move, and you’ll just sink. To get with the program, you can start to steer the kite forward so that it moves past 12 and in front of you. You need the bar on the sweet spot to get maximum response. If anything, it’s slightly better a touch too close than letting the bar out and giving away tension. You can clearly see that Karine has let her bar out, but only a little, whilst she’s started to steer her kite forward, dropping her board as she does and looking towards where she thinks she might touch down.
A Bit More Pic D.
As the kite moves over 12, you’ll get some hang before you carry on down. This means that the kite is moving forward and is on its way to 1 o’clock here (11 if you’re going left). It’s now where it should be. You don’t want the kite to fly around the edge of the window, otherwise you’ll have no room to down loop it, so it’s time to dive a bit harder, looking for that downwind pull you’d want from a jump landing. Karine is starting to give it the beans on the bar.
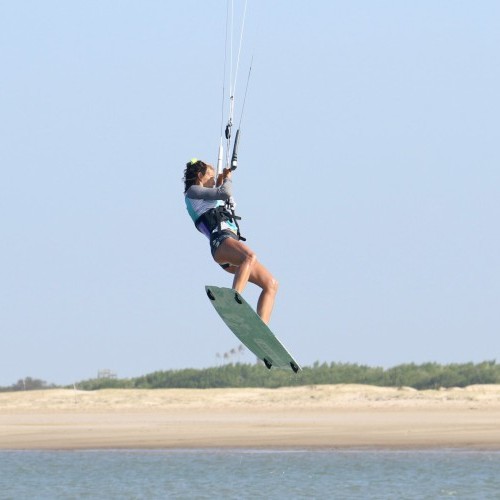
The Full Monty Pic E.
With the kite starting to dive you’ll feel the pull. You can now point your board towards the pull with your new front foot and fully commit to the down loop by giving it everything on the bar, whilst staying locked in. Keep your eyes on where you’ll land and prepare for landing by dropping your legs. Karine is giving it the full Monty on the bar, has turned her board towards the pull and is looking at her landing pad. She’s locked in and committed.

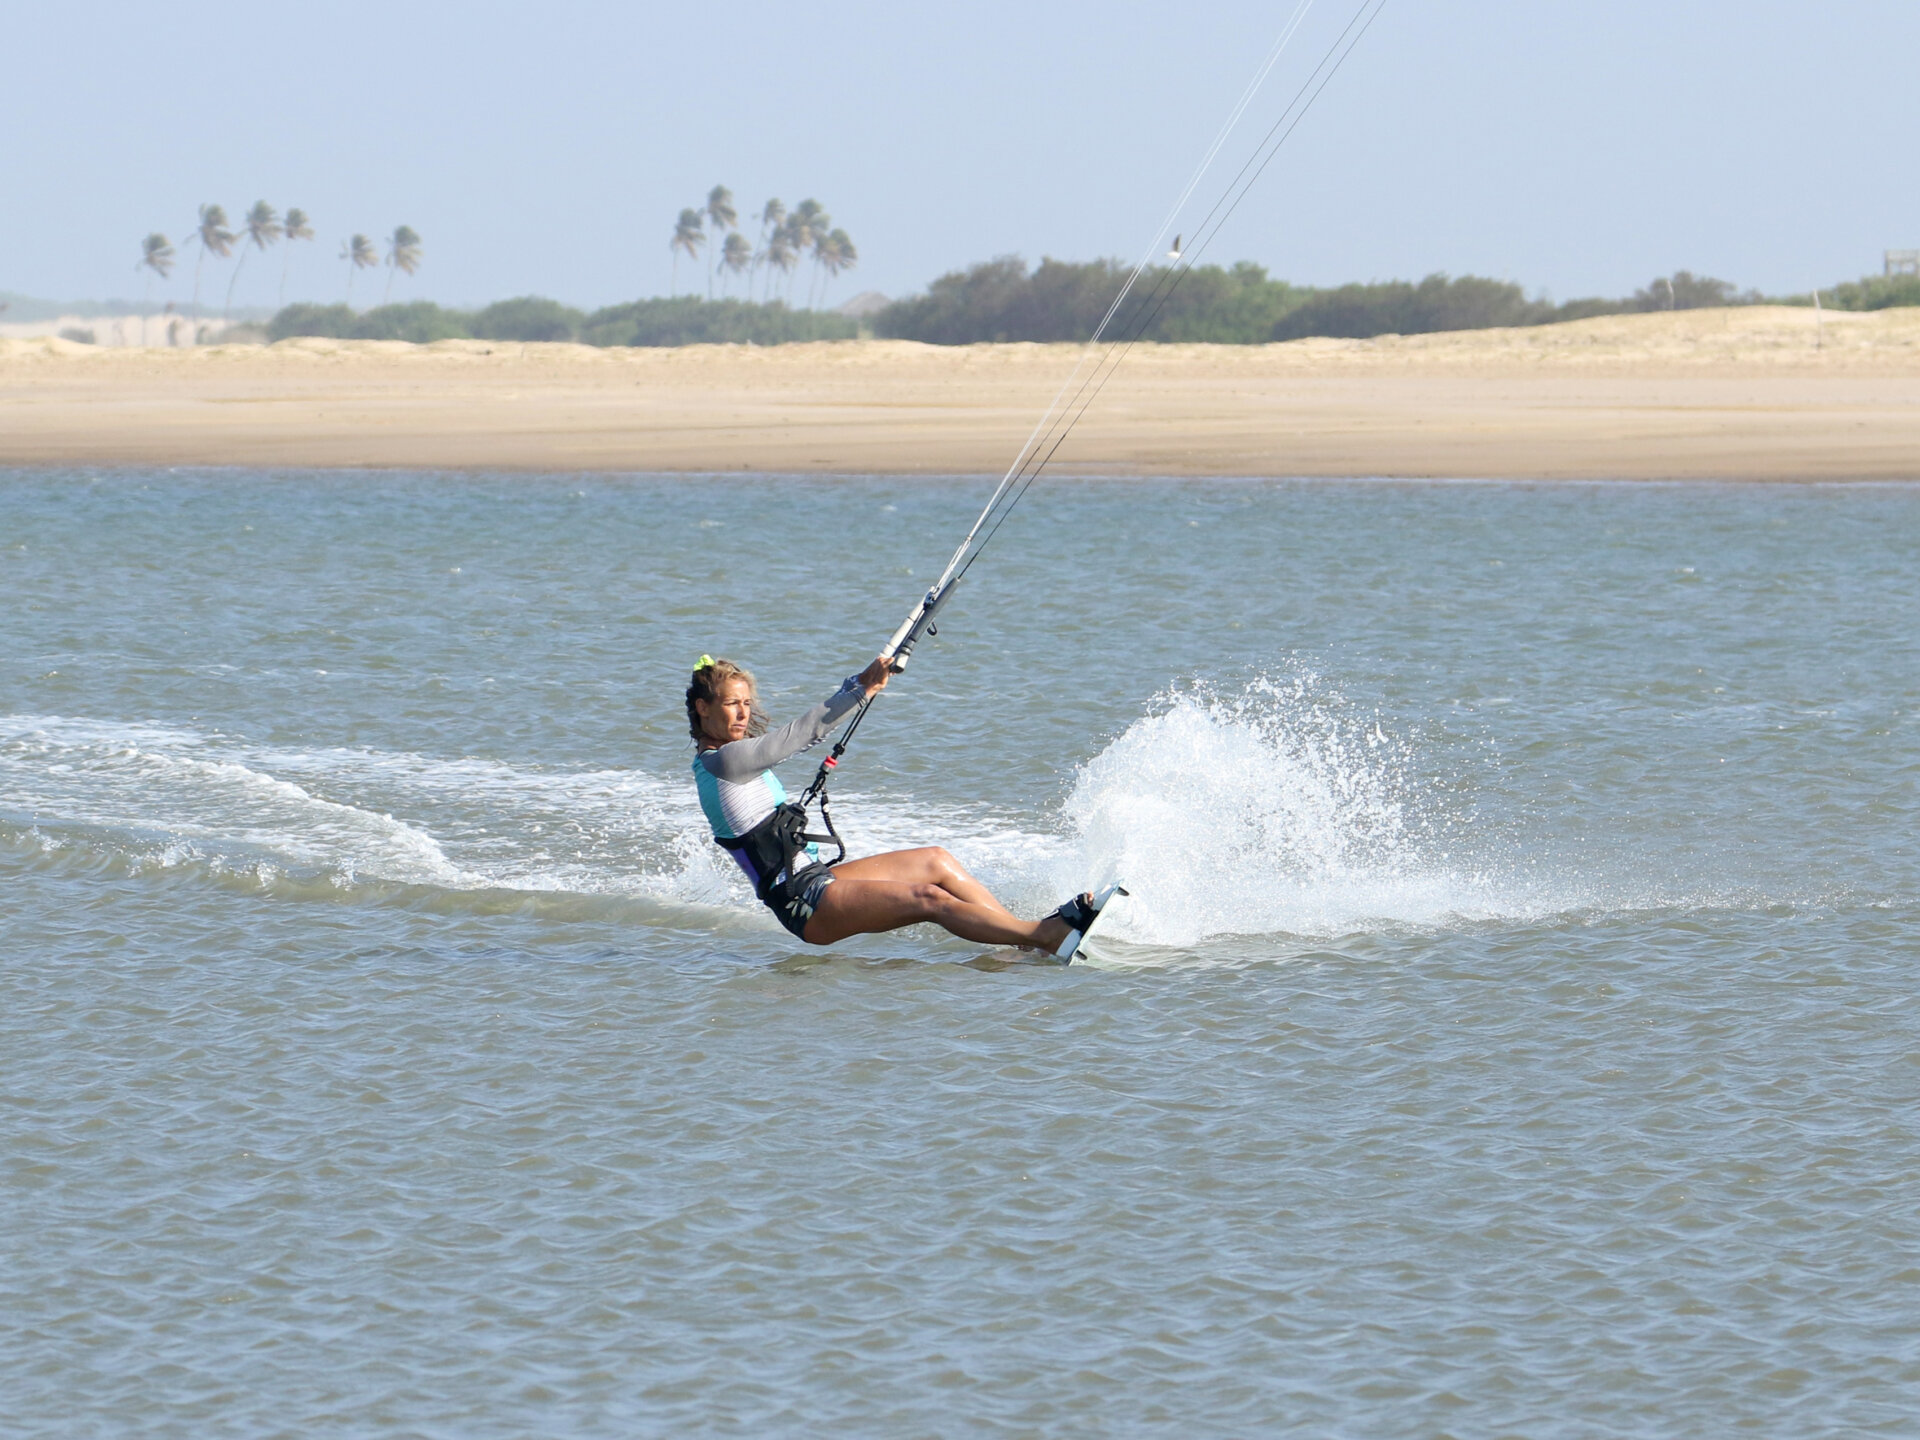
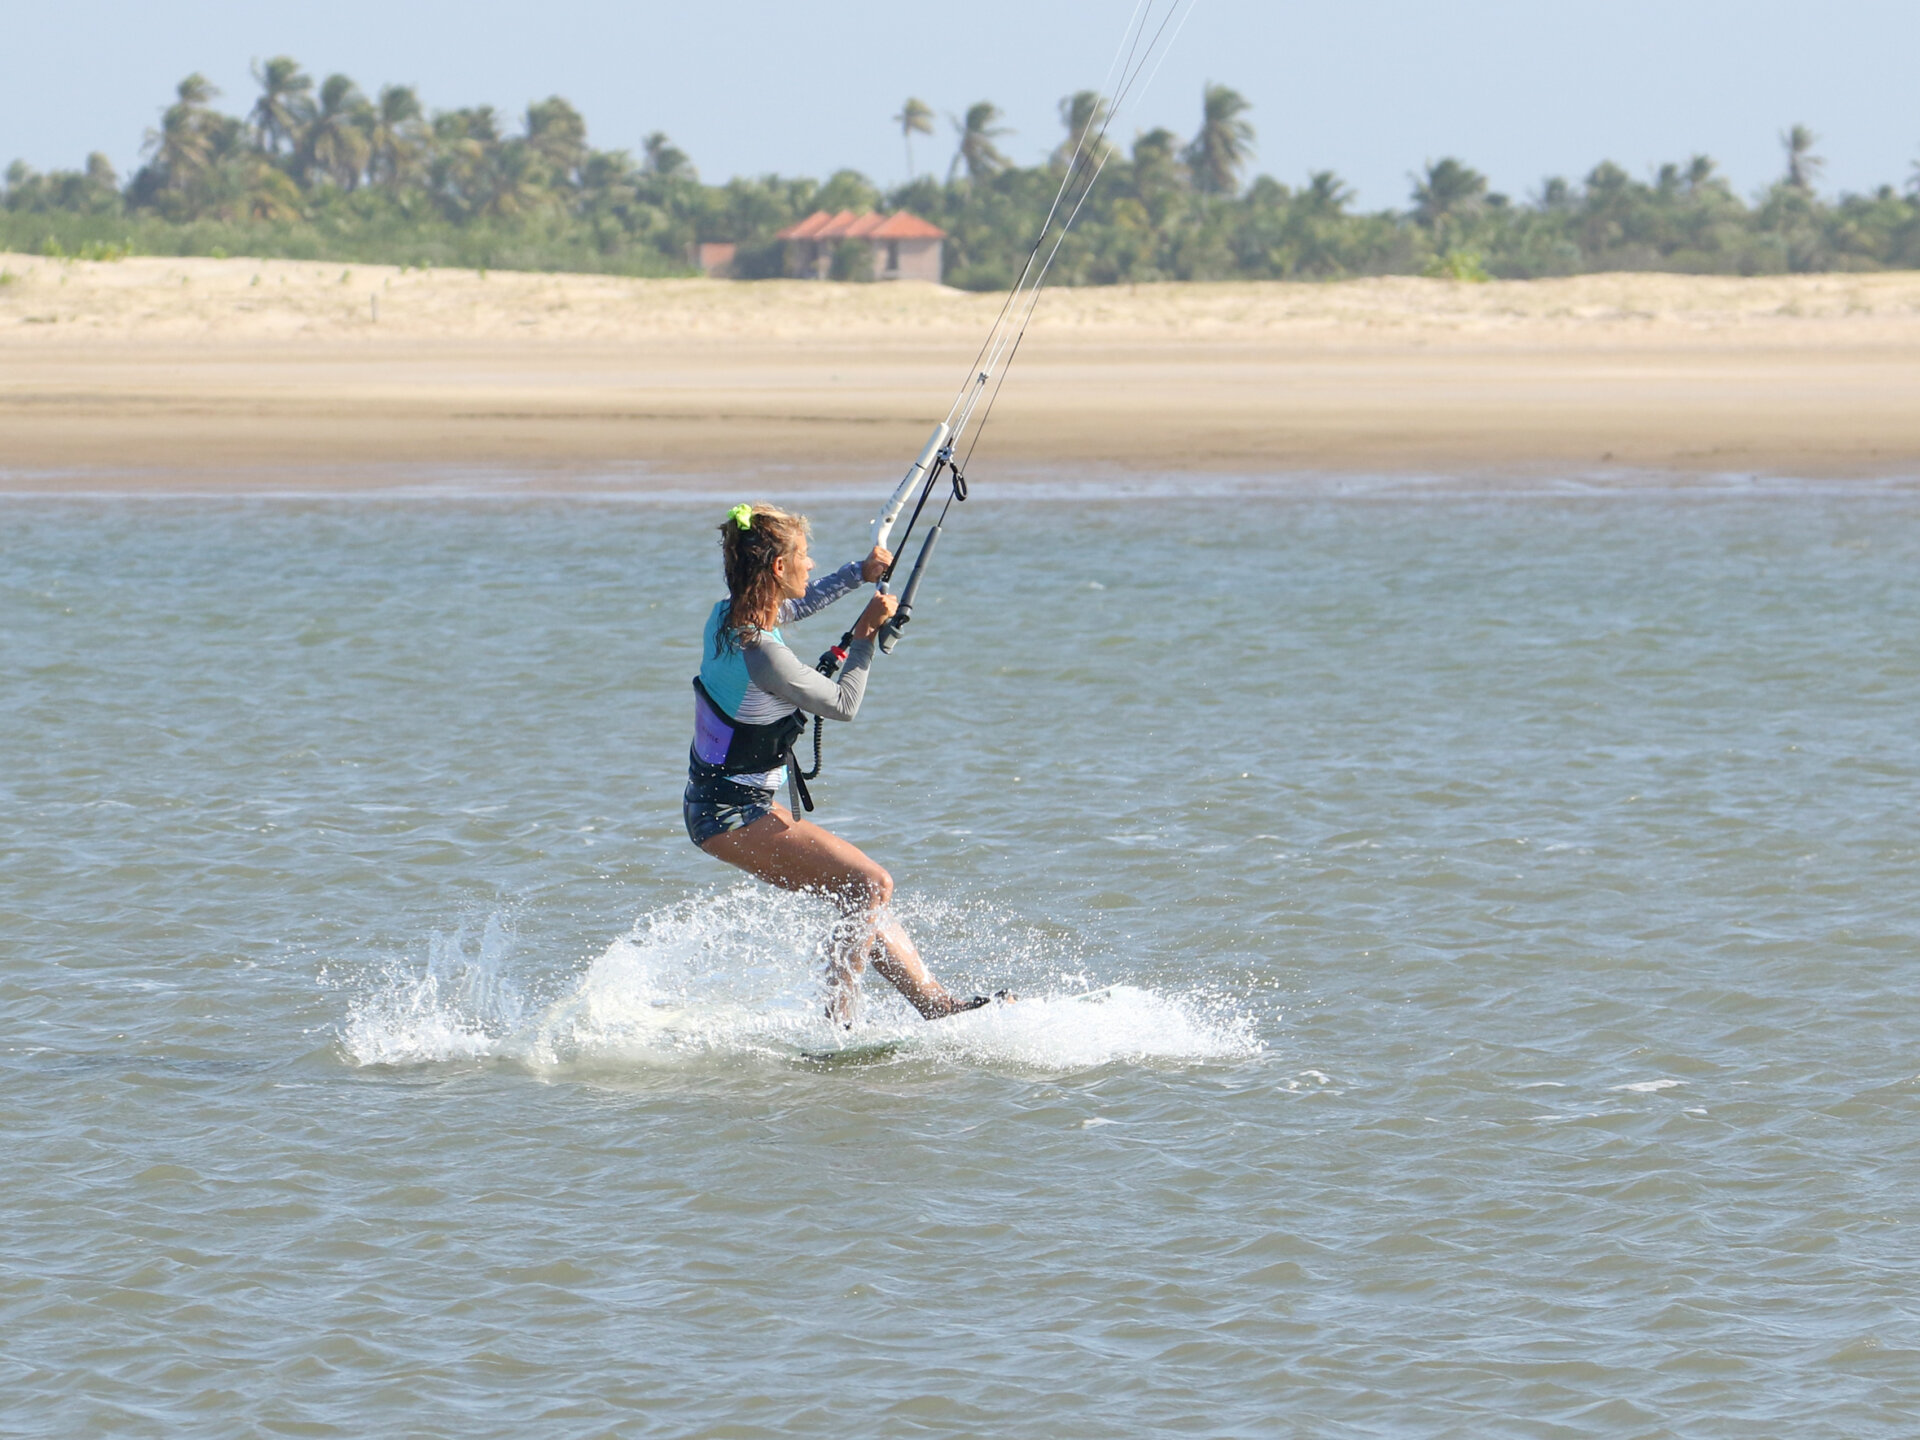
Kite & Carve Pic F.
You’ve followed the pull and landed towards it. This is the just toe side of downwind we were talking about. It’s now time to focus your attention on your kite so that you know where it is in the loop and get yourself heading back the other way. Now that you’re back on the water, this should be familiar territory and well-practised. Drop your weight onto your heels to carve back onto your heel side edge whilst watching your kite. Karine has her eyes on her kite and weight on her heels. Looking good.
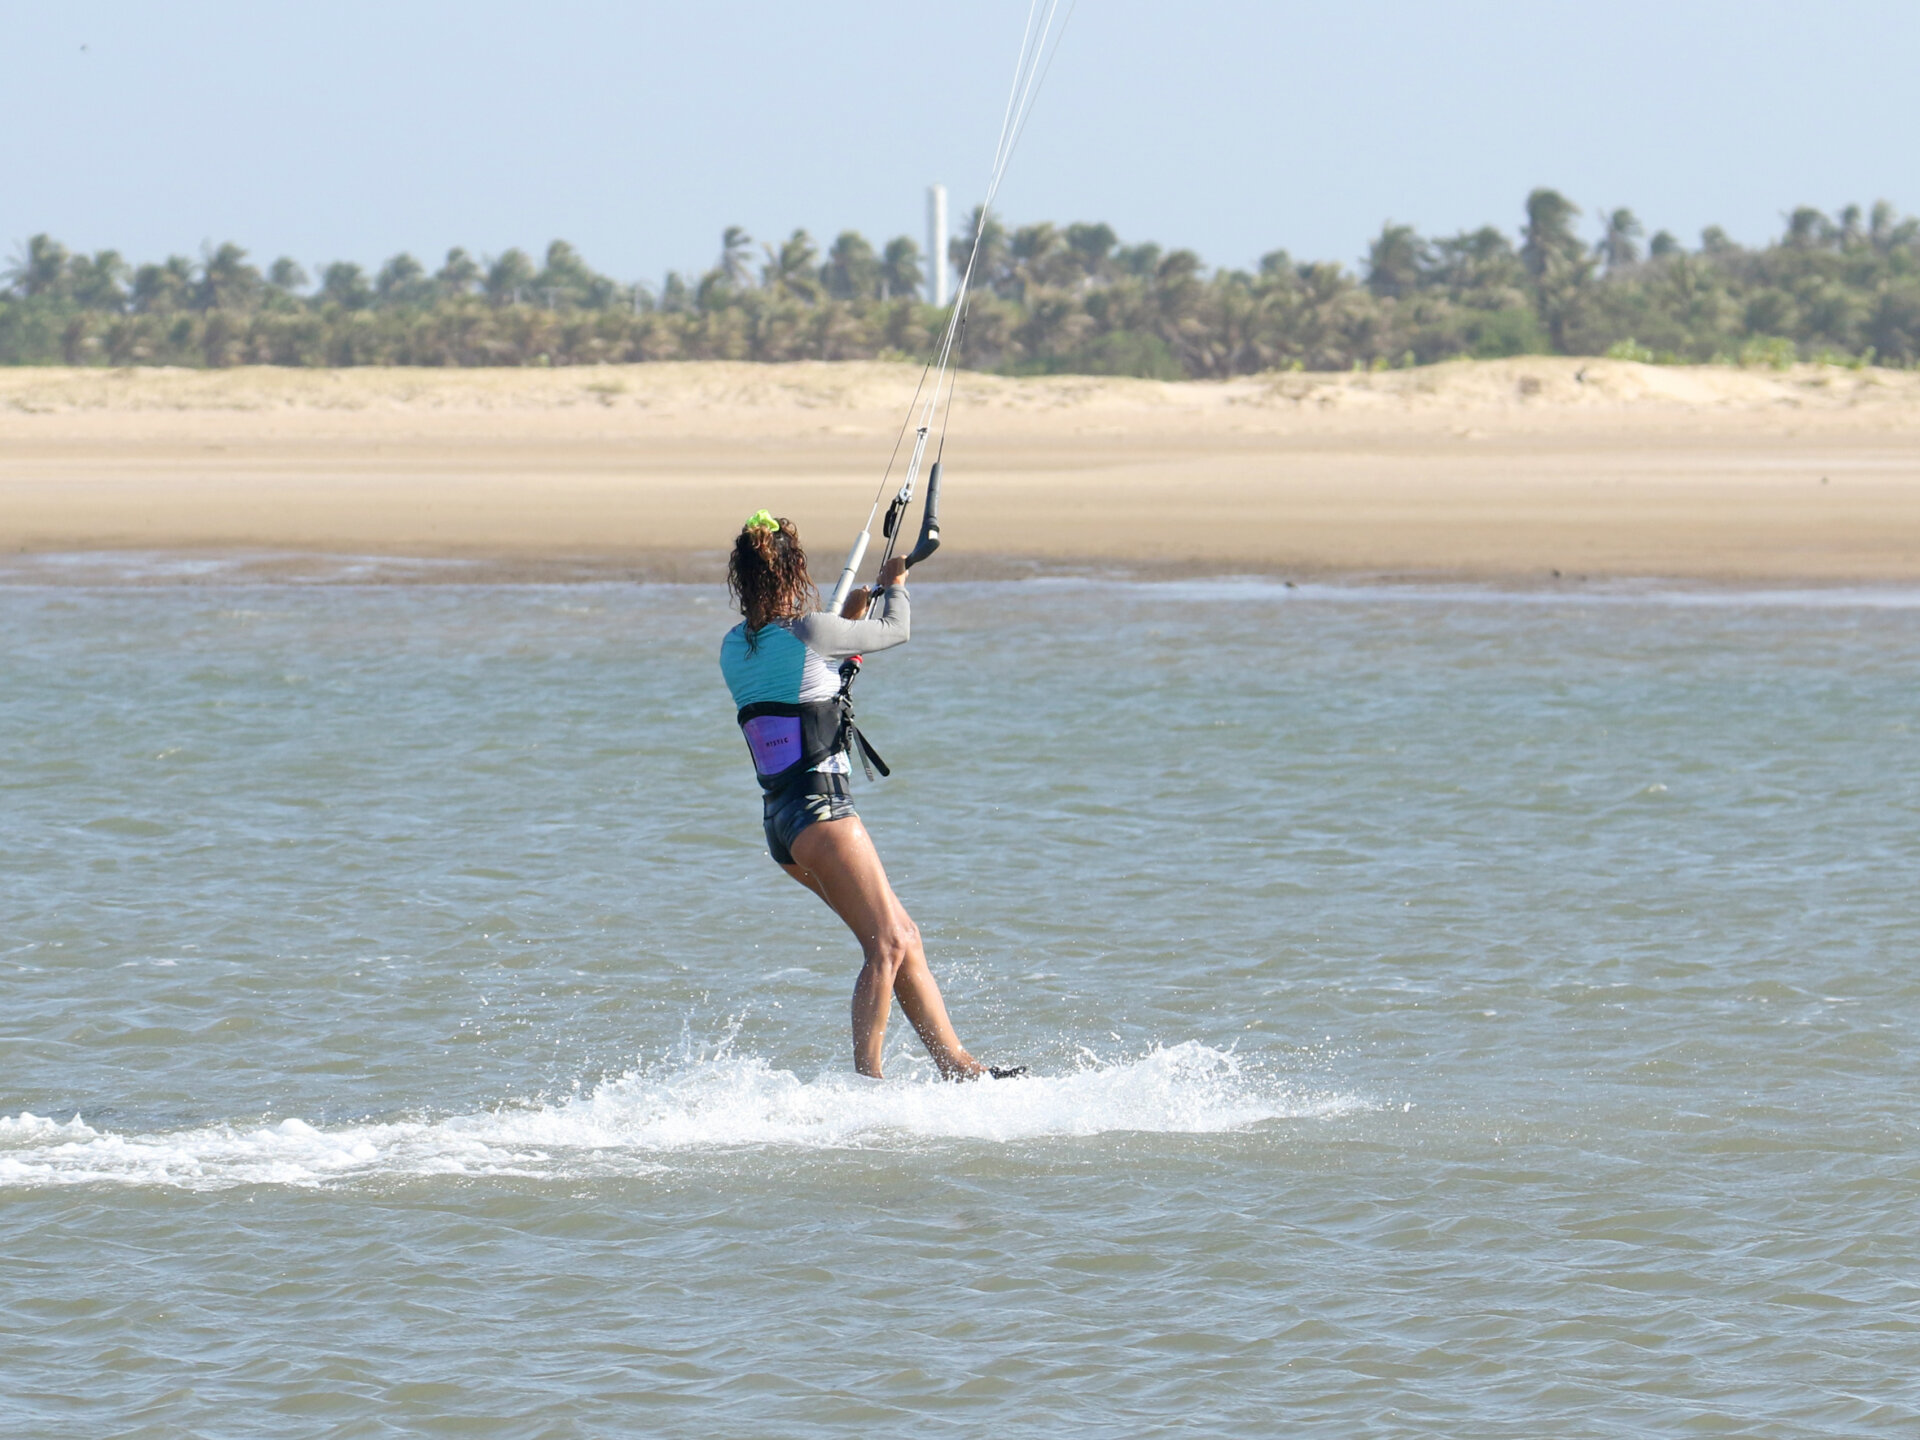
Claim It Pic G.
You can encourage the kite up and around by letting your bar out a little and allowing the kite to breathe. Keep carving to keep tension on the lines and follow the kite around. Once it’s flying back the other way, level the bar to stop it looping, and you can then steer it in a new direction. In the photo Karine is still gently carving back onto her heels, she has tension on her lines and has guided the kite in the new direction. All the while with some stylish and practical pull from the kite. Job done.
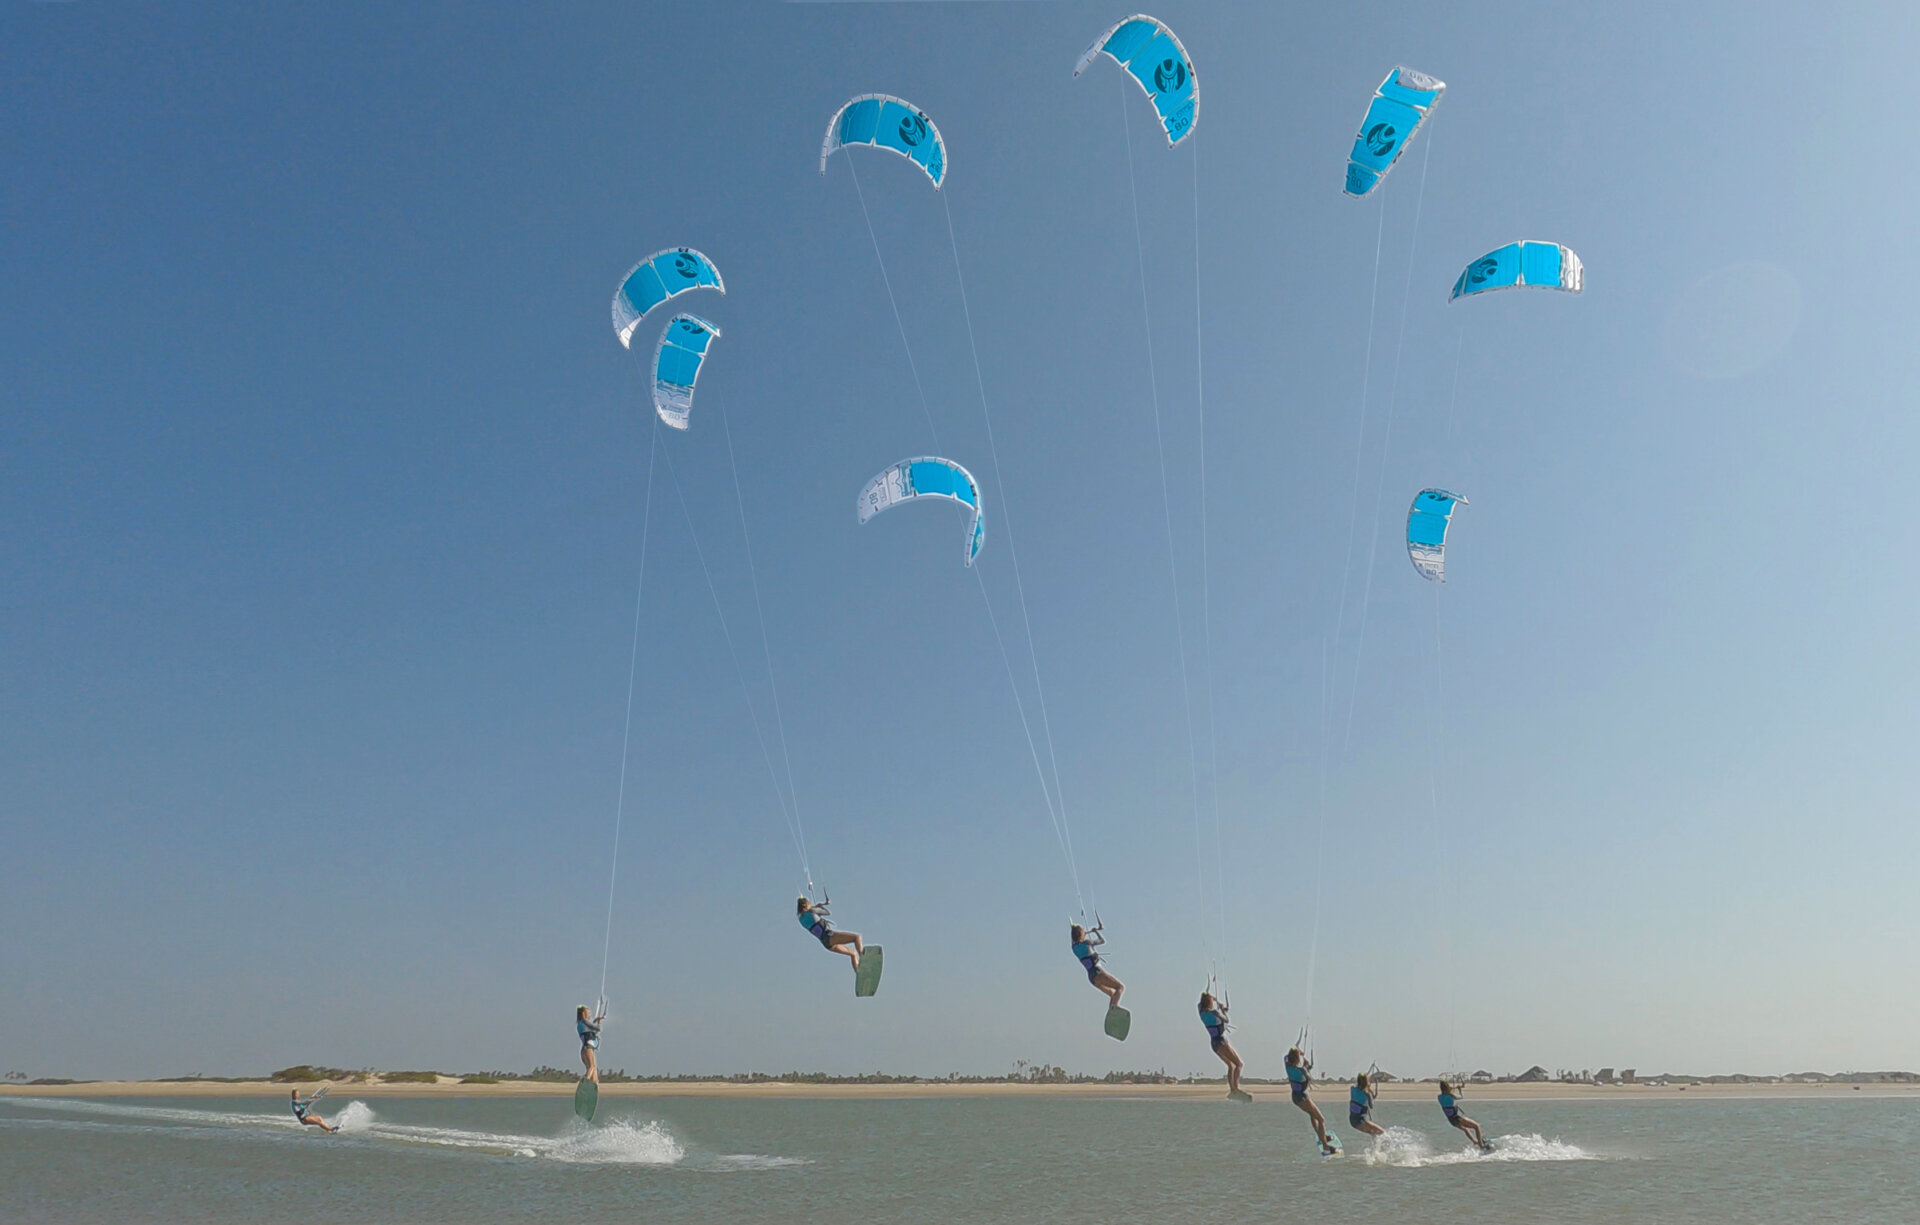
Kite Flight Sequence 1.
This is a continuation of your dive! Have a look at the bar and kite movements in Sequence 1. You can see that because Karine gave it more send to get more height, the kite did fly past 12 o’clock as she took off. With her bar level, the kite moved more above her whilst she chilled, but not back to 12.
As she starts her progressive dive, the kite moves forward past 12, into the perfect starting position, from where she gives it the full Monty, and it pulls her.
As it pulls, it guides her toward her landing spot before coming around as she carves back onto her edge. It's smooth and Perfect.


In essence, your down loop air gybe is a jump, but on landing, rather than bring the kite back up, you let it loop, land with your other foot forward, and follow it back the other way!
Top Tips
Timing. Finding the moment to get things started is key. Regardless of height, you certainly don’t want to go any earlier at the moment. Having the brunt of the pull as you’re landing is perfect, with the smoothest outcome.
Kite position. Once again, it’s starting high, and after your initial input, it is slightly moving forward.
Your bar position relative to your sweet spot is crucial. If you let the bar out too much before landing and give away too much tension, you’ll suffer a massive delay and risk diving your kite down around the edge of the window and into the drink. Better a tad too much, which you can then let out later to get the kite up and forward.
Moving On – Looping in the Air
Once you’ve got this down, give yourself a massive pat on the back. It’s been quite a journey, but you’ll hopefully be fully addicted to the sensational overload of exiting a jump transition will such a constant pull and smooth reception. This will remain as your go-to variant for the transition…

However, as alluded to earlier, when you’re able to execute this in your sleep and are more comfortable than a pair of fluffy slippers and a hot buttered crumpet on a winter’s morning, you can take it one step further, or rather one step earlier, option 2!
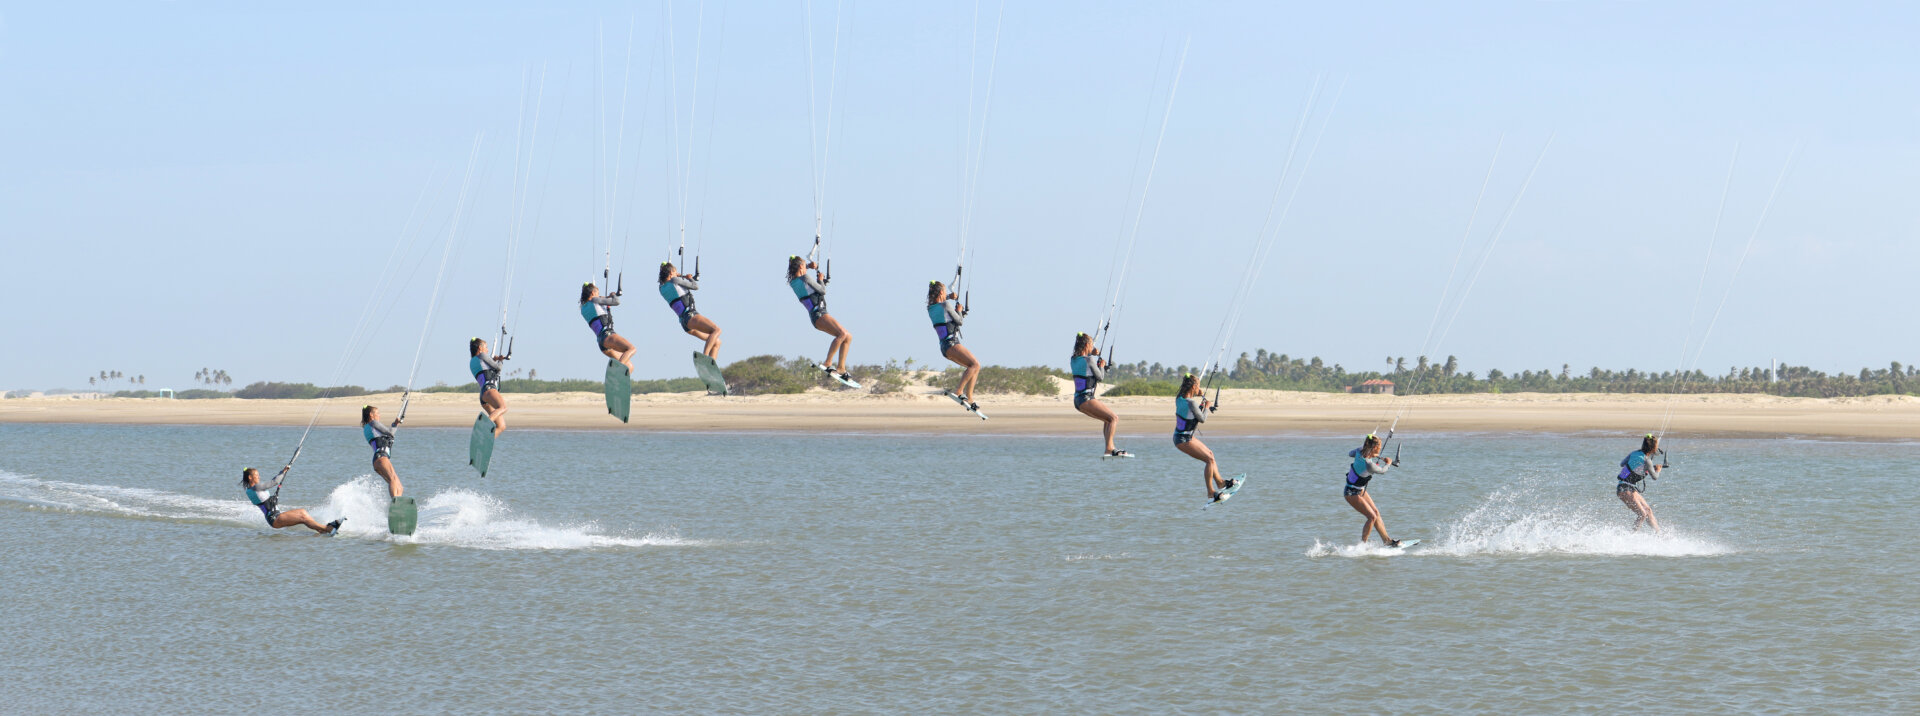
Have a look at Sequence 2. Karine’s intention is to loop the kite whilst she’s still in the air.
Karine hasn’t necessarily gone higher, but she has pulled her down loop at the apex of her jump. Also, she hasn’t given it such a progressive pull, but more of the full monty straight-out-of-the-gates approach. This means that the kite loops earlier, quicker and a tad more downwind.
The result. The kite completes its loop before she lands – an air loop! You can see that the landing is still with her new front foot as before, but she has already levelled her bar to stop the kite as it’s already way back up towards 12.
This means that her kite is high and stationary while Karine is motoring downwind, gaining slack under her kite each board length she travels. What is vital here is to use your landing speed to get back on your edge, driving upwind so that you can reclaim some ground and win back that tension. Be ready for a little jolt as the kite catches, and be prepared to save and steer it depending on how it falls.
How did that loop in the air feel? Like the end of summer term!! That’s it your first bona fide loop under a kite whilst flying. Time to party like it’s 1999:)
This technique article was in Issue 104 of IKSURFMAG.
Related


By Christian and Karine
Christian and Karine have been working together as a coaching team, running improver to advanced kitesurfing clinics since 2003.
