
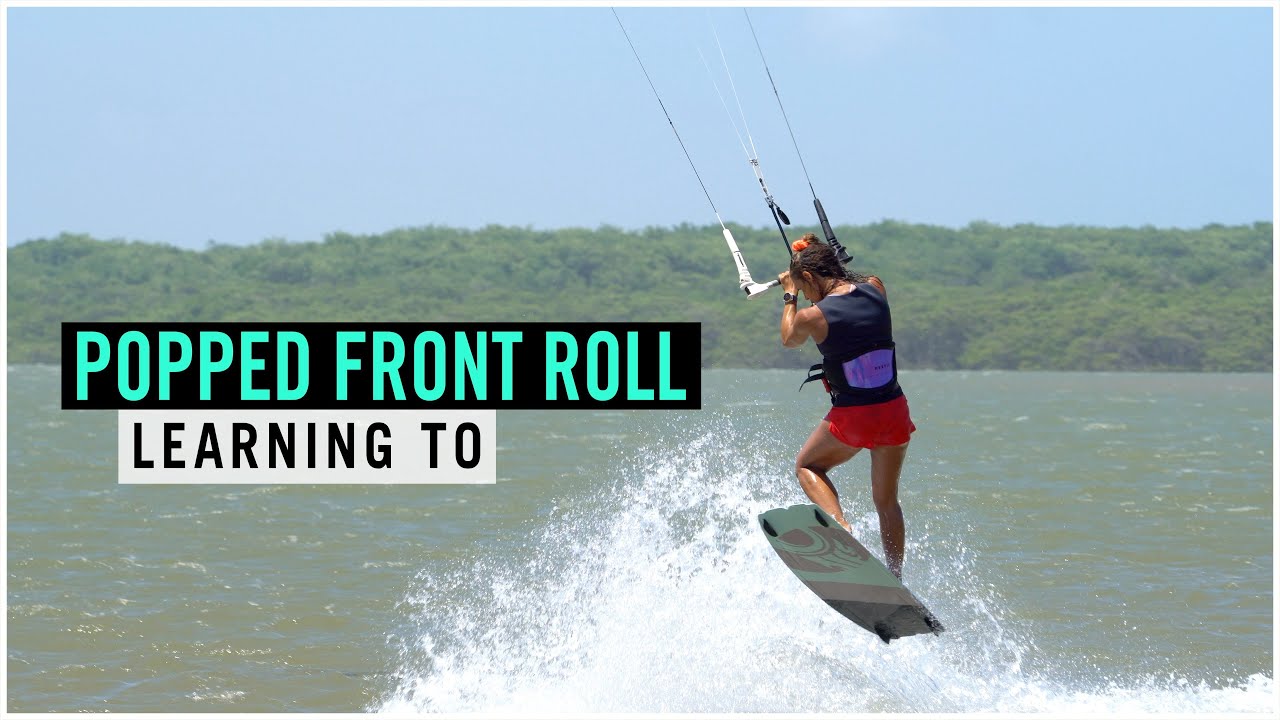
Hooked Popped Front Roll
Technique / Beginner
Introduction
The popped front roll. A move which is well within your reach if you can rotate forwards under a kite, yet a move which can appear so utterly incomprehensible and/or terrifying. Seemingly defying physics, trying to pop up whilst throwing yourself down into a front rotation. The mind boggles, and the body hesitates. Well, fear not; we're going to have a look at how to learn this. It'll still be very much popped, but you'll have some support from the kite, a touch more time to rotate and, therefore, room to learn and improve along the way. Once you get the initial rotation down and the confidence that follows, you'll have ample opportunity to be more dynamic, pop even harder and maybe even lower your kite just a tad. As well as being a brilliant trick on its own, there's the added carrot in the fact that the popped front roll is a springboard into so many other tricks, whether transitions, unhooked moves, blind or wrapped landings, and so much more. Pumped? Ready? Let's do it.
Set Up Pic A.
Getting everything in position and ready is key to your success. Flat or flattish water will make a massive difference, so if you can hunt some out, it's well worth the effort. And make sure that it's not too shallow. If you know you can bail without hitting the deck, you're much more likely to commit fully.


You want to approach on an edge with some speed. No need for Mach 10, but your board needs to feel alive so that you have something to pop against. Power-wise, you must be in control. If you're hanging on and the kite is taking you for a walk, it's really not the best time. You want to be comfy and confident, just enough that you can get going without having to work the kite too much. Trim if needed. If your bar is within easy reach, you can edge upwind with two hands on the bar and your shoulders leaning further upwind than your bottom.
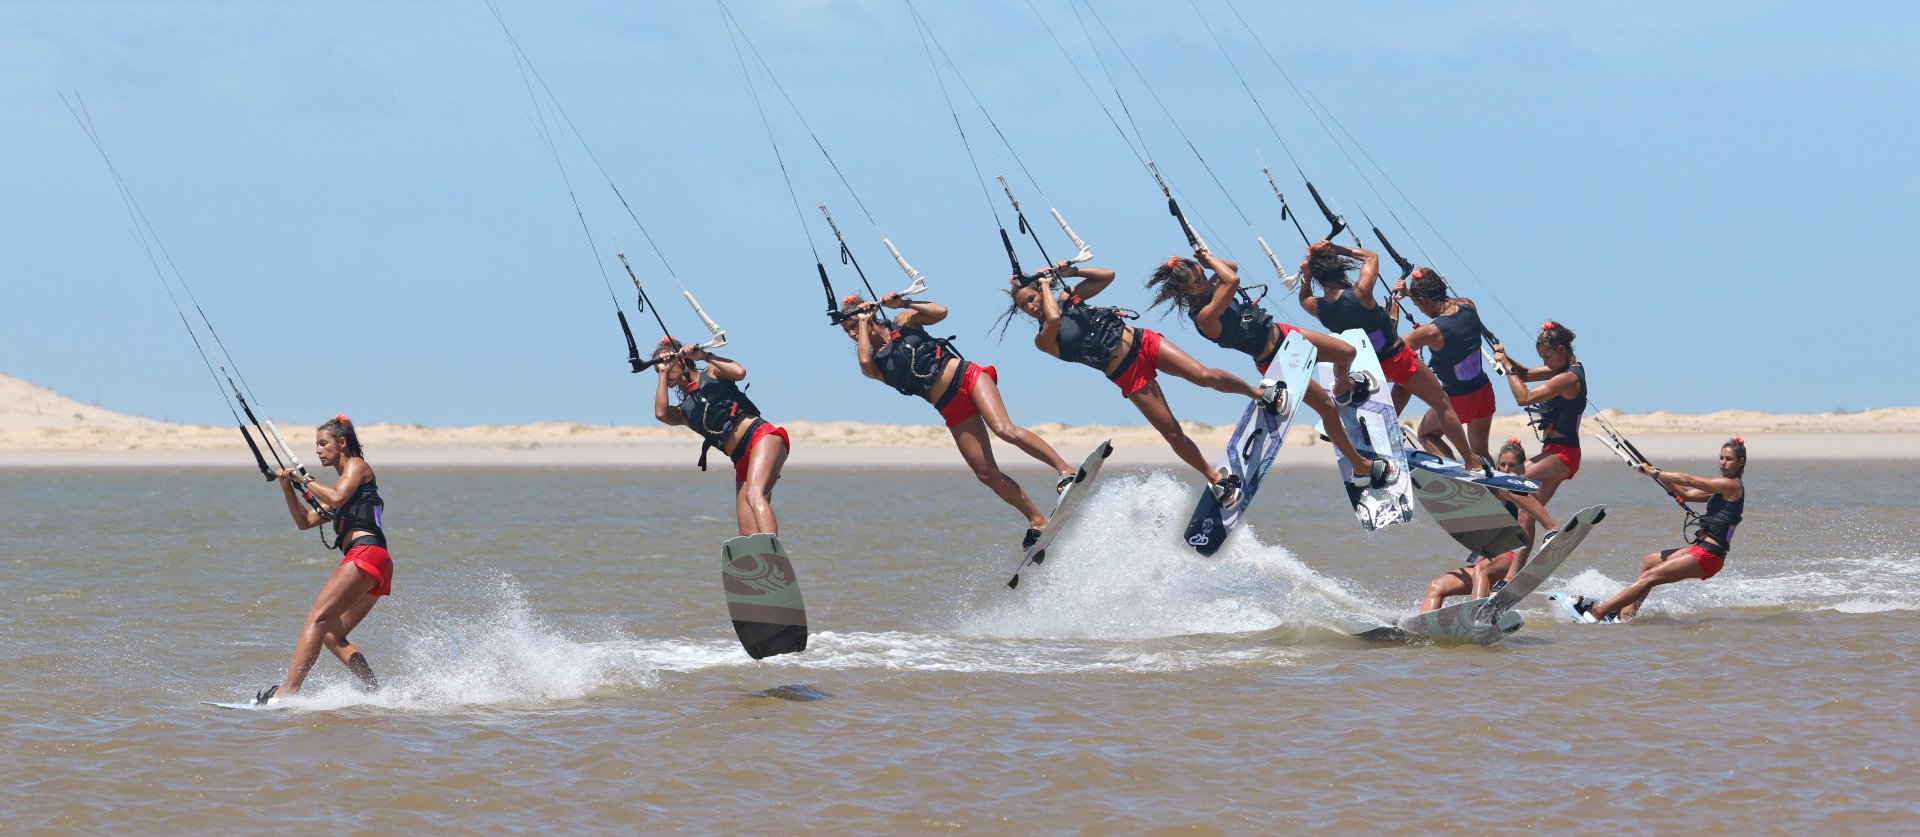
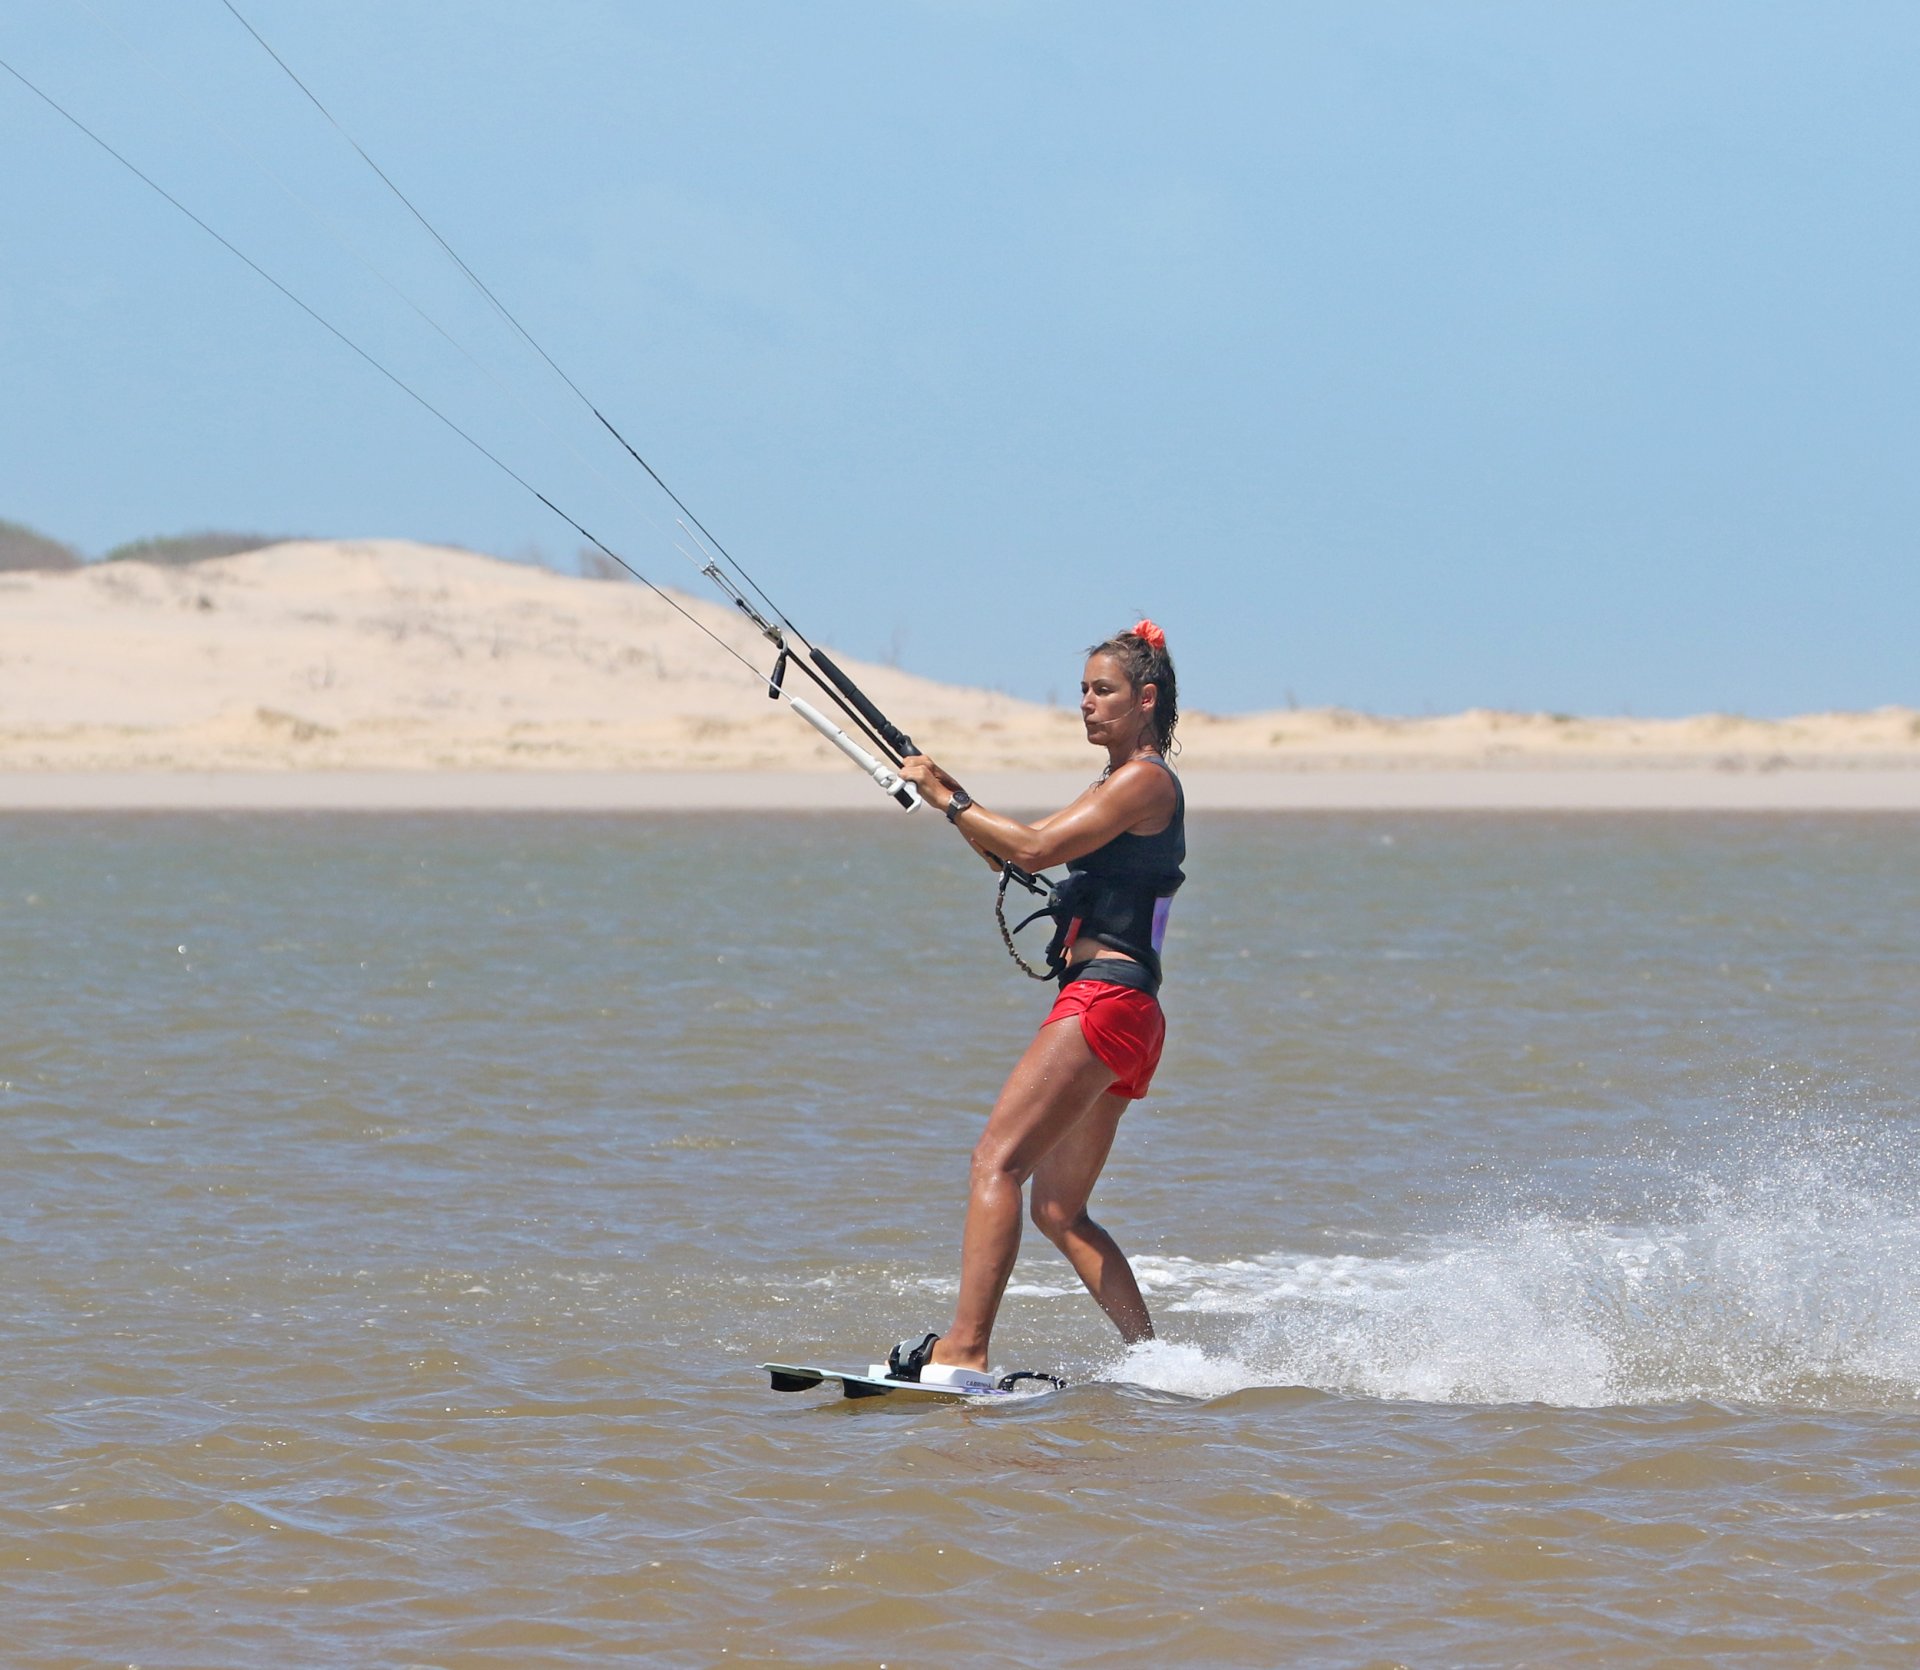
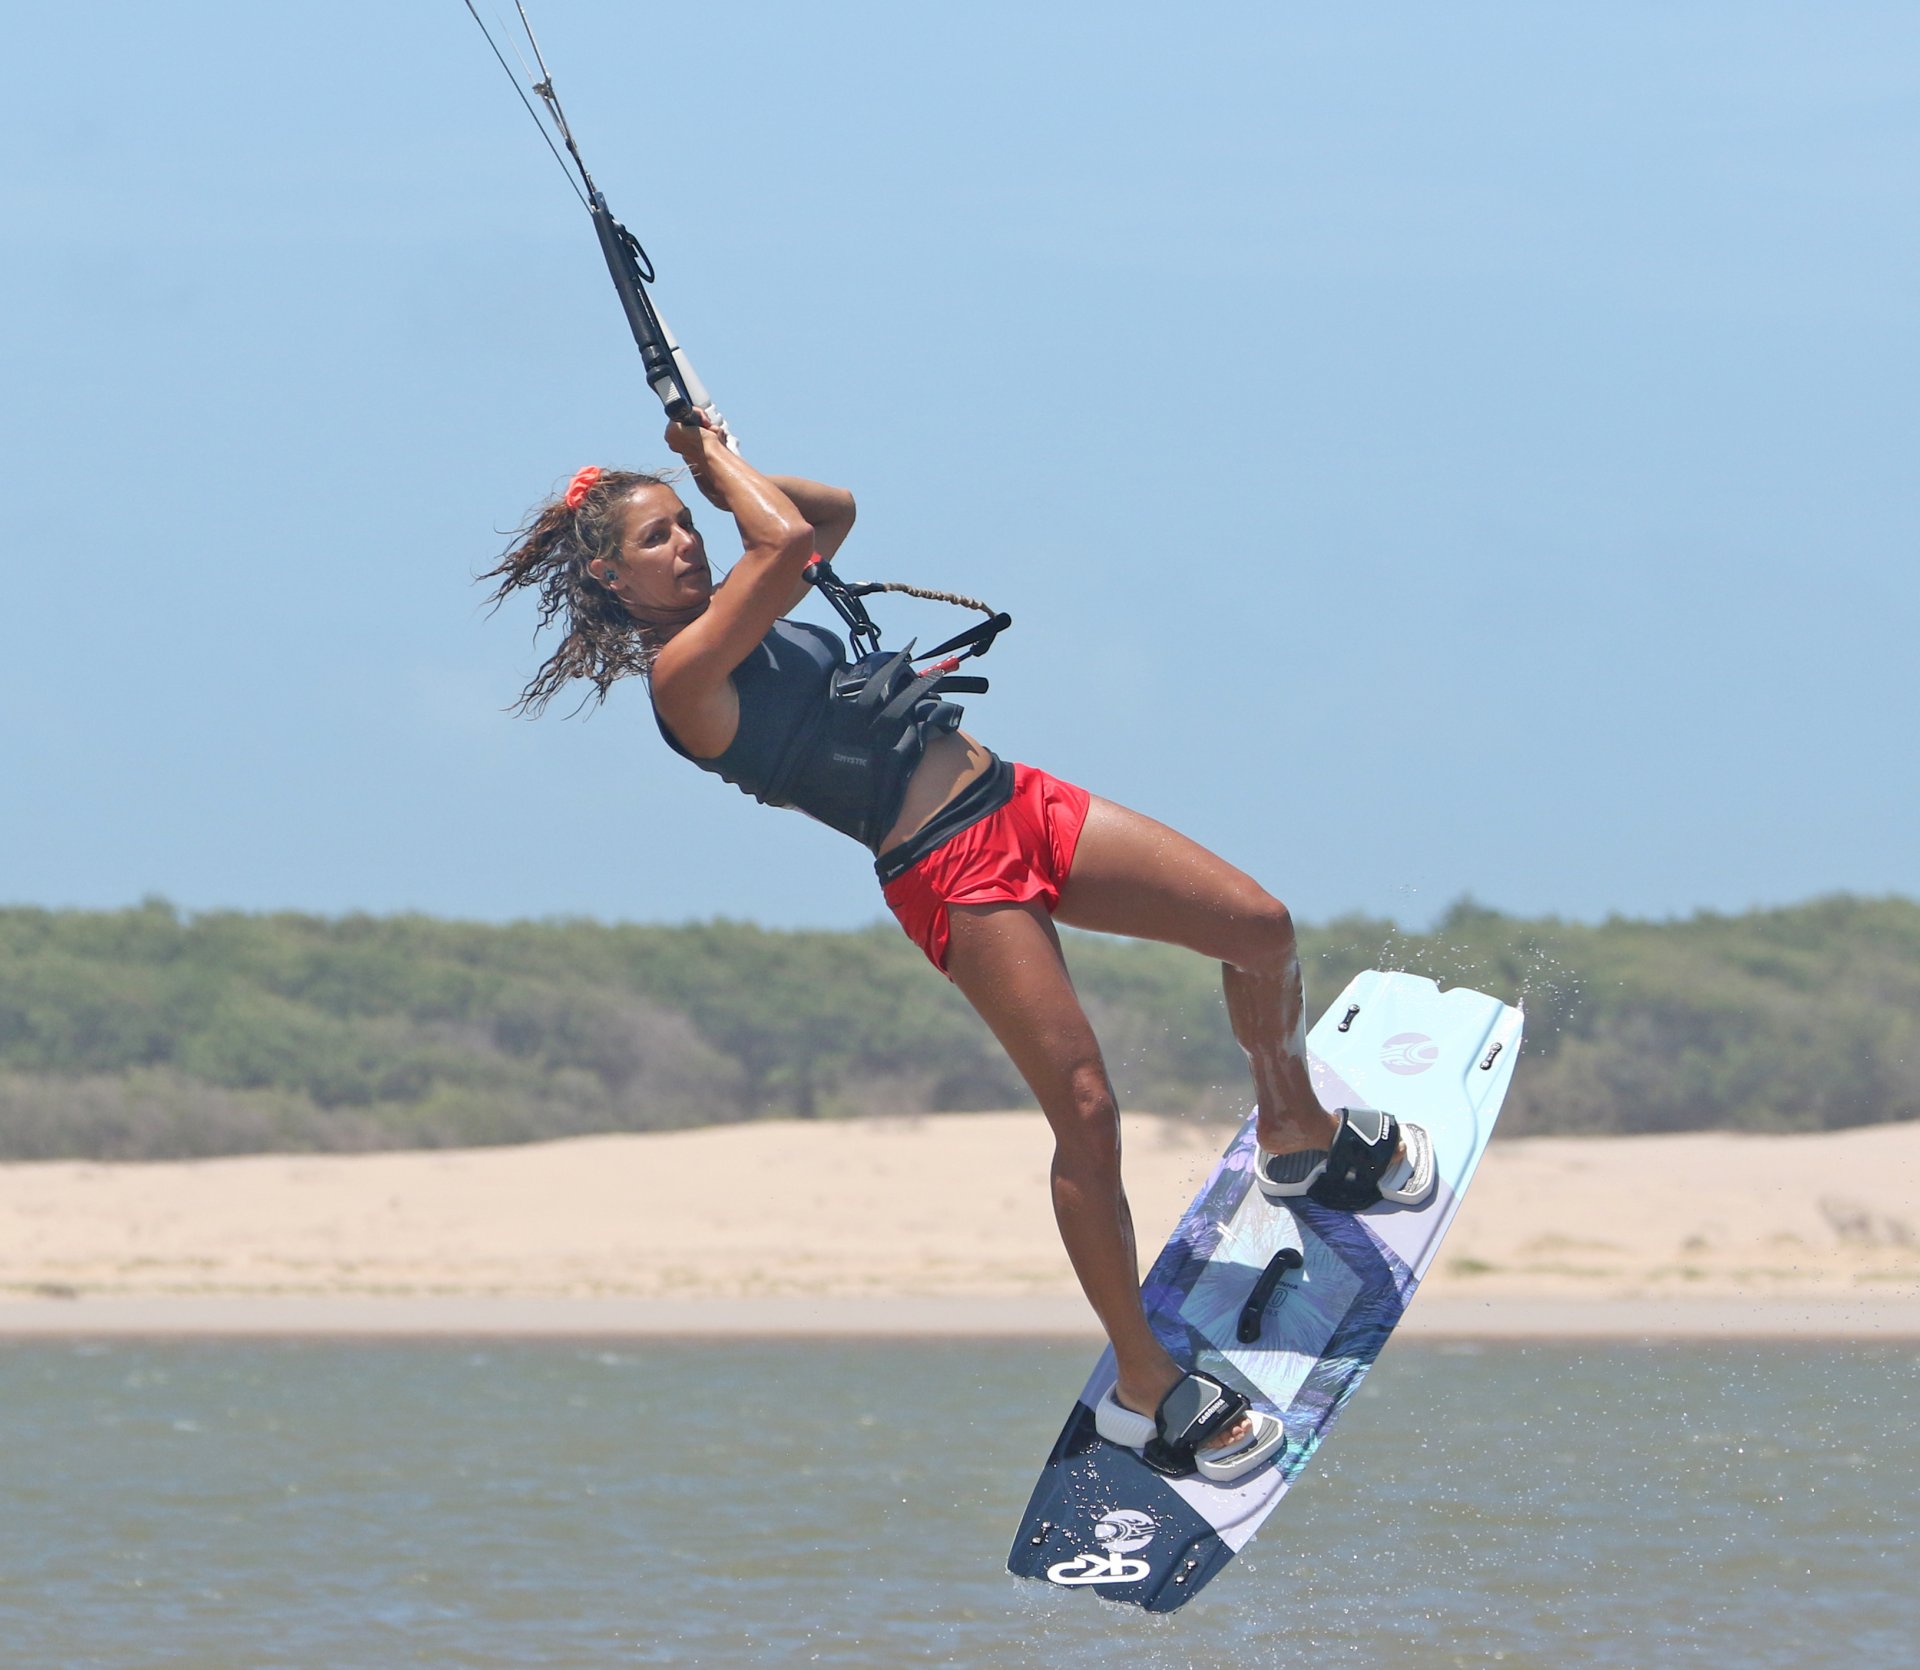
With your hands centred on the bar, position your kite at the magical 11 or 1 o'clock height. This means your kite is just low enough that it isn't lifting you, and you can happily edge. Karine approaches on a good edge and gets her kite and weight sorted in preparation for the move.
Bearing Away Pic B.
As you know from any previous pop moves, bearing away is essential. It allows you to carve up and pop without turning so far into the wind that you stop. It allows the kite to drop back in the window and help with your landing, and it gives you the chance to get into a strong position from which you can pop. Before bearing away, you need to make sure that you've moved your weight slightly back over your rear foot so that you feel the majority of pressure through your back heel. This is the point of your body from which you'll launch, so it's a sound idea to have the pressure going through it now. It also means you're back over the carvey bit of the board. How you bear away will have a direct impact on your take-off. It needs to be sudden and significant. If you slowly ease off your edge and gradually turn towards your kite, you'll likely accelerate and lose control. Your best bet before bearing away is to give a sudden bit more edge. This lets you test the pressure on your heel while also checking your speed. From here, you can then aim the board off onto a broad reach by releasing your edge and standing over the board. In the photo, Karine has suddenly turned off the wind. Her weight is biased over her back foot so that the nose of her board is lifted, her bar is within reach, and she hasn't bent over forwards but rather keeps her head and shoulders high. This stops her from going onto her toe side edge and carving off the wind.
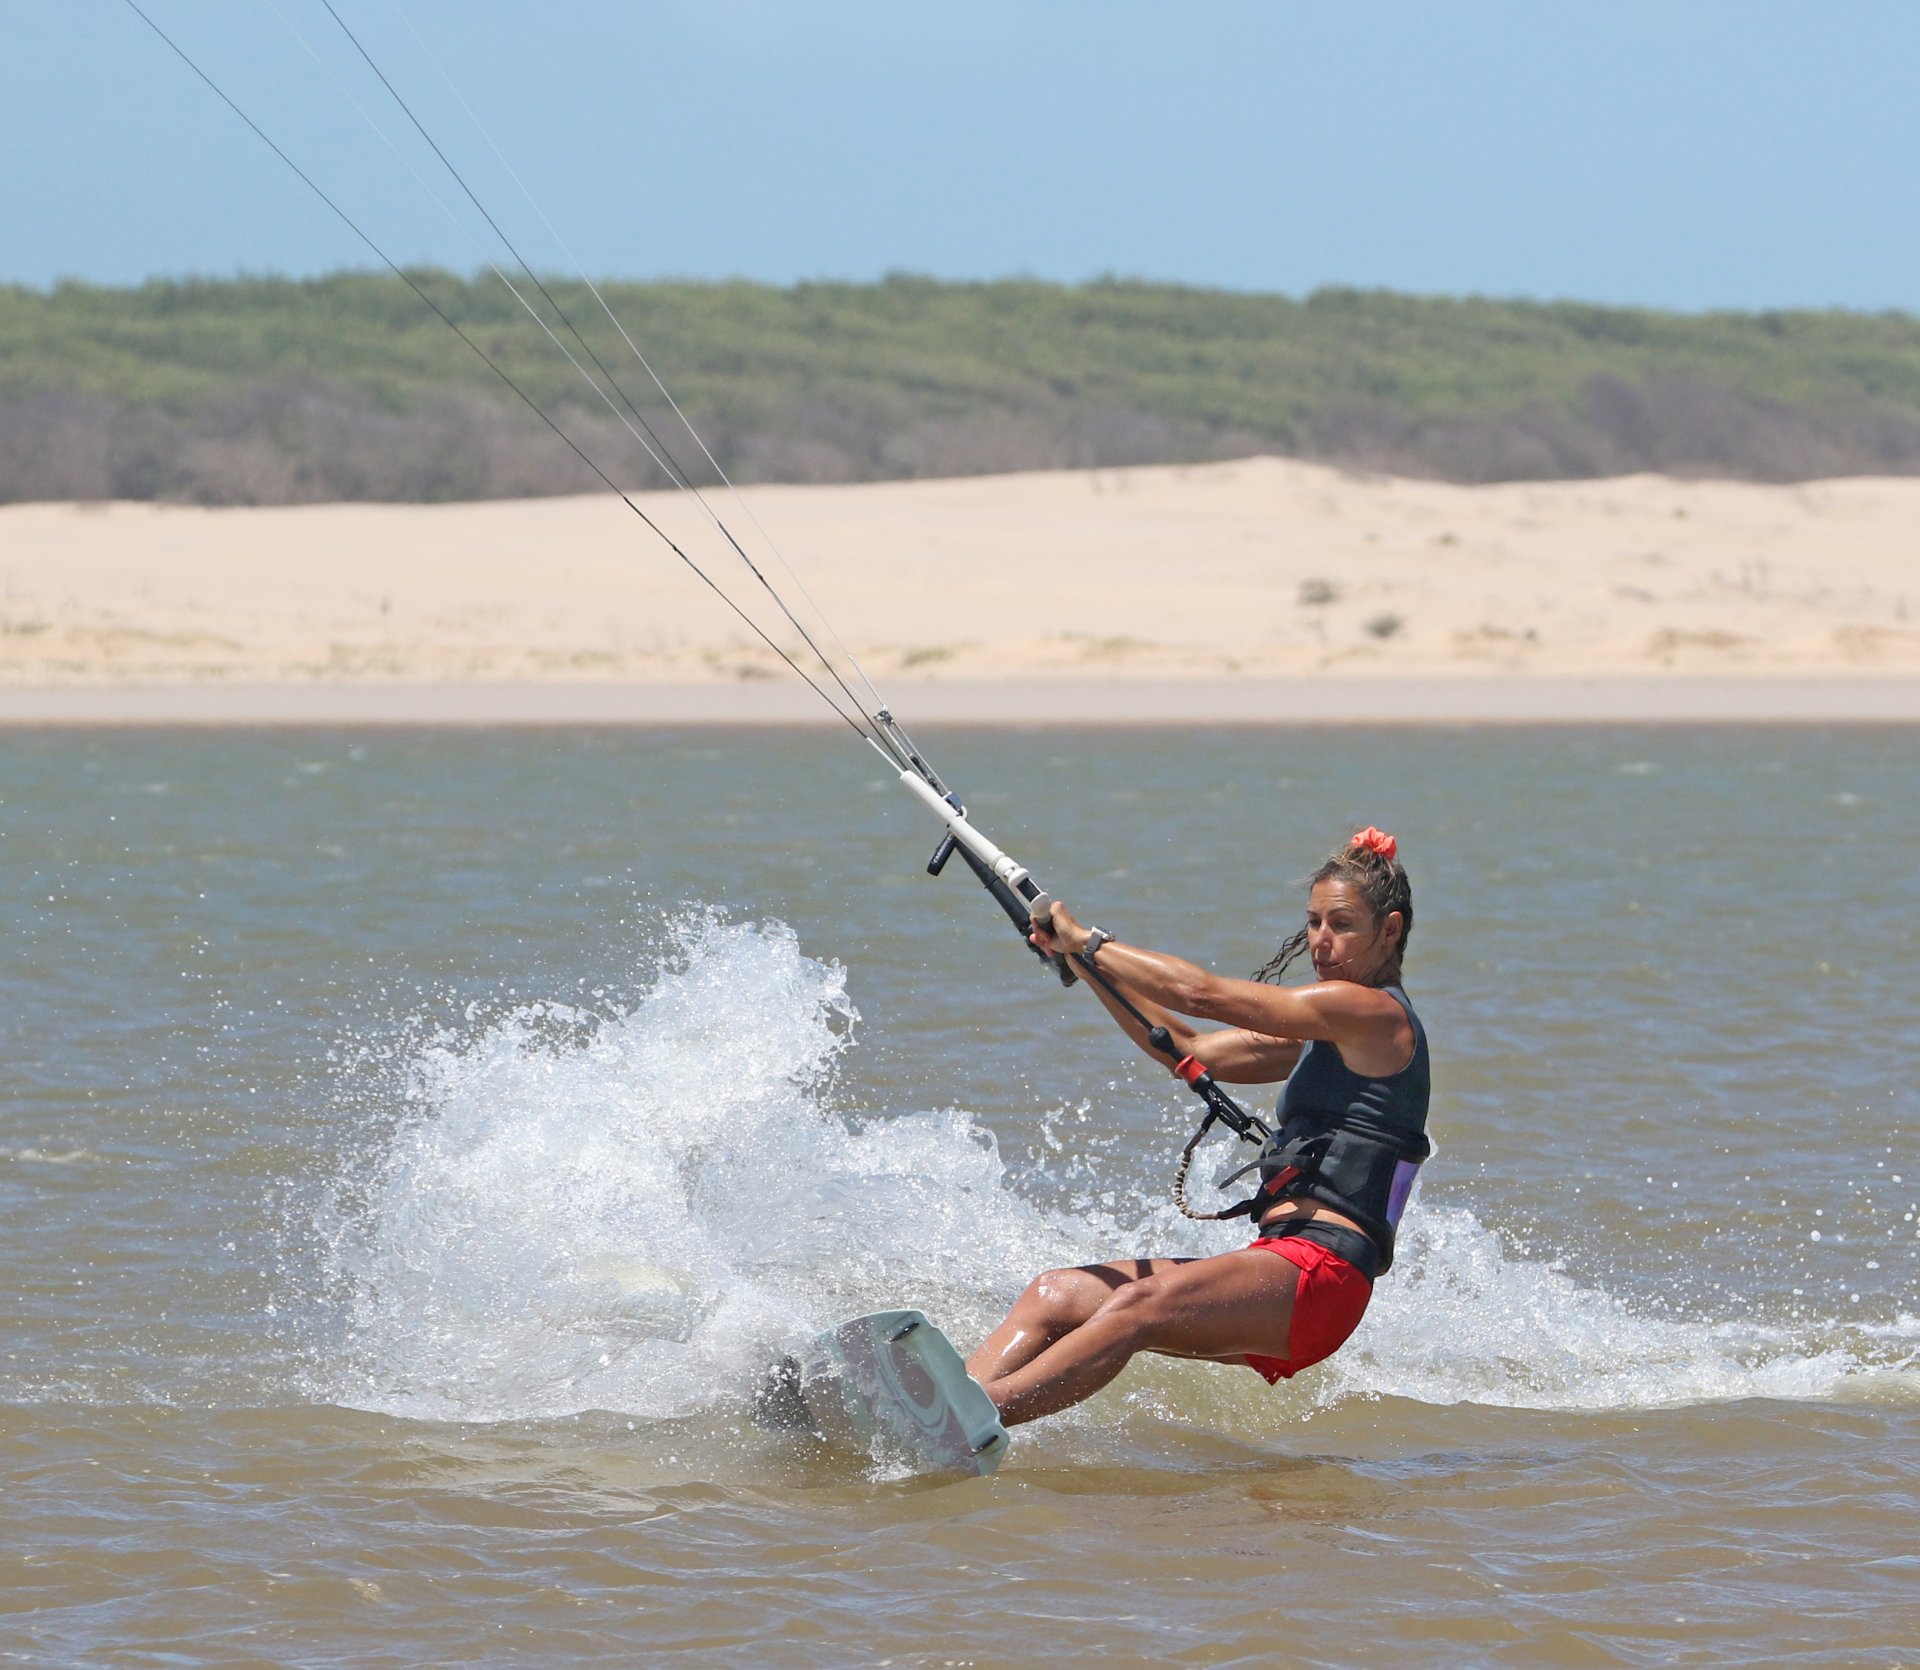
The Carve Pic C.
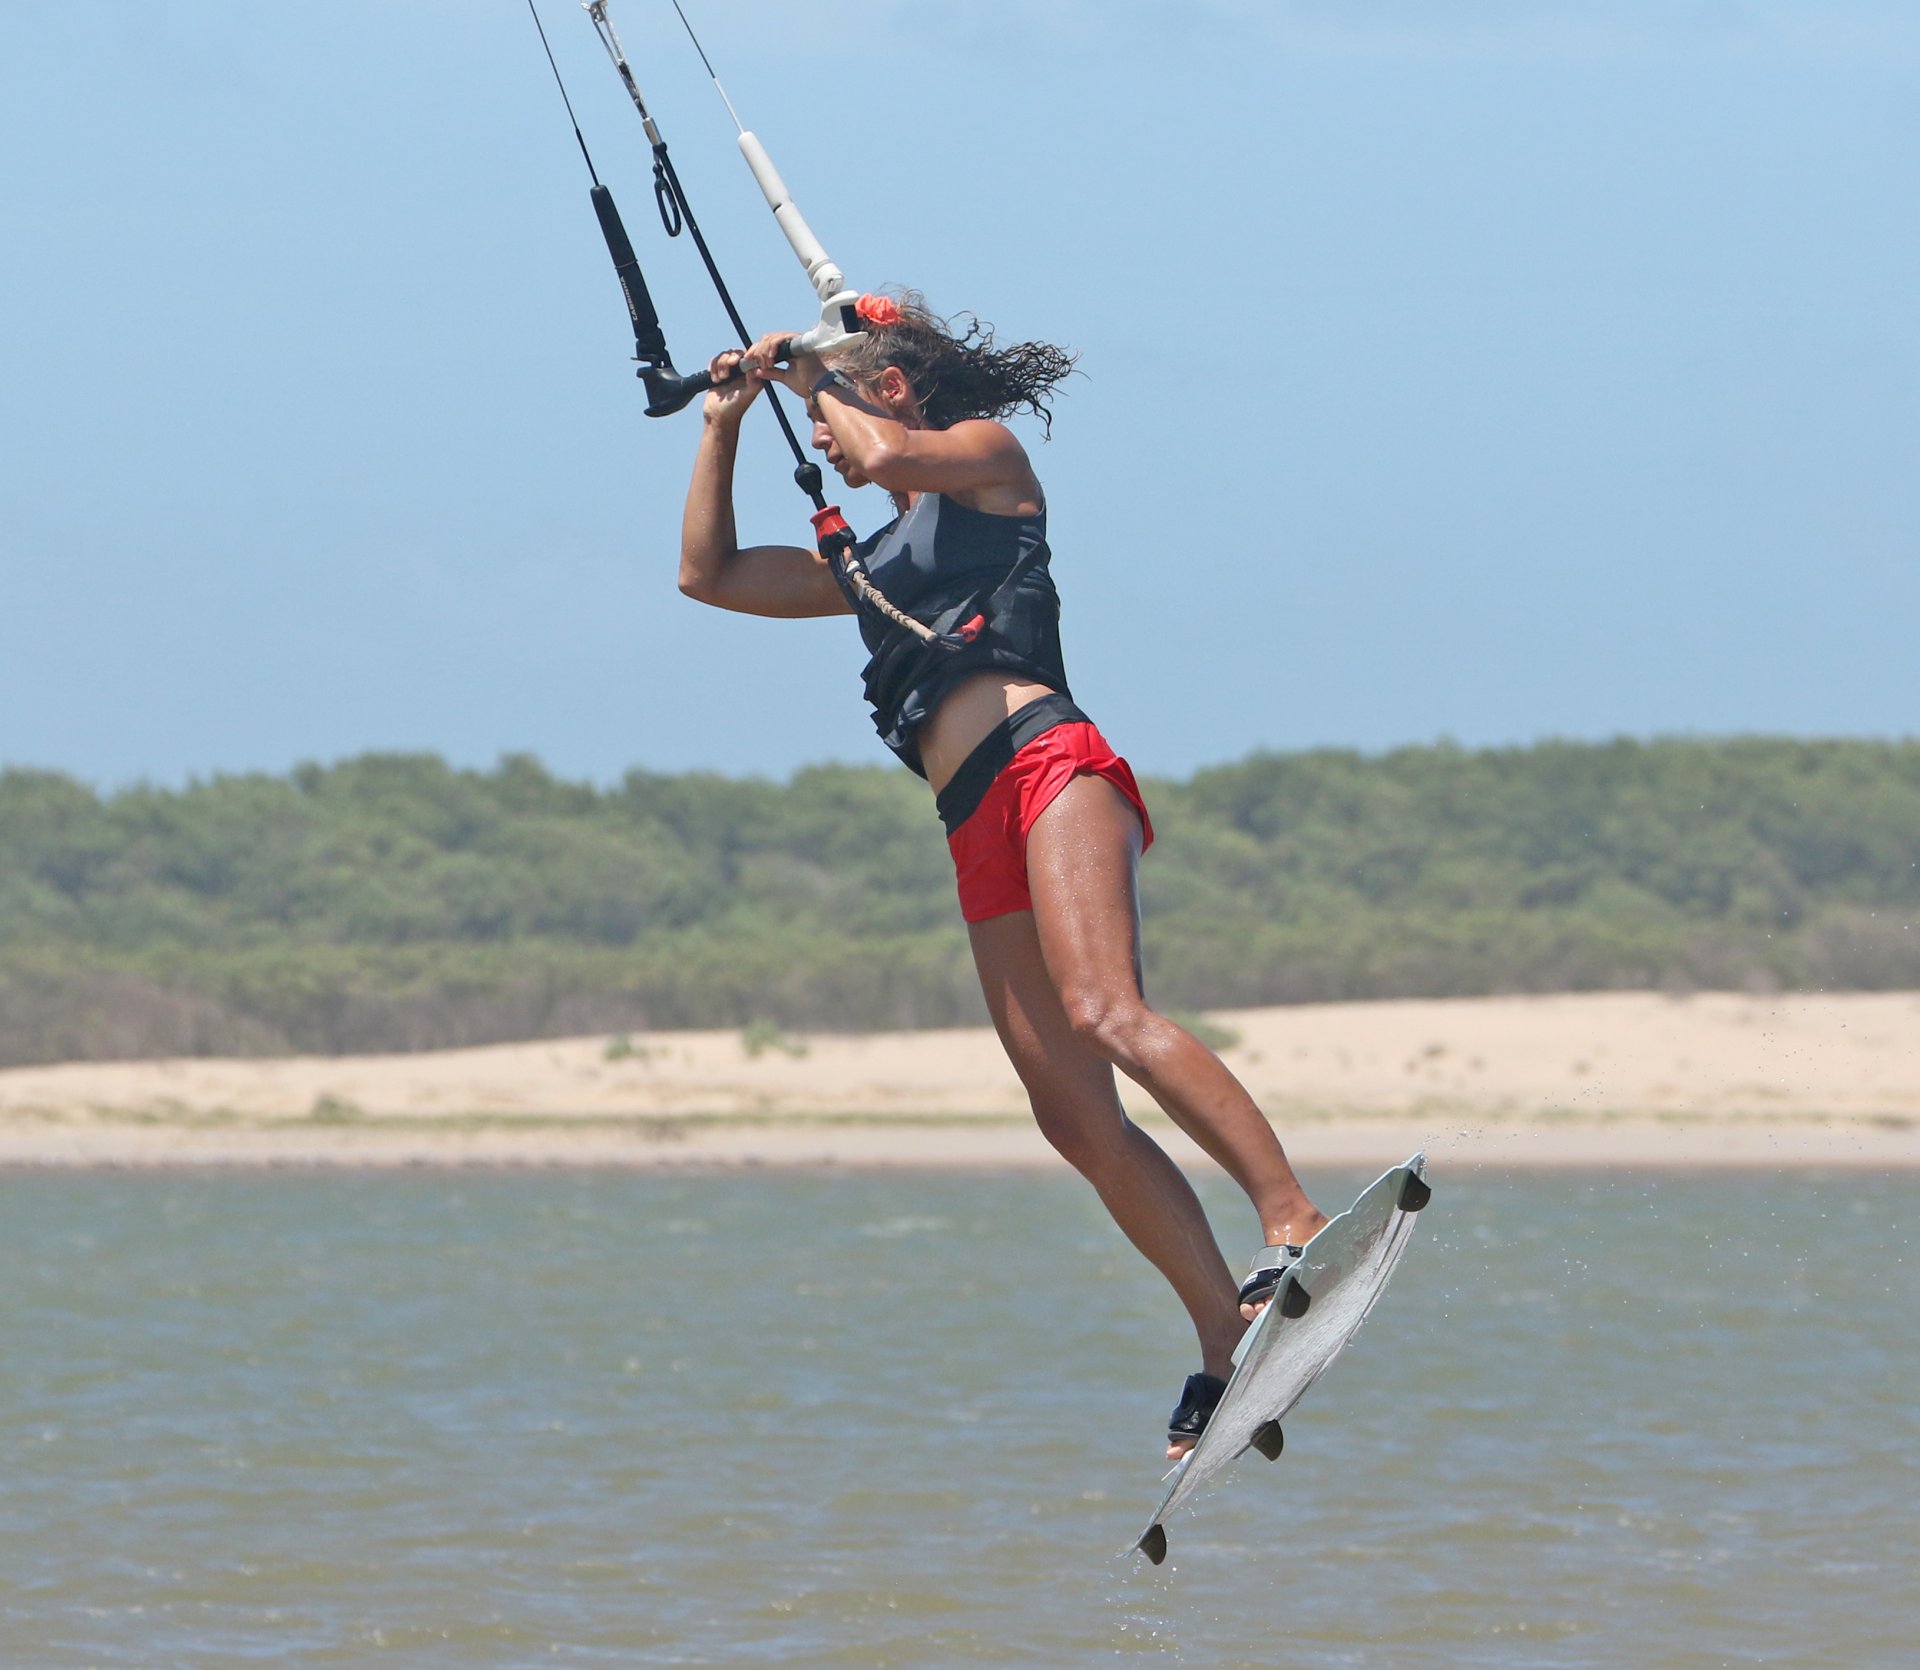
Your carve back onto your edge is what gives you a platform to pop against and the tension in your lines necessary to do so. In simple terms, what you're aiming to do is carve back onto the very same upwind edge, in the very same position that you were in just before bearing away. This needs to be dynamic and quick so that you can get into a strong position before the kite tries to pull you out of it. The beauty of being hooked in is that you can actually let the bar out a tad to help you get back into this position. The tricky part is resisting the urge to send the kite as you carve. The good news is that you can sneak the kite up slowly to help you learn. If you level the bar as you carve, the kite will move up, but in a slow and sedate manner. As you'll be carving and imminently popping, your kite won't have time to get to 12, so there's no danger of it actually lifting you off the water. Looking at Karine, you can see that her bar is level, so the kite is moving. She's dropped her bum low whilst keeping her legs strong. This drops her edge deep into the water, and with her weight over the back foot, the board immediately carves up, building resistance and adding tension. THE one thing that you must not do as you carve is pull on the bar! It will prevent you from carving. This is only possible if your sweet spot isn't too far out.
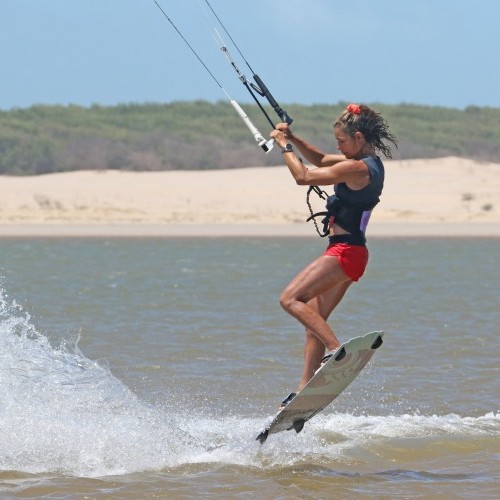
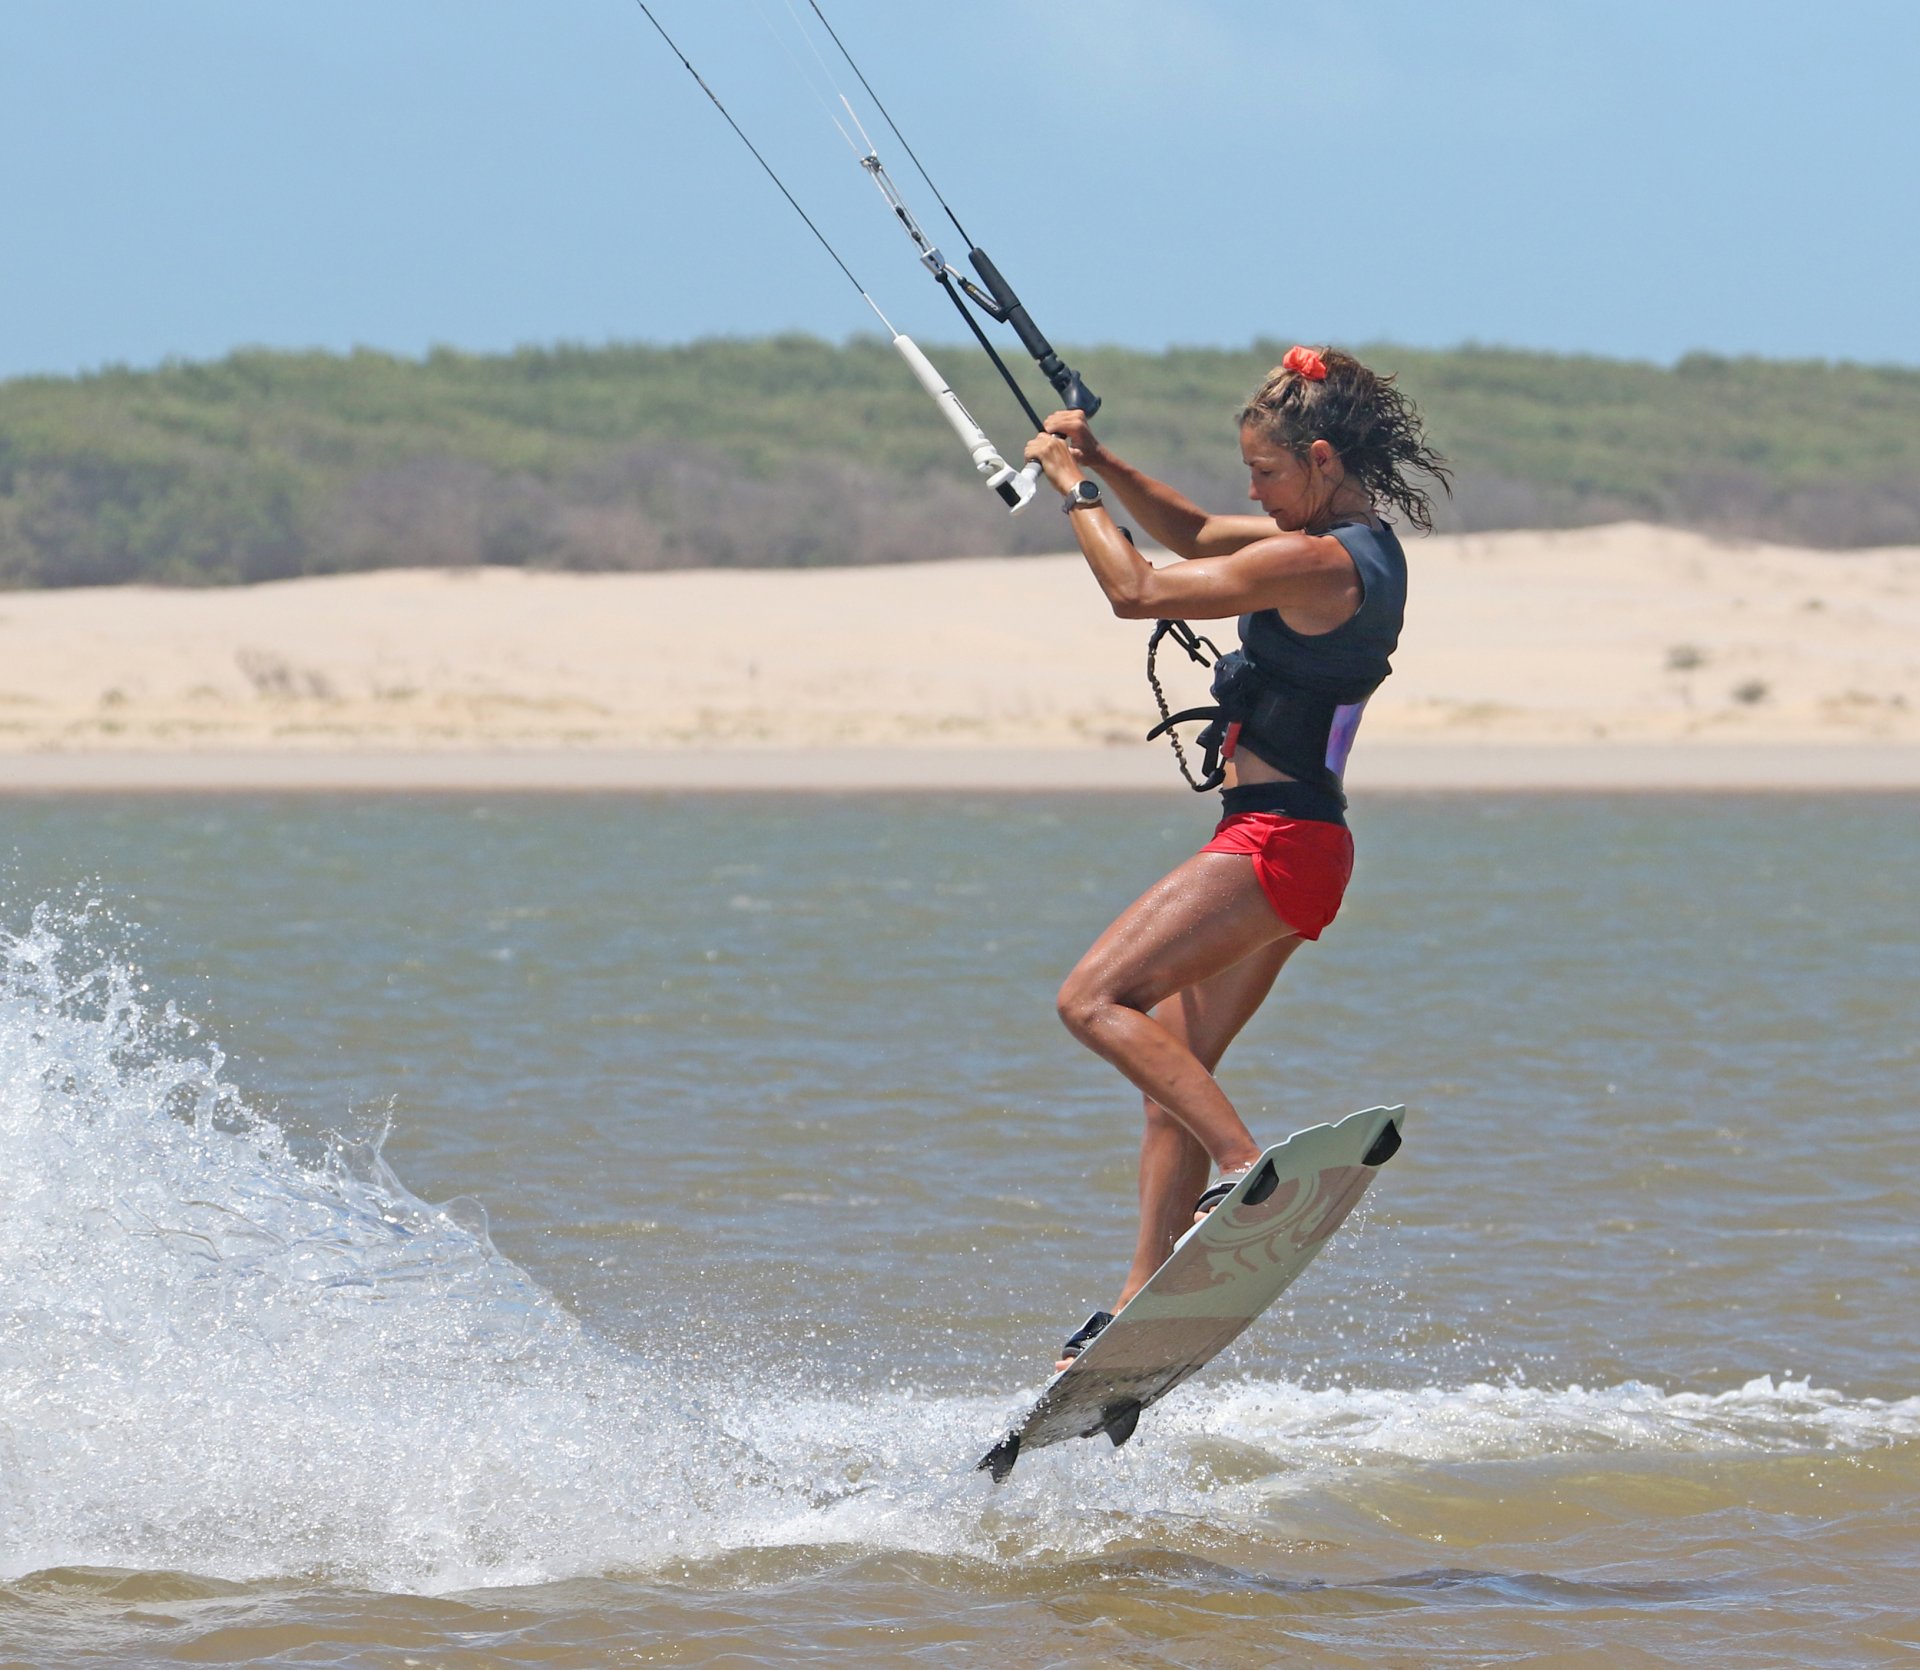
The Pop Pic D.
Before we get into the mechanics, it's really important to remember that, as with everything pop, you're the one making this happen. You're not waiting to feel lift. There's no cue from the kite. It's your responsibility to explode off the water. As soon as you've carved onto your edge and feel resistance, it's time to stamp with your back leg. You're aiming to extend your back leg violently so that you suddenly push against your back heel and extend all the way through your body from your feet to your head. Even though you want to go up, you want to kick yourself away from your board and kite, upwind. The line tension will convert your away energy into up energy. Quickly back to the bar… The stamp gets you up, not the bar. Once you're going up, you can pull the bar in, BUT if you pull before you stamp, the kite will pull you over the board, and you'll have nothing to kick against.


OK, getting up is one thing, but how about initiating your rotation? The good news, it's all in your head, shoulders and front leg, much like the sent version. As you stamp off against your edge, bring your front knee up whilst dropping your head and leading your shoulder towards it. This way, you will be extending up and lifting into your rotation as opposed to throwing down into your rotation. With the force of your stamp, this will send you on your merry way into your front roll. With the kite relatively high, your rotation should be more of a 360 around the axis of your lines and extended back leg. As you progress, this will remain the same; it's just your lines will change angle! Karine is most definitely on the way up into her rotation. Her back leg is fully straight, and she's used every muscle in her body to extend as she's popped. At the same time, she lifted her front knee, dipped her front shoulder and dropped her head towards her shoulder to initiate the roll. It's also worth mentioning that once on the way up, she's pulled the bar in a tad and has steered her bar forwards to make sure that the kite doesn't reach twelve and moves forward with her. As your head and shoulder dip, your bar dips with them.
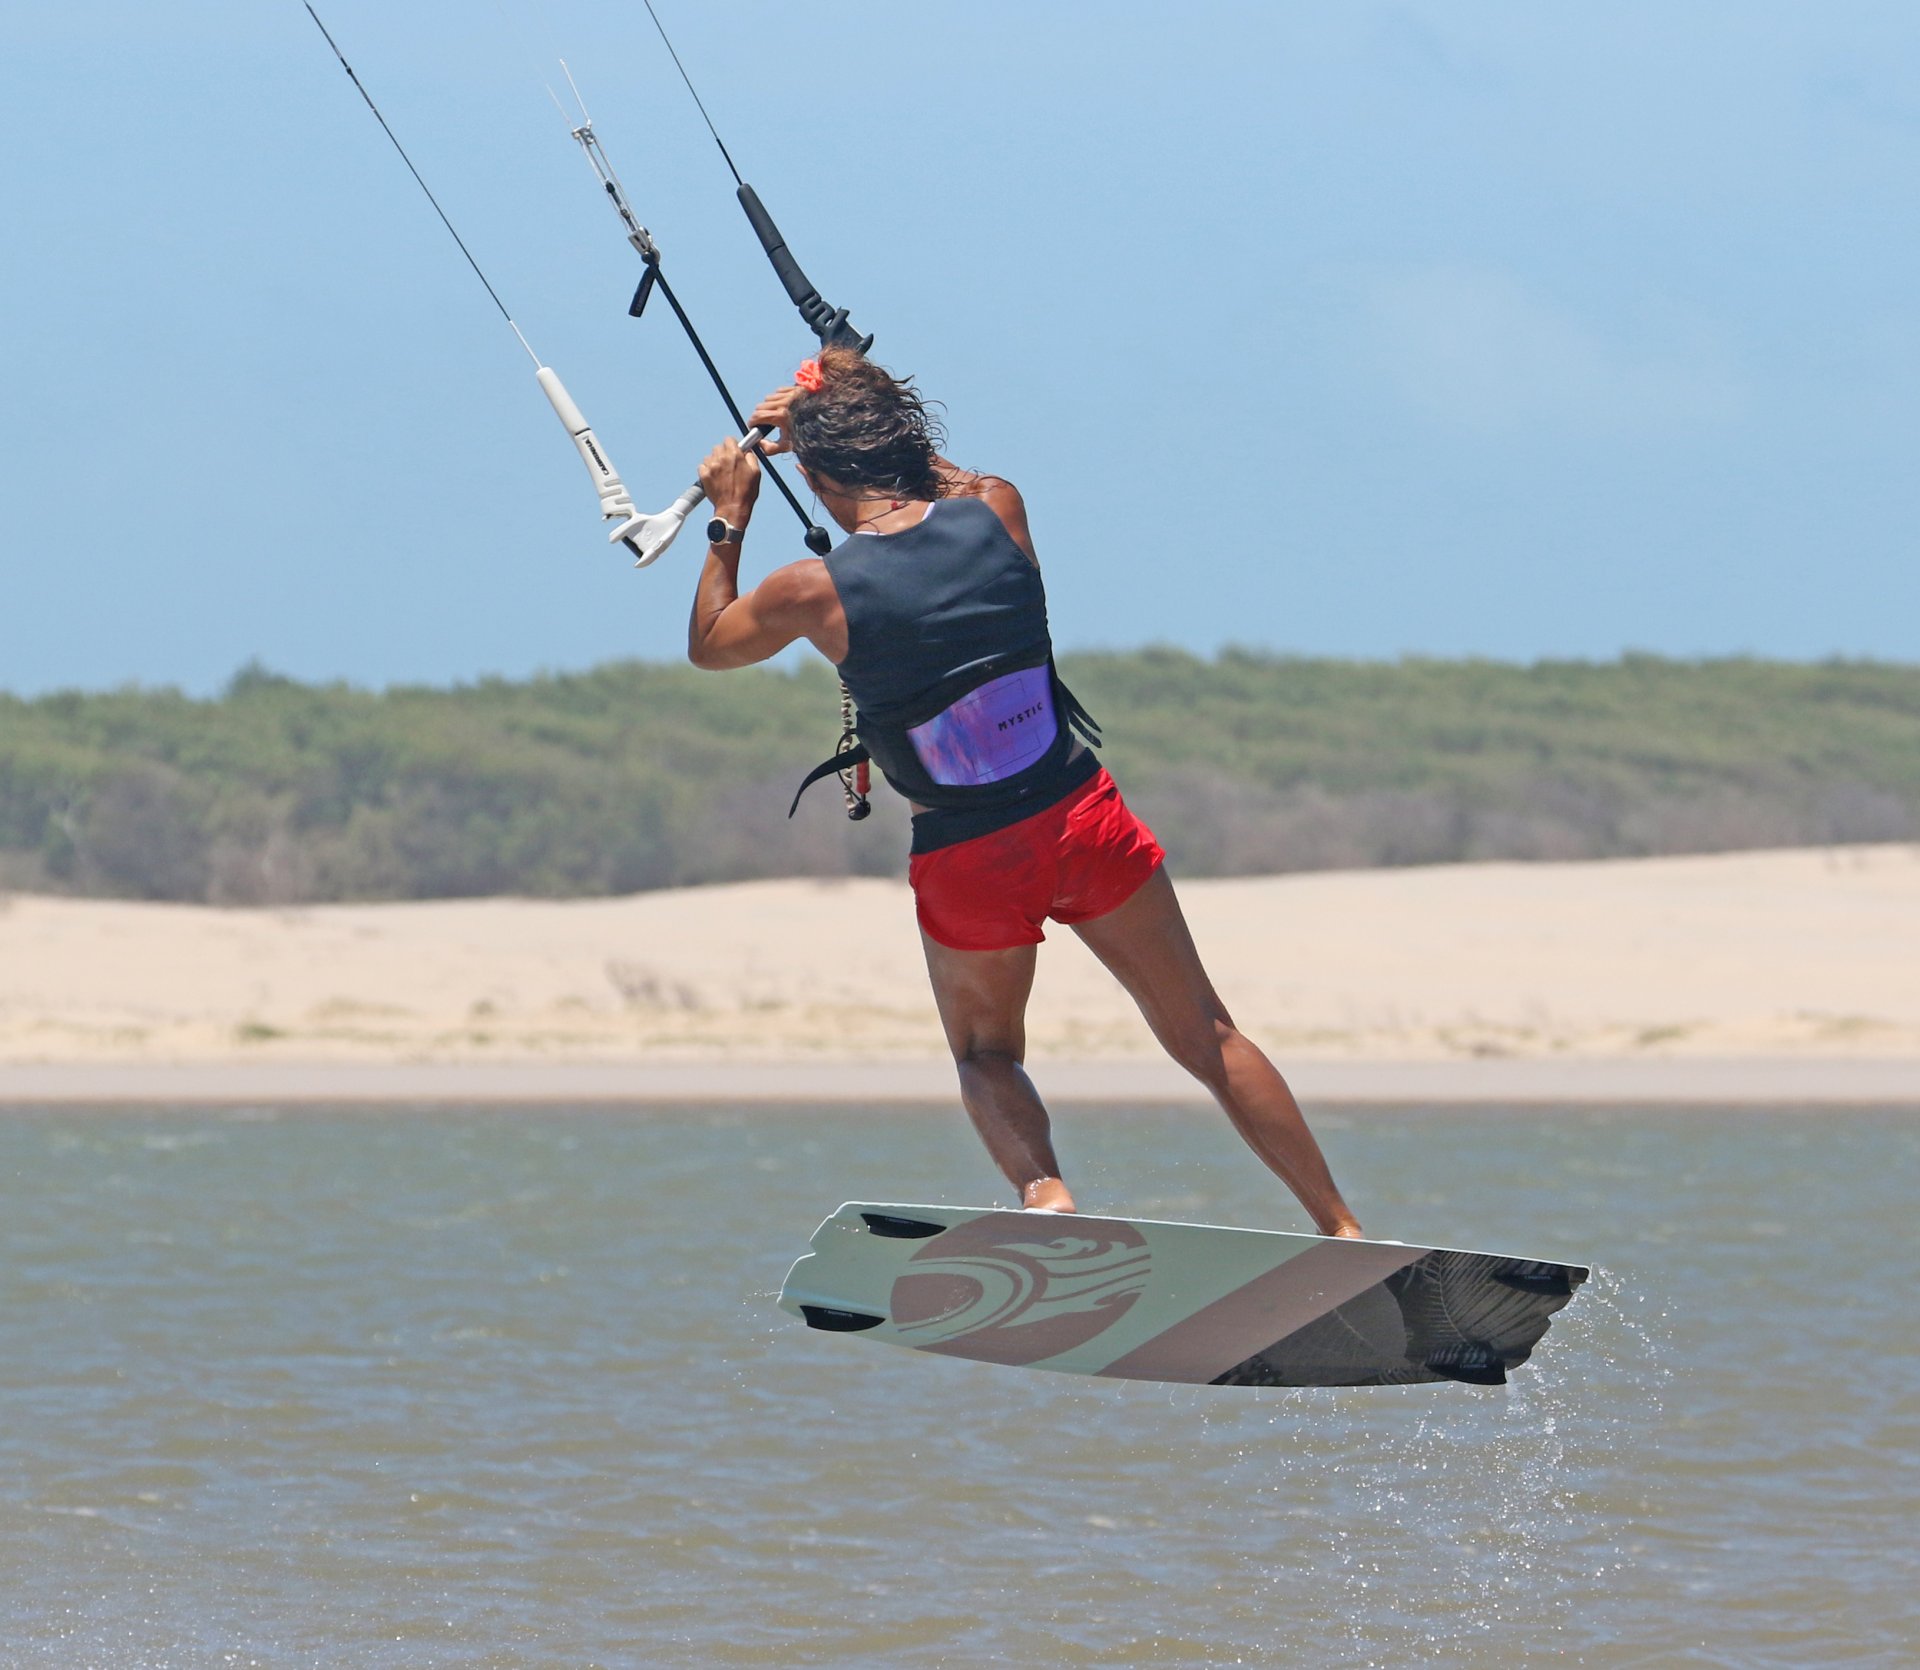
Rotate Pic E.
This is very much a continuation of the last image. You can see that Karine is in an almost identical position, just further around her rotation, a quarter way round, to be precise. The point is that your take-off, your pop, has set everything in motion. As such, you don't need to do much. And this is the simplicity of the move, give it everything you can on take-off and then you'll see that the rotation is in full swing and you don't need to do anything. Leave your back leg extended, your hands and bar where they are and feel yourself rotate. As long as your kite is relatively high, you'll have some support and, therefore, time to get around.
Eyes on the Prize Pic F.
As you come around your rotation, you'll see upwind flash past and know that you'll soon enough be facing the right way again. You'll still be supported by your kite and have time. However, it's always a good plan to know where and when you're going to land. So, turn your head to get your bearings and see where you're going. Not only will this help you finish your rotation, but it'll also be the moment when you can dive the kite for landing should you feel that it's snuck too far up or hasn't followed you forward. Once again, looking at Karine, you can see that she's in the same position; her back leg is still extended, front knee up, but she's now turned her head and is spotting her landing.
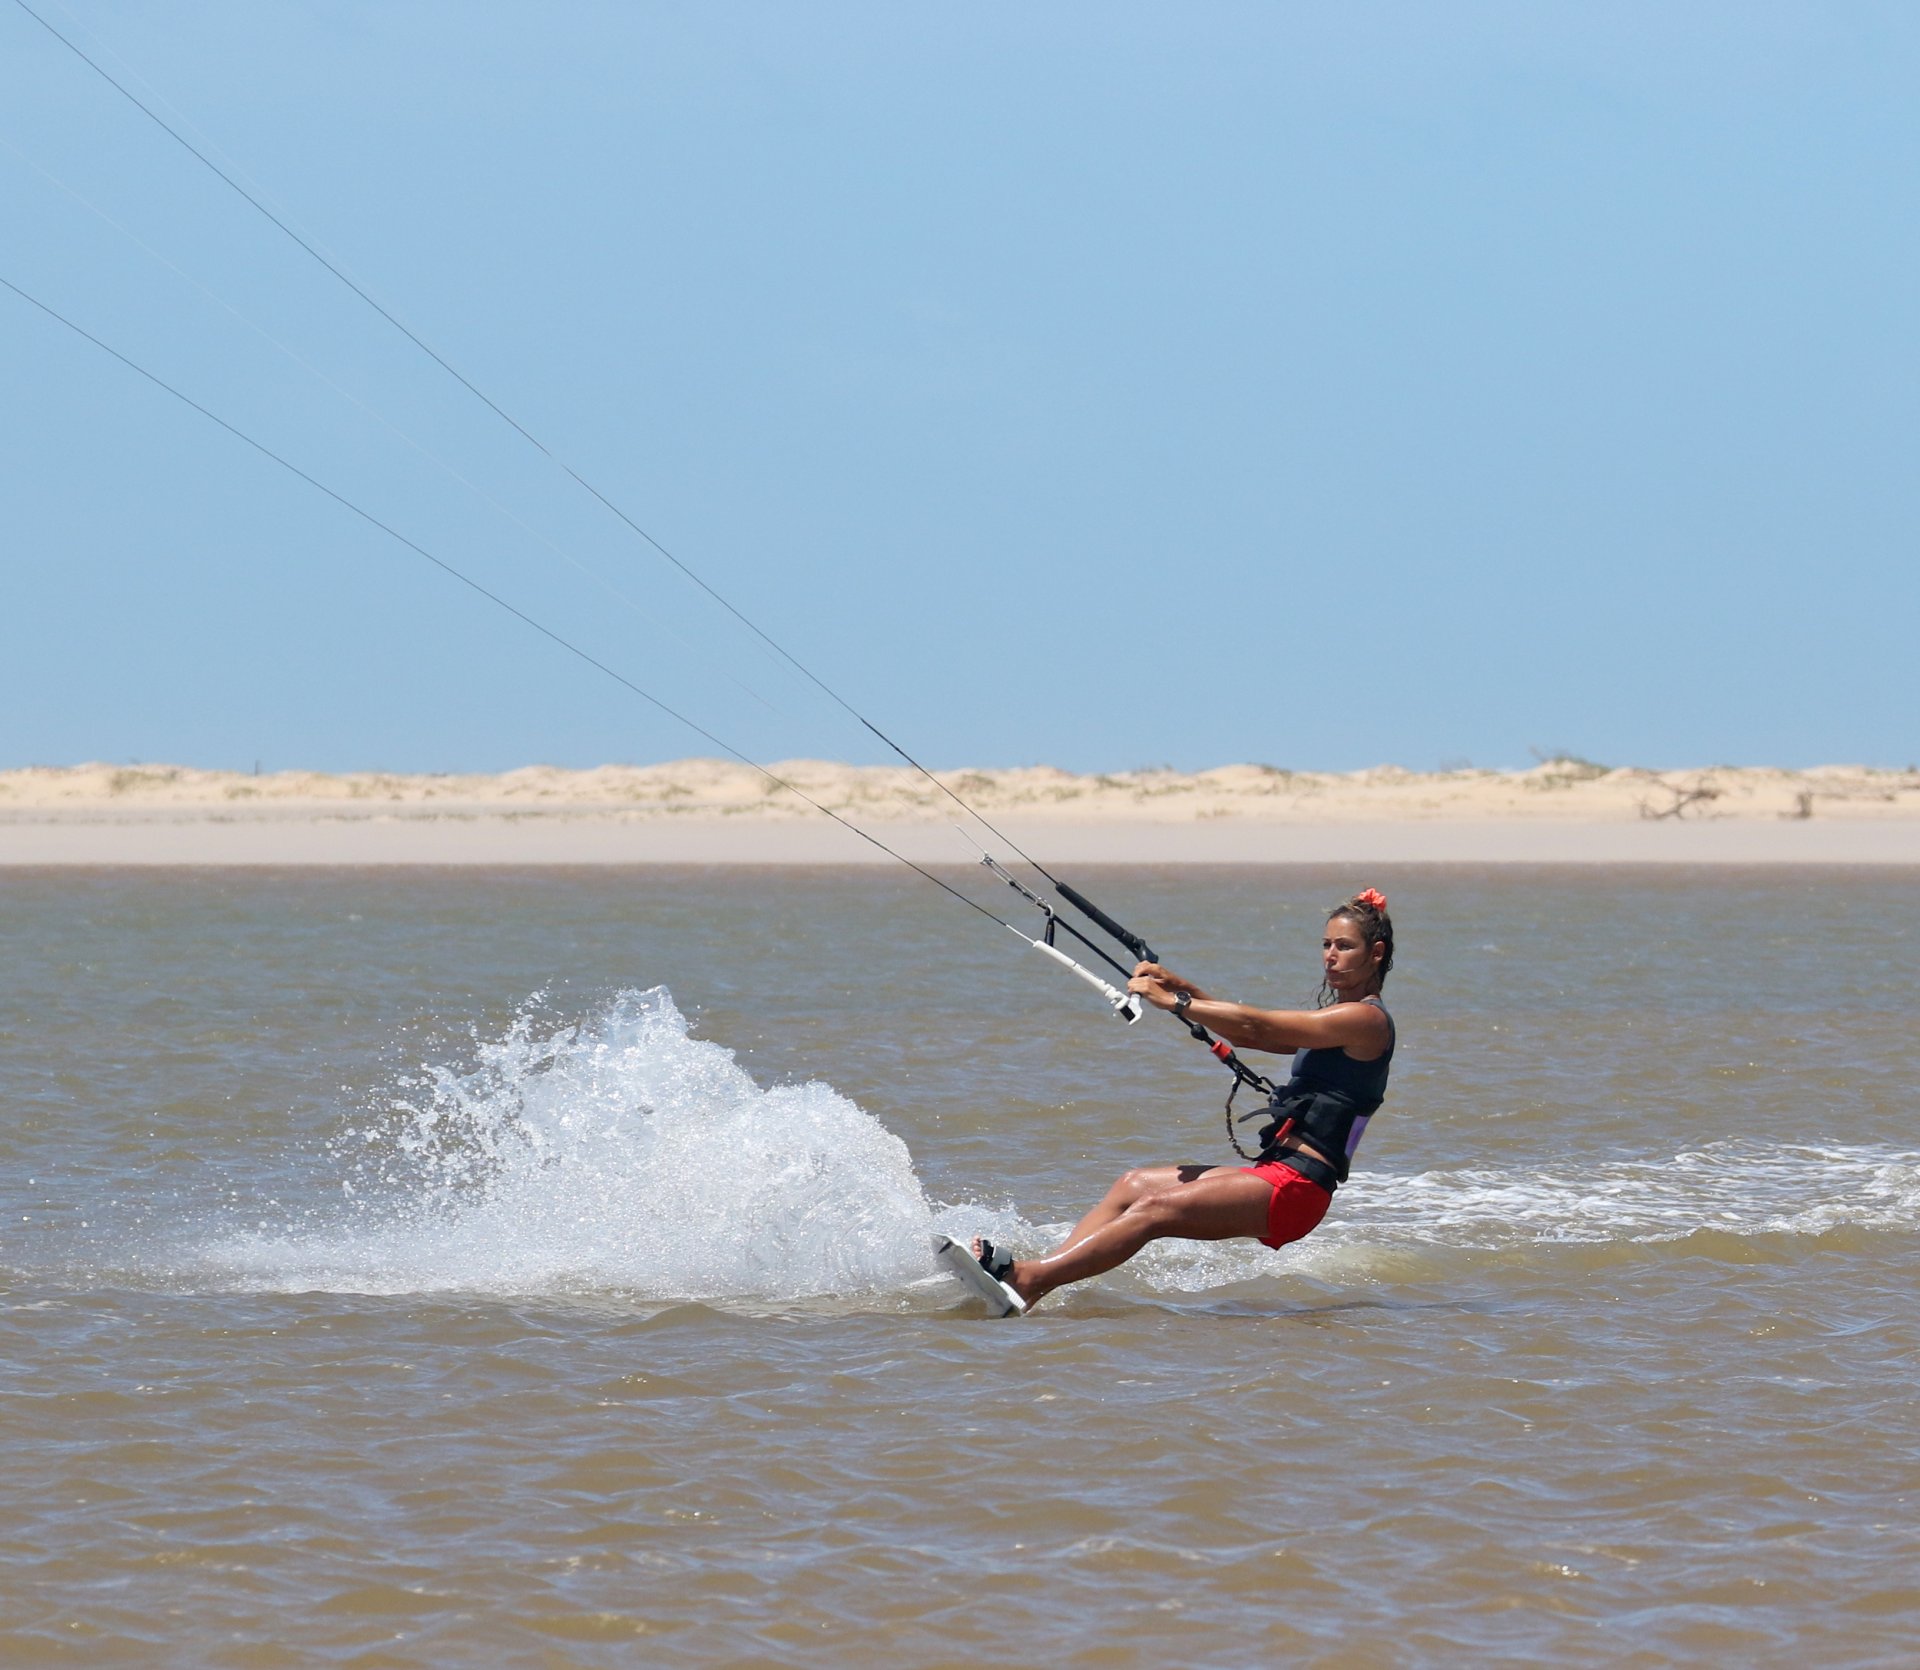
Landing Pic G.
With your kite diving down from a relatively high position, your landing shouldn't be dissimilar to what you're used to, if perhaps a tad faster. The same principles apply. You need to drop your legs, get the board under you, and aim to land over your board, slightly tail first, pointing off the wind. Focus on where you'll touch down and try to stomp your landing. With a bit of downward force, you'll settle the board onto the water and be able to keep your momentum going.
Top Tips
Getting comfortably into your default popping approach and then bearing away are the precursors to any good pop. It's worth practising your approach and position and then bearing away whilst keeping your weight back and the kite controlled before you start popping into any front rolls.


To start with, it's all about keeping the kite high throughout the move. With support, you'll have confidence and be able to get an idea of what's going on. That said, you can't set up and bear away with the kite high, so make sure you only start to drift it as you carve up. You should find that this will be surprisingly natural.
As a result of drifting the kite, you do need to be prepared to steer it down/dive it as you come around your rotation. However, don't worry if it moves too far. You can progressively move it less, step by step, as your confidence grows in your pop.
Check out the sequence for a step-by-step walk-through and then watch the video for the real McCoy!
Common Problems
Sending the kite! All those years of evolution have burnt self-preservation deep within our psyche. Two things that will help you send less. Firstly, trim the bar closer. With your sweet spot nearer, you'll be less likely to lean on the backhand as you carve up. Secondly, bear away more. By more, we mean further off the wind. The closer you are to the wind as you carve, the more you will pull. The broader you go, the less you are able to pull!
Not getting enough height. Chances are that you're pulling the bar in before stamping, which pulls you up and over the board and off your edge. Make sure that your back leg is your spring, not the bar.

Kite is moving too far back even though you're not sending it. This is the classic pop issue. It's a sign that you're waiting for lift, rather than creating lift. Once you carve up and feel tension, go for it.
Keystones
- Weight back and bear away
- Carve and drift
- Stamp, extend and pull
- Lift knee, dip head and shoulder
- Turn your head and dive kite
This technique article was in Issue 98 of IKSURFMAG.
Related


By Christian and Karine
Christian and Karine have been working together as a coaching team, running improver to advanced kitesurfing clinics since 2003.
