
Learning To Loop Part 1 – Body Drag Under Turn and Down Loop Sliding Transition
Technique / Beginner
Introduction
To kick off our series of all things loop, we're going to have a look at the very foundation, the under turn. First, it is employed while body dragging to get the mechanics and understanding in the bag before we then move on to the slide turn. Cracking this is a game changer and, with time, will give you both the confidence and know-how to take your looping further. Incidentally, as well as being rudimentary skills, both of these manoeuvres have practical uses, which we'll come onto in due course.
Body Dragging Under Turn
There is no better way to work on this than by ridding yourself of your board. You only have the kite to think about, and you can therefore focus all your attention on the challenge above you. Ideally, you should aim to try this in light wind, perhaps when you're at the beach and it's not quite enough to ride. The perfect opportunity; drag out and give this a go! We should hasten to add that you need space for the possible outcome that you don't succeed and crash your kite. So, make sure that you and your kite are out of harm's way, and anybody else's, for that matter.


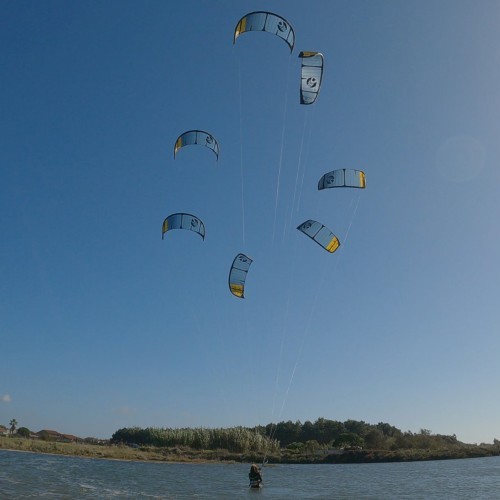
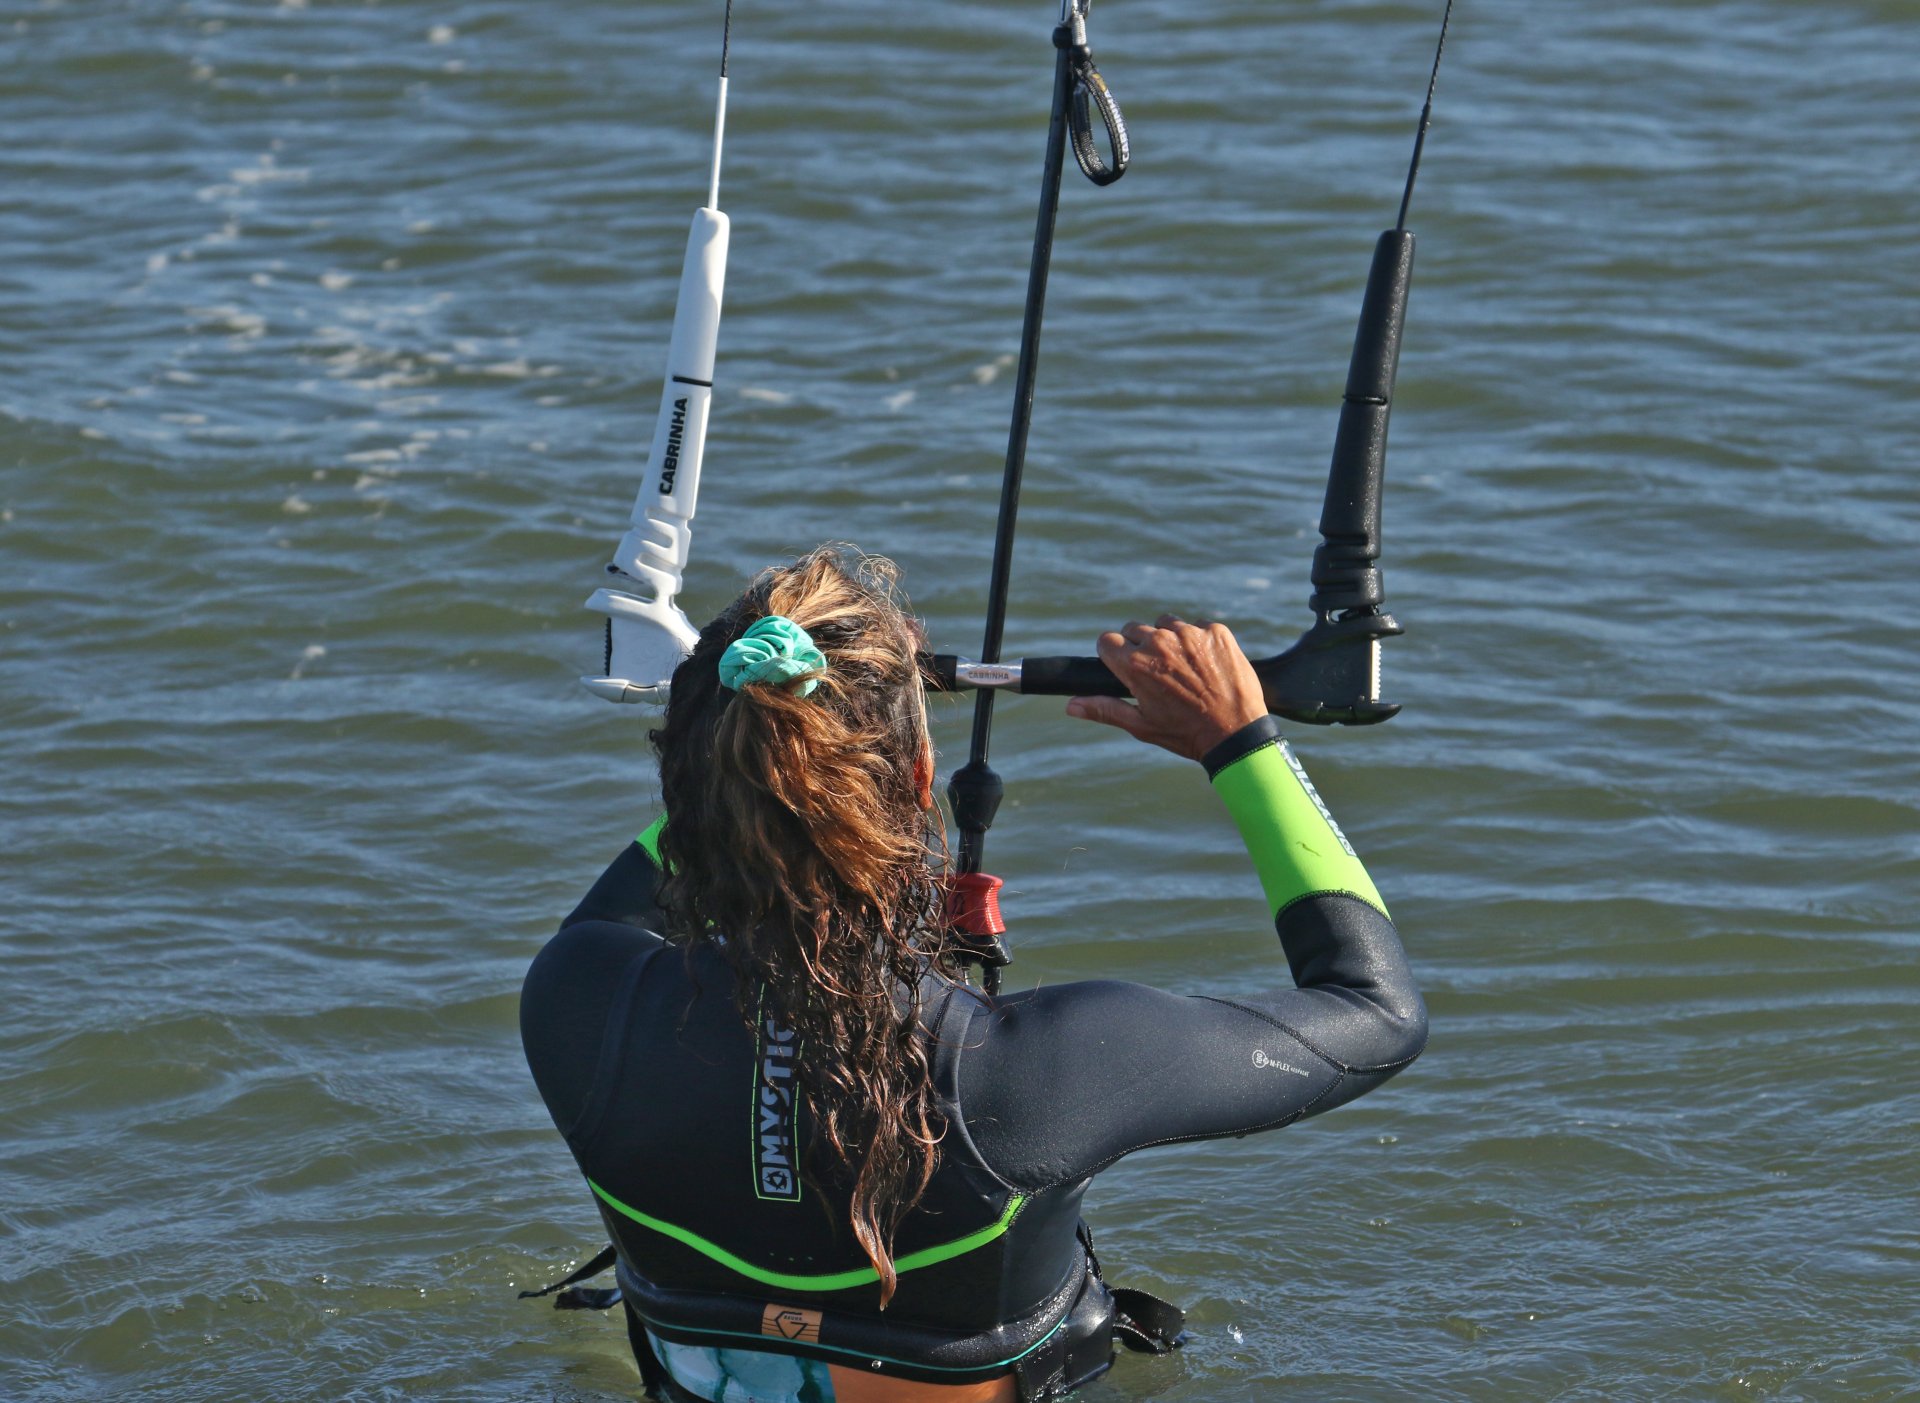
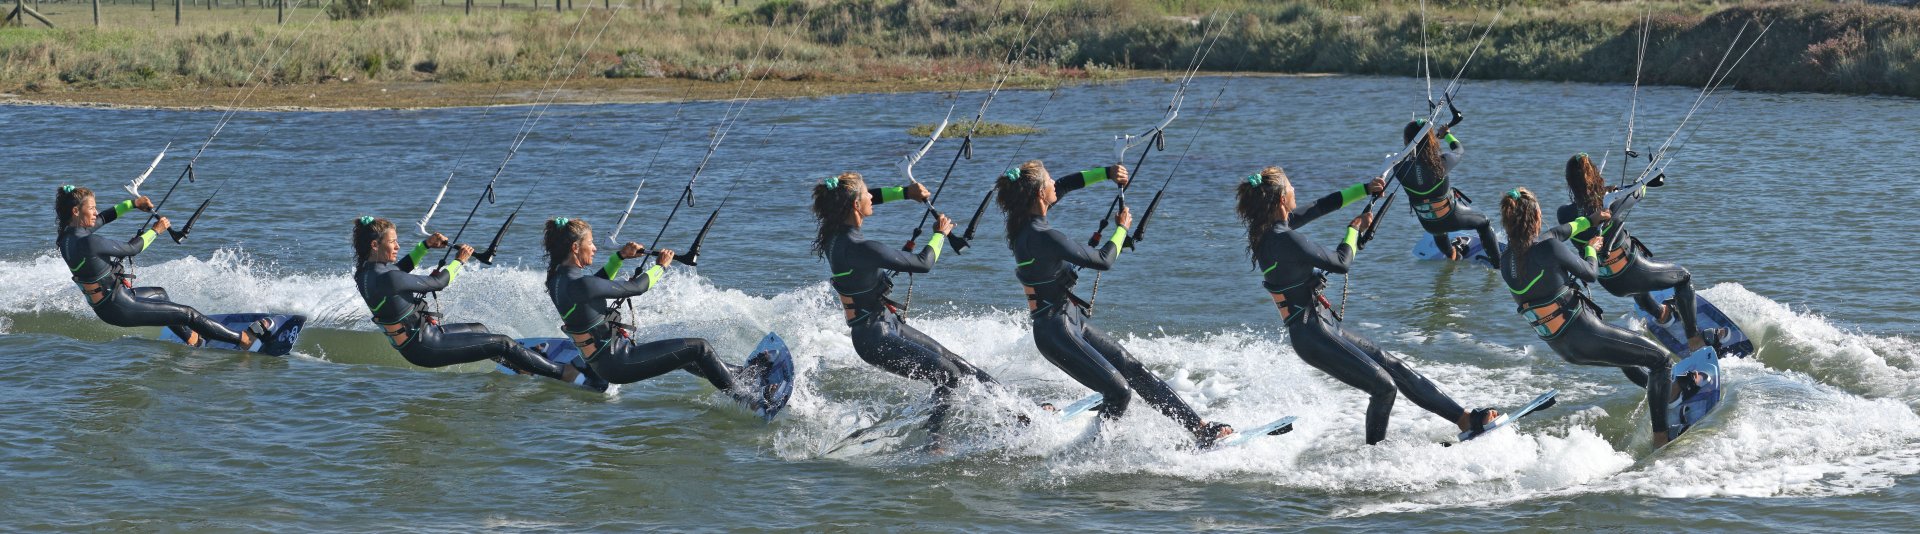
The game plan is to start with your kite at 12 o'clock and then steer it aggressively so that it turns under itself (hence the name) the full 360 and ends back up at 12. Start with one side until you get the hang of it before moving in the other direction. In this feature's photos, Karine is steering, right hand down, turning the kite to the right before it underturns full circle in Sequence 1.
As the kite loops, it will pull you downwind. How far depends on how powered the kite is and how quickly the kite turns. If you're powered, you'll get more pull, and if you turn the kite slowly, you'll get more pull! As already alluded to, aim to start with lighter wind and go for a quick turn.
Let's have a look at the key moments that'll make a big difference before we move on to some common mistakes.
Start at 12. Pic A.
Having your kite at 12 o'clock before giving it the beans is paramount to your success for a number of reasons.
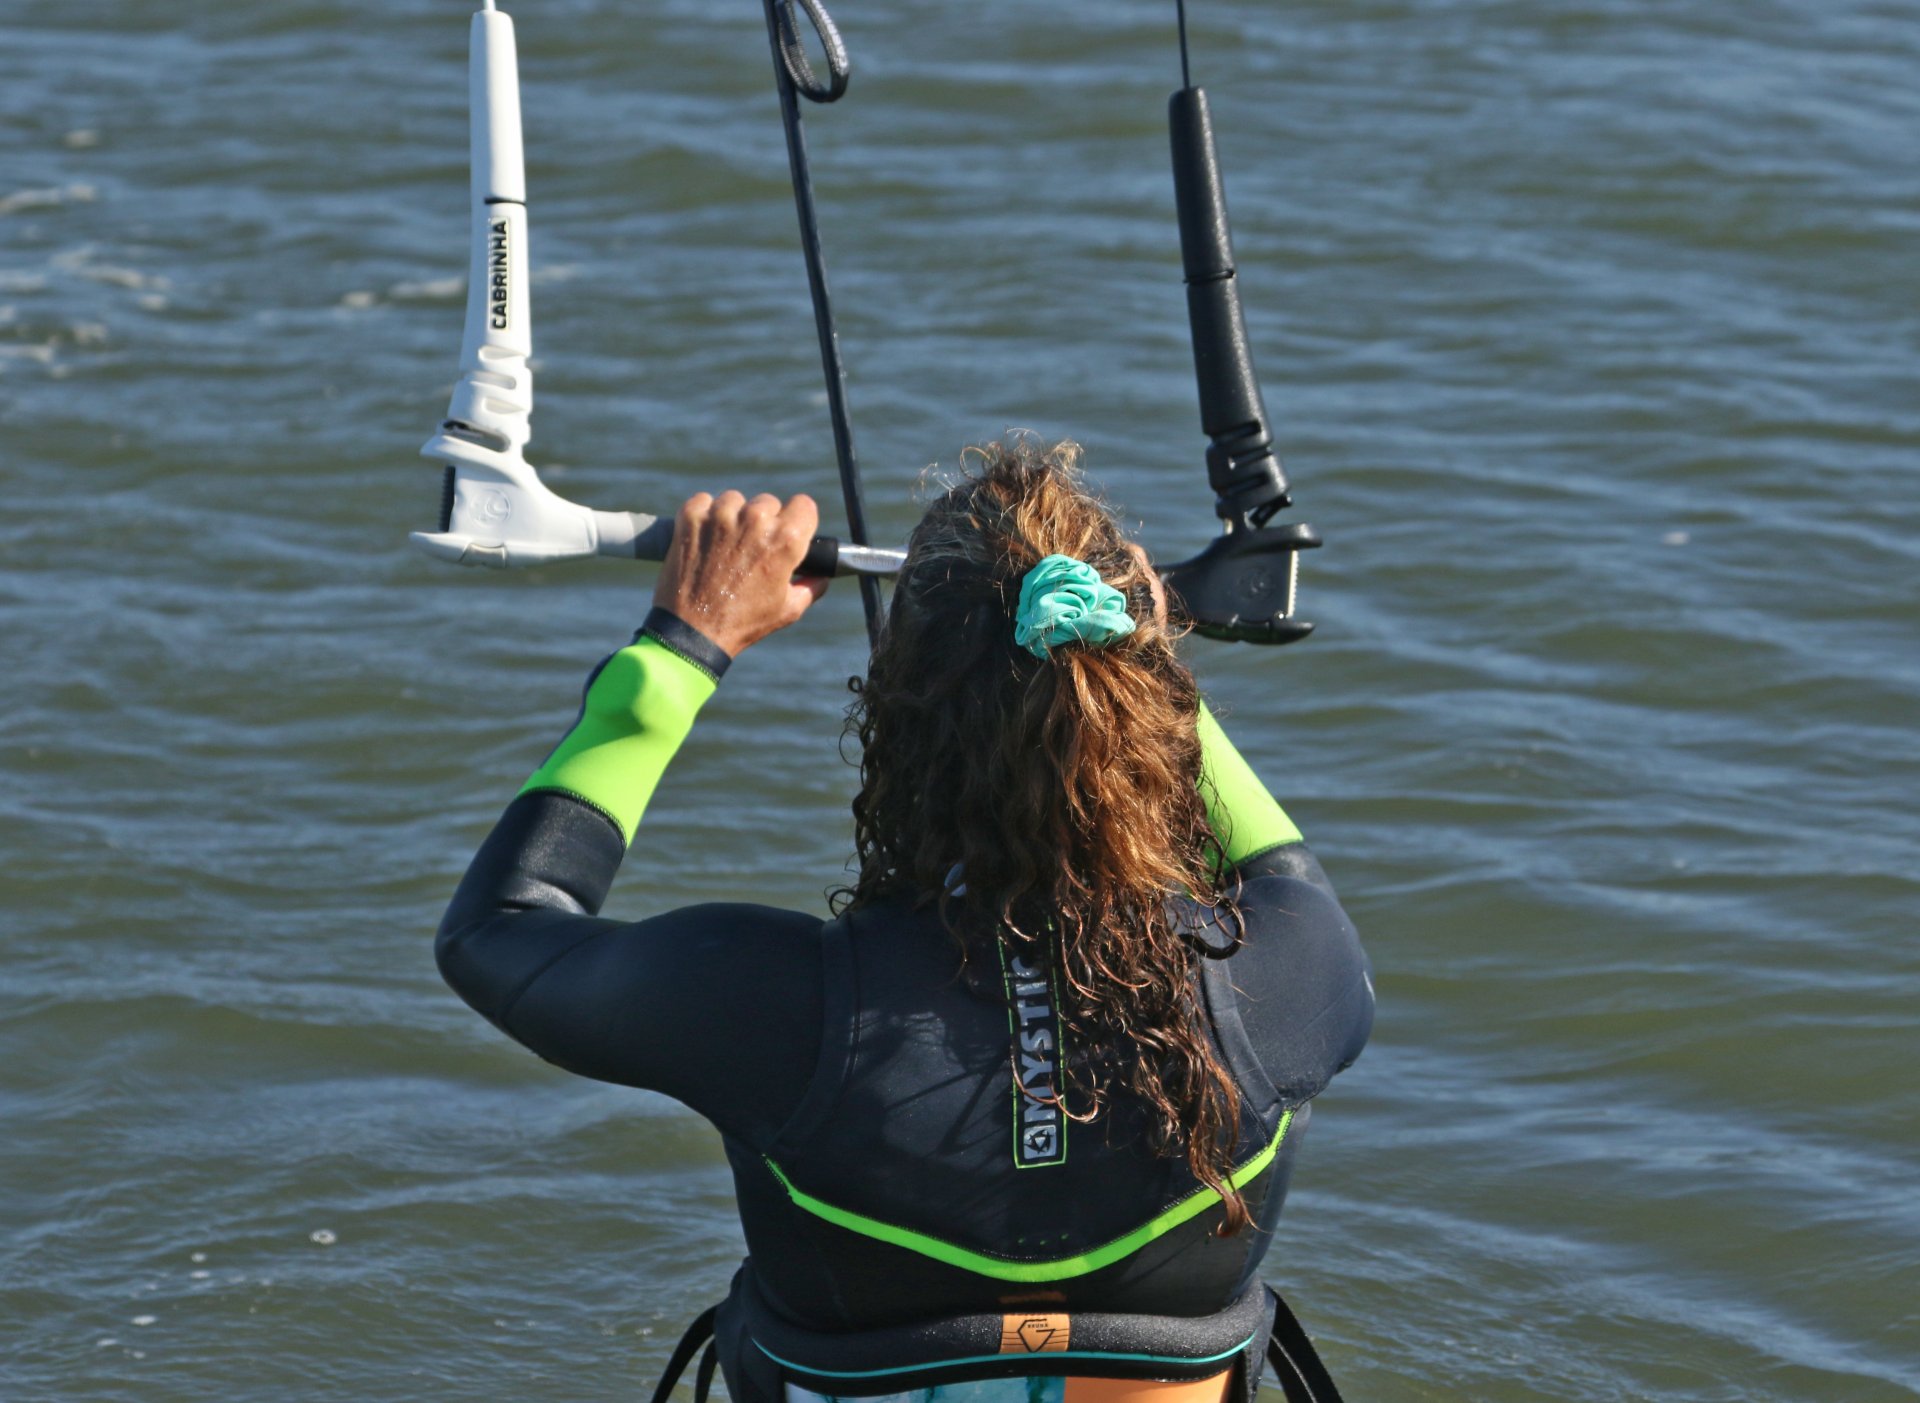
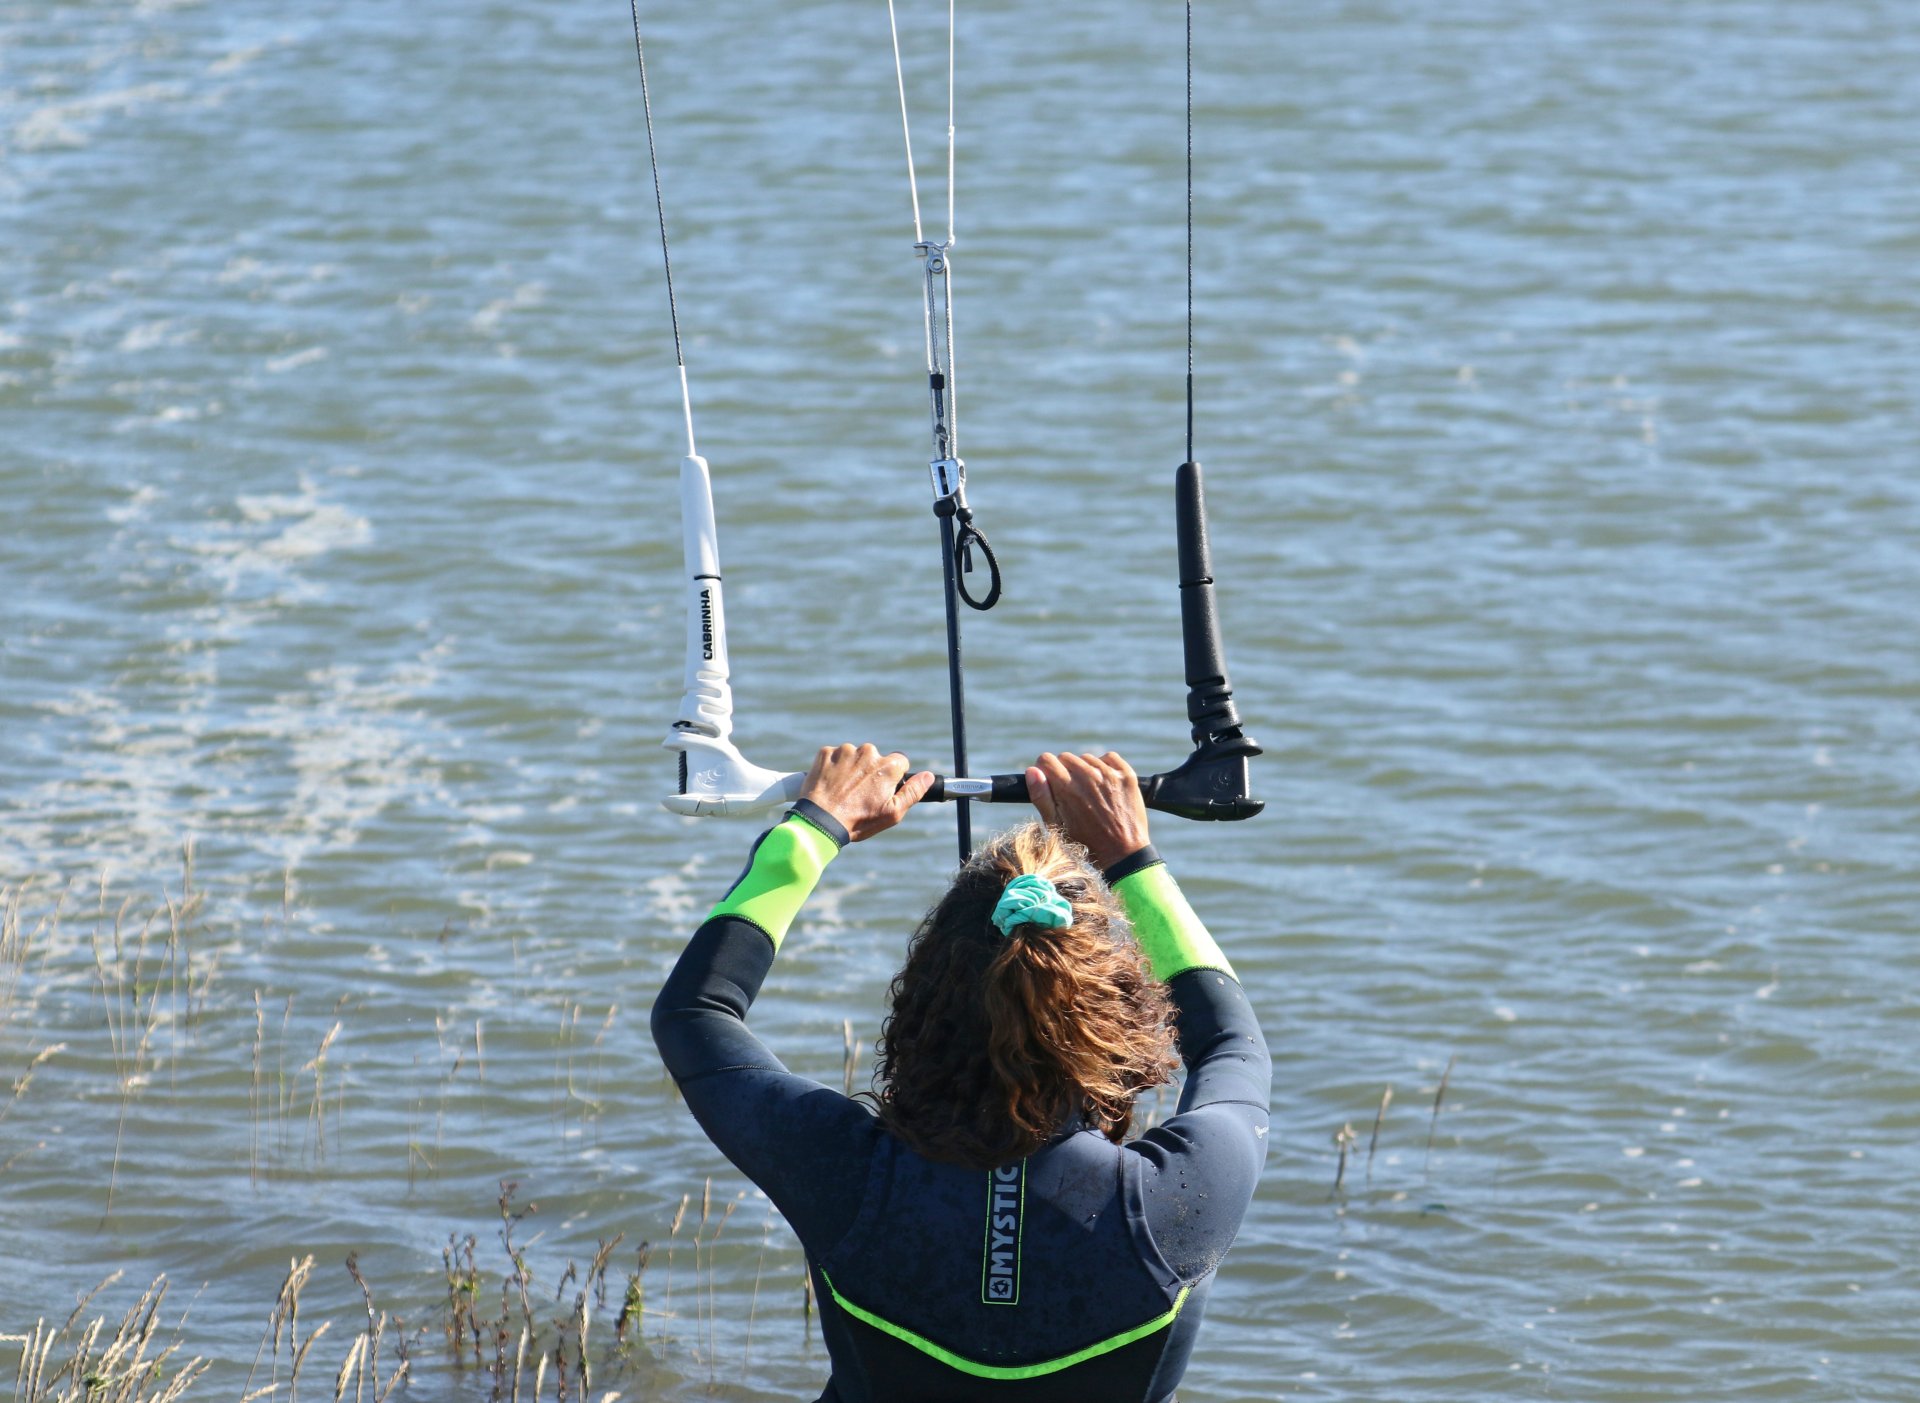
First and foremost, it makes for the most intuitive movement. With your kite at 12, you can concentrate on a big pull and push for maximum steerage. In this case, pulling your right hand down and pushing your left hand up. With the kite at 12, your arms are extensions of your lines, so you can simply lengthen the left and shorten the right. Keep your hands fairly wide on the bar for extra leverage to start with, don't hug the centre line.


Secondly, if you loop the kite higher, which is only possible if you start high, you'll get less pull relative to the power in the kite.
And finally, it gives you more room to get the under turn done. Not that you want to use all that area, but it gives you room for error… So, make sure your kite is at 12.
Know Your Sweet Spot. Pic B.
When you steer your kite, it's vital that you have your bar on or around the sweet spot. This way, you'll have control, and the kite will fly as designed. If you pull the bar in too far, you may choke the kite, and it'll do all sorts of crazy manoeuvres or potentially pull too much. If you play safe and let the bar out too much, your kite won't turn, as you'll have no tension on the steering lines. If anything, it's better to have the bar a touch out, in preference to too far in.
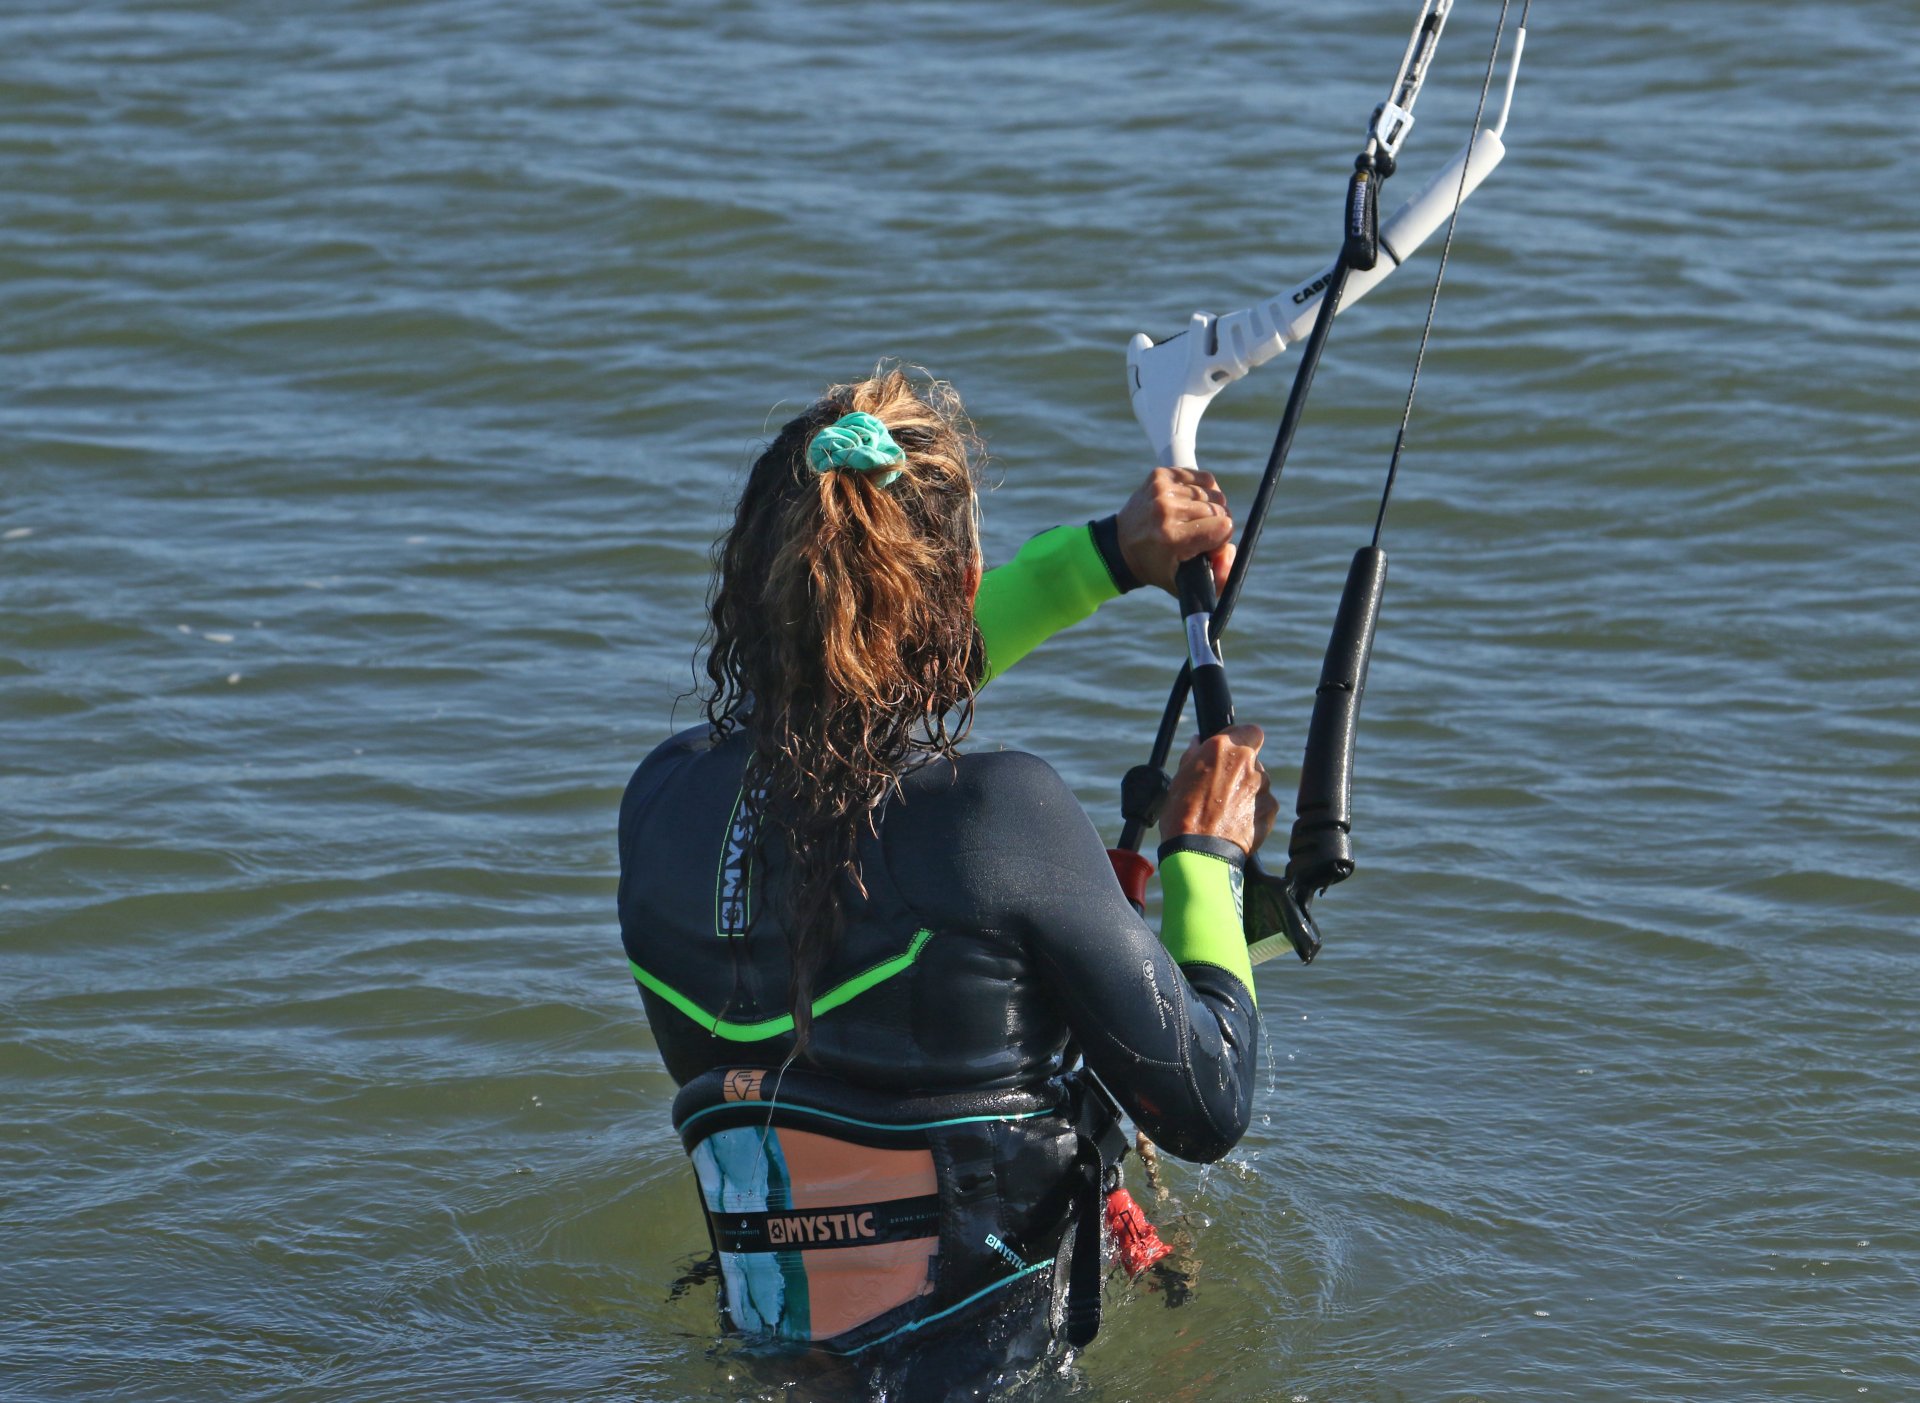
The Full Monty. Pic C.
You want your kite to turn quickly. The best way to do this is to use a meaningful two-handed push pull. Using two hands, specifically the push, helps you keep the bar on the sweet spot and prevents you from stalling the kite. You should aim to get the bar parallel with the centre line so that the knuckles of your pushing hand are rubbing up against it. A massive bonus of doing this is that you have the bar in the position in which it should stay until the kite has turned full circle. Whilst giving it the beans like this means that you'll generate less power, and it'll be over before you can say Jack Robinson!
Keep It On. Pic D.
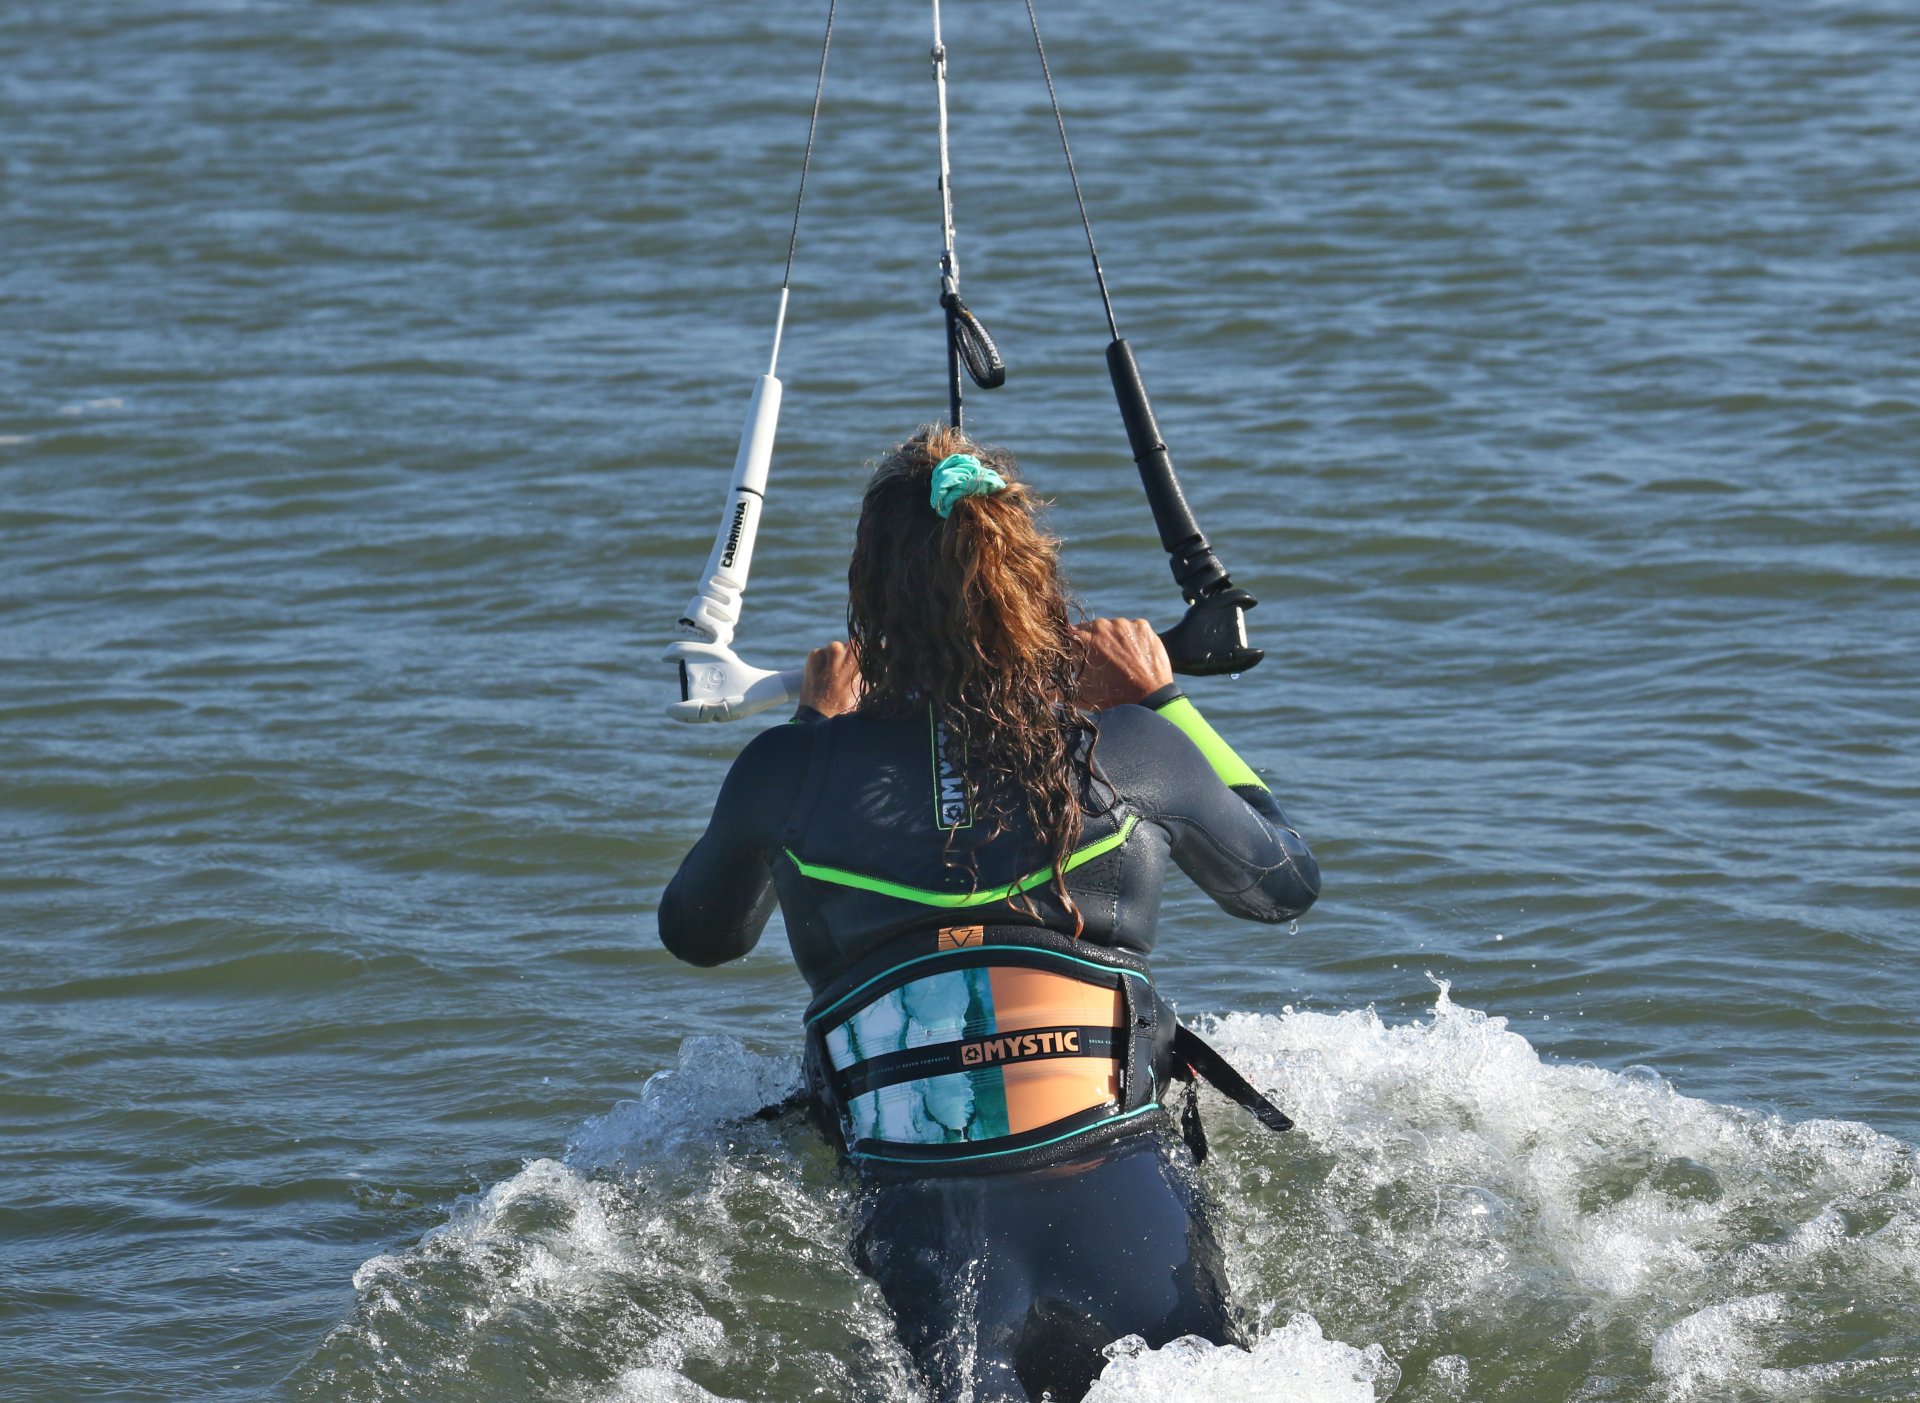
You need to watch your kite so that you know where it is. This visual comes with its own problems. As soon as you see your kite turn down, there'll be a million synapses screaming for you to stop. Then as the pull comes, they are joined by an even stronger impulse to let the bar out. Once you've pulled the proverbial trigger, you need to keep the push-pull on and the bar on the sweet spot. Commit! Sounds simple enough, but you'll have to make a concerted effort the first few times. As the kite pulls, let yourself go with it. Depending on how aggressively you steer the kite, it will pull you downwind, first slightly to the side you turned it, and then slightly towards the side it's climbing back up. When done correctly, it'll be a short but sharp pull, a quick turbo kicking in before subsiding. Try to keep yourself balanced and flat on your chest and hips as the kite drags you through the water.


The Finish Line Pic E.
You want to keep the full push pull until your kite is well and truly on its way back up to 12 o'clock. You have two cues; watching your kite and feeling the power. At first, the visual will be your best bet, and as you get used to it, you'll feel the power subside once the kite climbs. Both of these are dependent on you not stalling or sheeting out. If you stall your kite, the kite won't climb back up to the edge of the window, the magic neutral point or Zenith. And if you let the bar out, the kite won't turn far enough to make it to 12. It's better to turn the kite a bit too far than not far enough, as it's very unlikely that you'll go into a second under turn even if you react slowly.
Sequence 2.
A MAJORLY BIG POINT. Once you've finished, your lines will be twisted! This is not a problem. Your kite will still steer, and your bar will function the same as before. Don't rush to untwist your lines. Wait until you're balanced, happy, breathing and ready:)
Untwist. Sequence 3.
Untwisting and unspinning your bar can feel a touch intimidating at first. As long as your kite is at 12, you have plenty of time. To untwist your bar, you'll need to follow the direction that you turned the kite. Karine turned her kite down to the right, so to untwist, she will push the bar down to the right. Let the power off and push the bar around. It needs to go the full 360, so make sure not to stop after 180. In this case, Karine has to get from black right to black right. Once you get the hang of this, you can unspin the bar by letting go and pushing it around with enough force so that it unspins the full 360 without you having to guide it around with both hands.
Common Mistakes
Hopefully, the under turn mechanics make sense. There are a couple of common mistakes that we've touched upon, which you should try to avoid.
Number 1 on the list is trying to follow the kite around with your bar as if you're untwisting as you go. This can only end in tears. As the kite turns and pulls, keep everything as it is, in this case, right hand down, left hand pushing.

Number 2 is letting the power of the turn pull the bar out. If you do this, you'll lose all steerage, and the kite will likely hit the water. Once again, keep the bar where it is until you've completed the turn.
Top Tips
Once you're happy with the movement, do it both ways. If you have space, you can do one after another, which means no need to untwist the bar.
The more adept you become, and the more you do, you'll find the untwisting quite intuitive. Once it is, you can try unspinning the bar.
Keep practising this until you can do it with ease and confidence. Once you have it down and it feels natural, adding the board shouldn't be such a jump.
As we mentioned, not only is the body dragging under turn a great way to learn, but it will also come in useful whenever you need to body drag downwind. Let's say your board gets taken by a wave in onshore conditions. This technique is preferable to swinging the kite from side to side above your head when powered, as you won't get lifted out of the water and slammed back down!

Down Loop Slide Turn Transition
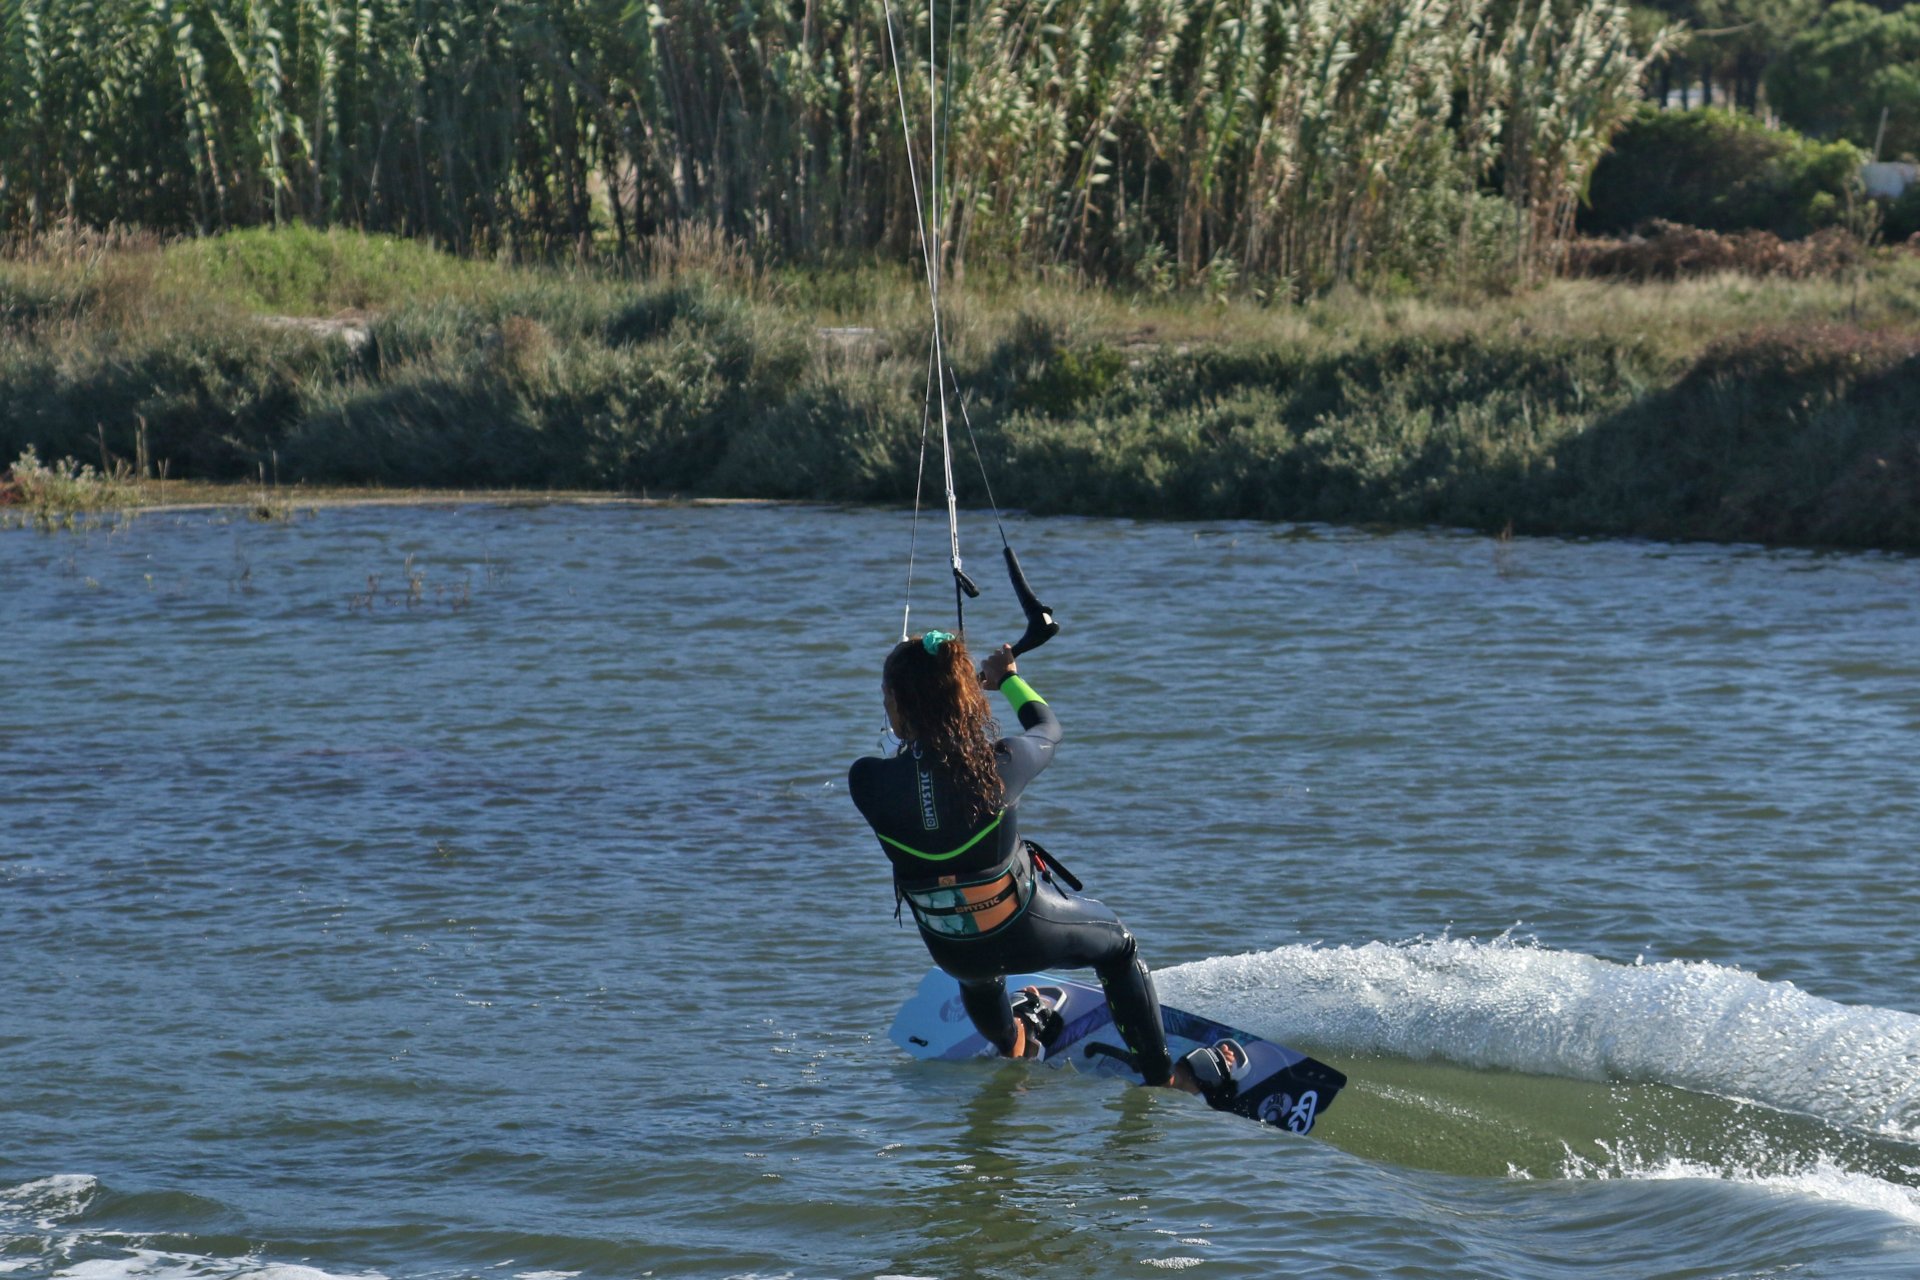
Okay, so you've got the under turn nailed without the board. You can now move onto the down loop transition. Your intention is to marry your under turn with a slide turn transition. What you'll do with the kite is exactly the same as you've just learnt. For this to work seamlessly, it's all about the timing, and by timing, we mean when to pull the trigger on your down loop? The simple answer is when you're sliding! If you're not edging up into your turn but sliding, you'll offer little resistance to your kite as the momentary turbo kicks in. If you need a quick slide turn refresher, check out the video here - HOW TO SLIDE TURN TRANSITION
The good news is, and it's worth pondering, that when you're sliding on a board, you'll offer much less resistance than when you've got most of your body on the water when dragging. As such, the relative pull from the kite will be less than what you're now used to.
Let's have a look at the pieces... And do remember to check that the coast is clear and that you've got plenty of room!
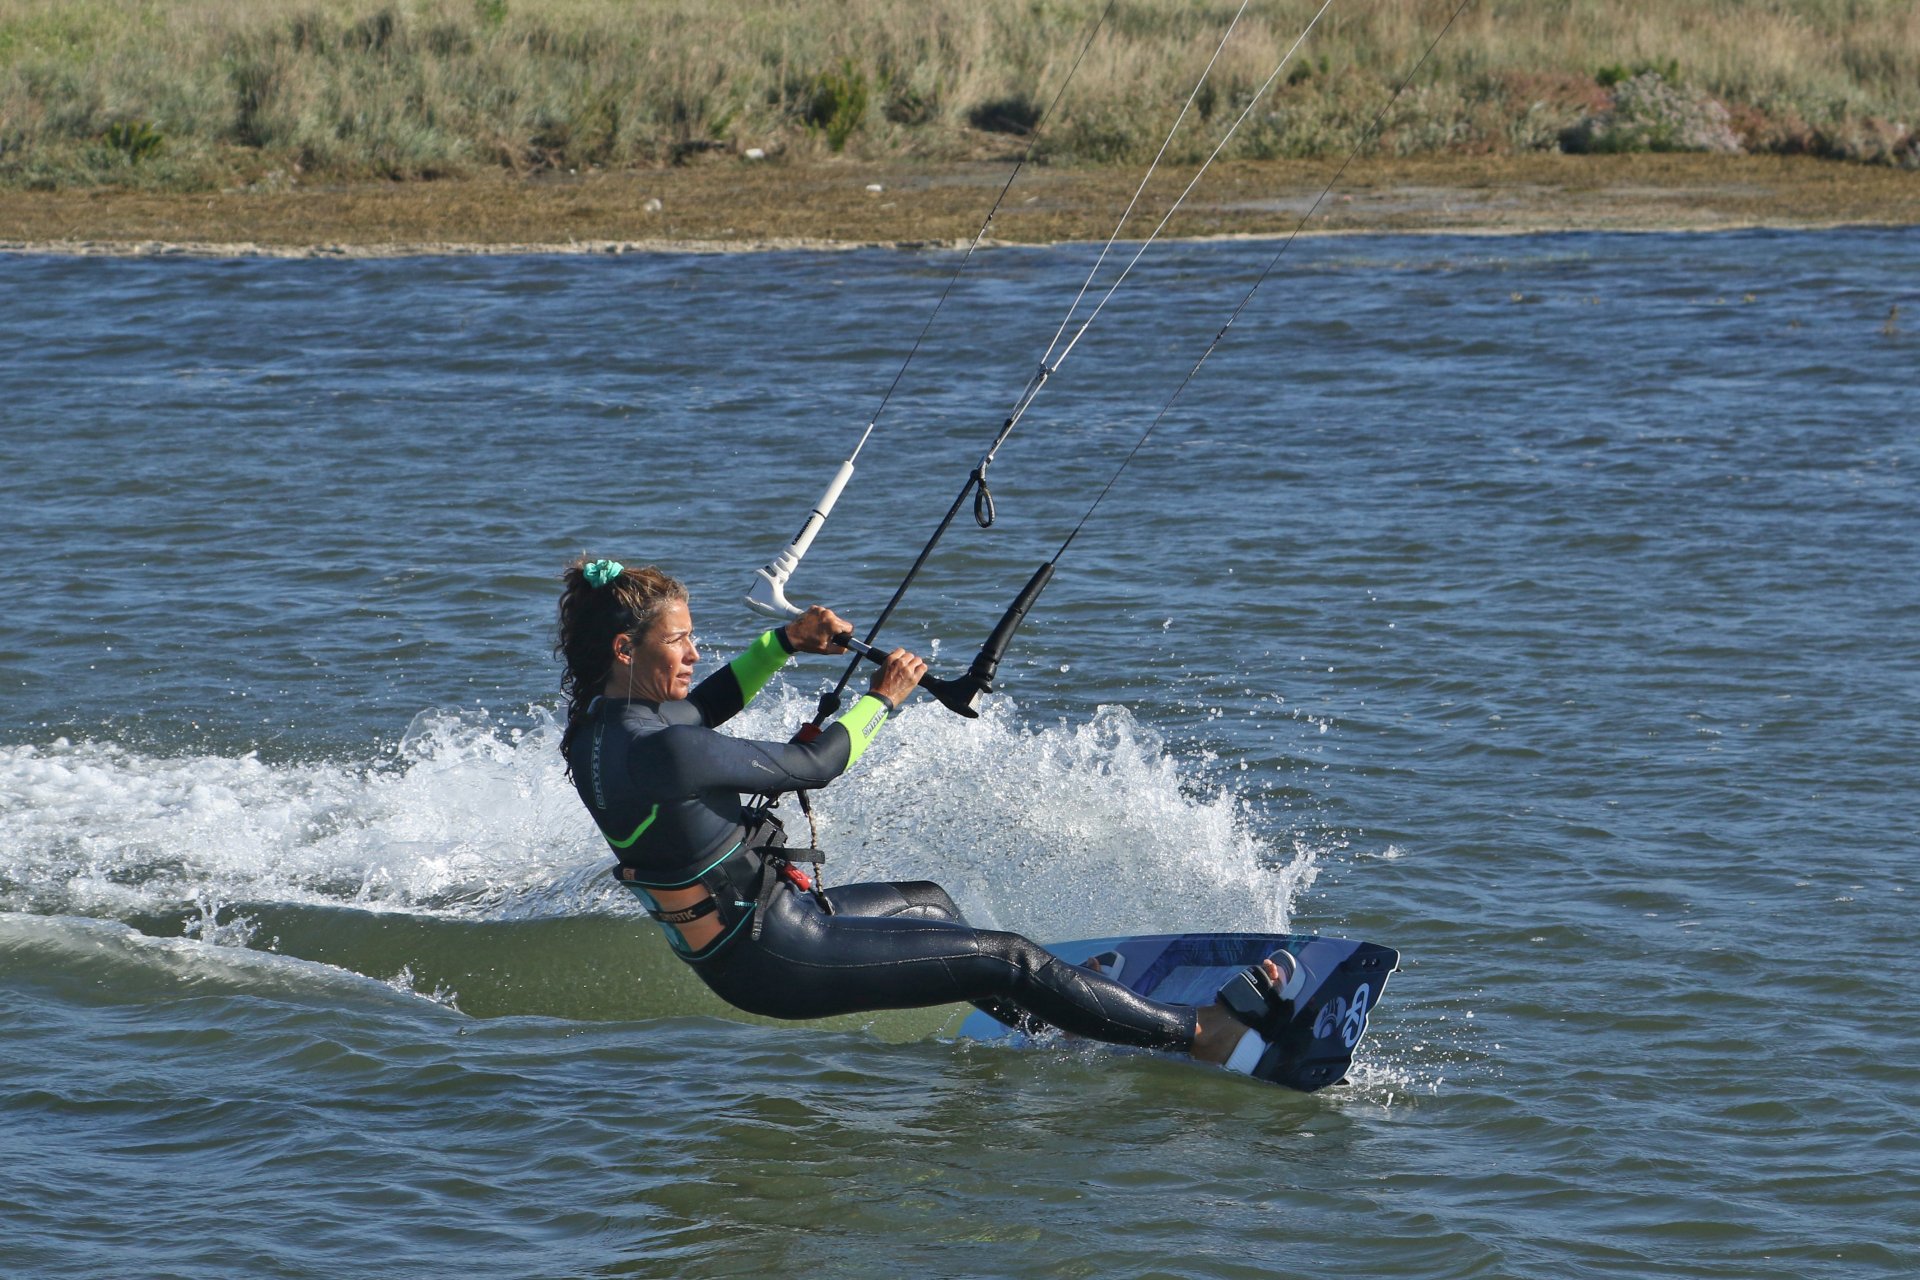
Slow and Kite Up. Pic 1.
Your entry into the turn should be as per normal, but remember to widen your hand position slightly. Slow down to lose forward momentum before the turn by edging upwind and letting the bar out a little. As you do this, drift your kite up. As you're moving forward, it doesn't need to be right at 12 o'clock, but for the first few attempts, pretty damn close, around 12:30 or 11:30 will be perfect. As the kite moves up, the bar will move to a more parallel position in relation to the water. As a result, it's in that more intuitive push pull ready position. Perfect.
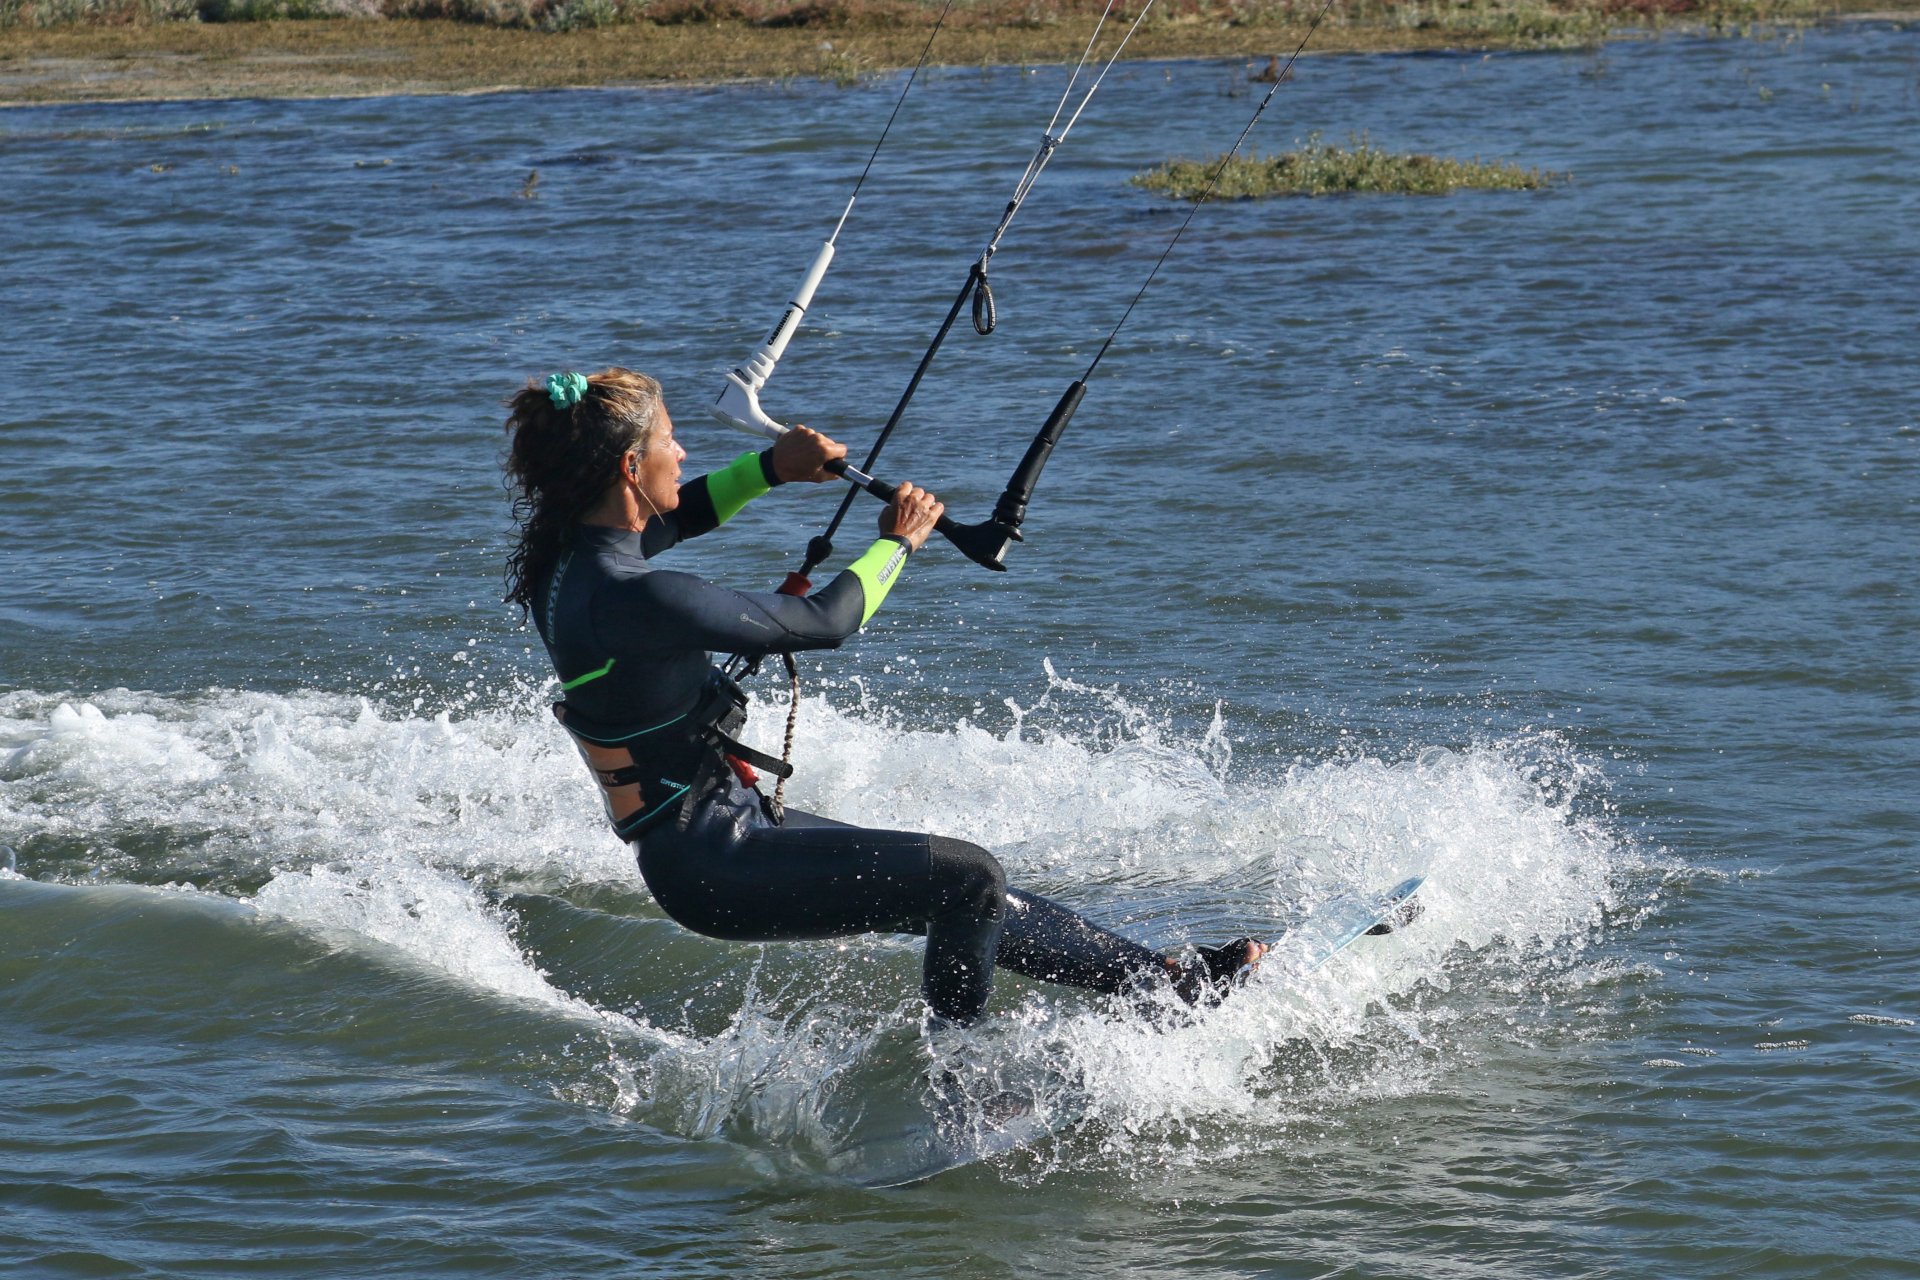
Shift and Slide. Pic 2.
Before you contemplate any meaningful bar movement, you need to get your slide on. Move your weight forward toward your front foot and then push your rear foot away from you to initiate the slide. Once you push with your back leg and break your edge out, your board will slide slowly, taking that edge tension off your lines. With your weight over what will become the tail of the board, you and the board are ready too.
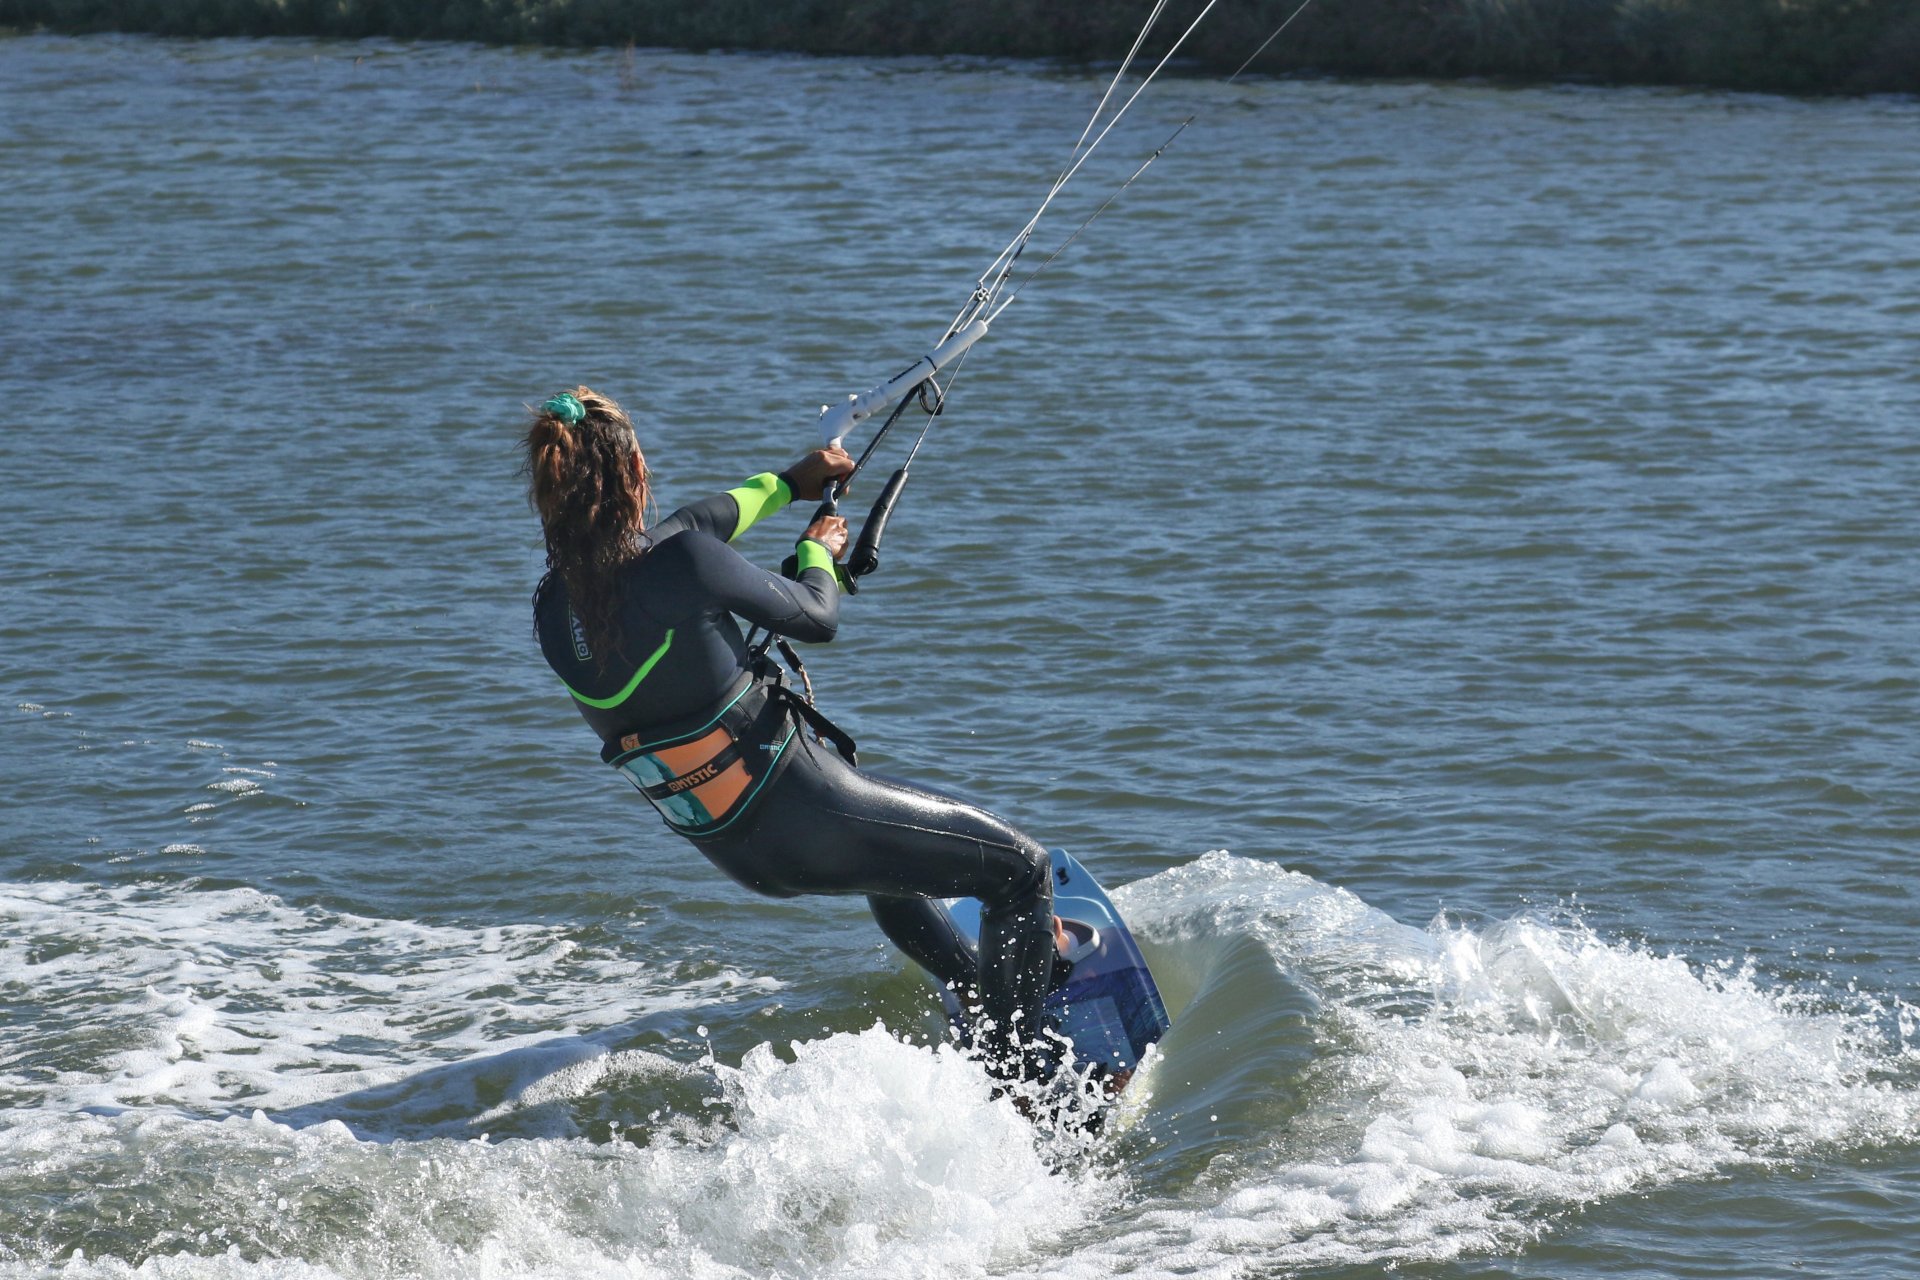
Pull & Push – The Loop. Pic 3.
Loop time! Pull the trigger just as you practised, a hefty pull push on the sweet spot. You don't need to do it blind, so watch your kite as you give it the beans. The kite will pull you around with it, and as such, you'll gently turn and transition towards your new direction.
Carve & Full Monty. Pic 4.
As you transition and start to move in your new direction, keep your weight over your new rear foot and turn your head to look where you're going. This will drop you back onto your edge, and you can start to gently carve around the rest of your turn. As the kite pulls, keep the bar on the sweet spot and keep turning the kite.
No Hurry. Pic 5.
There's no need to rush; you have time for each step. When the kite starts to rise, you can level the bar to stop it turning any further, and if it's gone too high, you can even dive it down to generate enough power to keep going. You're in no hurry to untwist or unspin your lines. You can happily ride, work your kite and be in full control with this twist in your lines. Once you're happy and settled, you can then untwist.
Top Tips
For your very first attempts, it is better to have your kite a little too high, slow down a lot and turn your kite all the way back to 12 o'clock. This exaggeration may result in you stopping and sinking slightly, but it'll give you the green light that you're doing it right.
You can then work on smoothing it out by starting a tiny bit less high and levelling the bar when the kite reaches 11 (or 1) so that you can drive yourself out of the turn.
You may also find that as you get comfortable with more power from the kite, you'll need to sheet out gently as you stop turning the kite, so that it can breathe and pull you out of your transition.

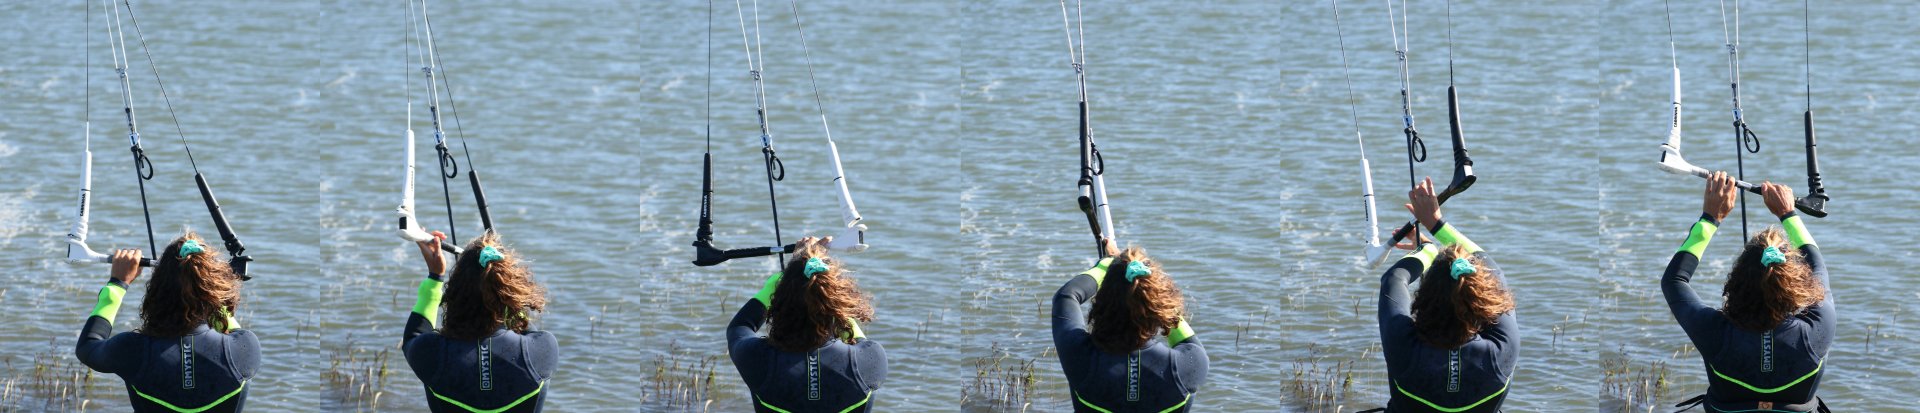
Have a look at Sequence 4 for a step-by-step of the transition in its entirety.
Common Mistakes
It can be tempting to rush through the transition, and if you do, you'll likely not "free" the board by sliding it. If you stay on an edge, you'll have a lot of resistance when you loop the kite, and it'll overpower you, pull the bar out, and you'll struggle to get the kite around the loop or control your exit.
Don't forget to lift the kite before your turn. If you've followed our slide turn transition, you'll be well versed in leaving the kite at 1 or 11, but for this, at the beginning at least, do lift it higher as you approach.
When to use the down loop transition?
Once this is in the bag, you'll find it becomes such a well-used and essential tool in your box of tricks. It's a great way to turn if there are kites upwind of you. You know the scenario when you're being shadowed to the beach. Now you can literally under turn with no risk of bumping anyone's kite.
It's also a great way to generate more power through a turn. By slowing the loop and using a bigger radius, you can generate pull even when the wind isn't playing ball. As such, you can use it to add power to a water start or to a carving turn. It can save your bacon tacking on a surfboard and is paramount to succeeding on a foil in lighter winds, to name but a few. And of course, you're one step closer…


Brilliant, there you go! Stage one in the process is complete! Do check out our CK'ssentials video on the IKSURFMAG YouTube channel.
Take care, C&K.
This technique article was in Issue 100 of IKSURFMAG.
Related


By Christian and Karine
Christian and Karine have been working together as a coaching team, running improver to advanced kitesurfing clinics since 2003.
