
Slide Turn
Technique / Beginner

Introduction
To kick off proceedings, this issue, we’ll be taking an in-depth look at the Slide Turn transition. Unquestionably the first transition on your radar and, unless you plan on crossing an ocean, a move that will top your frequency charts along with launching, landing and body dragging. The Slide Turn comes in many shapes and forms, long ones, sharp ones, carvey ones, spray ones, an endless list of possibilities with the same dependable opportunity to change direction. In short, it never gets old and can only get better.
As it is an absolutely fundamental and essential move, this issue, the Slide Turn gets the full CK’ssentials treatment with an in-depth video. Once you’ve finished reading, please click and have a watch.


Before we get ahead of ourselves, we should admit that the Slide Turn also happens to be a hard nut to crack. We see many new guests arrive on clinics with good foundations but slightly wobbly transitions. In principle, what can be so tough about casually turning around without dipping one’s derriere in the drink? In practice, quite a lot. In kiting, we have so many variables, from kites, water state, gust, lulls, conditions to name but a few, that it’s way too easy to get sidetracked and bumped off the task at hand. The good news is it comes down to learning and appreciating a few separate skills before linking them together. Forget multitasking; it’s a myth. Do away with rushing; it’s an obstacle. We’re going to look at it step by step, concentrating on the separate parts. Once they’re all sorted, they’ll fit smoothly together, and you’ll be the custodian of a Slide Turn to be proud of.
One last thought before we get into the nitty-gritty; we’re going to nickname this the “Kite Last Slide Turn” method. The clue is in the name. It’s most definitely in the slide, and you’ll be moving the kite last.
With this in mind, let’s have a look at what’s involved.
Approach and Set-Up
First things first, we mentioned not rushing, so give yourself space. Don’t leave your turn until you’re about to hit the beach, and always make sure that you have room to turn, so have a good look in your mirrors. We can’t emphasise this enough. There may be times when kiters who are following you don’t leave you enough space to turn. In this case, there’s not much else you can do but stop, wait for them to turn and then head out for another attempt. Remember that just because you looked, it doesn’t mean that you can turn, but hopefully, it sends a clear signal to others of your intention.
Your aim is to approach your turn in control and on an edge. This way, you’ll be in charge of both your kite and your board. As with all transitions, you need to slow down and get rid of forward momentum in order to go back the other way. The faster you approach, the more you’ll have to slow down, which in itself is a worthy skill, and the longer it can take. In short, don’t come into your turn at Mach 10!


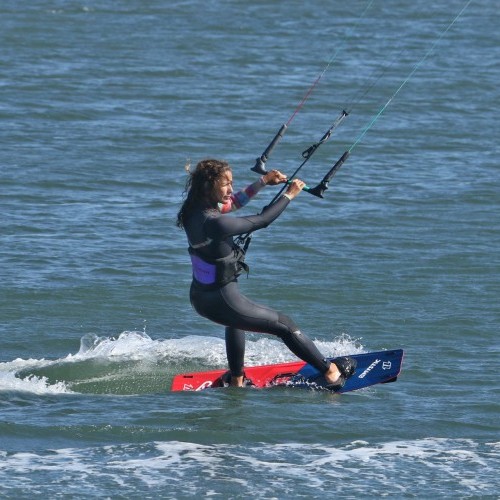
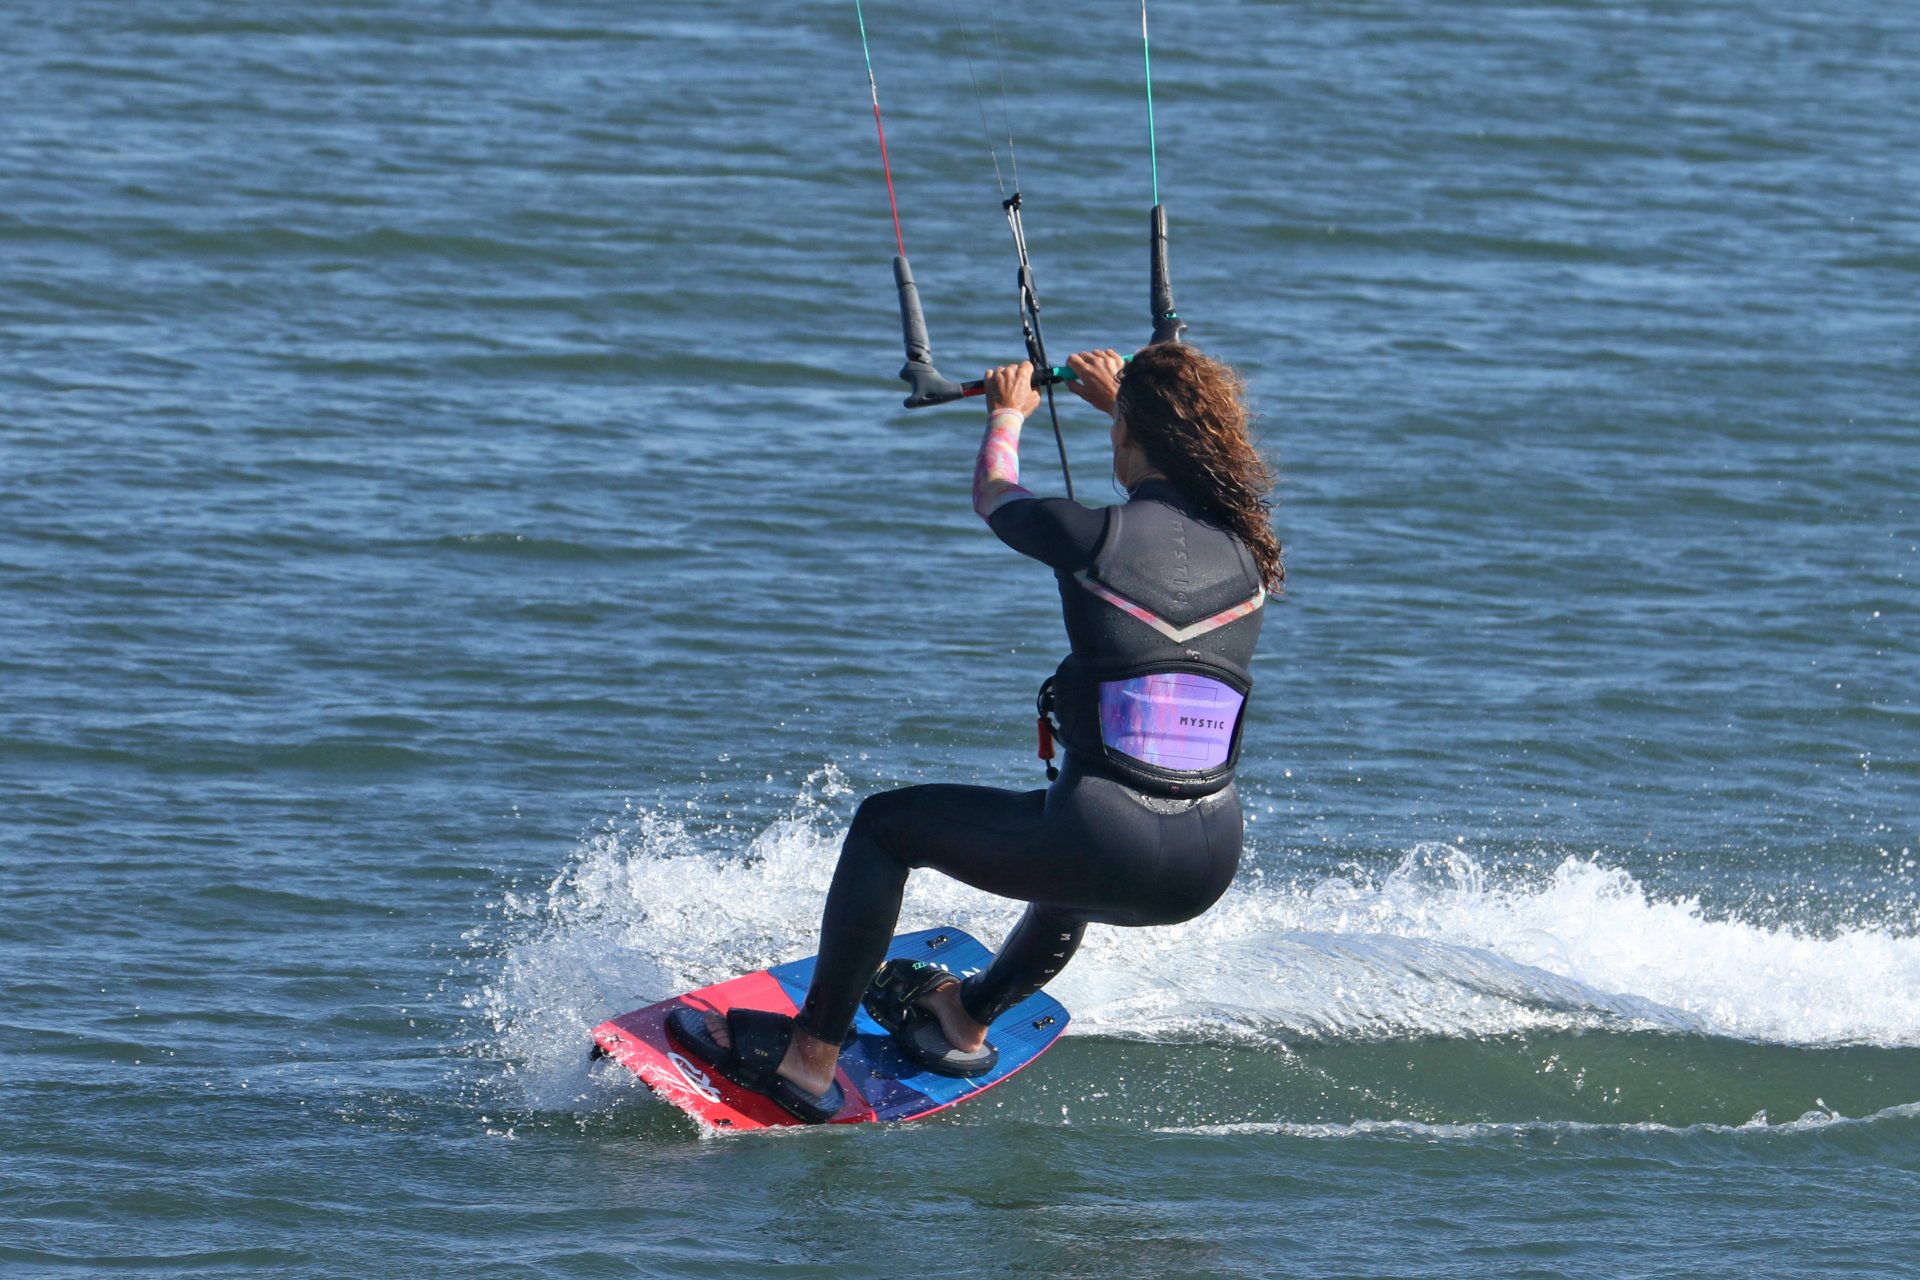
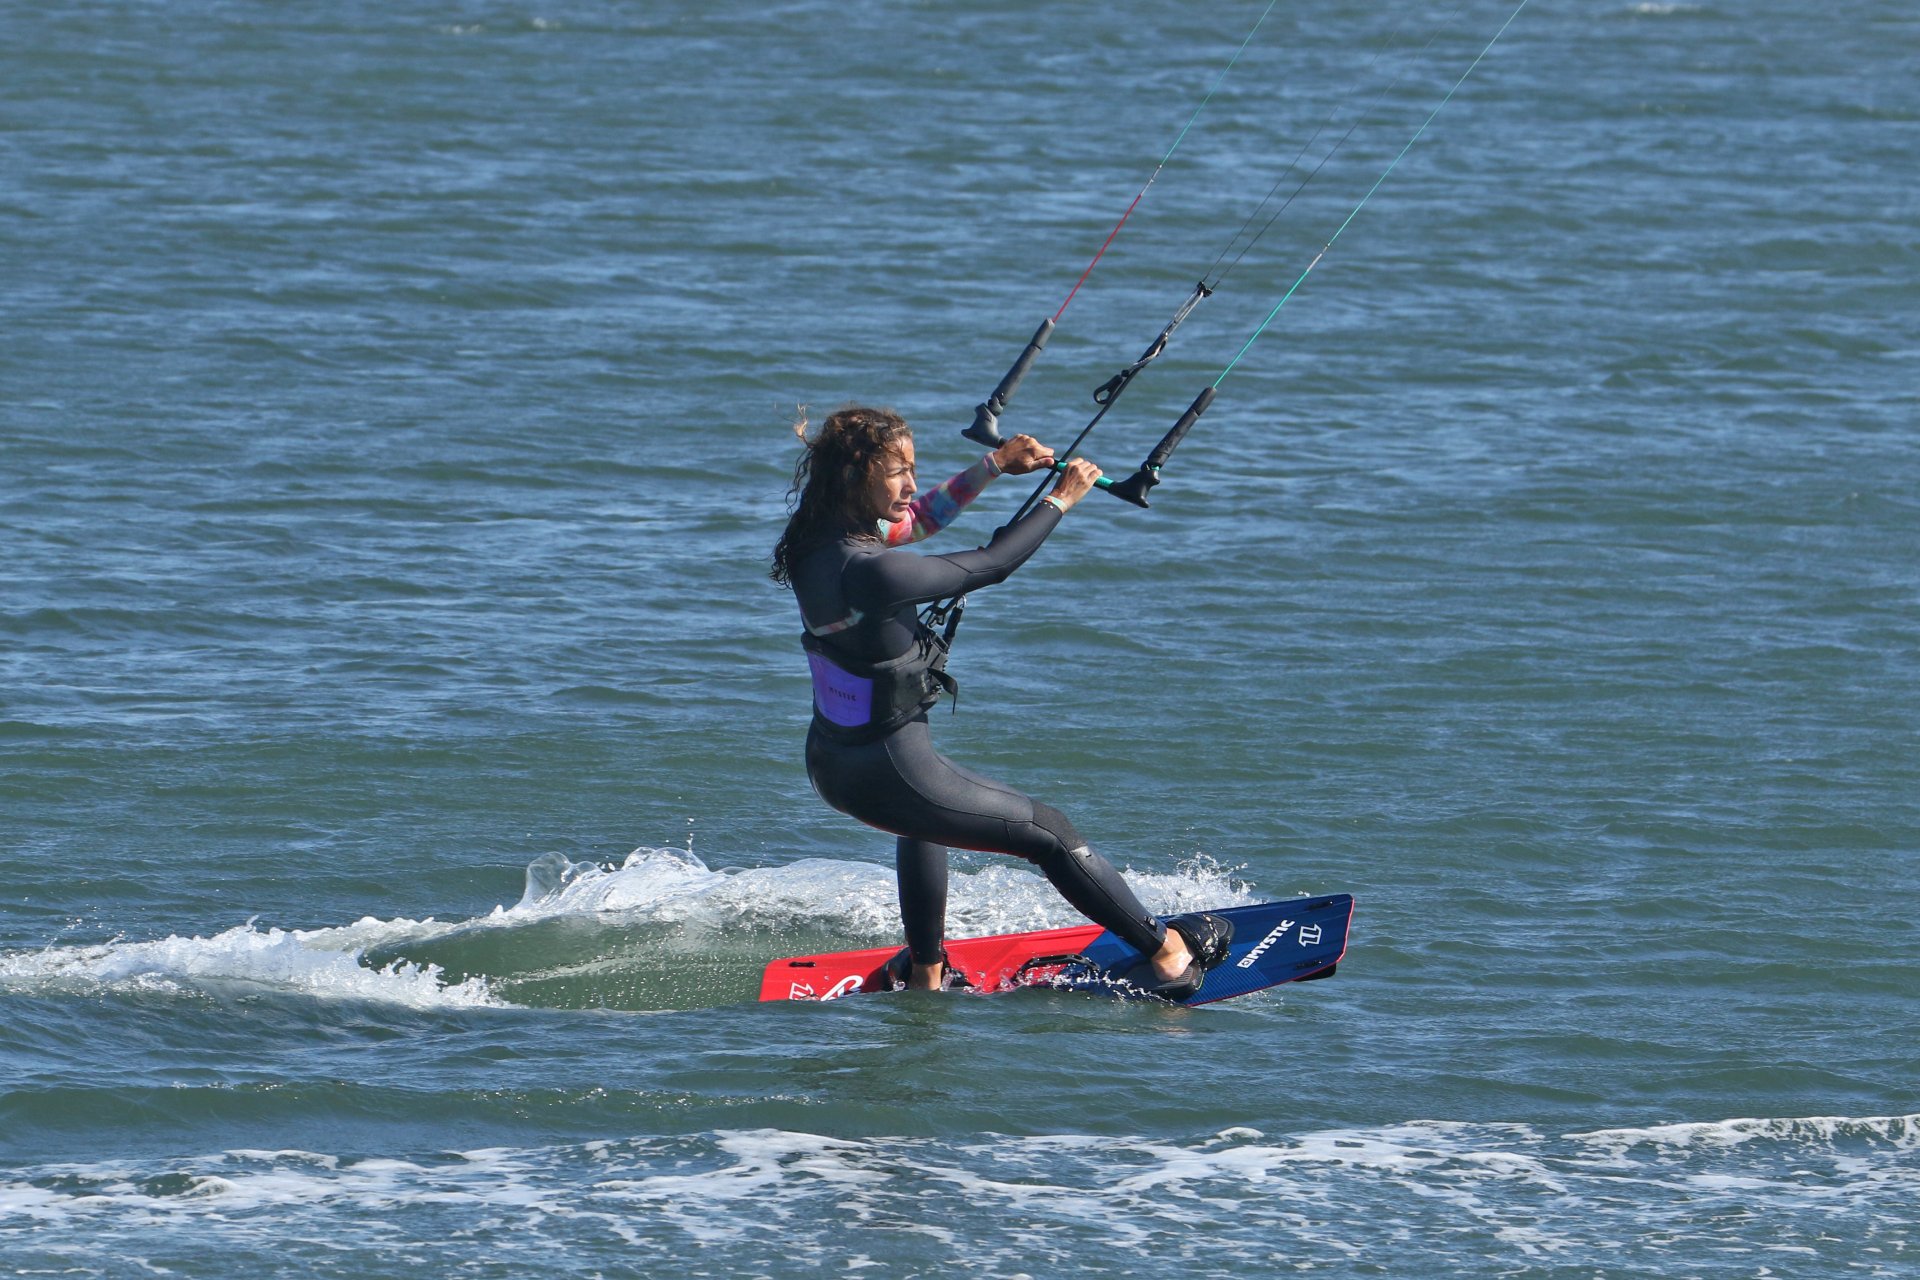
Let’s have a quick look through the checklist of your approach using Karine in Pic A for reference.
Kite Position – Nothing beats 11 or 1 o’clock. You don’t have to be exactly on time, but these hand positions are often advocated for good reason. Simply put, if your kite is too high, it lifts, and the only real way to resist is to drop your weight. As you bring the kite down a little, it moves to a position where that lift actually pulls you to the right or left rather than up. When your kite is in this position, around 11 or 1, you can edge against it, and you’re able to control your speed, direction of travel and the kite. In the photo, you can see from her lines that Karine’s kite is parked around 11 o’clock, and as such, she can edge against it. We already alluded to the name. The kite last part starts here. Once you’ve parked your kite, you’ll do everything else involved in the slide turn before you move it again!
Stance – It’s all about edging. In principle, come in on a comfortable upwind edge in your usual stance. Your edge works in harmony with your kite’s position; you have tension on your lines and control of the kite. And you can control your speed. Ideally, you should be travelling upwind, looking where you want to go, your bum low on stiff legs, with hips biased more towards the tail of the board so that you’re driving against it through your back leg and into your heel. As just mentioned, it’s easier to get into this position with the kite at 1 or 11. AND you are only in control if you can easily reach the bar with both hands. If you’re hanging on for dear life or have to release your front hand, you won’t exactly be in a great position to take control. If you aren’t feeling comfortable, trim a touch.
Brilliant! Kite is parked, you’ve got space, no one around, and you’re in control. You are ready.
Braking
The first step then is to slow down. The big question is, how do you slow down? There are a few options available, but they don’t all fit your remit.
One of the most tempting choices is to drift your kite slowly up to 12 o’clock. However, as you’re leaving the kite parked at 11 or 1 o’clock, you can correctly assume that this is not an option. It will only hinder your chances of pulling off a beauty whilst most definitely increasing your chances of sitting down under your kite, doing your finest impersonation of a fishing float.

So, what’s left and acceptable? You can edge harder, putting the brakes on, which will certainly help, but it won’t be enough. You also need to let your foot off the proverbial gas. By easing the bar out and dumping power, you will reduce the pull from the kite. This, combined with your edge, will slow you down.
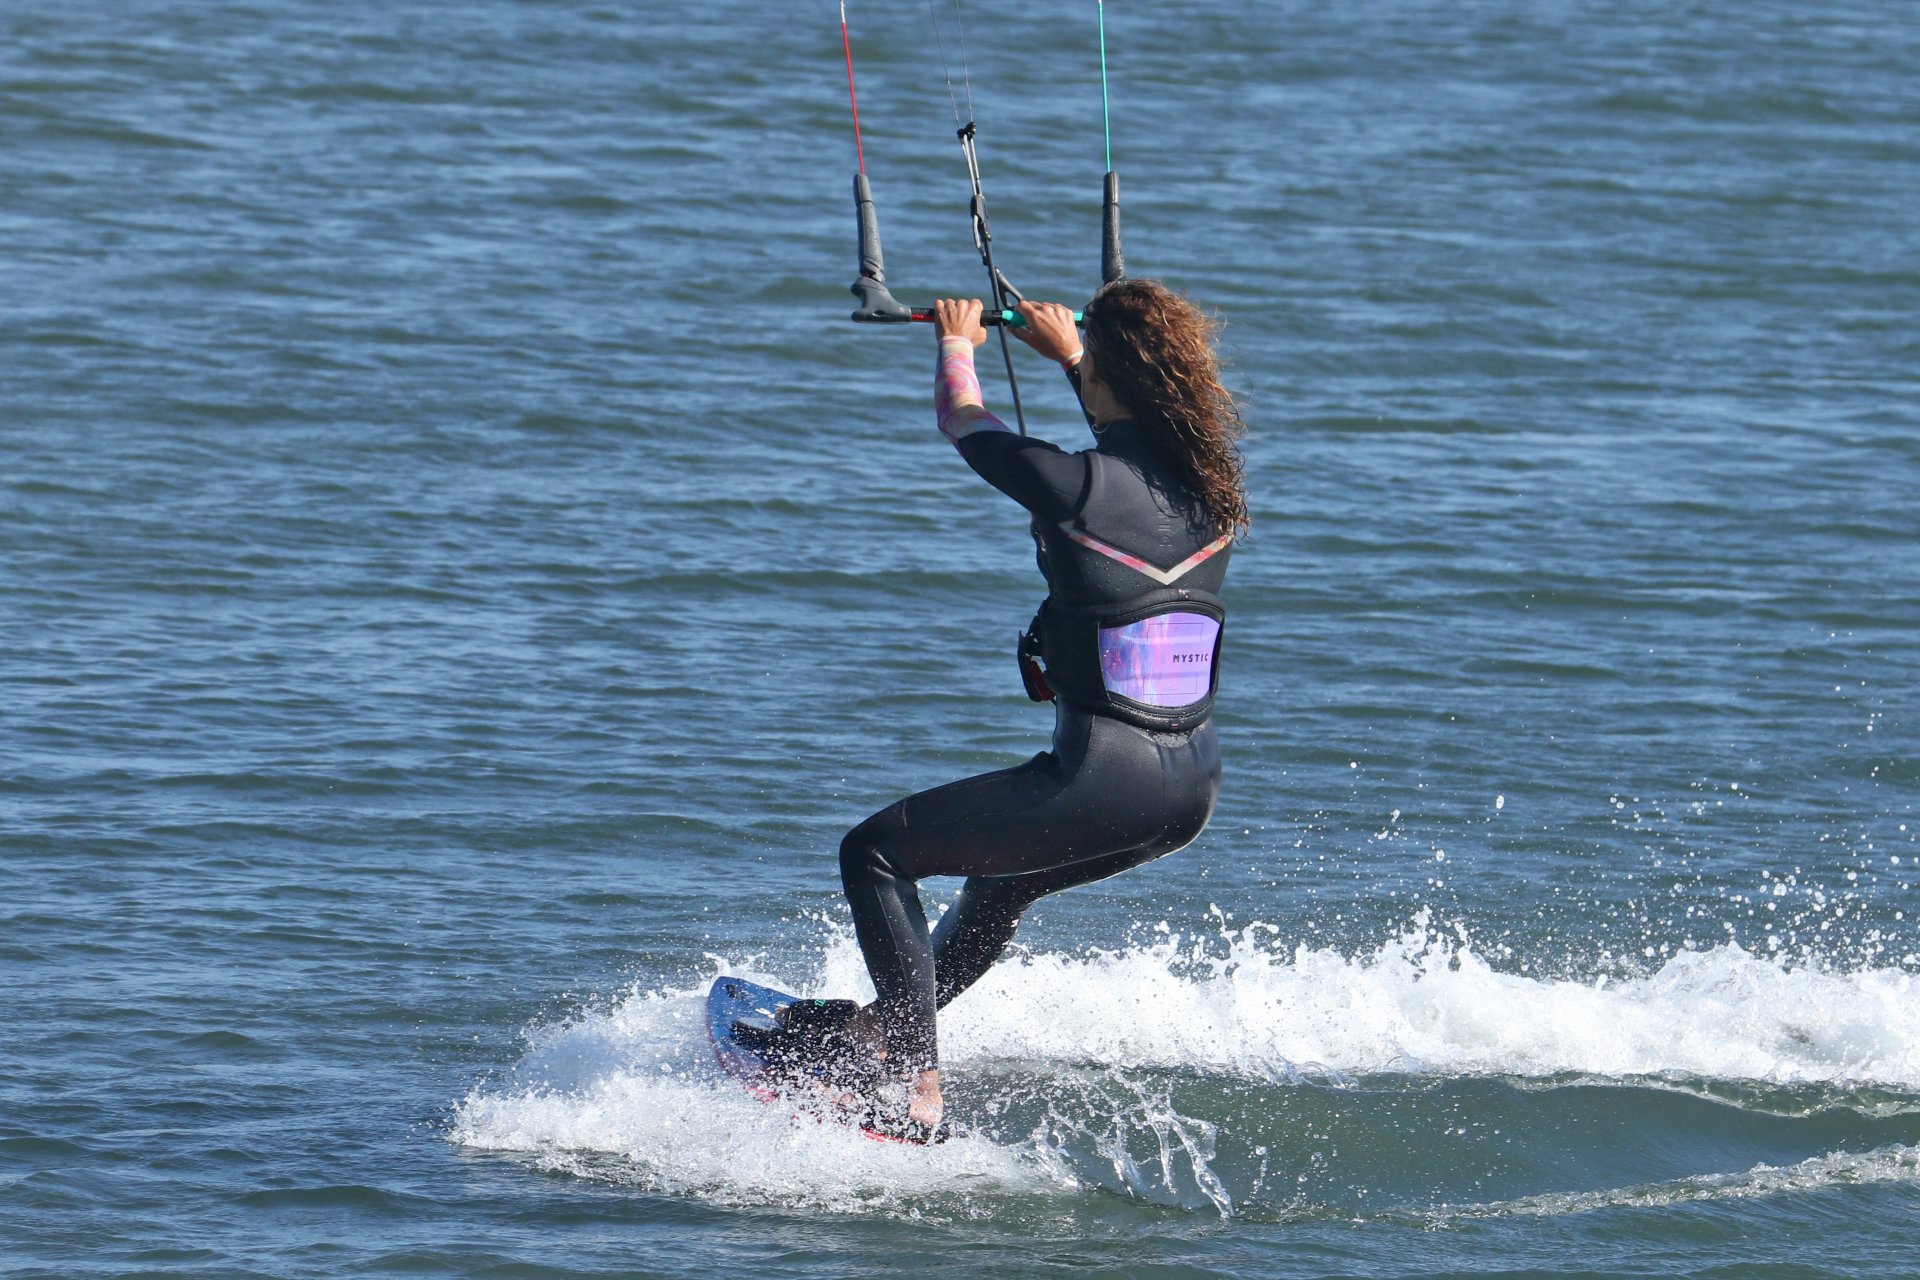
Pic B. You can see that the only difference between this photo and the previous photo is the position of Karine’s bar. She has eased off the power, altering the precious balance between power and edge. As a result, she slows down. One won’t work without the other. Love and marriage, horse and carriage! Without an edge, sheeting out will do diddley squat, and without sheeting out, an edge won’t be sufficient.
There’s another magical result of gently easing the power off whilst edging. We say easing because if you suddenly release all tension from your back (steering) lines, you won’t slow down; you’ll stop suddenly—extremely useful as an emergency stop, but not much cop when it comes to slowing down. When you ease the bar out, the kite flies more towards the edge of the window, and as such, it pulls you more upwind. With your weight on your edge and biased over your back foot, this has the effect of turning you and your board up into the wind. This is exactly what you want.
The Slide
Before we dive into the how-to, let’s briefly ponder why you want to slide and what you want to slide? The reason for the slide is to move you and your board into the perfect position so that you’re ready to go back the other way. Your board will be pointing in the right direction, the other way if somewhat downwind, and your stance will have magically transformed itself to take the power from your kite and ride back from whence you came. To achieve this, you want to slide the tail of your board away from you so that your back leg becomes a somewhat straight front leg, and your original front leg becomes your new bent back leg.
Slide 1 - Weight Shift
To be able to slide one end of your board, you first need to shift all your weight onto the other end. Much like walking, you can’t move a foot when you’re standing on it. You can get an idea of the required weight shift on Terra Firma. Stand with your legs apart, knees soft and weight on both feet. Try to slide your right foot along the floor. Impossible! Now shift your weight onto your left foot by moving your hips over it and bending your left leg. Now you can slide your right foot easily! To really get ready for the water, rather than sliding your flat foot, lift your toes and push your heel away from you.
Back on the water, once you ease the bar out and the board turns upwind, this is your cue to shift your weight. Bend your front leg and move your hips over your front foot.
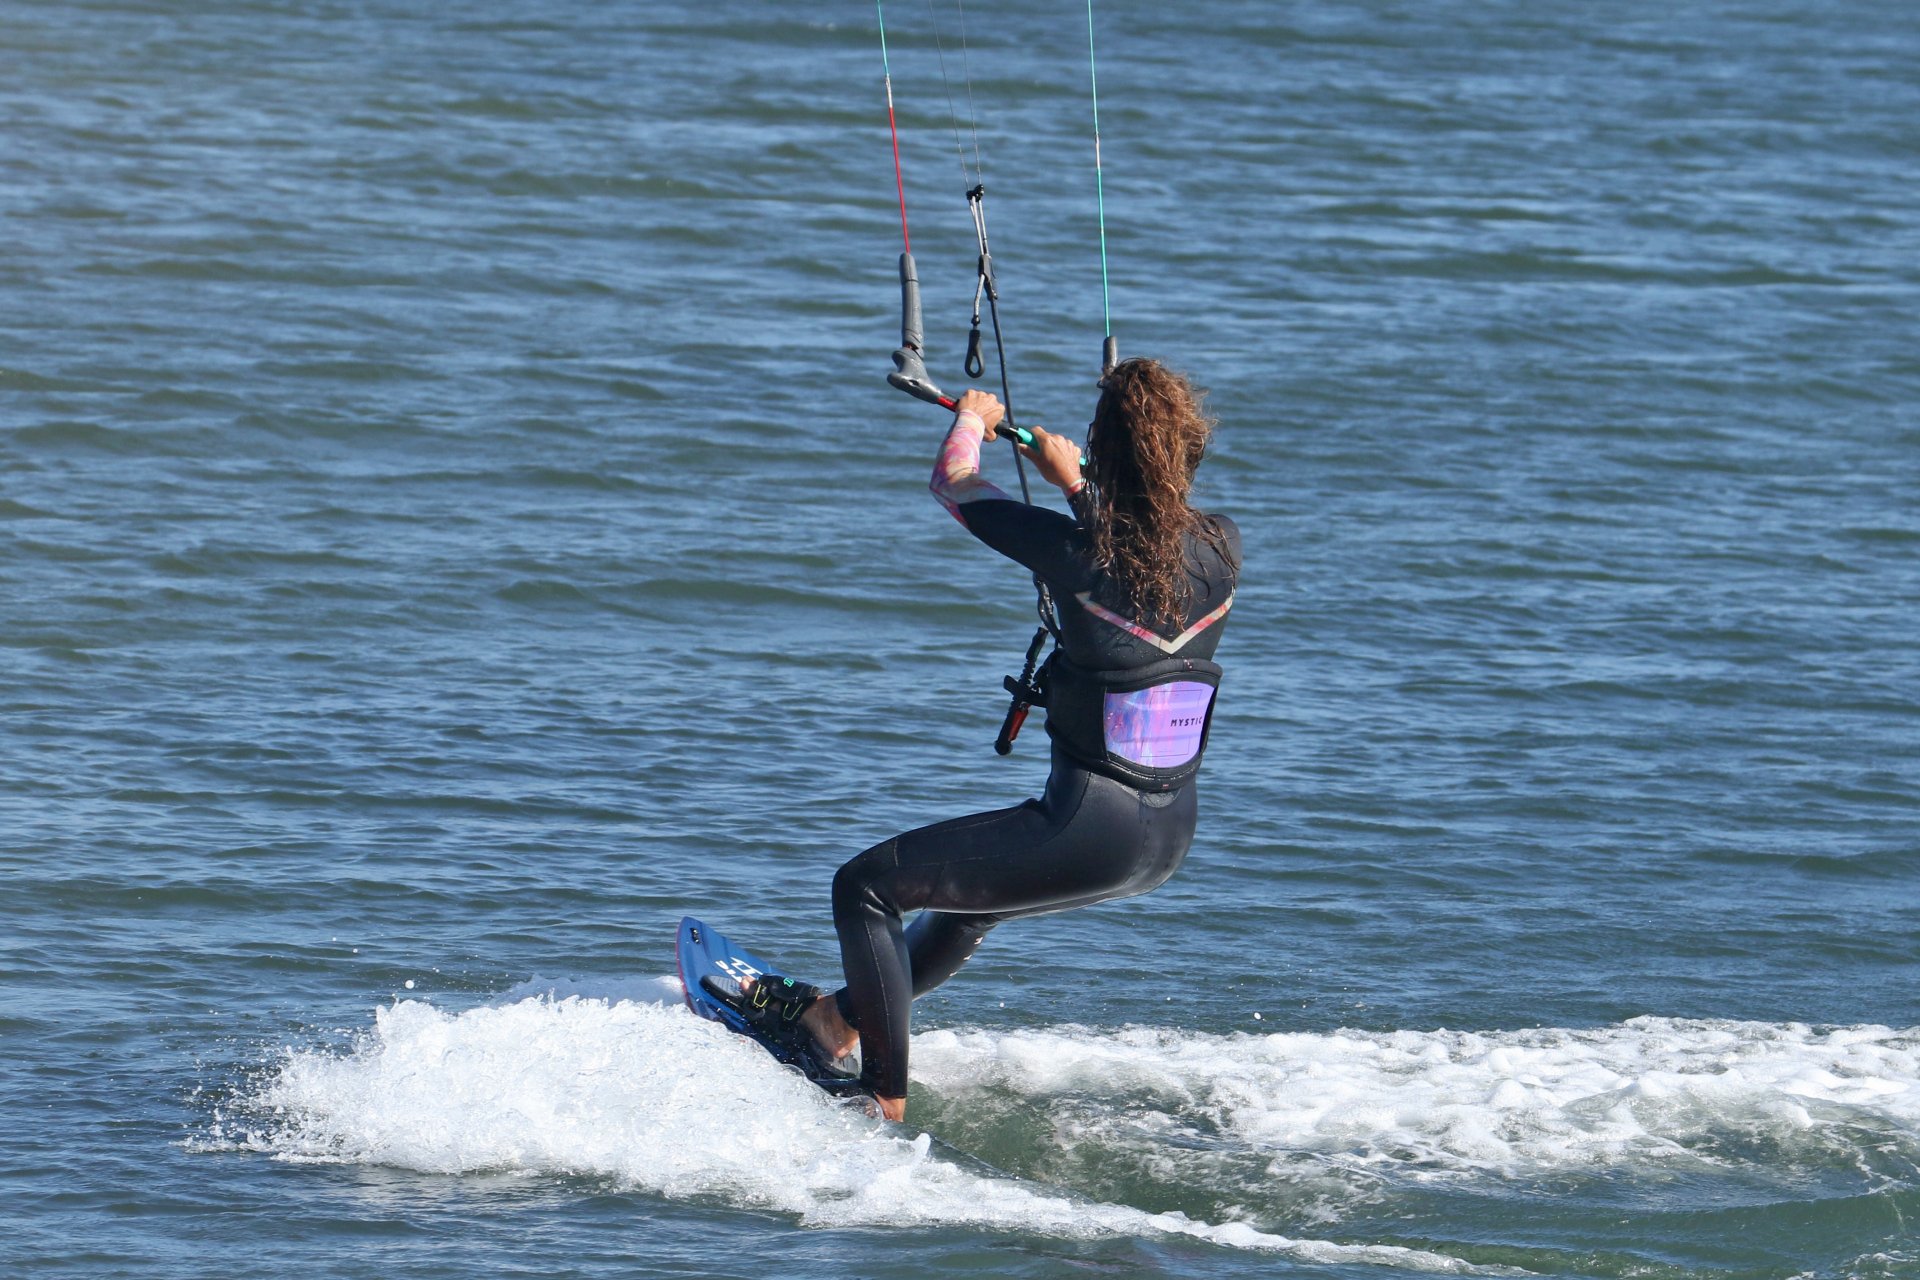
Pic C. As Karine eases her bar out and her board turns upwind, she takes full advantage of the situation by bending her front leg and moving her hips over her front foot. All the while, she stays on her edge.
Slide 2 – Heel Push
With your weight shift complete and hips over your front foot, you can now slide the tail of your board. Extend your back leg and push your heel away from you. As you do so, the tail of your board will skid out and slide away. Bingo!
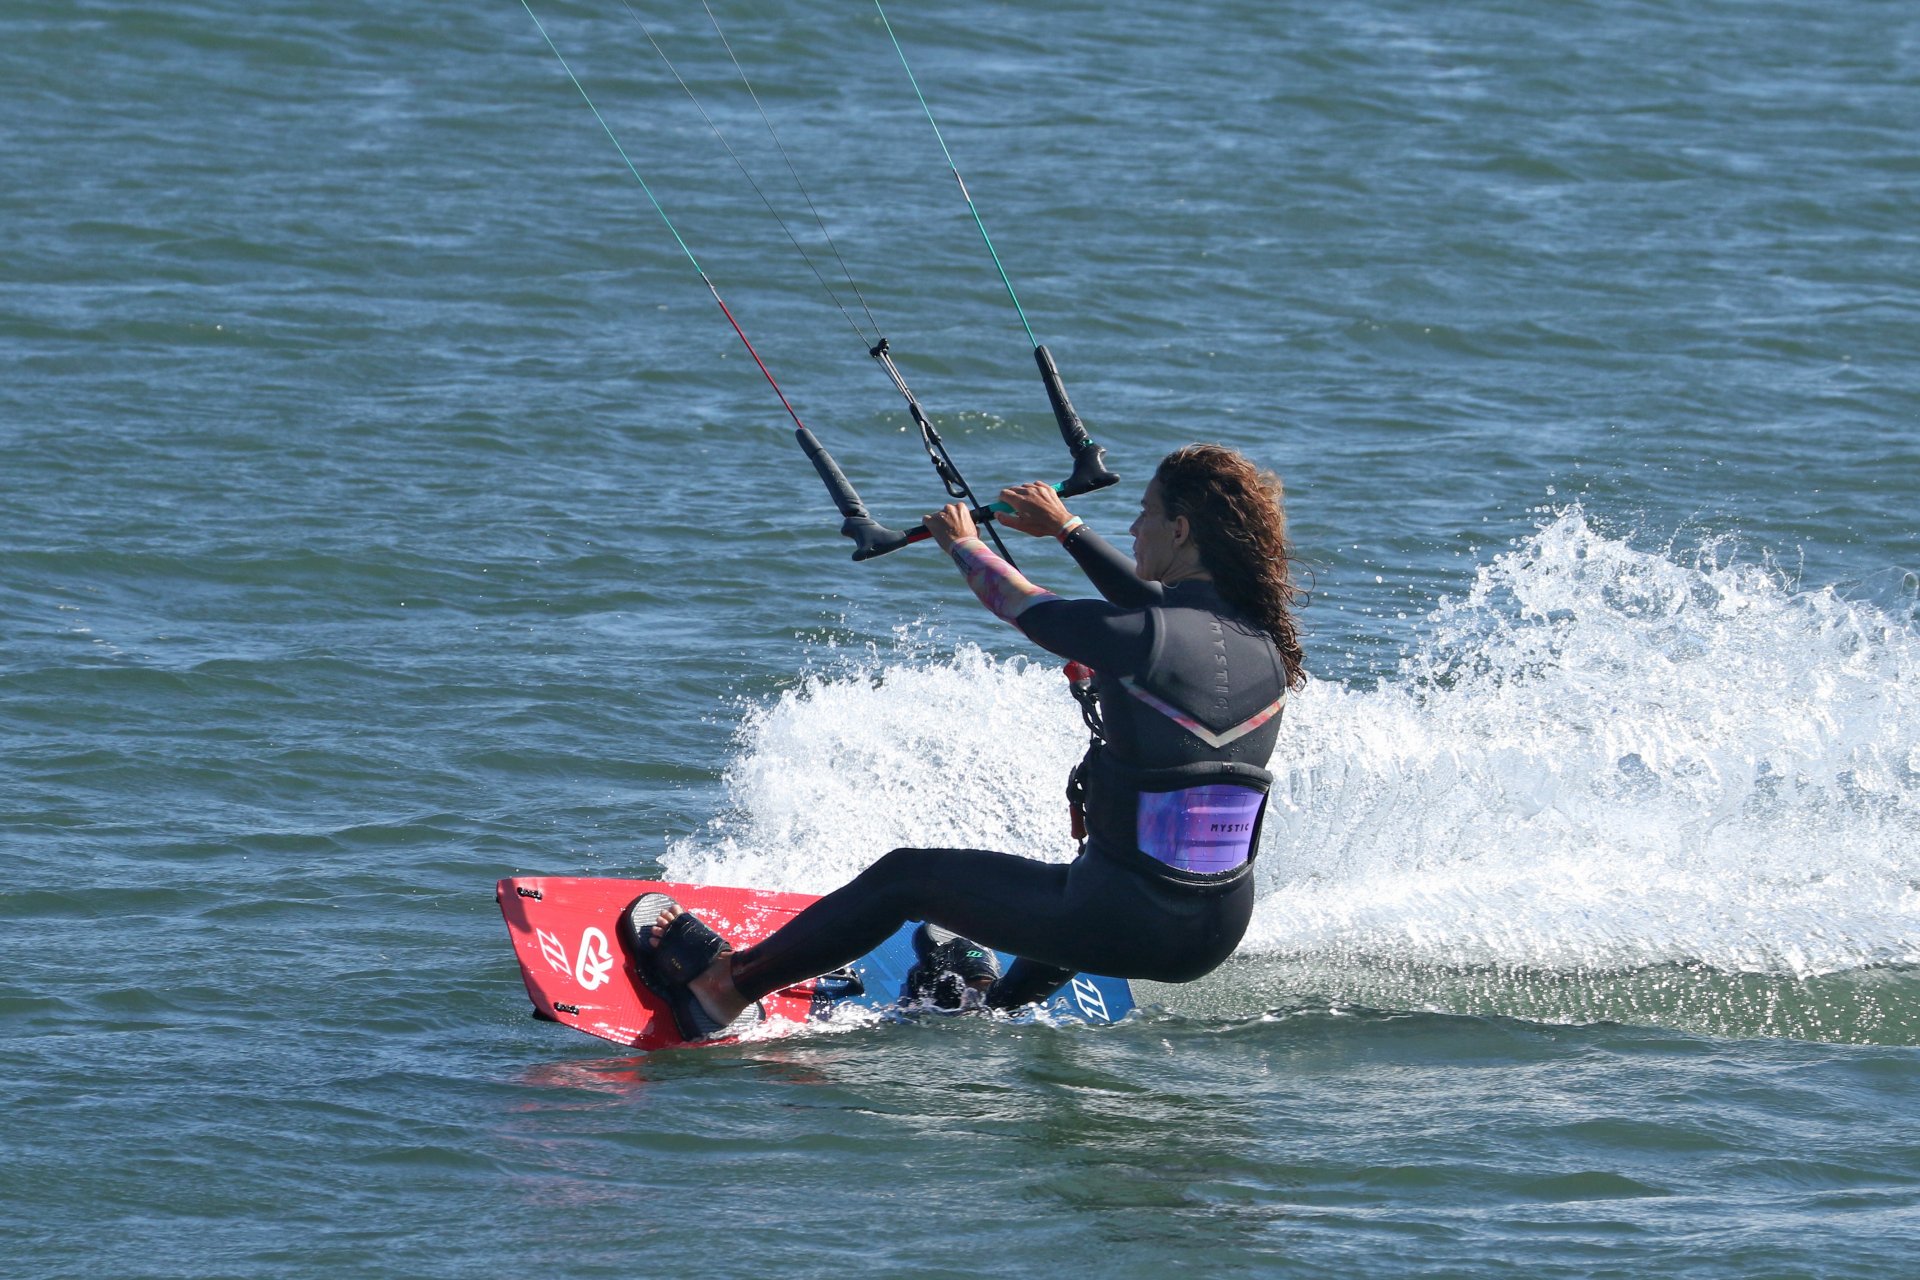
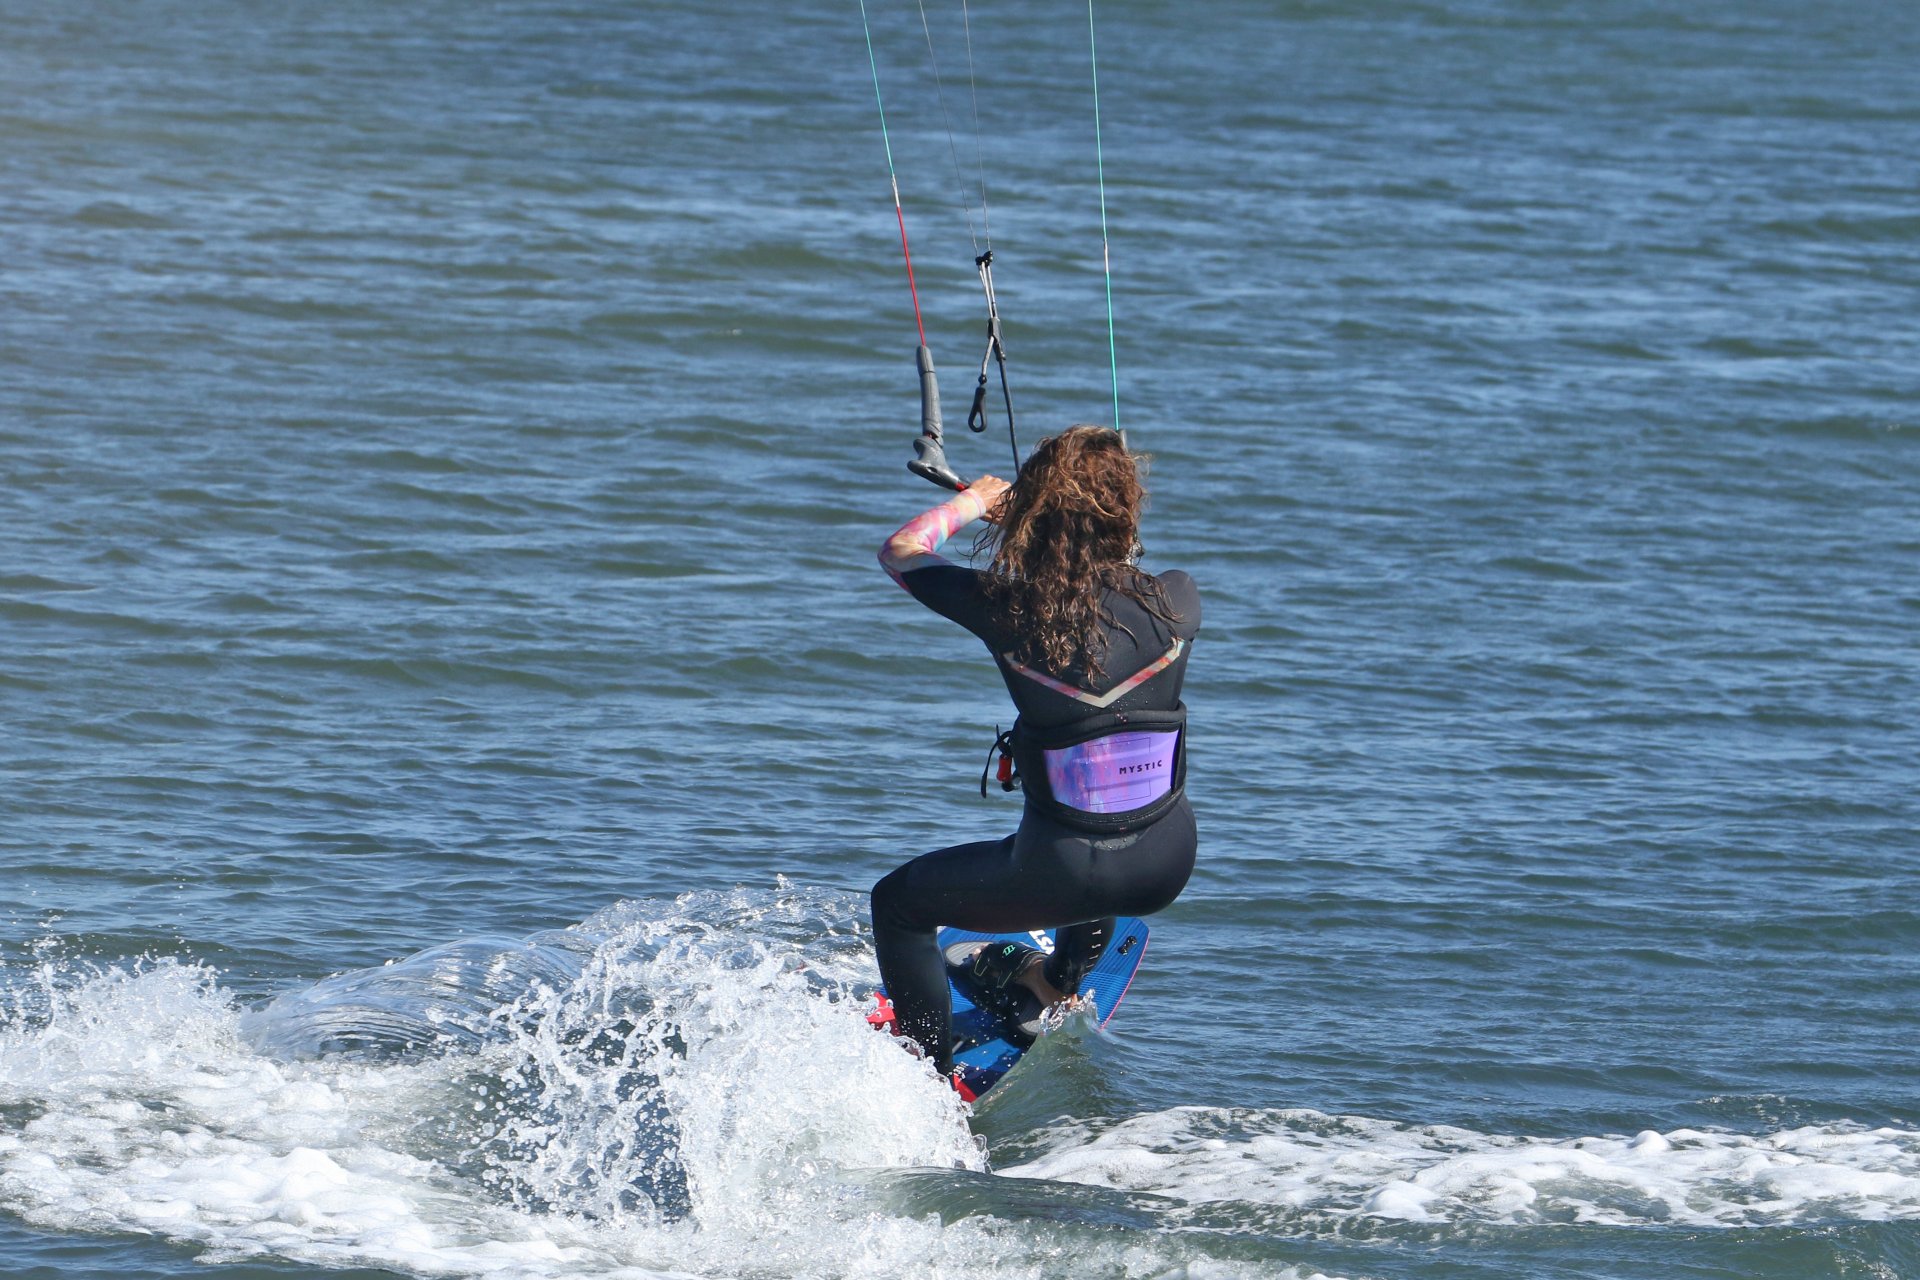
Pic D. With her weight now on her front (left) foot Karine now extends her back leg and pushes her back heel away from her, forcing the tail of the board to slide. Have a look at her kite lines; they are still pointing off to the left of the picture because her kite is still over towards 11 o’clock. She hasn’t moved it yet!
Slide 3 – Don’t Be Shy
When you first slide the tail of the board, it will be a new sensation. As it slides away from you, your first thought may well be that you’re falling. However, resist the temptation of pulling the bar in for support and wait to see what happens. The worst will be that you get a little wet. What you’ll find is that with your weight over your back foot, the further the board slides, the more “over” the board you’ll find yourself and the more off the wind and ready both you and the board will be. We implore you to practice this step separately so that you become comfortable with sliding. If it means sliding, then slowly sinking before water starting back the other way, so be it. You should find the water start fairly simple because having not moved the kite yet, it’ll be sitting pretty in a perfect place from which to start.


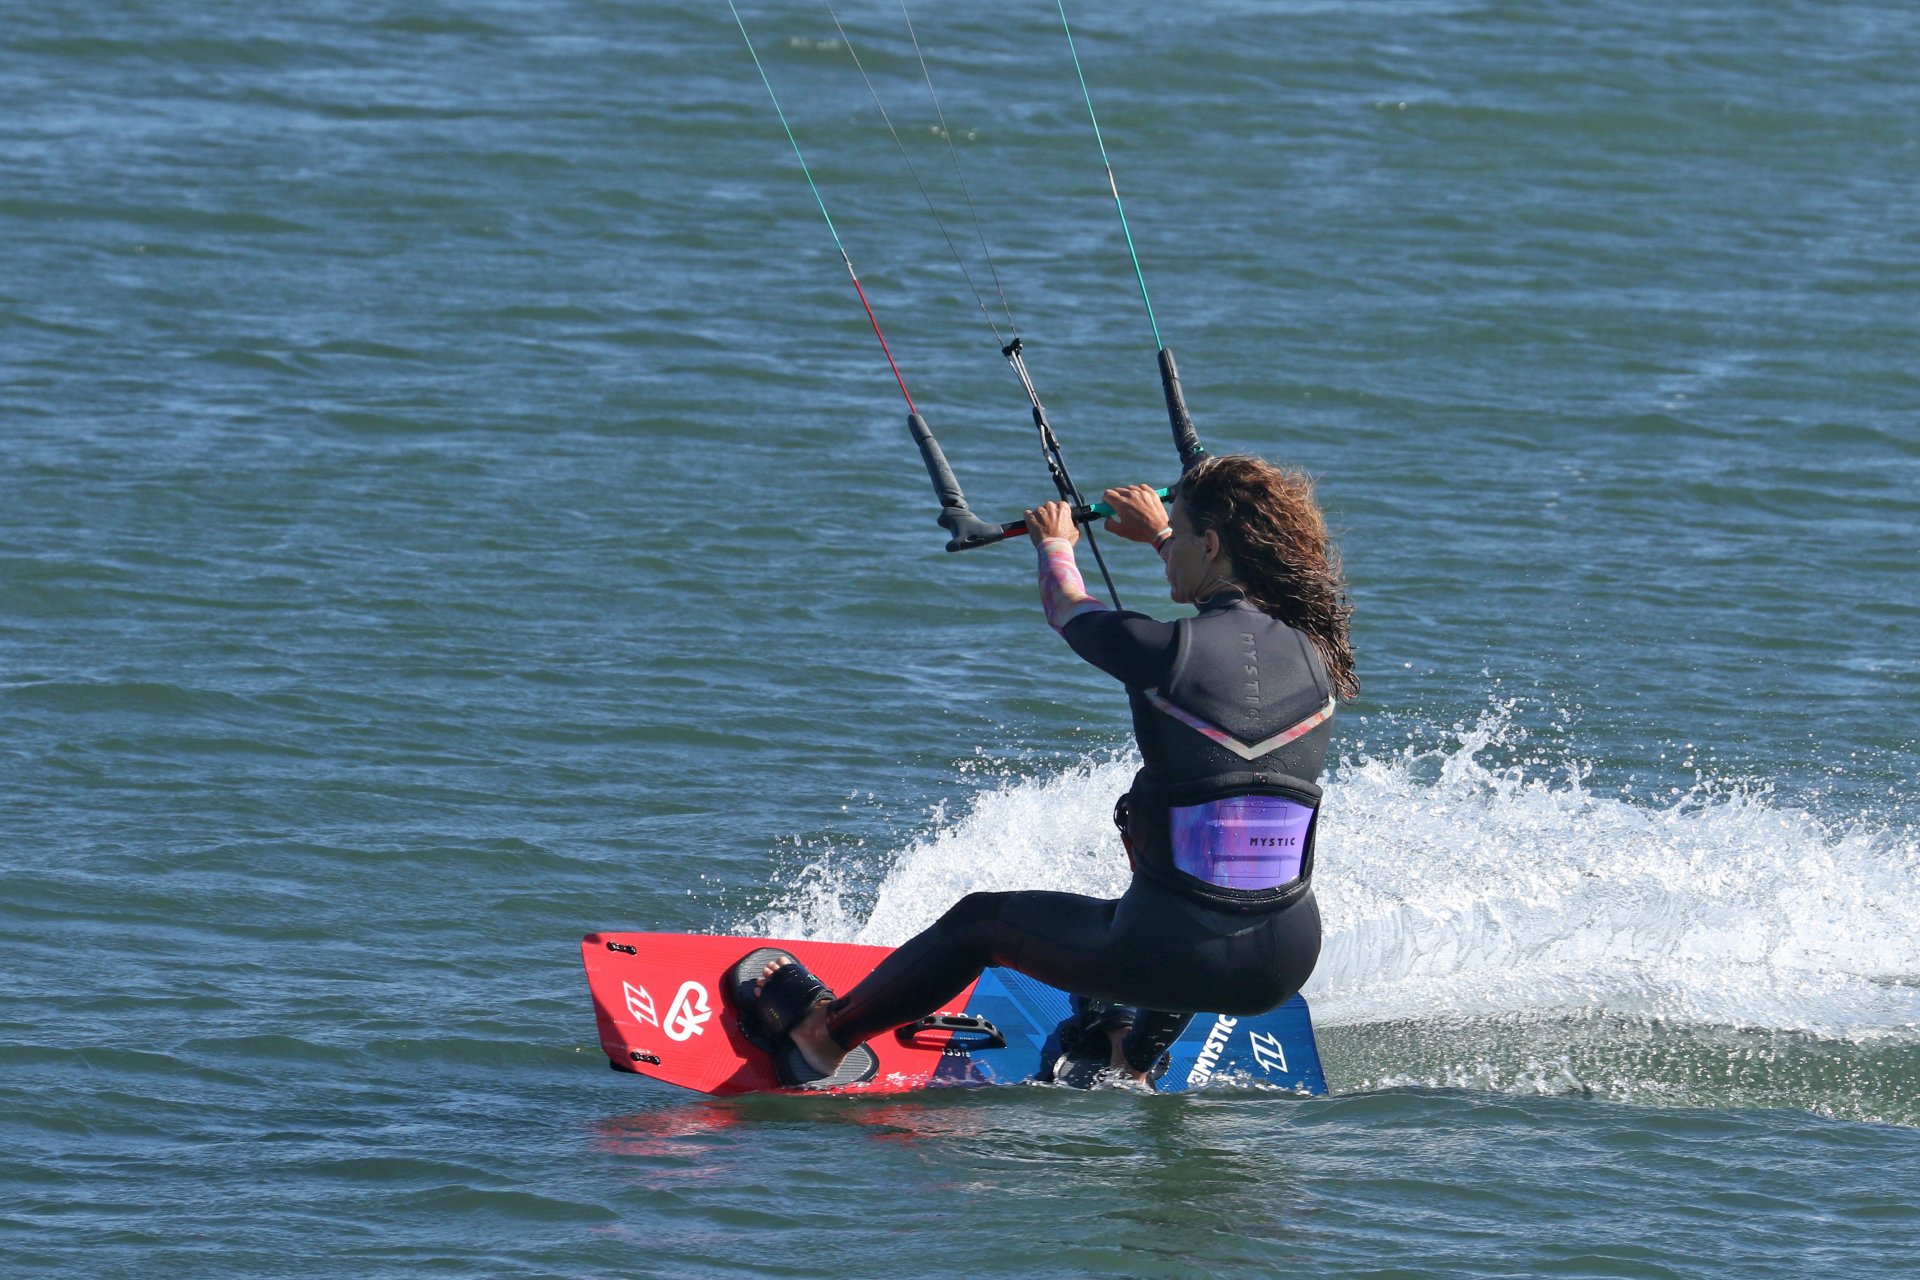
Here in Pic E. Karine’s weight has come fully over her front foot as her back foot slides further away, and she has yet to turn her kite. The brilliant bit is that you can see how she and her board are perfectly poised to go back the other way.
Kite Last
You are officially primed and ready. The magic is complete, your original front foot is now your new back foot, and everything is gagging to get going in the new direction. This is the moment that your patience will be rewarded. With your kite obediently waiting around 11 or 1, it’s in the perfect position to help you execute a flawless exit.
Your aim is to generate enough power to pull you back the other way. You need tension in the lines so that your kite will respond, so make sure you pull the bar in a little. Then give it a pull and a push to get the kite turning and moving. As you steer the kite, it will move up, supporting you and keeping you out of the water. Then it’ll move across, generating power. Be ready to level the bar so that the kite doesn’t actually dive down towards the water. Turn your head so that you can follow the pull.
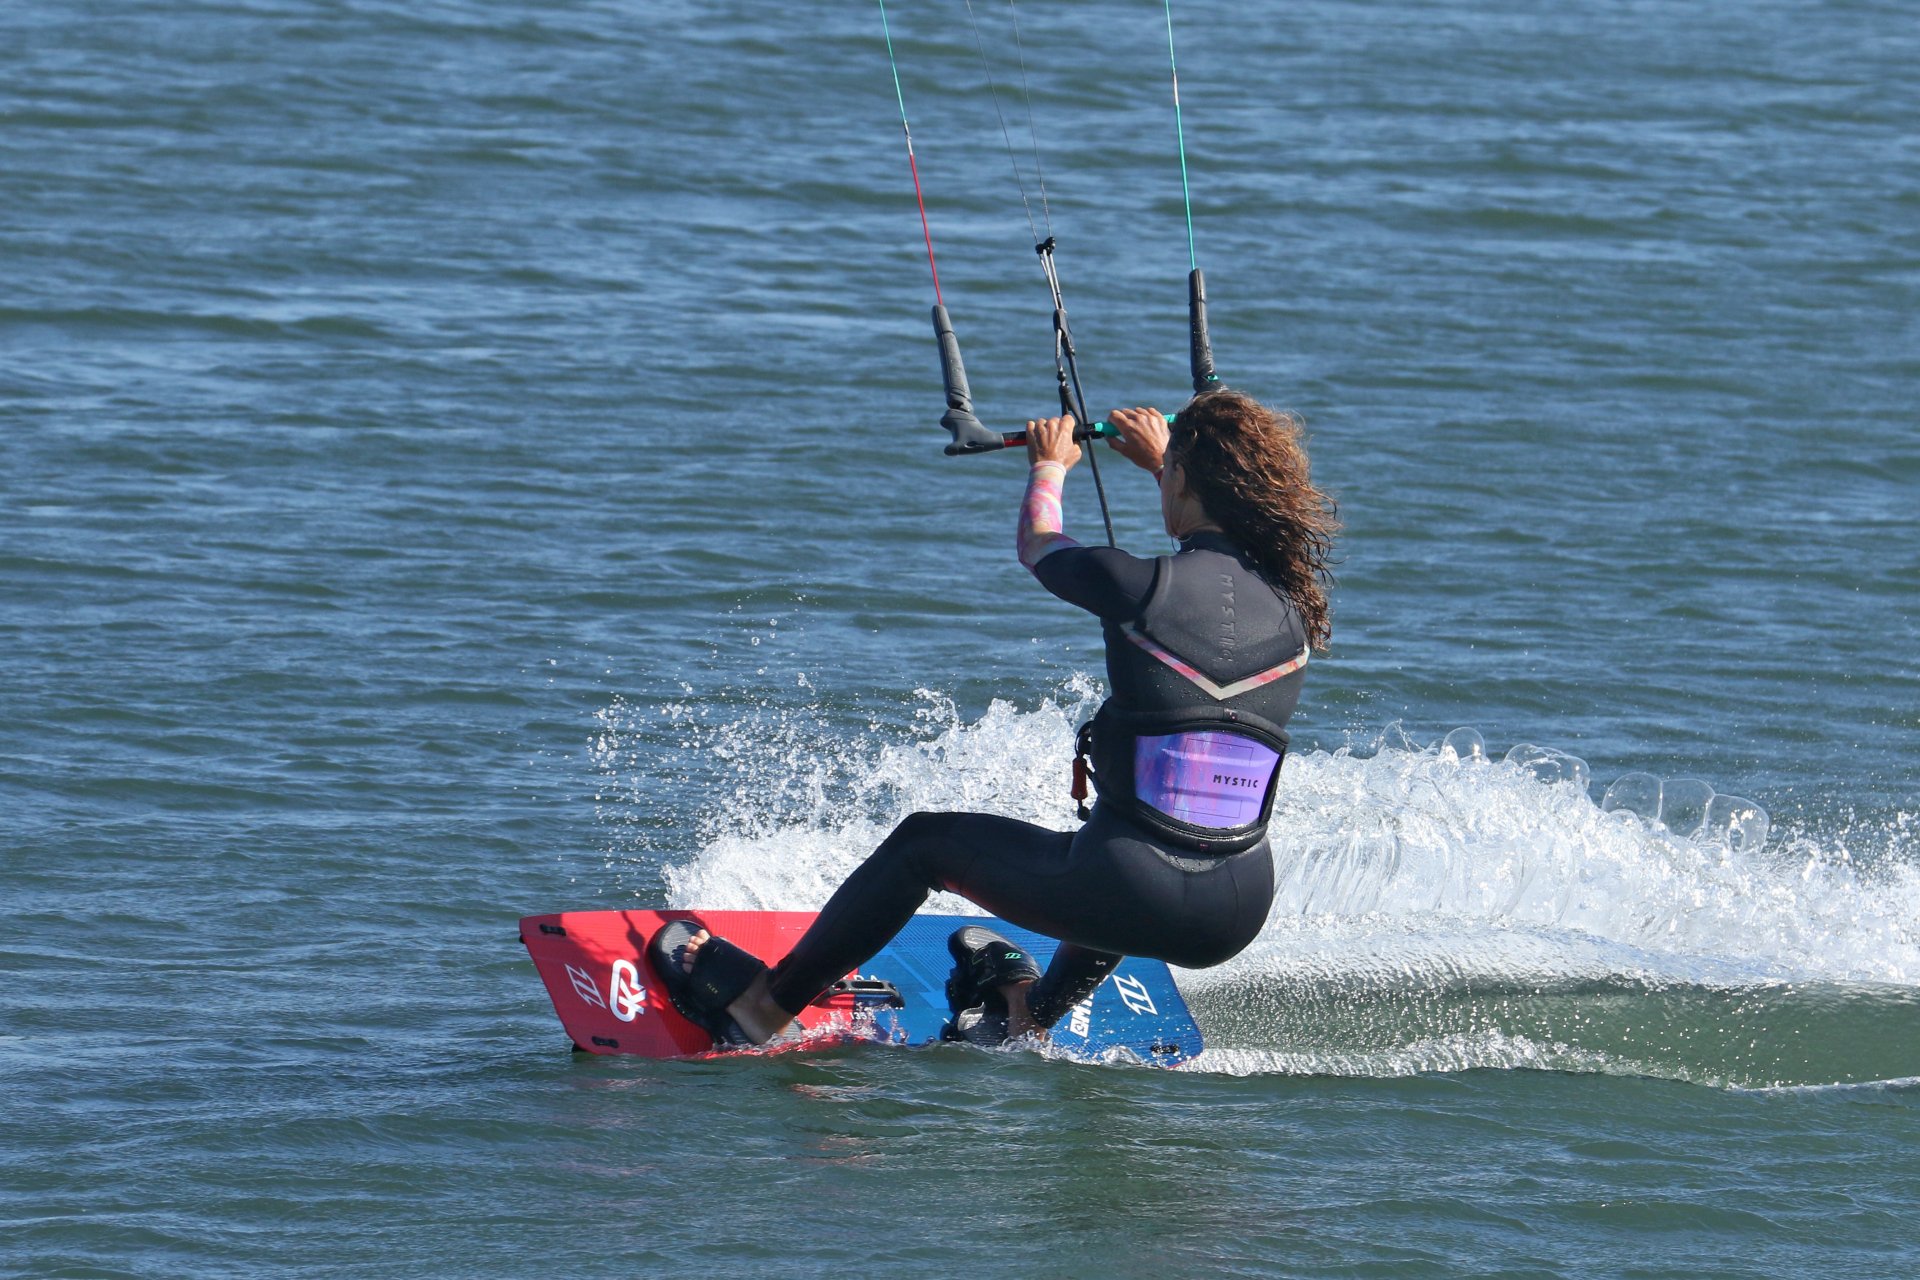
Pic F. Karine gives the bar a decent pull and push to set the kite on its way. As the kite starts to move, it supports her. Karine turns her head and follows the pull.
How hard you steer the kite will depend on how much power you have. The more power you have, the gentler you can be. Keep your leg bent with weight over your new back foot to resist the pull from the kite. You always need to be ready to take the pull from the kite, and as such, it’s crucial to keep your weight back and on your heels. It allows you to open your hips and shoulders and to follow the kite. You’re also in a strong position to control the pull by easing the bar out if needed.
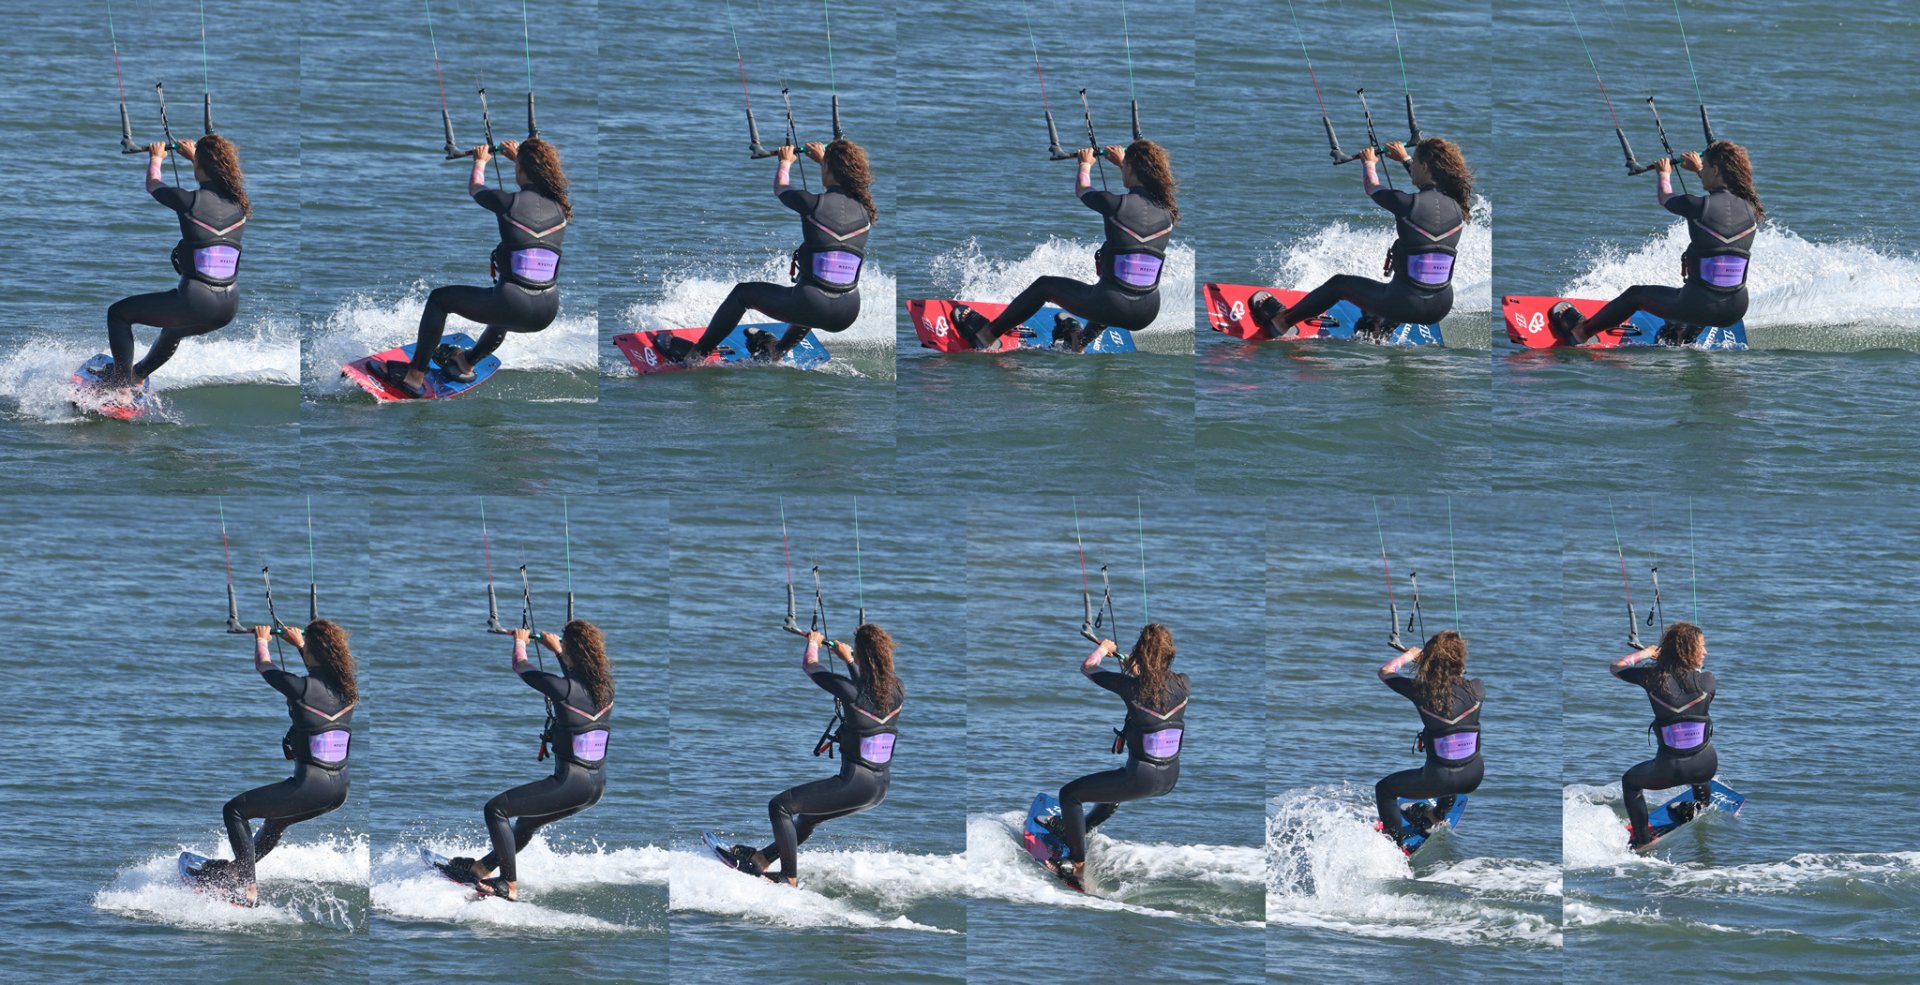
Pic G. As the kite starts to pull, Karine is ready, weight on her heels, committed against the pull, and she’s able to pivot on the tail of the board, opening her hips and shoulders towards the new direction.
It’s all about control, which will come with practice. The unquestionable beauty of starting with your kite around 11 or 1 is that you should not need to dive the kite hard down towards the water during the transition. This means that after moving the kite across the window, it should end up high enough to give you choices once you get back onto your edge and riding in the new direction. You can take it up or down for an extra boost to get you back riding upwind. Or you can level the bar and just park and ride if you’ve got enough power.
Pic H. The end result. Karine’s kite is nice and high; she’s followed the pull, and with her weight on her heels, the board has first pivoted and then carved back onto an edge. Karine is all set on her new path.
Top Tip
Trust the process. We’d be lying if we said we didn’t always want to be able to do something immediately. However, if we’re honest, when does that ever happen, unless we’re using a skill that we already have? Resist the temptation to go for a Slide Turn. Ignore the end goal and practice the individual steps, slowing down, leaving the kite, working on your weight shift and slide and eventually, dipping in until you can fit them all together to create a sequence of flowing manoeuvres. This way, as you progress, you’ll be able to follow each step more quickly until they morph into one casual sliding turn.
Final Words
We won’t be looking at possible hurdles and solutions just yet, as your time is better spent working on the steps. However, we will add that once you’re comfortable and everything starts to go swimmingly, don’t be tempted to dive the kite to keep your bum dry or drifting it early. Work the “Kite Last” step forward so that it comes right up and follows immediately from the moment that you push your back foot away into the slide. It’s still last!
This technique article was in Issue 89 of IKSURFMAG.
Related


By Christian and Karine
Christian and Karine have been working together as a coaching team, running improver to advanced kitesurfing clinics since 2003.
