
Continuing our front loop fest we thought it high time to introduce the baby brother of the much-respected s-bend, the popped unhooked front loop. Not only does this move dazzle, but also it is a base for a whole other world of kiting tricks that may or may not intrigue you. Added to that all this unhooked malarkey, if you’re tempted, is just as well practiced on those underpowered summer days, so bring it on.
Popping, front looping and a basic unhooked Raley would be minimum prerequisites, along with a modern safety system that lets you both rotate and unhook without endangering any third party members of the public or kitesurfing community.

To help you absorb all the relevant ingredients of an unhooked popped front we’ll take another look at unhooking, glance at popping and way up the differences of a popped front compared to a sent front loop.
The easiest way to make unhooking controllable is to understand how your kite’s trim, and therefore you bar position will effect what’s going on. In Issue 5 we wrote in depth about using “the strap” to move your “sweet spot”.
For unhooking it is paramount that you use the strap to trim your bar’s sweet spot so that it rests just above the chicken loop. This way the bar will feel light and the kite will fly forward, enabling you to be powered up yet in control. Every kite is different but it’s worth taking the time to get it right. If you don’t trim the sweet spot down, your kite will be flaring, pulling you off downwind, falling out of the sky in the lulls and making life in general fairly unpleasant.
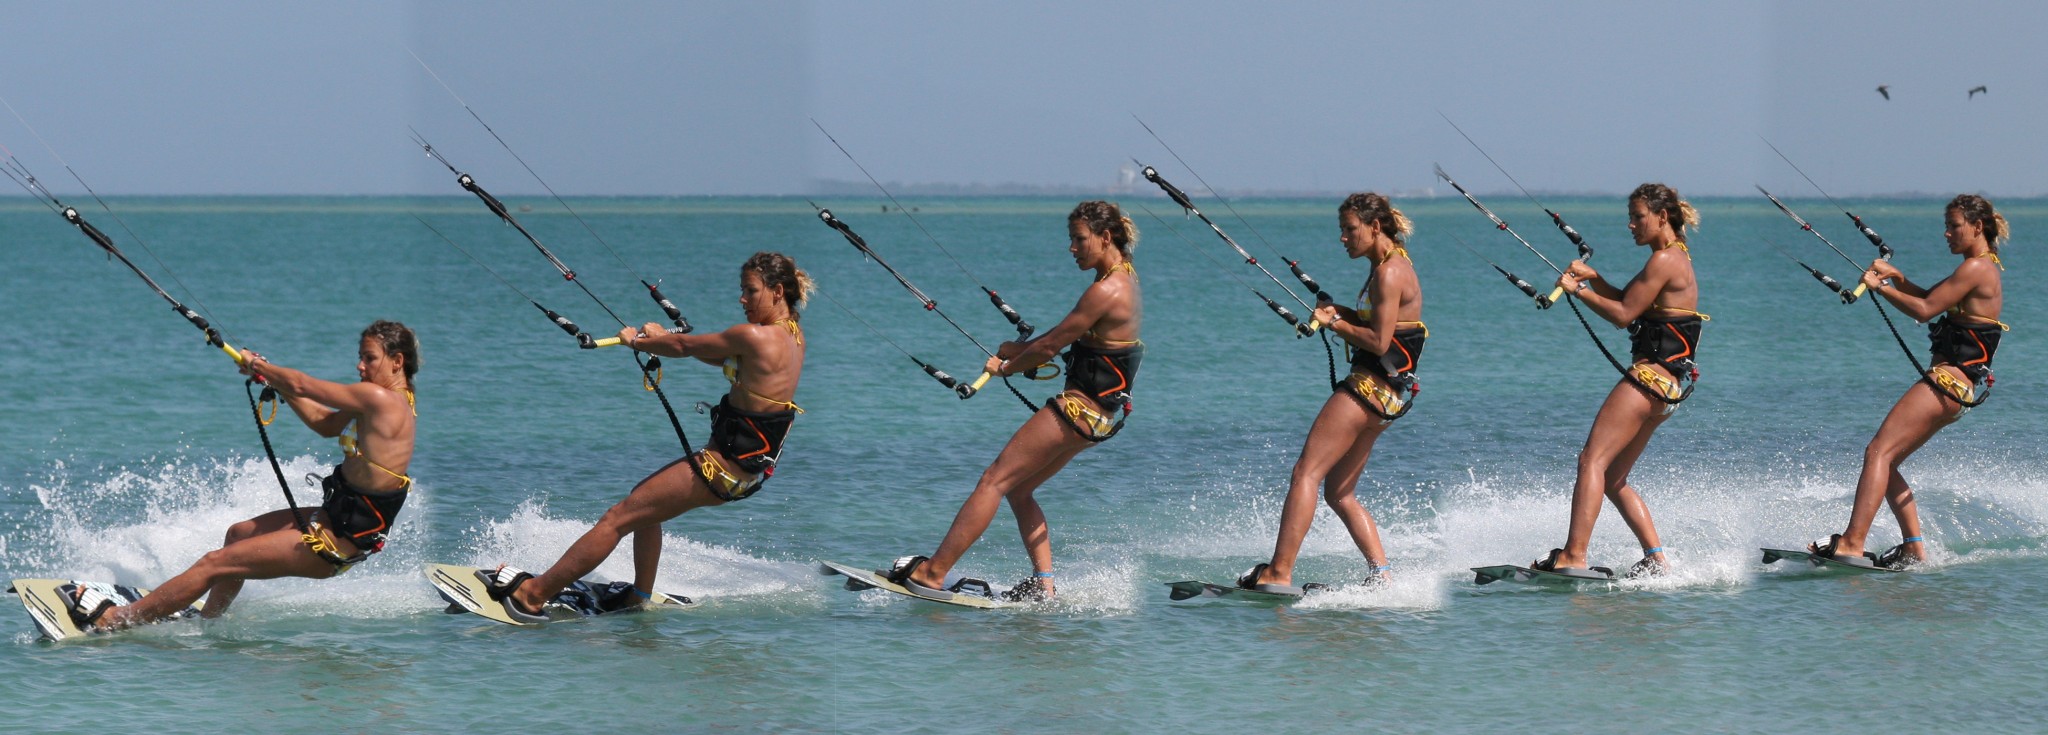
As a quick reminder of how to unhook have a gander at Sequence 1, and you’ll find more in Issue 6.
Supposing that you can confidently front loop, and are happy with your pop and Raley, learning to pop around a front loop is not going to be too much of a chore, but it’s best to keep in mind those little things that will make all the difference. Video 1 is a slow mo and close up to help you catch these morsels.
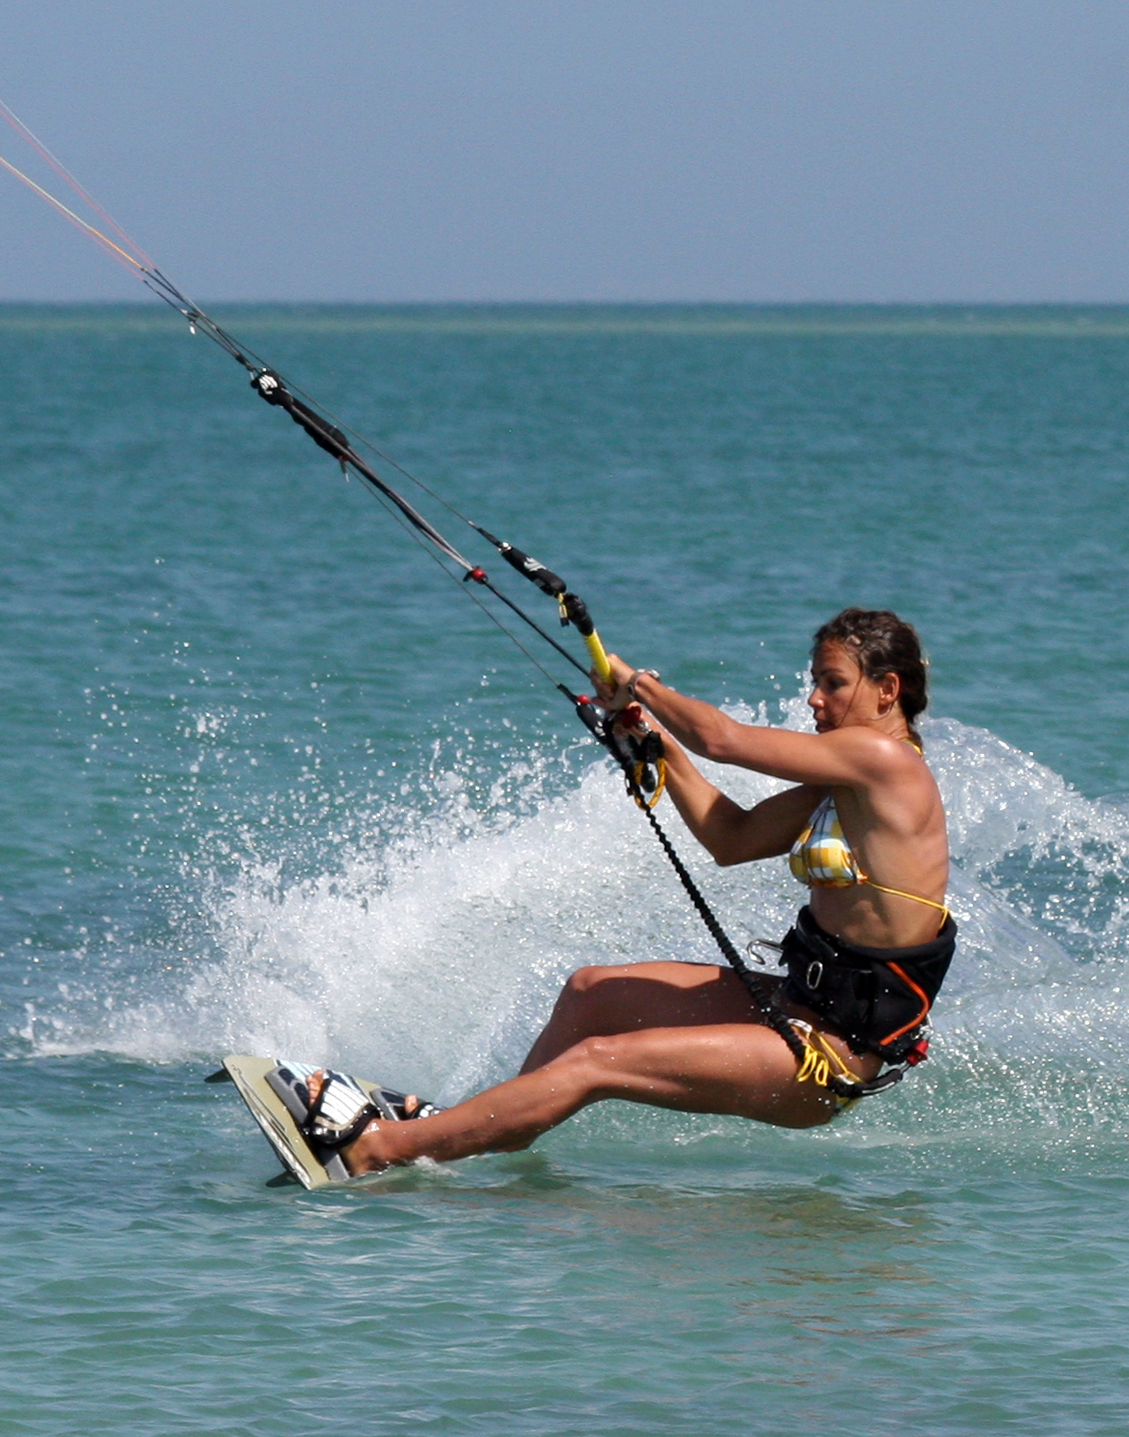
Making sure you get good pop is essential, as this will give you the time to complete your rotation. Your body position in the last stage of the carve will either give you the chance to explode up, or let you be pulled over the edge in the unwanted low flying version. In Pic A you can see that just before take off Karine has her bum low to the water, her shoulders have not been pulled forward of her hips, her front leg is extended to keep the edge and push her weight back over the tail of the board, her back leg is flexed for the explosion and she is looking forward, which will stop her carving too far into wind.
To aid in this don’t park your kite at a 45˚, that’s for some time in the future. You need to find a height where you are comfortable edging like this, without the kite offering too much lift, but which will also give you a bit of extra bounce off the water. 11 or 1 o’clock would be a good place to start.
Your pop is going to spring you up off the water, and therefore your front rotation needs to compliment this. In a standard front loop when the kite is used for height, you’re more than likely to throw your head and shoulders down and around to start spinning. This works because the kite is lifting you.
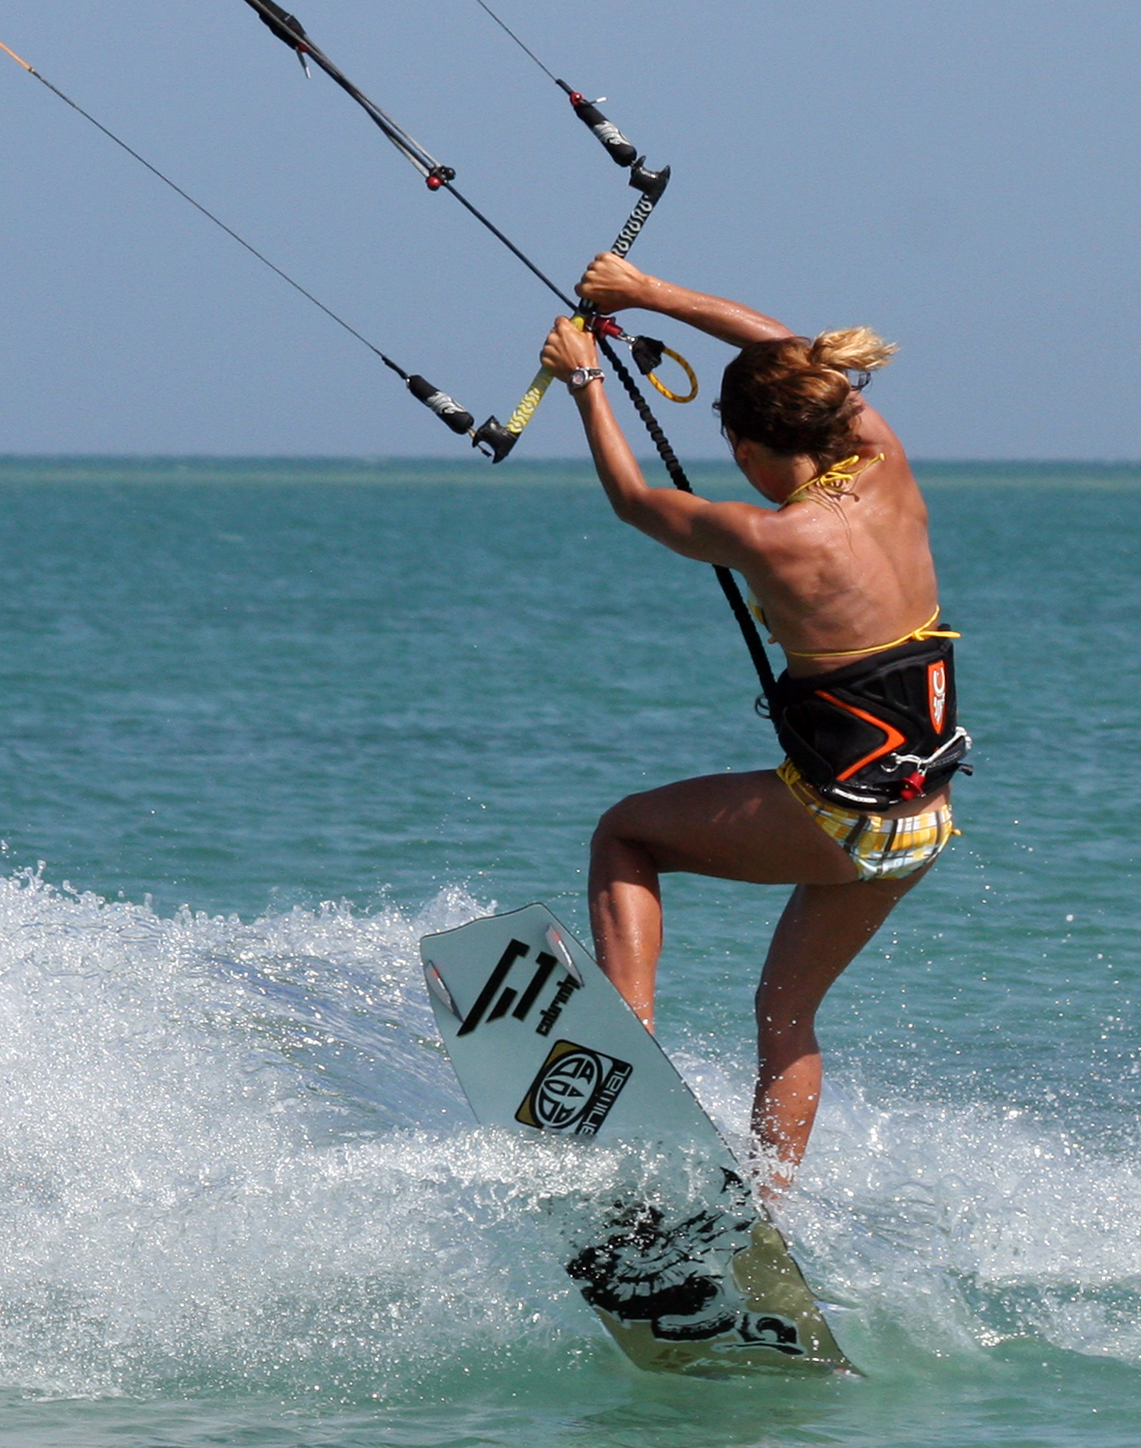
When popping, if you throw your head down towards your front shoulder, you’ll be counteracting all the good work you’ve done getting up off the water, by forcing your bodyweight down, assisting gravity. Instead you need to lift your chin and turn to look up and over your back shoulder as you back leg extends as in Pic B.
To some this seems like a bad idea as essentially you are straightening your back and turning it towards possible impact. Whereas the original front loop was a safe roll as if you where scrunching up to brake a fall. Here lies the second difference. In a popped front loop your body can stay extended, whereas in the jumped version you trying to make yourself small.

As well as trusting yourself, your head is key to finishing this rotation. As just mentioned, half way around you are in a prone position, so this is not the place to freeze. Because the kite will be pulling you forward, you will not be able to force your hips, legs and ultimately board around in front of you, whilst your legs are dangling behind and upwind of you.
To complete your rotation you’ll need to look over your shoulder at where you want to go and then push your hands around to follow. By doing this your upper body will be facing down wind and the rest of your anatomy will have to follow – leave it to science.
As with all unhooked popped tricks, there is a tendency to pull on the back hand as you carve against the kite. This is more than normal, but it must be avoided. If you’ve got over it on your raleys, it shouldn’t be too much of a problem. However if you do find the kite drifting up give a pull on your front hand, and a push on your back hand as you come around your rotation. If this doesn't help try pulling on your front hand as you take off!
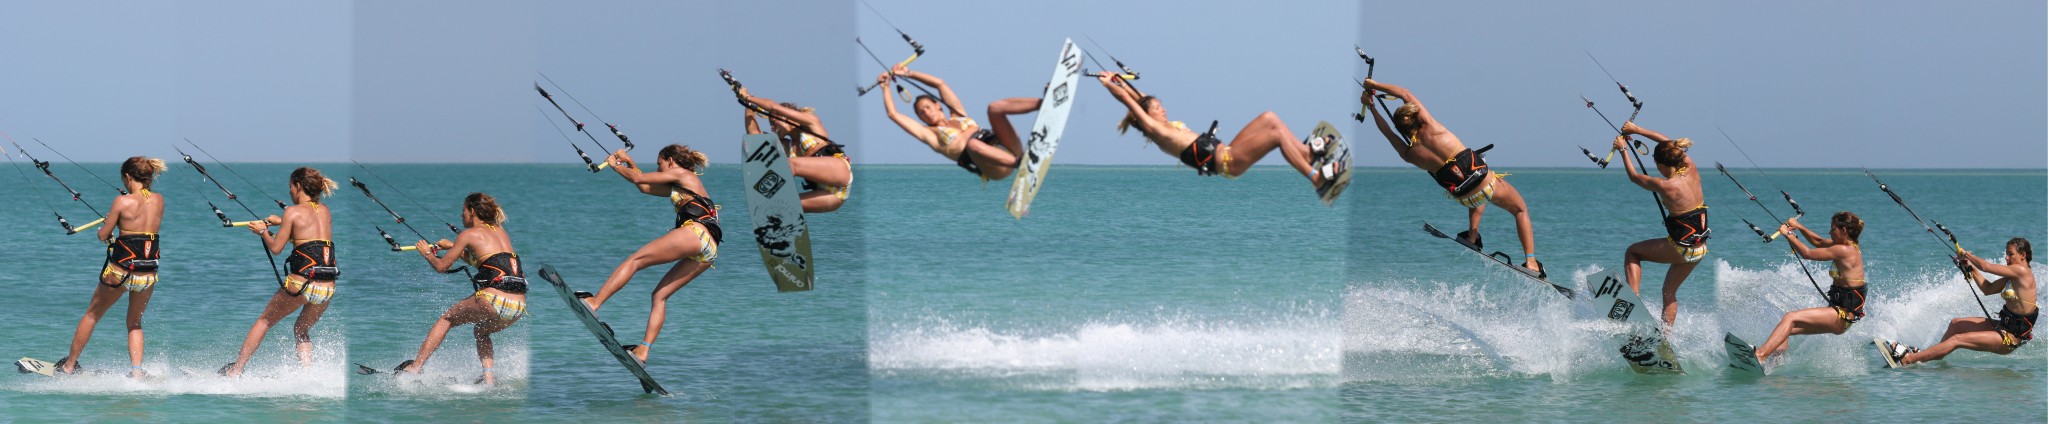
Following Sequence 2
Don’t take too much speed into this move at first, as it’ll feel like you have not time to pop, yet alone rotate and land.
As you progress you should try and start with the kite a touch lower, and try to keep it still during the move.
Once you start to do this with more power, concentrate on popping up into the a Raley first, and then start your rotation.
If you find that your kite really misbehaves and keeps rising, try moving your back hand to the middle of the bar, with the chicken loop line running between your first two fingers.
This technique article was in Issue 9 of IKSURFMAG.
By Christian and Karine
Christian and Karine have been working together as a coaching team, running improver to advanced kitesurfing clinics since 2003.