
Back Mobe
Technique / Advanced

Introduction
Seeing as its getting much warmer up this way, and holding onto the bar is now genuinely possible and even enjoyable, we thought it high time to throw a real cherub of a move at you aspiring unhooked freestylers. So here and beyond lies the A-Z of how to learn the jolly Back Mobe. Just to clarify this is not the low mobe, even though you don’t have to be high to learn it, but the classic “old school” move, excuse the irony…
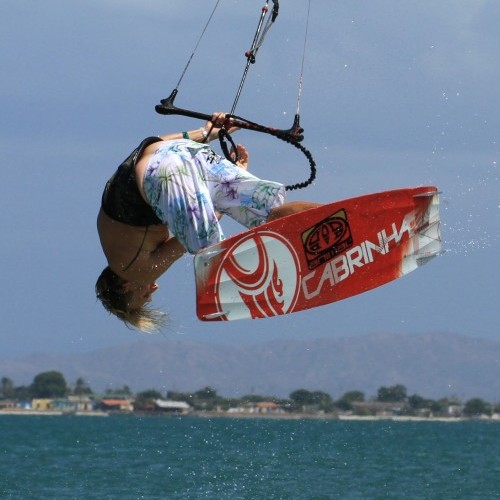
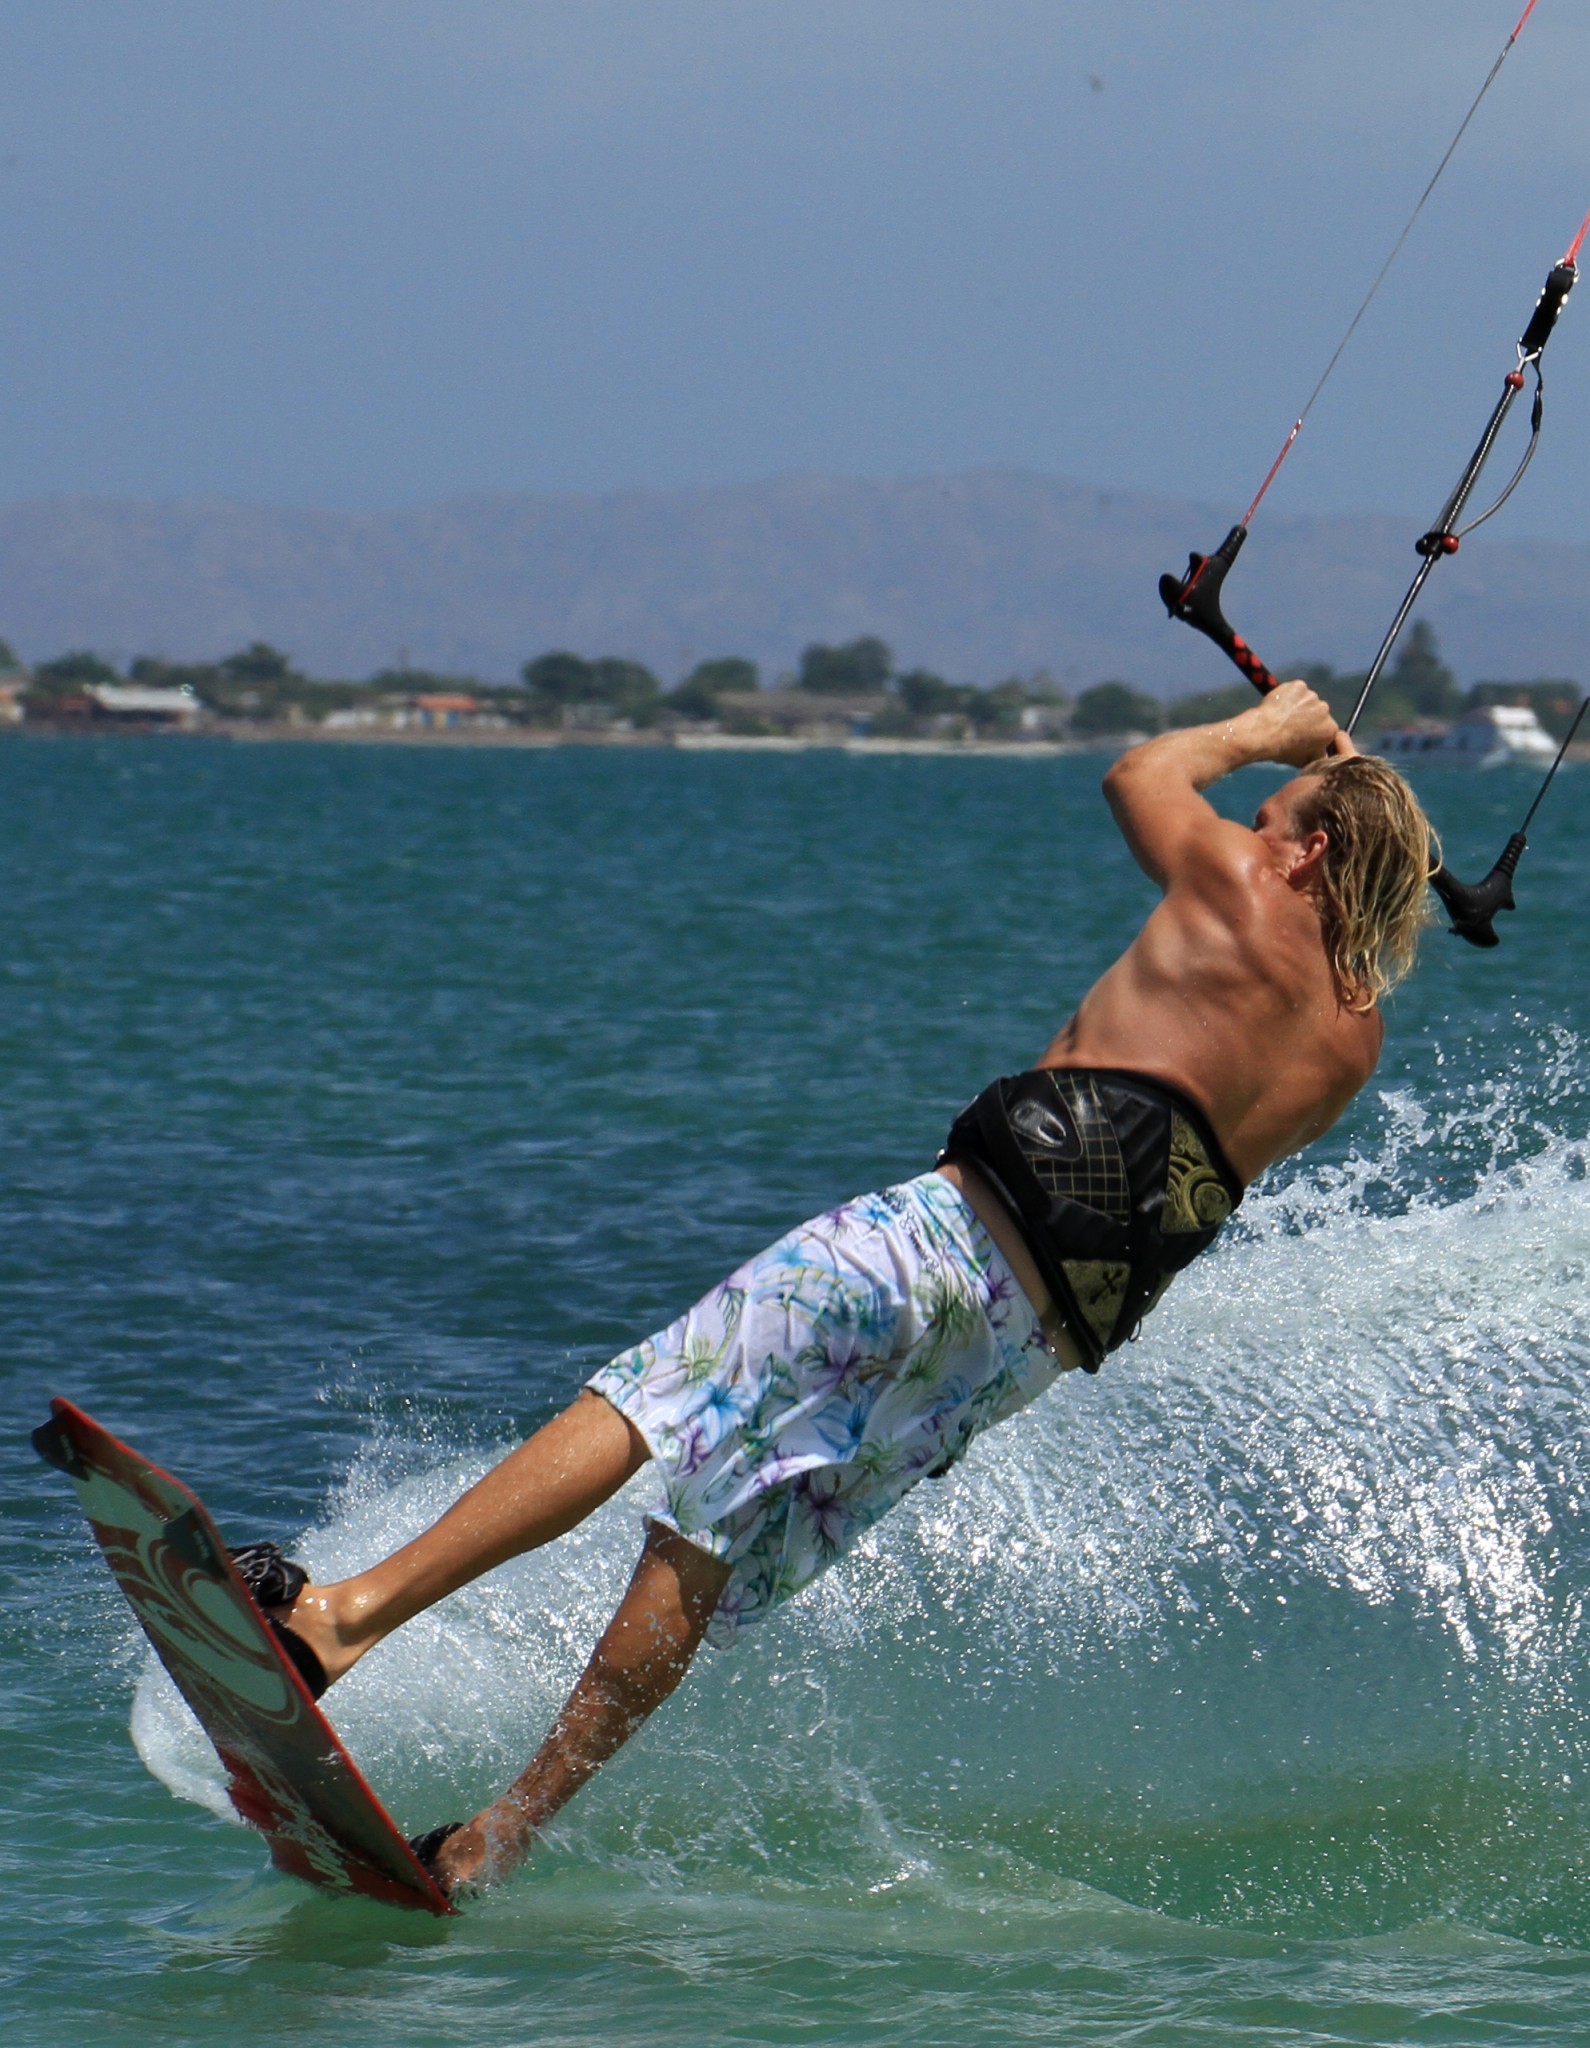
To kick proceedings off lets think what a back mobe is in its simplest form. It is an unhooked back loop, which pretty much on completion is followed by a handle pass in the same direction of travel. So in essence once you land your body will have done 2 rotations, a full 720˚ from where you started your carve. Hopefully this makes sense? The biggest hurdle that most kiters struggle with learning this is that they’re not sure if they are doing one spin, one and a half spins or 2 spins, and due to various different styles and techniques it can all get very confusing.


Knowing this, the fundamental for a back mobe is a decent popped and slow rotated back loop. So you can do a lot worse than obsessively practicing these! Sequence 1 shows what we’re after in a back loop, and whether you land it heelside or toeside is irrelevant. Your aim is to end up with your hands and hips together and your body fairly horizontal as you complete a full rotation. The key elements here are to keep you arms bent and bring your knees up. However there are many building blocks which don’t all follow the same path, so lets have a quick look at two of the most popular roots.
1. The back to wrapped
A great move in its own right and a potentially good lead into the back mobe. Only thing going against it, is if you are deliberately keeping the kite low to help you around the rotation, you will be throwing yourself around, trying to over rotate in order to land wrapped, which will do nothing for your pop or kite control. On the positive side it teaches you to hold onto the bar once you’ve released you back hand – this is a good thing!
2. The back to Toeside
Yet again this can be a great step up to the back mobe but only if you see the toeside landing as a comfy alternative to a heelside landing. It’s very tempting to keep the kite low, say around 45˚, and really throw yourself around. Once again you won’t be working on pop or controlling your rotation.
We want to try and get some elevation with our back loop from our back leg and we want some time in the air. To make this all a bit more achievable you’ll need to have your kite just under 11 or 1 o’clock, about 75˚ if you’re into angles. The danger is now that you’ll spin under the kite so you need to work on how you’ll rotate, the axis, and this is what takes the practice. By looking at the individual parts of the back mobe we’ll hopefully uncover how to get there in a controlled fashion.

The Approach
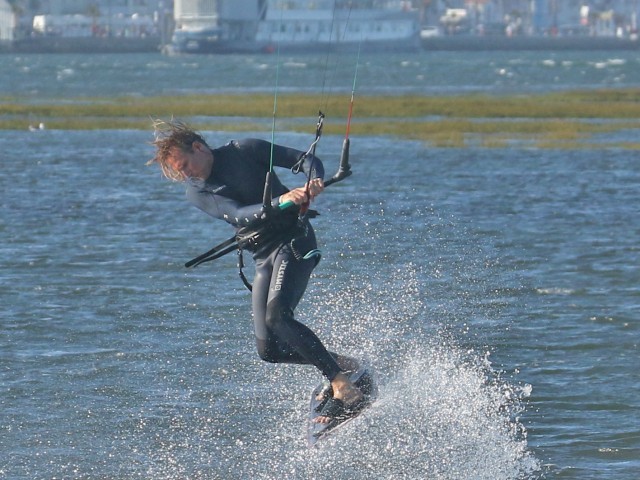
Pic A shows probably the single most important part of the set up to a controlled unhooked popped back loop. To bear away off the wind and unhook Christian has bent his back leg and really moved his hips towards the tail of the board, pushing the nose off the wind. This way his weight is already where it needs to be to get a tight but quick carve upwind. Try not to carve off the wind on your toes as this will move your weight forward, making it much harder to resist against the kite and pop. But do make sure you go off the wind enough before carving up as otherwise you’ll take off too late, spin too quickly, and won’t have time to think.

The Carve
In Pic B Christian is carving hard upwind to initiate the back roll. Note that his front leg is fully extended, toes up to keep the front foot from pulling out of the strap, whilst his back leg is flexed and ready to pop. Even though his shoulders are leaning back into the rotation which will help him get horizontal, his hips are twisting upwind to allow him to resist against the pull of the kite, which keeps the board in between him and the kite, and will let him pop off the back leg.
The Take Off
Pic C Firstly getting some up from the pop. Having initiated a good carve in the last picture Christian can kick down off his back leg before he gets pulled over the board and it turns through the eye of the wind. Secondly Christian has kept his arms bent. This will allow him to rotate his hips towards his hands. If he had straight arms now he would not be able to get his hands and hips together by the end of his back loop as the distance between them would be too great. Finally Christian has his head firmly between his shoulders and is looking forwards. By not looking over his front shoulder Christian rotates at a controllable pace, using the momentum from his carve to turn him. This means that he can save the energy from his head and use it slightly later on when he will need it.
End of the Back Loop
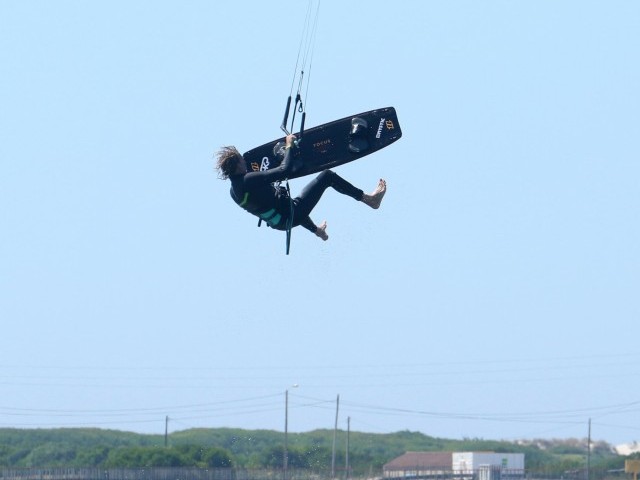
Pic D. Here Christian is now about to complete his back loop. You can see that because his arms are bent the bar is not too far away. Just picture where the bar would be if his arms were straight – yup no chance!
This is where the practice pays off, as you need to anticipate this moment just before it happens. The more slow rotation back loops you do with bent arms, without trying to pass, the more time you will have to think as it seemingly happens slower and slower, and therefore the greater chance you have of pre-empting this moment.
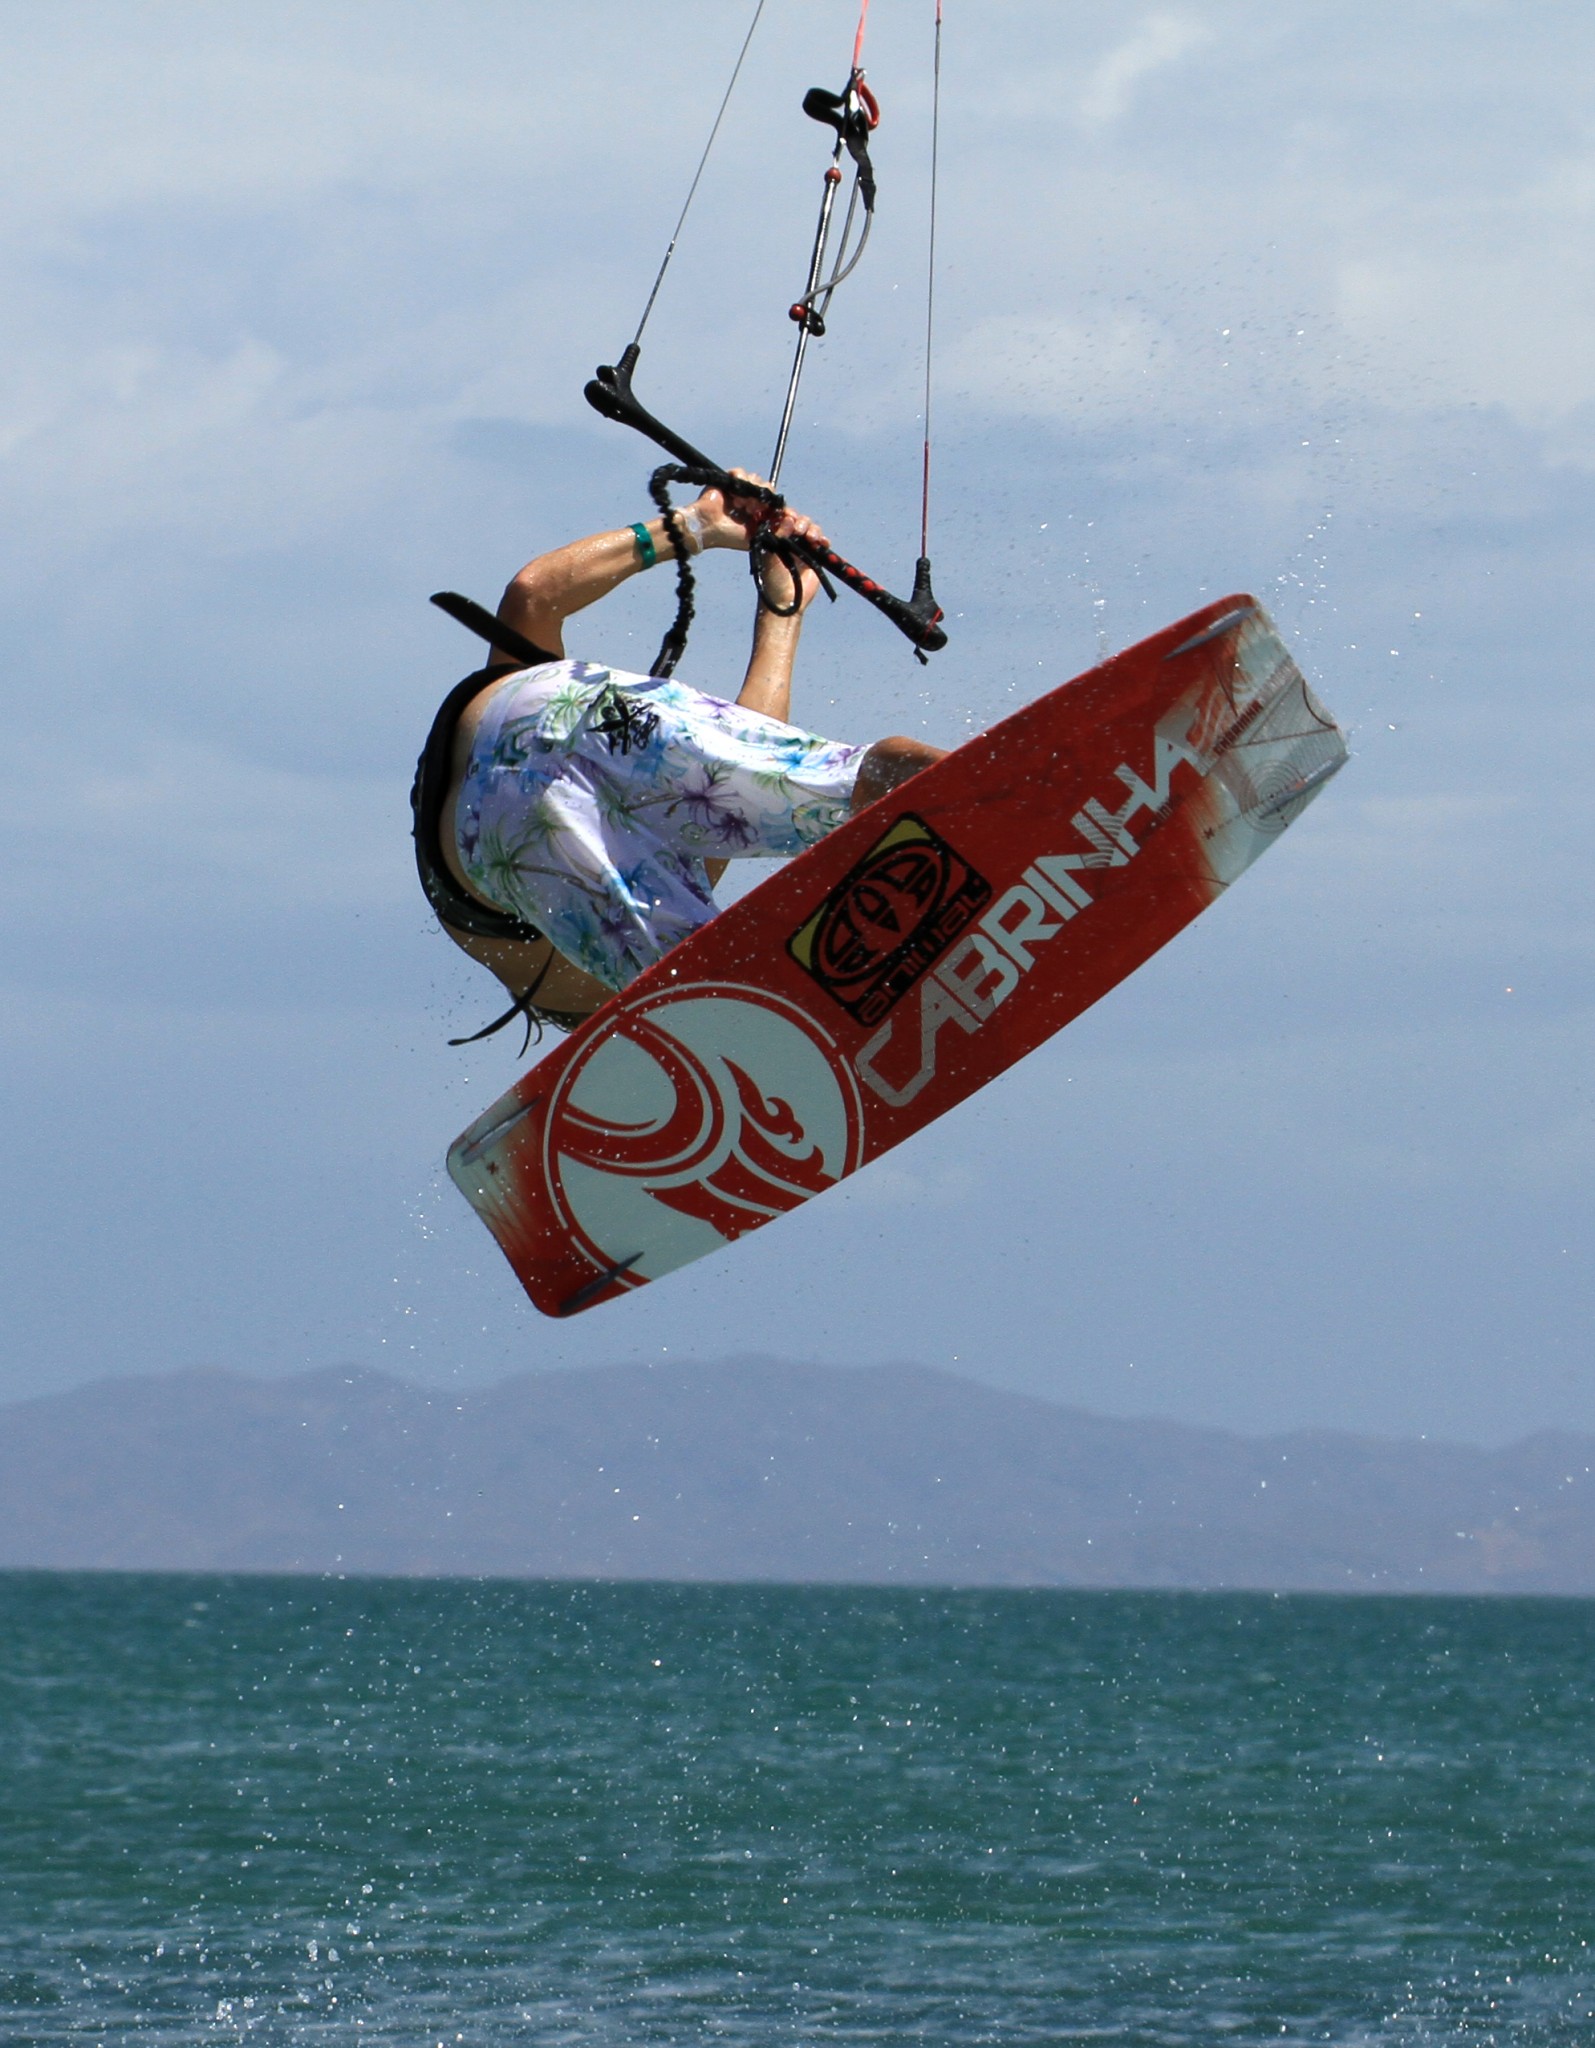
Just as Christian approaches this moment he throws his head and shoulders down and around, which has the effect of rolling his hips up towards his hands. By keeping both hands on the bar you will have the strength to roll your hips up to the bar towards you hands as you head and shoulders go down, which in turn starts to twist the bar around behind your derriere. Its really important that you don’t pull the bar into your hip with your back hand as the kite will rise and pull the bar away from you when you go for the pass.
Letting Go
Pic E. You’ll know when to let go because you’re arm will be in the way! The main difference between learning the back mobe and watching the pros do it, is that they will be letting go so much earlier than you’ll get away with at the beginning. If you’re a bendy kid your limbs may let you pass some distance for your body, but if you’re a grown adult, keeping the bar in close for that little bit longer makes life considerably easier. You can see here a similarity between and the secret of many pass moves, the bar is already twisted enough to grab as you let go. This allows you to turn more, and more quickly and means that you don’t have as far to reach with your free hand. You can help yourself here by keeping you knees bent which will stop the board from dropping and dragging you away from the kite.


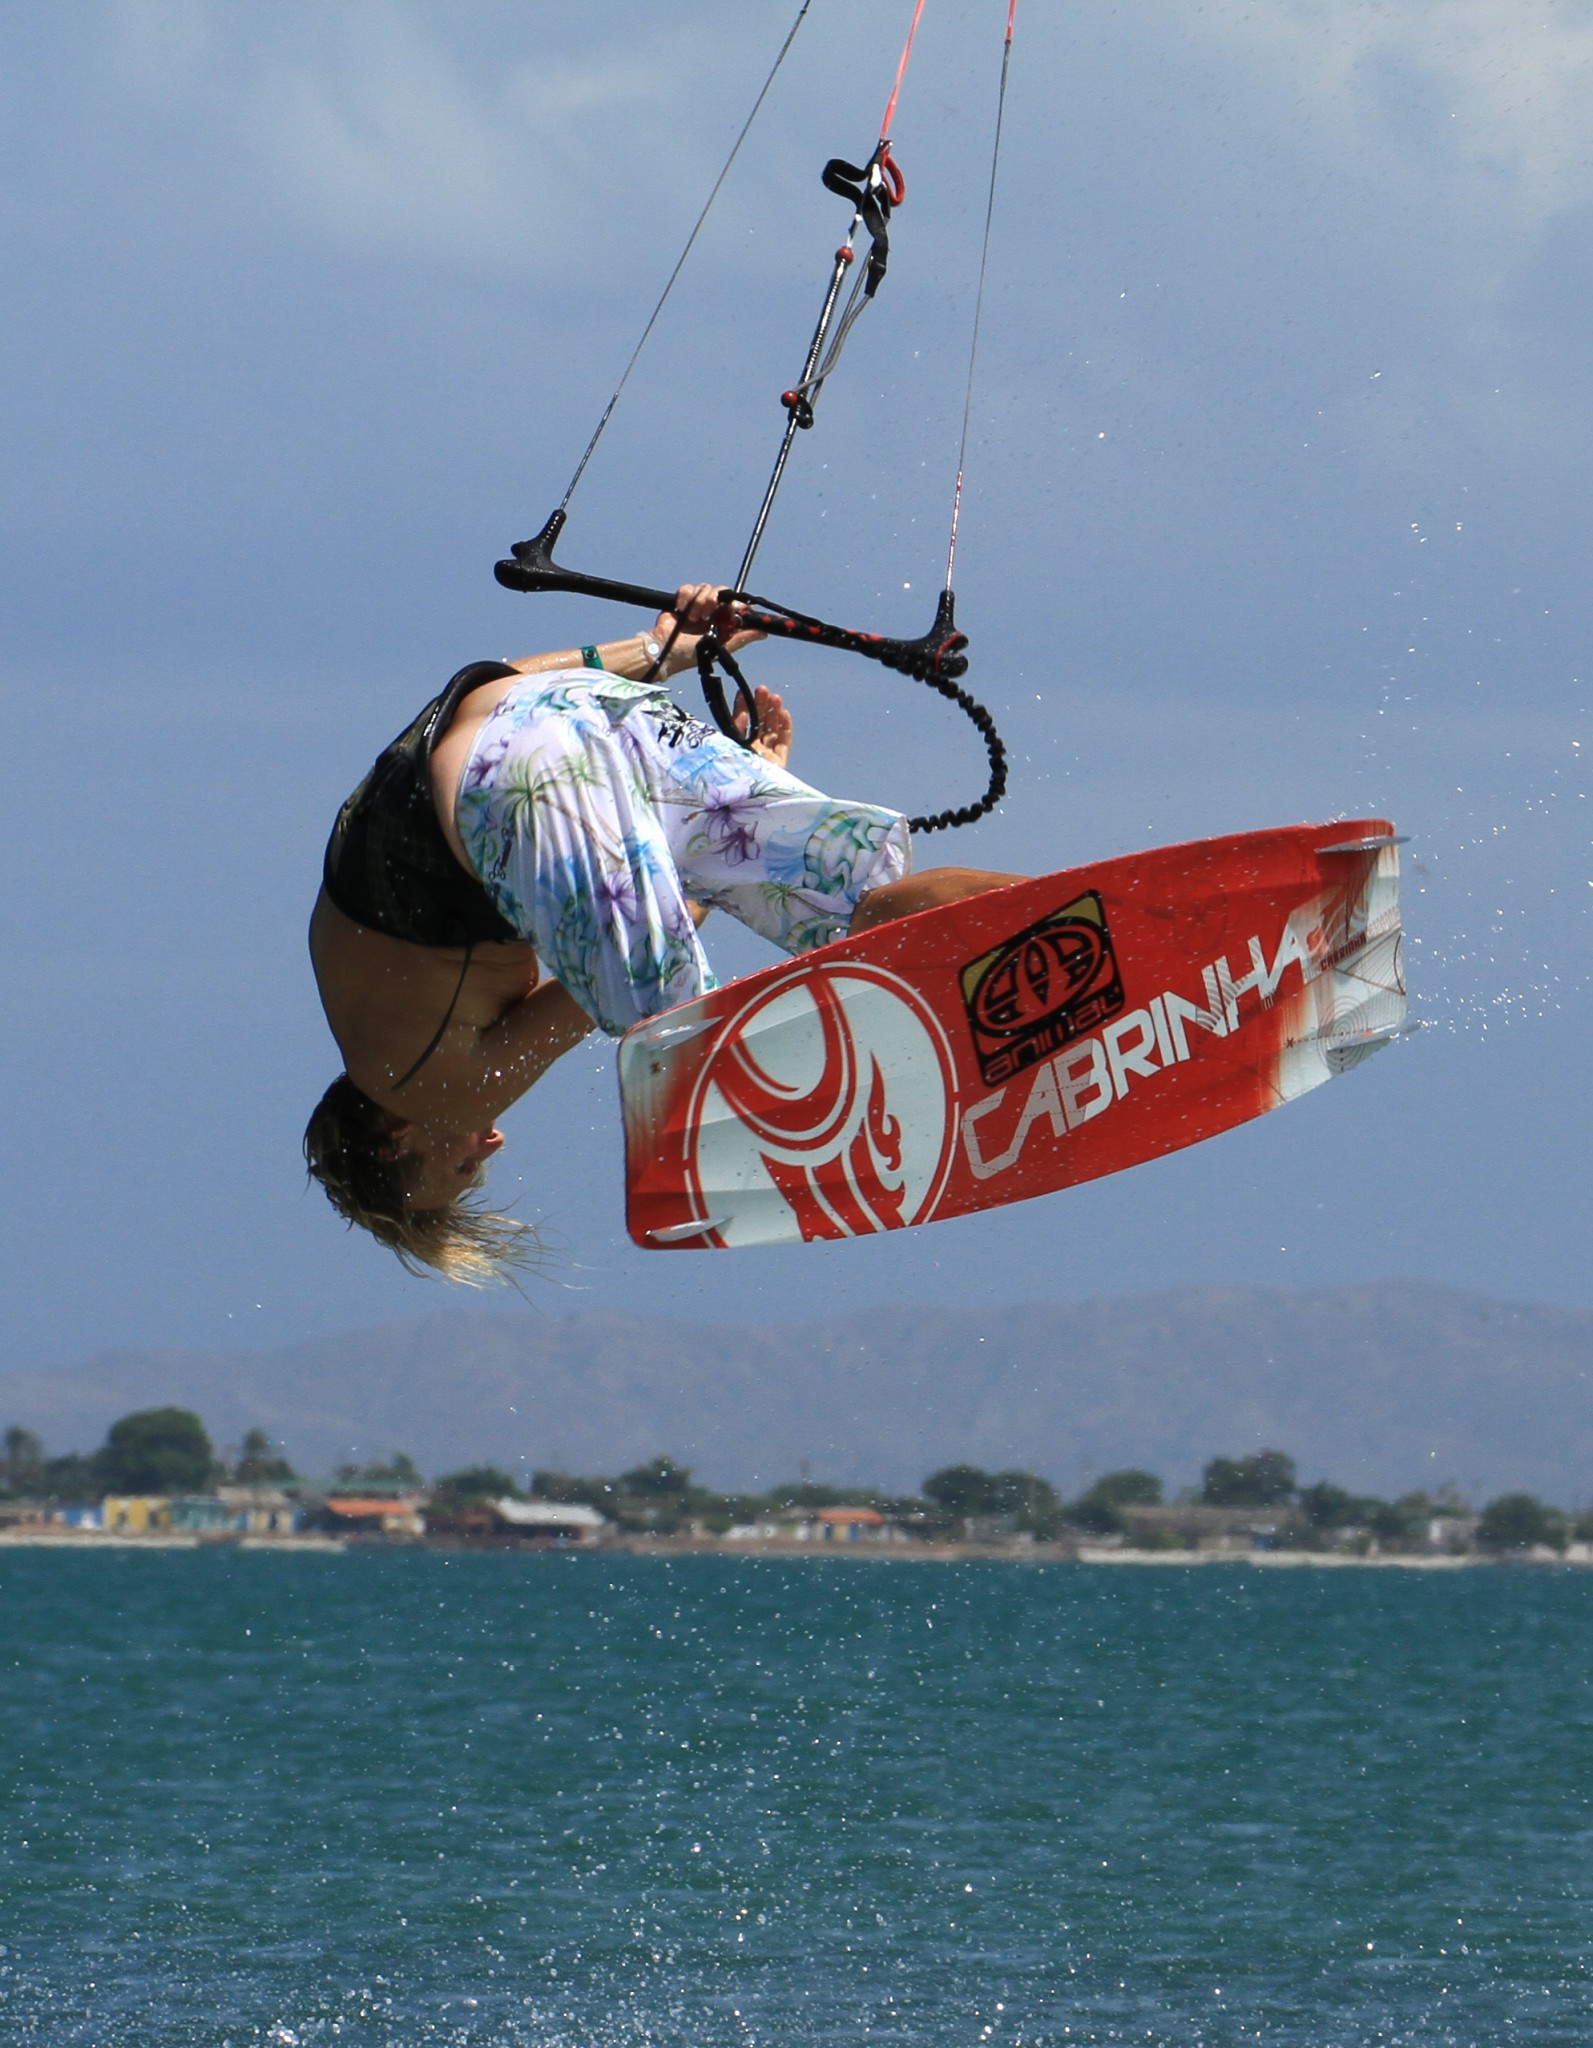
The Reach
Pic F. Nothing too complicated here as the bar is waiting for Christian so he doesn’t let go. Christian has both hands on the bar for a split second. By holding on he can rotate around his arm and therefore keep the bar nearer for his reaching hand. If you let go a fraction too early the bar will ping away and you’ll miss it. However the speed at which you reach around to grab the bar is key. You want to take the shortest and quickest route around your waist with as little movement as possible. If you’re already claiming Shifty 3s you should be used to this, but if you’re new to passes practising passing a bar behind your back on dry land will serve you well.
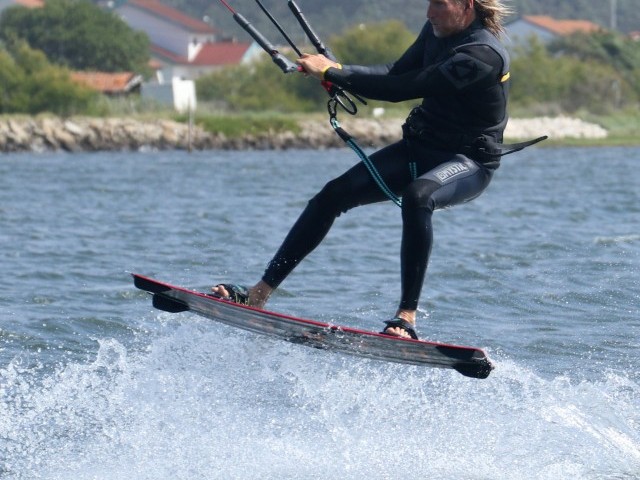
Stomping It
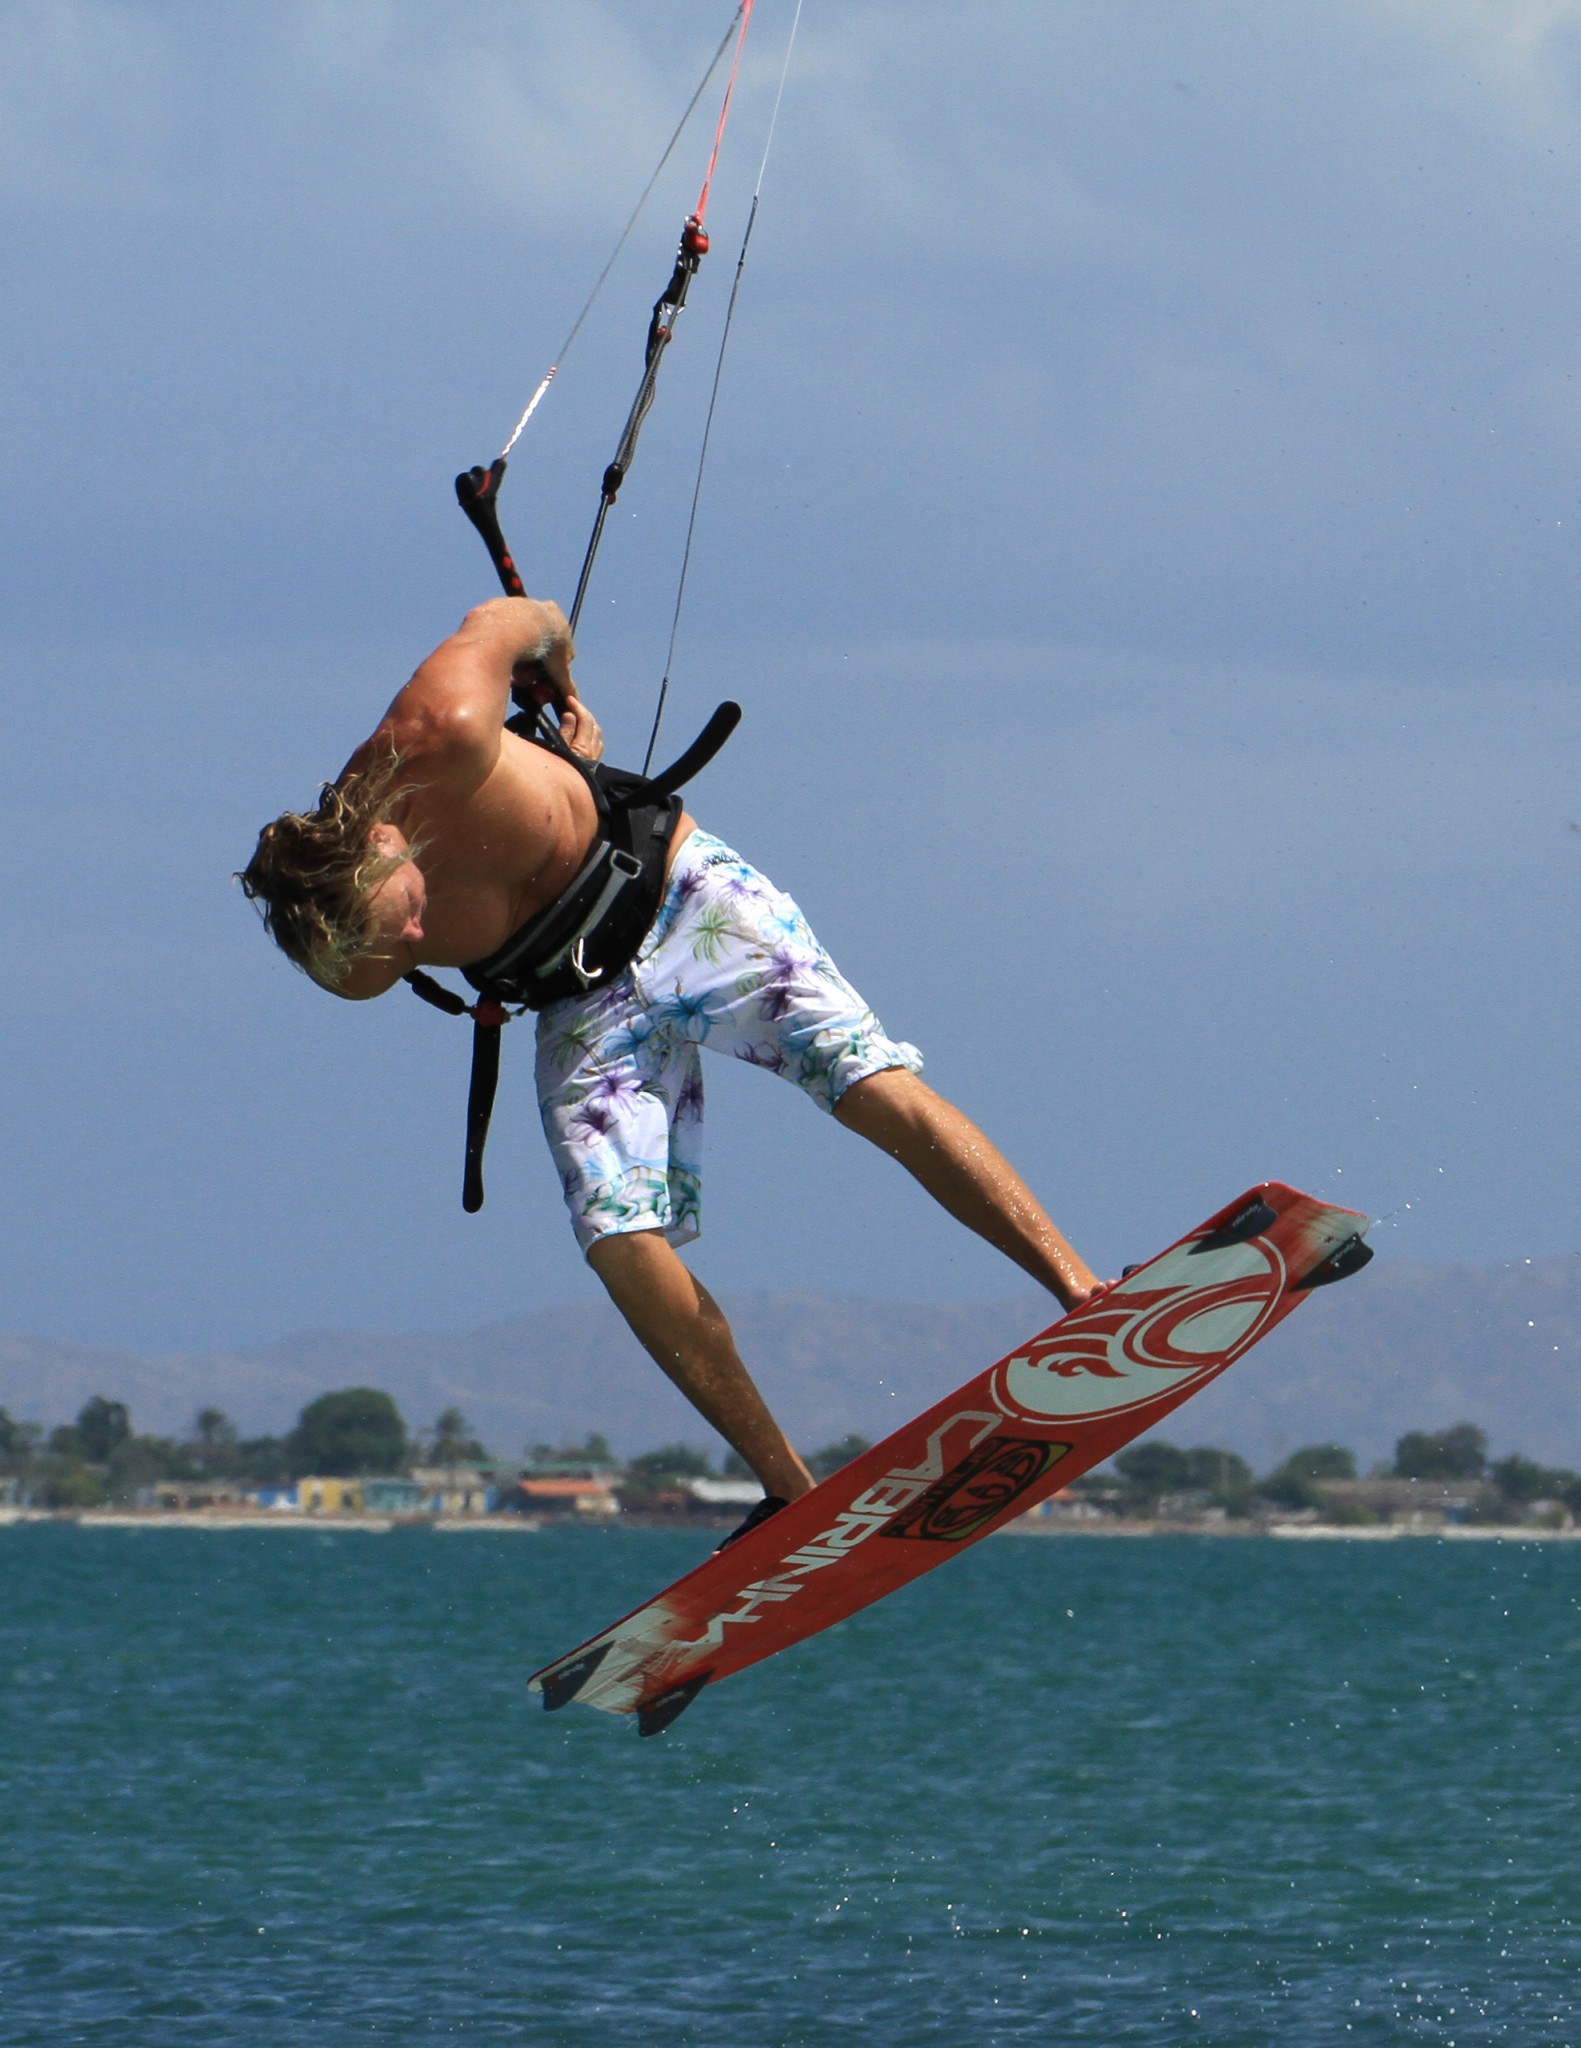
You can see in Pic G that Christian’s front arm is bent. Its all good and well passing the bar with enough height to land, but it won’t mean Jack unless you sail away. A nearly will give you the confidence but a landing lets you claim it as in the bag. By keeping your arm in after passing, the kite will pull you around enough to land comfortably at speed on a flat board. If you let your arm pull out straight the chances are you just won’t turn enough and you’ll get pulled over the nose of the board when you land. This can be the most frustrating part to conquer. After you pass try and bend your arm from your elbow so that you hand comes towards your shoulder rather than pull your hand in towards you.
Top Tips
Once you’ve obsessed about back loops with a slow rotation and are ready to go for the pass, really try and visualise the movement of one slow back loop followed by a second very quick off axis rotation. As Walt Disney said, “if you can dream it you can do it”.
If you have a tendency to lift the kite as you go to pass try pushing down on the bar as you turn you head down. With the bar twisting down towards the water this pressure will stop the kite from moving.
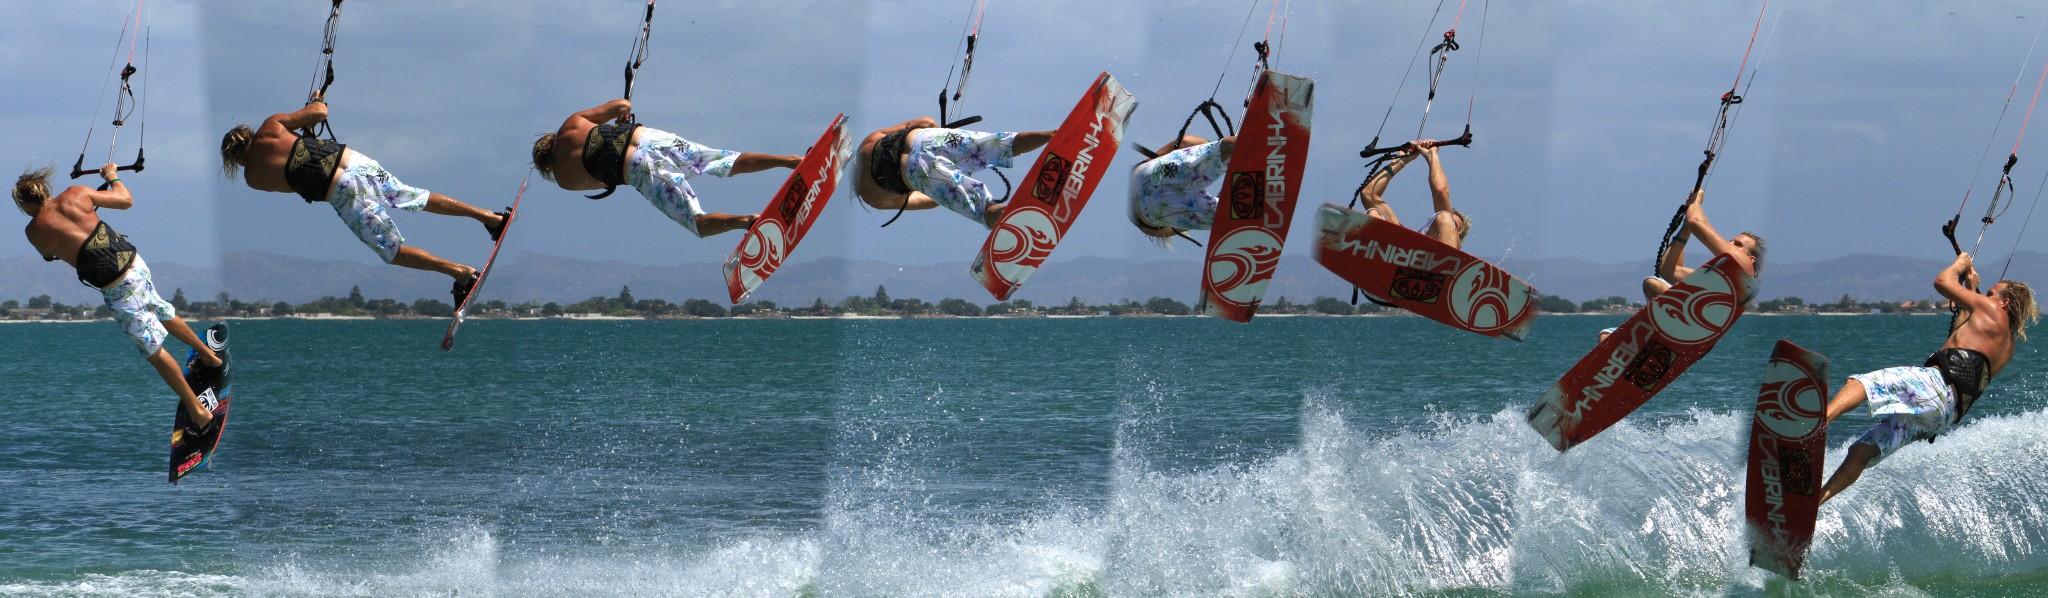
Following Sequence 2
- Pic 1. With his kite around 11 o’clock and weight well back over the tail of the board Christian carves hard into wind with his hips and shoulders and explodes up off his back leg into a slow back loop.
- Pic 2. Leaving the water Christian keeps his arms bent, his hands in close and looks forward.
- Pic 3. As he rotates Christian brings his knees up.
- Pic 4. Three quarters the way around his back loop Christian must realise that the time to use his head is approaching.
- Pic 5. As he completes his back loop he throws his head down and around towards the water to initiate his pass, but holds onto the bar with two hands, twisting it around with him so that he can roll his hips up to the bar.
- Pic 6. As his hips rise and meet his arms, Christian releases the bar with his front hand.
- Pic 7. Christian swings his free arm around in front of his waist and continues to twist the bar around behind his back.
- Pic 8. And reaches back around behind his harness.
- Pic 9. Christian rotates around his back arm until he can grab the bar with his front hand.
- Pic 10. Once he’s grabbed it Christian releases his back hand.
- Pic 11. As he drops Christian lifts his head to keep his weight over the board.
- Pic 12. And he lifts his left hand towards his shoulder to stop his arm from extending and pulling him off balance.
- Pic 13. Christian lands over a flat board, reaches around to grab the bar and sails off happy as a pig in …..
Common Problems
Your kite drifts up fast as you try and bring your hips up. This is most likely caused by you trying to pull the bar down to your hips rather than bring your hips up to the bar. Try to hold the bar with both hands and use the movement of your head and shoulders dropping to pivot your hips up.

That said splitting the fingers of your back hand over the centre line will help to keep the kite from moving up as you go to pass. And if you feel you must pull the bar in make a conscious effort to steer the kite down with the front hand as you pull.
You land on your board still moving, but you didn’t manage to grab the bar. This is a classic for riders getting into the mobe.
The reason for this is likely to be that you are trying to throw a double rotation, rather than control a back loop and then pass. As a result you are spinning on a more vertical axis, your hips won’t roll up and you have no chance to get near the bar. If this is happening to you, go back to the slow back loop and try to separate the two rotations.
You always pass, land and then fall. This was a personal favourite and has everything to do with not holding the bar in once you’ve passed it. If you arm just extends like rubber you’ll get pulled off balance as the board brakes on impact. By keeping the hand nearer to you with tension on your front arm you and the board will move forward on touch down.
Keystones
- Carve hard with weight back to initiate back loop
- Look forward for a slow rotation
- Head and shoulders at end of first rotation
- Hold on with both hands until hips up
- Hold on with back hand until you grab the bar

This technique article was in Issue 27 of IKSURFMAG.
Related
By Christian and Karine
Christian and Karine have been working together as a coaching team, running improver to advanced kitesurfing clinics since 2003.
