
Barefoot Water Ski
Technique / Advanced


Introduction
It’s not that long ago that the Jesus walk was the Don of support moves, but now the stage light and emphasis certainly shines bright on the art of barefooting under your kite. Back in the day slalom skiers turned their noses up at the barefoot brigade, please don’t deny it, but who is laughing now eh:) Once you have this nailed and can get some distance, it really is one of the most striking moves. Unsurprisingly we’ve called Heliarde in to demonstrate this, and believe us when we say that watching him do the length of the lagoon, high tide behind the trees of an evening, is indeed a sight for sore eyes. Here however, he’ll show us a more “moderate” ski. As well as good kite skills, your board off, using either the toe edge or handle is an absolute must. Thus, if you qualify for the slow to put your socks on in the morning club, this will require some practice and perhaps even some aggressive stretching! Let’s see how it’s done...
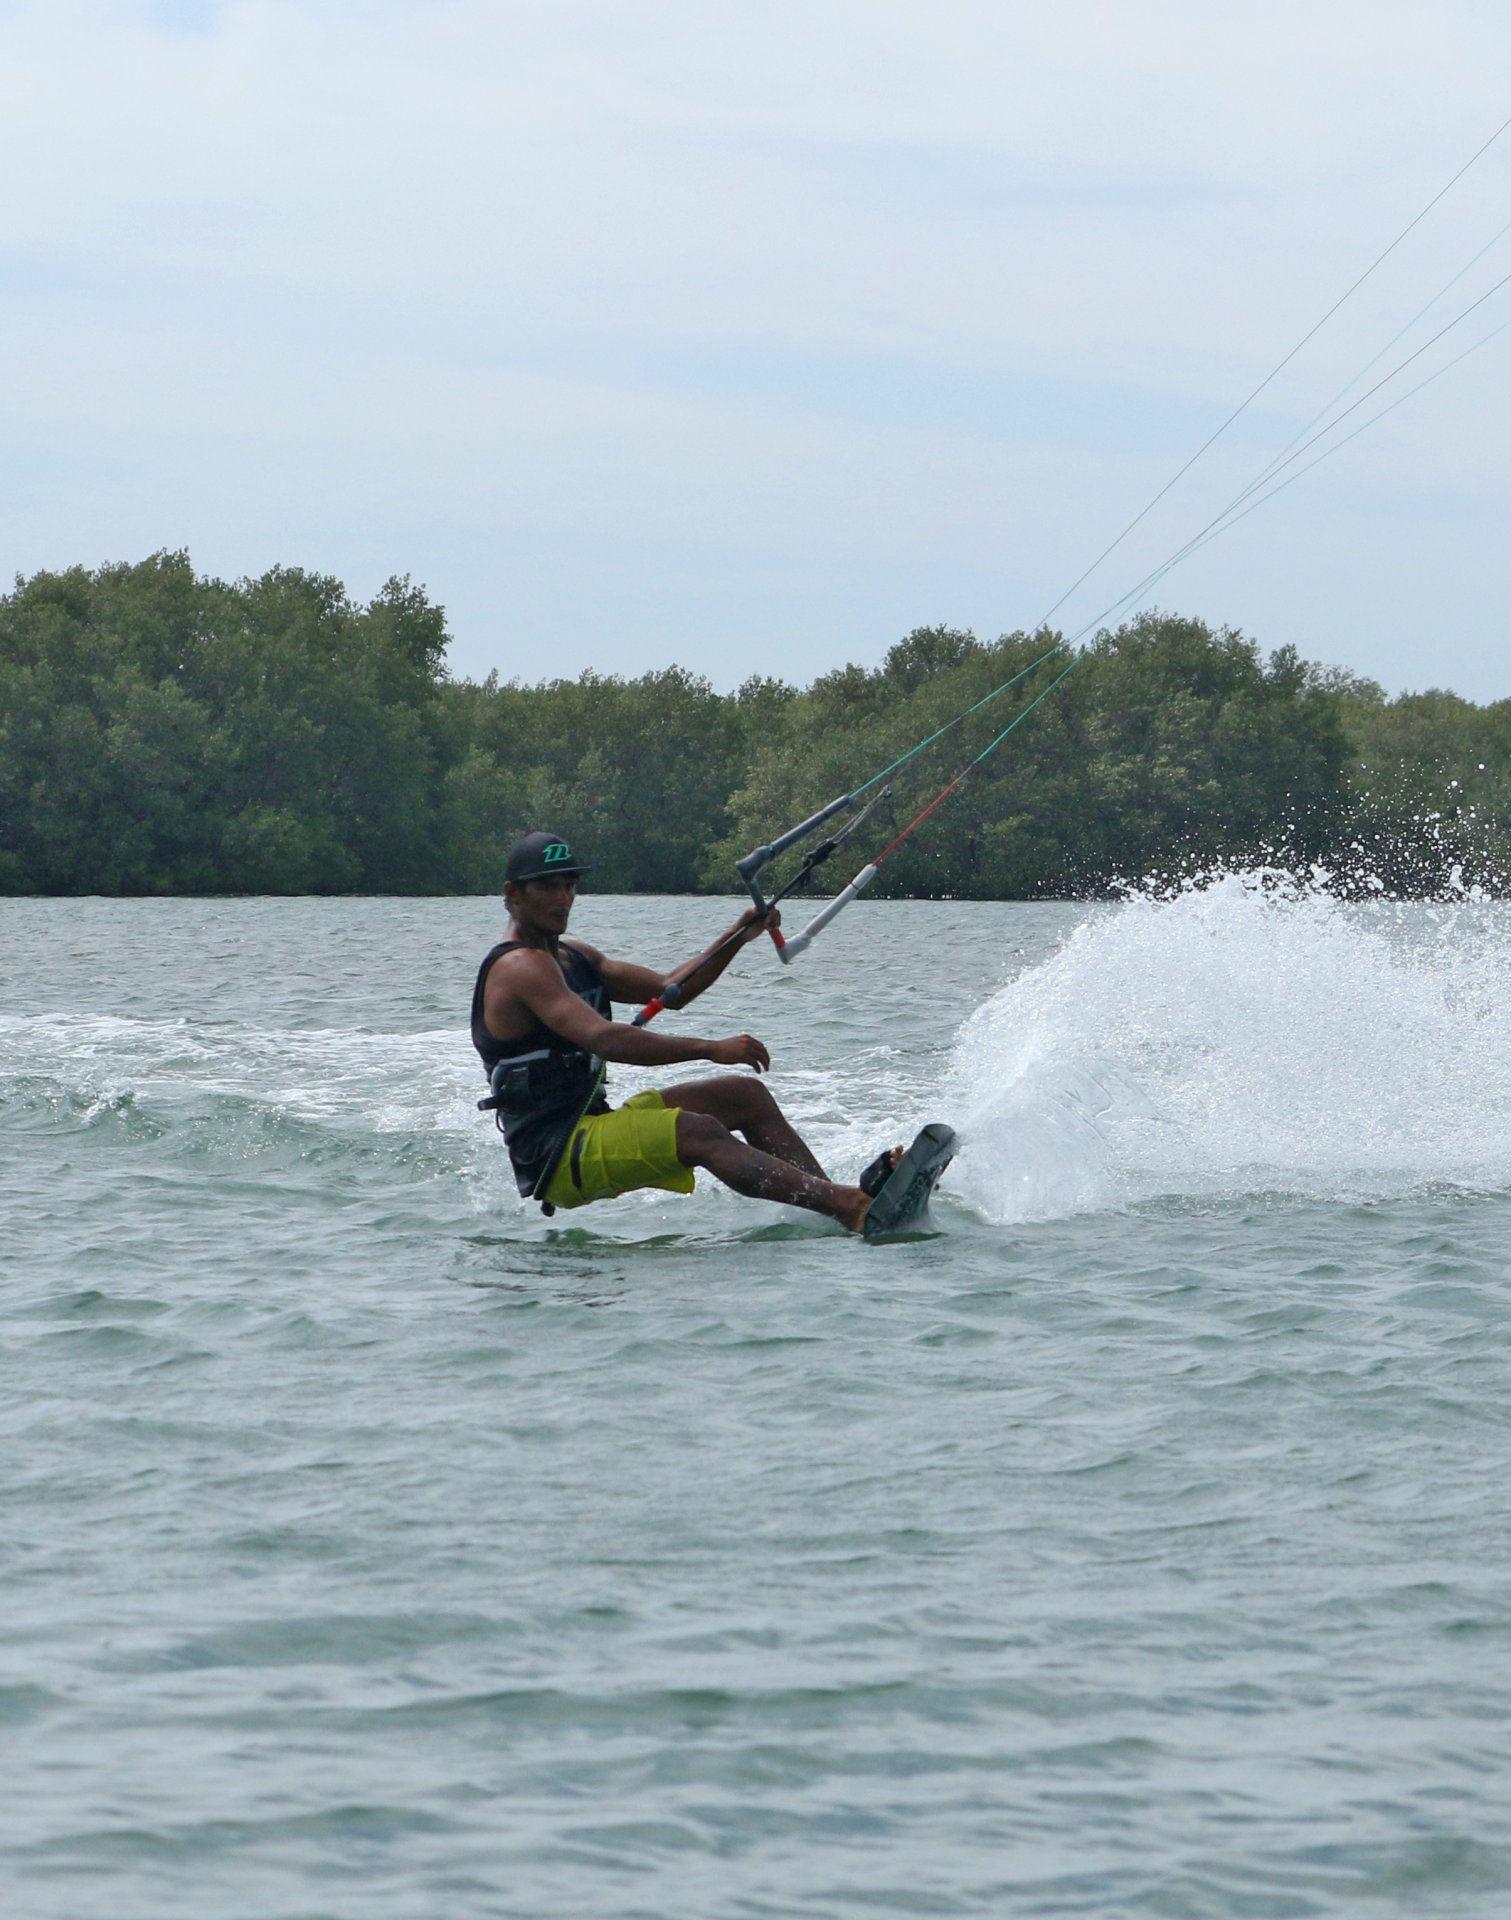
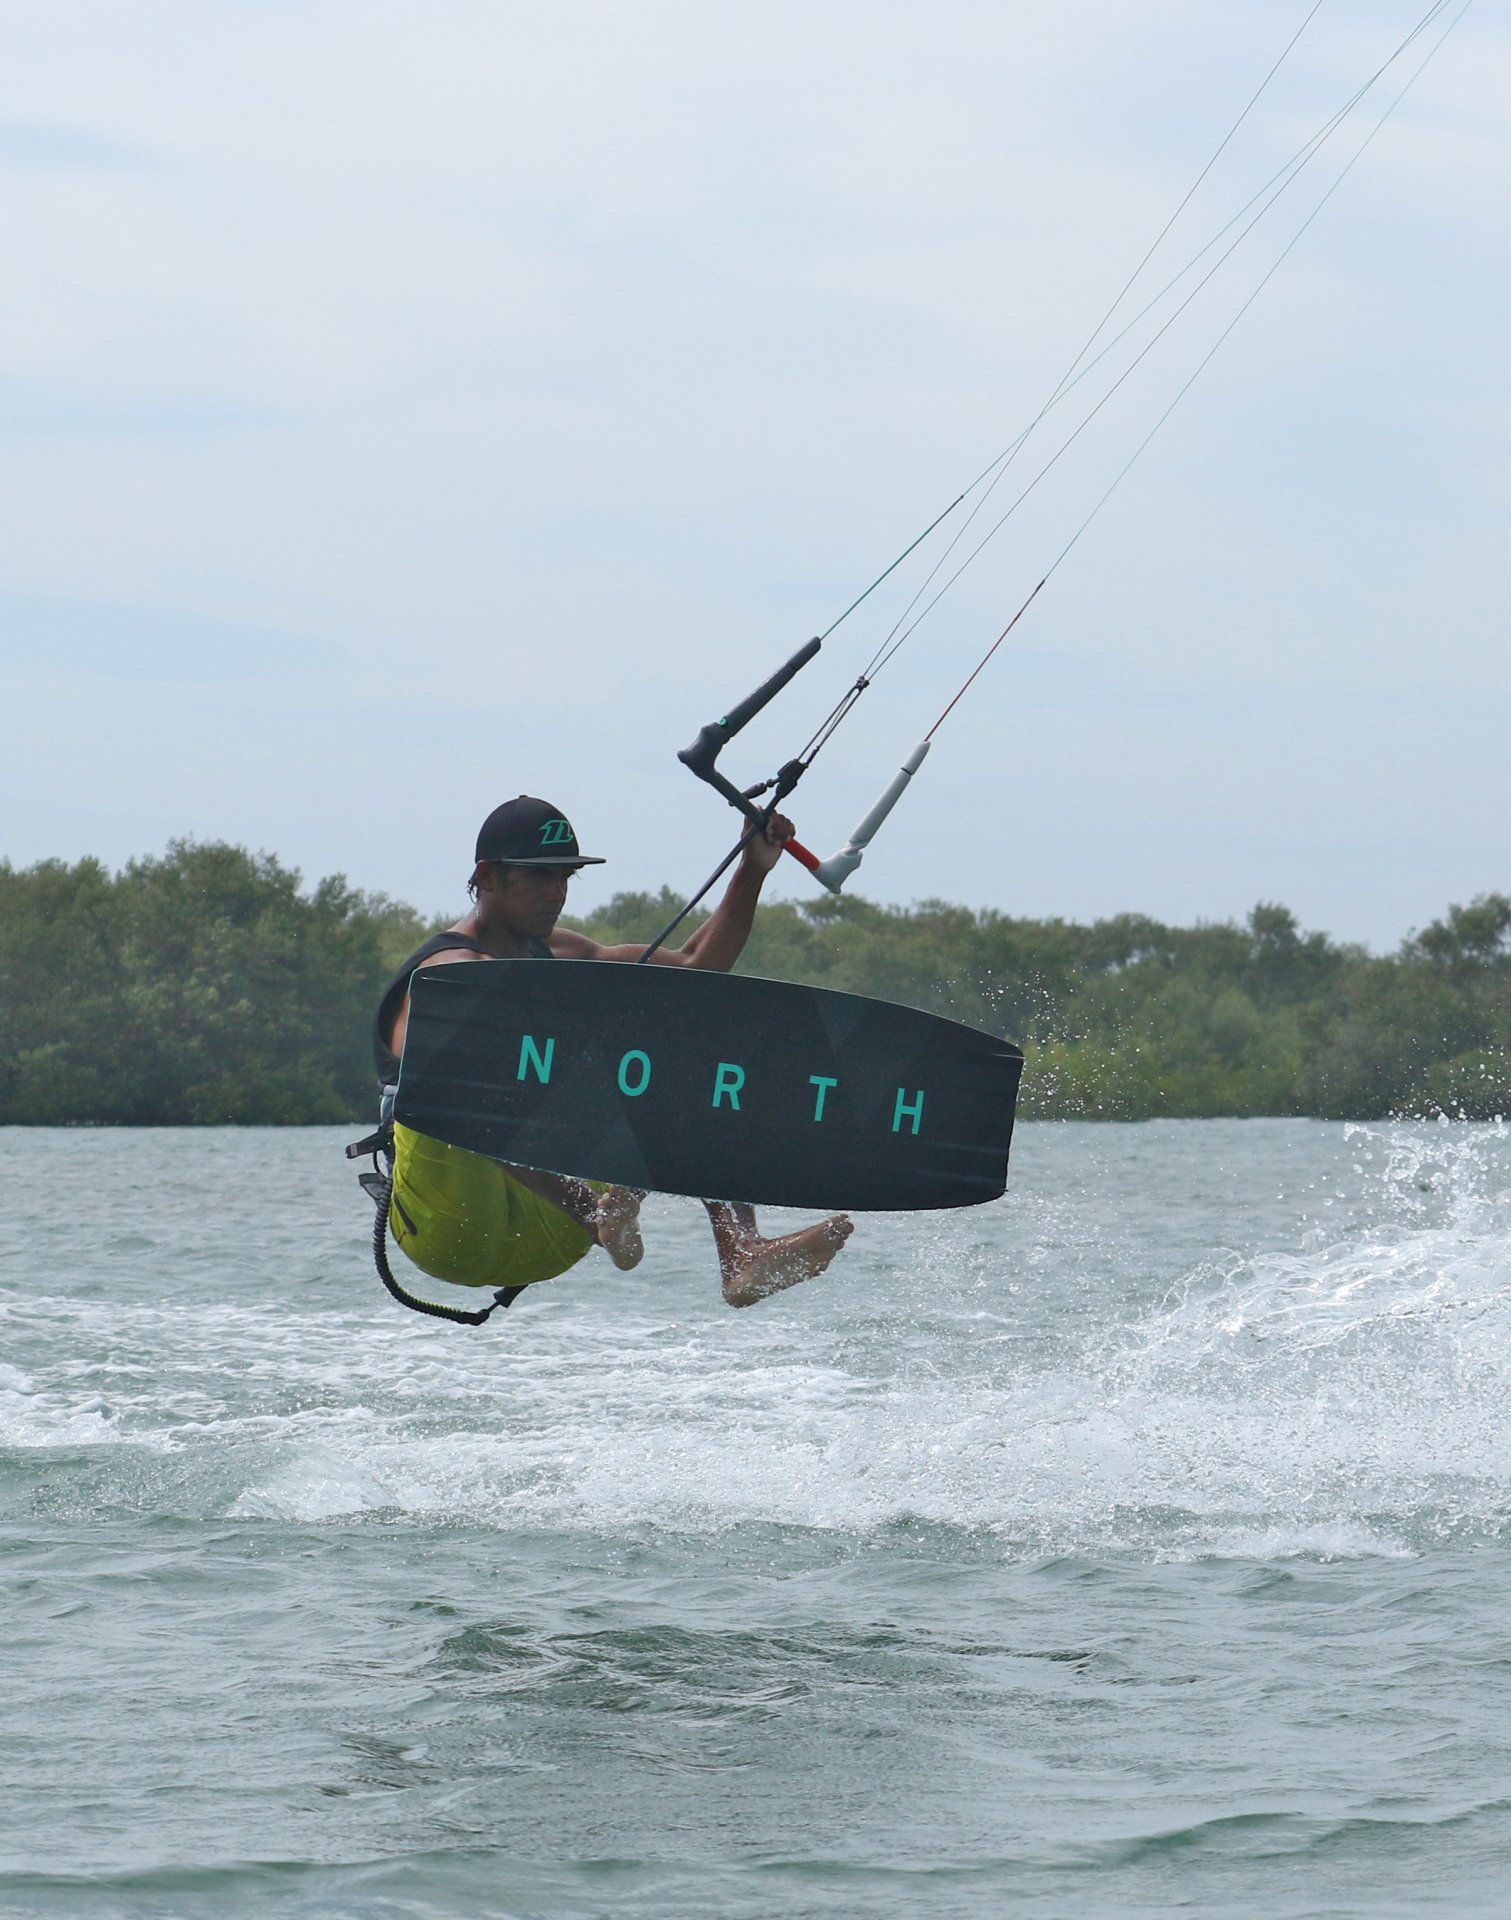
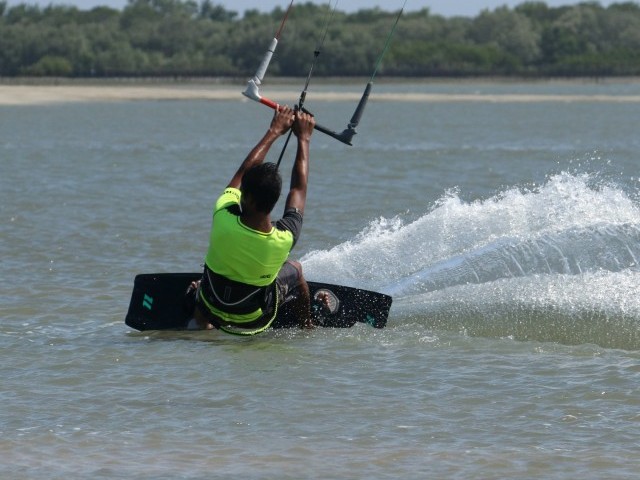
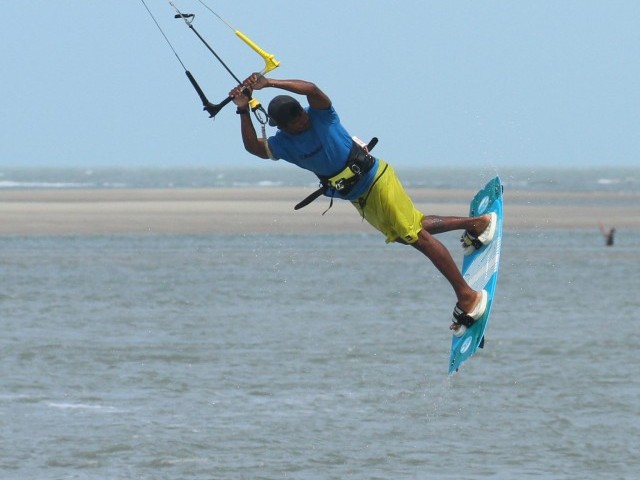
The Set Up Pic A.
Admittedly you may have a kite to help, but if you really want to tickle your feet and barefoot across the pond, you’re going to need some speed. Speed combined with line tension will give you lift, support, control and enable you to both ski and finish off with style. Being a support move it goes without saying that this will be considerably easier to learn on a larger. Looking at Heliarde, the most important points here are the fact that his kite is relatively low on approach and he’s hacking in on a monstrous edge. This combo is tension Nirvana. His kite starts below 1 o’clock, and Heliarde is edging on a decent upwind course, weight on both feet, so no carving, his sweet spot is trimmed out, back hand centred on the bar and he’s got his posterior close to the water. In short, he’s ready. From here it’s about generating some lift and forward pull. Look at Heliarde’s bar and you can see that he’s given it a decent sending, not exactly a drift. However sharp and positive it may be, it’s also very short – just a quick “up you go” so that you can move onto the next bit.


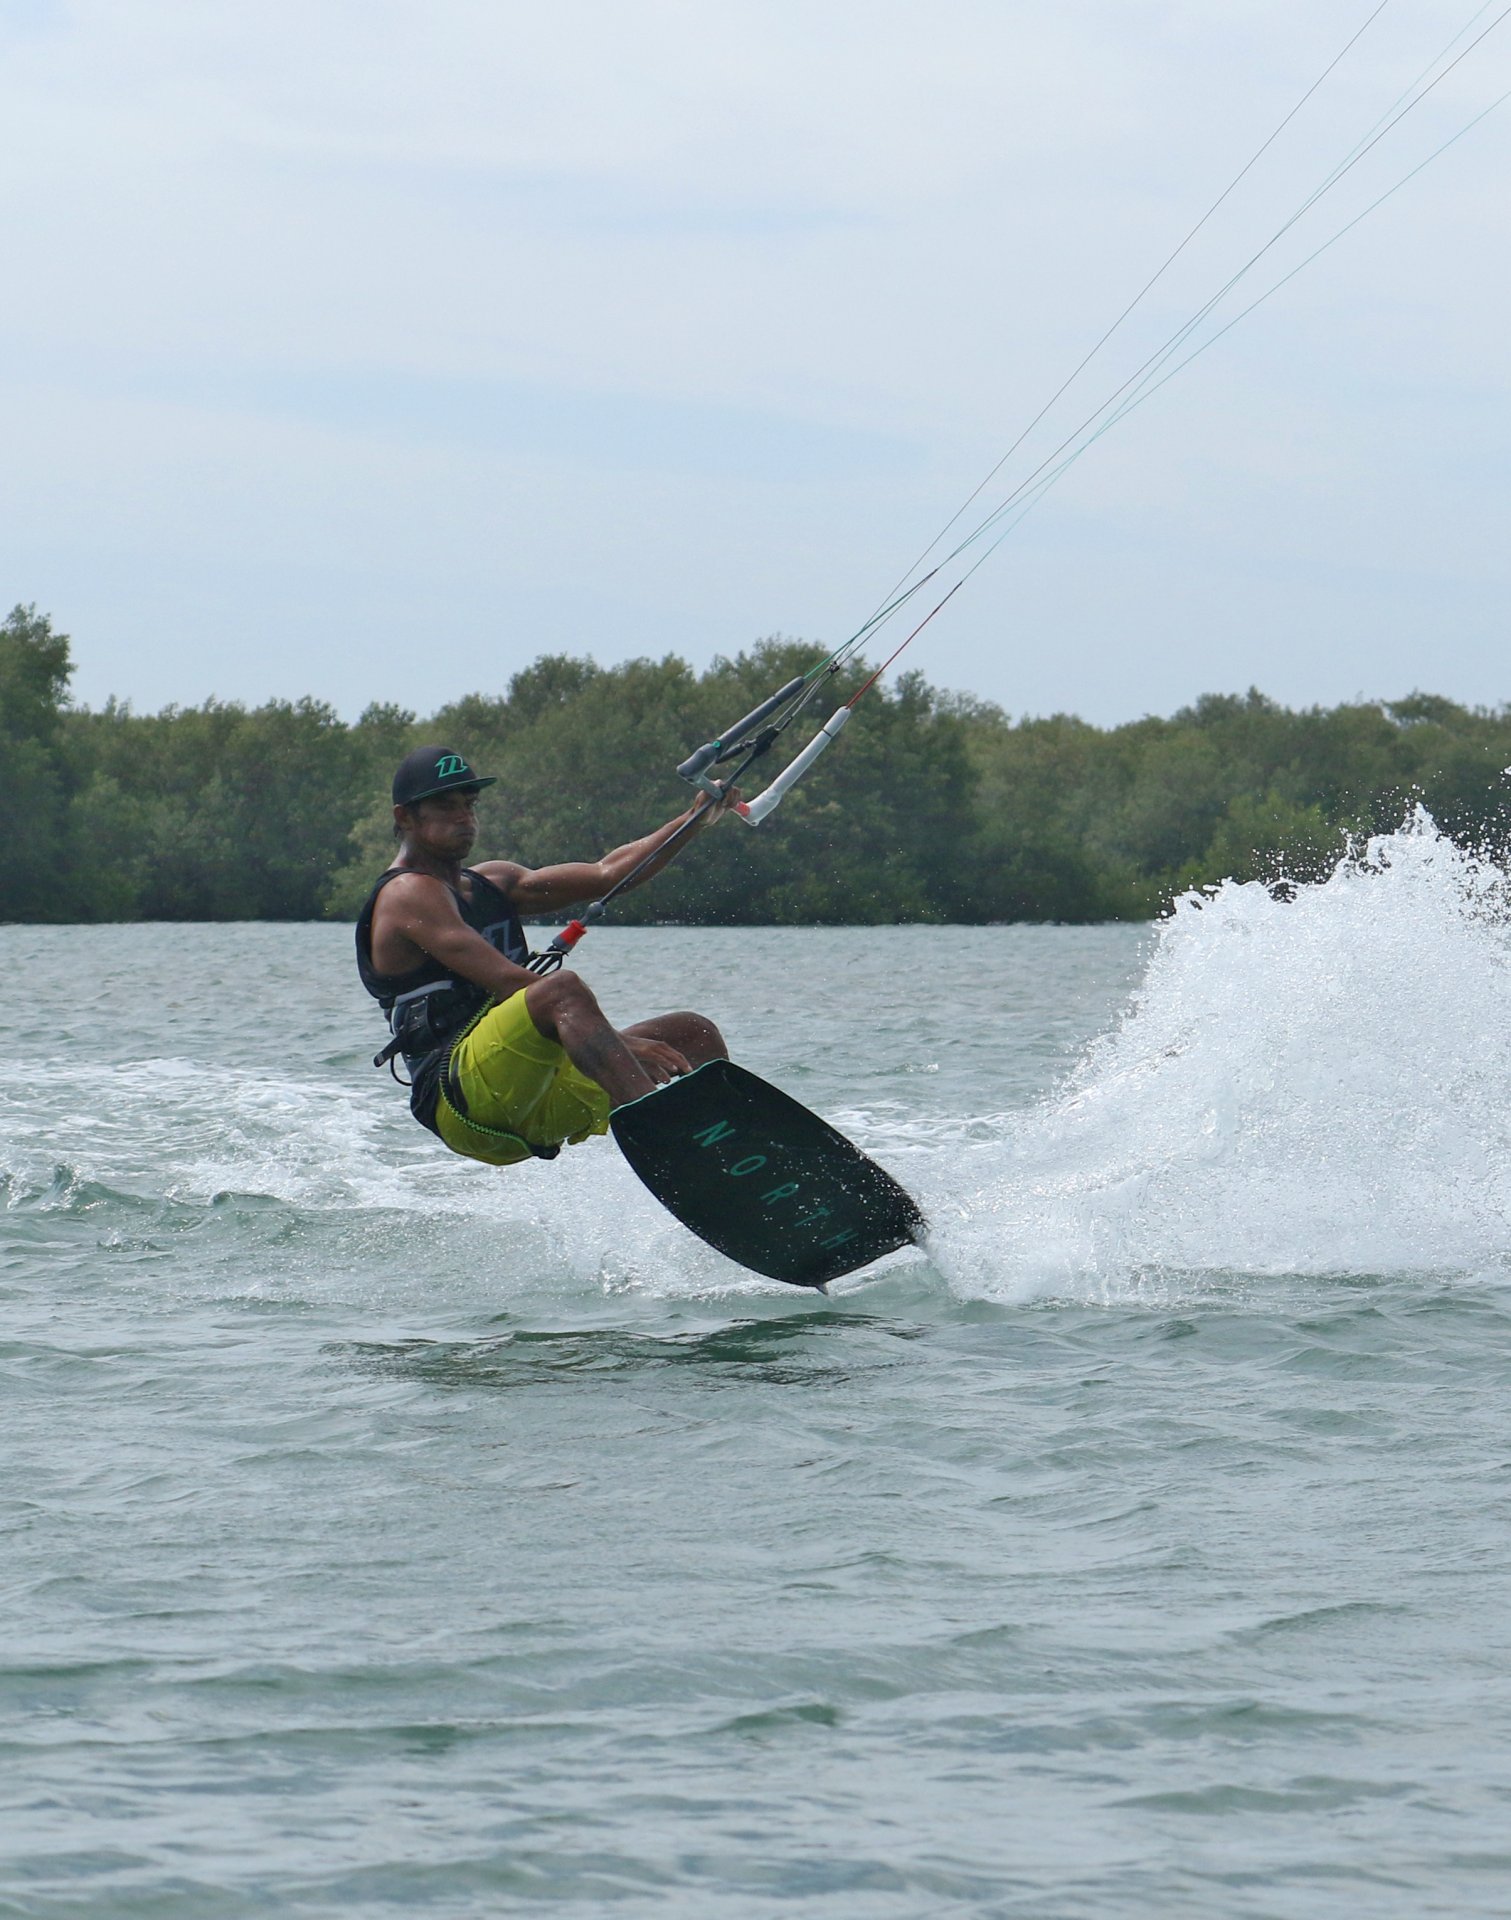
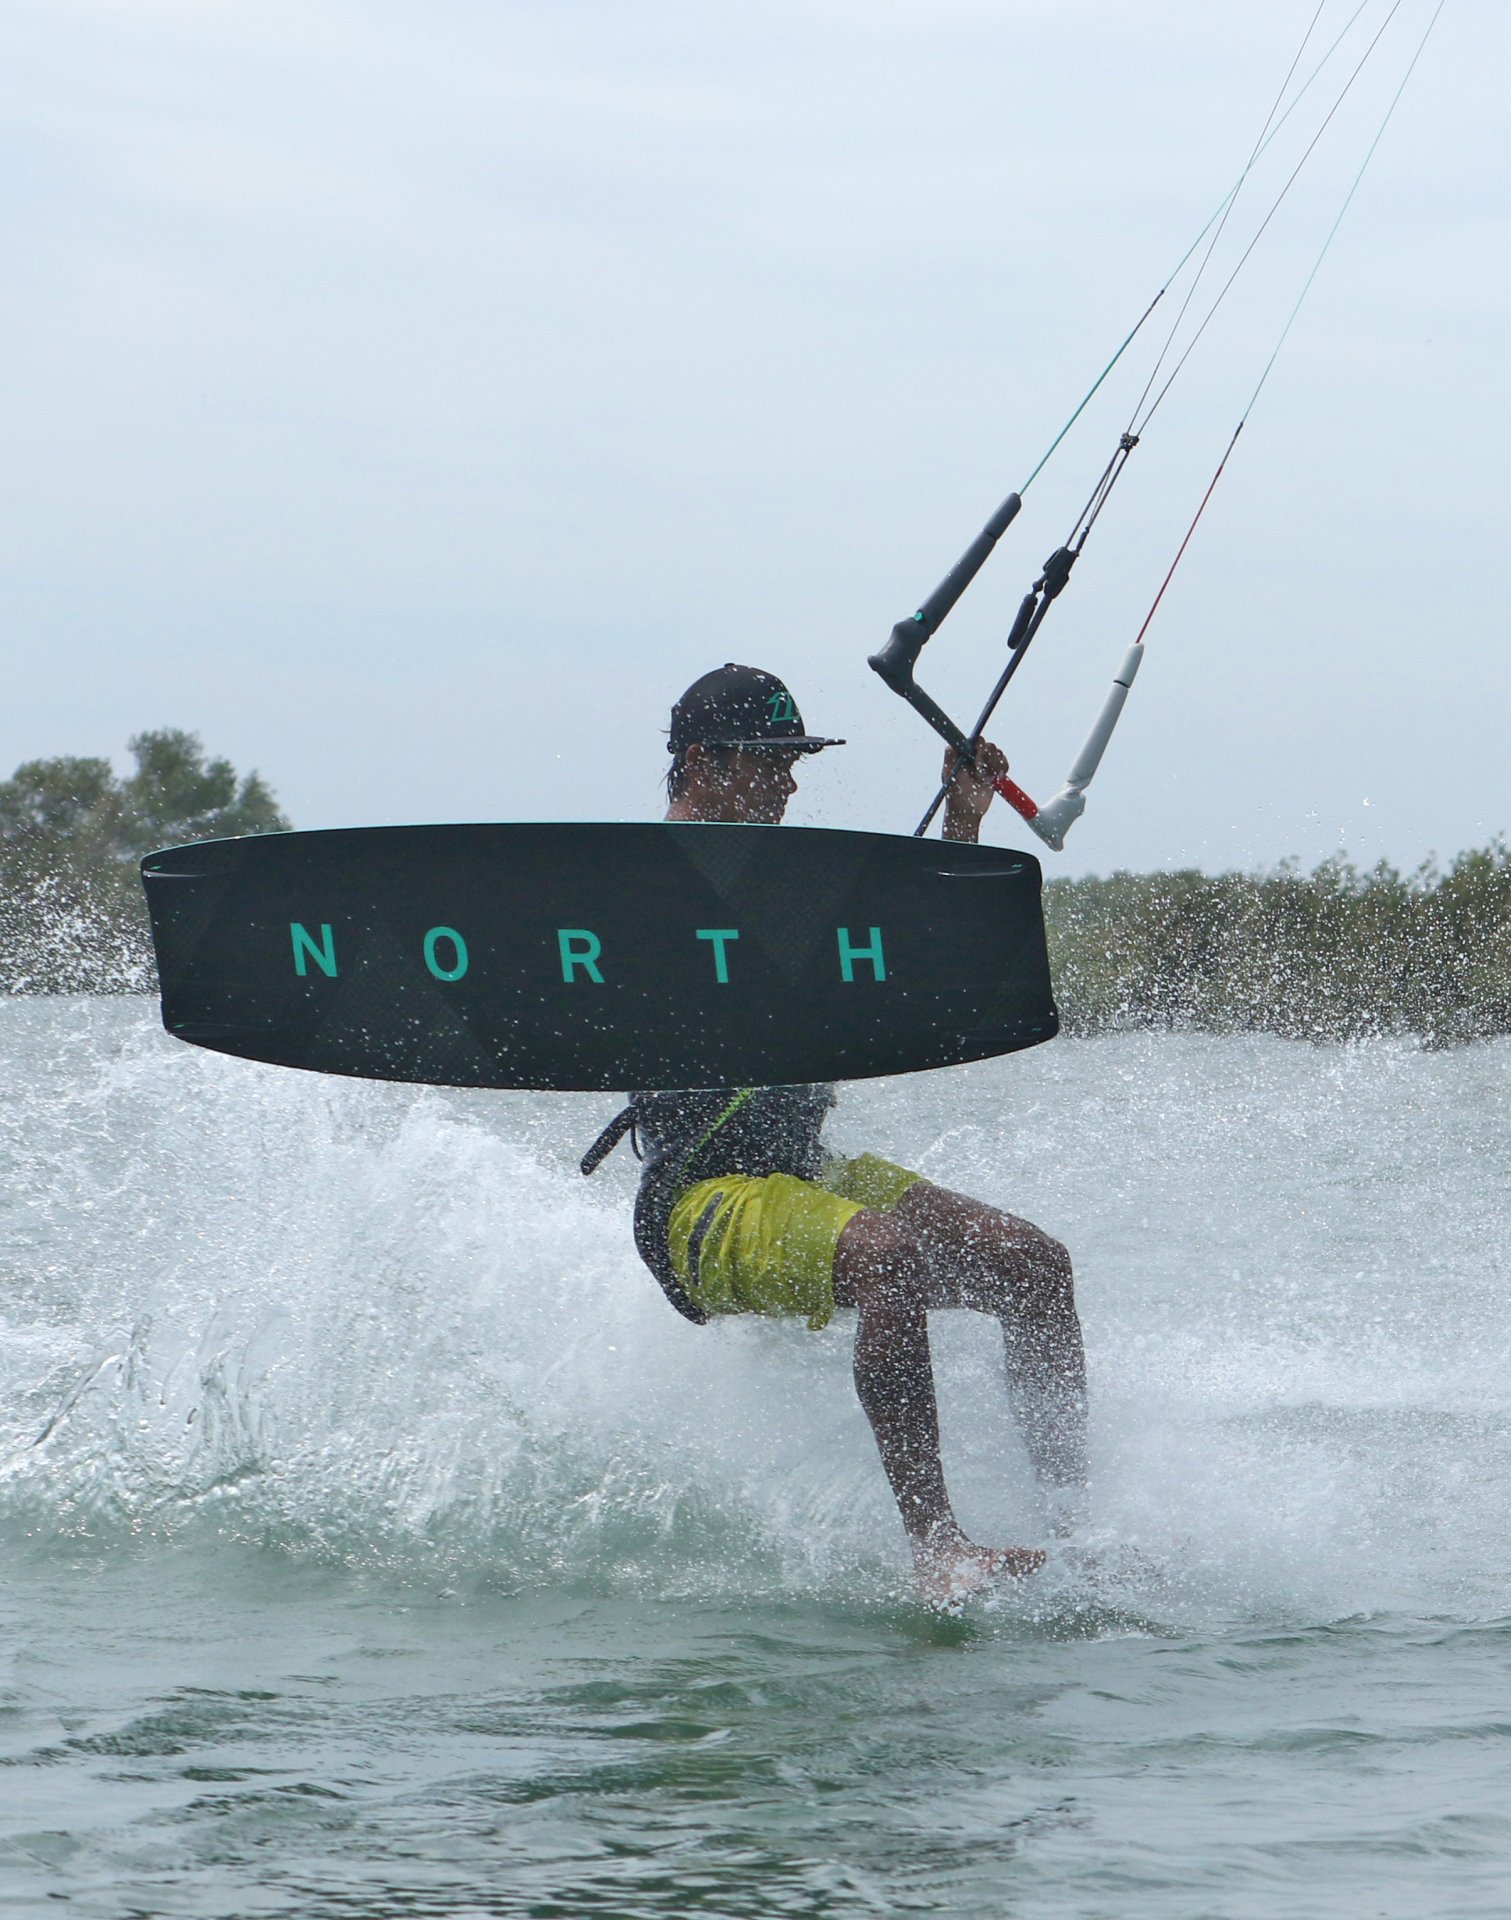
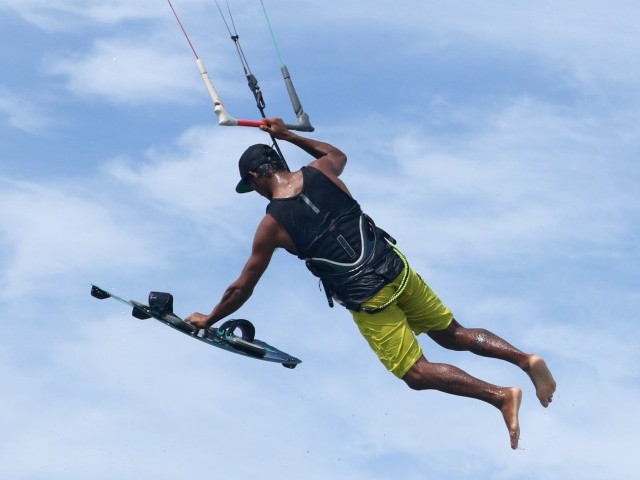
The Low Pop Pic B.
As soon as you’ve asked the kite to move it’s time to get off the water. You’re not waiting for lift, it’ll come and in the meantime you have plenty enough to keep you occupied. If you’re already used to support moves that require the low pop, you’re good. However, should the concept of popping without actually going up seem foreign to you, this bit will be critical. It’s worth noting here that timing is everything, the relationship between kite movement and low pop should be as tight as a the late, great Freddie Mercury’s trousers. Move the kite too slowly and you’ll just pile drive yourself into the water, too quickly and you’ll be lifted away from it. The low pop still requires a sudden carve up into the wind, creating even more tension and momentarily slowing you slightly. The stamp has no extension. A quick kick against the back leg is sufficient, followed by an abrupt lifting of the legs. Here Heliarde has let the bar out and levelled it to stop the kite turning further, even though he’s felt no lift yet. He’s carved the board hard and given a quick kick against his back foot, followed by an immediate lifting of his knees and crunching up. You can see he’s blowing, so there’s still plenty of effort involved. As soon as he’s kicked, he’s already reaching for the handle. By carving to pop you will be moving your hips out in front of the bar, the mirror of a look back when jumping, so you’ll have more room and less in the way to make grabbing the board or handle a fraction easier.
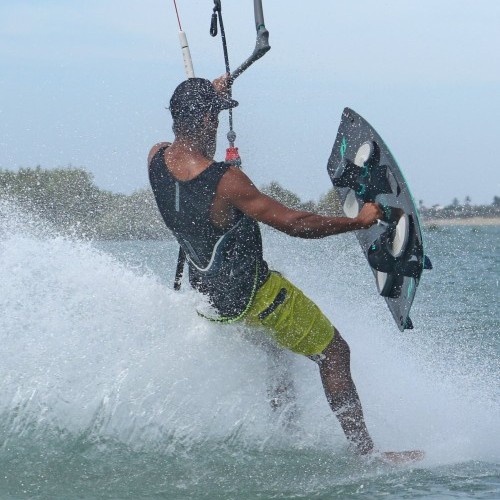
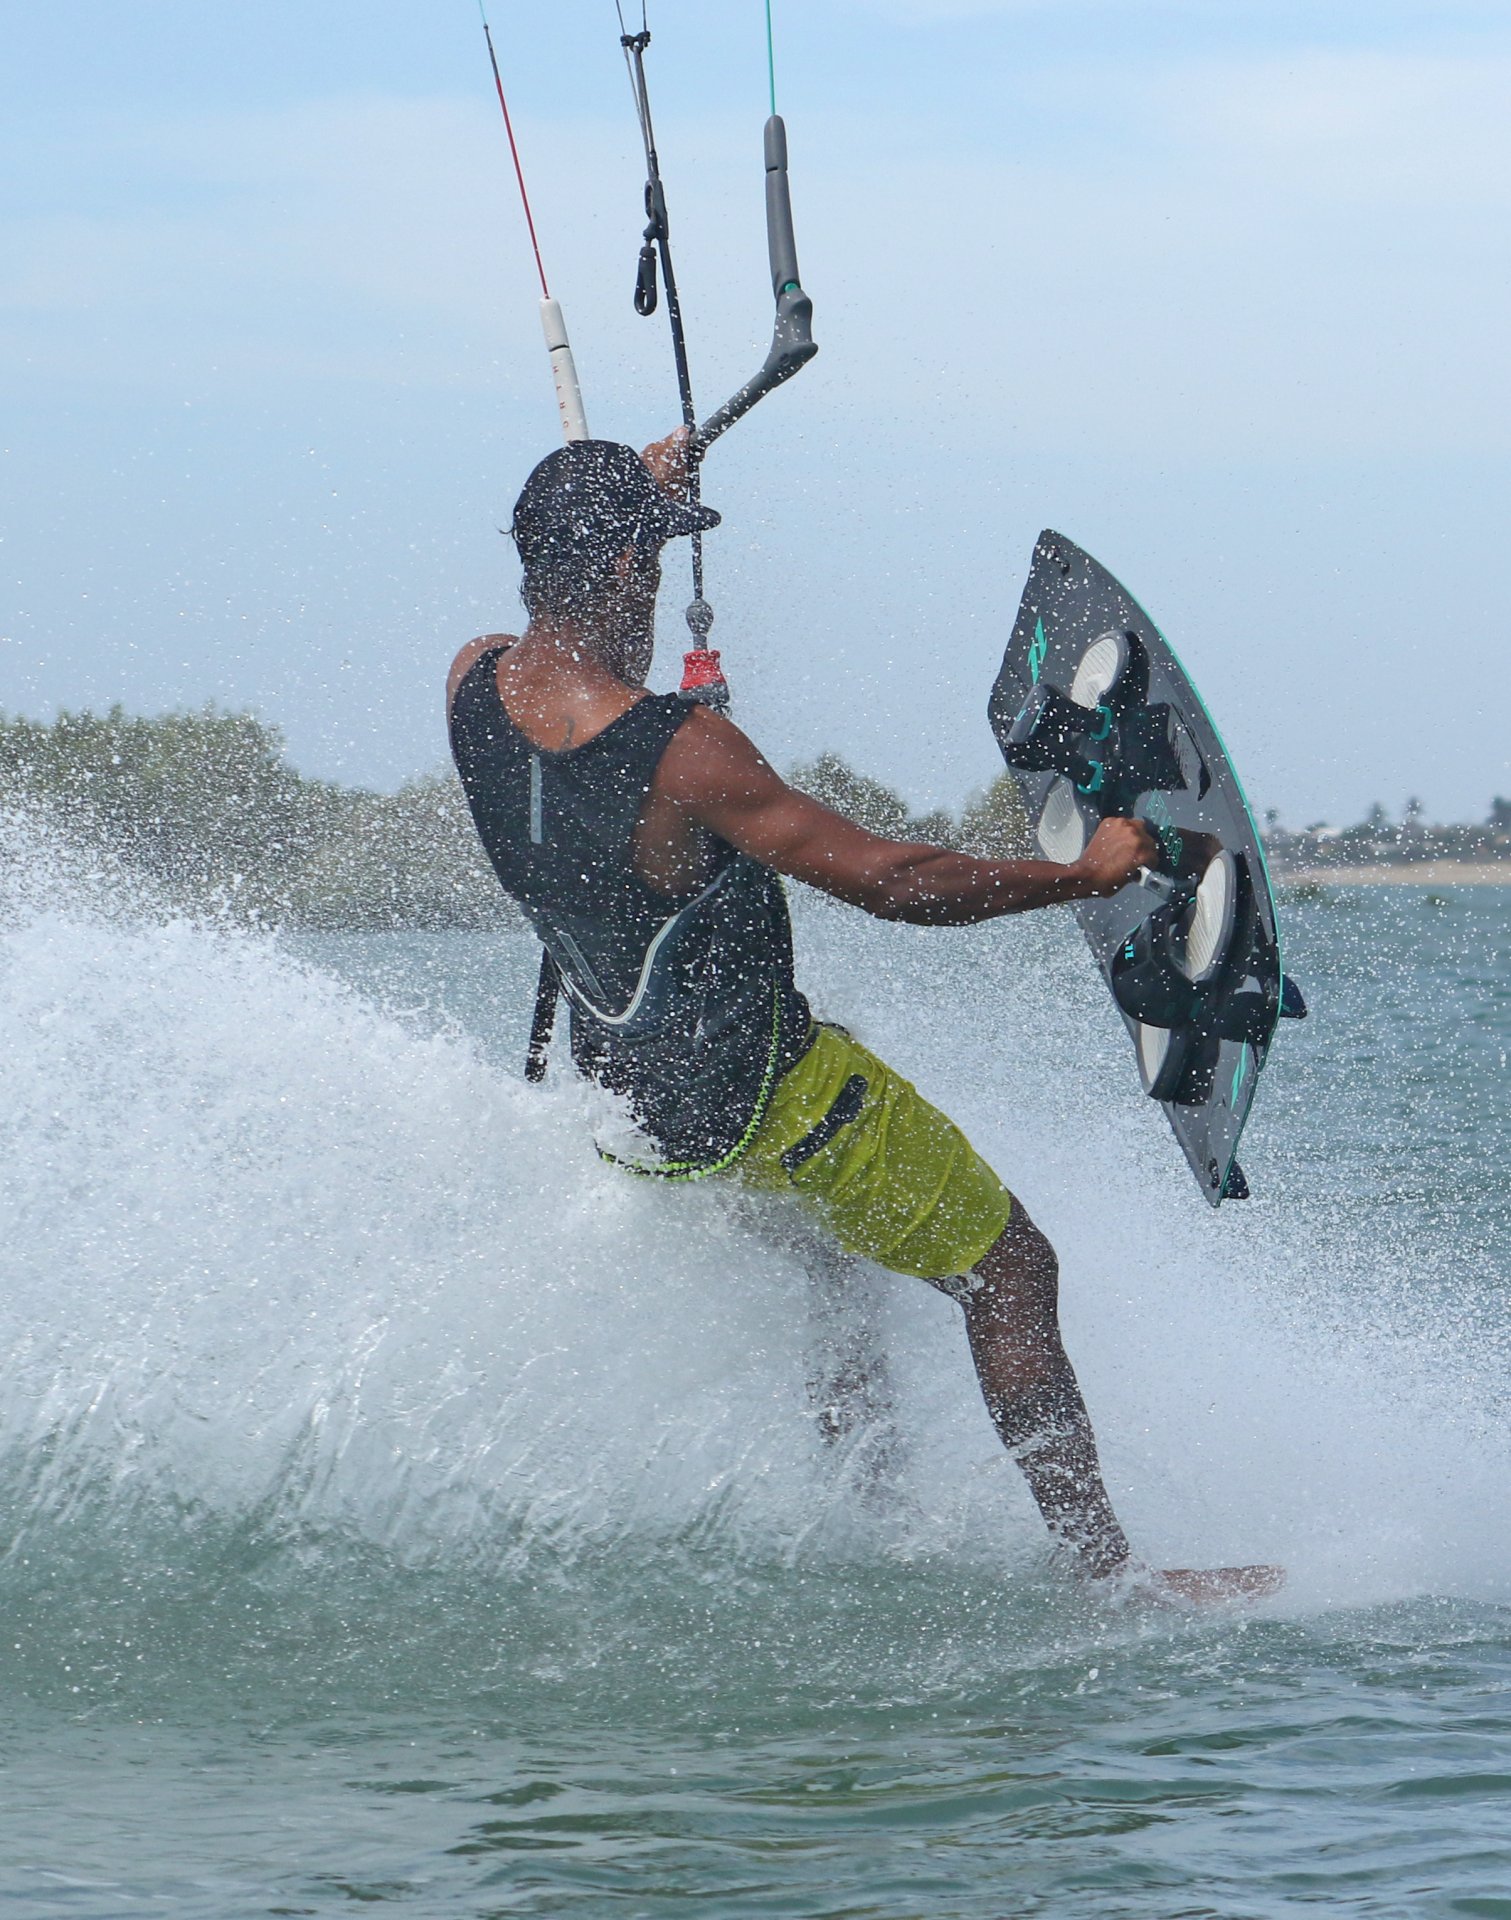
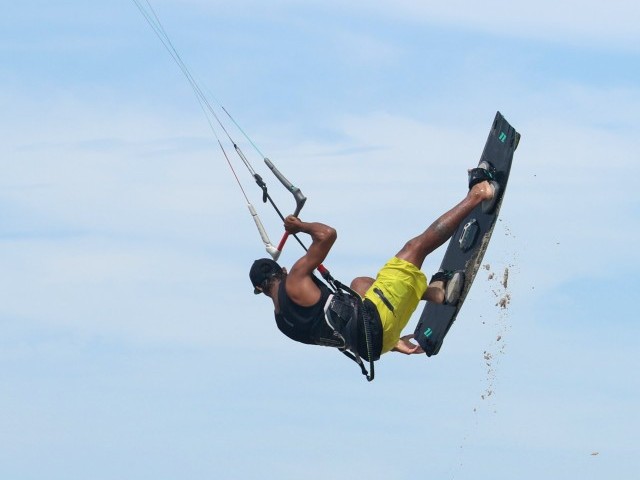
The Bolt of Board Offs Pic C.
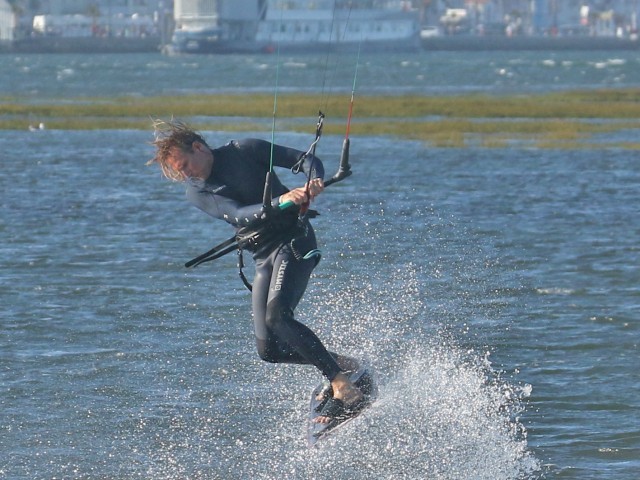
As you can no doubt imagine the time from pop to your re-acquaintance with the wet stuff is limited, so getting your board off asap is essential. You can make this faster, slicker and simpler with a few tricks. Either loosening your foot straps, or at least wiggling your feet out slightly so that they are loose will make it quicker. Lifting your legs with your knees pointing out will give you more room. Making sure that your harness hook isn’t loose will let you crunch over more. And using a handle can make the distance less and the actual manoeuvring of the board simpler. Final tip here is to exhale, as it’ll be less effort to bend and compress as set of empty lungs than manhandle 6 litres of mother nature’s finest cocktail. Use gravity to help, if you can hold the board up and firm, your feet should be willing to slide out. And try not to lean back with your shoulders, as this will just place the board higher and make it even harder to take off. As you can see Heliarde is no slouch. He’s crunched over, has the handle and holds the board firm so that he can slip his feet out in double quick time. Note how his bar is still out and he’s not high off the water.
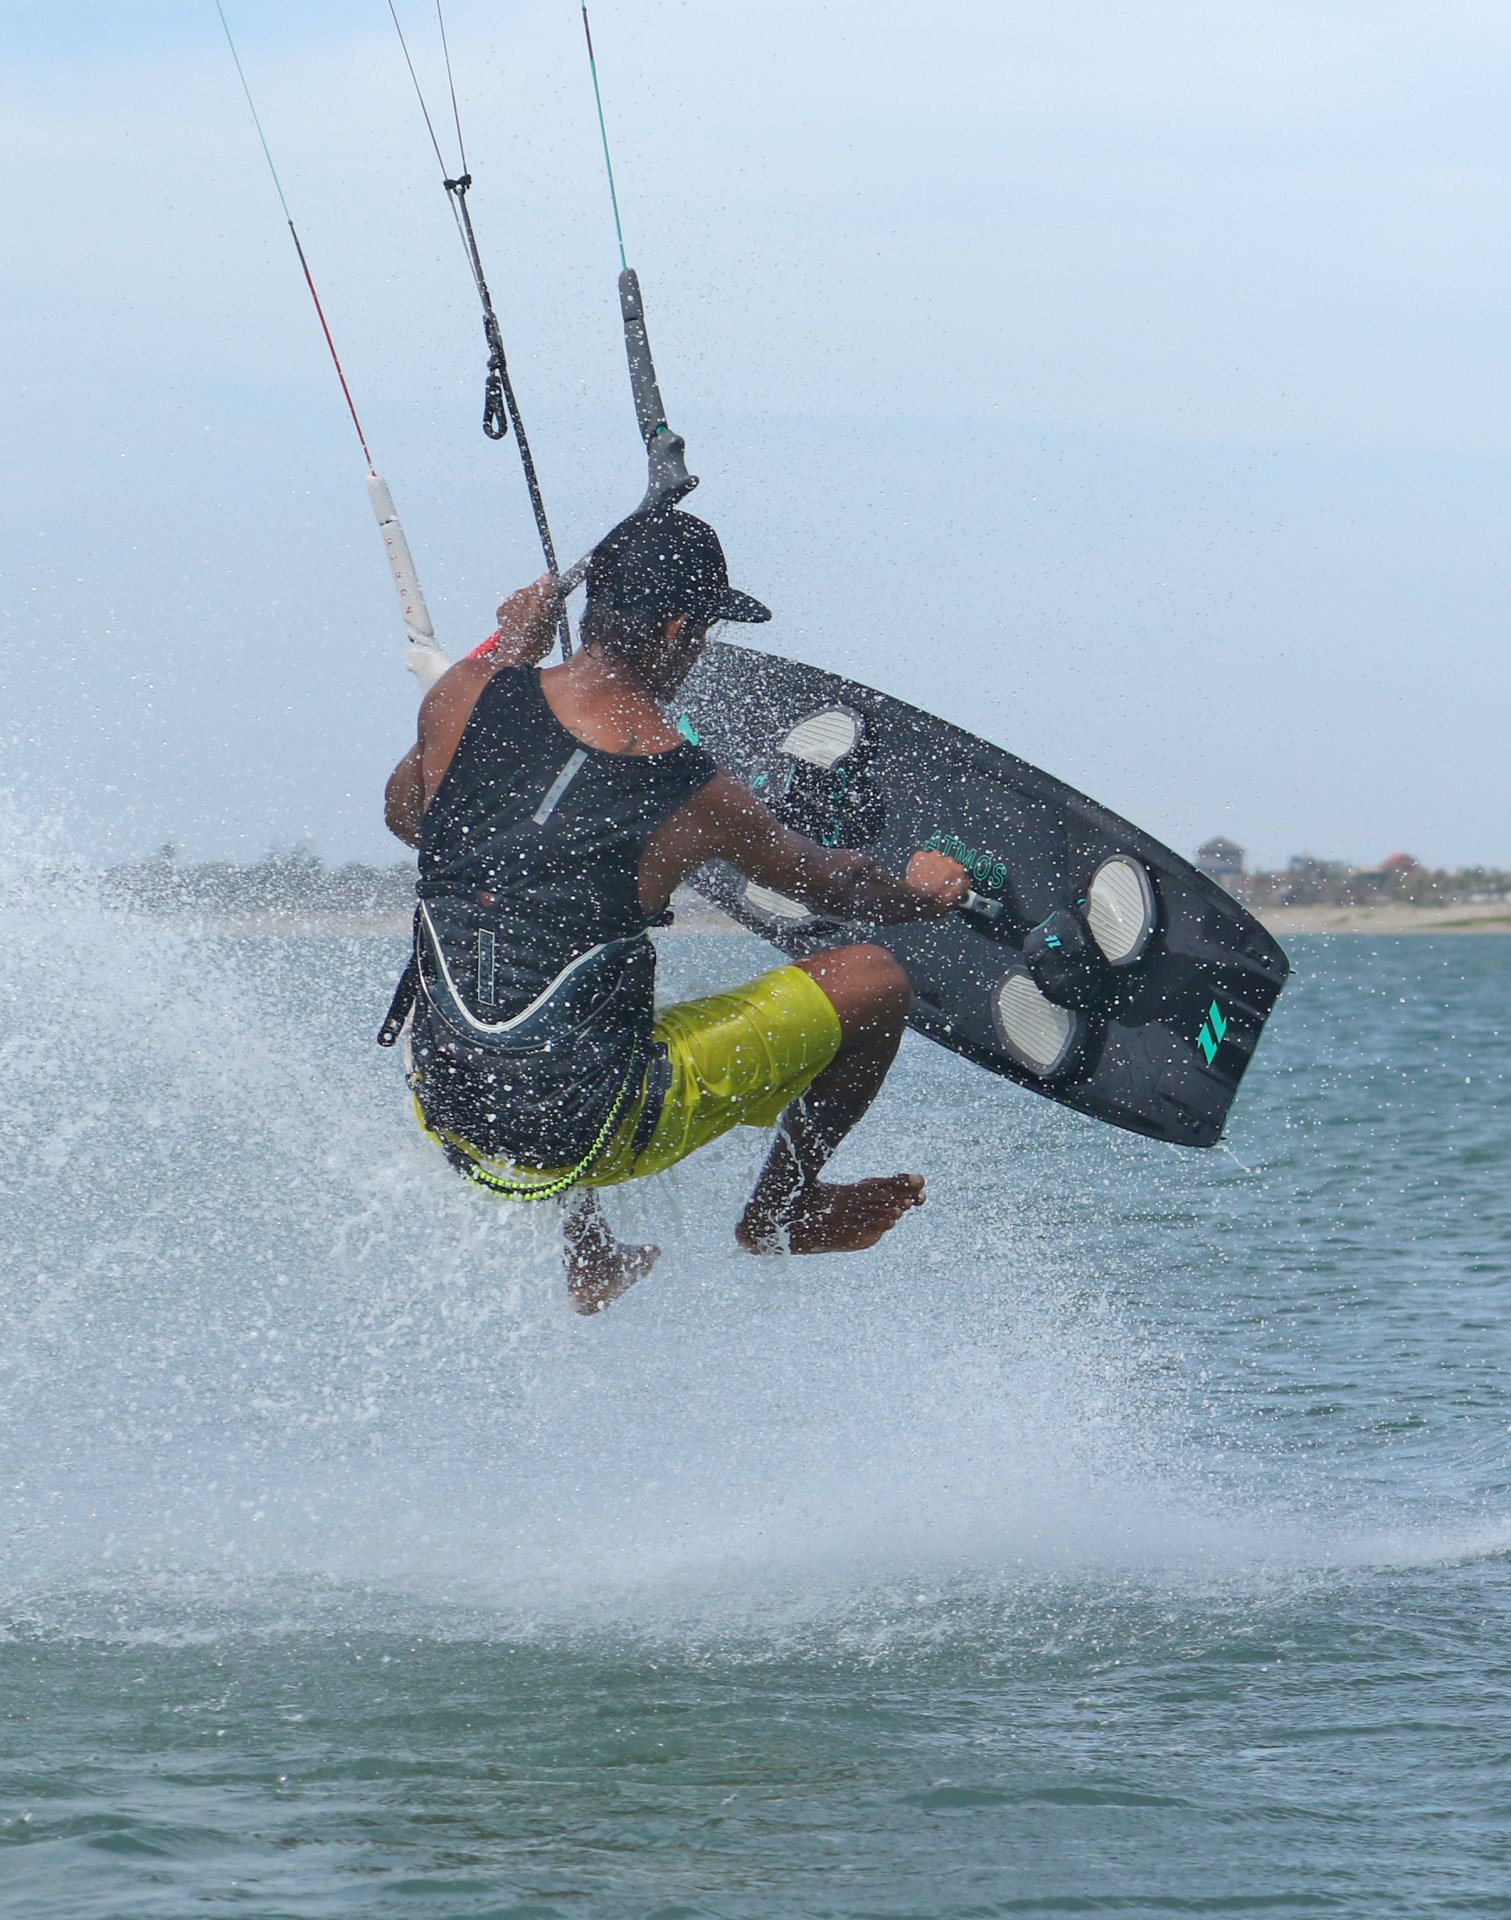
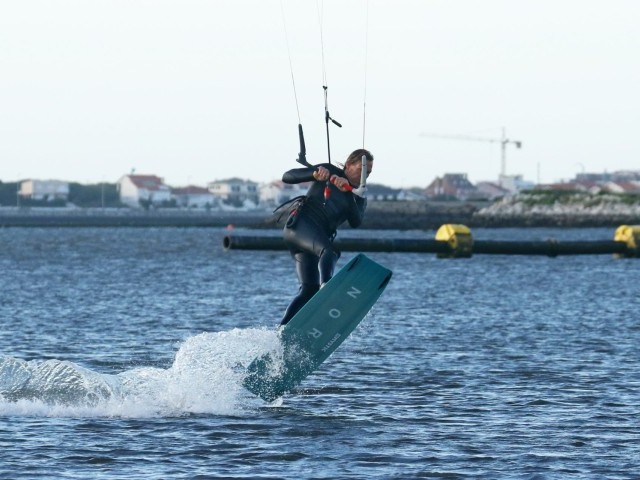
Tickle Time Pic D.
Your first contact with the water should be like meeting the in-laws, discreet, charming but with good intent. Not guns blazing, a few swift sherbets down the hatch, inappropriate jokes, gung-ho mode. You need to lessen the impact with a long term view, lowering yourself onto the water with subtle distinction. Get your toes up and as you feel the water, bend your knees as you squat down, keeping constant light pressure on your feet. At the same time, you now want support, so pull that bar in. Heliarde is casually holding his board up for the camera whilst easing his feet down onto the water and pulling the bar in to load his weight into his harness.
From here on in your aim is to balance support and pressure. You actually need your heels dug in, as this gives you resistance which leads to more lift and support from the kite. However too much and you’ll stop rapidly. All your coordination should be concentrated on your bar and legs. If you feel you’re dropping, pull on the bar and bend your knees. If you’re lifting straighten your legs to maintain contact with the water and feather the bar out so that you don’t lift too much. Without stating the obvious, this bit will take practice, but as long as you use a low pop it’ll be a lot easier. It’s also worth mentioning that you’ll be altering course and need to keep your eyes focused on where you are going. Without your board’s edge you’ll be bearing away onto a broad reach.
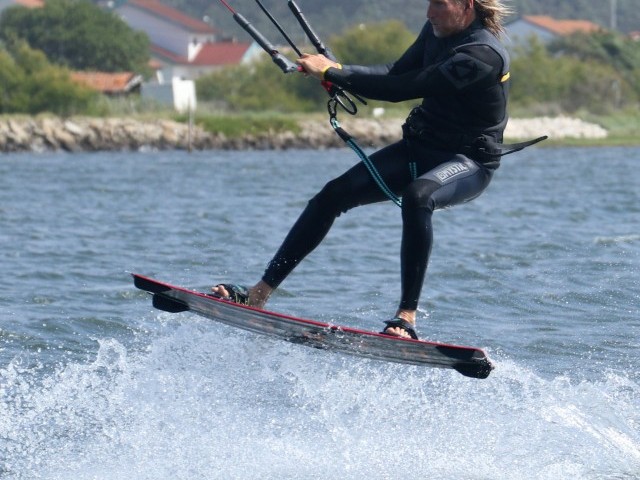
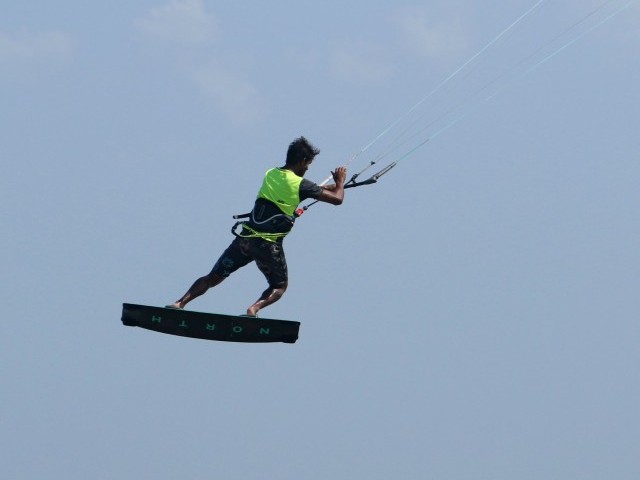
The Finish Line Pic E.
Your kite position will dictate when it’s time to get off the water and lace up your boots. Depending on your resistance to lift ratio (hours on the water), your kite will either be drifting slow across the window or rushing back across it. By anticipating it loosing lift, you’ll have the chance and time to get yourself set for a claim. As you’re getting more and more competent at this you should be skiing well before your kite gets to 12 o’clock. In which case, as soon as you feel the kite pulling from behind it’s an indication that your kite has passed 12 and it’s time to move on. However, don’t just try and get the board on, rather get yourself into a better position. Pull the bar in and allow yourself to be lifted into a standing position. This will give you more height and time to get the board on. Also bring the board back across in front of you, so that it’s in place and ready for you to daintily lower back onto your patiently waiting feet. In the pic you can see that Heliarde is still going at quite some pace (that’s a rooster and half). His kite has drifted across, he’s standing tall and getting the board lined up.

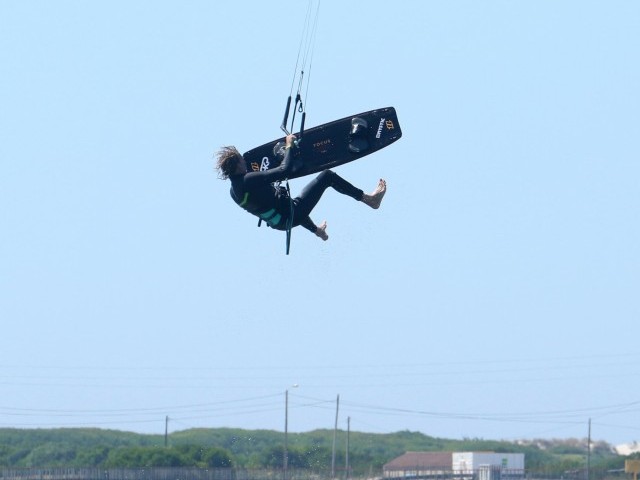
Dive Pic F.
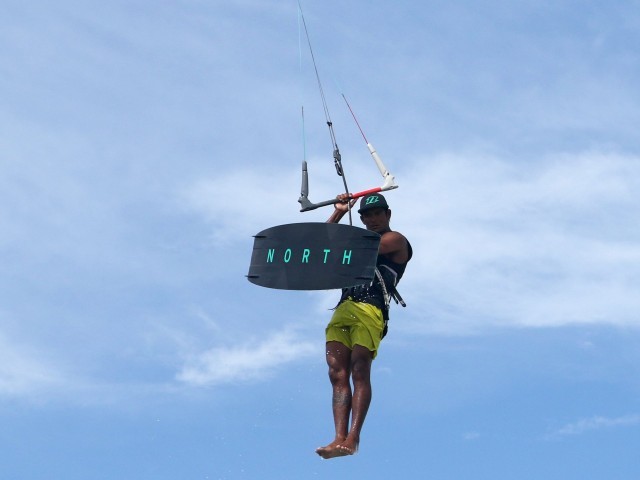
To finish off you need all the lift you can get. It’s tempting to pull even more on the bar, but then you risk stalling the kite and achieving the opposite. Instead you need a hefty dive. This will give you that last bit of lift and a touch more time, much like diving at the end of a jump gives you that secondary lift. The tricky part is that as you aggressively dive the kite you also have the small matter of getting the board back on. Look on the bright side, you’re not high so the worst that can happen is that you get wet (again) and you may need to relaunch your kite! Here you can clearly see that Heliarde has given the kite a decent dive by steering hard down with his back hand, but even so he’s fully concentrating on getting the board back on, crunching up and lifting his legs.
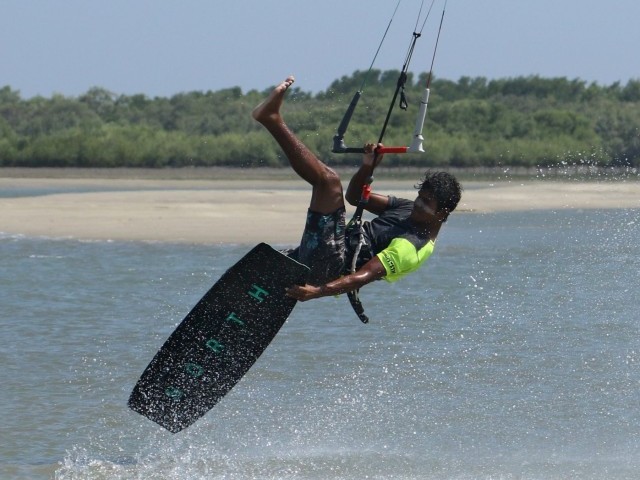
Decisions Pic G.
To be fair if you get this far, it’s only a matter of time:) If you can get your toes hooked into your foot straps and still have a modicum of daylight between your board and the water’s surface, you’re 99% there. If you had opened up and loosened your foot straps before trying this, getting the board back on will be worlds simpler, and it means that even if your feet aren’t quite secure, they will push in on landing. Final thought is which way will you land as you need to choose a foot. Here Heliarde has the choice of pushing his left foot forward and riding out as a transition, or right foot and carrying on in the same direction. Continuing the dive of the kite into a late loop is also an option. All good things come to those that wait...
Top Tips
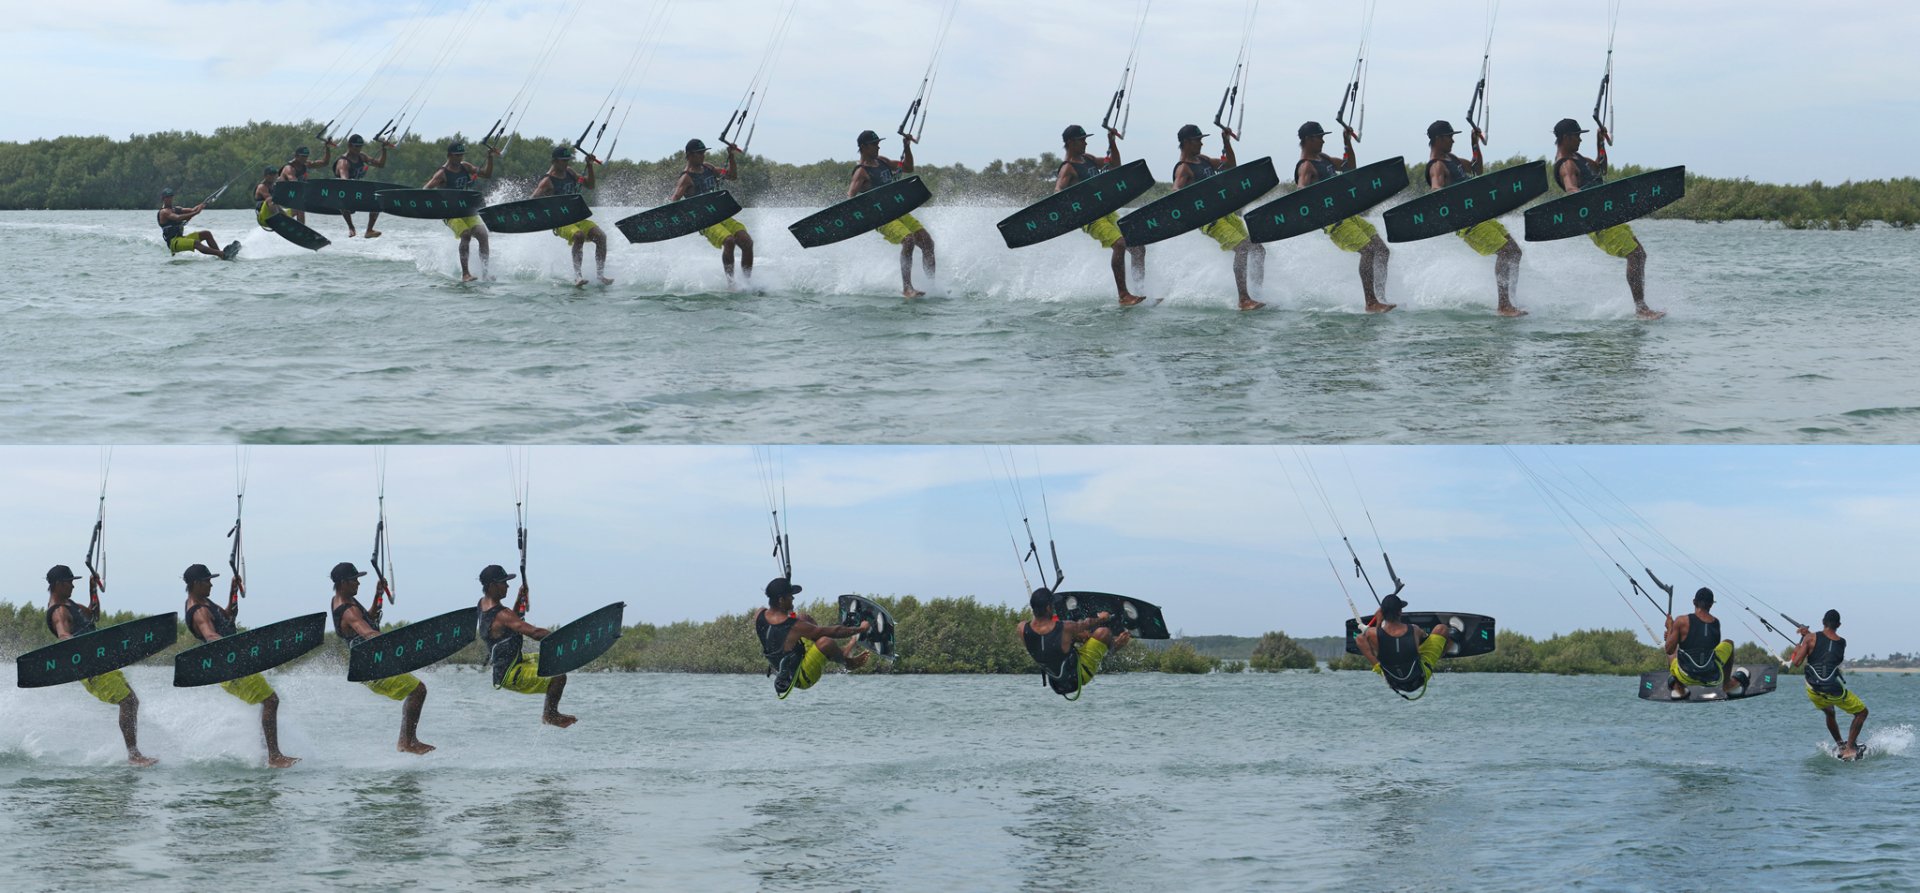
If ever there was a move to learn in baby steps, this is it. From the low pop to getting the board off your feet will be plenty enough of a challenge. Once you can hold the board, working on a slide, even a metre or so will make you feel like you’ve conquered one of life’s great hurdles. Then controlling the slide and adding more speed, before eventually having the time and awareness to get the job done in its entirety.
To lengthen your slide you’ll want more speed, an earlier pop and plenty of power in the kite, and you’ll also need to fight the natural tendency for the kite to drift. Physically steering the kite forwards with your back hand, elbow held high, as you skim across the surface.
We’ve cut the sequence in half, as it was a tad long to fit in these pages, but it should give you an idea of distance travelled, power and speed required. After that have a good look at the videos, concentrating on the pop and initial bar movement. All the best.


Common Problems
No time to get the board off. When learning anything it’s a good idea to slow things down. However, as your aim is to stay low, knocking off too much speed will result in you having no lift. This means that you’ll have no support and no time to get the board off. Worse still, as the kite will already be moving past 12, the kite will pull you away from the board and make freeing your feet harder still. Make sure you keep some speed and pop early.
Sinking straight into the water. Yet again if you’ve no speed the kite will be too far back. If, however your kite is lifting and hasn’t passed 12, make sure that you have let the bar out pre pop. This allows you to then pull in post pop for support.
No time/height at the end to get the board on. Don’t be greedy with your slide. You can slide much further without getting the board on if you keep tension, but once the kite has flown too far back you won’t get any lift as you stand and pull. Shorten your slide and go for the board on sooner.
Keystones
- Power, speed, edge and bum low
- Bar out and low pop
- Breath out, board off
- Feel feet down and pull bar in, game of balance
- Steer kite aggressively for lift to replace board
This technique article was in Issue 80 of IKSURFMAG.
Related
By Christian and Karine
Christian and Karine have been working together as a coaching team, running improver to advanced kitesurfing clinics since 2003.
