
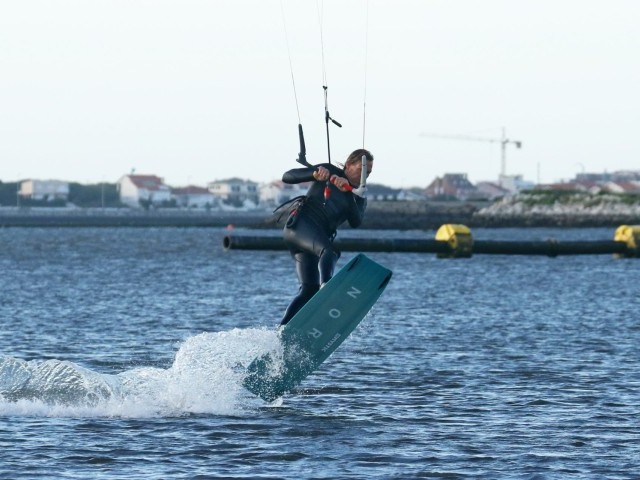
Back Roll Tail Grab Board Off
Technique / Advanced


Introduction
There is no set course in kiting. Once you’re up and riding, the world is your oyster, kiting your canvas. Different craft, moves, priorities. Whatever lights you up from cruising to quite literally bruising. That said, there are some logical paths which you can follow as you improve, and in this case, we’re following the jumping path. You get confident and add a cheeky grab, and before you know it, you’re dreaming of a one foot and fantasising over a board off. It is easy to obsess over an extra metre of height, when you could curb the frustration by adding something to your already achievable flying skills. This holds just as true to your rotations, which brings us perfectly onto the subject of this piece, the back roll tail grab board off. You don’t need record-breaking height, storm winds or the latest kit, just a decent back roll and a modicum of patience.
Your precursors for this, well, it’ll help no end if you’ve got a slow sent back roll, and we’d definitely recommend that you can already board off with a tail grab. The back roll board off is not the most intuitive of moves, so having the two fundamental parts already firmly stuffed in the bag will allow you to concentrate on putting them together and on the intricacies of the move. The great news is that you don’t need to go huge, so you can practice this in any conditions that you can jump in. In short, you’re aiming for a slowly rotated upright back roll, into which you can fit the tail grab board off. Right, let’s see how this pieces together.


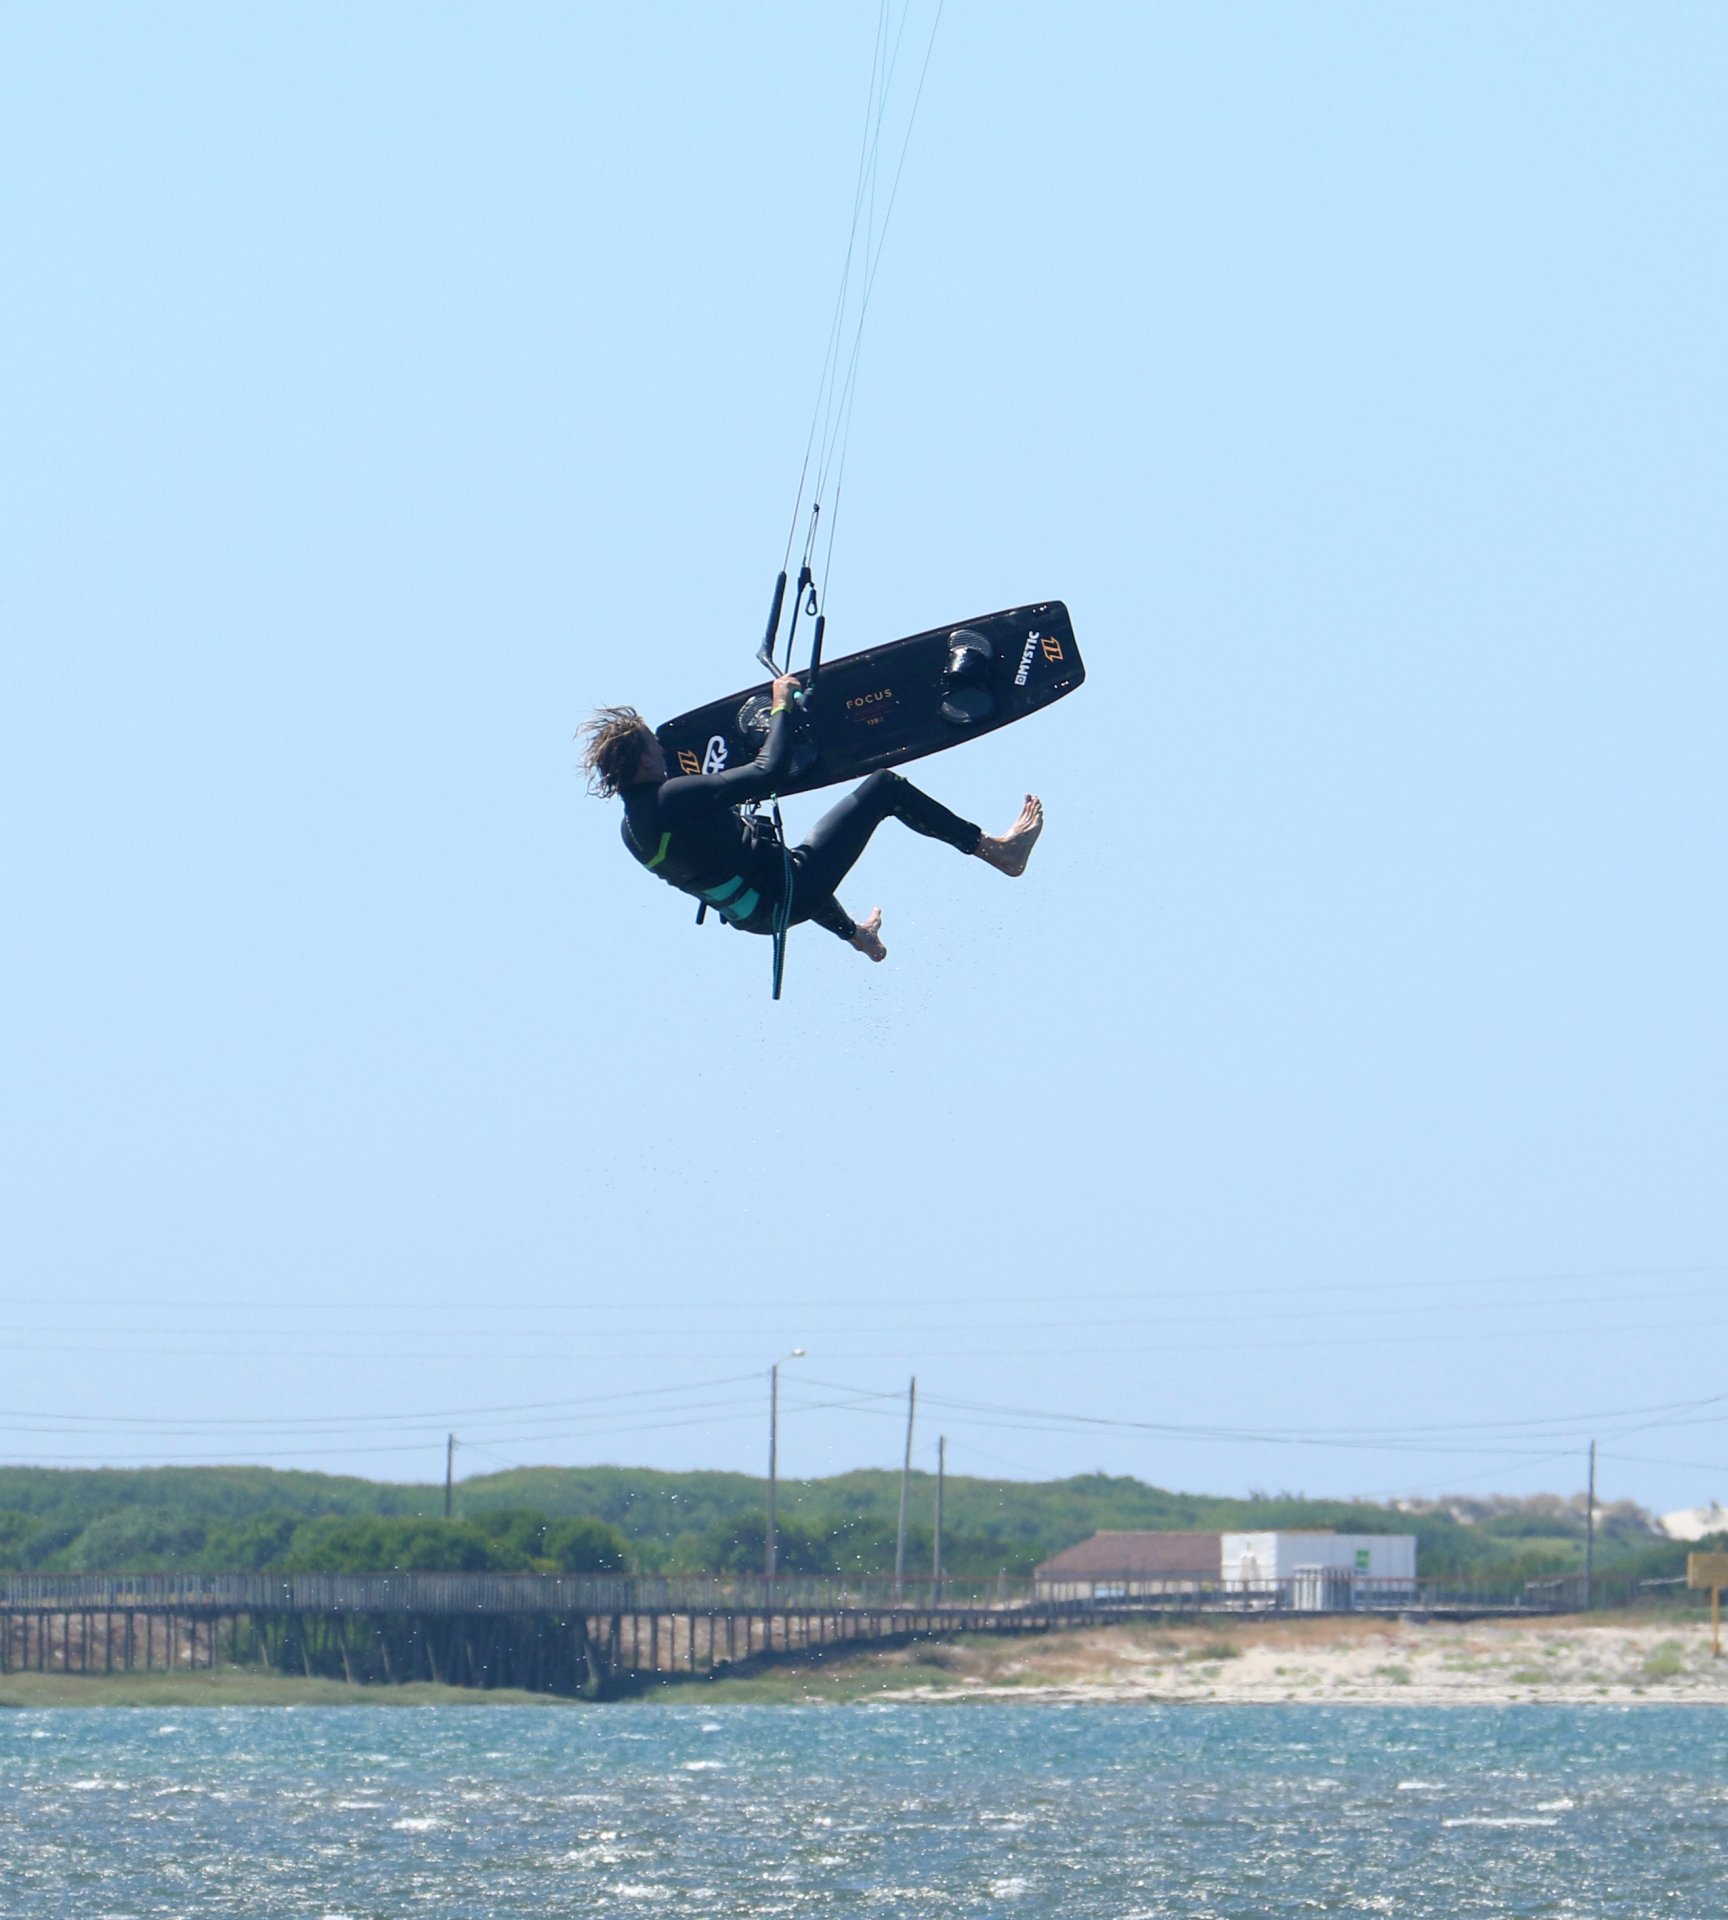
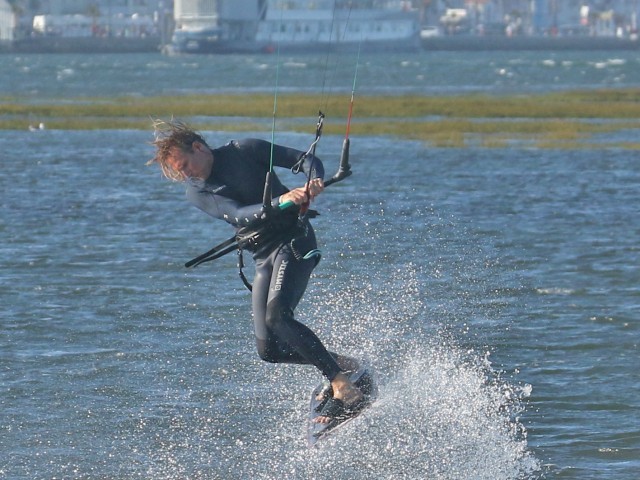
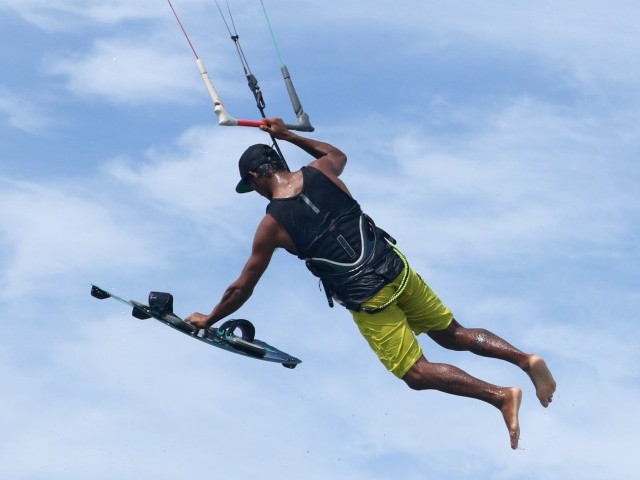
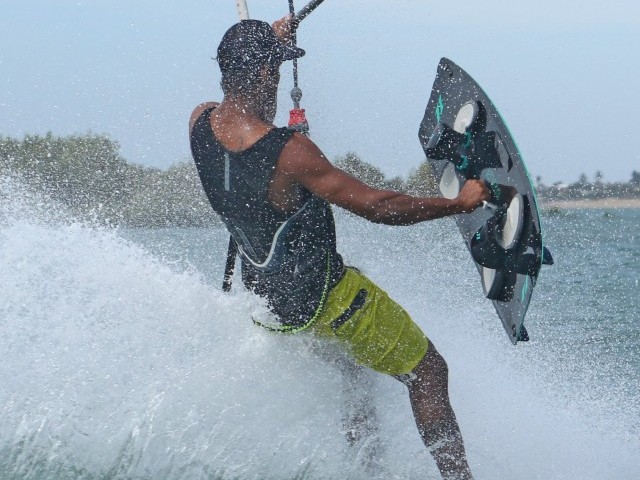
Take Off Pic A
Your approach will be as per any sent back roll, with a good upwind edge, sweet spot trimmed to midway, comfortable speed and kite no higher than 1 or 11. Your send needs to be positive, steering the kite with meaning. However, short and sharp is what you’re looking for. When you get the kite moving quickly, it’ll generate lift sooner. If you drift it leisurely back, you won’t feel much until it’s way past 12 o’clock. The big problem with taking off with the kite back behind you is that it’ll encourage you to roll back and force a more off-axis, leaning back rotation. Super sexy in its own right, but it’ll make the board off so much harder. Along with this, you want to add a decent kick up against the edge, which will allow you to take off a touch earlier, preventing you from carving hard up into your rotation. The benefit, both a slower rotation and a more upright back roll. And finally, as with all board offs, either wiggling your feet a bit looser in the straps or loosening them off prior to the trick will make the off and on more achievable. If you look at Christian in the photo, his kite is just past 12, he’s levelled his bar, his head is square to his shoulders, looking forwards, not upwind, and he’s on the way up more than around. This balancing act between up and your back roll is key. A slow rotation gives you time, but too slow, and you won’t rotate enough.
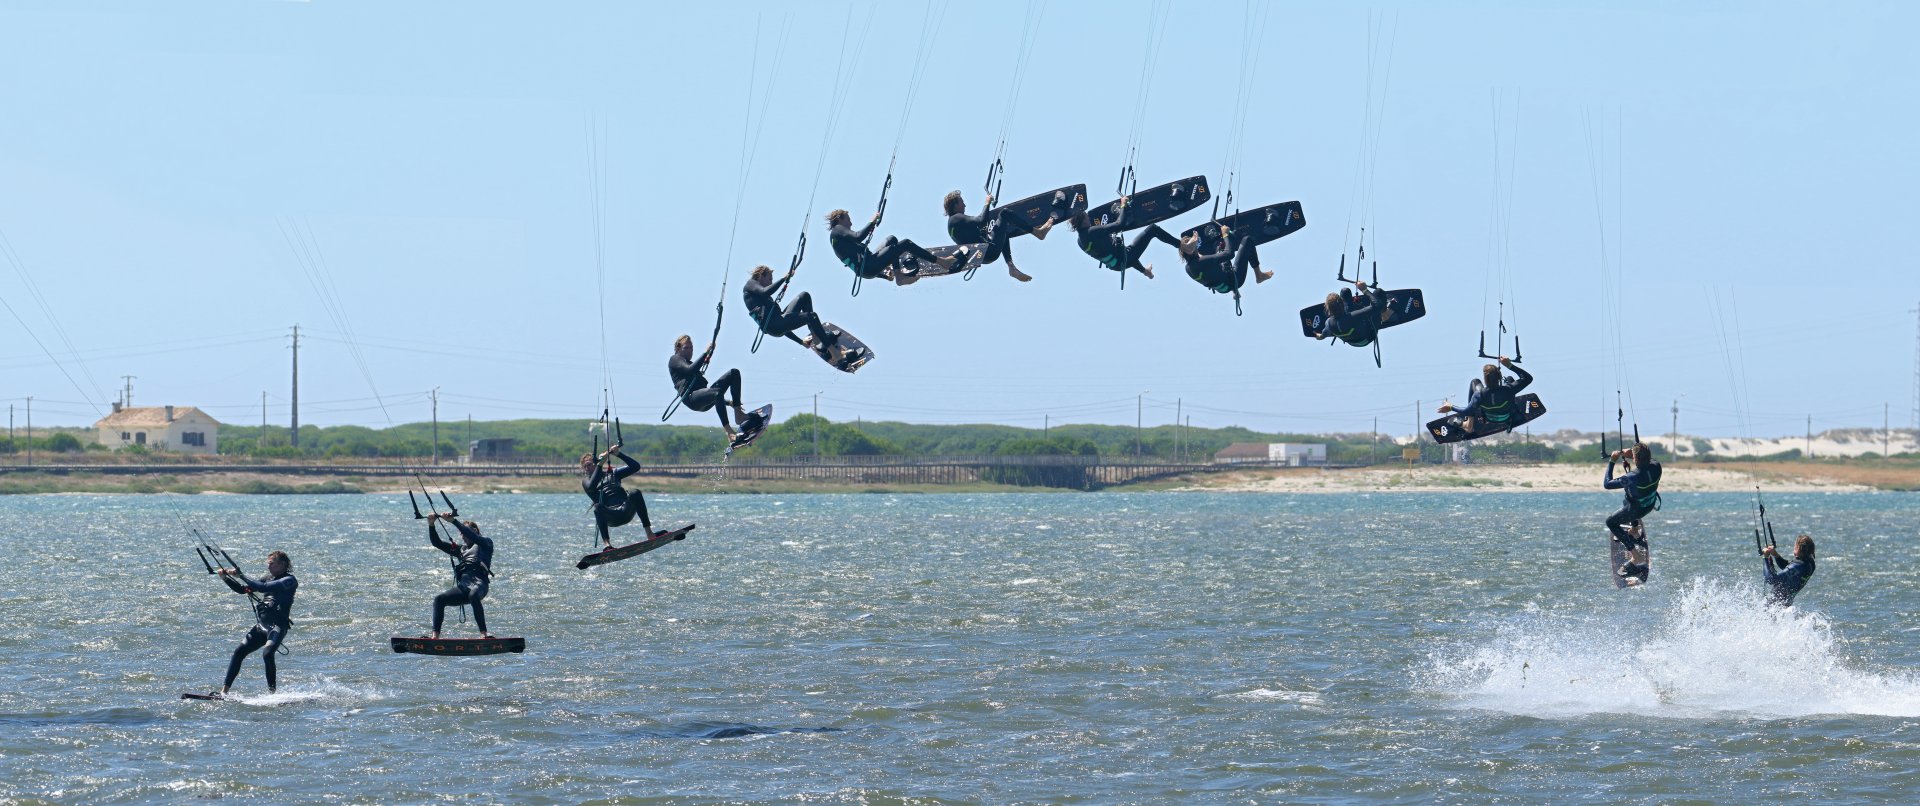
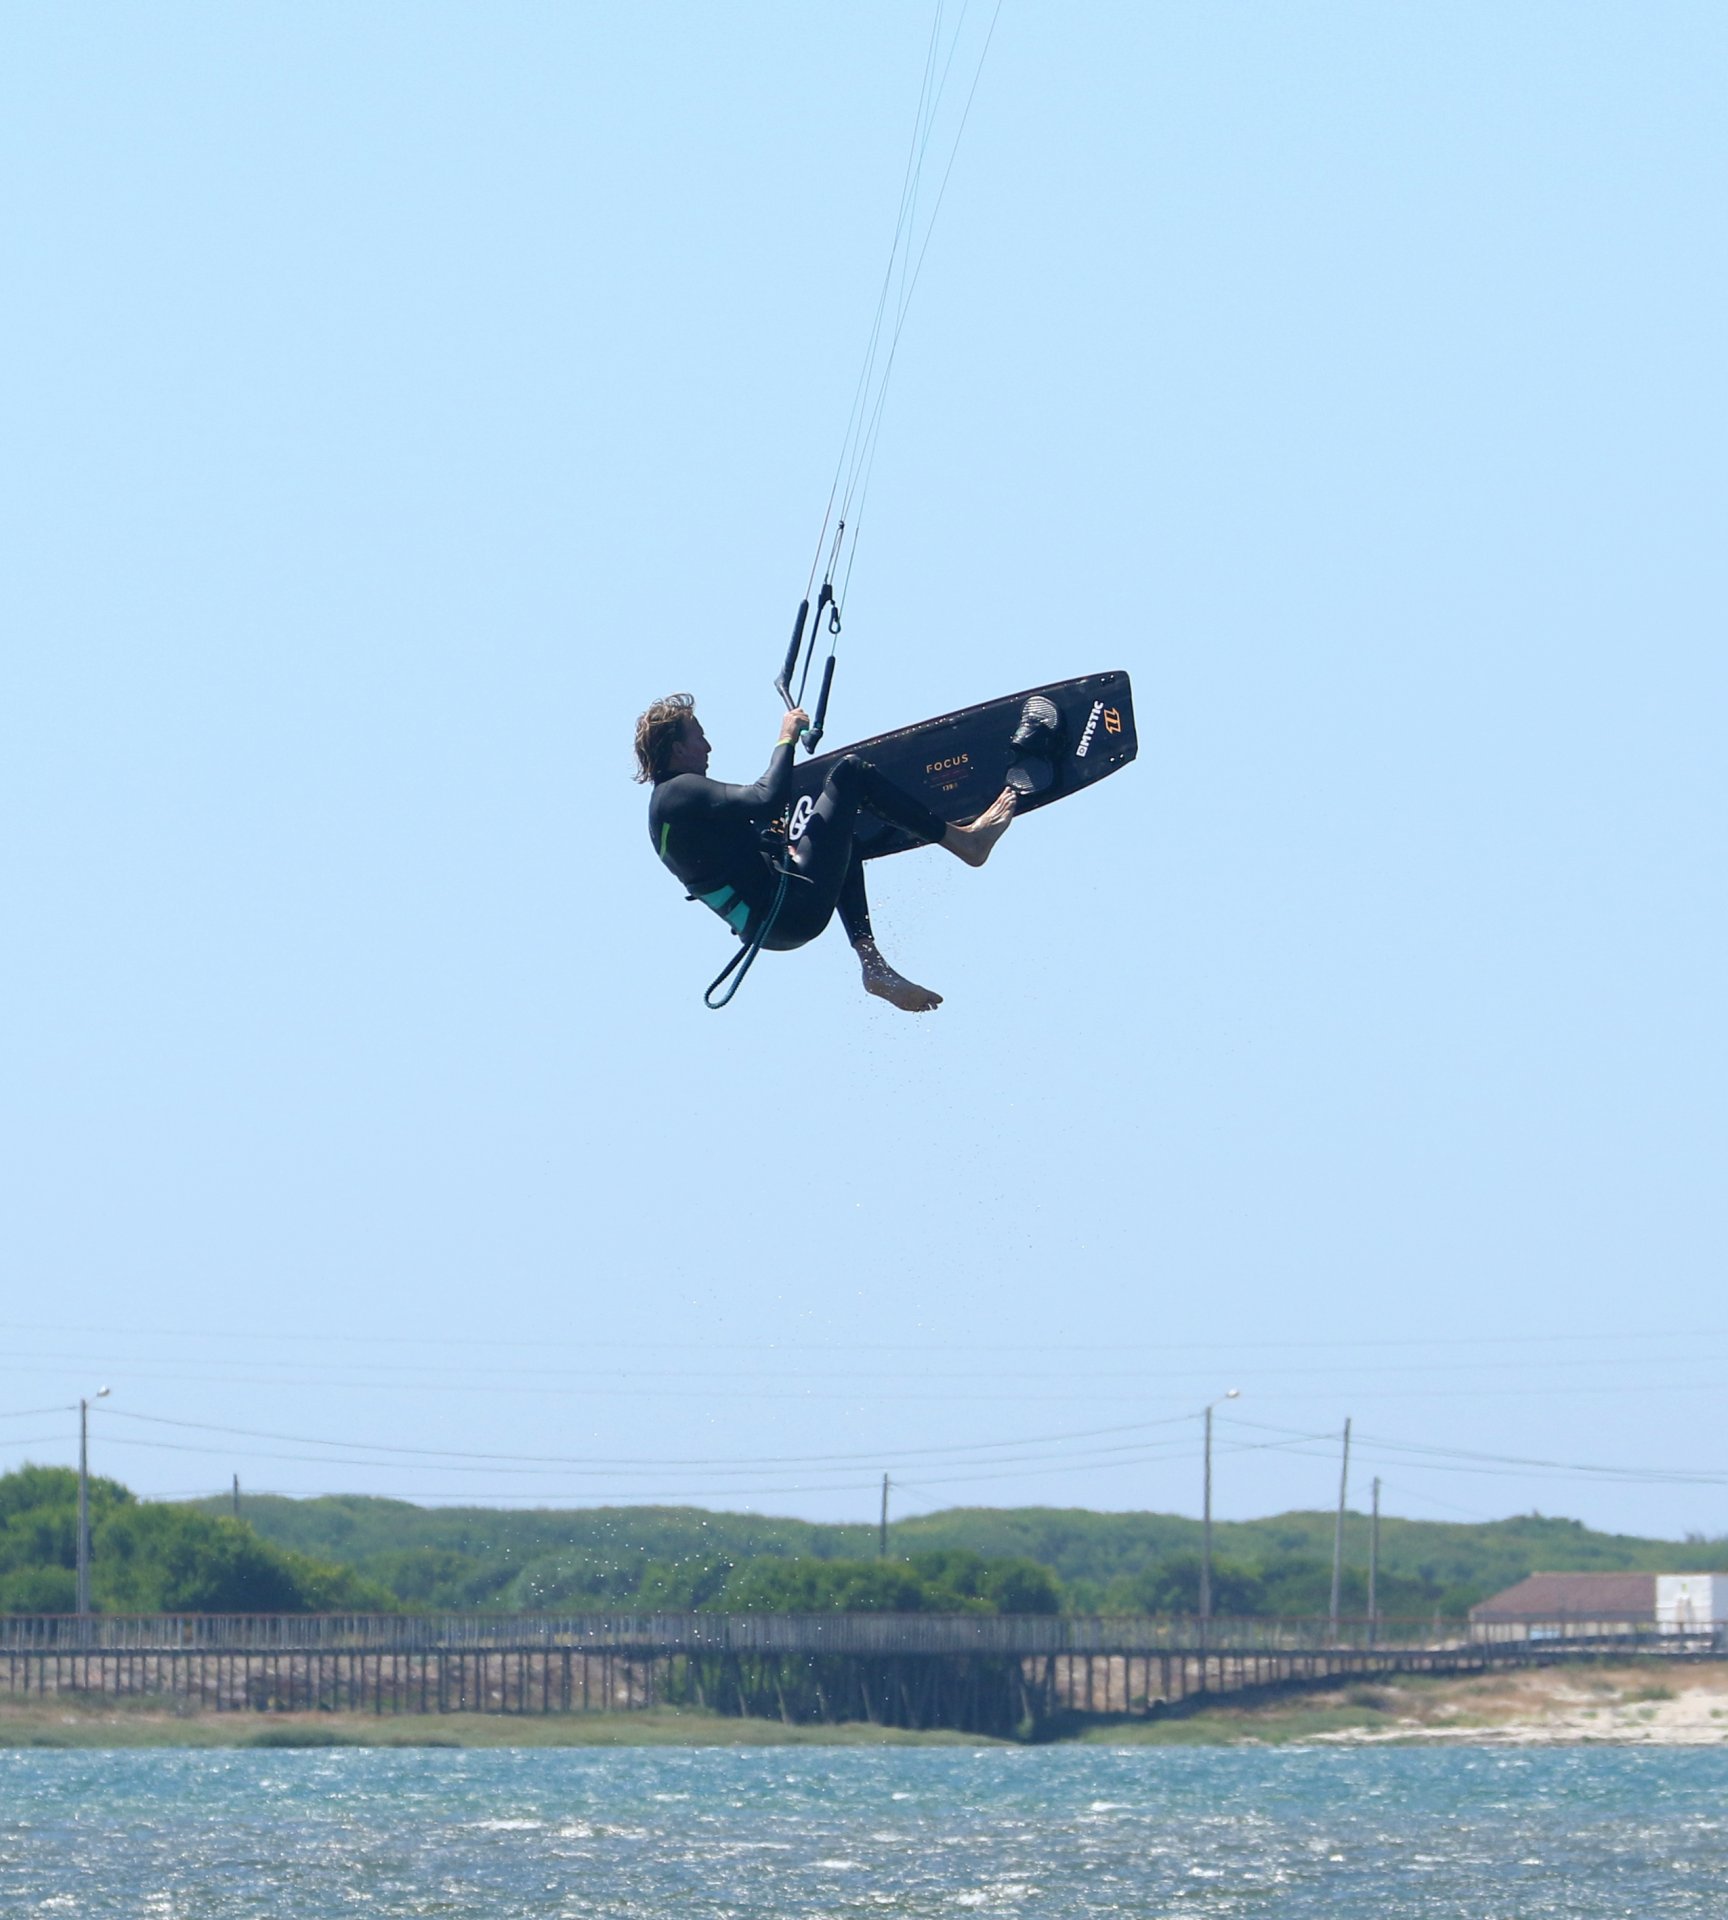
Prep Work Pic B
Due to the extended nature of your take-off, now is all about getting everything into place so that you can attempt the board off. Once again, make sure the kite is above you. If it feels a bit back, steer forwards before you release your back hand. Bring your knees up high so that the board is close. Keep the bar in on the sweet spot so that you have float. And as you look for where to grab, try to keep your head up, chin down as close to the bar as possible. Naturally, you’ll want to bring the feet up, over and around. To keep your rotation more upright, keep your head near the bar, and you’ll resist the temptation to rock back. Glance over at Christian, his head is up, bar is in, and the kite is high whilst he releases his back hand and looks for the grab near the heelside tail fin.
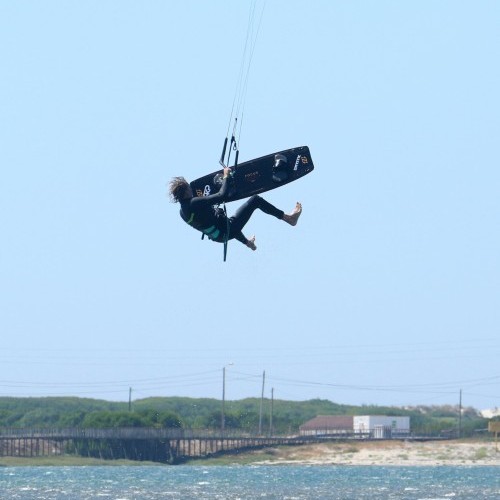
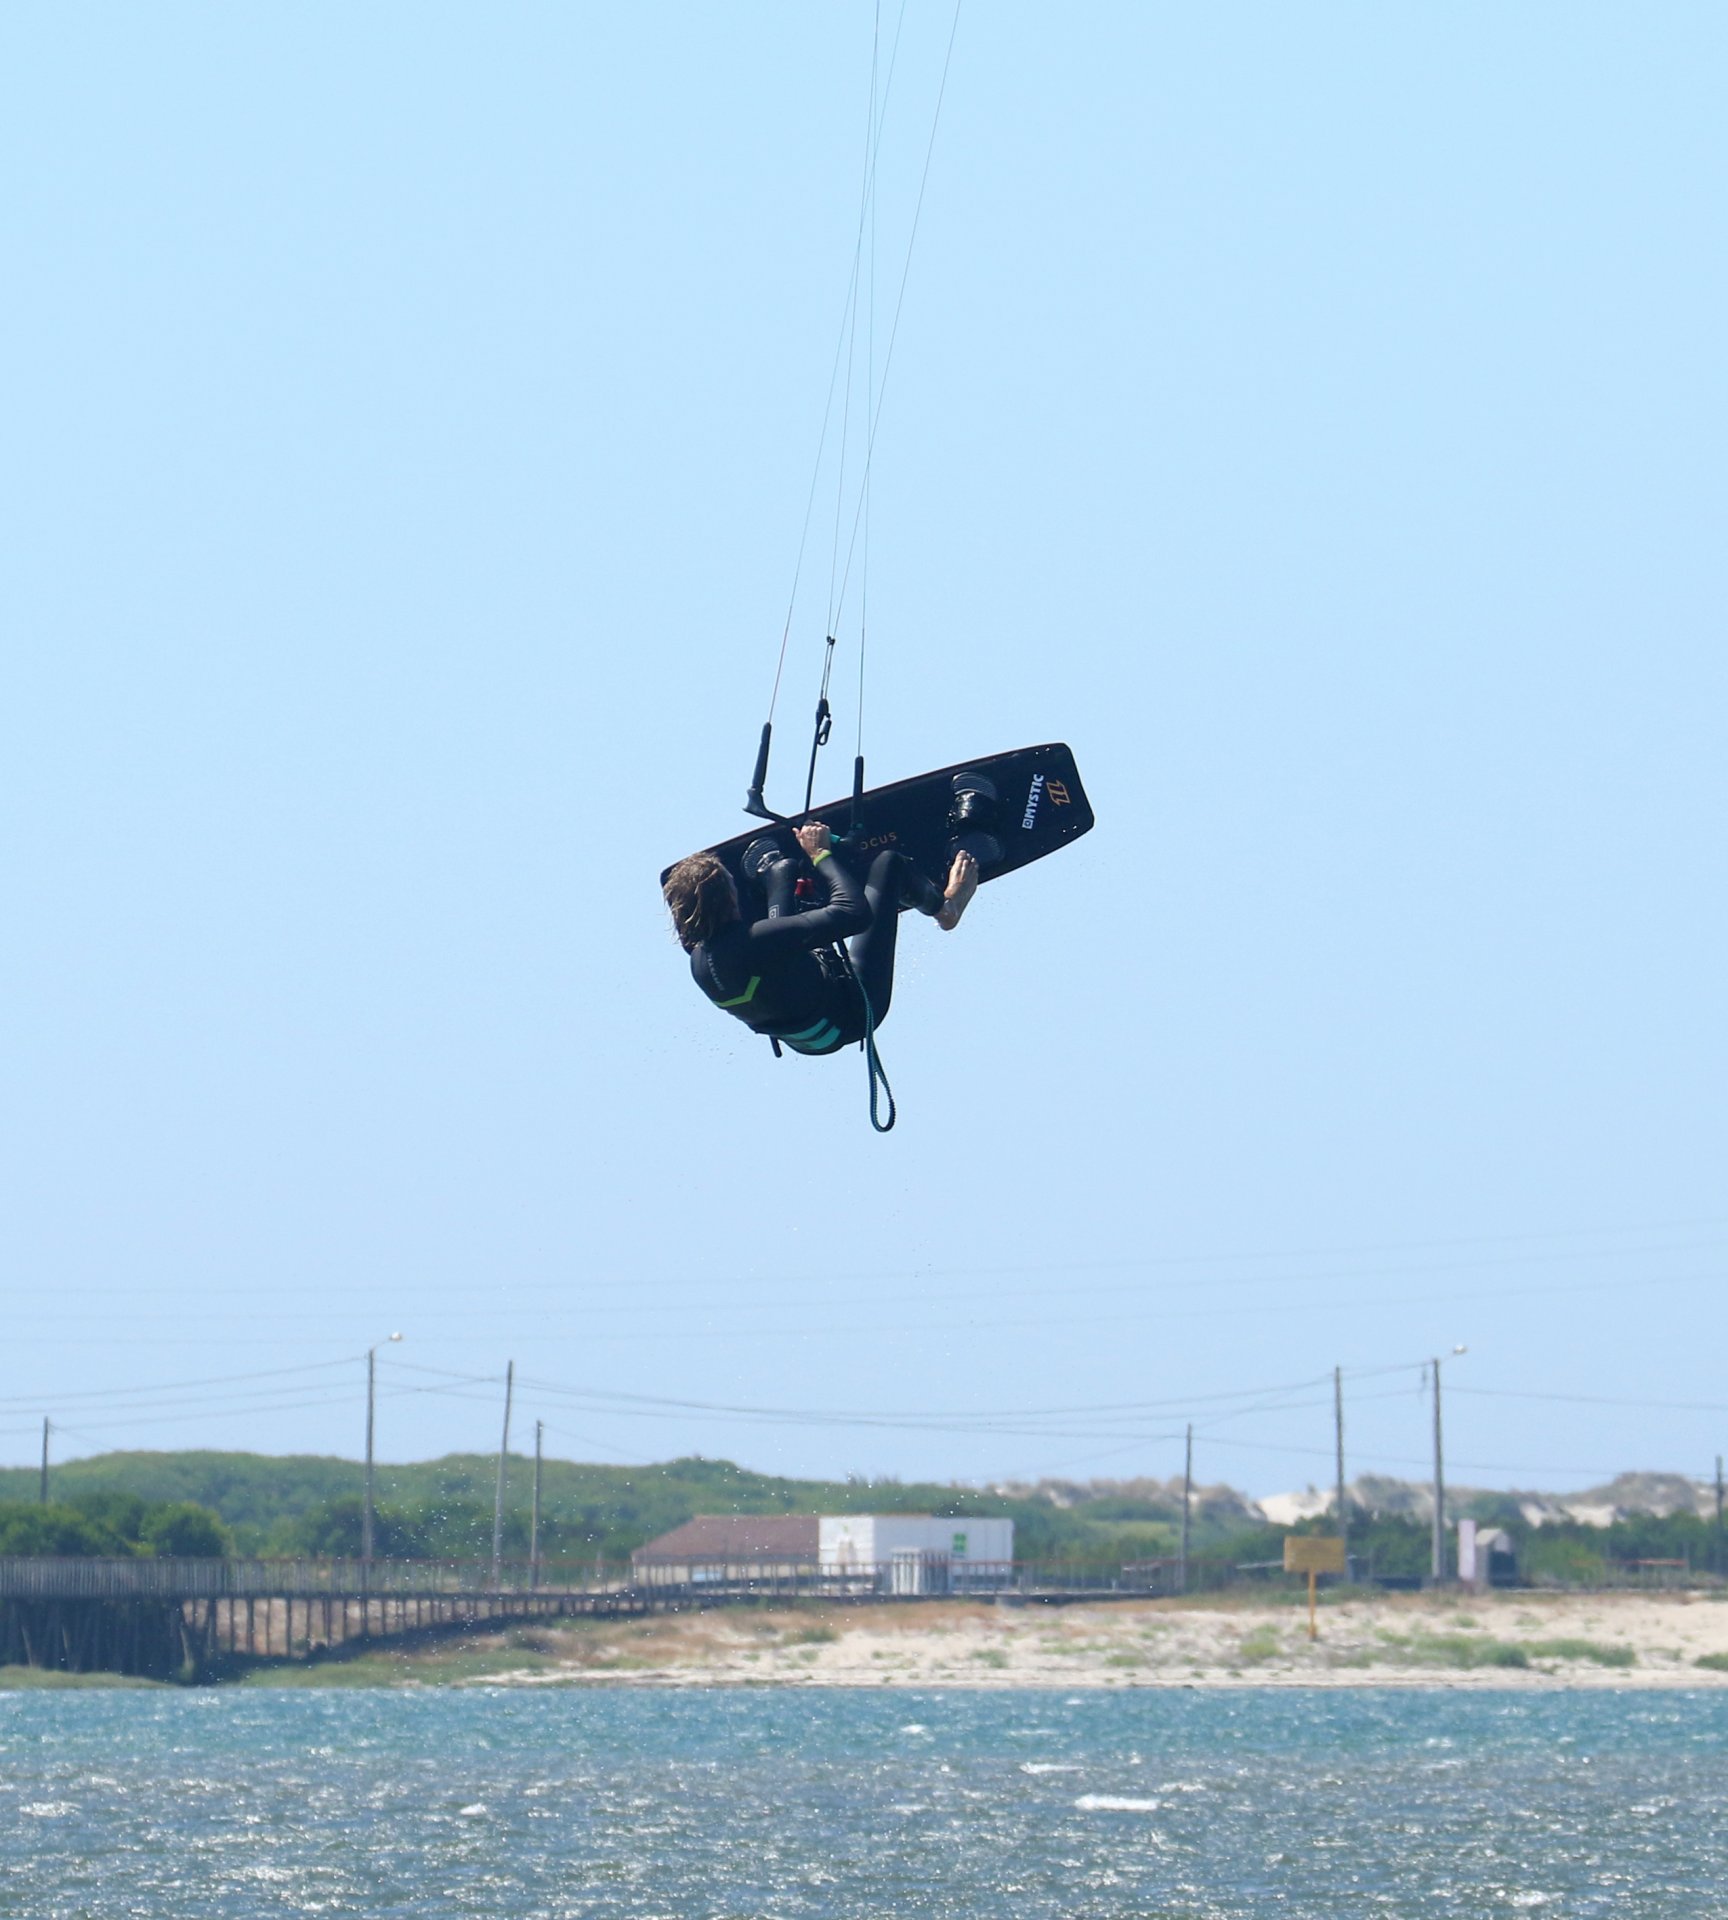
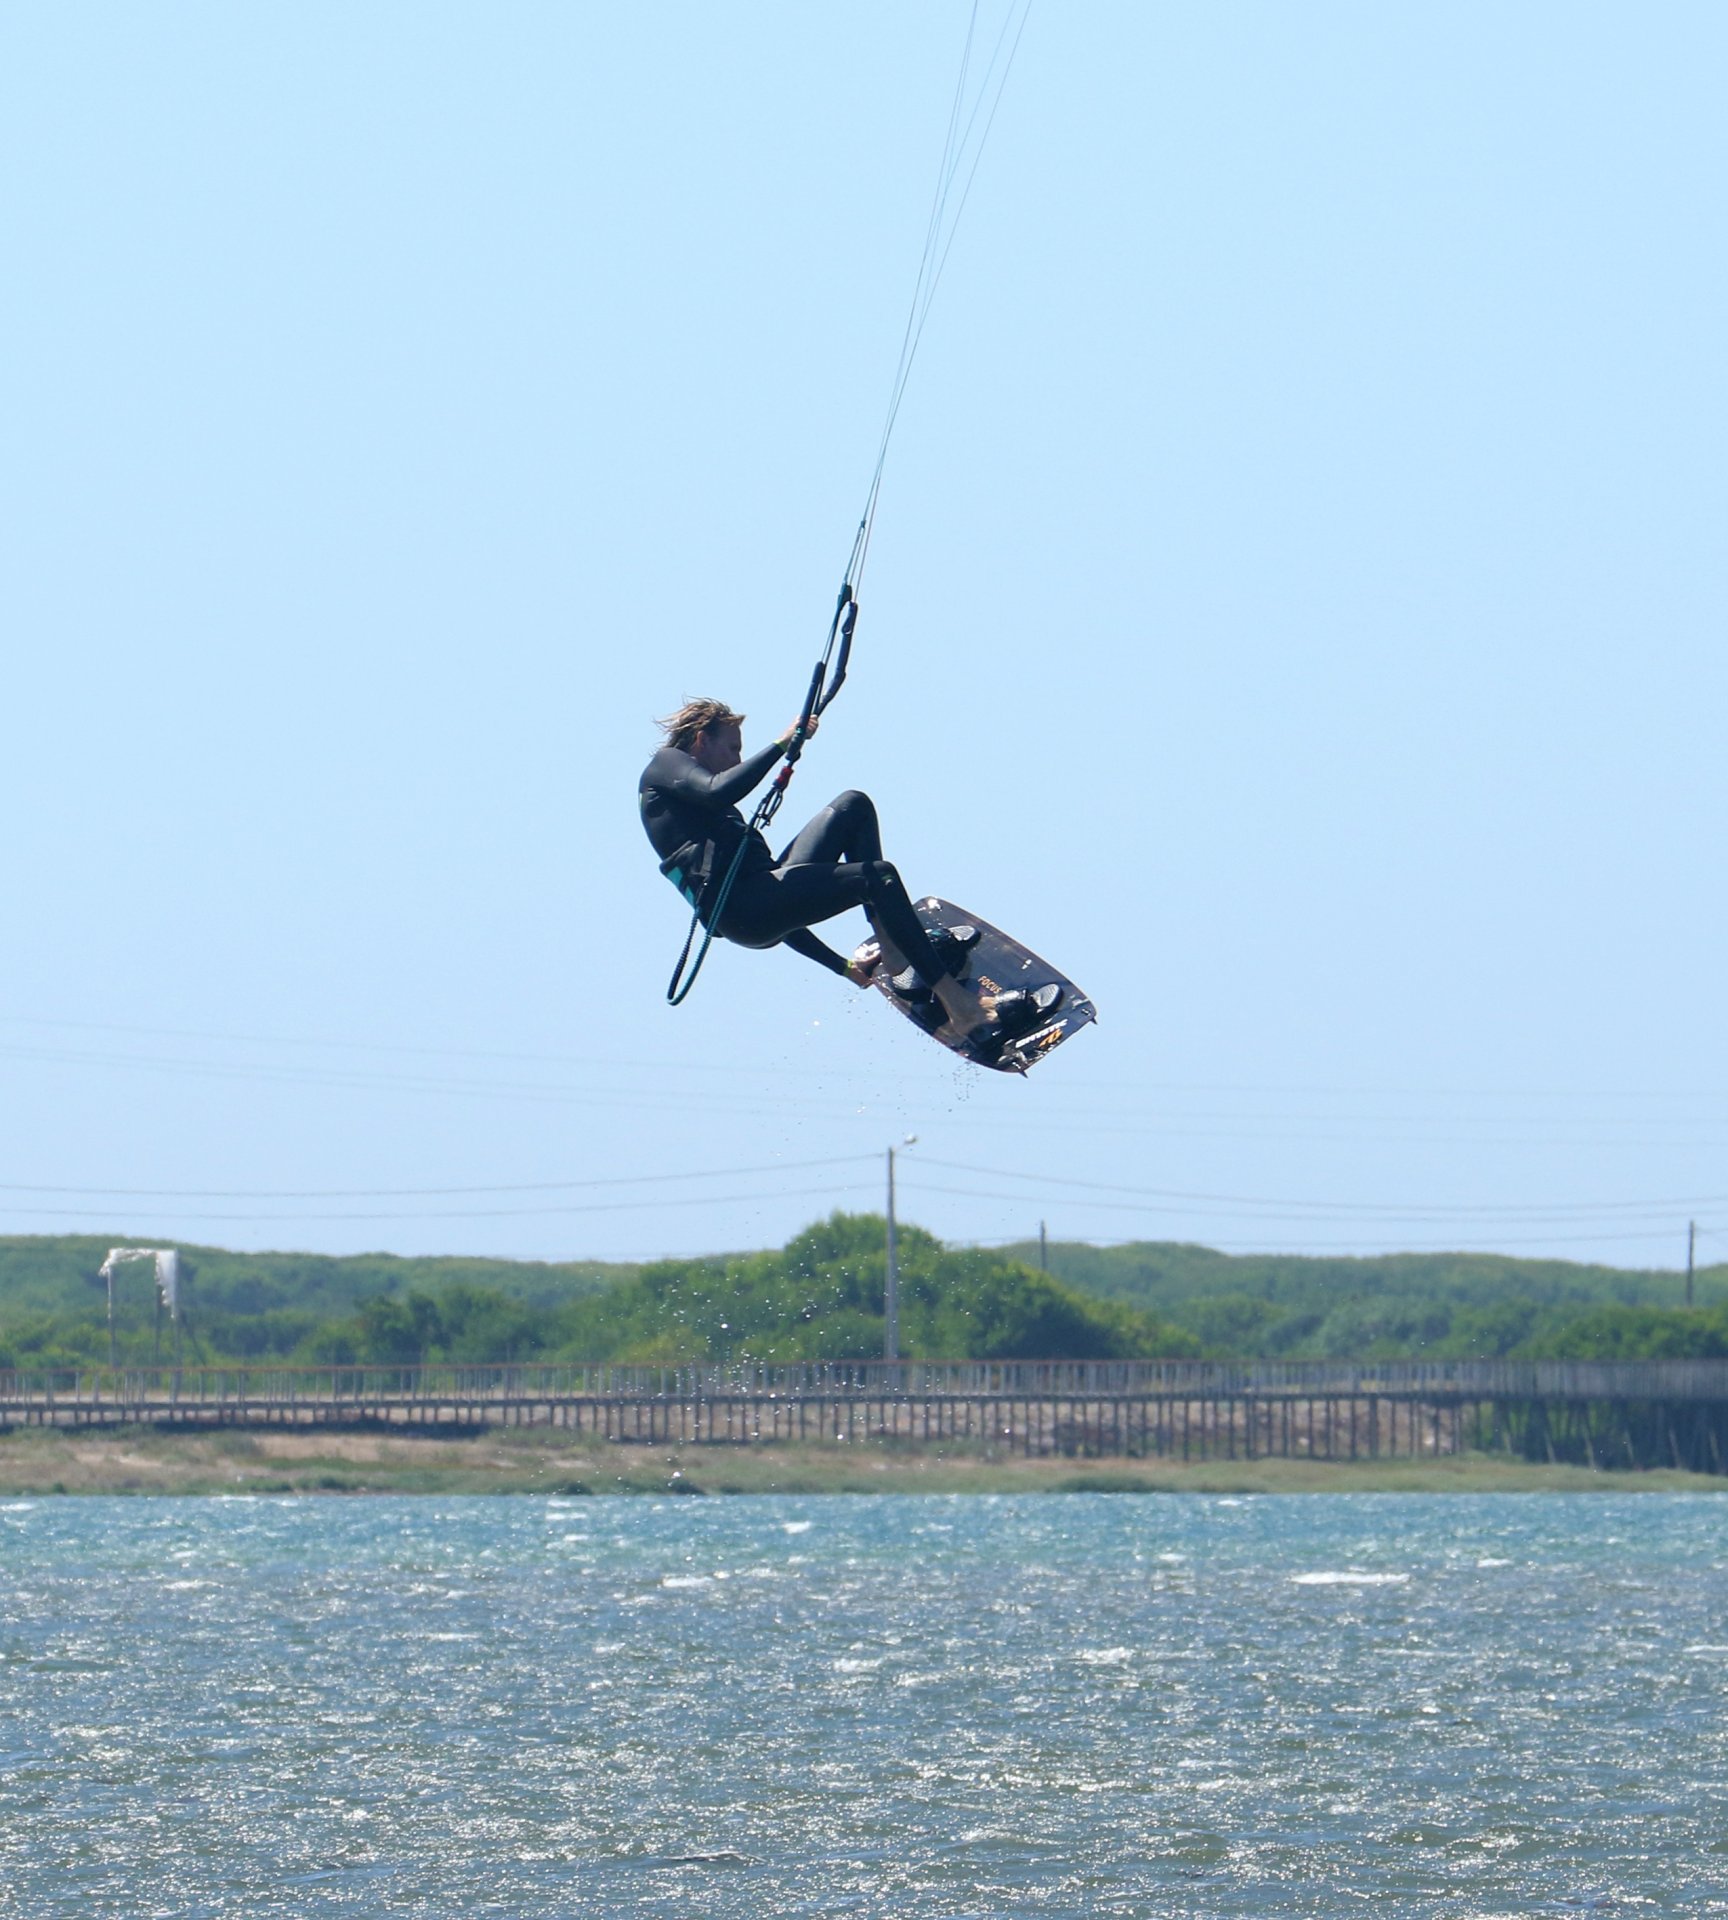
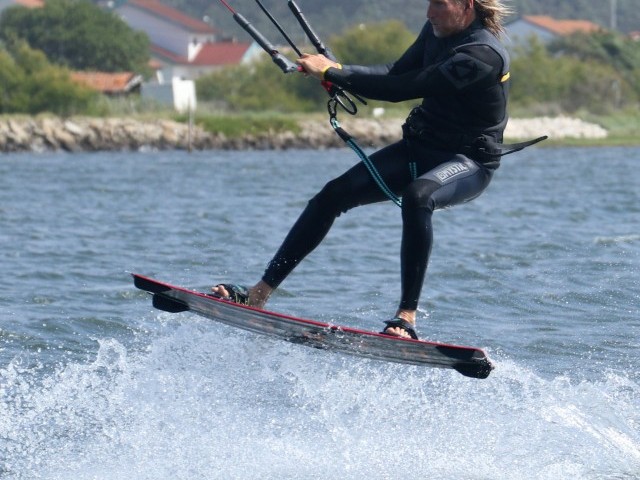
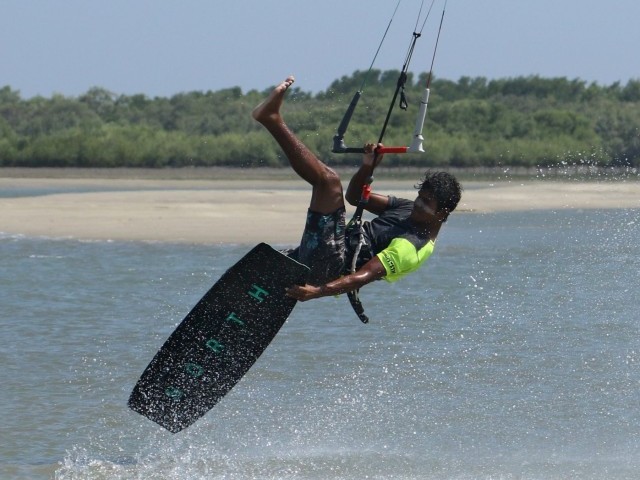
The Board Off Pic C
You want to aim to get the board off as early in the rotation as possible, preferably by the time you’re halfway round and facing into the wind. Any later, you’ll run out of time, as you’ll be slipping it off as you drop rather than as you rise towards the apex of your jump. Getting it off will be the same as you’re hopefully accustomed to, using your grab to hold the board steady whilst you tilt the heelside of the board away from you and slide your feet out. However, there are a couple of points to consider due to the nature of the rotation. As already mentioned, you want to be upright, rotating on as vertical an axis as possible. The main reason for this is that with the board up high, you’re not in a great position to hold the board away from you as the wind catches it and tries to blow it back onto your head. If it’s lower, you can keep your arm straight and fight the wind. In the picture, Christian may not be completely vertical and upright, but he’s much more upright than normal in his back roll. The second point is how you can help keep the board away from you as you come through the wind. You’ll actually see this better in the video, and this is the unintuitive bit. Just before sliding your feet out, extend your legs. This way, you place the board further away from you, and you have a fraction longer to get out and back in. If you take the board off and it’s already on your shins, you’re making life much tougher than it needs to be.
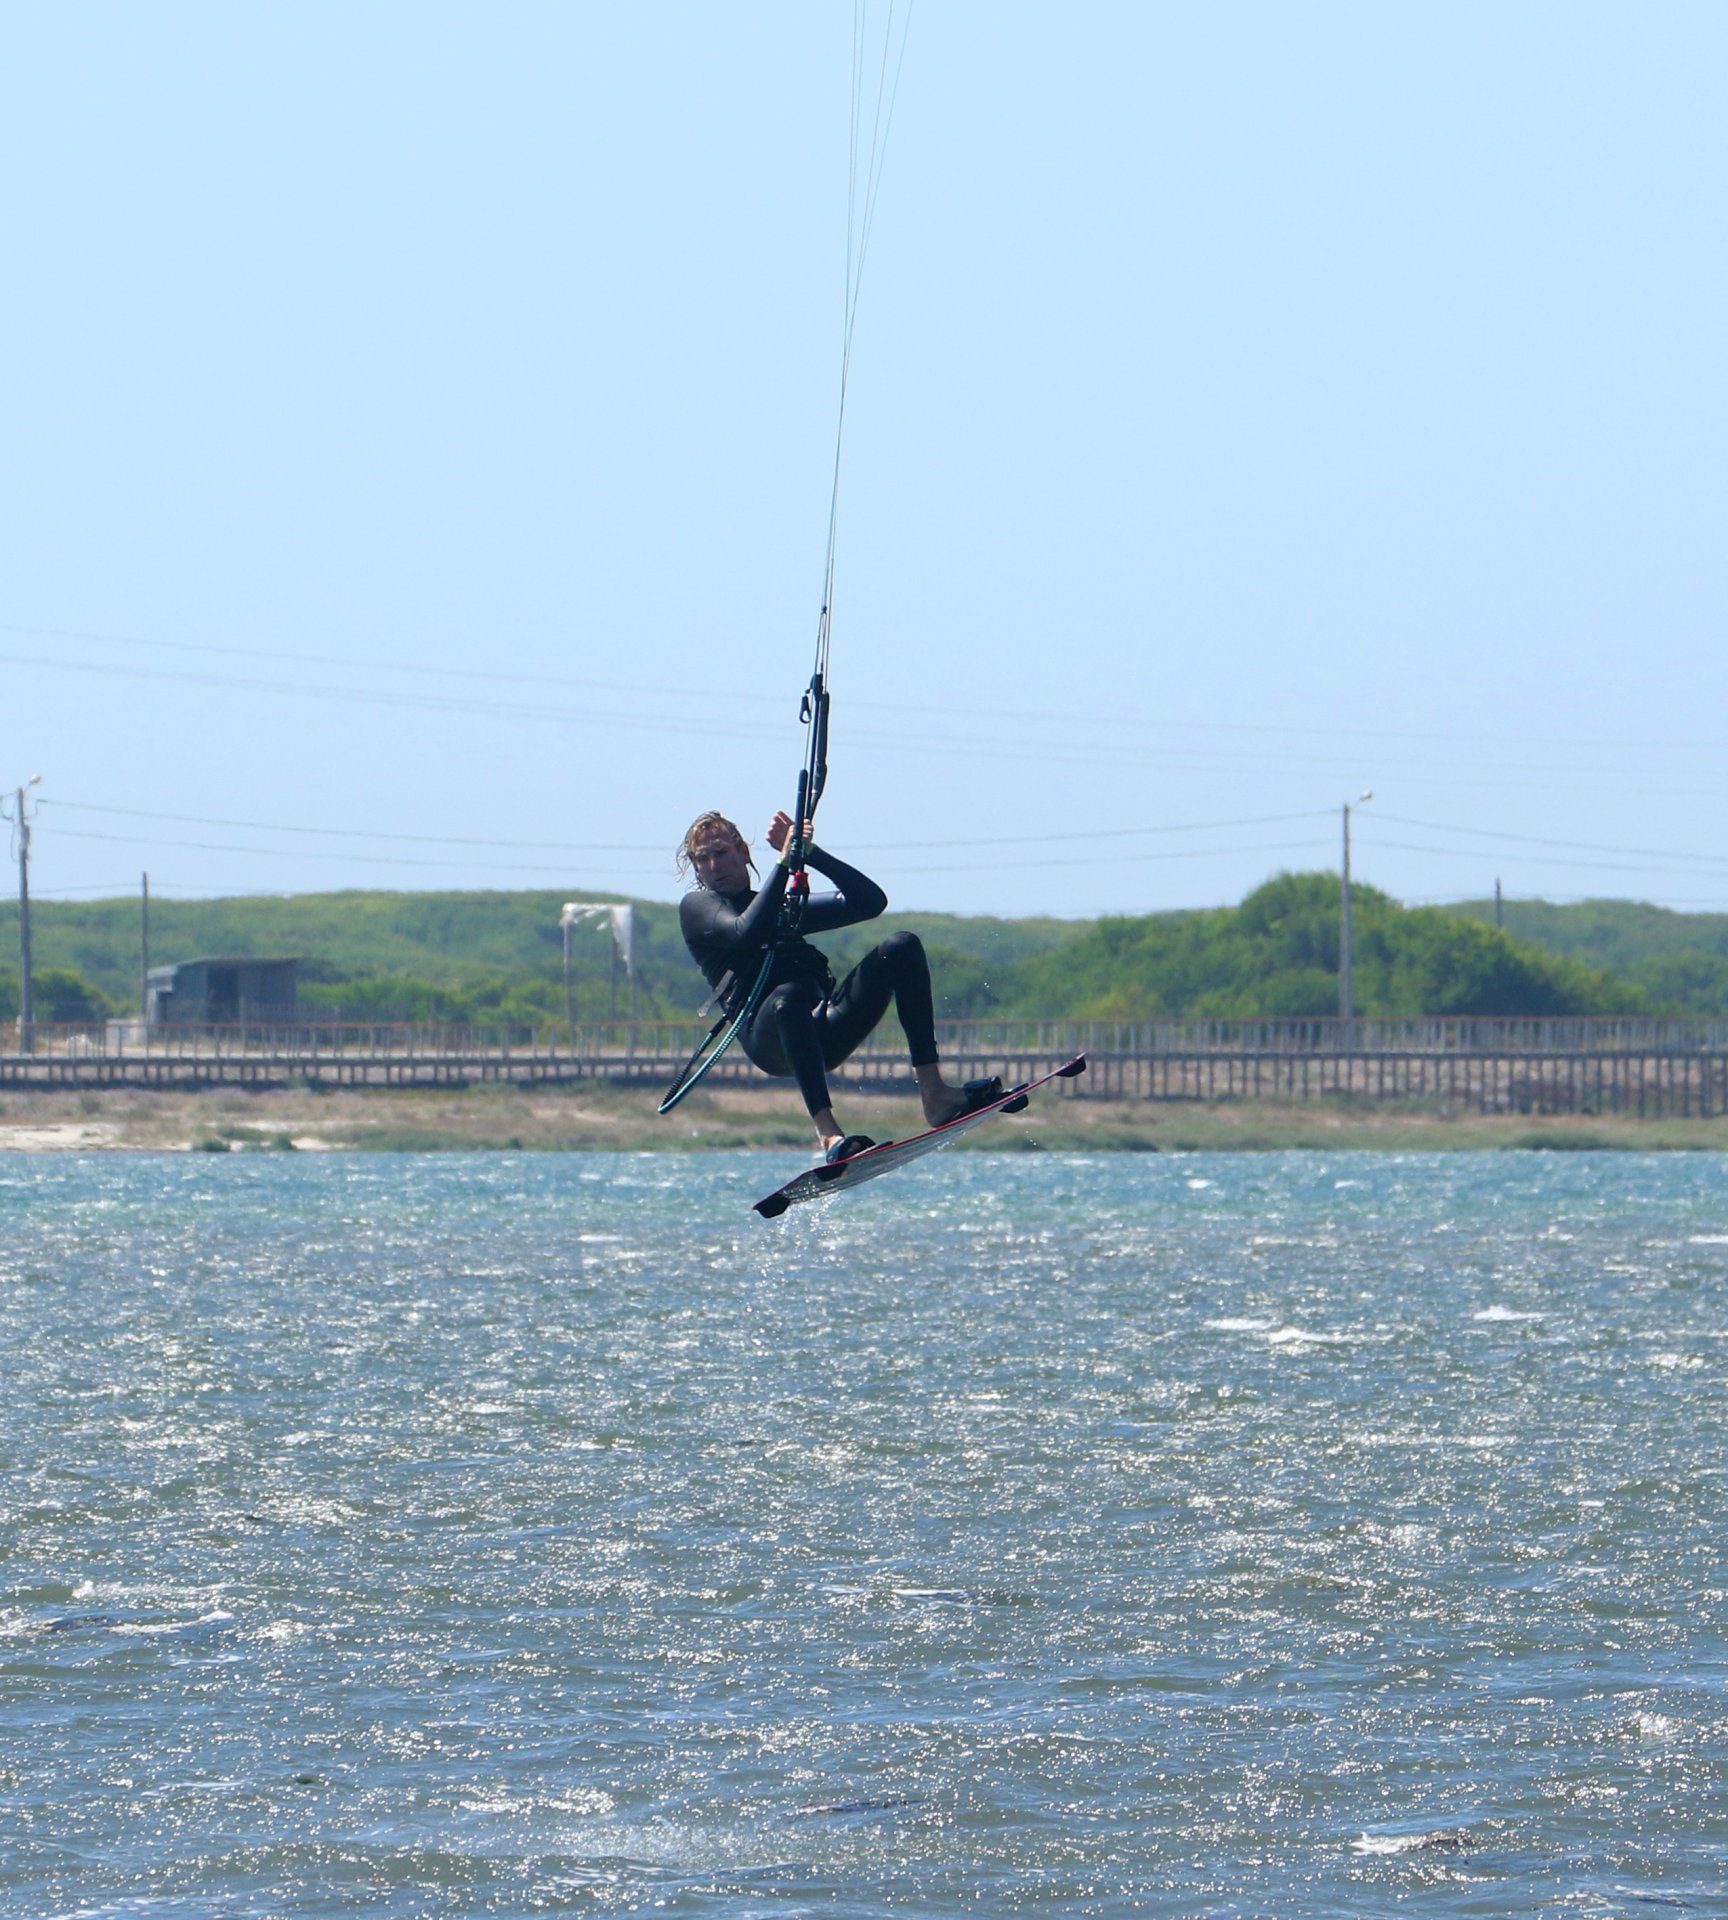
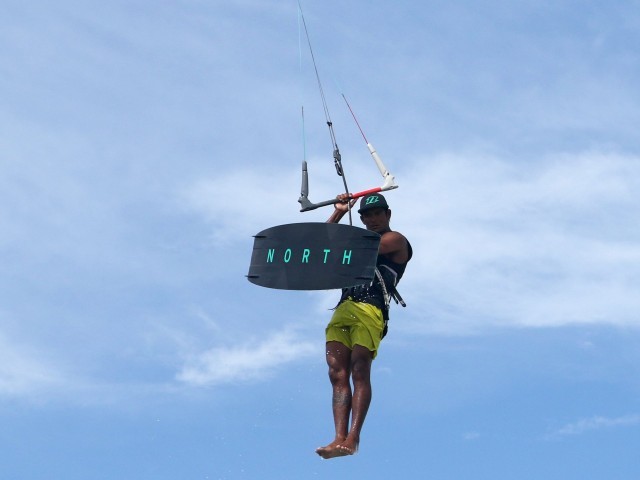
Foot Fetish Pic D
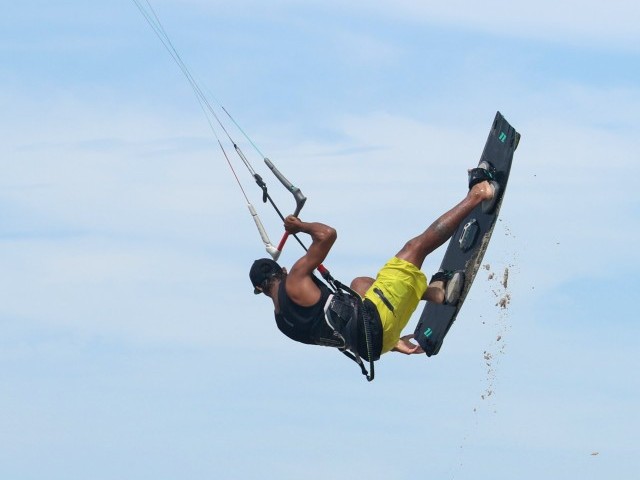
Here we go! With the board off, be proud of your pinkies and get them on display. A quick out and in is all that’s necessary, but by briefly extending your legs, you can lay claim to having removed the board. Whilst you’re waving your feet at the seagulls, you need to keep the board in place. Your back arm and wrist need to be strong, keeping the board at arm’s length and angled away from you. Don’t let the base of your hand bend in towards your forearm, but rather try and keep your thumb perpendicular to your arm, as this will stop the nose of the board from bending in and resting on part of your anatomy. Finally, make sure you bring your arm with you, don’t leave it and the board behind as you rotate. Here you can see that Christian’s synapses have managed to communicate the memo to his feet, and whilst he airs them, he’s keeping the board in place by locking out his arm and wrist. It’s worth keeping your eye on your board. This way, you’ll see if it has any violent intent towards you, and it’ll also help maintain a slow rotation.

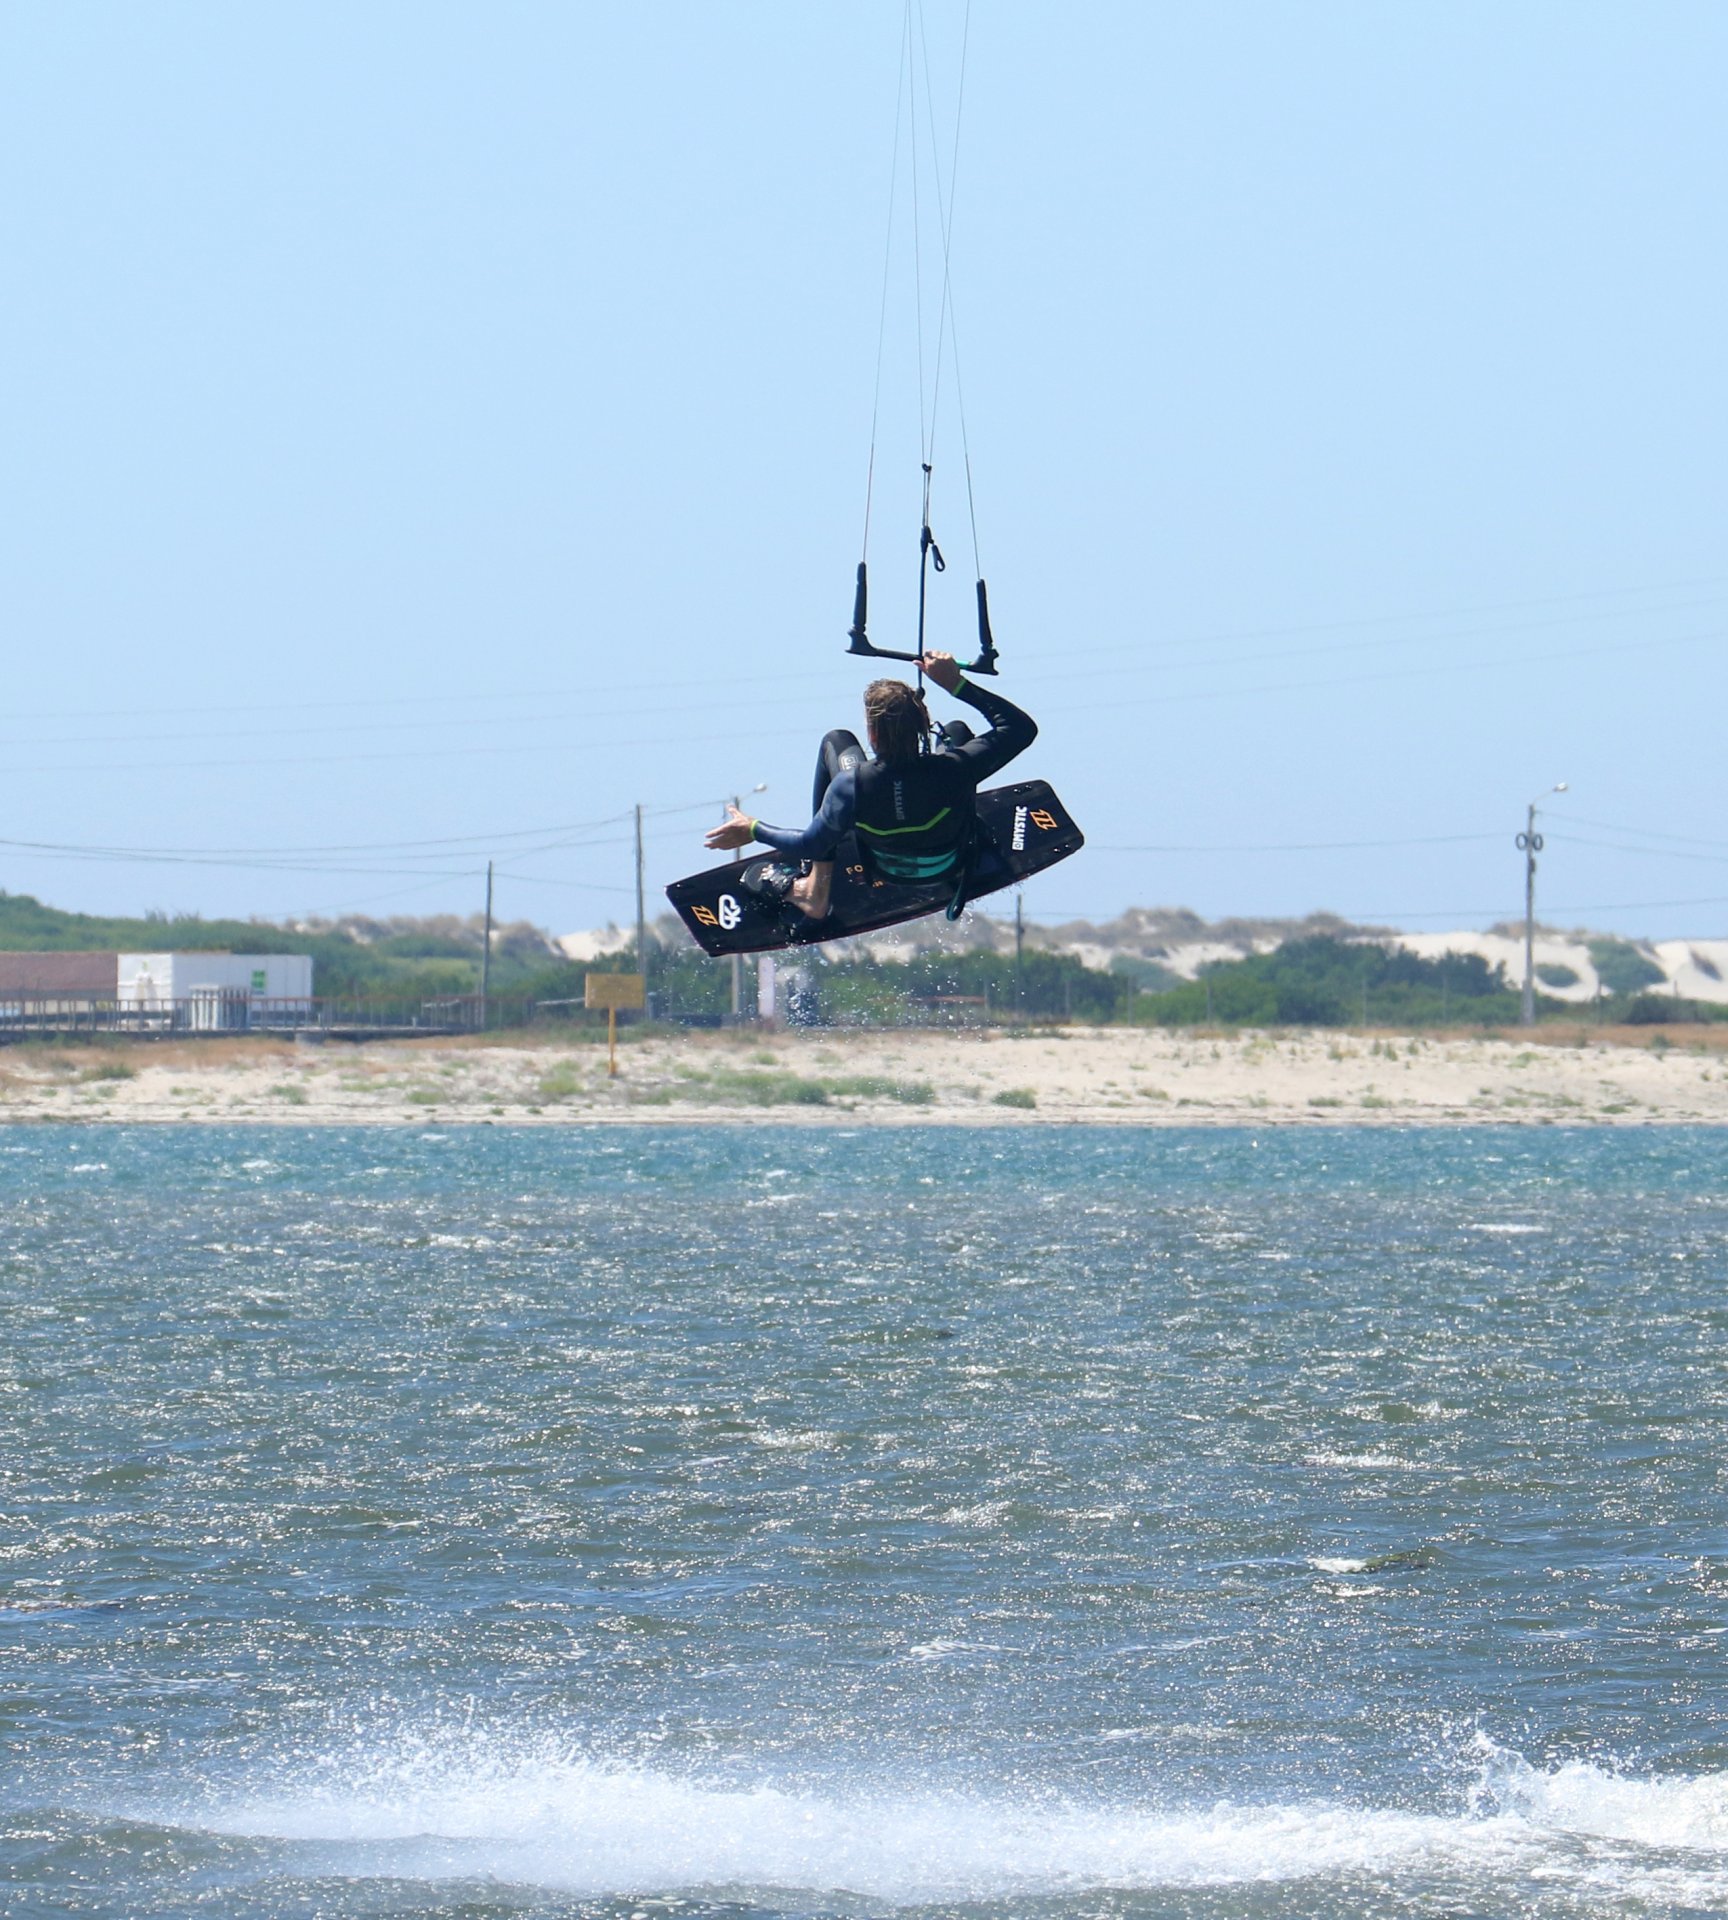
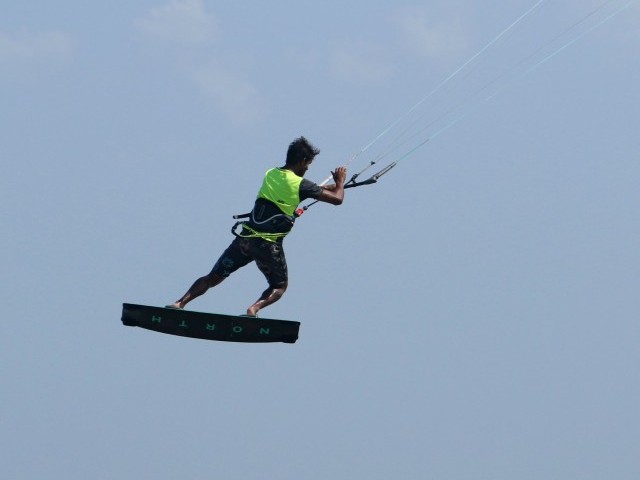
Front Foot First Pic E
The beauty with the tail grab board off is that you don’t need to be flexible to get the board off or on. Once your feet have fleetingly bared themselves, get them back into hiding. Couple of things to consider: You’re most likely on your way down now, so a bit of extra lift will be welcome. Get on the front hand and steer the kite forwards. As it moves, it’ll hold you up just that tad longer, which will give you more time to get your feet in and complete the rotation. As for getting your boots back in the stirrups, when you’re holding the tail, it’s front foot first. You can see Christian is watching and guiding his front foot into the front strap whilst holding the board steady. He’s also steering the kite for lift.


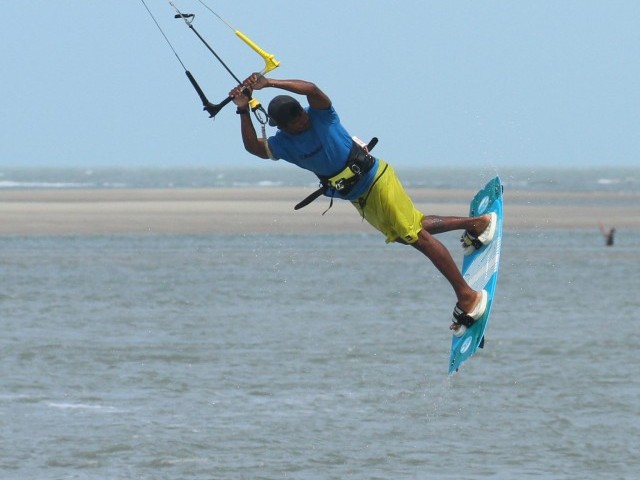
Back Foot Pic F
Once your front foot is in, you’ll have much more stability with the board anchored on two points, hand and foot. This means that you’ll feel more balanced, and you’ll have more confidence to slot the back foot in whilst starting to dive the kite for the upcoming landing. Once again, Christian is looking at his back strap so that he can guide his foot in without stubbing his toes. As his back foot feels its way in, Christian can steer more aggressively with his front hand to get the kite diving for landing.
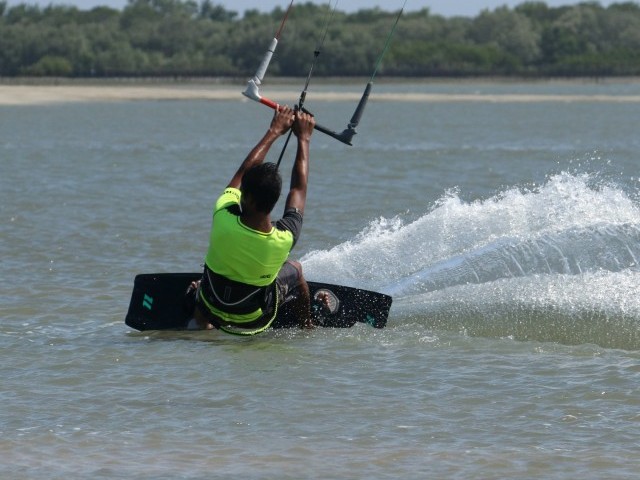
Familiar Territory Pic G
With the kite diving and the resultant pull, you will be able to turn your head and look downwind towards where you’ll land. Hold your legs up so that your board comes around with you and your feet staying firmly planted in the straps. In the photo, Christian is looking at his landing zone, getting his back hand back on the bar, and with the board held up, he’ll be able to land over it, flat and balanced as per any good reception.
Top Tips
Practice both parts separately to get the muscle memory going. Bash out a few board offs and a handful of slow back rolls. For the board offs, concentrate on keeping the arm and wrist strong so you can hold the board steady, don’t let the nose drop. In the back rolls, concentrate on a short sharp send, an early stamped take-off and a more upright position.
Loosening your foot straps will make it easier to learn. You can wiggle your feet loose, which helps in getting the board off, but it can still make it tricky to get back in. If you’re confident of getting them back in quickly, you’ll be more confident to steer and dive the kite for landing and be rewarded with that secondary lift.
You don’t need to be lit, but if you’re underpowered, you’ll have to swing the kite like a baton twirler to get off the water, and everything will seem rushed and difficult. A larger floaty kite will give you more time to learn.


Have a walk-through of the sequence and a good look at the videos to see the process in full.
Common Problems
The most likely and undoubtedly most annoying problem is a violent or amorous board. Whether it’s slapping you on the shins or cuddling up close when you’d rather keep it at arm’s length, the wind will always try and push the board towards you when it’s upwind of you. Keep your arm and wrist strong, and make sure you extend your legs slightly away from you before sliding the board off. This can also be a result of taking the board off too late, as the wind is straight on the entire underside. If you can get it off before the nose passes fully through the wind, you’ll be the one choosing to pull it around.
If you’ve got no time, it’s as sure as hell that you’re spinning too quickly. Make sure that you keep your back leg strong and don’t turn your head as you turn up. However, even with perfect form, if the kite is swinging madly past 12, it will pull you around quickly, so concentrate as well on a shorter send and a hefty levelling of the bar on take-off.
Keystones
- Good edge, short sharp send.
- Stamp and level, head up.
- Push board away with legs as you slide it off.
- Strong arm and wrist.
- Front foot and dive, back foot and land.
This technique article was in Issue 88 of IKSURFMAG.
Related
By Christian and Karine
Christian and Karine have been working together as a coaching team, running improver to advanced kitesurfing clinics since 2003.
