
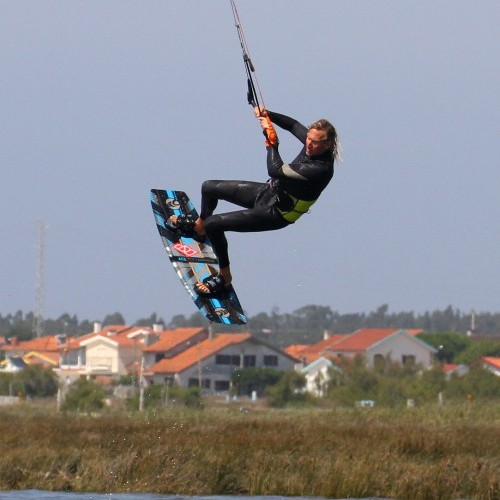
Toeside Back Loop Downloop Transition
Technique / Intermediate

Introduction
If Paul Simon were a kitesurfer, he’d have surely written about the numerous ways to leave the water and perhaps more poignantly about how many transitions there are on offer for us to learn. So here is another for those of you that love adding bows to your quiver, enjoy a decent challenge and have good enough memories to remember every move that you should be doing when you hit the water.
This will obviously be a whole bunch simpler if you can already back roll from toeside, but if you can’t don’t let us stop you from using this as a how to for the first part before you cheekily add the sneaky downloop. What is essential though is a decent toeside. Without it, you’ll be lost and left floundering around in the shallows. How does it work?


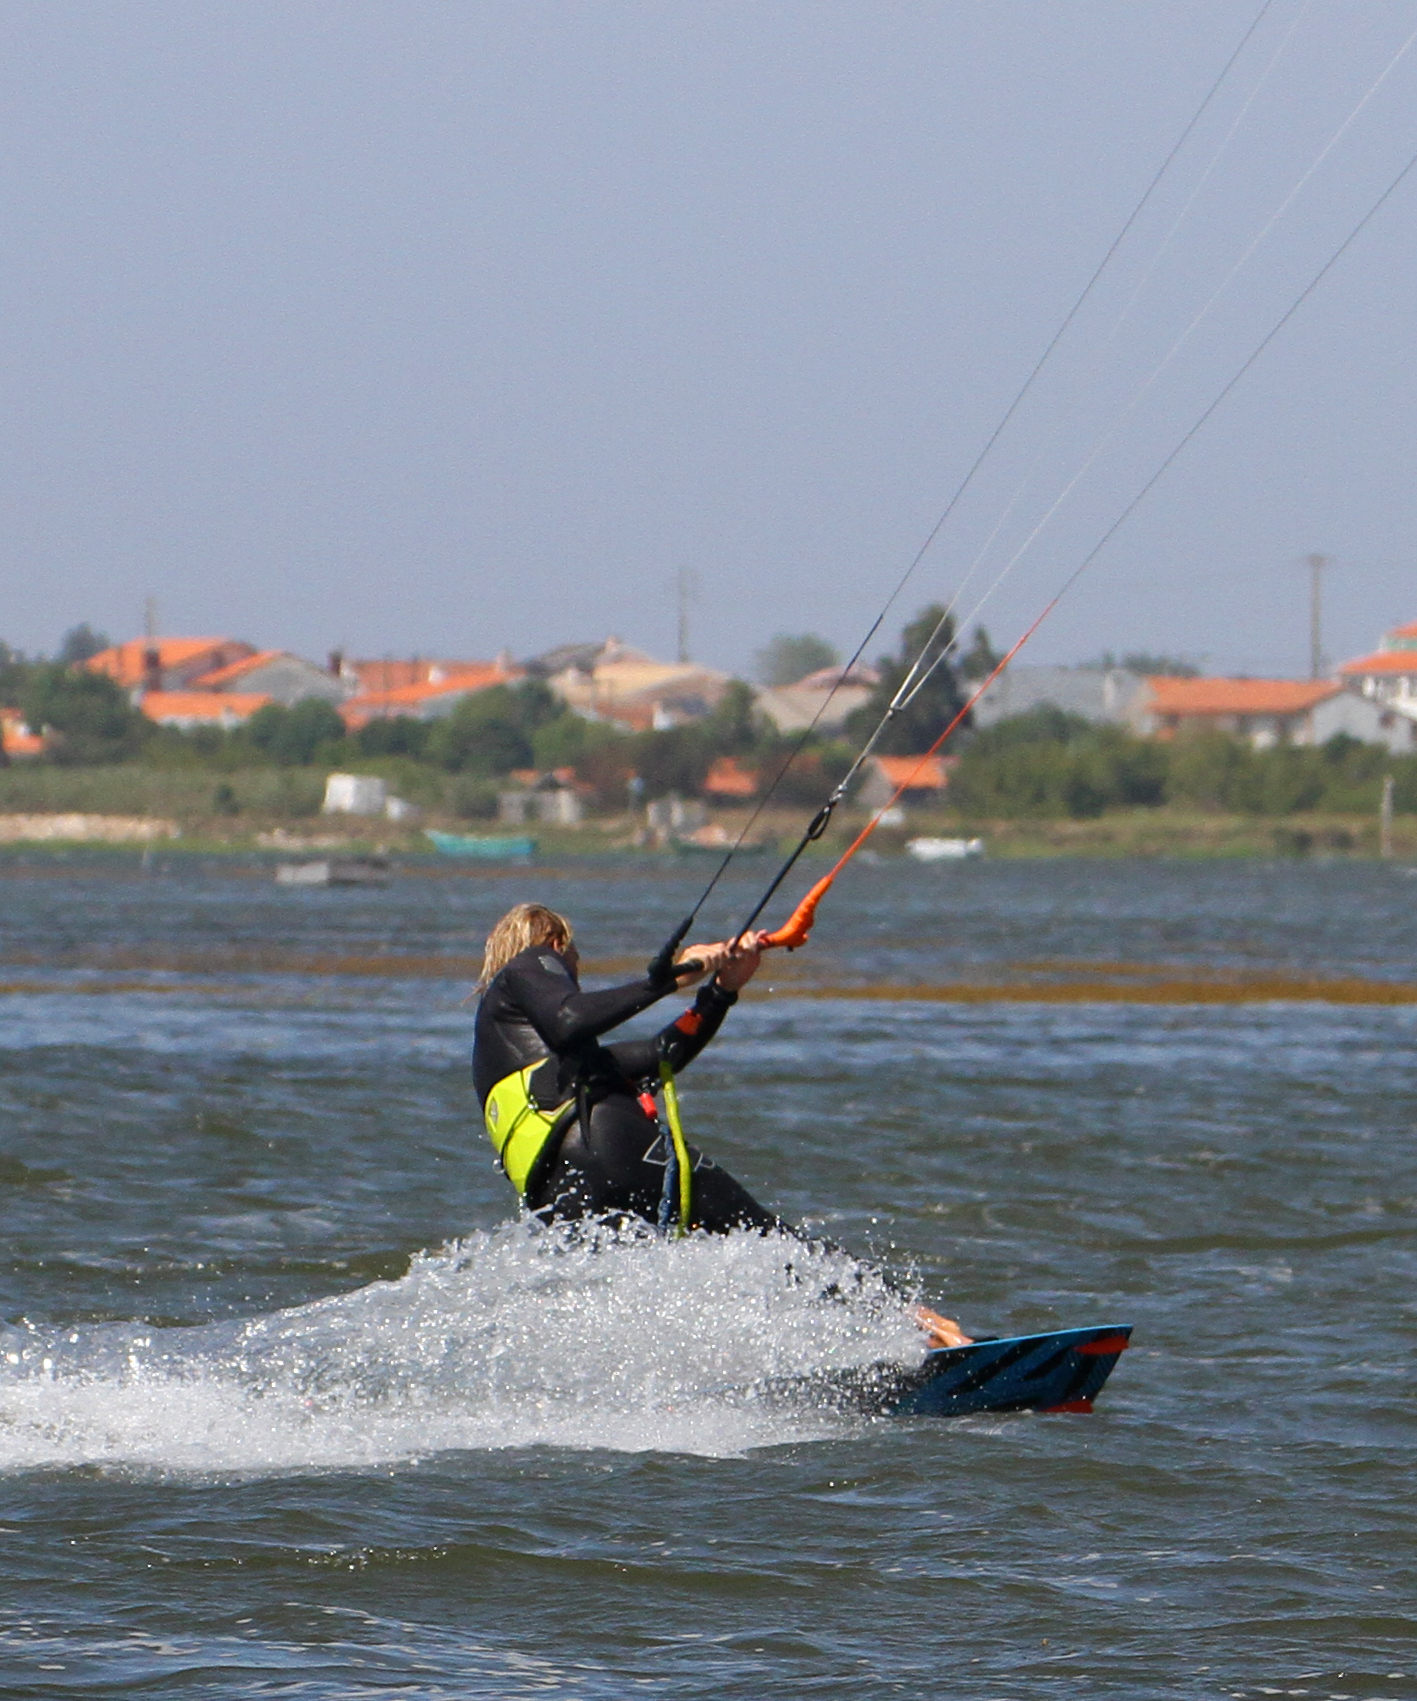
How Long Is Your Edge Pic A.
That pretty much sums up our aim here – getting all the edge in the water. Let us ponder why! Much like heelside, if we are to attempt anything sent, using the kite for jumping, it’s all about resisting. To resist efficiently and effectively you need a whole lot of edge. The more edge you have in the water, the more resistance you get, but without drag. Drag slows you down, resistance squirts you forwards.
Now think about your early attempts at toeside, or perhaps toeside on your weaker foot – where is your weight. Right back over the tail of the board. You’re sinking the board; it’s dragging through the water and slowing you down. It might feel like resistance, but really it’s no different from towing your pyjamas behind you. To make it efficient, you have to learn to get your weight forwards, trimming the board from front to back while still edging.
Look at the picture, and you can see plenty of Christian’s board in the water. Suffice to say you need to get your weight forwards and onto your front foot. The easiest way to do this is to open your chest, facing forwards down the board so that you have a shoulder each side. This with a bent front knee, head dipped forwards and both knees driving forwards, pointing in the same direction and working together opens the door to a world of possibilities.
Think of a surfer racing down the line or a slalom snowboarder in hard boots. Coming into any toeside trick, this is your approach position, speed, no drag and kite flying at 11 or 1 o’clock on the edge of the window, ready to send.
Timing Pic B.
With the aim of adding a back rotation, you will need to add a bit of back leg kick, which can only be done with your weight back. However as discussed in the last paragraph you can’t just be back as it all goes Pete Tong. Also, it’s impossible to kick off your back leg if all the power you’re edging against while sending the kite is already transferring through it unless you’ve got thighs like Luis Picamoles.


The art here is to time perfectly when to drop back over your back foot to kick up into your rotation. If you have a look at Pic B. Christian has sent the kite from 11 o’clock and was still edging on all his board during the approach. As the kite reaches around 12, he’s edging super hard but then drops his weight quickly back by moving his hips and extending his front leg. However, he doesn’t bend his back leg anymore as he would then lose his edge. From here he’s ready to kick. It’s a sudden movement, from edging to suddenly rocking back a kicking off.
Kick Off Pic C.
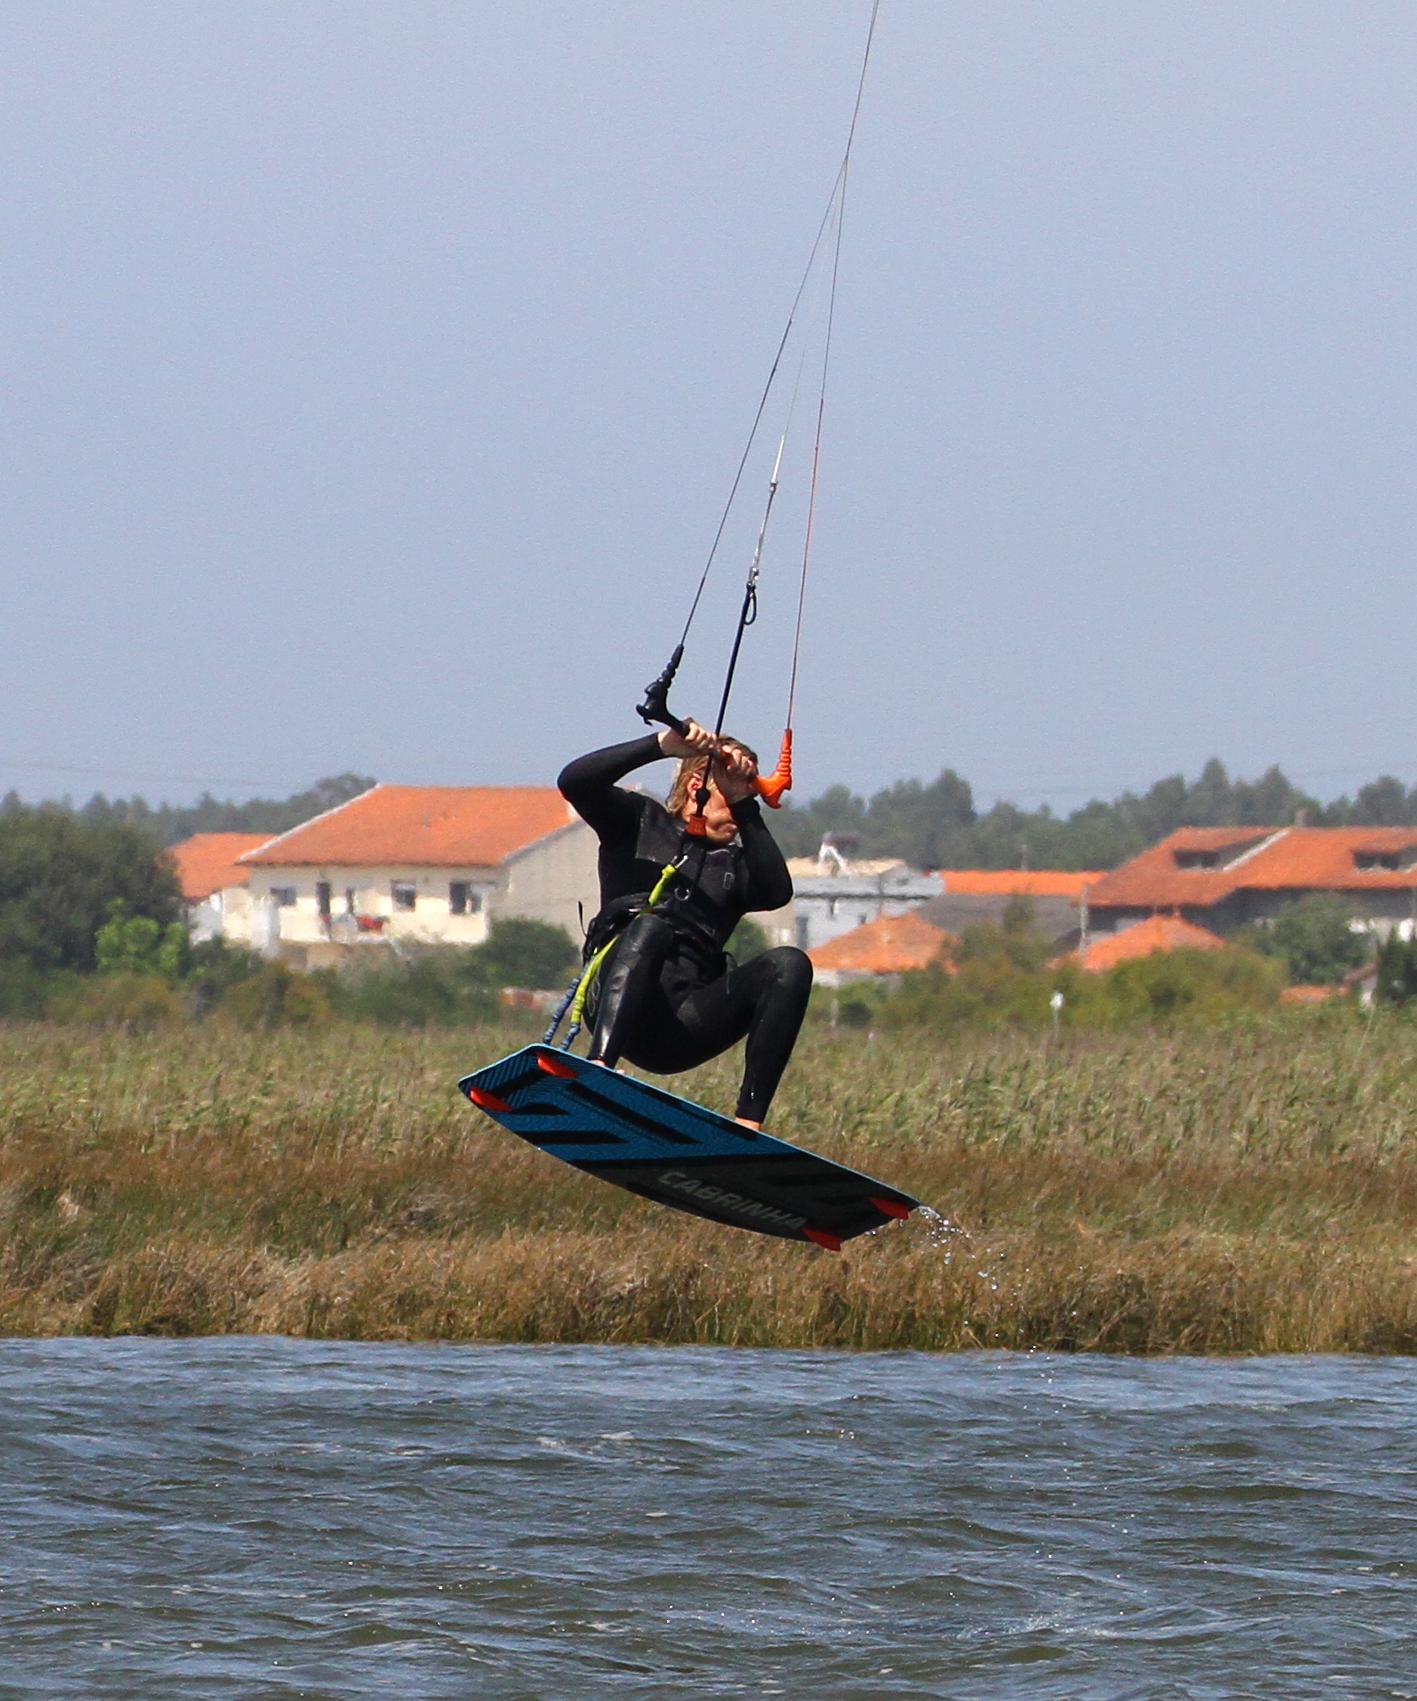
And this is again why the edge was so important. Going into a back rotation from toeside requires you to lean back as the kite passes 12. This way you’ll take off, and the kite will pull you slightly back as it also lifts you. As you feel it pull, you must stamp down against your edge, digging the tail in as this will encourage more up and less back. You can see in the pic that Christian’s board has not turned any further upwind into his rotation, but his shoulders are back and his head is turned. As long as you go up, you’ll have time to rotate. Once you do start to go up, it is super important to stop the kite going any further back in the window. As a result of being toeside, and thus it potentially being a weaker edge your kite will likely fly further back than you’d like, so stop it on take-off by levelling the bar as Christian has here.

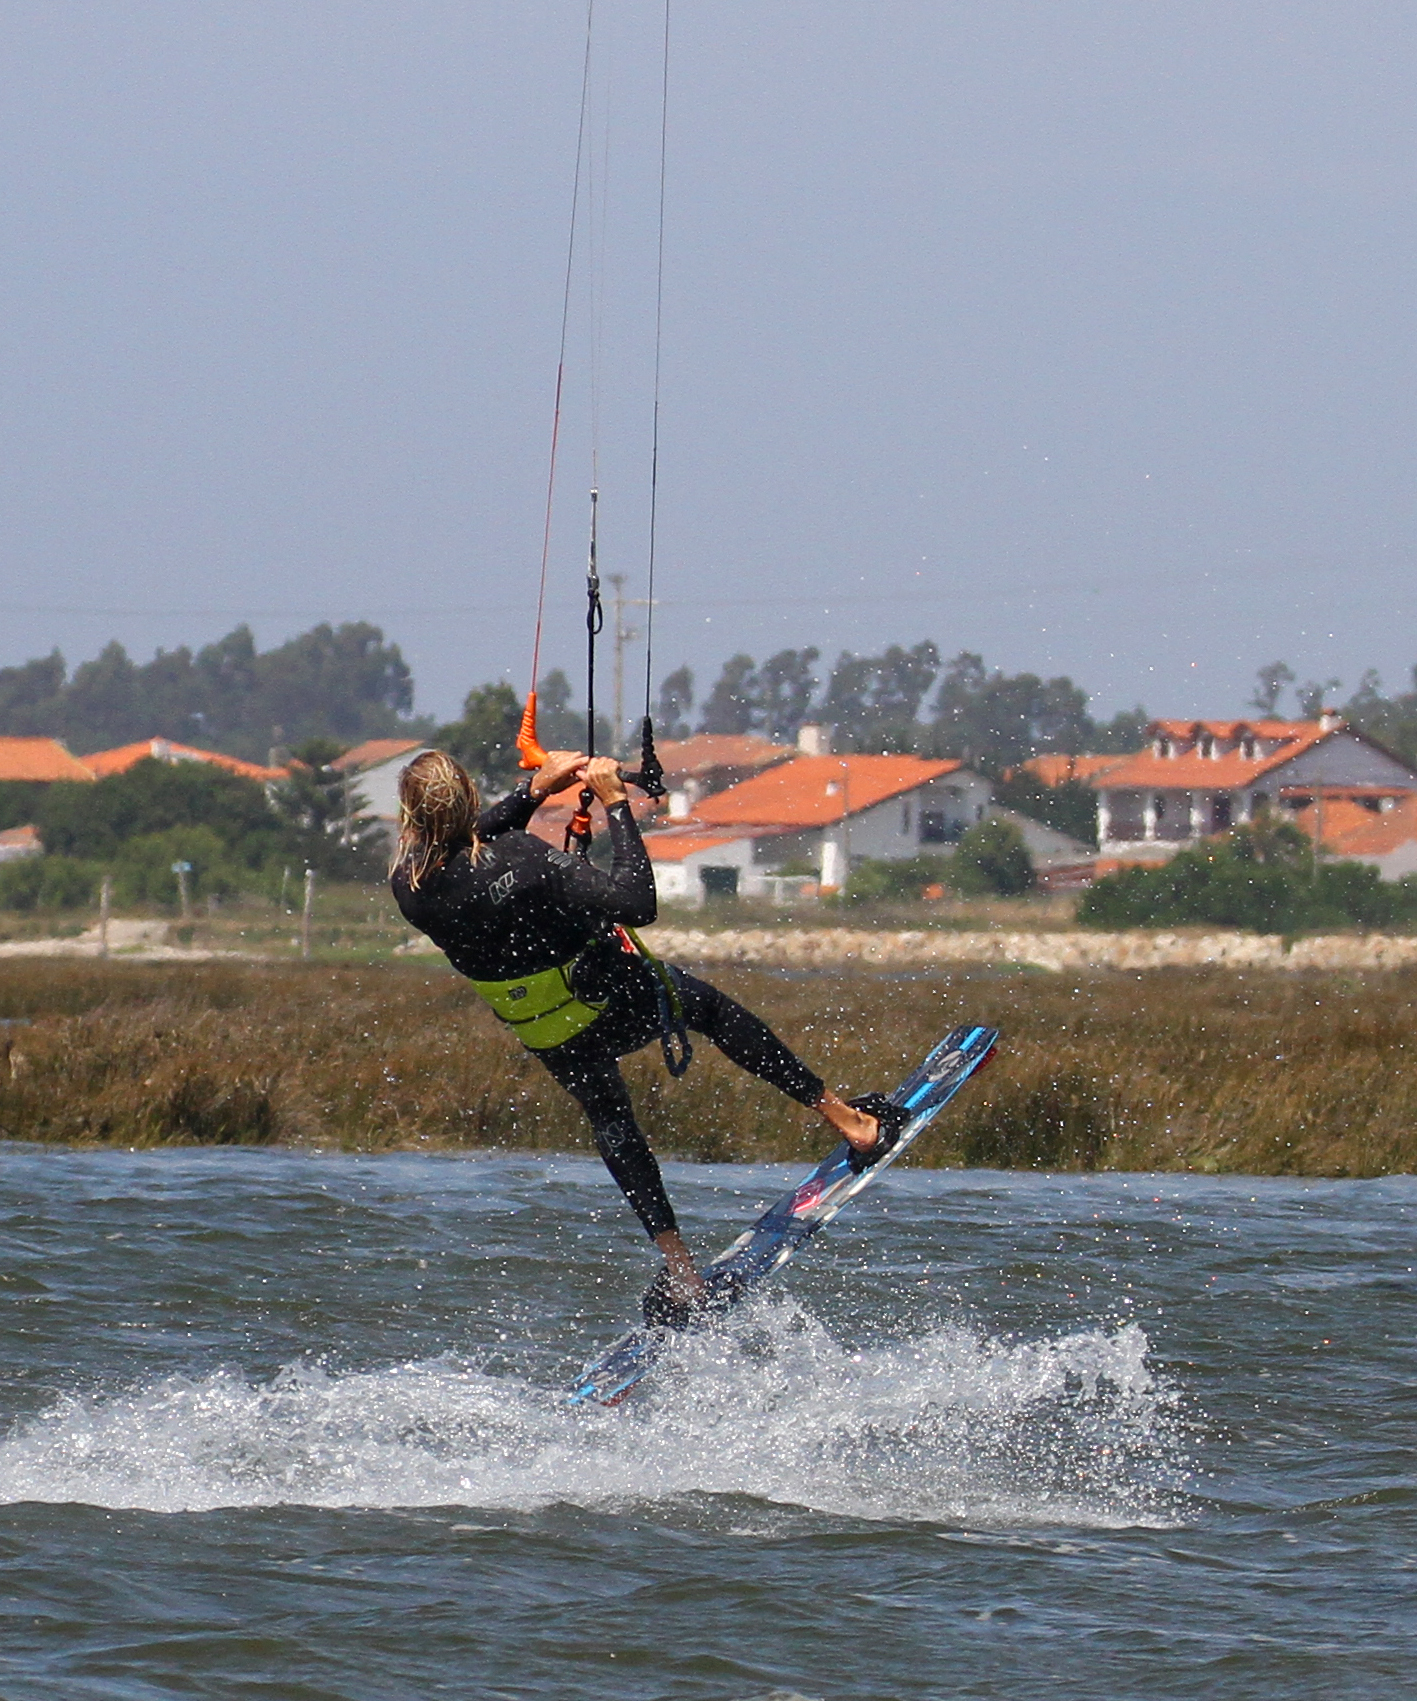
Rotate Pic D.
The rest of the rotation should be simple enough once you’re up as long as you can keep control of the kite. With the kite keen to go back, you need to be aware of where it is at all times. Even though it’ll help pull you back and start your rotation, if it carries on back it’ll just dump you down again. Your next goal is to get the head and bar working together with the help of your legs. This isn’t a circle your belly and tap your head moment as everything is trying to do the same thing, which is moving around. The head is the easy bit, look over your front shoulder in the direction that you want to turn. The bar needs to be steering the kite forwards now, as you want to take it back across the window so that it is moving towards the other side, and will, therefore, be ready for the downloop. This will only be possible if you keep the bar in on the sweet spot. Let the bar out, and you’ll spin uncontrollably. Now it’ll be much easier to keep the bar in if you bring your knees up, and this will give you more control as you won’t be dangling. If you look at Christian his bar is in and he’s steering the kite forward, he’s looking where he wants to go, and his knees are lifted. As a bonus, with your knees up, turning the board at the end for the landing will be a piece of cake.
The Moment Pic E.
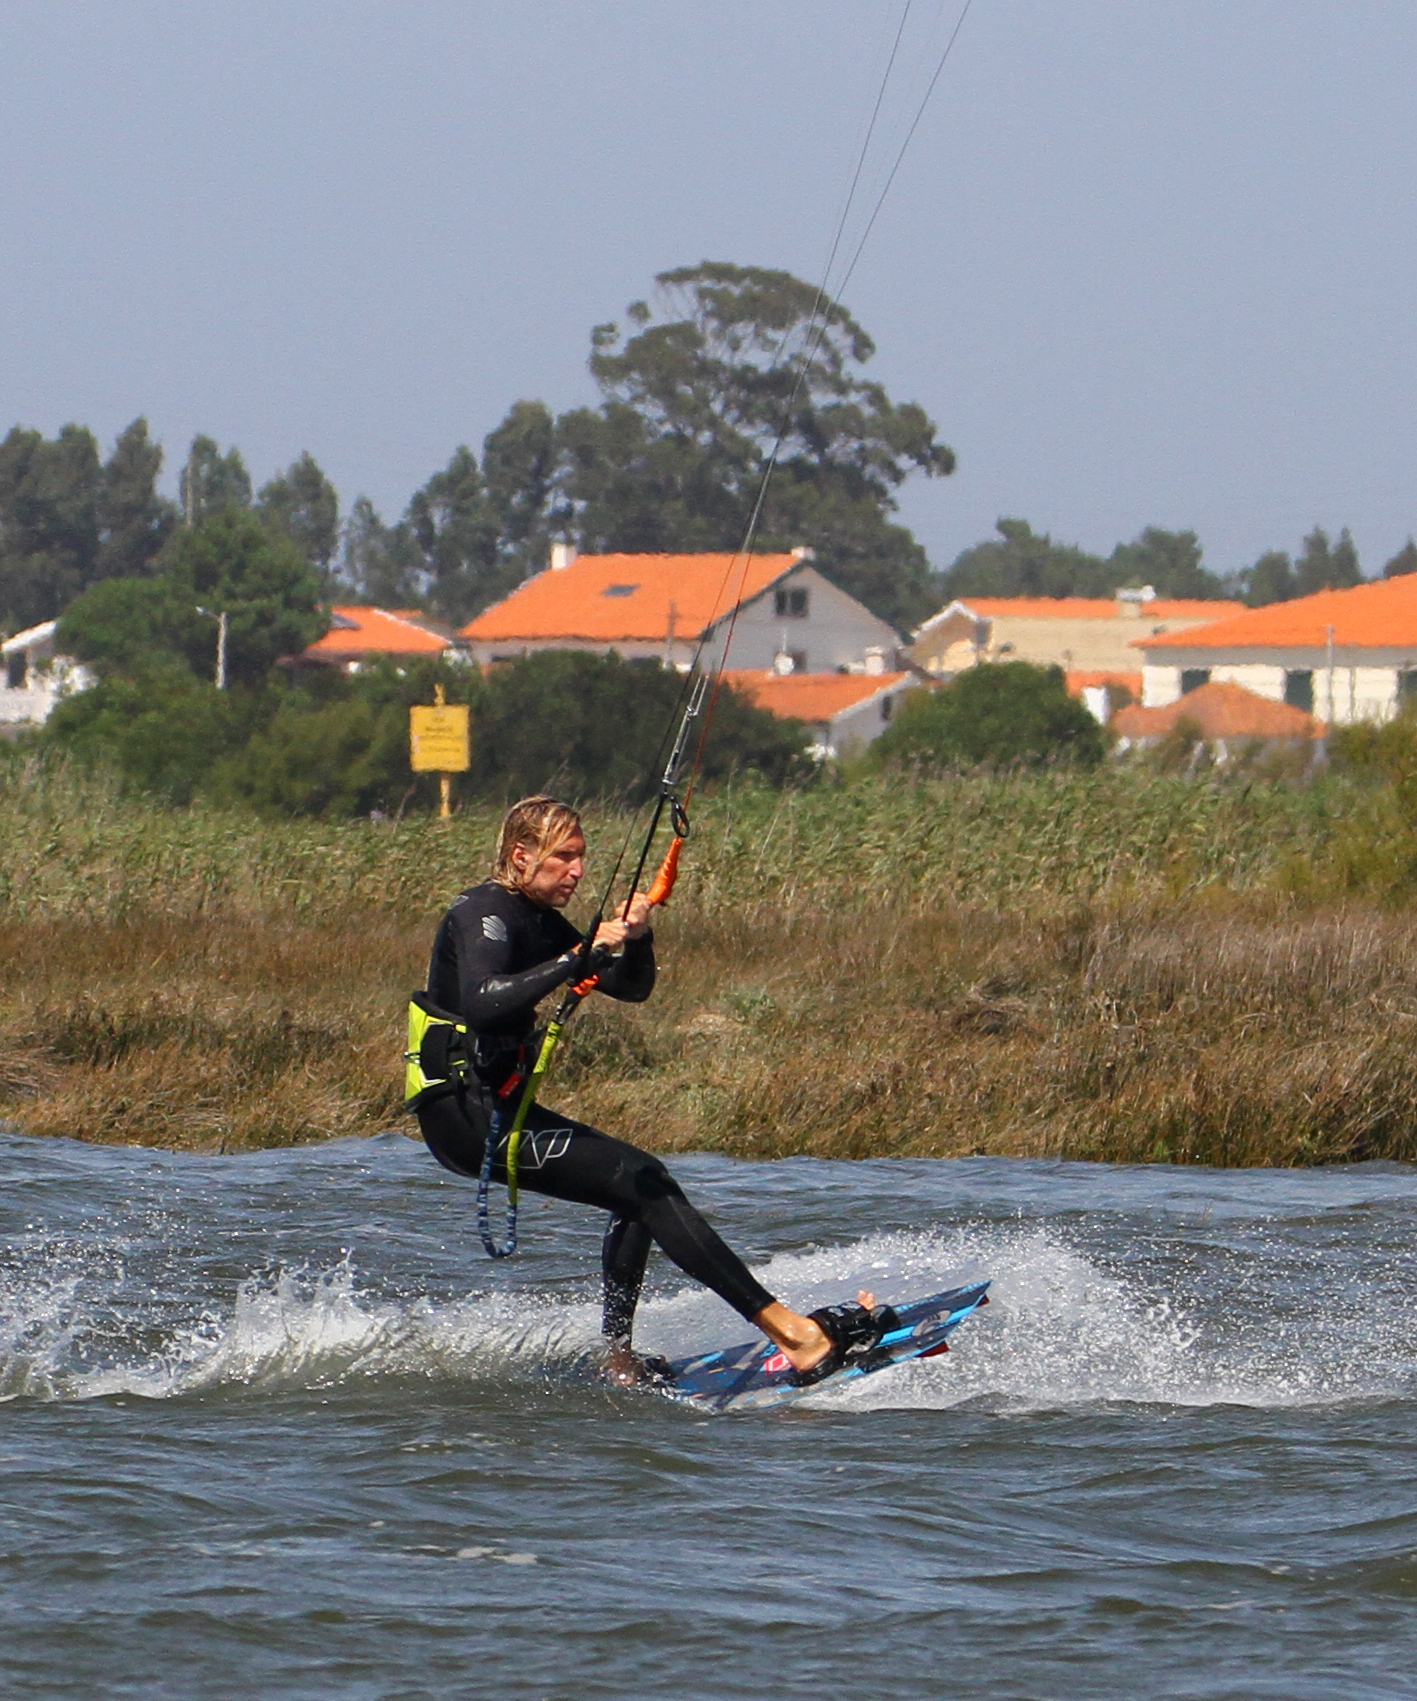
Now that the back rotation is in the bag you need to maintain control, add the downloop and position your board and body so that they will stay balanced and be ready for the landing. As already mentioned, to get some pull out of a downloop the kite needs to be back across to the other side of the window, so in Christian’s case somewhere between 11:30 and 11. Then to land the downloop, you’ll almost be doing a back roll to toeside. As you need to land other foot first to go back the other way. Rather than bring the board through all the way, you’ll be landing downwind. To make this happen, you must bring your back knee up high so that you can bring it through. This will all happen in a blink of an eye, so the final ingredient is commitment, keep the bar in, steer the kite down and around and bring the knee through. You can see Christian is steering the kite down, not overly aggressively as it’s progressive from his redirect, his bar is in on the sweet spot, and his back knee is high so that he can bring the board through.
The Finale Pic F.
The result of all the previous parts. As the kite downloops it should pull you relatively gently down wind, so go with it as you bring the back leg through for what is almost a toeside landing. If you pulled too gently or too late the kite may come through once you’ve already landed, but if you time it right you’ll need to steer the kit forwards towards the new direction of travel to stop it going back up and loosing power.
Top Tips
Your take of is everything in this trick so work on getting it smooth and predictable. This is a sent move so you do need to give the kite a decent sharp sending. Maybe not for as long as a heelside jump, but certainly with meaning. The kite moving fast is what will give you the lift, so be positive.
A you drop your weight back, rolling onto the tail of the board be sure to keep your back leg pushing against the power. If it goes soft, the kite will go too far back and not a lot will happen, so keep driving against your board.
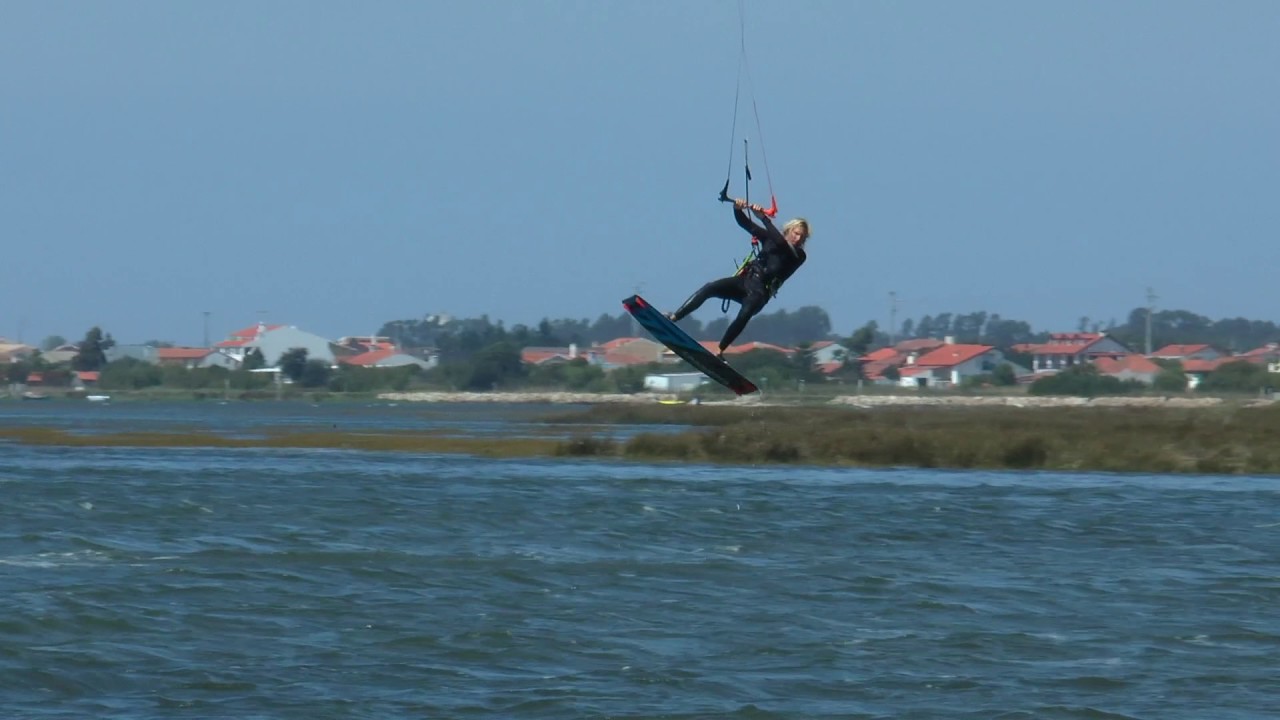
Now have a look at the sequence and videos to get a good idea of what you’ll be up to…

Common Problems
This is a move where we’ve deliberately tried to cover the issues as we’ve gone through because it hopefully makes you realise why you’re doing certain things and therefore should make it easier to learn. However the most common error is the take off and not getting any air. This is usually the result of trying to initiate the rotation by turning upwind, rather than edging and rolling back, so be sure to concentrate on this when you’re practicing.
Keystones
- Solid toe side edge with speed
- Good short sharp send
- Roll back and kick off whilst levelling the bar
- Look over shoulder, redirect kite and bring legs up
- Pull on front hand whilst bring back leg up and through
This technique article was in Issue 64 of IKSURFMAG.
Related


By Christian and Karine
Christian and Karine have been working together as a coaching team, running improver to advanced kitesurfing clinics since 2003.
