
Popped Back Roll
Technique / Intermediate
Introduction
Some time ago, back in IKSURFMAG Issue 84, we took you through the joys of popping and all its necessities, including a brief foray into board design. Today, we intend to marry your well-rehearsed pop to a perfect bedfellow, the back roll. We’re talking full horse and carriage here! When the planets align and you hit a sweet one of these off the centre of your bat, it will feel more than incredible. As a prerequisite, you should already have popping in the bag. Now, to some, this will be your first venture into the world of back rolling. If so, it’s achievable, but already having a back roll in the bag will be a massive bonus. Either way, read on to find out how you are going to turn this dream into a reality.
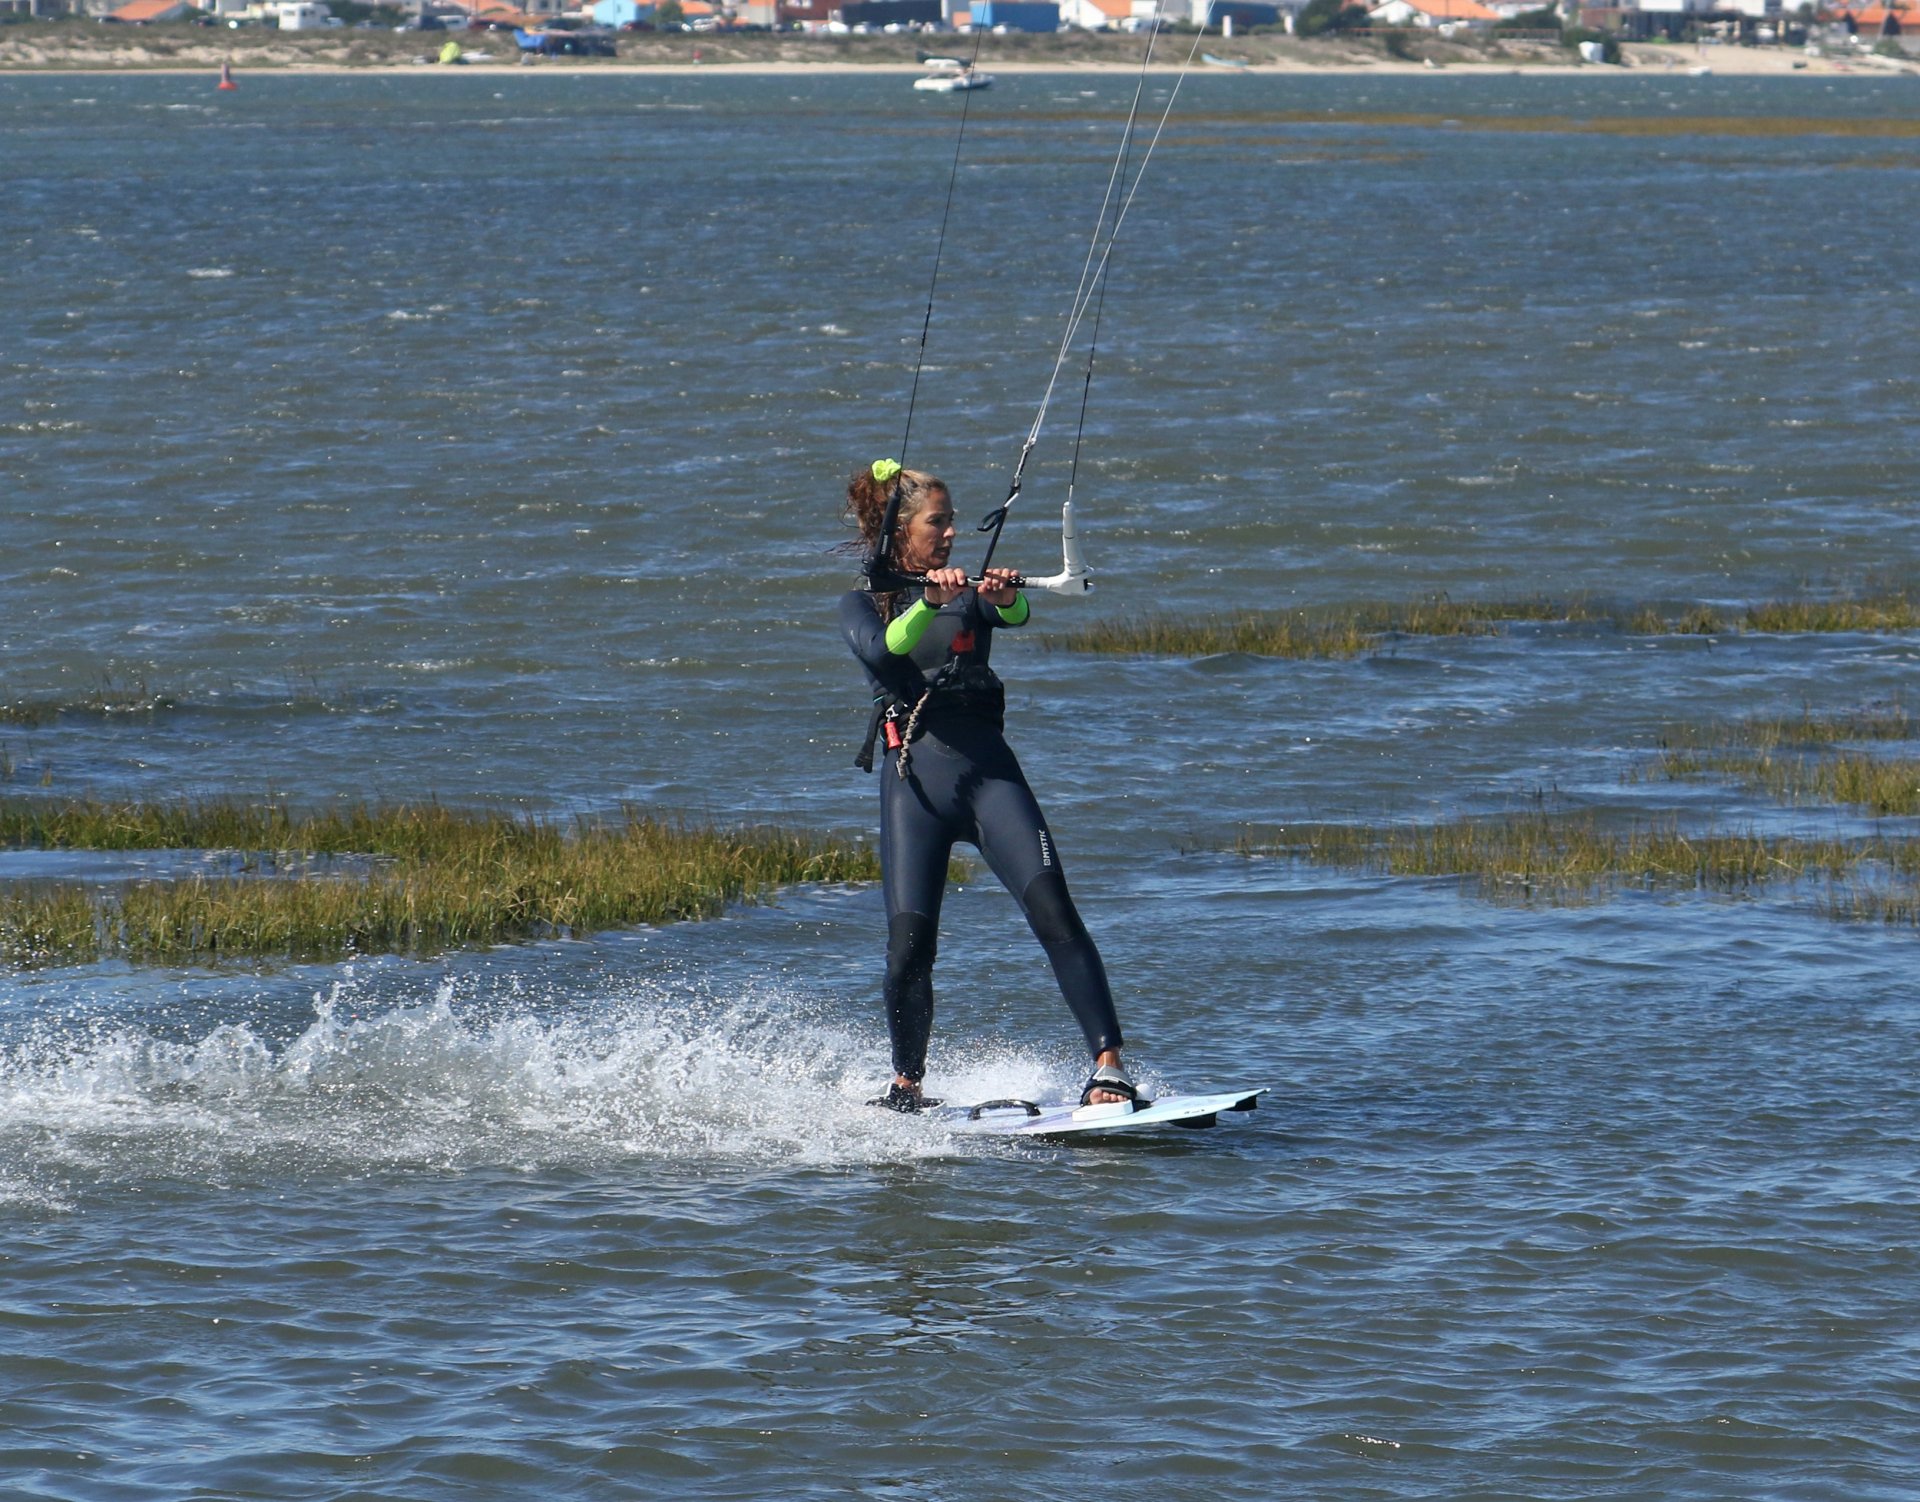
The Approach Pic A.
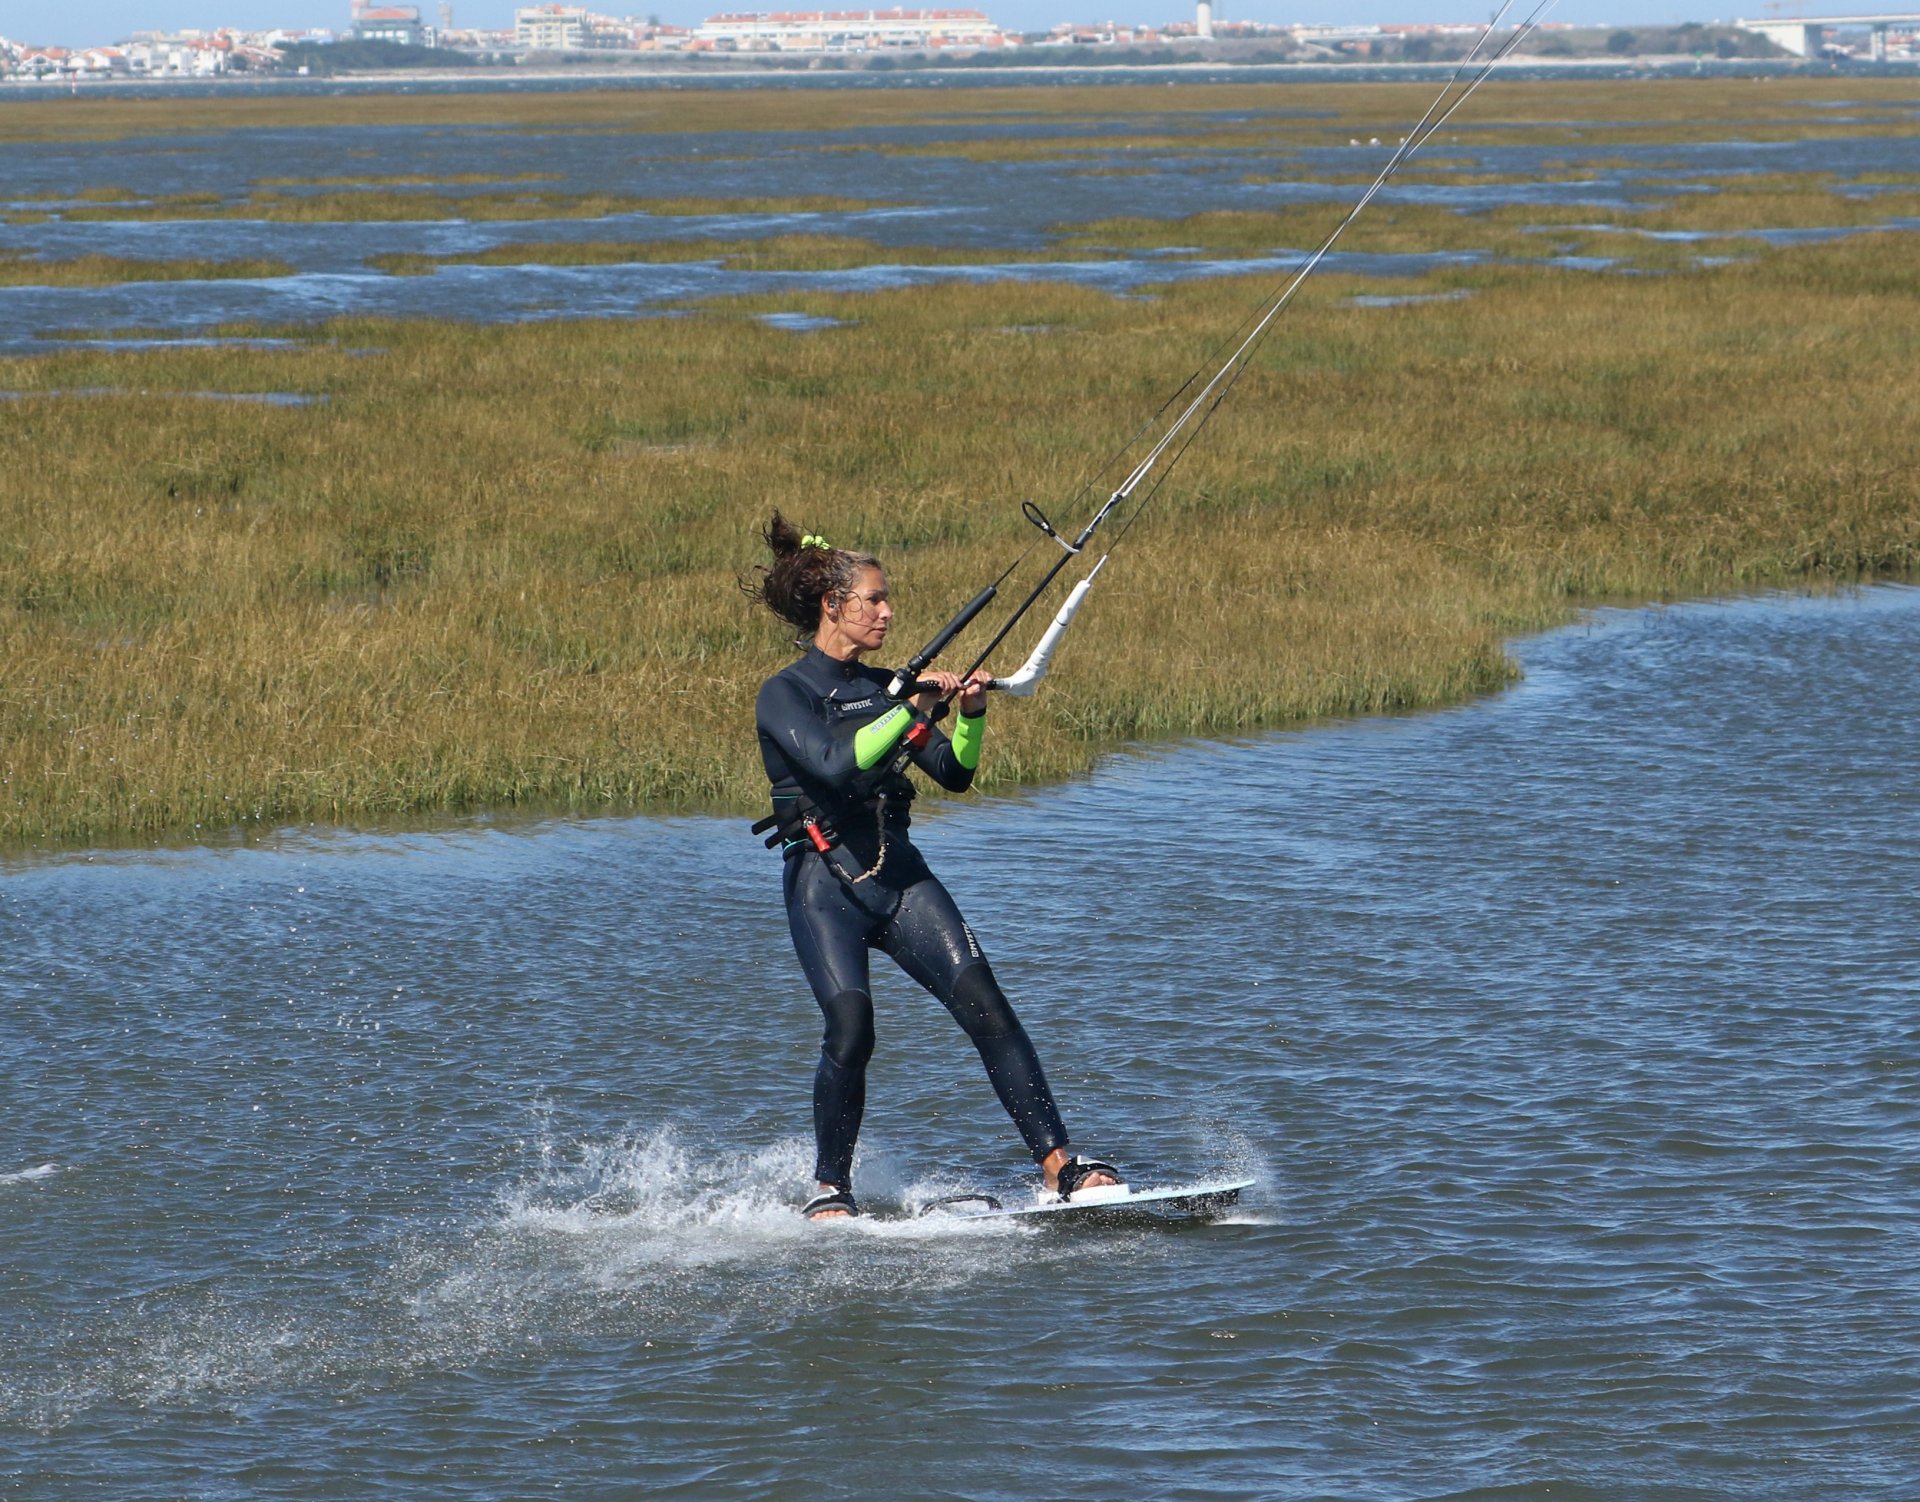
Your approach and set up are vital, as are the conditions. Search out some flattish water if you can, as it’ll up your chances, but make sure it’s deep enough for a soft bail. Just as per popping, trim your bar so that it’s easily reachable when you have your bum low, get your hands centred, and approach on an edge across the wind. Move your weight and hips back to get on the curvy tail of your board and drive through your back heel so that you can feel the pressure in your leg; this is your default popping stance. Looking at Karine, you can see that she’s edging, but not massively upwind. Even with her weight low, her bar is within easy reach. Her hips are back so that she’s on the curvy bit of the board. With her kite parked at 11 o’clock, she’s locked and loaded.


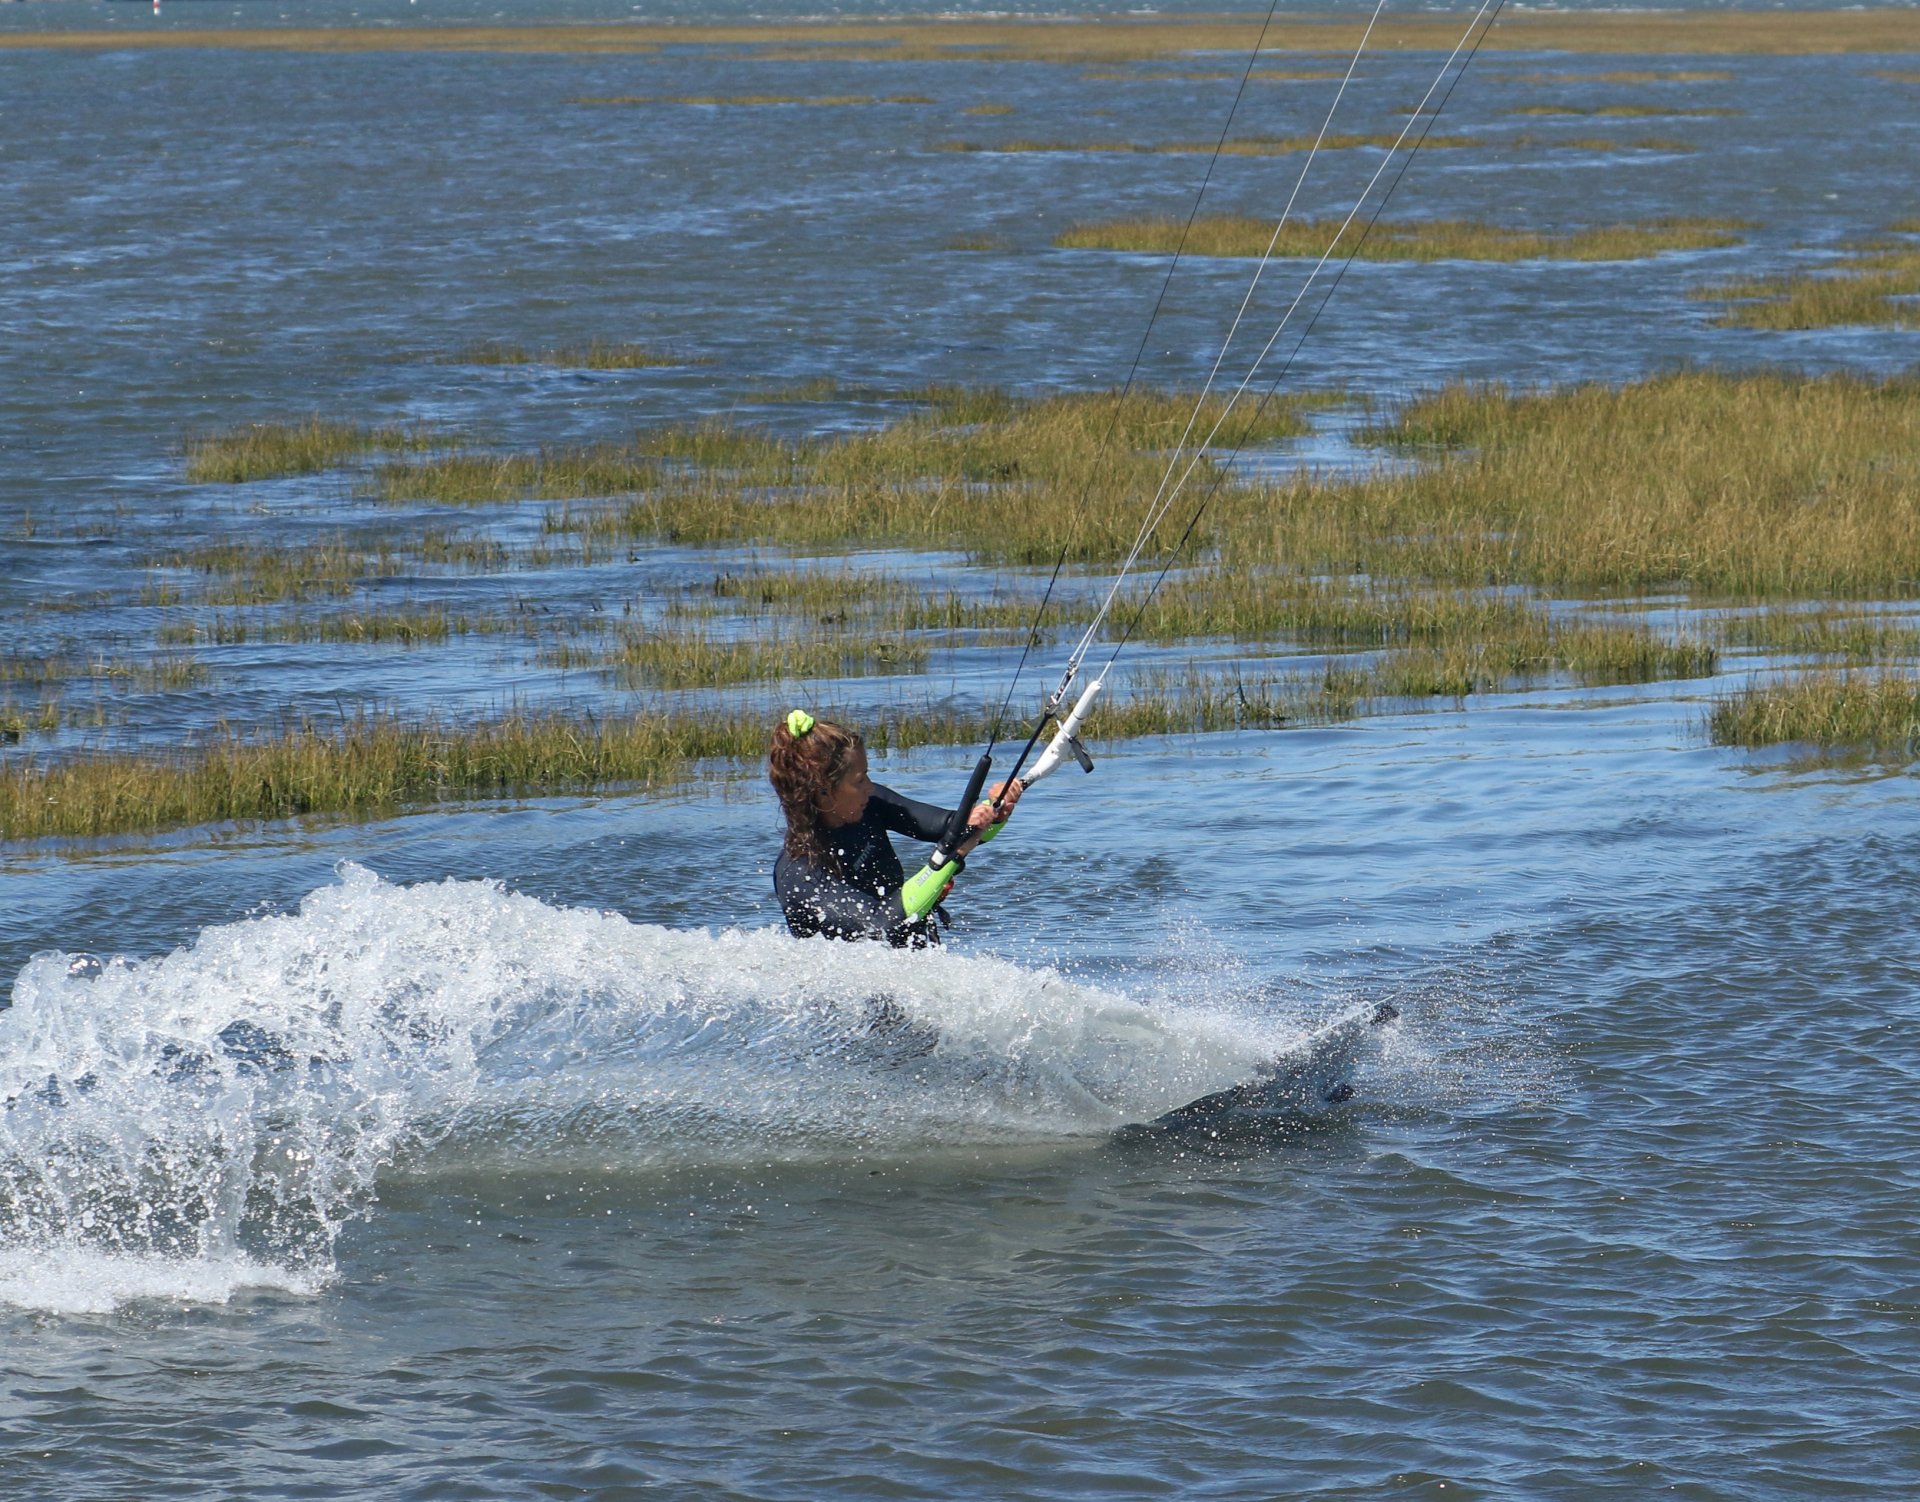
Bear Away Pic B.
Bearing away and flattening your board off is probably the hardest part to get used to in popping. When going for a popped back roll, you’ll need to exaggerate your bearing away, as it needs to be a fair bit more than for a straight pop. The same reasons apply. Bearing away means that you can carve up without stopping. It drops the kite deeper in the window, so you have something to pop against and something to pull you out of the move for your landing. Additionally, by bearing away, you can take off and complete most of your back roll in the air, giving you more time and the potential for more height. If you carve most of the way around on the water, you’ll just spin under your kite. To bear away, relax your back leg. With the pressure released, you’ll come up off your edge and move towards the kite. Keep your weight back and upwind, so that you don’t stand directly over the board or end up carving onto your toes. You can see that Karine’s back knee is soft, which released her edge and allowed her to push her board off the wind. With her weight back, she’s performing a little wheely, so her board is ready to carve back up, but her bum and shoulders remain upwind of the board. As you bear away towards your kite, you should feel that the kite depowers as tension is lost from the lines. If it doesn’t, you’ve either got too much power or you haven’t borne away enough.
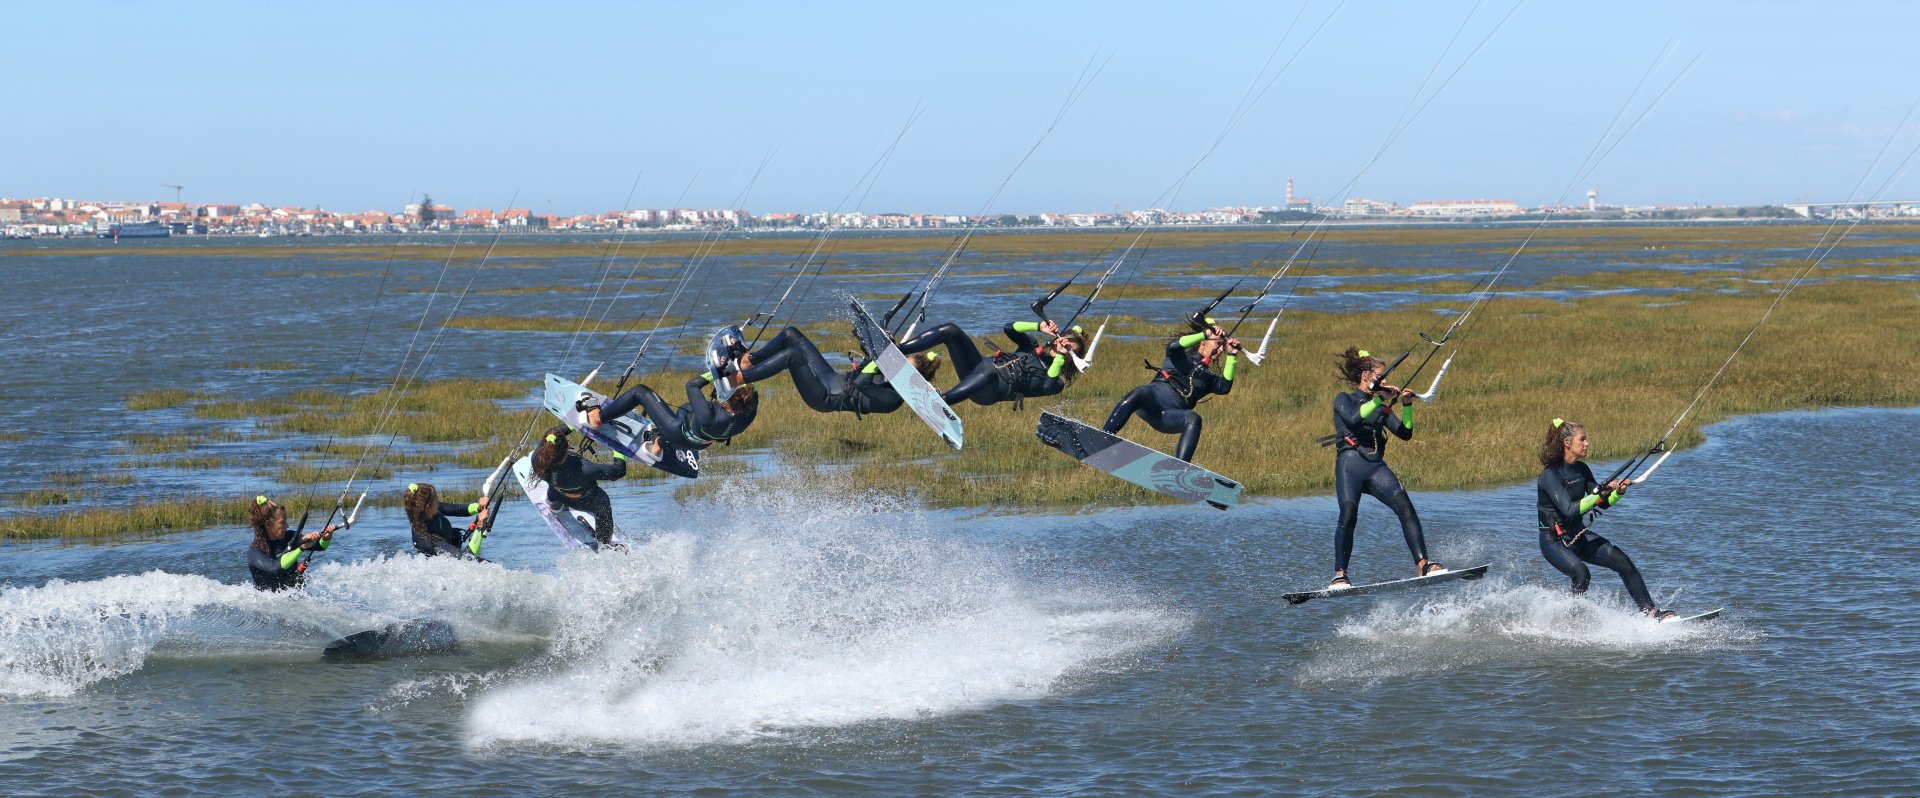
Carve Pic C.
As we alluded to in our popping piece, carving up is turning back onto your edge using the curvy shape of your board. However, the tools will only do so much, whilst you, the craftsperson, are saddled with the rest. The carve is important for two reasons; it enables you to regain tension so that you have something to pop against, and it initiates your back rotation. So, how do you carve up? In simplistic terms, you’re turning the board back onto its edge whilst keeping your weight back. However, it’s all in the way you get your weight onto that edge that matters. Your aim is to drop your edge deep into the water whilst banking your board over so that it’s resisting again. The first part is fairly intuitive as you can turn upwind using your head, shoulders, hips and feet. To make sure you have resistance, you also need to drop your bum whilst keeping the board between yourself and your kite. You can’t sit down as this will flatten the board. You need to hinge at the hips so that your bum drops away from the board, enabling you to push against it. This is why you need your bar trimmed close enough, otherwise you’ll end up with your shoulders forward, bum back, and you won’t have a hope of popping. Karine is carving back up, her weight is back, her kite is still at 11 o’clock, and, although she’s hidden by her rooster, you can see that her bum is way upwind of her board, and as such she can apply pressure through her back leg. One final point to add and live by: Don’t pull on the bar as you carve! If you do, you won’t be able to carve upwind enough to initiate your rotation.
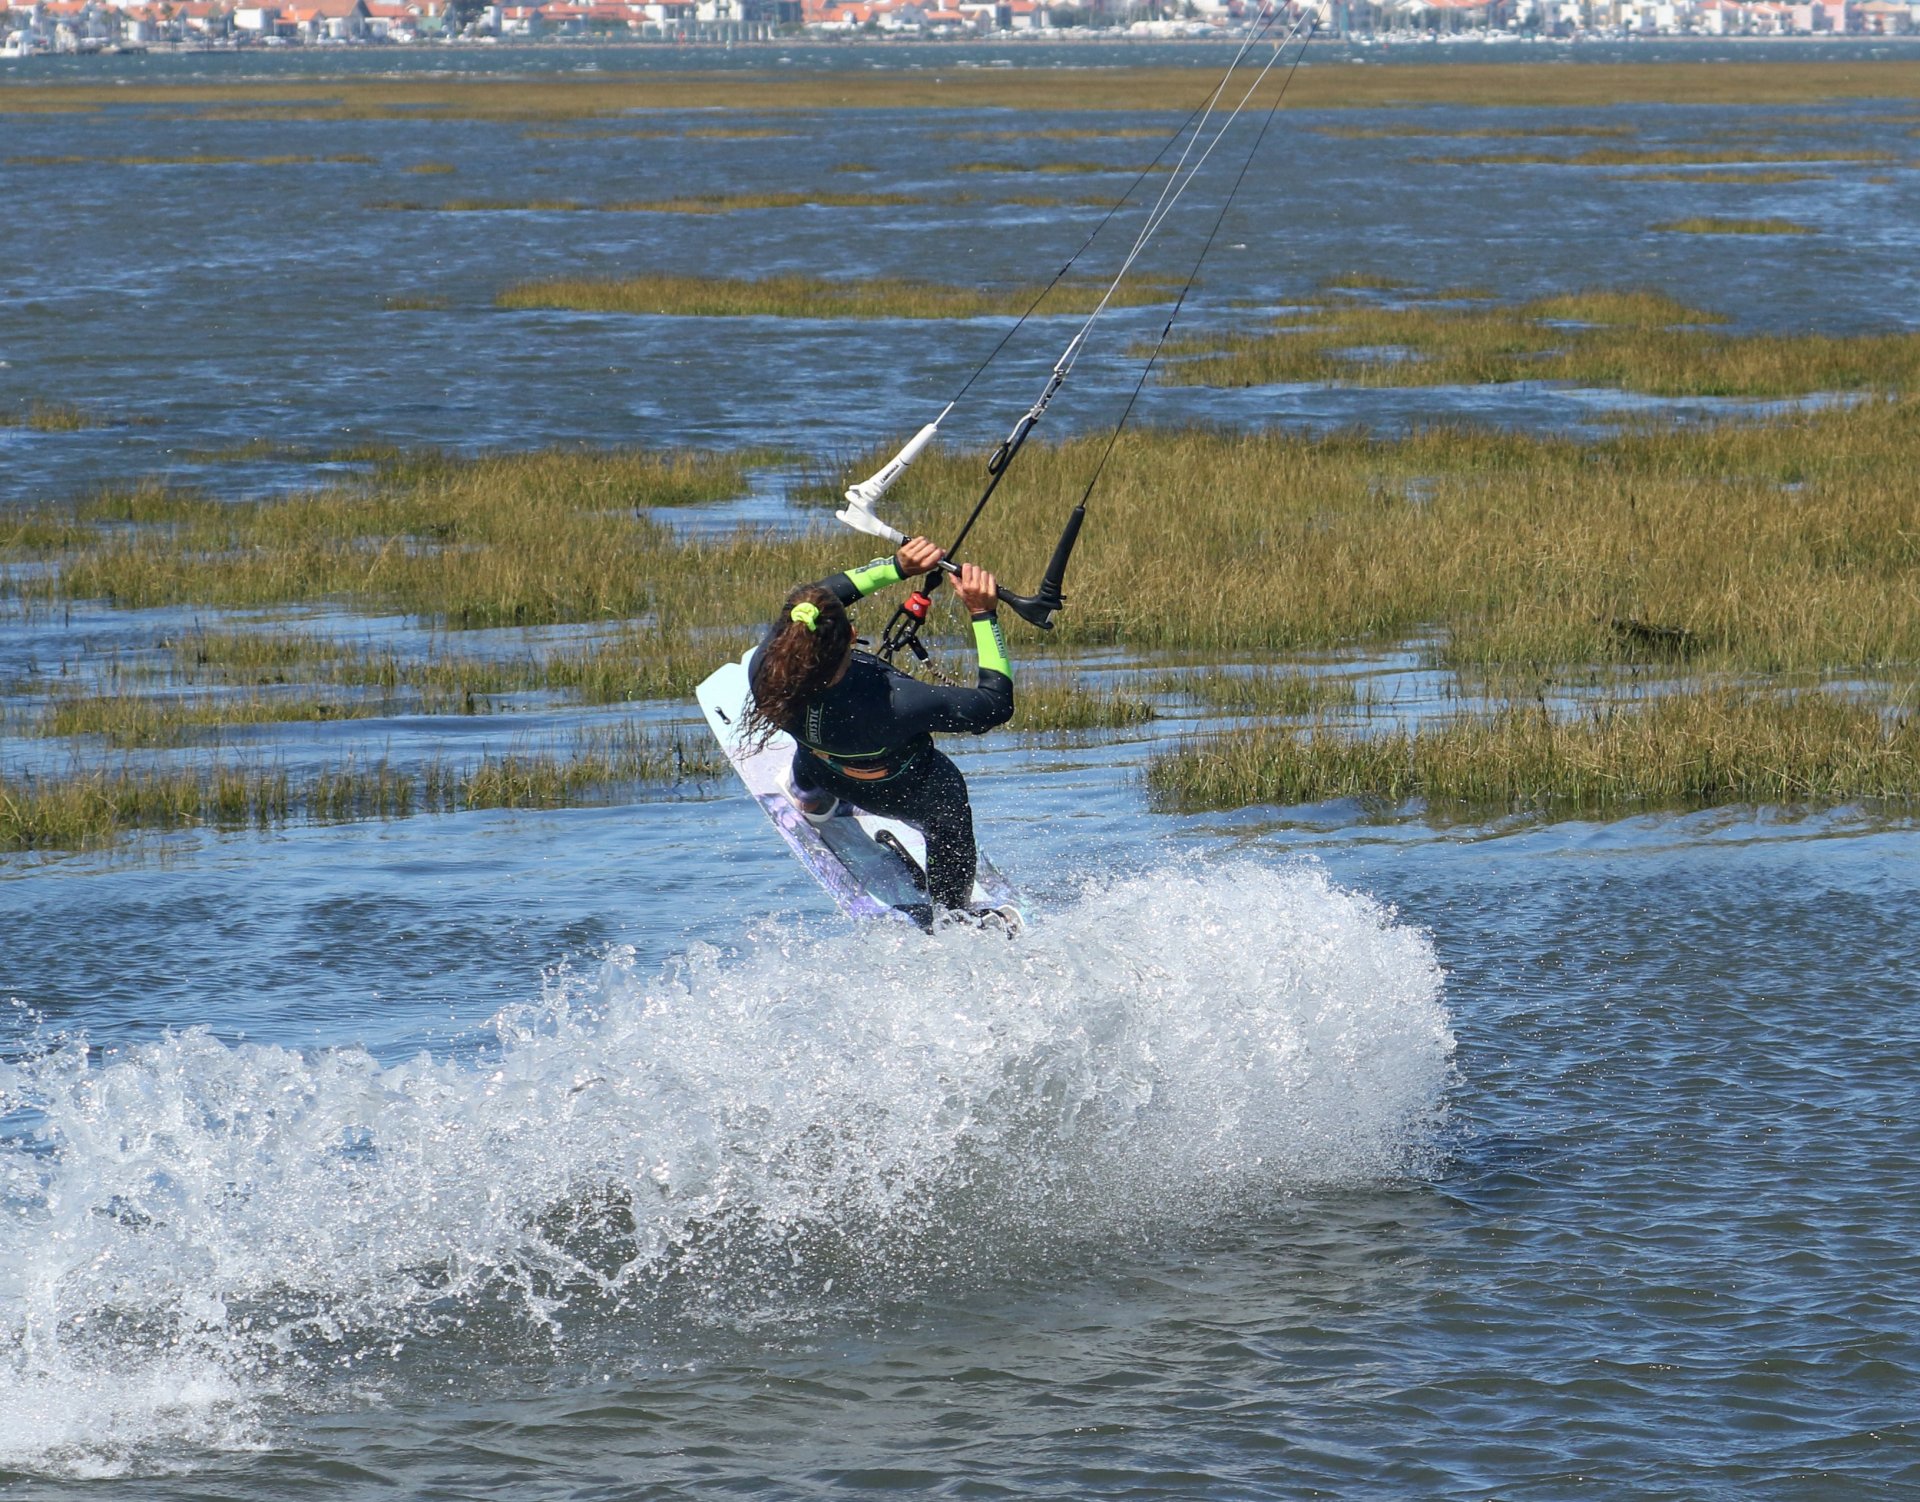
The Pop Pic D.
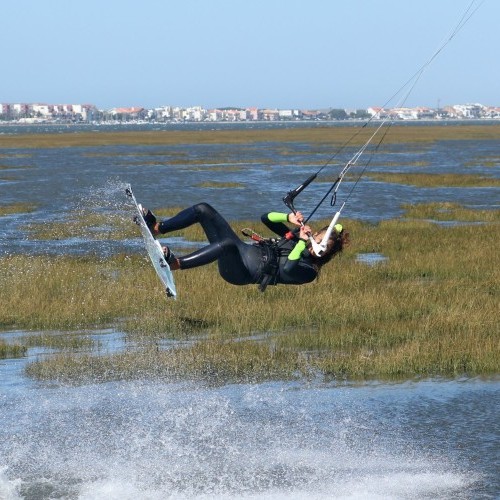
This is it, the moment of truth. The pop doesn’t just happen, you have to make it happen. Popping is stamping, explosively extending your back leg. The idea is not to give into six million years of evolution and bend your legs in anticipation, but rather use the bend in your legs that you have as you carve up. If you bend, you’ll lose your edge and all that tension. The main impetus is coming from your back leg, but the front will automatically assist. You also need to think slightly ahead, in that you’re aiming to rotate. This means that as you pop you want to continue carving, like a follow through after kicking a ball or a racket stroke. Keep carving by turning your head, shoulders and hips to look upwind and drop your shoulders back. Once again, the tail of the board will do its job. Timing wise, you need to stamp before you slow too much. This is balanced against turning enough to get your rotation. The stamp is a full-on extension and even though your weight is back on the board, aim to kick yourself up, rather than throw yourself around. Whilst all this is going on, your challenge is to keep the kite still. As per the pop, make sure you kick before you pull on the bar. In the photo, you can see how Karine has carved well into the wind before exploding up off her back leg. Notice how everything is turning together. Her board, hips and shoulders are all aligned.
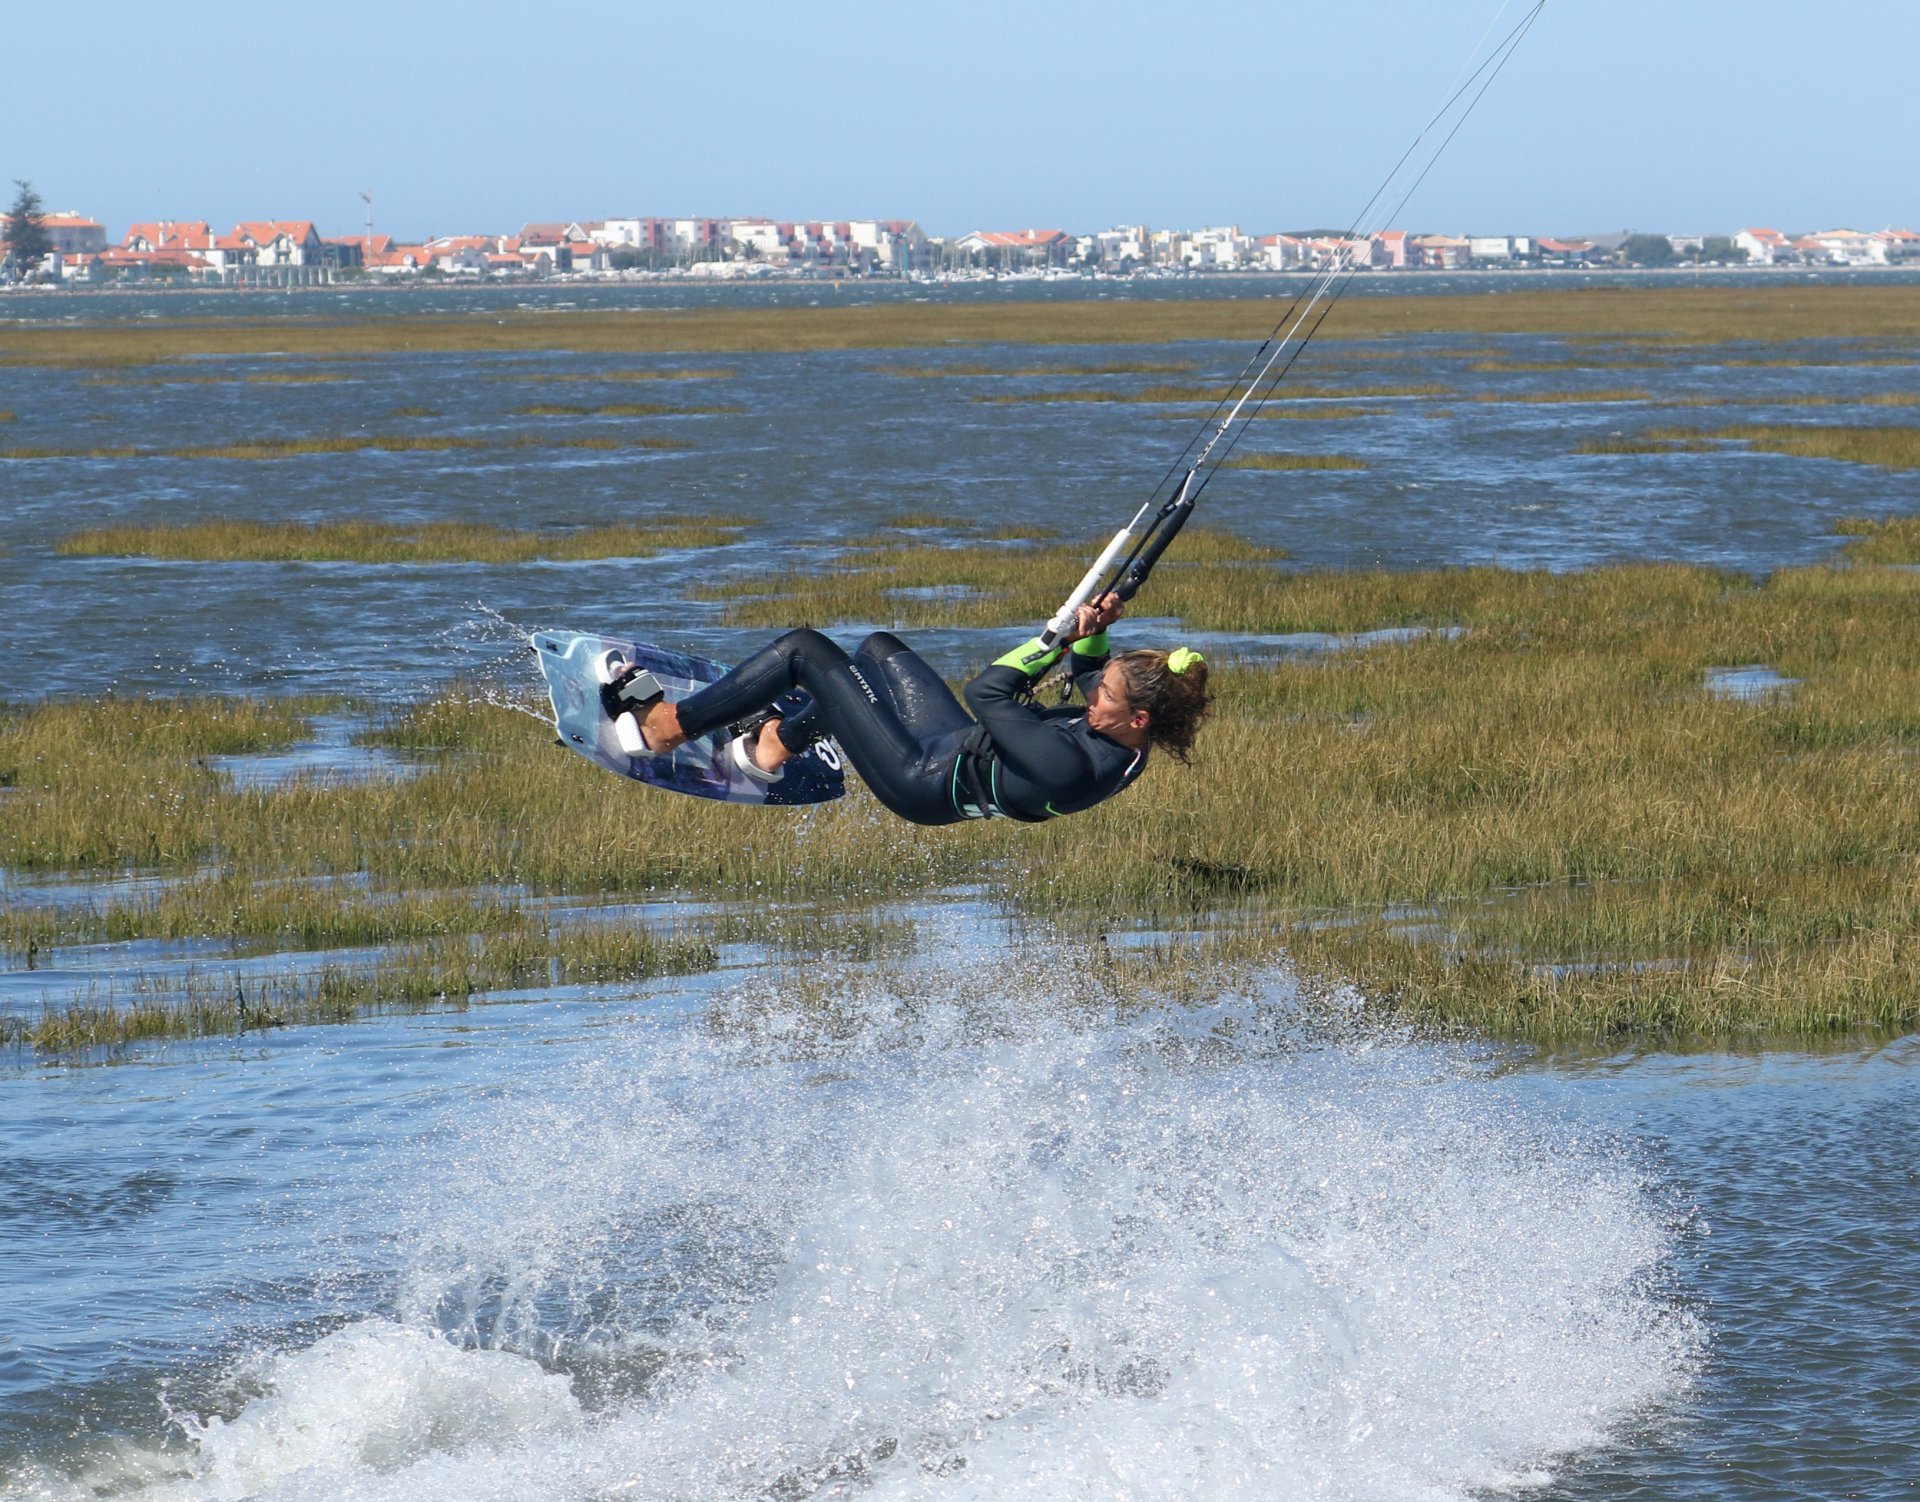
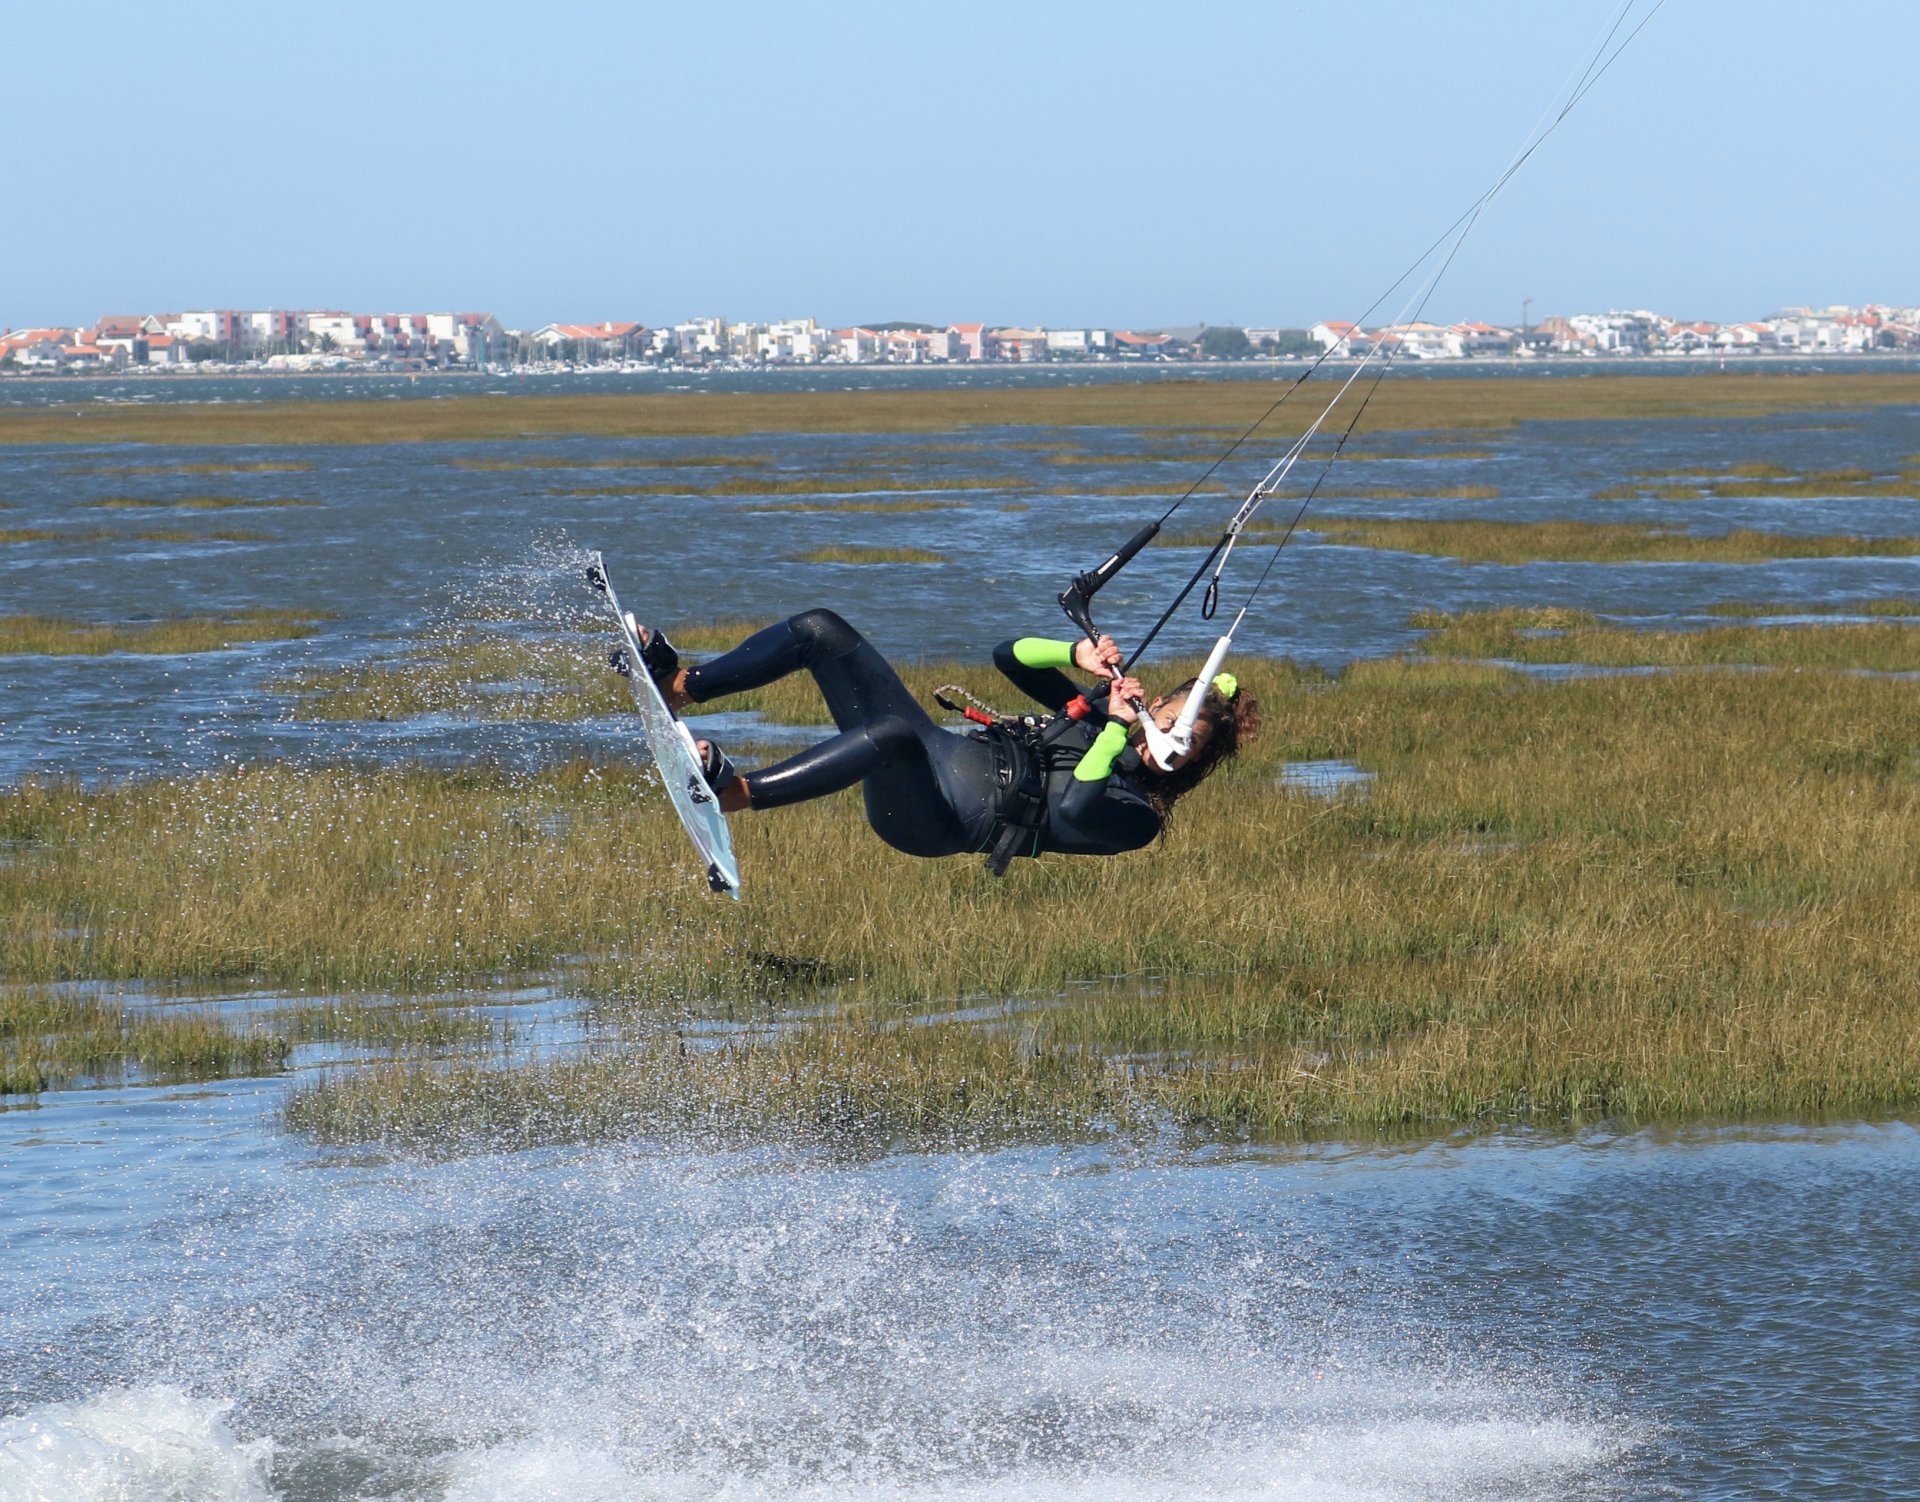
Airtime Pic E.
A popped back roll will be over in a flash, so there won’t be much time to think. However, as each stage becomes more comfortable, you can think ahead to the next one. Up until this point, it’s all been about carving and popping. If you manage to time it right, you will get around and find yourself facing the right way with a twist in your lines. Brilliant. After a few more attempts, you can concentrate on your position in the air. The first thing is to bring your knees up. If you’ve popped well, you’ll have extended, and to make the rotation more controlled and the landing softer, you need to make yourself smaller. You can see that Karine has bent her legs and lifted her knees. Everything is still lined up.
Look Pic F.
Once you’re up and coming around, you need to have some awareness of where you are. Once again, if you’ve managed to pop up and keep everything together, you won’t have thrown your head into the move. However, you need it to keep your rotation going and to spot your landing. There is a beautiful moment when you hit the sweet spot in a popped back roll, after the aggression of the carve and pop, the effort of resisting and stamping, when you’ve lifted off and the lines momentarily stop pulling. It’s an ethereal weightlessness in which you defy gravity for the briefest of time. It’s at this moment that you need to get your vision focused on where you’re going so that you can complete the back roll and stomp it with style. Turn your head and look over your front shoulder; you’ll see where you’re going and will get an idea of when you’ll land. This is also a great moment to give your kite a little dip down if it has snuck up. Karine has turned her head which brings her shoulders, hips and board around. She can see where she’ll land and judge when to…

Drop Your Undercarriage Pic G.
After your moment of defying gravity, it does unfortunately return. As such, you need to get your board underneath you. Drop your legs and look forwards in the direction of the pull.
Touch Down Pic H.
In an ideal world, your aim is to land tail first on a flat (not edging) board pointing slightly off the wind. This is your softest option. The reality of this is connected 100% to your approach and kite position. As long as you bore away into the move, you will bear away out of the move. And if you managed not to move your kite up to 12 o’clock, the kite will keep moving forwards and help you achieve this. As Karine lands tail first and flat, she is over the board and as such she can absorb the impact. Once back in control, you can turn up back onto your edge, untwist your bar, and set up for another one! 🙂
Top Tips
For your first attempts, feel free to position your kite a tad high. If you’re able to edge in, feel free to lift it a tiny bit. This help from the kite will give you the confidence to go for the rotation. Once you’ve got the idea, you can lower it to 11 or 1 o’clock.
Getting into a little wheely position and feeling the board push back against your back heel is vital. Once you feel it, you know where to direct your anger when it comes to the pop part.
It’s not unusual for the kite to lift a bit as you carve up into your pop and rotation. Once again, it’ll give you a helping hand. However, be sure to steer the kite down as you come around and turn your head to spot your landing.

Remember to use the bend you have in your back leg. If you compress, you’ll lose your edge and roll backwards with no up.
Right, have a look at the sequence for a step by step and check out the accompanying video for real time action.
Common Problems
You’re not getting any pop. Chances are, you’re flexing your back leg as you carve, flattening the board and, therefore, you have nothing to kick against. Keep your back leg stiff even whilst flexed.
Skipping out on landing or stopping abruptly. Make sure you go downwind and pop before you turn the board through the wind. Really make an effort to extend up before tucking up.
Over rotating the back loop. It’s likely that you’ve thrown your head around, so keep it looking forward between your shoulders. If you’re still over cooking it, keep the kite still as you carve and try diving the kite as you come in to land.

Keystones
- Across wind edge with little wheelie
- Bear away whilst keeping weight back
- Carve with bum low whilst resisting
- Pop up and around
- Turn head and look for landing

This technique article was in Issue 95 of IKSURFMAG.
Related


By Christian and Karine
Christian and Karine have been working together as a coaching team, running improver to advanced kitesurfing clinics since 2003.
