
Pop Back Roll to Toeside with Front Hand Grab
Technique / Intermediate
Introduction
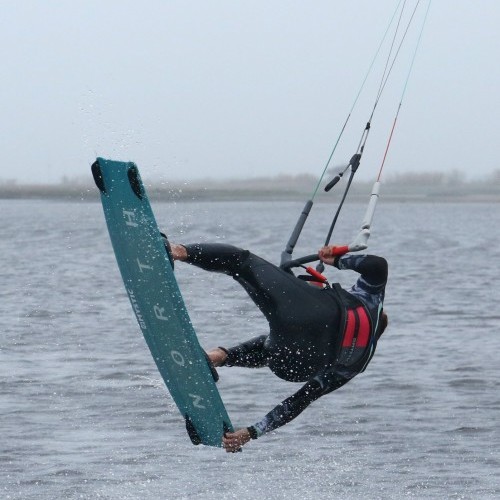
Woohoo! This is often one of the first popped grabs that kiters nail. It fits so well with a back roll to toeside, as you actually have a tad more time. It even helps the switch to toeside, and can be boned out as you get more and more confident. It’ an absolutely phenomenal feeling to stick a grab onto anything popped, and a cheeky tickle is claimable. So, go on, give you back roll to toeside a USP with this front hand grab.
There is both beauty and the beast when you consider grabbing anything with your front hand. In this case, chances are that when you learnt your popped back roll to toeside you voluntarily, or involuntarily, released your front hand to help you round. Therefore, the principles of the move should be no less familiar to you than rubbing your eyes. You don’t think about it, but you do it with unrivalled success However on the more hairy side, you will have discovered that the kite misbehaves and is more than keen to head up and even past 12 o’clock when you’ve only got your back hand gripping the bar. This teething problem will demand some attention as we go through the move.


And before we dive into the subtleties, let us remember, consider and refresh one nugget of the utmost importance. A back roll to toeside is not one and a half back rolls (excuse the necessary plural). It is in fact a back roll, onto which you append a toeside landing. Once accepted, this contributes positively to all aspects of the move, from the position of your kite, your take off, rotation and your landing. If you haven’t yet stuck the back roll to toeside, it’s best to get it down before buffing it up with a grab.
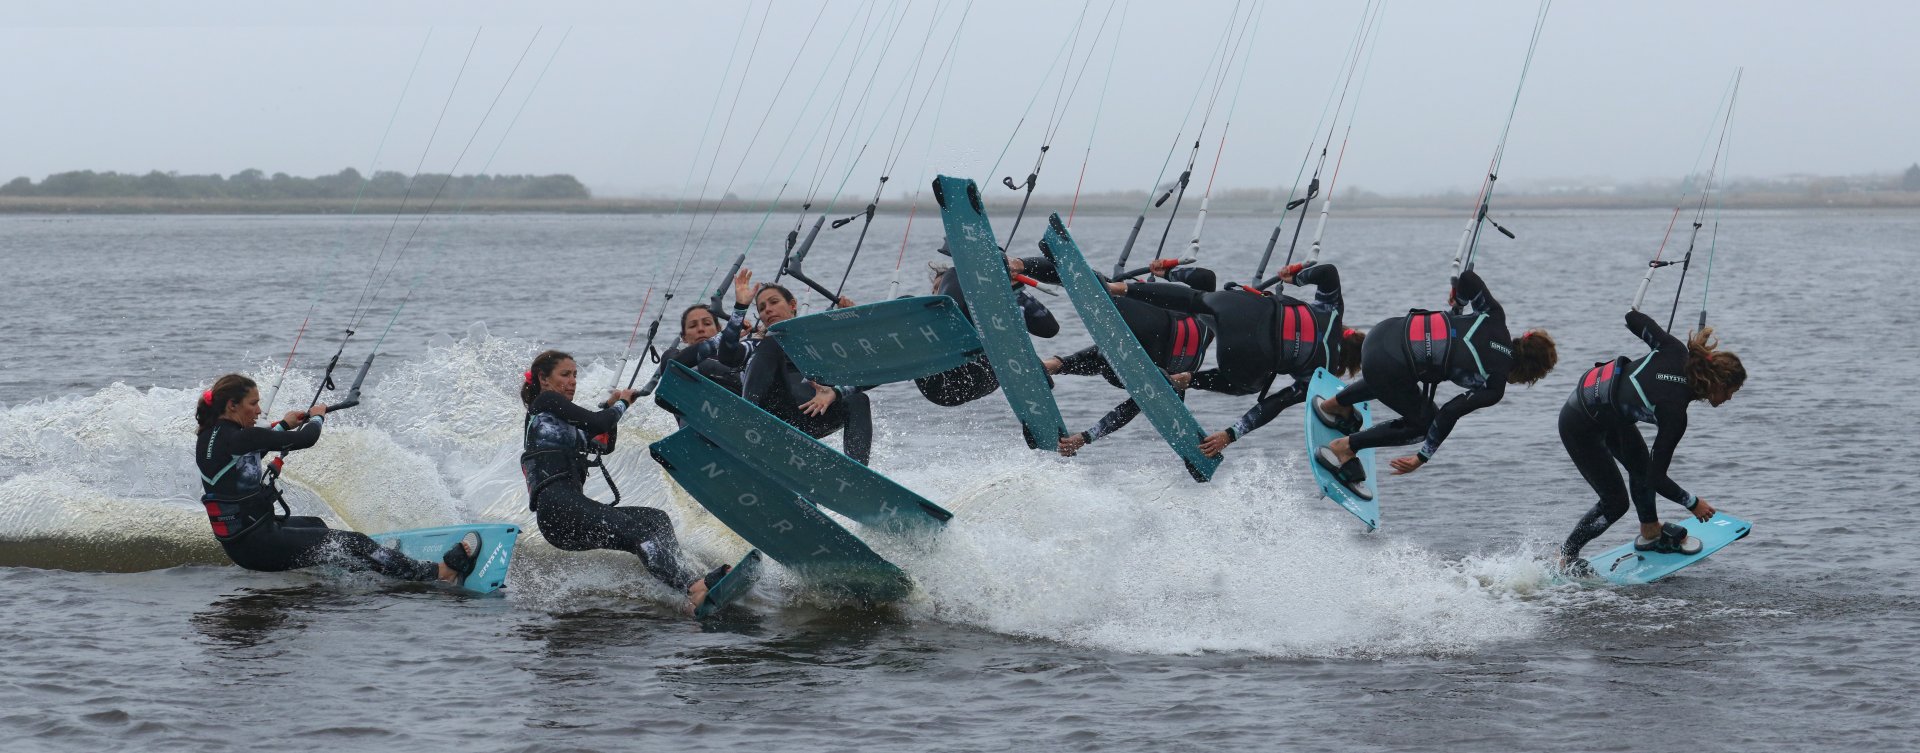
Groundwork Pic A.
You need decent foundations to build anything, and your set up here is no different. The plan is to go for a popped back roll, but with a bit of help from the kite. This means that you can lift and drift the kite, which will give you a bit more support and time. We’re only talking fractions of second, but with the board off the water you’ll have time to switch it to toeside. However, the kite will not get up to 12 o’clock, otherwise you’ll be in the realms of jumping and more importantly you’ll struggle to stop the kite moving back.
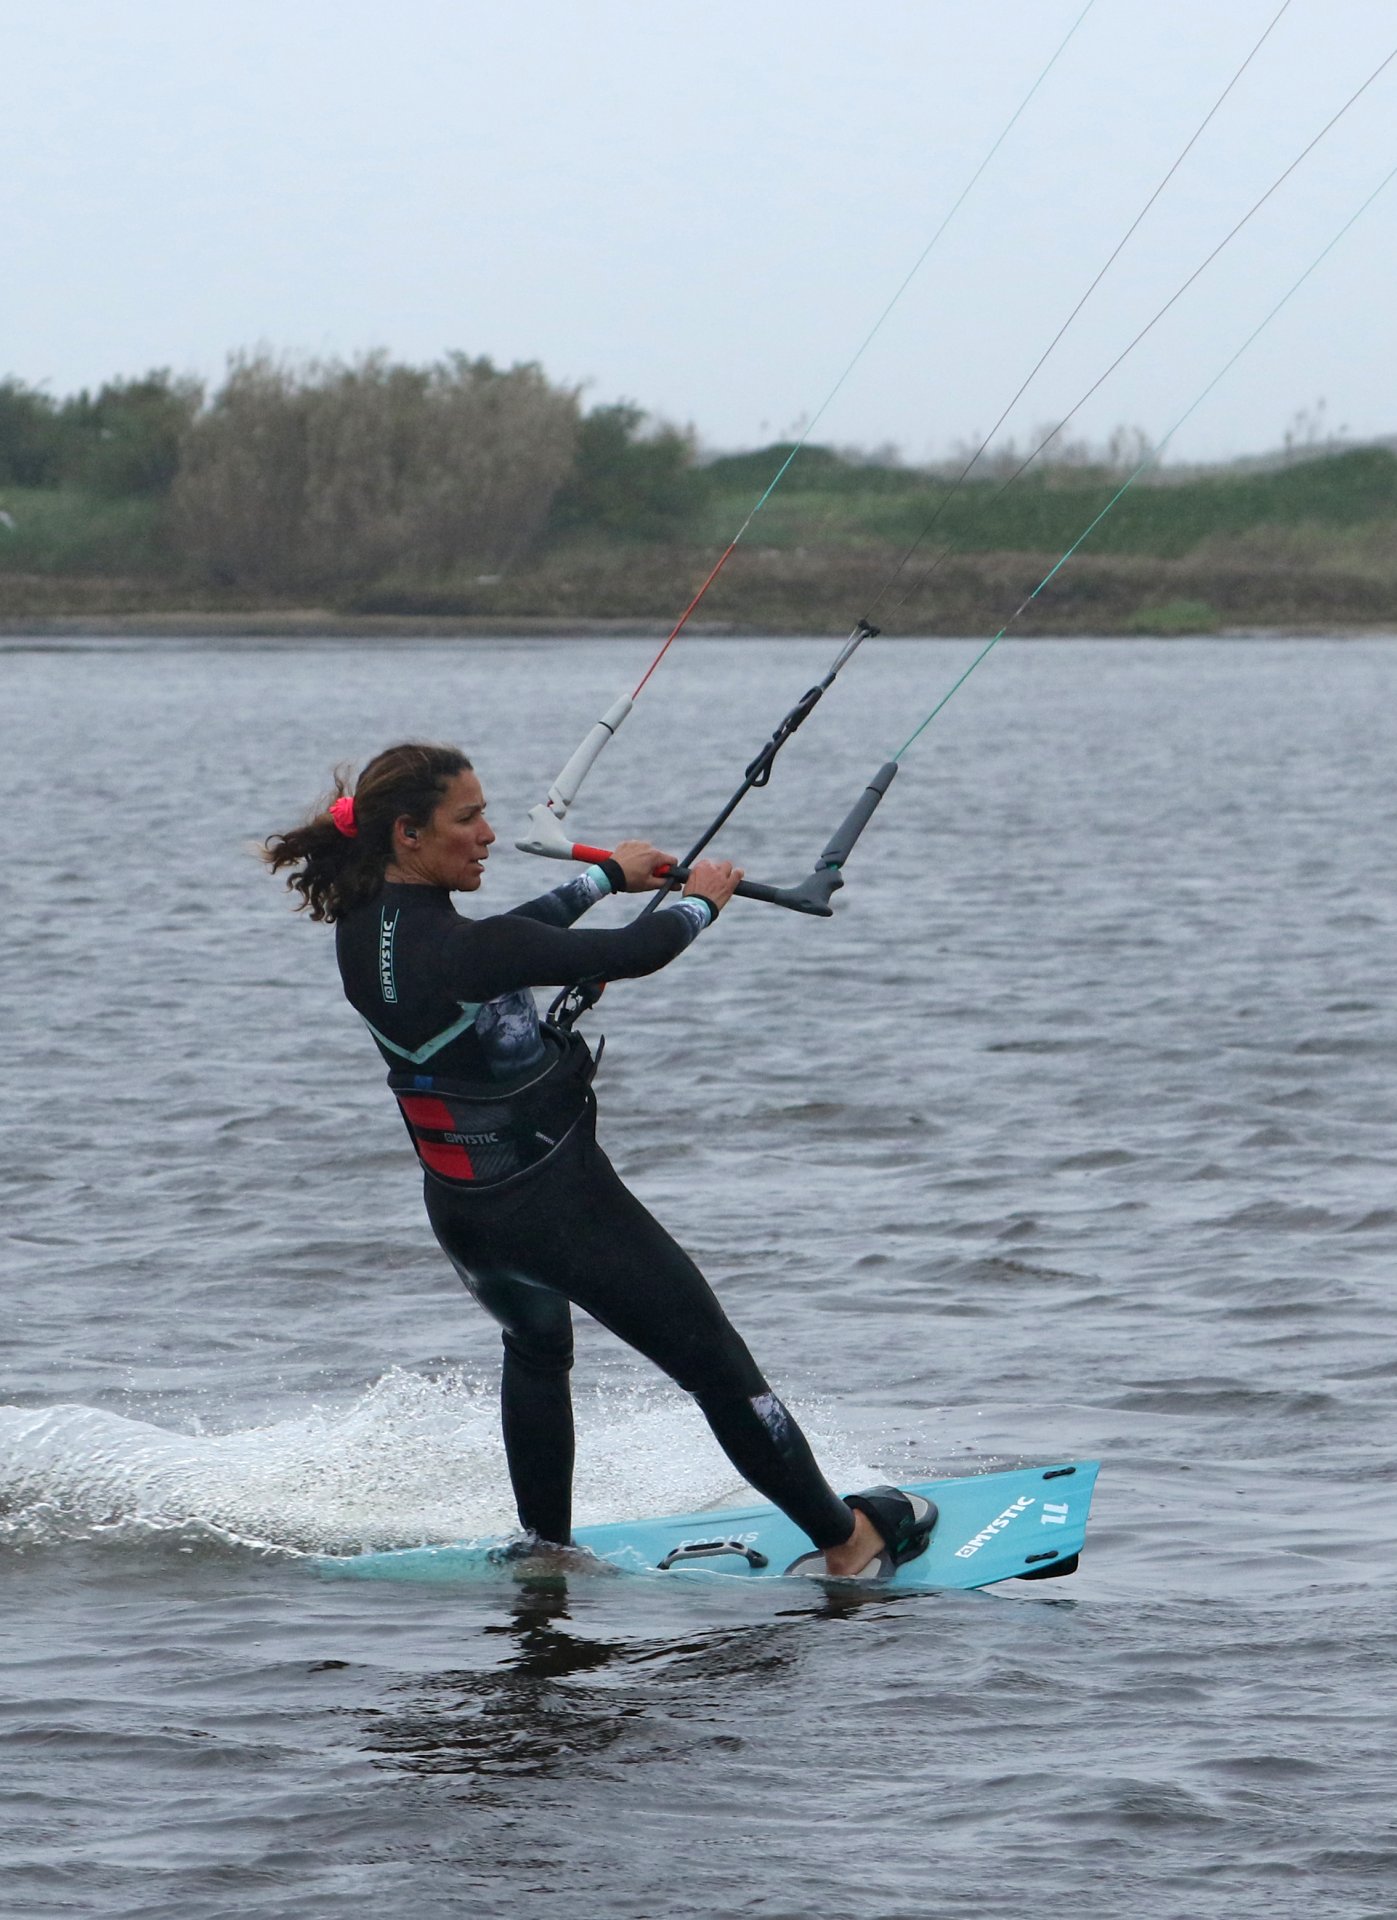
As you’ll be popping, you’ll need to relax your edge on approach, so that you bear away onto a flattish board. At first this is so much easier if you can find a flattish spot of water. By standing over the board you’ll bear away, which moves the kite deeper in the window, so you have something to pop against. It also means that you’ll start your back roll less into the wind, so along with the huge advantage of not grinding to a halt, you’ll have more back roll in the air, and more time to reach the grab. Once again time is relative here, it’ll be over in a jiffy without you contemplating life and the universe. To relax your edge, gently bend your knees, allowing the board to flatten, and then roll yourself up and onto the board. We’ll take out final thoughts here from Karine in the pic. Her hands are centred on the bar, which is trimmed in close enough that she can edge without having to break too much at the waist. Her hips are back over her rear foot, so she’s on the carvey tail of the board and her kite is parked around 1 o’clock. From here she can gently drift the kite by steering it up nice and slowly, whilst dropping her bum and looking back up wind, to start her carve.
Kick Off Pic B.
To learn this there is no need for mahussive pop, great height or stacks of pull. However, the one element that you’re searching for is control. With control you’ll feel comfortable going for the grab and your chances of a positive outcome will improve no end. Your take off is an area where you can gain, or lose, control. The aim is to make the most of your carve early on, so that you can benefit from more time in the air. Think about it this way, if you carve all the way into the wind, and then stamp off, by the time you’re airborne you’ll be three quarters the way around your back roll. This leaves you a quarter to squeeze everything in. If, however, you take off before the nose of your board passes into the wind you have a full half, that’s double the time, and a benefit worth fighting for. Your carve up into the wind will give you the required rotation. As you carve up resist the temptation to pull on the bar as this will make it impossible to carve as the kite will pull you back upright. With the bar on the sweet spot, you should get a good carve by turning your shoulders and hips upwind and driving against your back foot. As you approach upwind it’s time to pop, exploding against your back heel, extending your back leg with all your might. This will force you off the water and send you up and around. At the same time, you need to level the bar. Having drifted the kite, you need to stop it, so a bit of front hand down as you take off is ideal. A quick check on Karine, you can see how she’s stamping against her back foot, extending her back leg before the nose of her board has carved all the way upwind. As she stamps, she’s levelling the bar, stopping the kite from moving any further and giving herself a bit of lift. And Karine is looking forwards, not throwing her head over her front shoulder. She’s confident that rotation momentum is already achieved, she’s not looking to spin quicker or further.
Get to It Pic C.
As preluded to, time is relative, and as such, even with a good take off, in short supply. As soon as you’ve stamped off you need to fire straight into getting the board up close and get ready for the grab. The good news is, as you’ll be grabbing the heelside edge near the nose and your explosion for take-off comes from your back leg, you can focus on and prioritise bringing your front knee up. Not only will this help you grab earlier, but it’ll also make the grab easier. With the back leg slightly extended the nose will actually be nearer. However, it’s very easy to focus on your take off and not immediately bring the board up and compress. You’ll also need to free your front hand and start going for the grab. This will only be possible if you look where you want to grab. Another good reason not to throw your head. The final key point here as demonstrated by Karine, is keeping the bar in. This way the kite will support you as you rotate. Let it out and you’ll drop. Be warned though, if your sweet spot is miles out and you pull the bar right in, you’ll stall the kite, and this will also drop you.
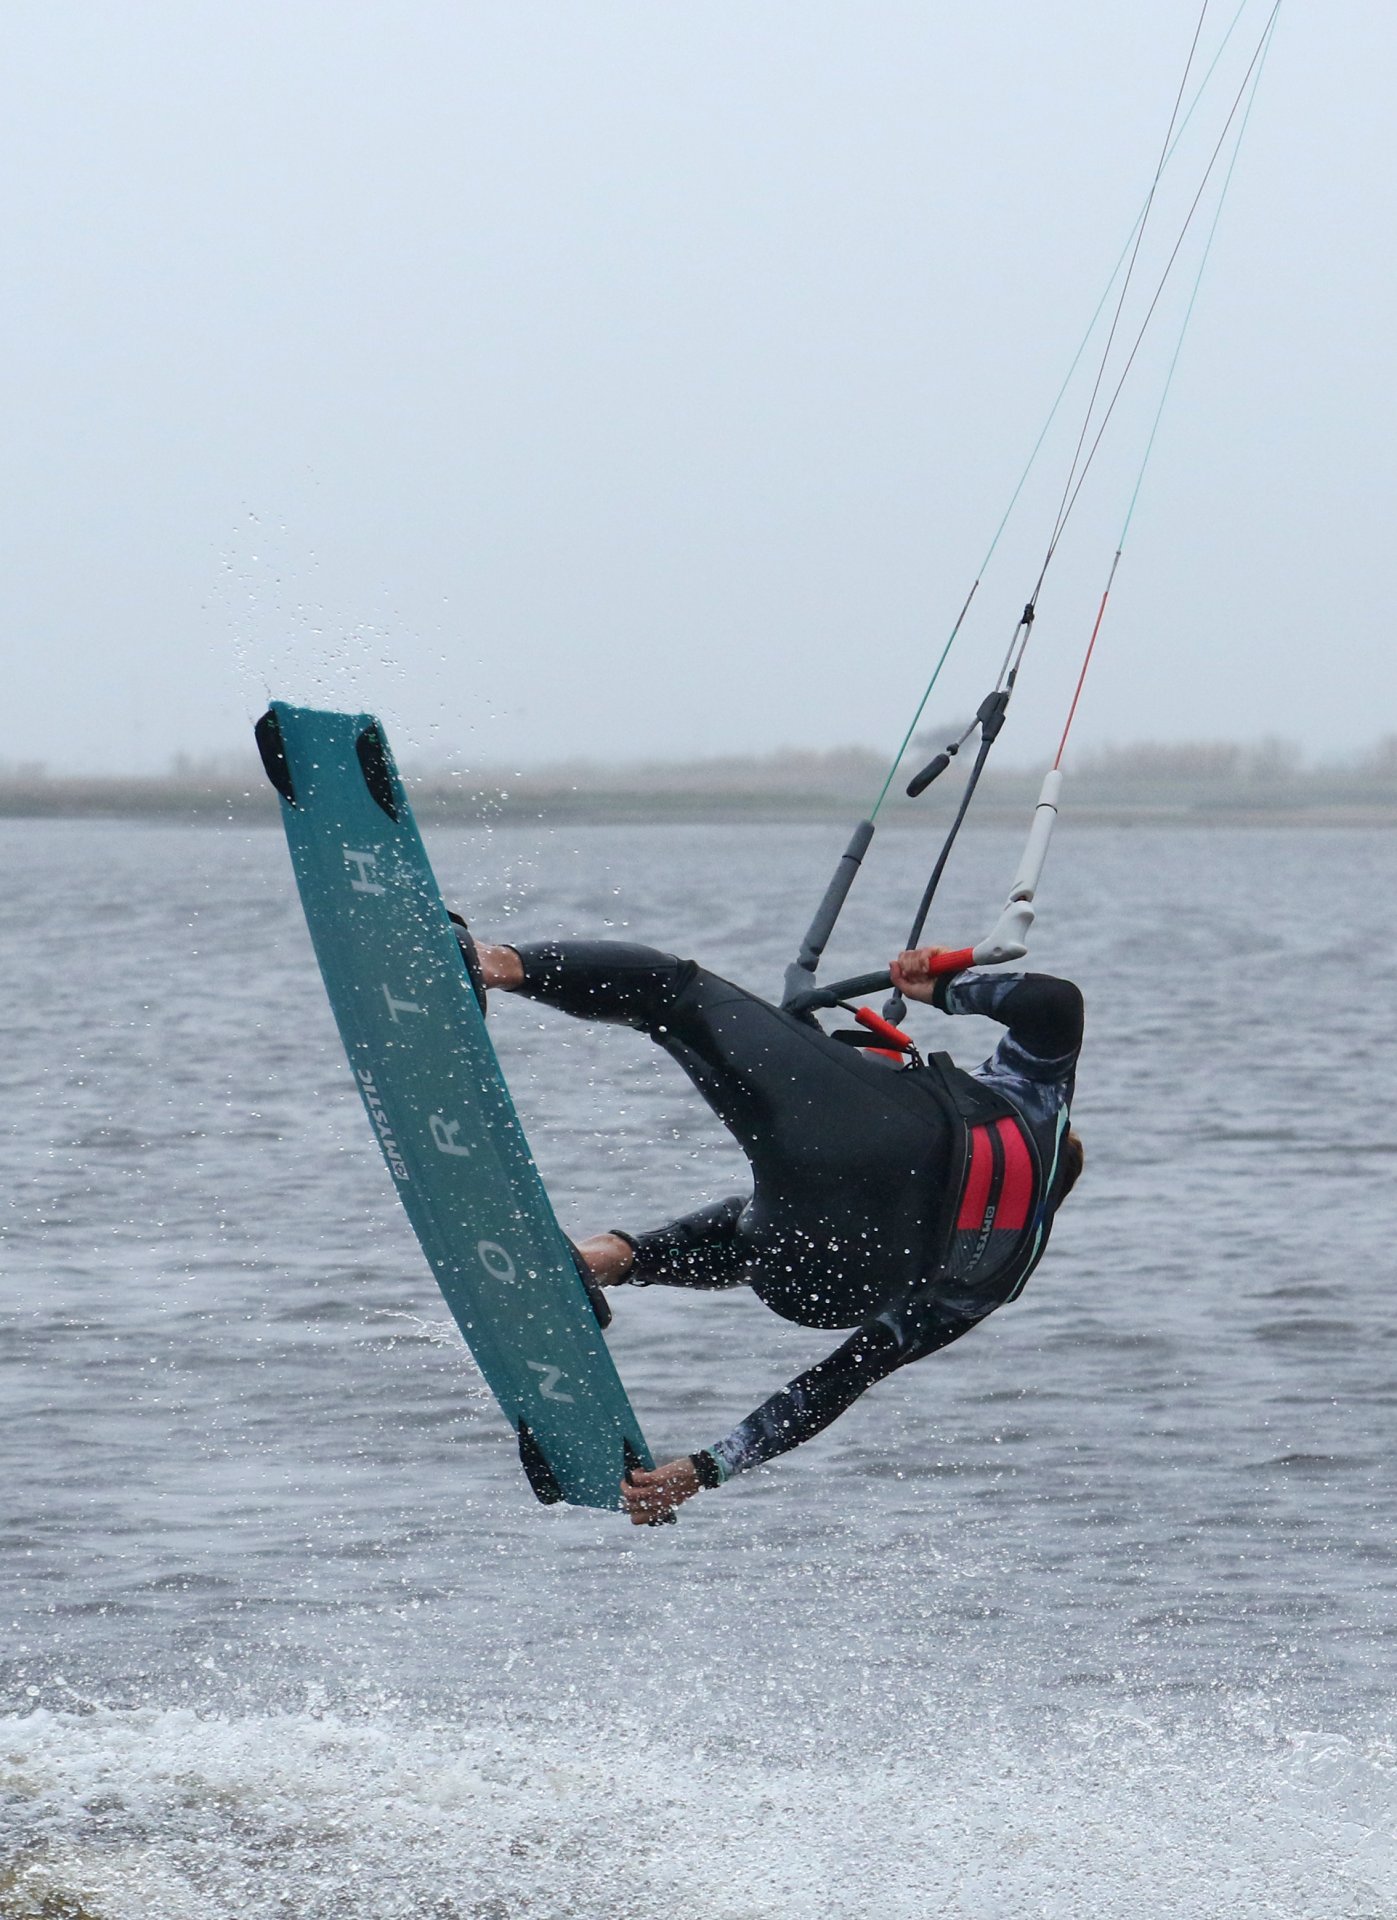
The Shot Pic D.
Looking at Karine you can see where she’s grabbing the board, near the nose by the heelside fin. Funnily enough this is exactly where you’d grab the board if you were jumping in the other direction and grabbing the tail. At this point Karine is most the way around her back roll. You need to keep you legs high, so look down at the water, which will encourage your front shoulder to dip and you legs to rise. Note how Karine’s bar is in and as of yet there’s no twisting or turning to toeside. Throughout the move it’s worth pressuring the bar with the heel of your hand, as you would to lower the kite when body dragging. This will help keep the kite moving forwards and prevent it from going up. Once you’re confident and well-practiced, it’s here where you can really tweak the move out by pulling the board in towards you and extending your rear leg!


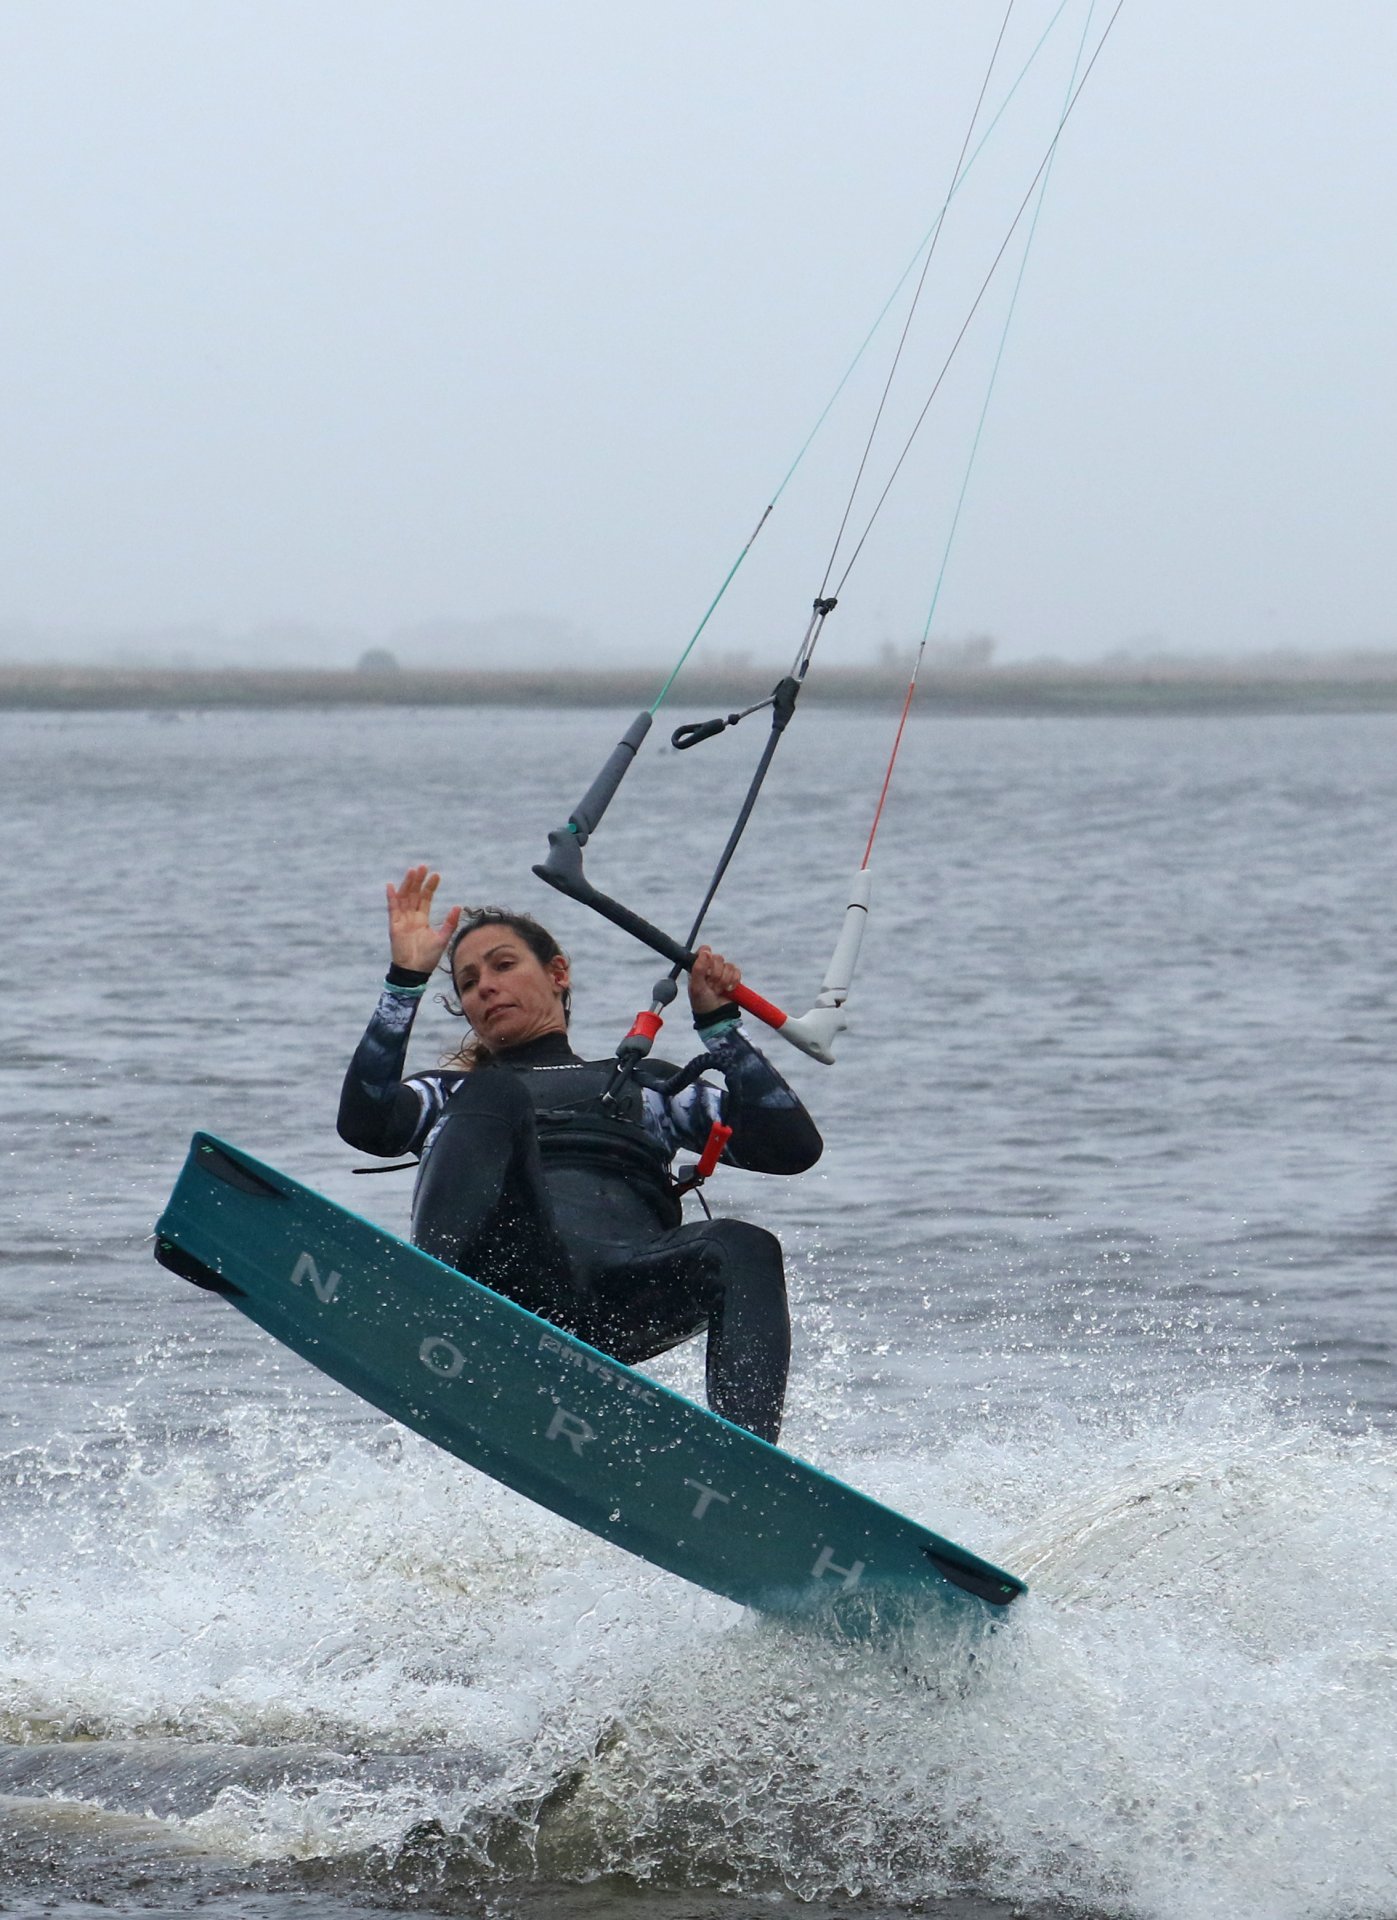
To Toe Pic E.
Once you’ve got the grab you won’t have long. You’ll still be rotating around your back roll but in no position to land it. Nose down has never been the most comfortable reception method in kiting. Your aim now is to get your board and feet switching to toeside. To make the dream reality you need to release your grab but hold the board up, keeping your knees in to give you vital room above the water. In this position you can bring you back knee over and around, bringing the tail of the board through downwind, so that you rear foot is now leading into toeside. Remember it’s a toeside landing, not another 180˚. Looking at Karine you can see that her rear foot is coming through as she holds the board up with knees bent. However, she is looking forwards towards where she’ll land, and has not turned her head and shoulders to face upwind. Toeside is coming from the lower body only.
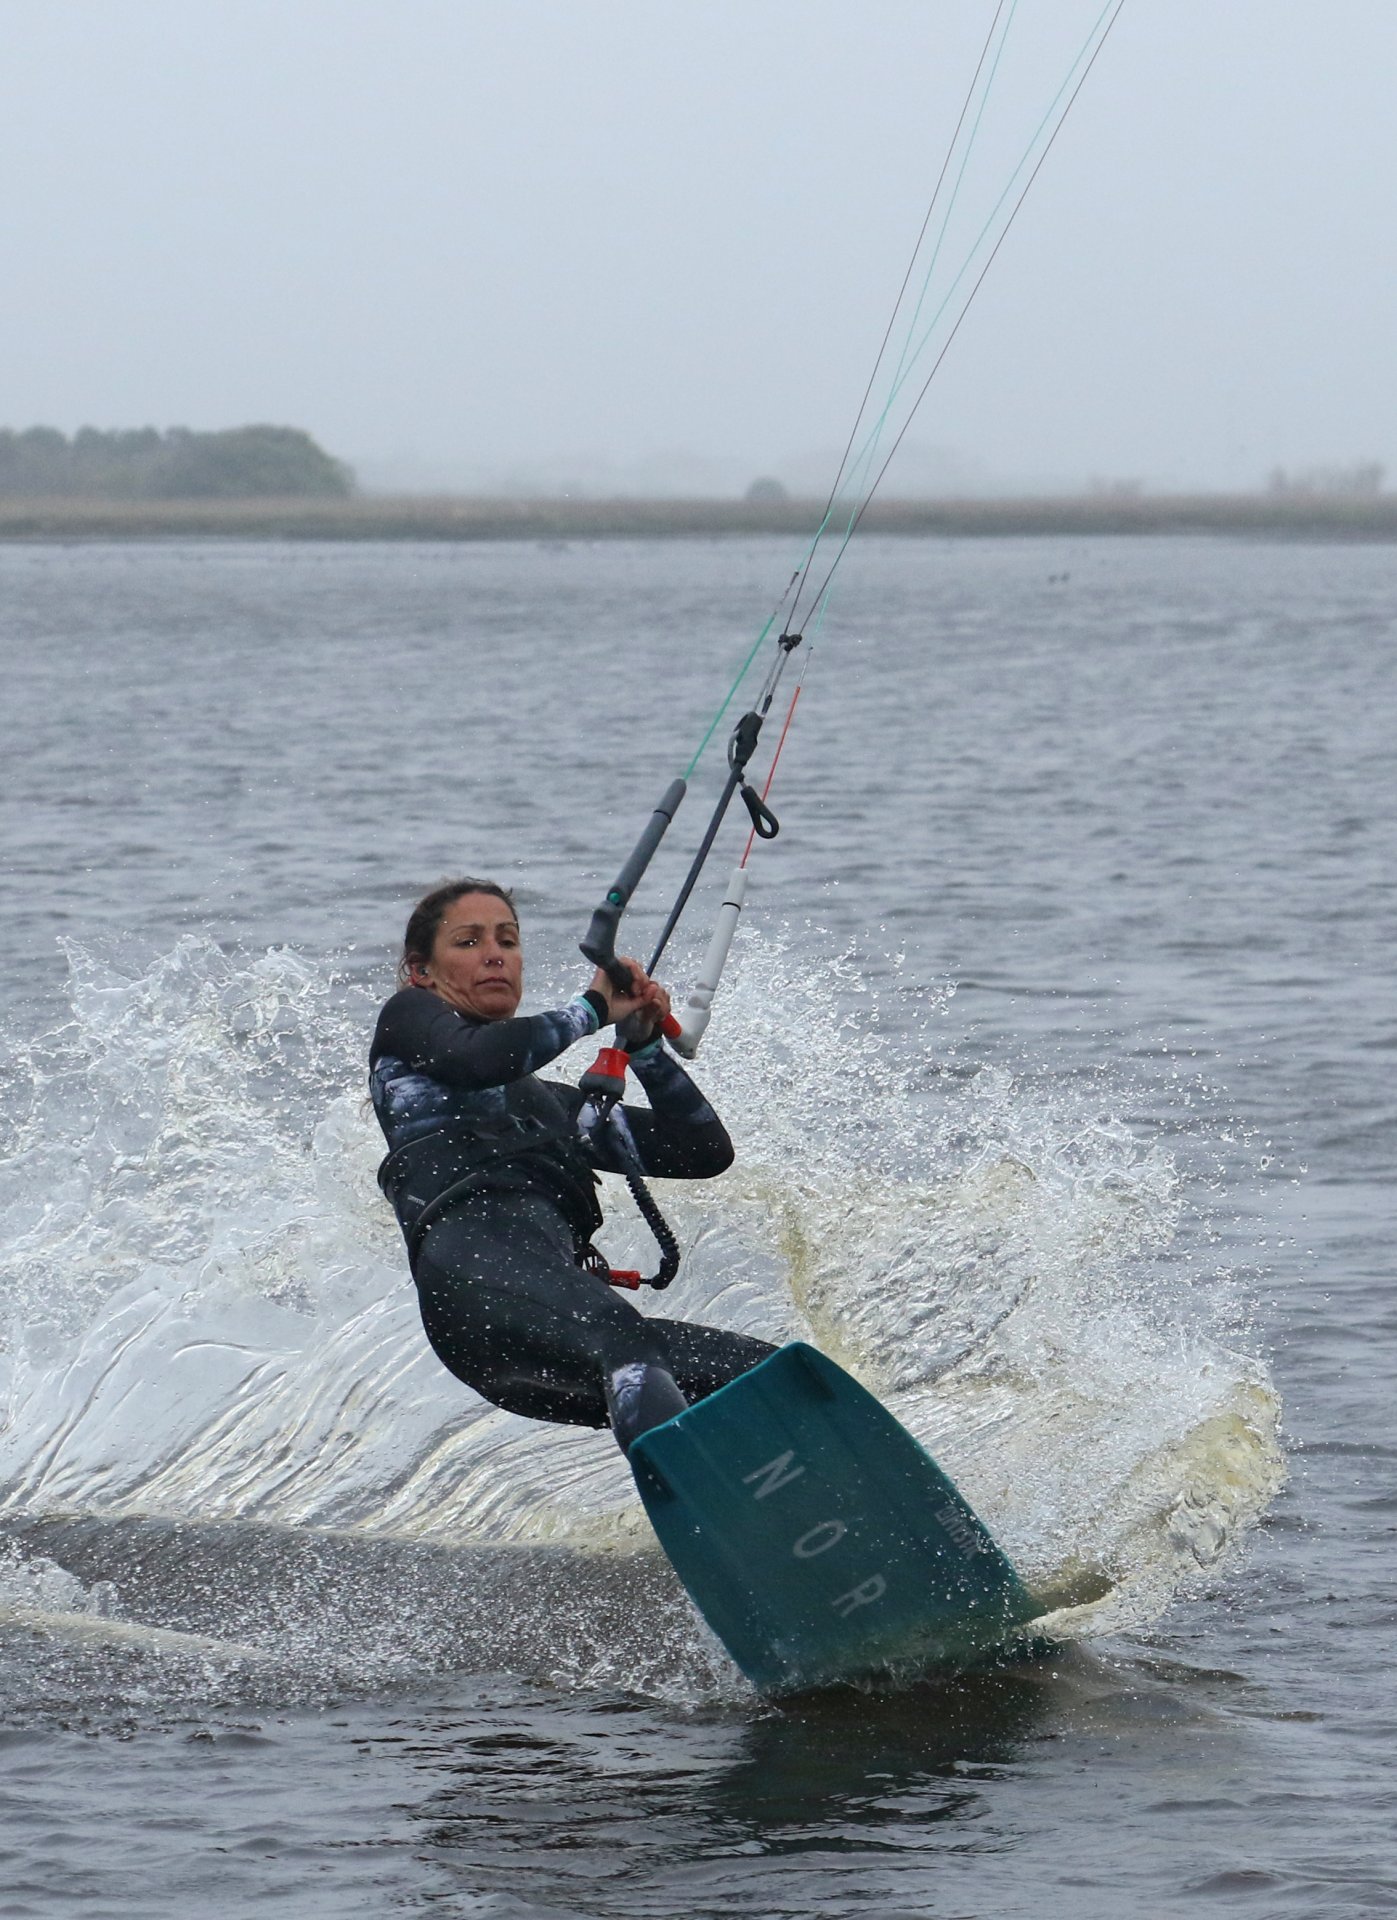
Touchdown Pic F.
This is very much a continuation of bringing the board through. We really wanted to highlight the landing position. Your goal is to land tail first on a flat board, no edge. However, that’s not all. The open shoulders and head still looking forwards are key to stomping this. Similar to a surf stance, this open toeside stance keeps your speed, projects you forwards, helps keep the kite down and allows you to regain your balance before turning back up onto your toe edge. Once again looking at Karine, her front shoulder is dropped, whilst her back shoulder is up. This puts her in a good position to control the kite with only her back hand – again think body dragging. Her head is looking forwards and her chest is open, not twisted upwind. This keeps her weight forwards and the board planing.
Top Tips
What to practice to hone this? A few positive steps back to then move forwards is always a solid plan of action. Practice your pop to toeside so that you’re comfortable with your action, practice your back rolls to toeside concentrating on the landing, making it more toeside and less a quicker rotation. It never hurts to walk through on land without a kite or board, and this way you can both visualise and practise bringing the front of the board up asap from take-off. Once all the parts feel good and are logged in the noggin, it’s time to hit the water and give it a whirl.
Have a look through the sequence, and if the videos aren’t yet up, we promise they’ll be there as soon as we can:)
Common Problems
No time to grab. A sure sign that you’re throwing yourself into a spin, trying to rotate quicker to get around. You don’t need any height to normally pop to toeside from heelside. You only need that much clearance below you post back roll to add the toeside landing.
Missing the grab. It’s very likely that you’re trying to bring both legs up quickly. If the back one comes up fast it’s further to reach the grab, so focus on your front knee. And don’t forget to look at the grab. If you can’t see the spot, you’re throwing your head into the rotation.
Kite going up. This is par for the course as you’re taking your front hand off and have no way to pull the kite down as you come around. The beauty however is that you can push it down. Stand on the beach and move your kite with your back hand, you do it every time you body drag, so it’s a skill you have that you need to add. As long as you don’t drift the kite all the way to 12 o’clock prior to take off and you level the bar as you stamp, you’ll be able to keep the kite down with your back hand.
Keystones
- Bear Away
- Carve Up, Stamp and Level Bar
- Hand off and front knee up, look for grab
- Drop grab and bring back leg up and through
- Land off the wind in open toeside stance
This technique article was in Issue 85 of IKSURFMAG.
Related


By Christian and Karine
Christian and Karine have been working together as a coaching team, running improver to advanced kitesurfing clinics since 2003.
