
Hand Drag Back Roll
Technique / Intermediate


Introduction
Kite tricks are much like cakes, once you’ve got the foundation you can add to and embellish it in any number of ways, combine it with another skill and the keep the ever growing endless game of learning alive. Here is one such combination, the Hand Drag Back Roll, a bit of a twist on the Hand Drag from a couple of issues ago, but with more than a hint of rotation. Before we go on though, we ask you not to confuse this with the back roll hand wash transition, as here you are dragging the back hand, there is no change of direction and not a sniff of a kite loop...
In simple terms this is a back hand Hand Drag, with a back rotation, intended to be completed travelling in the same direction as it was started.
Dare we assume that you’ve already tried the hand drag/wash? If not have a quick read through in issue 75 under Hand Wash. That said there’s no harm trying this even if you’ve not yet dragged or washed. Lets have a look at what makes this move tick, and the required difference to add the back roll.


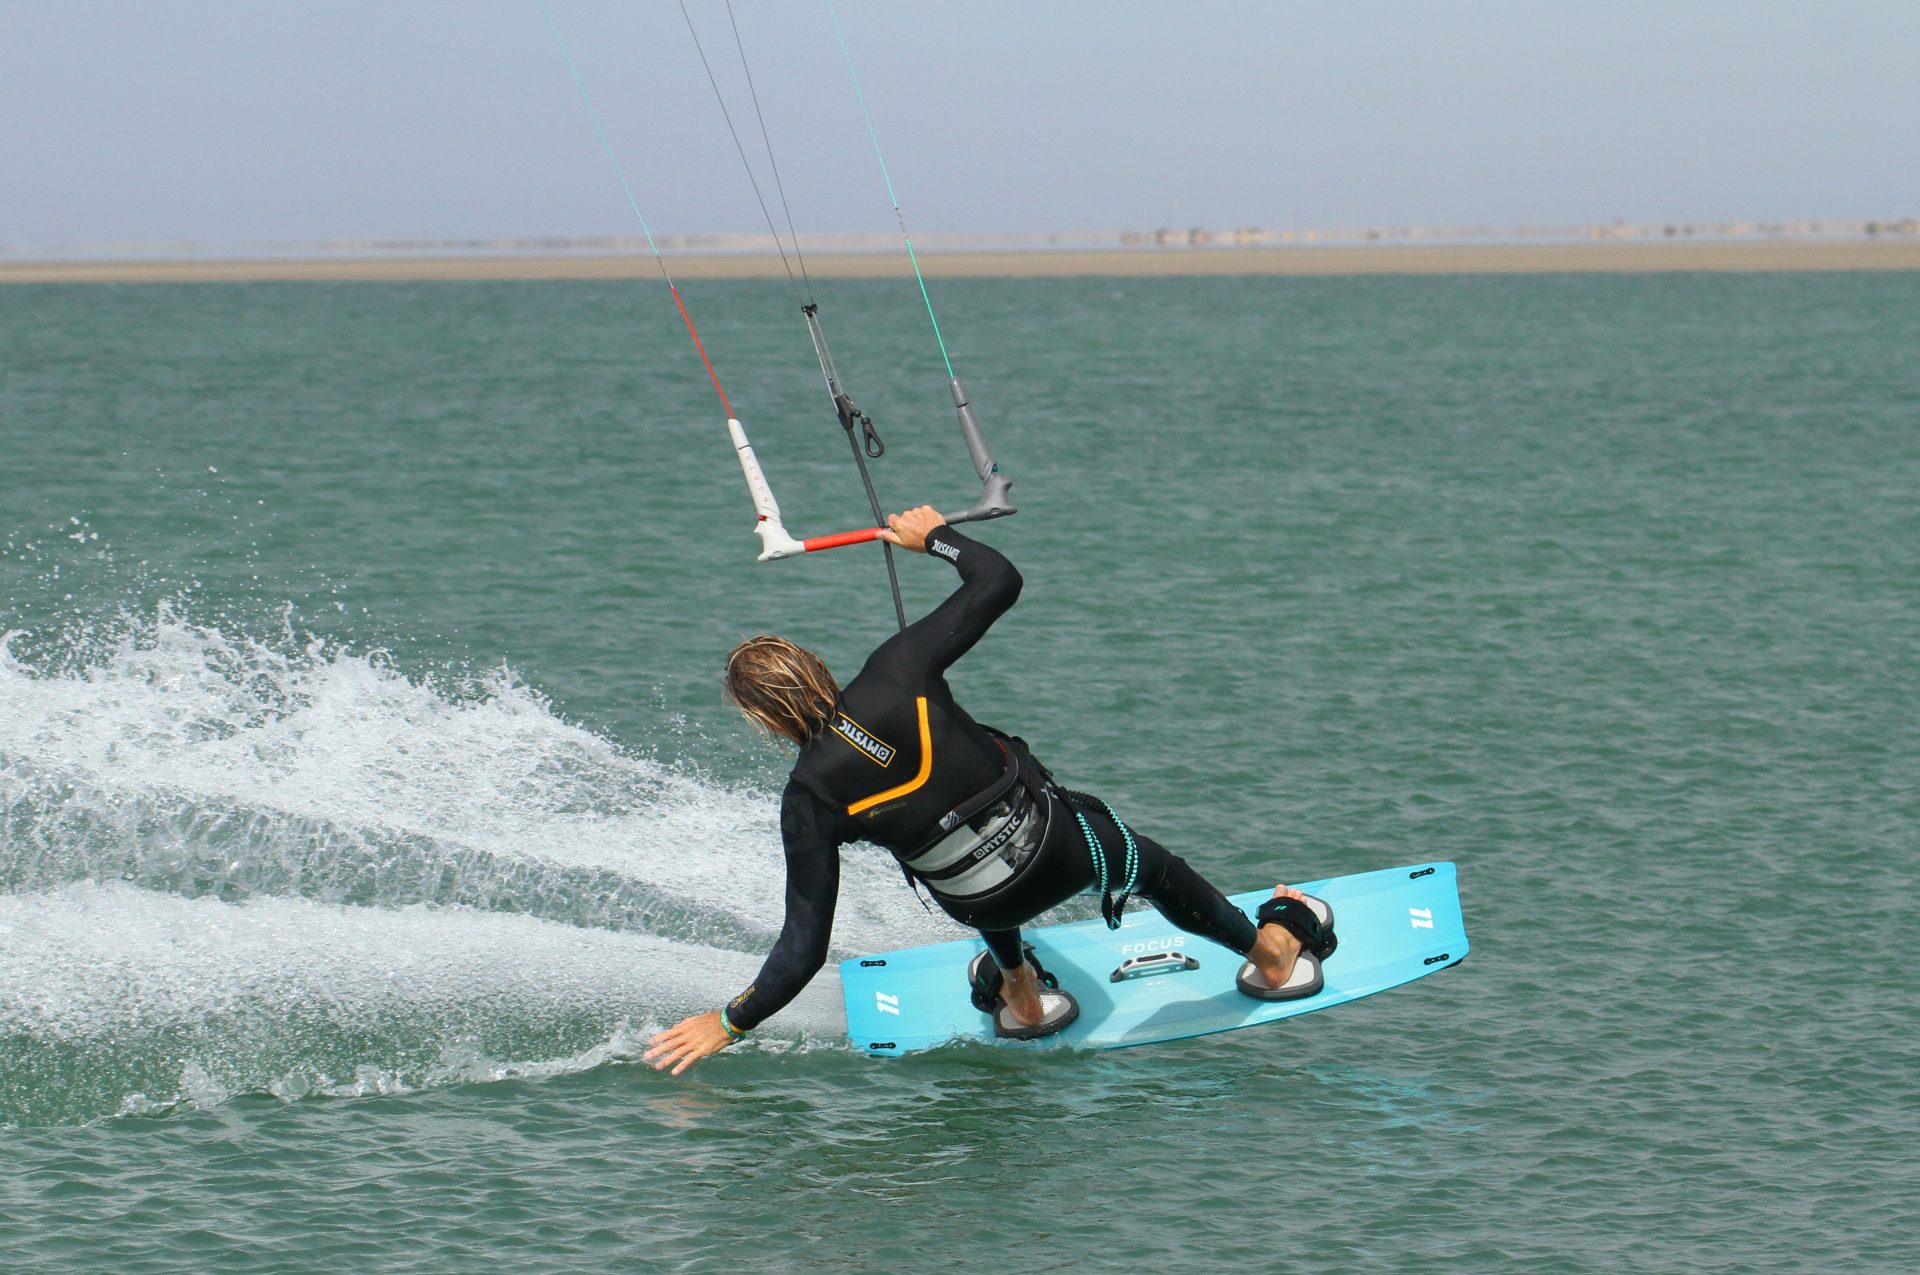
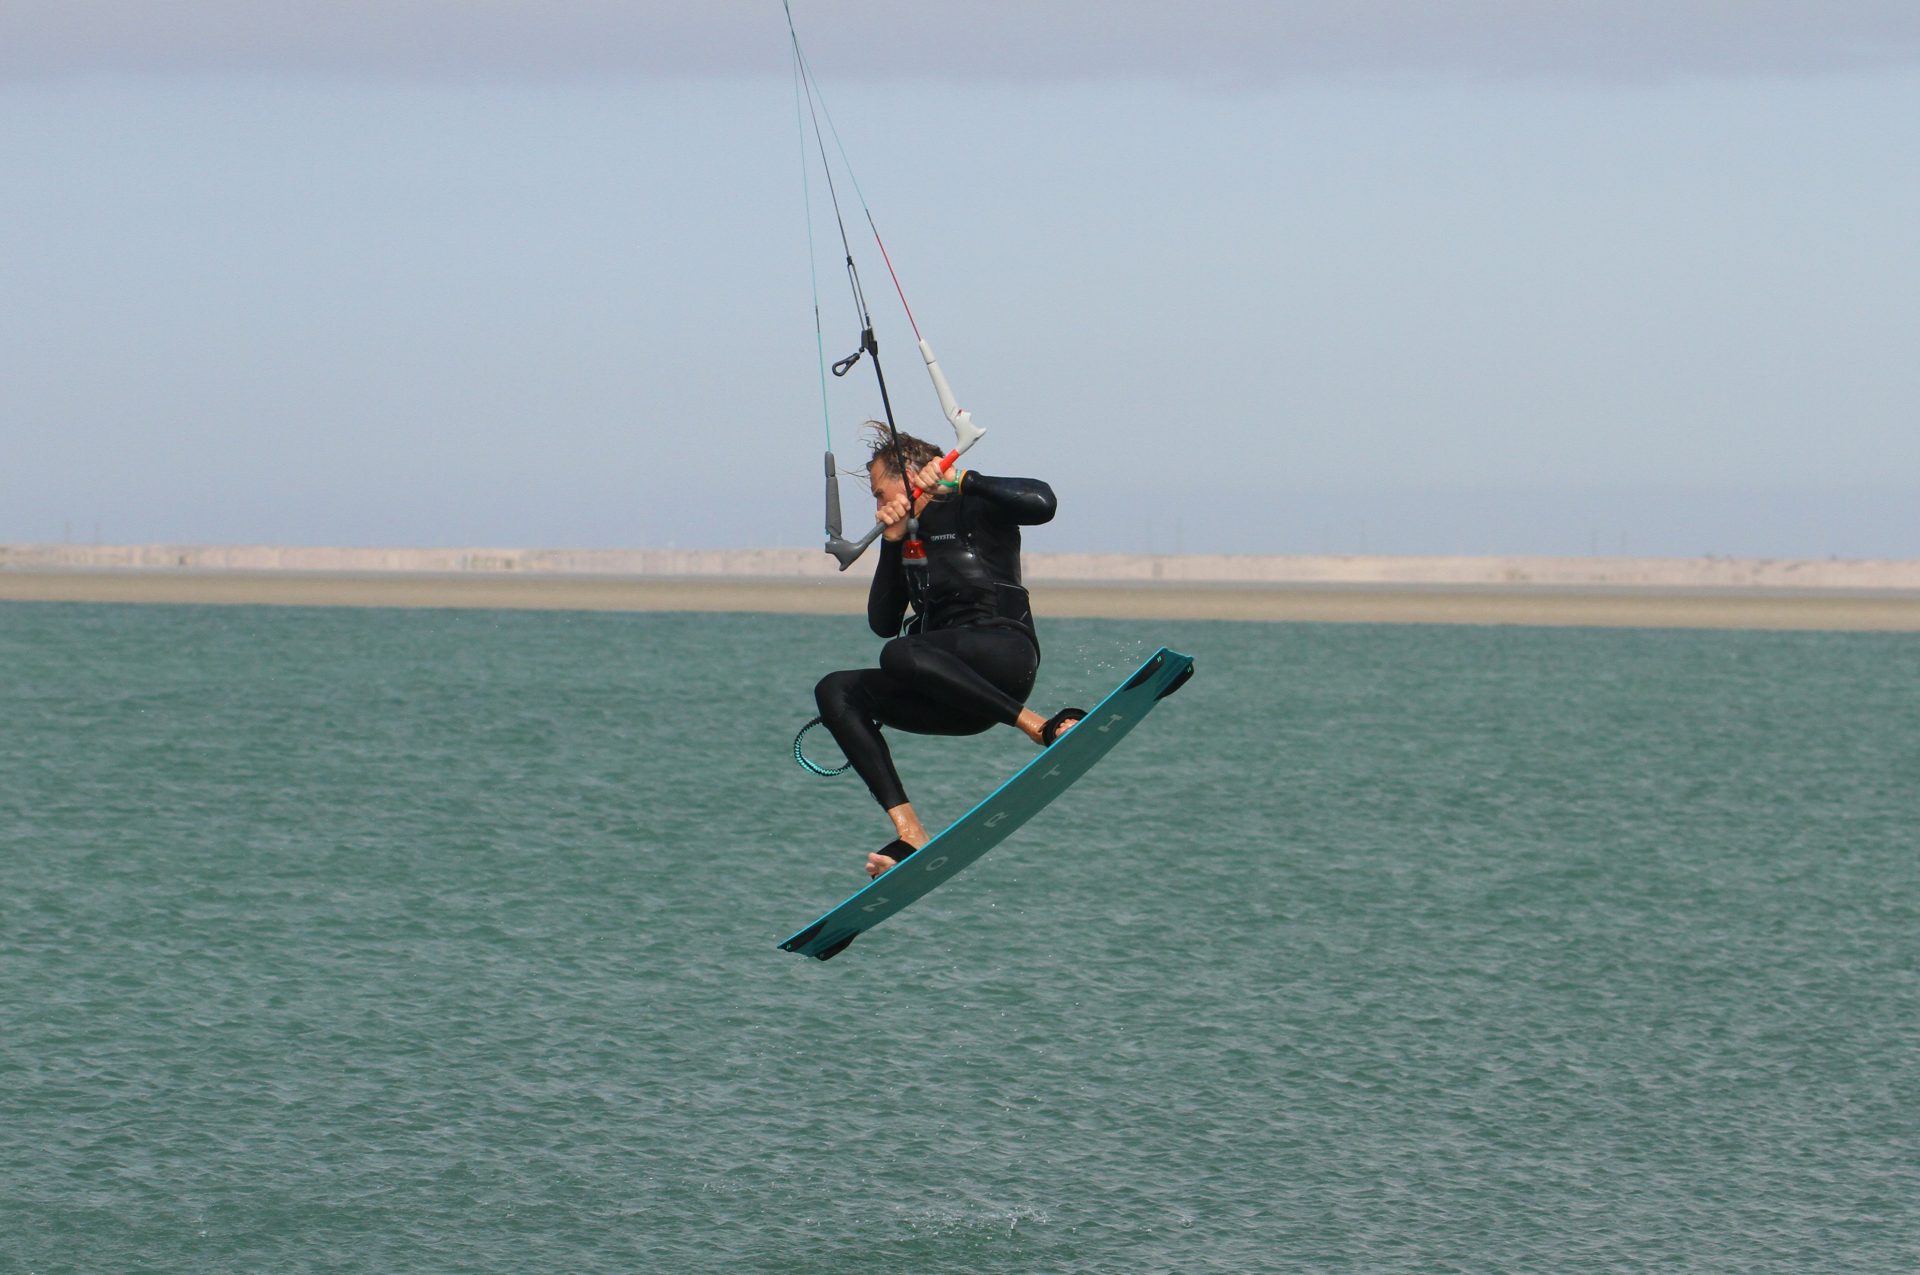
Approach Pic A.
Once again, as for all support moves there are two absolute necessaries here, lift in the kite and tension on the lines. You need a good solid upwind edge to put plenty of tension in your lines and preferably some power in your kite. A larger kite will simplify things too with it’s readily available consistent lift. If you have lift and support, then you’ll want your sweet spot trimmed out so that the bar is in a comfortable position for straight arms during the move and place your hands centred on the bar.
As for your position, lower your bum and get yourself down close to the water, but keep resisting, and move your weight back towards the tail of the board so that your back leg is quite bent. From this position you can then start to bring the kite up from either 11 or 1 o’clock. If you’re on a large kite and powered you can slowly drift the kite up. If however you’re on a smaller kite and not so powered you’ll have to be more aggressive in order to generate some lift. Either way, it’s only possible if you’re edging!
You can see all of the above in the photo. Christian is just powered on a 9m, so giving it a bit extra on the bar, however he’s low, edging, weight back and ready.
Lean On Pic B.
Once you feel the kite starting to lift it’s time to free your back hand and get ready for the wash and drag. As per the straight line variant of this move, it’s all about leaning yourself back, rolling your rear shoulder down towards the water, keeping everything in synch. By releasing your back hand you will naturally stop moving the kite back, which is good as it’s now lifting. By moving your hand down towards the water, you can follow it with you head and shoulders, tilting your head towards your back shoulder as if you were clamping a phone there. Rocking your upper half back is effectively preparing to rock your lower half up. Final point here is that you’ll need to feather the bar out, be careful not to merely push it away as then you’ll loose all lift. Hence the sweet spot trimmed further away:) In the pic Christian has his back hand off and is rocking back, all the while still edging to keep tension on the lines.
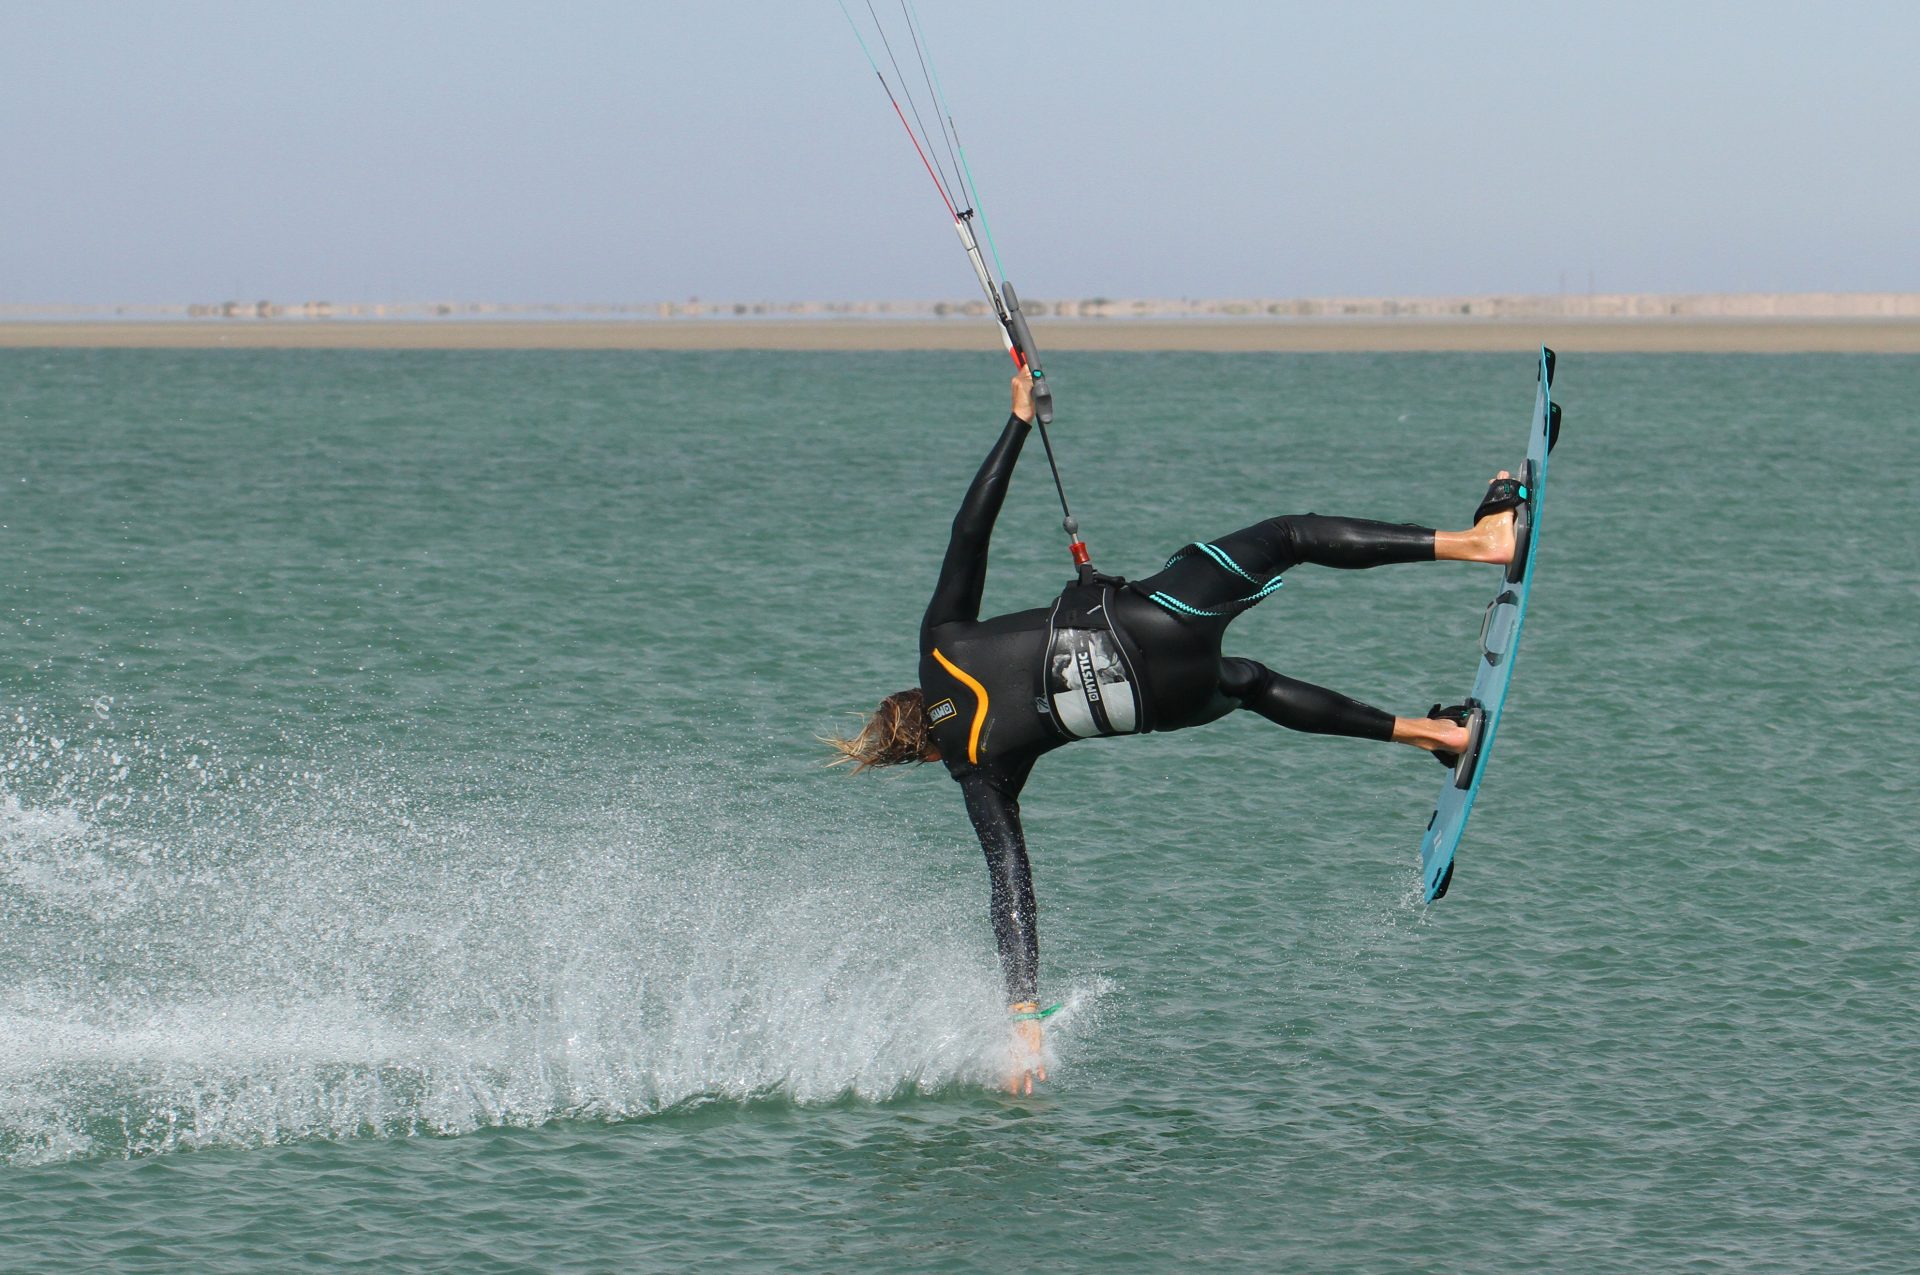
The Rotation Pic C.
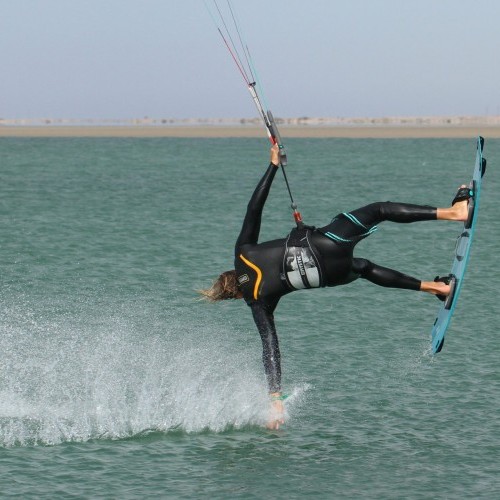
So this is where it’s ever so slightly different! If you want to get some rotation, you’ll need to set yourself in motion before the board leaves the water. You’re still leaning back to get the hand wet, the head and shoulders following and the nose of the board is just gagging to rise up. However rather than lifting your feet and therefore your board up off the water, you will instead keep the tail of the board engaged just a tad longer by extending your front leg, and continuing to push against your back leg. By doing this, the board rolls back onto it’s tail rocker and starts to carve you upwind. Your job now is to allow your hips to turn upwind with the board, and low and behold you will have started to rotate. Looking at Christian you can see that the nose is up but his board is carving upwind off the tail, he’s pushing his back foot against the board and allows his body to twist up with it. The trick here is not to be too greedy with lift. If you pull in for support too early you’ll lift yourself off the tail and have trouble carving up. We should also point out that you won’t be spinning like a ballerina on a jewellery box even when you get it right. The rotation will be somewhat more languid.


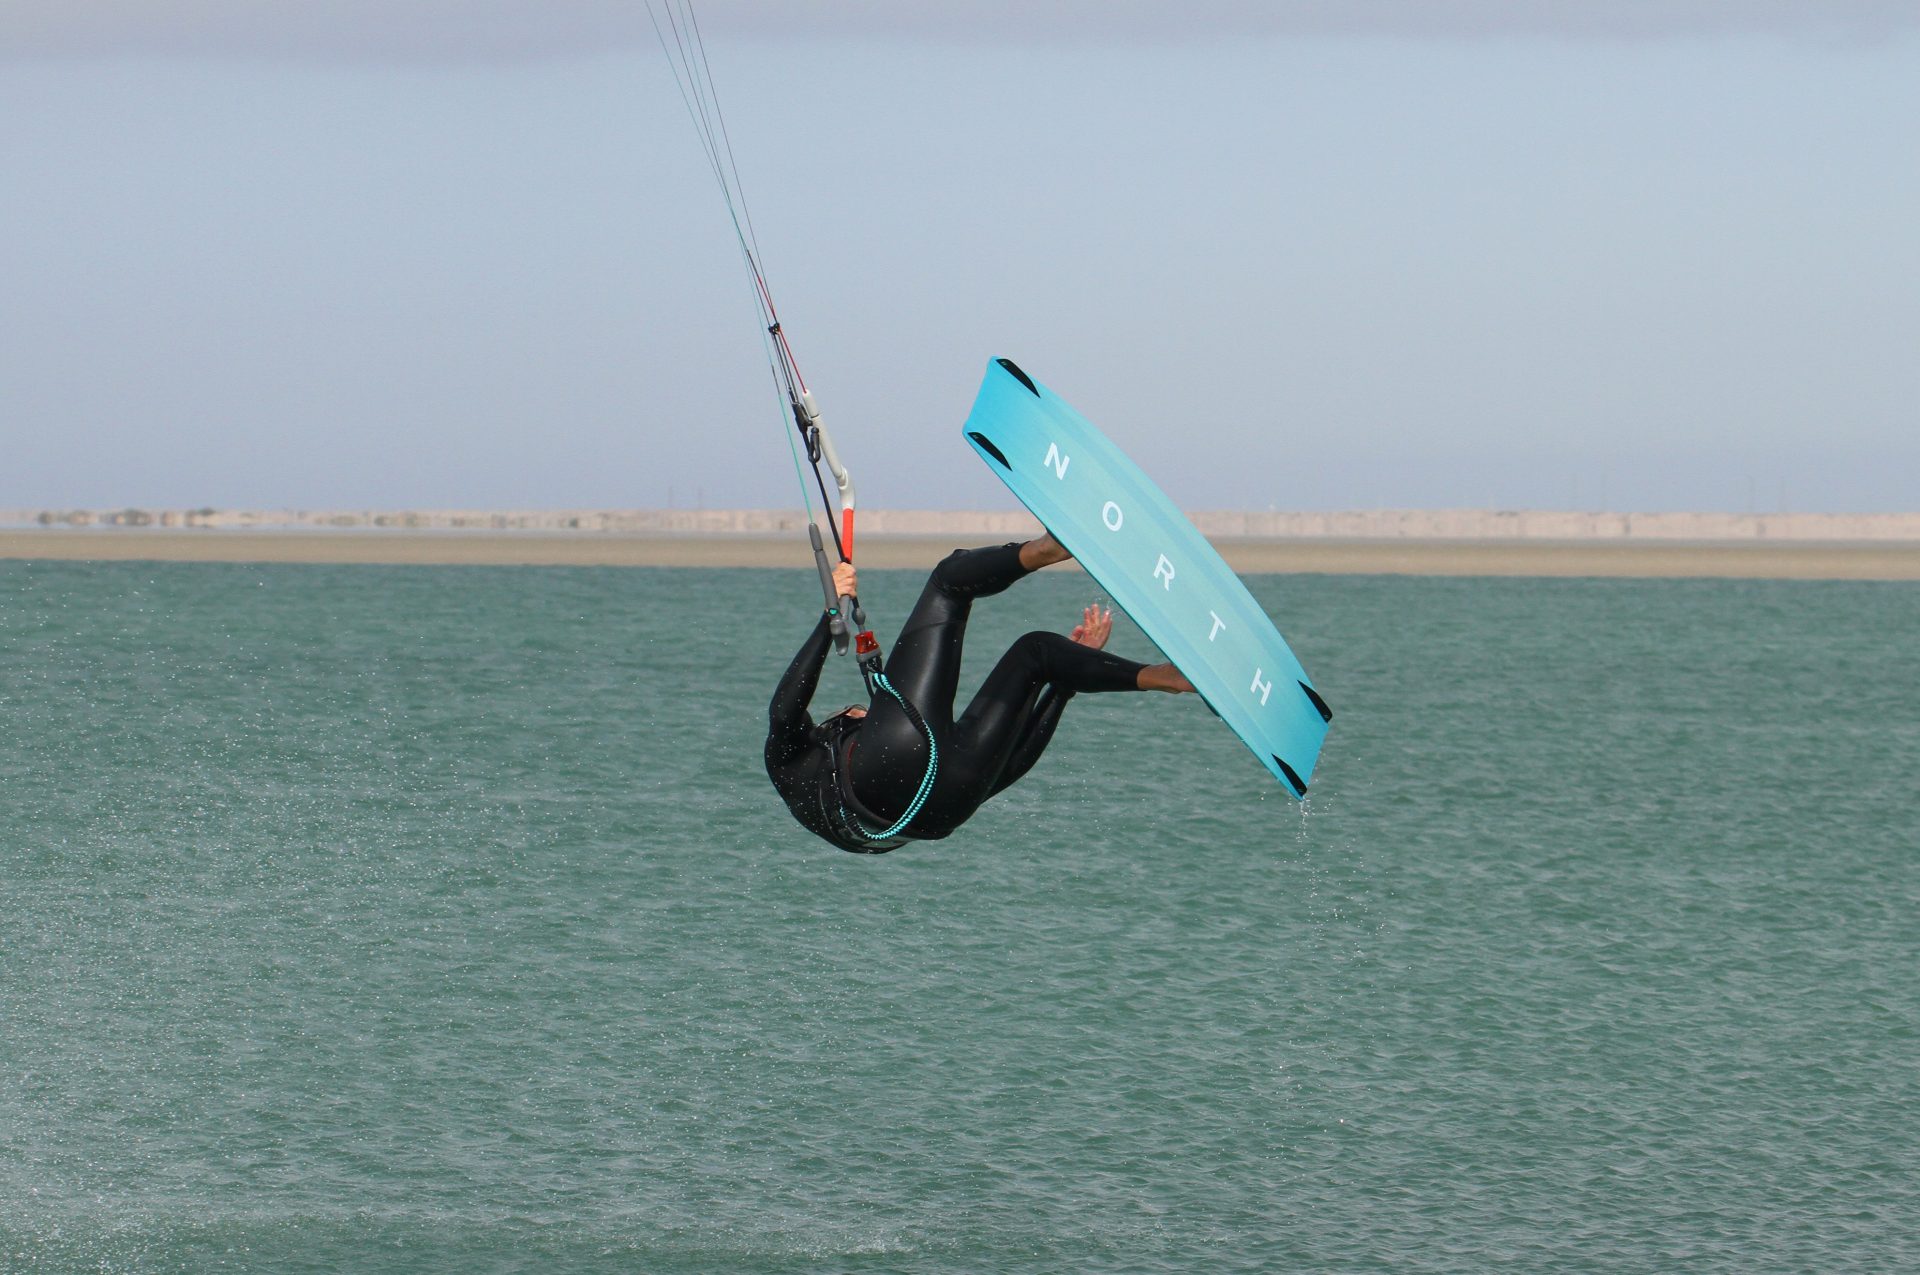
Drag & Roll Pic D.
The bit we’ve all been waiting for. Regardless if you succeed or not, this remains the money shot... Leaning back with your weight in the harness your legs will rise and your hand will plough a flume of spray, quite brilliant. However the move is far from complete. First off there’s the tricky business of trying to keep your hand in the water to maximize show time. You need to keep the power and tension on, but too much and you’ll lift, too little you drop. And if that wasn’t enough you’ve got the rotation to complete. As long as you got a bit of carve off the tail you should be going around. If you kept your weight back and front leg extended it will be easier still as you’ll be inverting more, which means that you’re using the lean to help you round. The crux here is to have enough time and rotation to get half way around, as from the 180 degree position we can bring it home. Both speed into the move and line tension will help. The good news is that if you don’t have enough of either you’ll just lower gently onto your back.
In the picture Christian has his arm fully extended so he’s maximum distance off the water, which means he has time. He’s got plenty of room on the bar for some extra lift and his board has already rolled up through the eye of the wind, so as it drops it will help him around. Things are looking rosey.
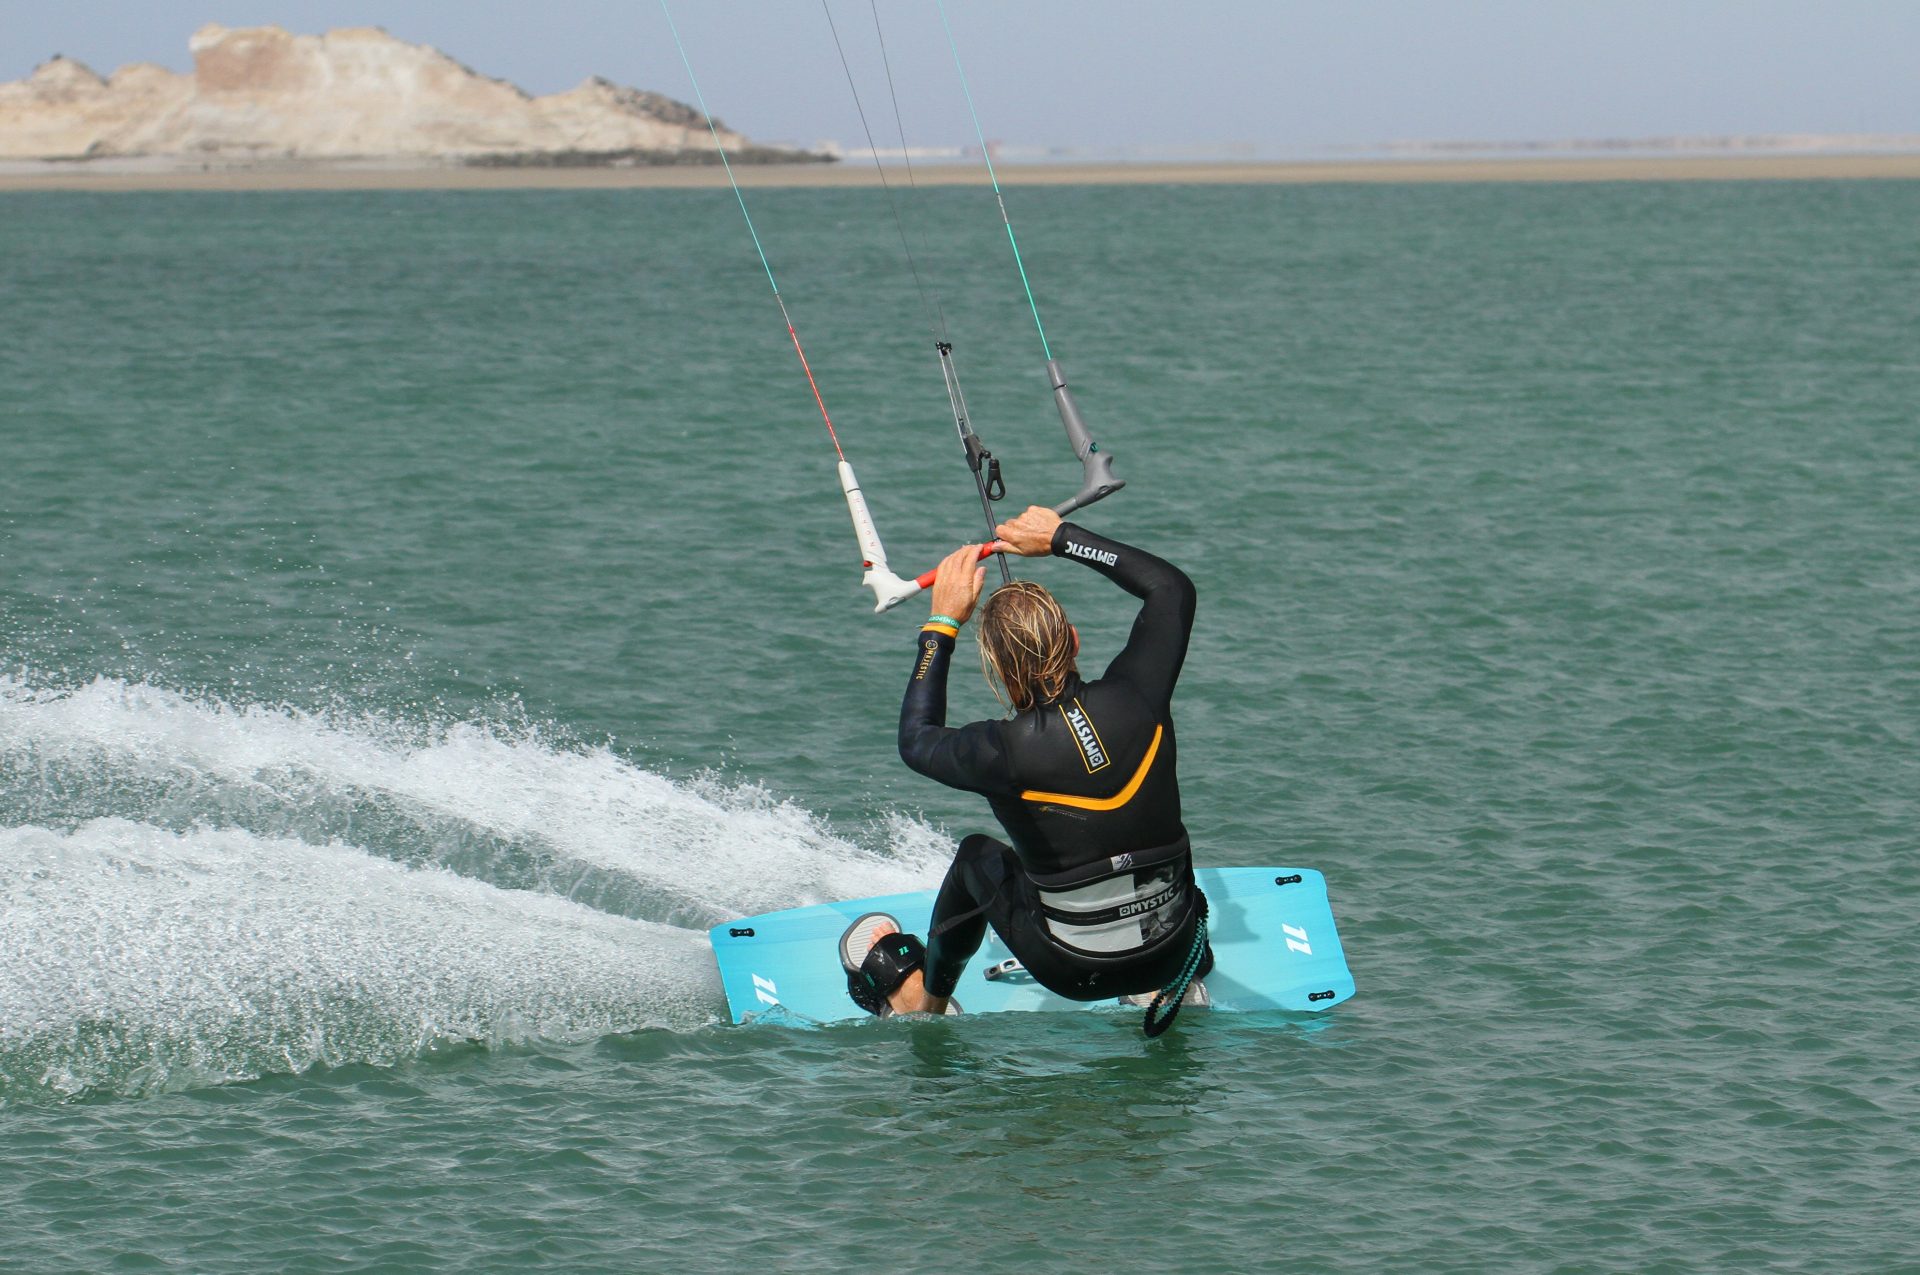
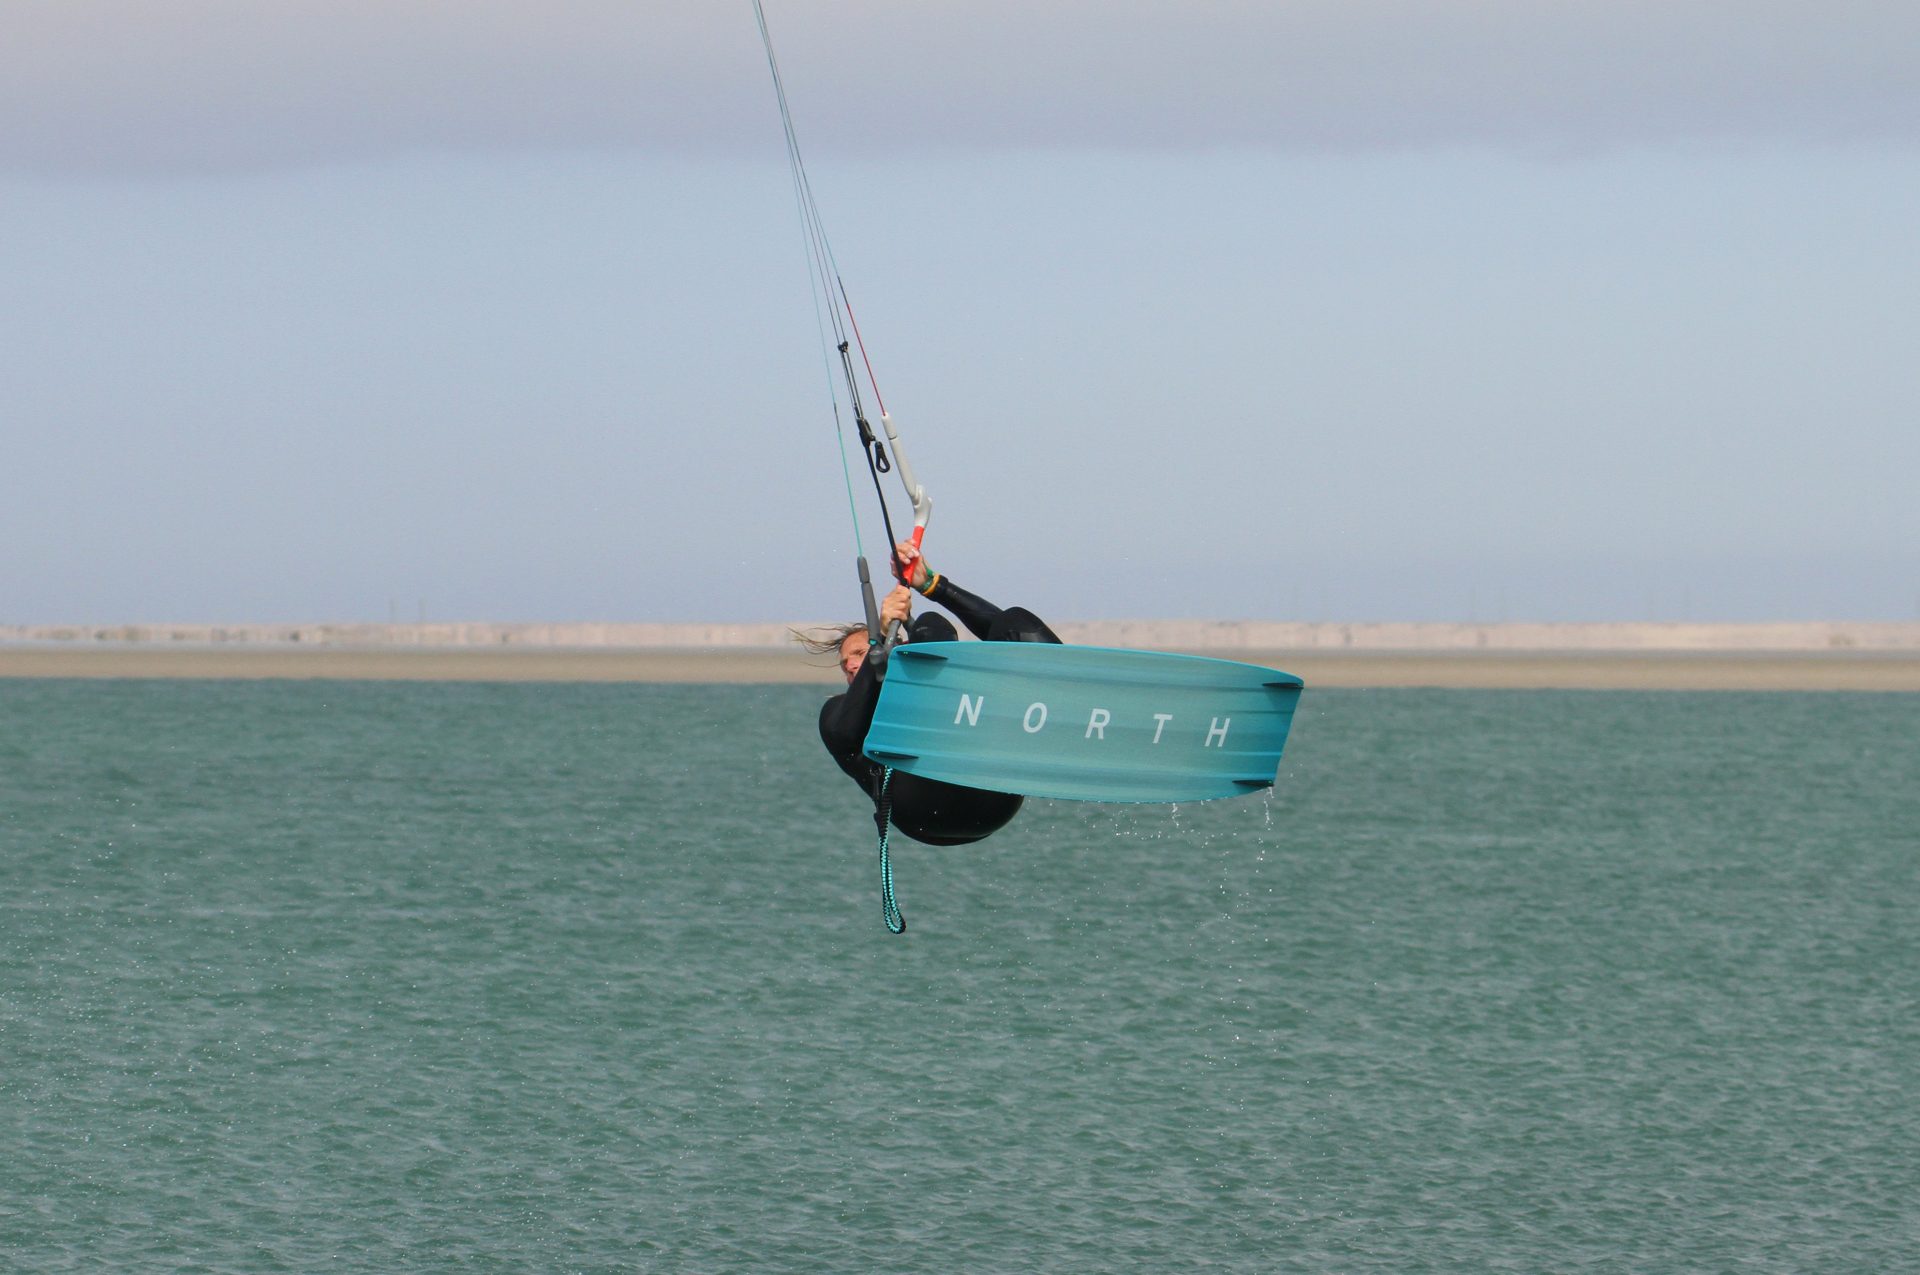
Pull When You Pause Pic E.
This is where your carve up will get you, half way around, slightly inverted, possibly disorientated and with the finish line somewhere in sight. From here you need lift to make it around the rest of the manouver, and forwards momentum so that you can keep moving and land. Both of these will come from the bar. By steering the kite forwards it will fly back over you and give you more time, and then as it moves down from 12 o’clock it will start to pull you forwards. Use your front hand on the bar to steer the kite using your wrist. Try not to just pull the bar in as it won’t be as an effective way to move the kite and you’ll be more likely to stall it.
You can see here how Christian could easily float down onto his back. However by steering the kite across and over he gets more lift, more time and some much wanted forwards momentum.
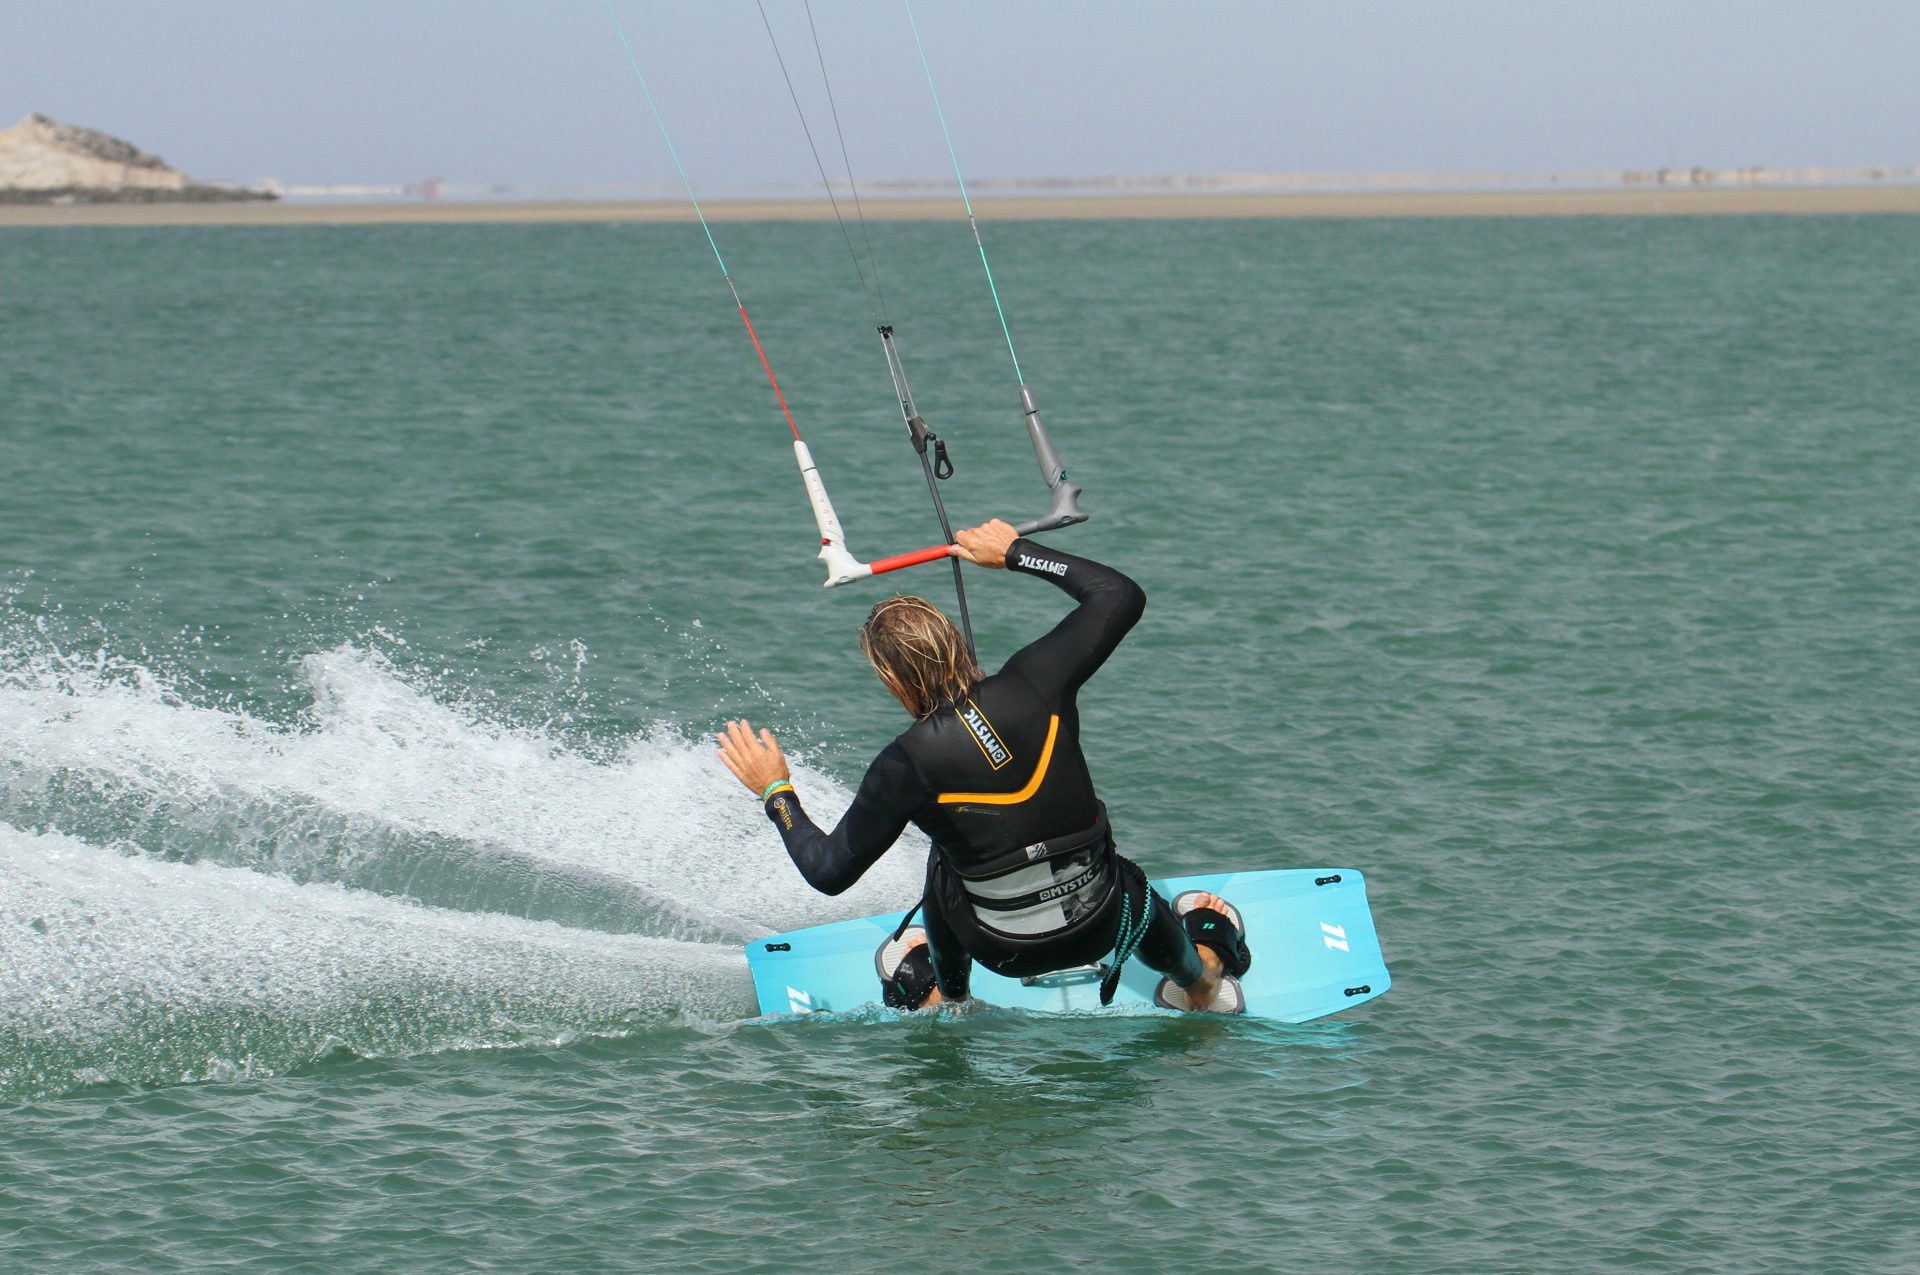
Heads, Shoulders, Knees & Toes Pic F.
Now that the kite is moving, you must follow it. They say that coaching is stating the obvious and this is one peach of an example. To make sure you finish the rotation, you absolutely have to turn your head, looking over your front shoulder. It may seem obvious, but from your inverted position it will feel that everything is going to plan, but without turning your head you’ll just stall and freeze at the half way house. Here Christian has turned his head, peering over his front shoulder, looking for a glimpse of the future. At the same time he gets his now rather clean back hand back on the bar. Make sure you keep your knees up, it’ll help you rotate and will give you room should you already be low.


Dive Captain Pic G.
Now that you’re on the way to sticking this, you just need to add the final piece of the jigsaw and it’s well and truly yours. As for pretty much all moves it’s imperative that you dive the kite and set yourself up for a smooth downwind landing. Keep you knees up, give the bar a hefty pull and push so that the kite dives down through the window and look where you want to go, which is downwind. This way the kite will pull you downwind and you can extend your legs for a gentle touch down. Christian has the kite diving hard, his knees are still up, he’s got his board positioned to go with the kite and stomp it downwind.
Top Tips
Without encouraging you to go mad, this move is definitely easier with more board speed, as the kite will be happier holding you, and as such you won’t need to concentrate on feathering the bar as you try to get everything else in order! Combined with a bigger kite, you can just worry about the rotation.
The disadvantage of a smaller kite and/or less power is that you’ll stall the kite easily when you try and redirect it, as due to the nature of the move you need the sweet spot out.
When learning this, don’t worry about the length of your drag. The trick is getting the back rotation with some inversion. Once you have this nailed you can then polish the washing line.
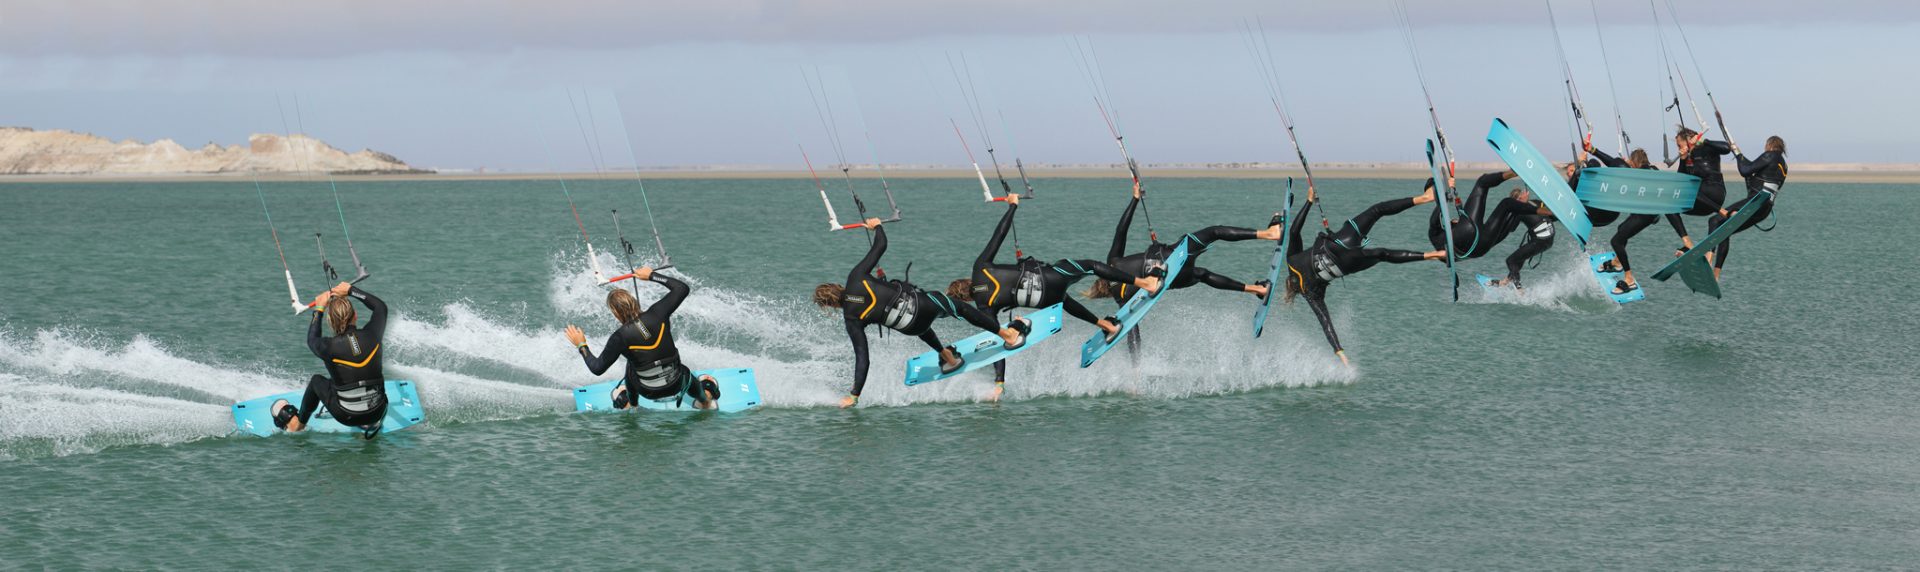
Now have a good look at the sequence and videos to see the move in from start to finish...
Common Problems
Not getting the hand wet. This is likely to be your first issue. When you’re concentrating on carving up a bit and keeping the edge in the water, you’re likely to do one or two things which scupper the wash. First of you may try and pop into the rotation. If you kick you’ll give yourself some extra height and it doesn’t need much to make the water unreachable. Secondly by concentrating on the carve you may not be concentrating on the kite. If it goes too far back it’ll lift more and as such you’ll be jumping rather than supporting. Gentle movements with kite and encourage the carve by extending your front leg.
No Rotation. If you’ve already trained the Hand Drag this is more likely as you already have the muscle memory engrained for that move. You are used to lifting your feet up off the water simultaneously. To overcome this, concentrate on shifting your hips further back towards the tail of the board and extending your front leg, as this will encourage the board to turn as you roll back and invert. Then as mentioned the turning of the head once you’re up is paramount to completing the rotation.
Not enough support/height. Assuming that you are moving the kite enough, it is either down to you moving it too slowly, letting the bar out, or if you’re a bit underpowered, stalling the kit. Make sure that you keep drifting the kite until you feel lift and then use the bar to prevent the kite lifting you too much. If however you just dump the power the kite will continue back without helping you. When you’re underpowered it is very easy to pull the bar in and stall the kite when you’re trying to steer it, so make sure that you steer with your wrist and not by pulling on your arm.
Keystones
- Speed and Edge.
- Drop weight back and drift
- Push front leg out and carve up
- Wash and Invert
- Turn head and dive
This technique article was in Issue 77 of IKSURFMAG.
Related


By Christian and Karine
Christian and Karine have been working together as a coaching team, running improver to advanced kitesurfing clinics since 2003.
