
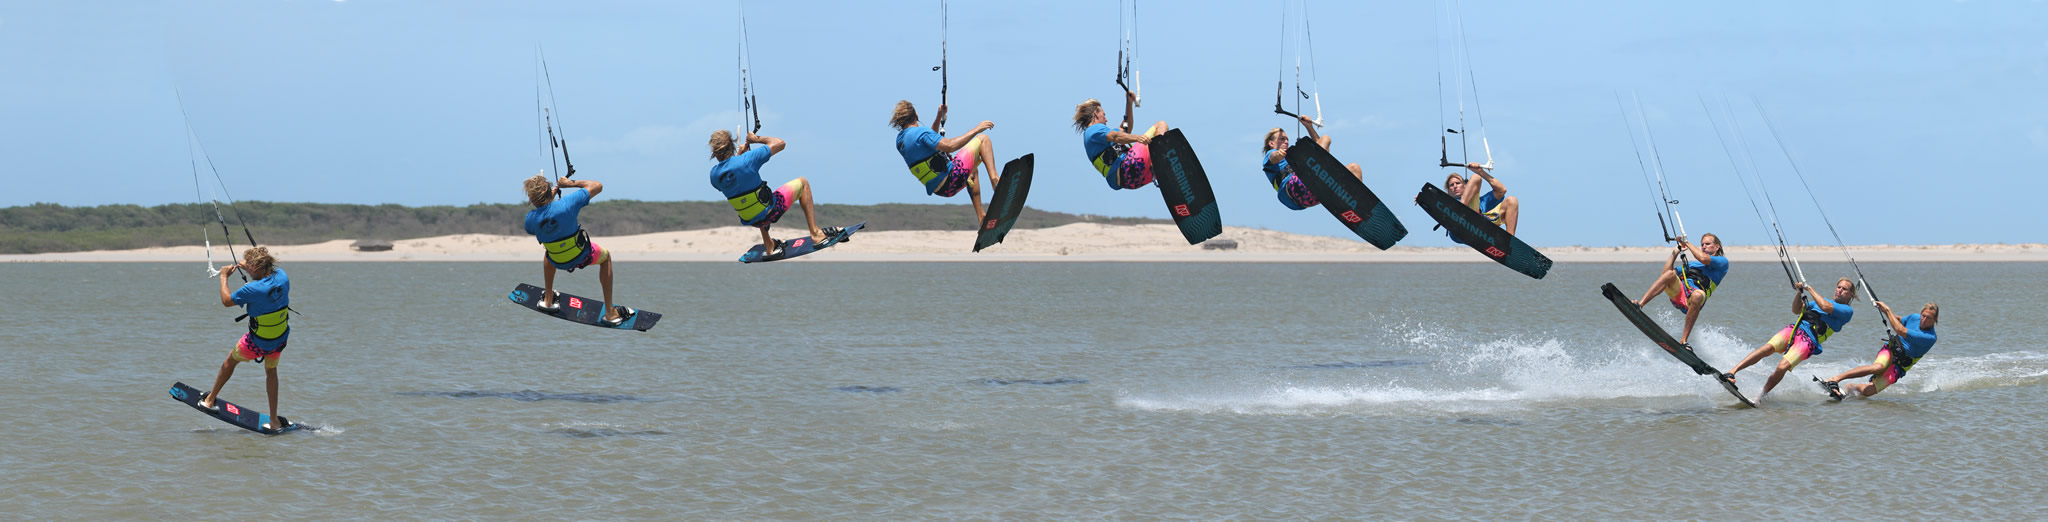
Back Roll Grab from Toeside
Technique / Intermediate


A cheeky embellishment on a classic. Adding a tail grab to a sent back roll from toeside sums up the joys of kiting, so many possible variations to spice up any move. This is a great one to add to your armoury. You can bang it out in pretty much any conditions and it’ll keep your toeside foundations strong for a whole plethora of other moves. What’s not to like?
We’ll have a look at this in its entirety, reminding you what is required for both the back roll from toeside using the kite to jump, as well as the mechanics of squeezing in the grab. It should be no secret that your toeside will dictate just how well the rest of the moves continues. You’re aiming to grab what will be the tail of the board as you come down heelside, and you’ll be using your back hand to grab so that you have the front hand for steering and landing.


Let us ponder the details!
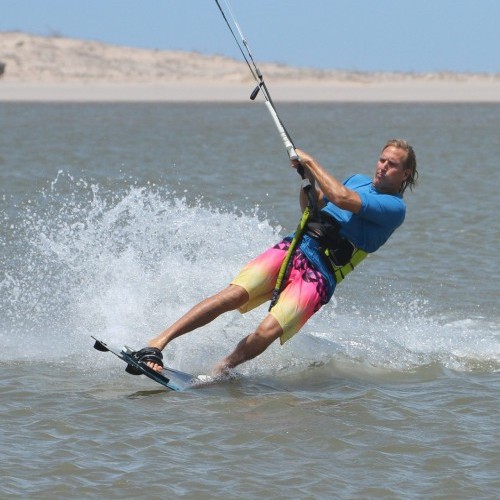
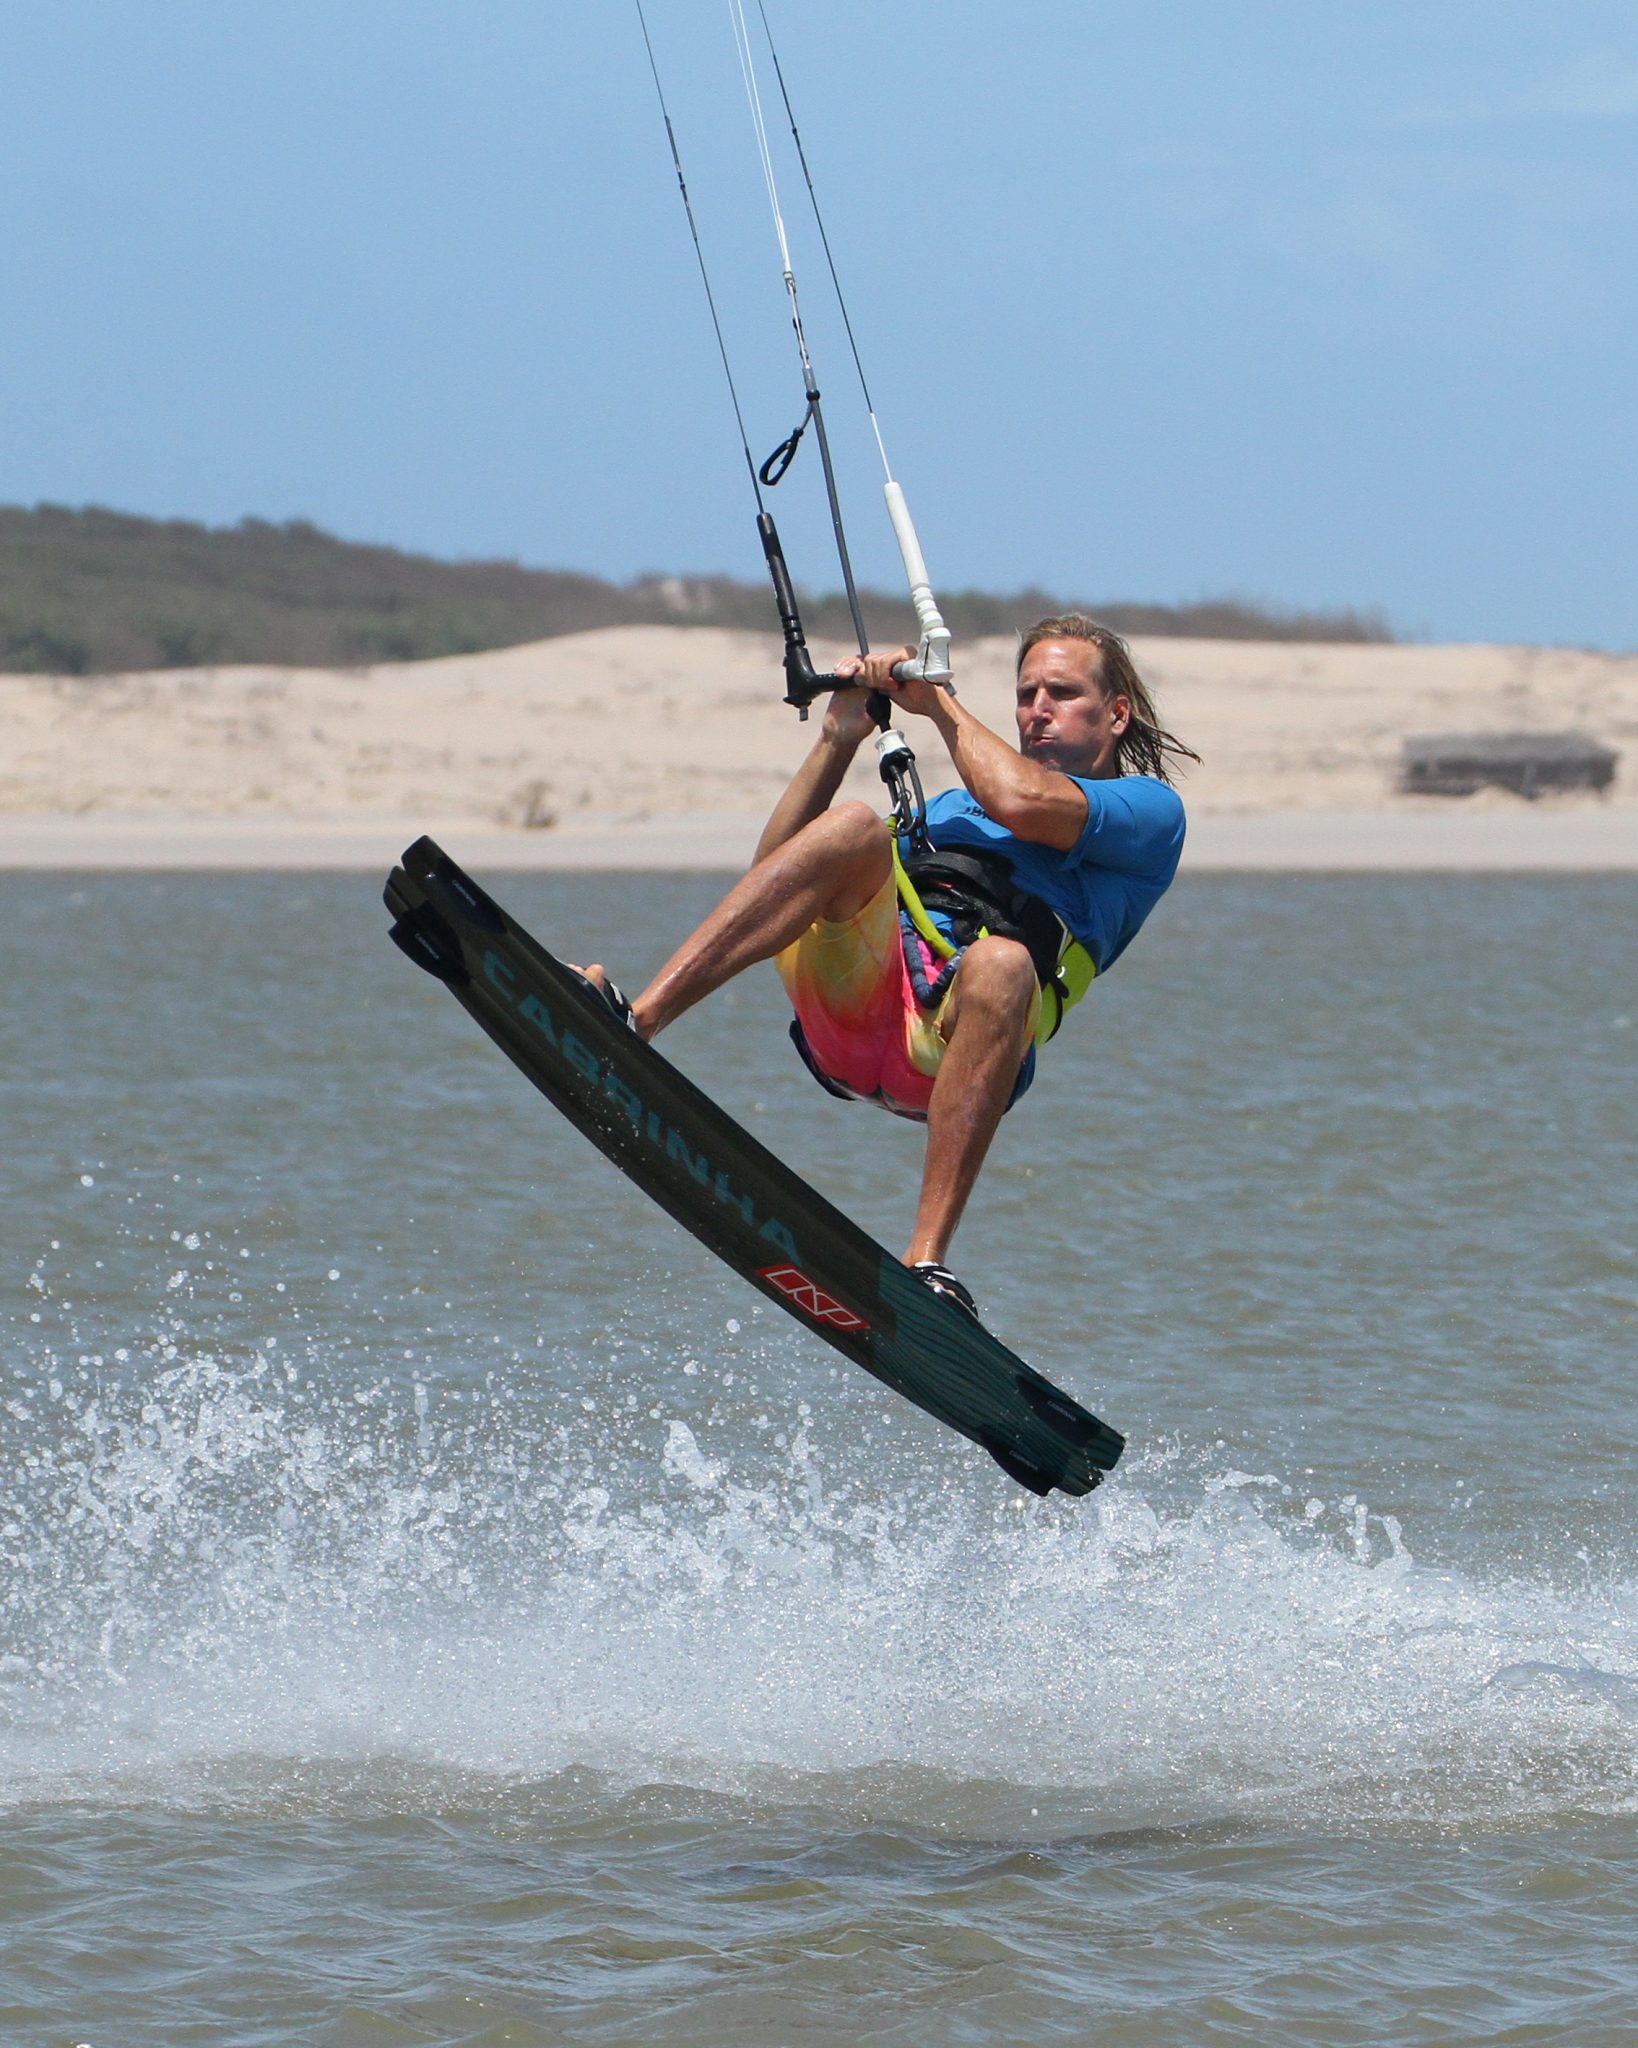
Your Toe Side Pic A.
We’ve said this before, and we’ll say it again now. Much like heelside, if we are to attempt anything sent, using the kite for jumping, it’s all about resisting. To resist efficiently and effectively you need a whole lot of edge. The more edge you have in the water the more resistance you get, but without drag. Drag slows you down, resistance squirts your forwards. Now think about your early attempts at toeside, or perhaps toeside on your weaker foot – where is your weight. Right back over the tail of the board. You’re sinking the board, it’s dragging through the water and slowing you down.
It might feel like resistance but really, it’s no different from towing your laundry behind you. To make it efficient you have to learn to get your weight forwards, trimming the board from front to back whilst still edging. Look at the picture and you can see plenty of Christian’s board in the water. Suffice to say you need to get your weight forwards and onto your front foot. The easiest way to do this is to open your chest and hips, facing forwards down the board so that you have a shoulder each side. This with a bent front knee, hips and head dipped forwards and both knees driving forwards, pointing in the same direction and working together opens the door to a world of possibilities.
Think of a surfer racing down the line or a slalom snowboarder in hard boots. Coming into any toeside trick this is your approach position - speed, no drag and kite flying at 11 or 1 o’clock on the edge of the window, ready to send. You can see in the picture that the other advantage of this position is that Christian is able to control the bar with two hands and therefore send the kite with the usual push pull, dropping his weight to resist the kite as it lifts towards 12 o’clock.
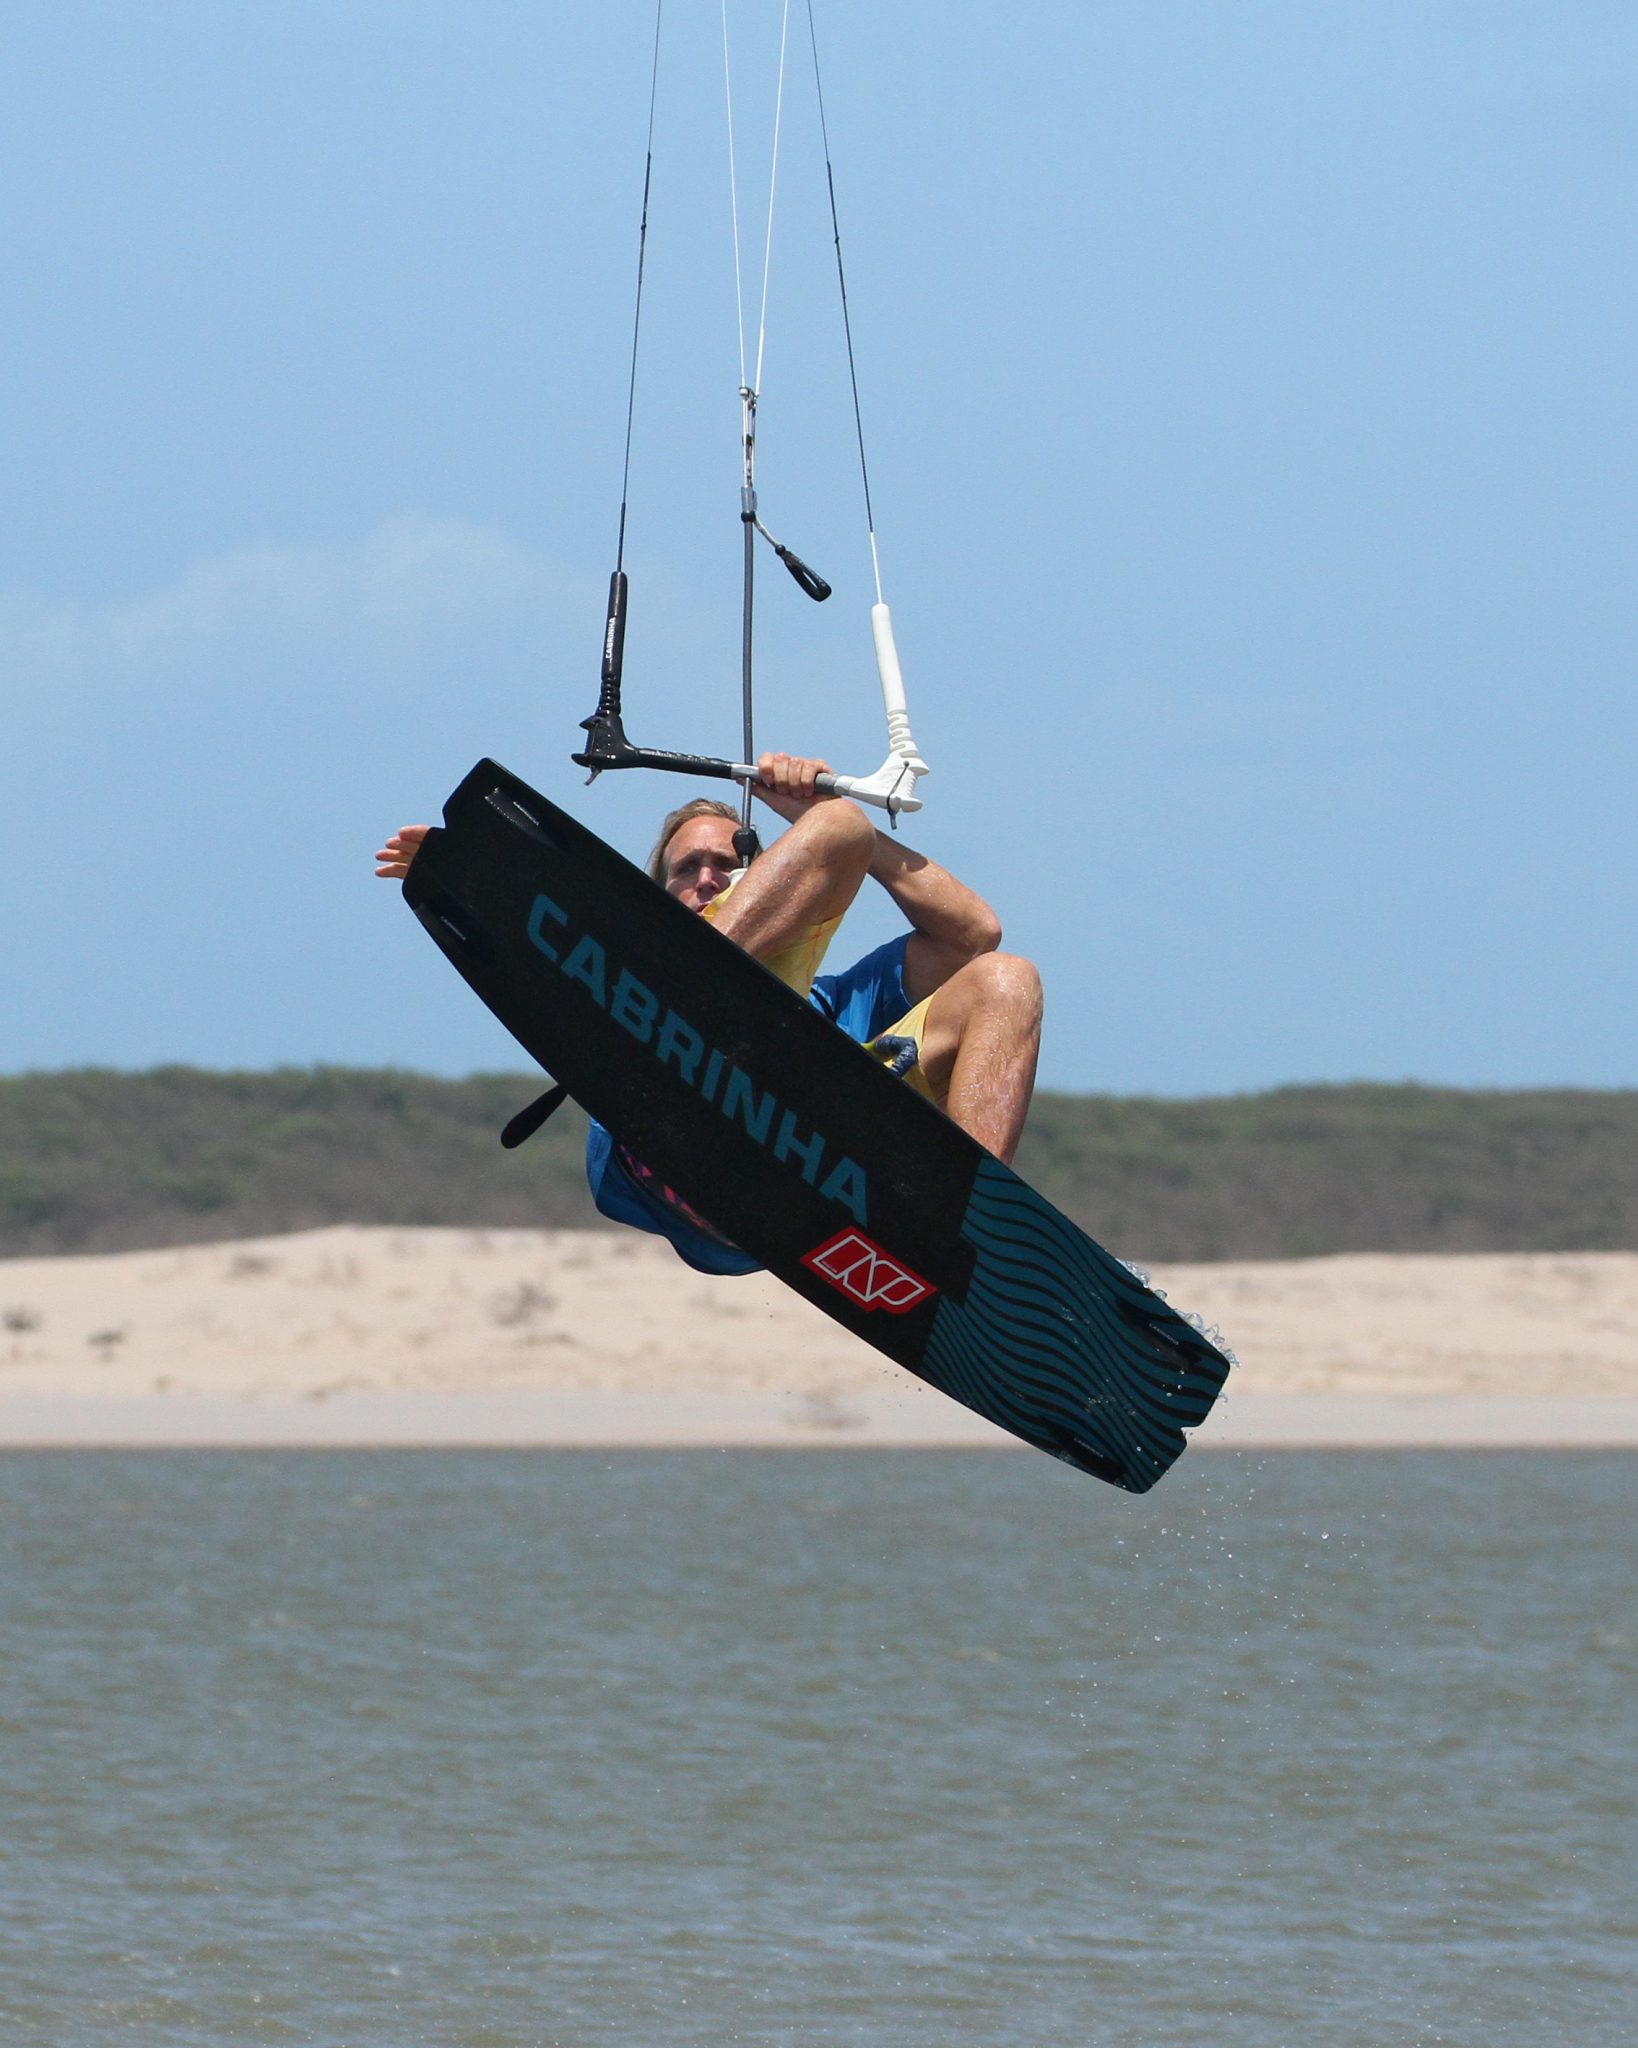
Kick Off Pic B.
With the aim of adding a back rotation you will need to add a bit of back leg kick, which can only be done with your weight back. However as discussed in the last paragraph you can’t just be back as it all goes Pete Tong. Also, it’s impossible to kick off your back leg if all the power you’re edging against whilst sending the kite is already transferring through it, unless you’ve got legs like a Dutch Speed Skater. The art here is to time perfectly when to drop back over your back foot to kick up into your rotation. If you have a look at Pic B. Christian has sent the kite from 11 o’clock and was still edging on all his board during the approach.


As the kite reaches around 12, he’s edging super hard but then drops his weight quickly back by moving his hips and extending his front leg. However, he doesn’t bend his back leg any more as he would then loose his edge! From here he’s ready to kick. It’s a sudden movement, from edging to suddenly rocking back a kicking off. The result of moving your weight back on the board also gets it carving which will help initiate your back rotation.
As you take off, the kite will pull you slightly back as it lifts you. As you feel it pull, you must stamp down against your edge, digging the tail in as this will encourage more up and less back. You can see in the pic that Christian’s shoulders and his head are leaning back. As long as you go up you’ll have time to rotate. Once you do start to go up it is super important to stop the kite going any further back in the window. As a result of being toeside, and thus it potentially being a weaker edge your kite will likely fly further back than you’d like, so stop it on take-off by levelling the bar as Christian has here.
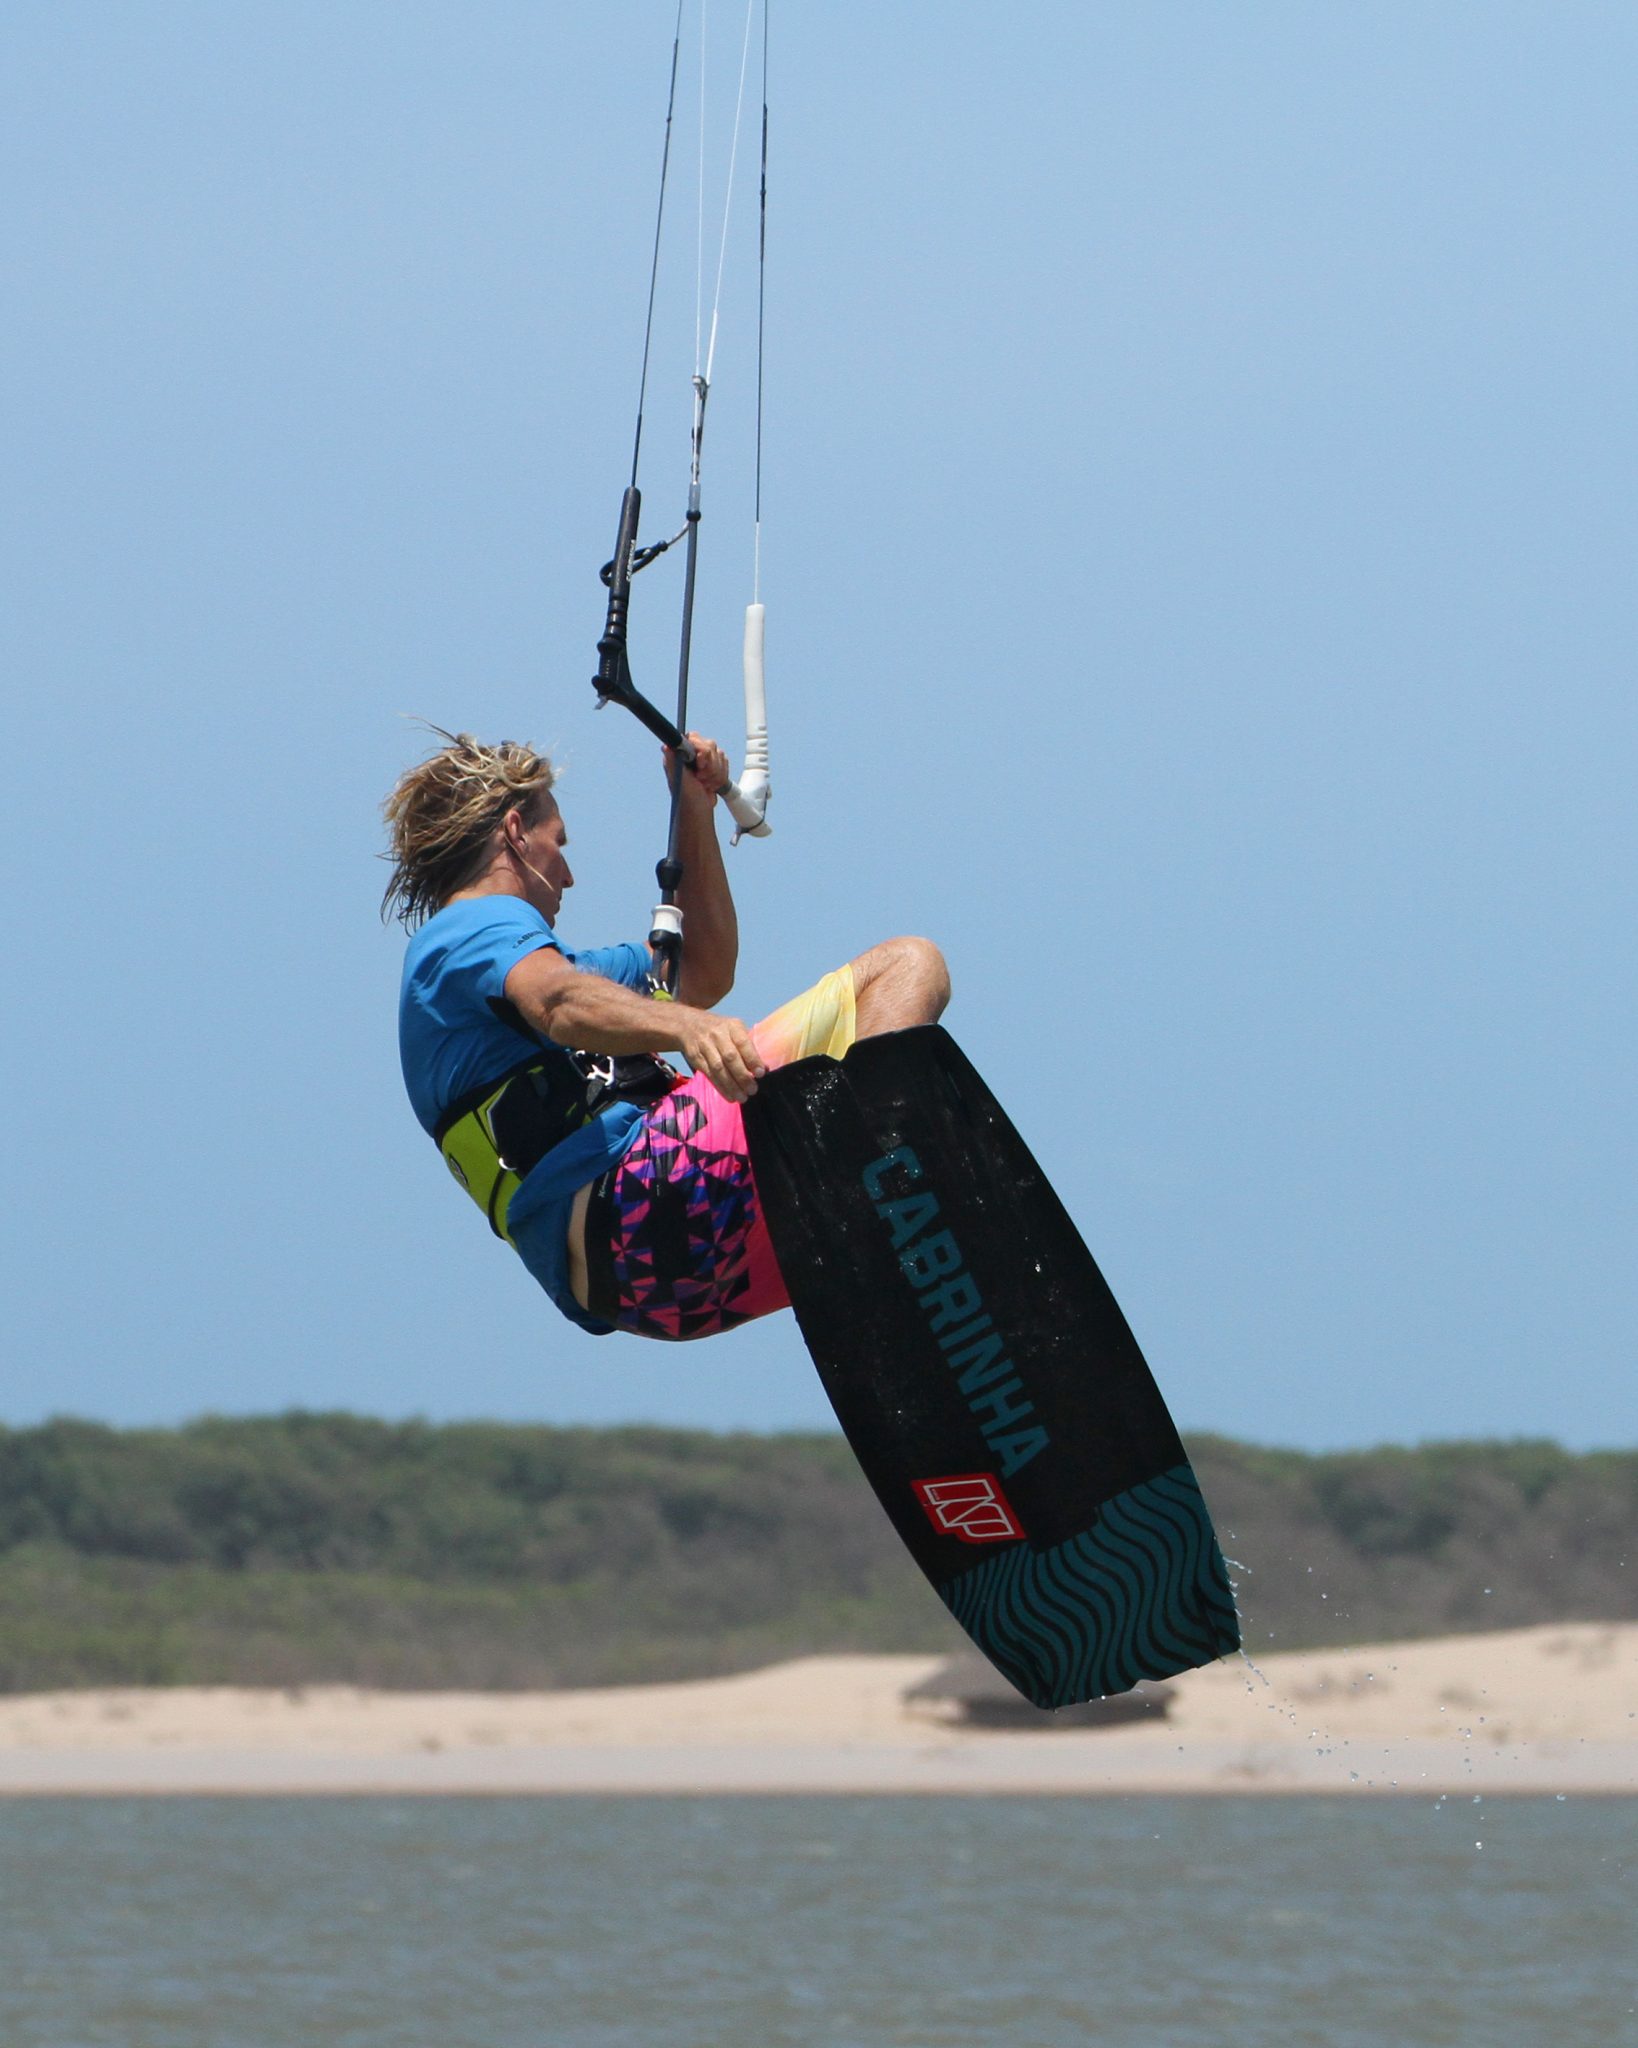
The Slow Back Roll Pic C.
The rest of the rotation should be simple enough once you’re up as long as you can keep control of the kite. Your aim is to rotate slowly so that you have time for the grab. With the kite keen to go back, you need to be aware of where it is at all times. Even though it’ll help pull you back and start your rotation, if it carries on back it’ll just dump you down again. Your next goal is to get your knees up. This will only be possible if you keep the bar in on the sweet spot. As you lift the knees the board will come up nearer to you and into a position that you can grab it. If you look at Christian his bar is in, he’s steering the kite forward slightly, he’s looking where he wants to grab, and his knees are lifted.
The Grab Pic D.
As long as your knees are up, you’re looking at the tail of the board and you’re not spinning, reaching the grab shouldn’t be too problematic. If you’re well versed in the art of tail grabbing the movement should be natural. As a result of a slow rotation what you have really done is allowed your legs, feet and board to catch up with you. You may have taken off toeside, but by this stage you’re actually performing a standard sent back roll with the board where it would normally be. You can see that Christian is looking at the tail and reaches for the grab as he has done many times before. The advantage of focusing on the grab, is that it prevents you from turning your head and therefore effectively stalls your rotation, giving the board time to catch up, and you time to reach the grab.
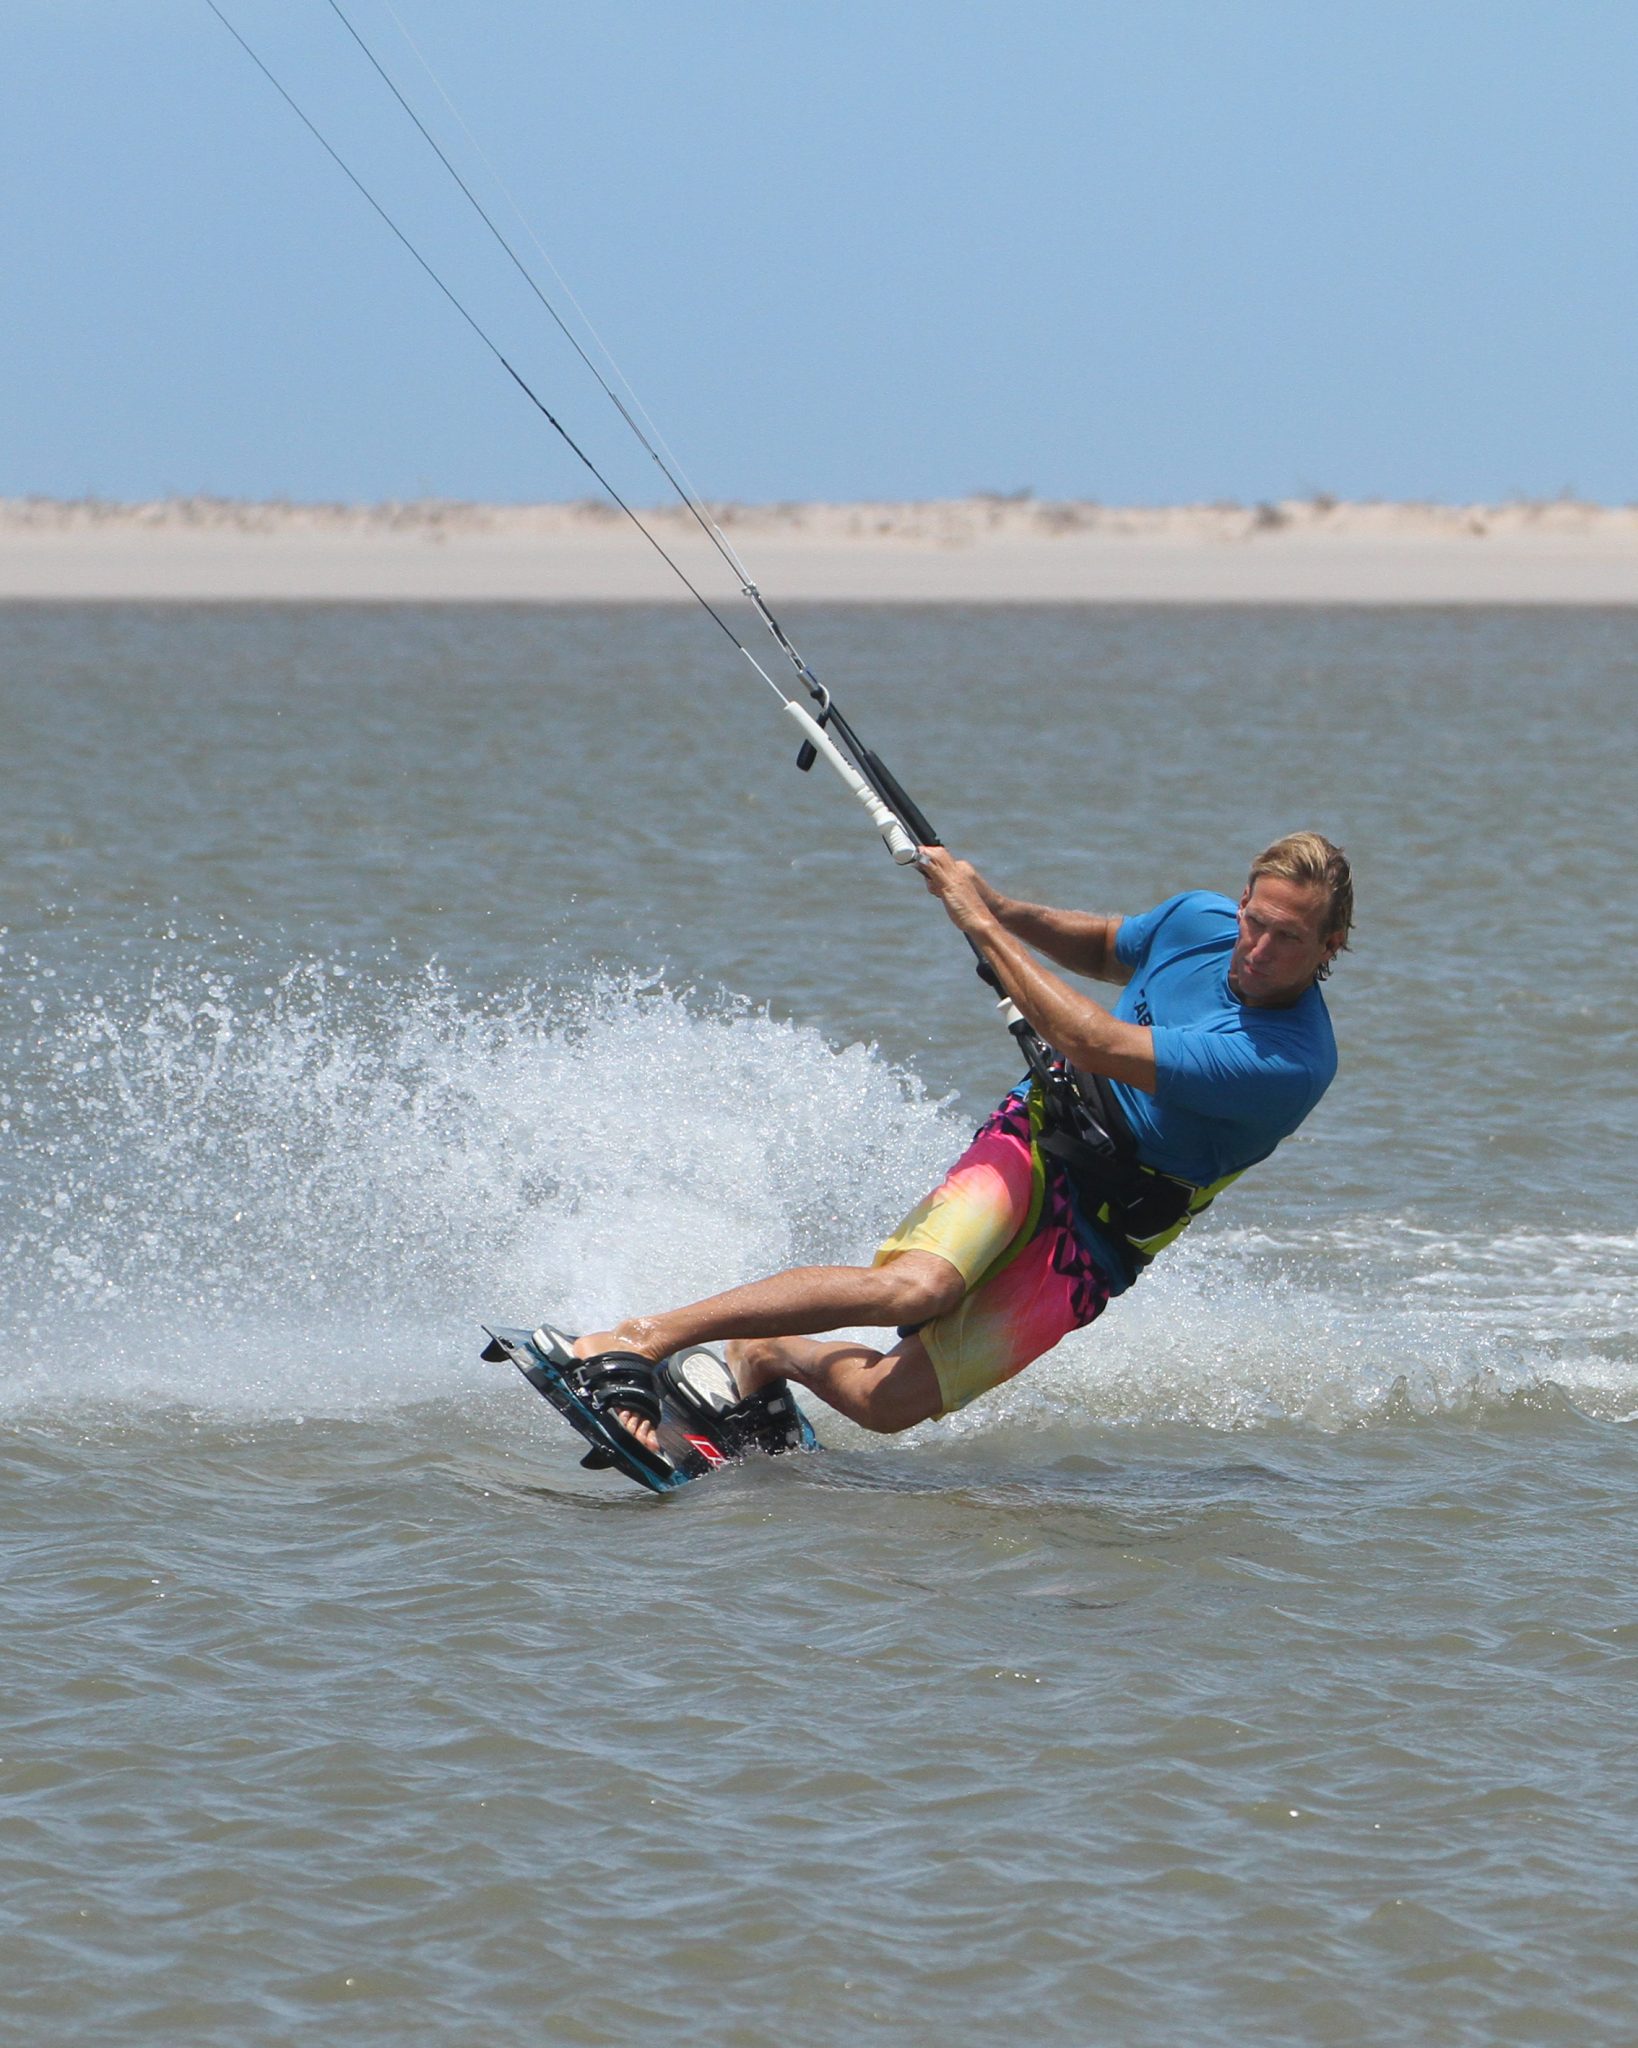
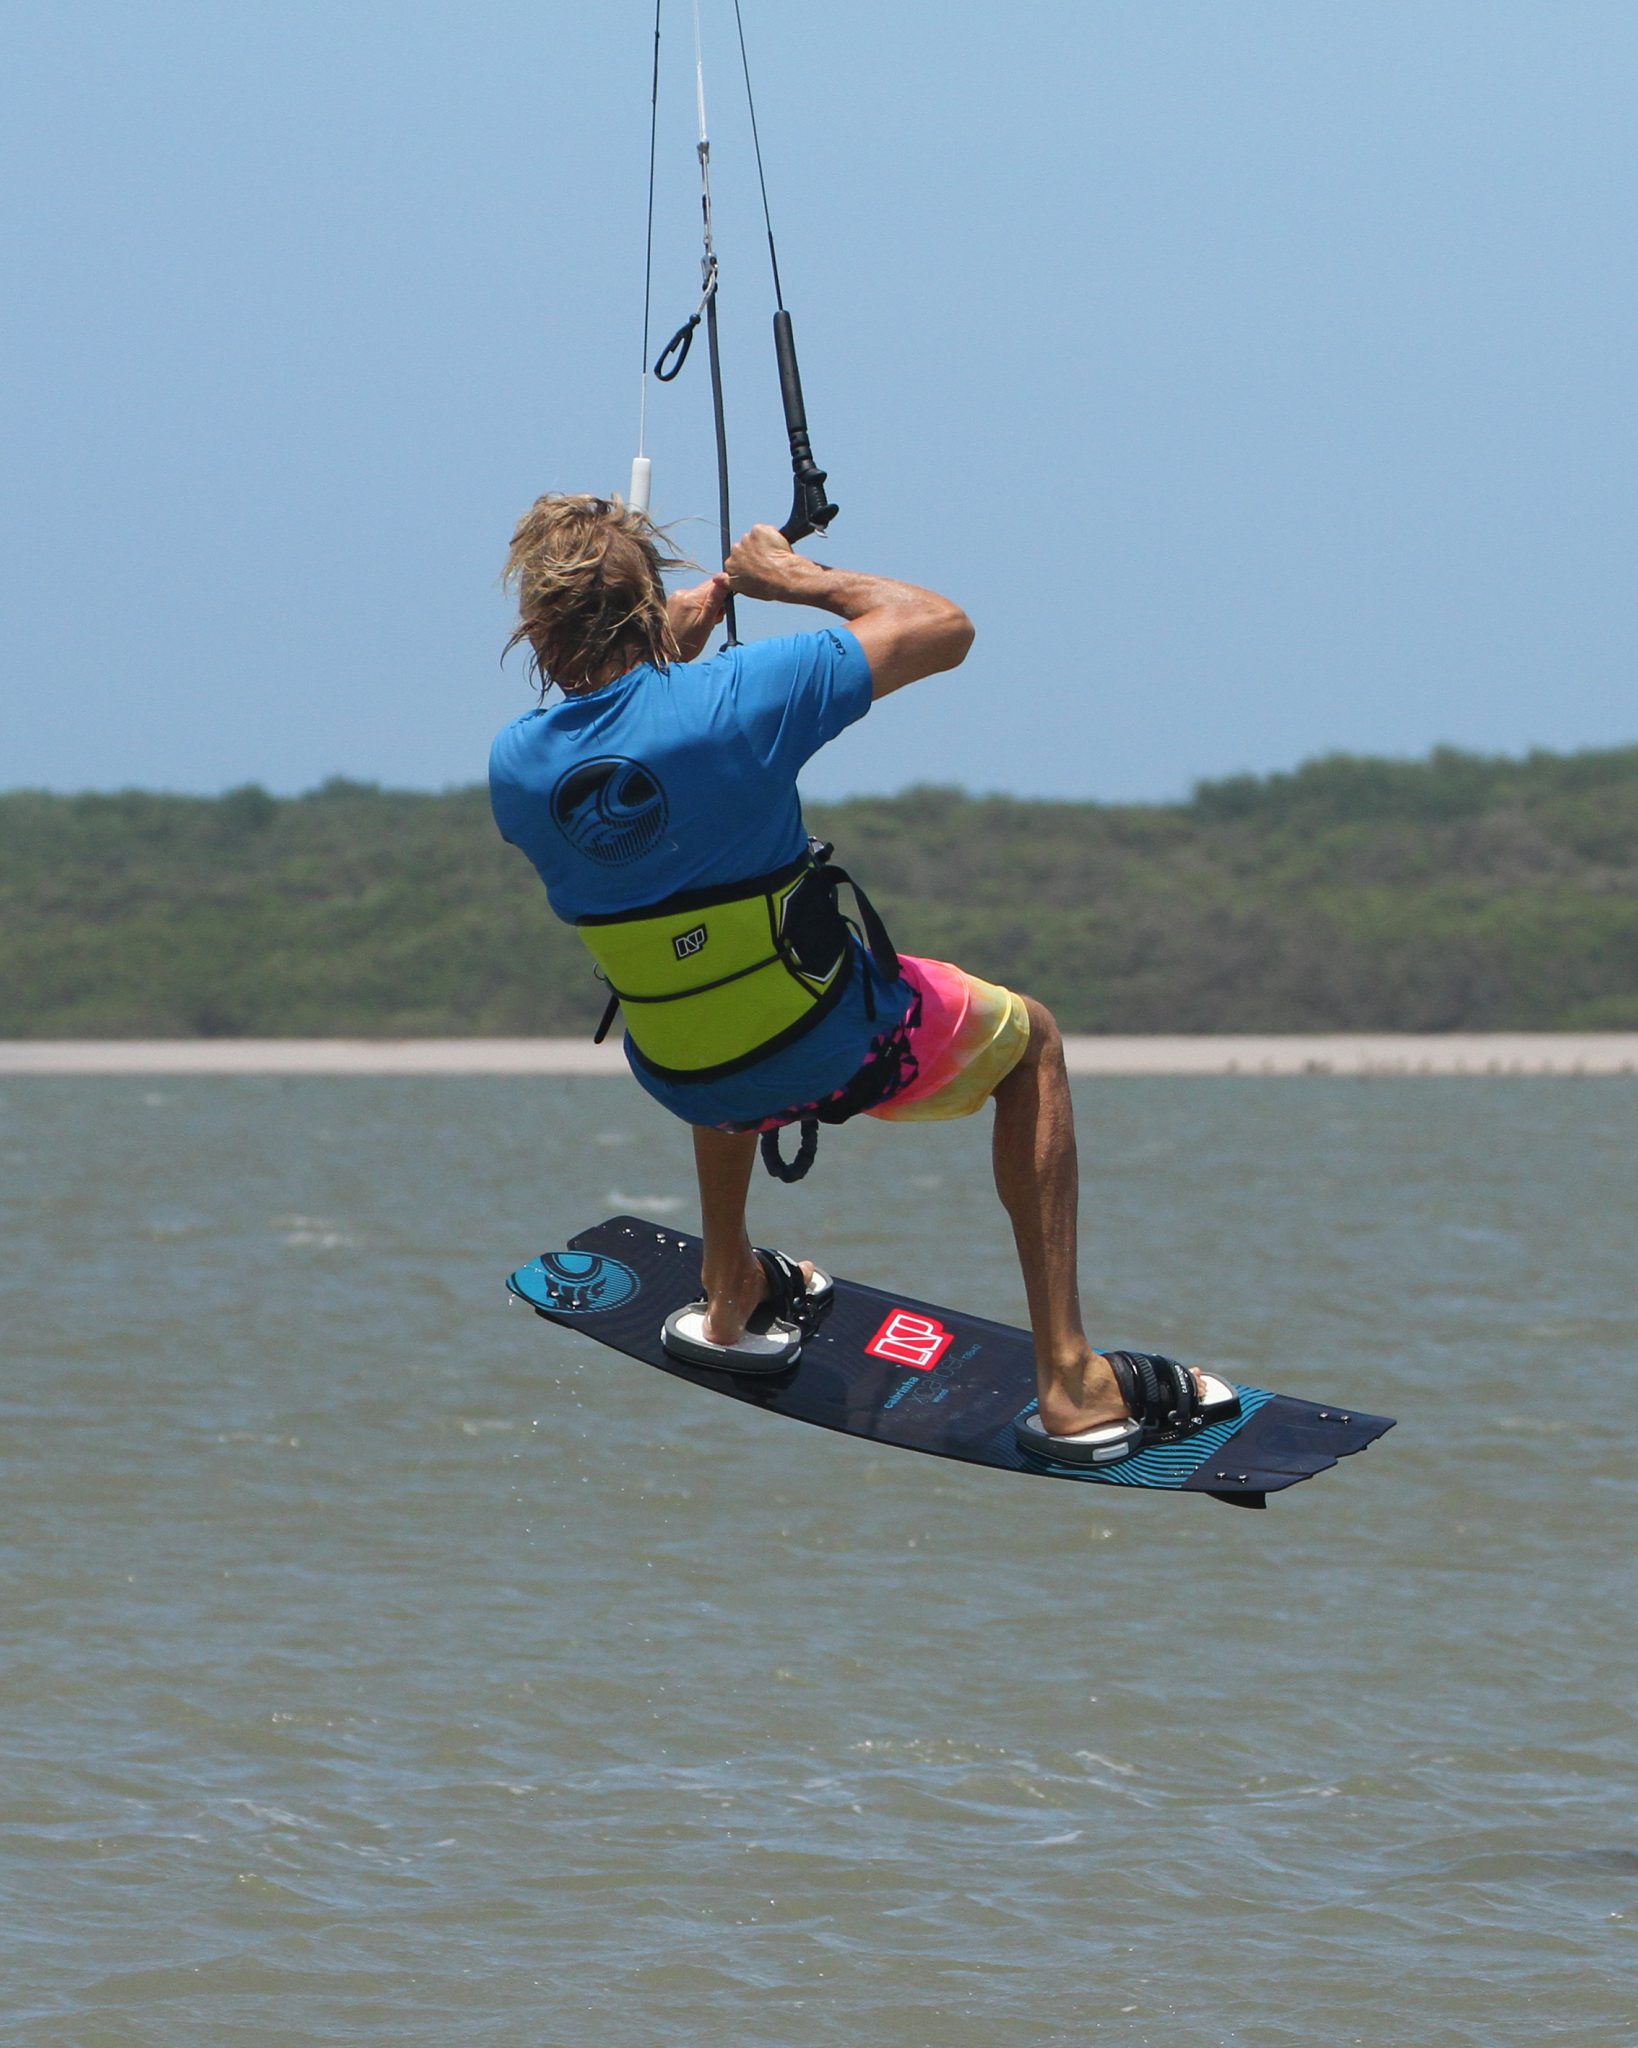
Complete the Rotation Pic E.
Once you’ve got hold of the board it’s time to “unstall” your rotation and get the second half underway. Christian has his grab, so he now turns his head and shoulders, looking over his front shoulder towards the water. To further encourage his body and board to turn Christian also starts to steer his kite forwards, pulling gently on his front hand. As the kite starts to move across the window above him it will pull on his harness and help him complete the back roll.

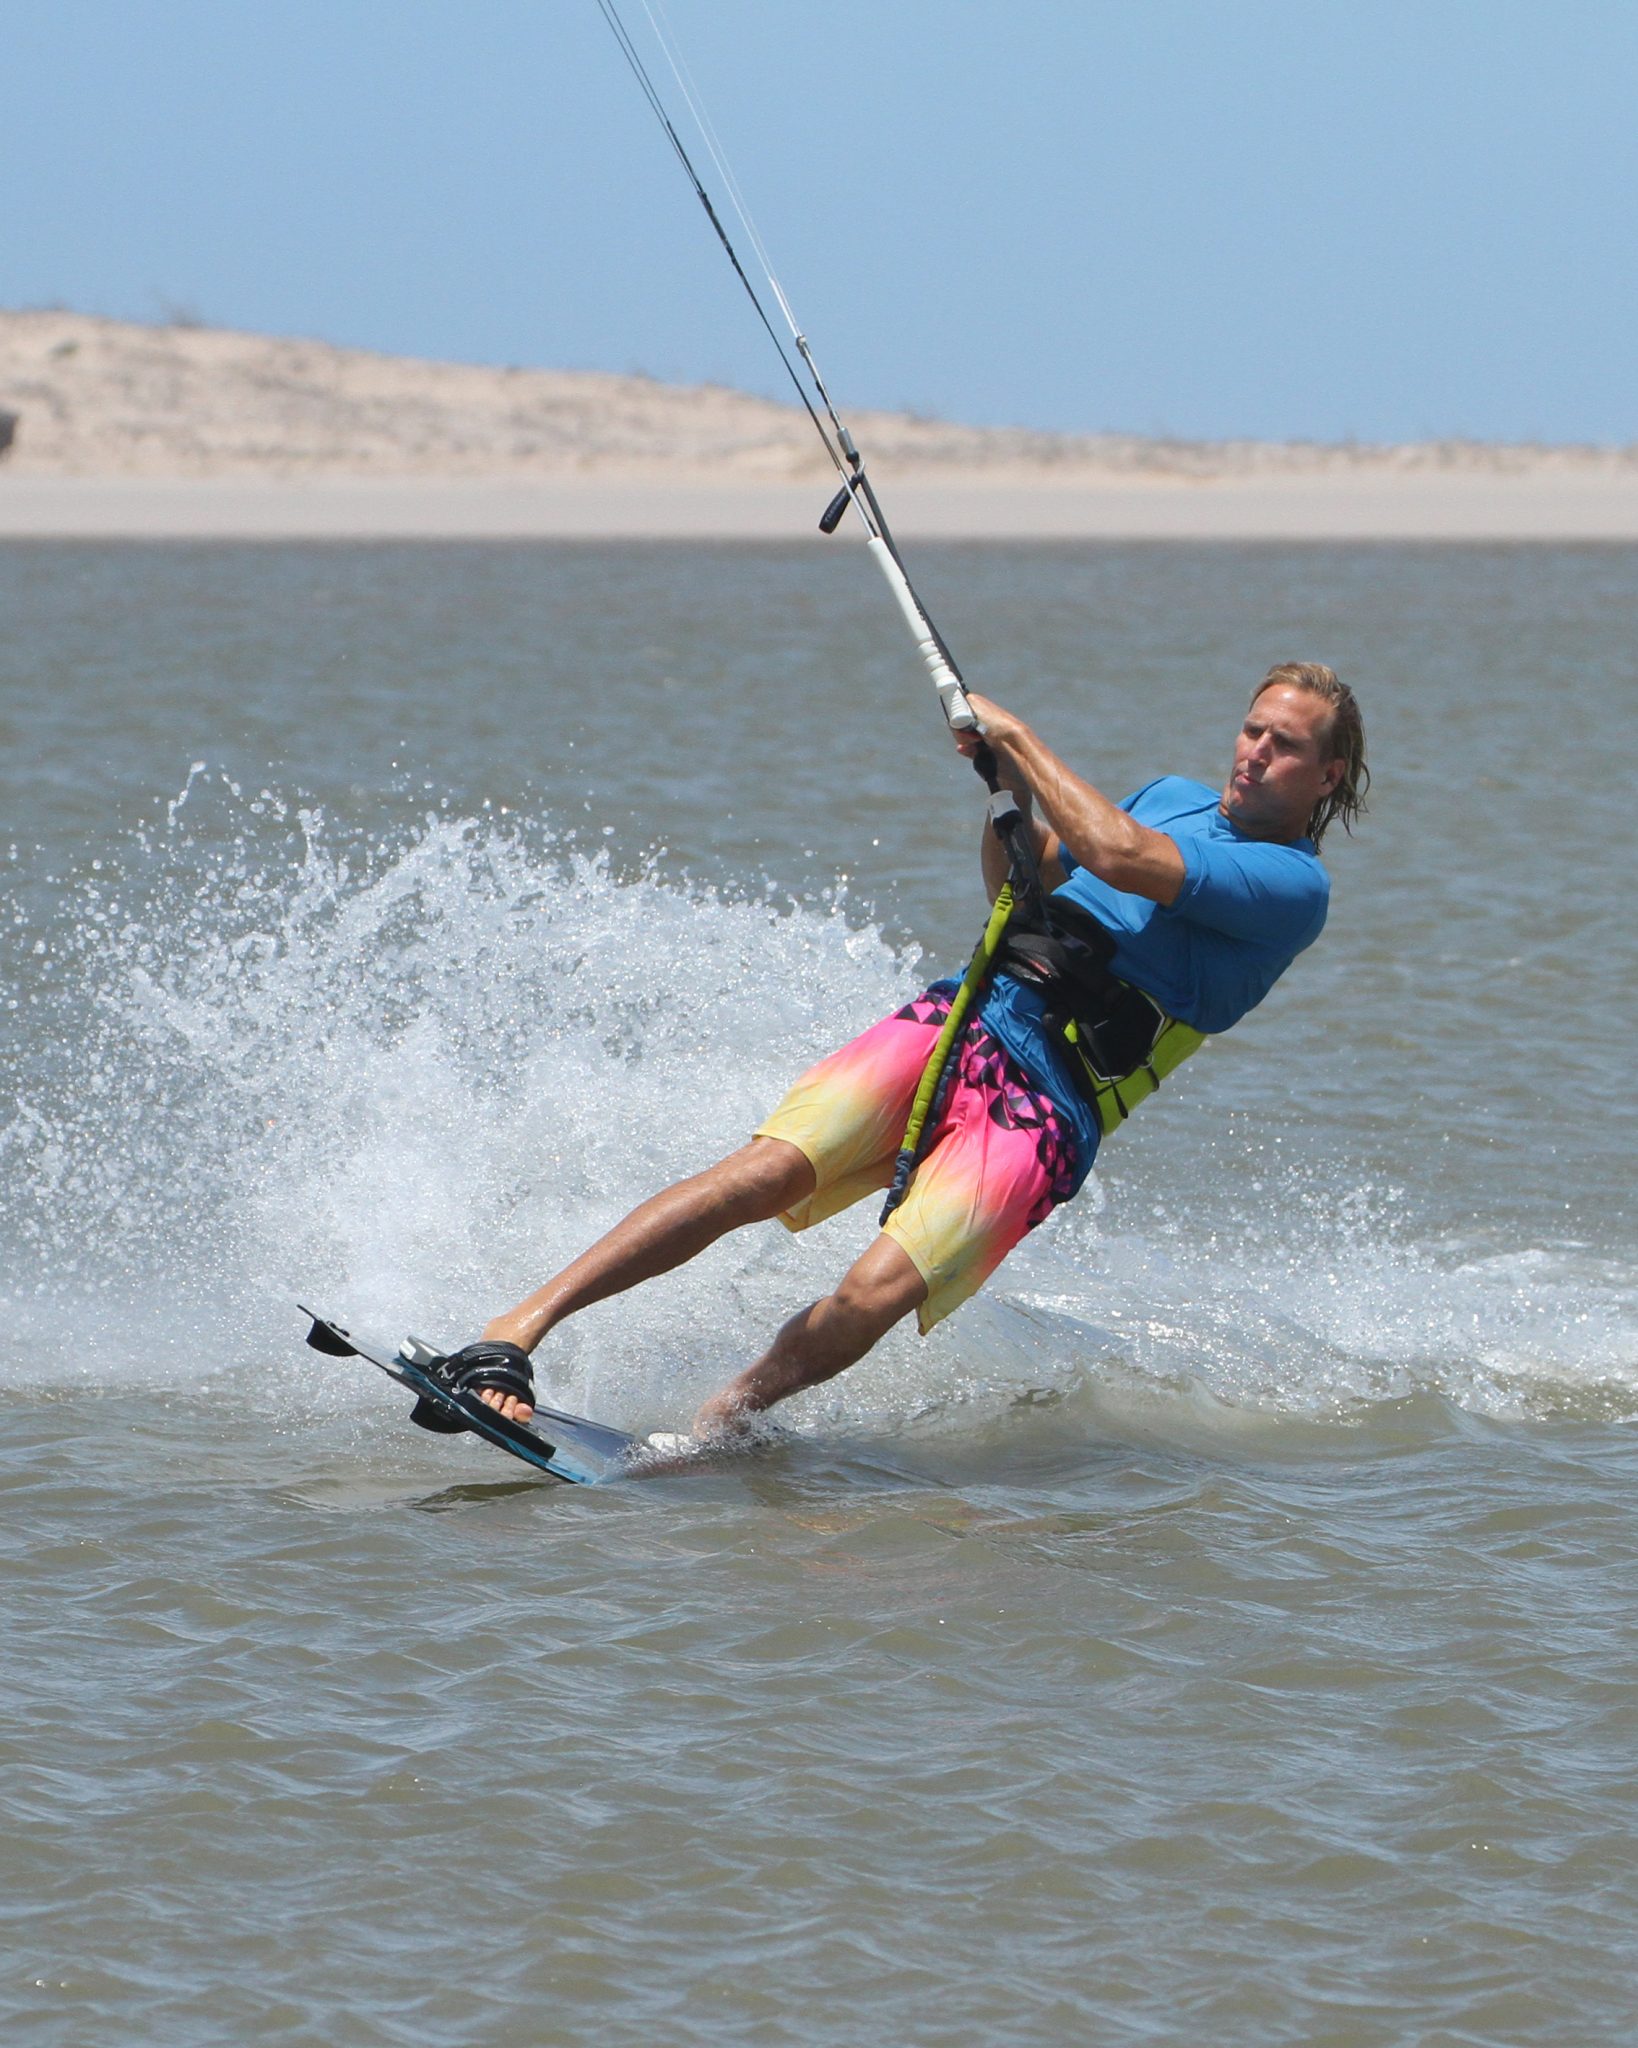
Prepare for Landing Pic F.
All that’s left to do is get yourself in a comfortable place for landing and you can claim this. This should be standard issue. Once you’re on your way down release the grab and get your back hand back on the bar. Focus on where you hope to land, drop your undercarriage and dive the kite for a smooth downwind landing.
Top Tips
Your take off is everything in this trick so work on getting it smooth and predictable. This is a sent move, so you do need to give the kite a decent sharp sending. Maybe not for as long as a heelside jump, but certainly with meaning. The kite moving fast is what will give you the lift, so be positive.
A you drop your weight back, rolling onto the tail of the board be sure to keep your back leg pushing against the power. If it goes soft, the kite will go too far back and not a lot will happen, so keep driving against your board.
Now have a look at the sequence and videos to get an idea of this move playing out in full...
Common Problems
The real problem here is not getting any rotation, so either flopping back and getting a small amount of air, or launching yourself out of the straps. As already mentioned, your toeside edge is key, but it’s nothing without a bit of speed. If the board is moving well, it won’t stick and will therefore come with you.

If you’re still not getting air and rotation, the problem lies in your bar movement. This is after all a sent jump, so you do need to give the kite a positive send with the bar. If your sweet spot is trimmed to far out it will be very difficult to send the kite without stalling it, which in turn will pull you up off your edge and make the take off very tricky. So make sure you can position yourself in a dynamic stance from which you can use both hands effectively.
Keystones
- Speed and edge
- Short but sharp send
- Kick off and level but don’t turn head
- Knees up and grab
- Turn head and complete
This technique article was in Issue 72 of IKSURFMAG.
Related


By Christian and Karine
Christian and Karine have been working together as a coaching team, running improver to advanced kitesurfing clinics since 2003.
