
Toe Side Front Roll Hand Wash Transition
Technique / Intermediate


Introduction
It seems that our technique this issue is perhaps leaning towards a harmonious blend of skills. This move features no tyrannical part dominating the agenda, with other embellishments pushed aside into supporting roles, but instead kneads every detail into a languid roll from beginning to end. The toe side front roll hand wash transition is based on the wonderful pop transitions from a bygone era of miniscule twin tips, over finned mutants and no discernible depower. However, these transitions still feel refreshingly rewarding and retain their simplistic beauty.
A decent toeside and the ability to add a late kiteloop when required will stand you in good stead for this, but if you’d like to make this as simple as humanly possible, most important of all is a pop front roll transition. Spatial awareness helps, but despair not. If you don’t think you’ve got much when kiting, this could be the number that teaches you:) Let’s look at what makes this move achievable.


First off, the approach. As for any popped transitions you’ll want some speed and a decent edge as this equals tension on the lines and lift in the kite. You’ll expect to pendulum out from under the kite a tad in such a transition, and that’s why you may need the late kite loop. Your best bet is to approach on your heels with your kite at either 1 or 11 o’clock, and then quickly pop around onto your toes, as this will make it easier to enter with speed. Then once you’re on your toes keep your weight forwards, hips open and relax your edge just a smidgen.
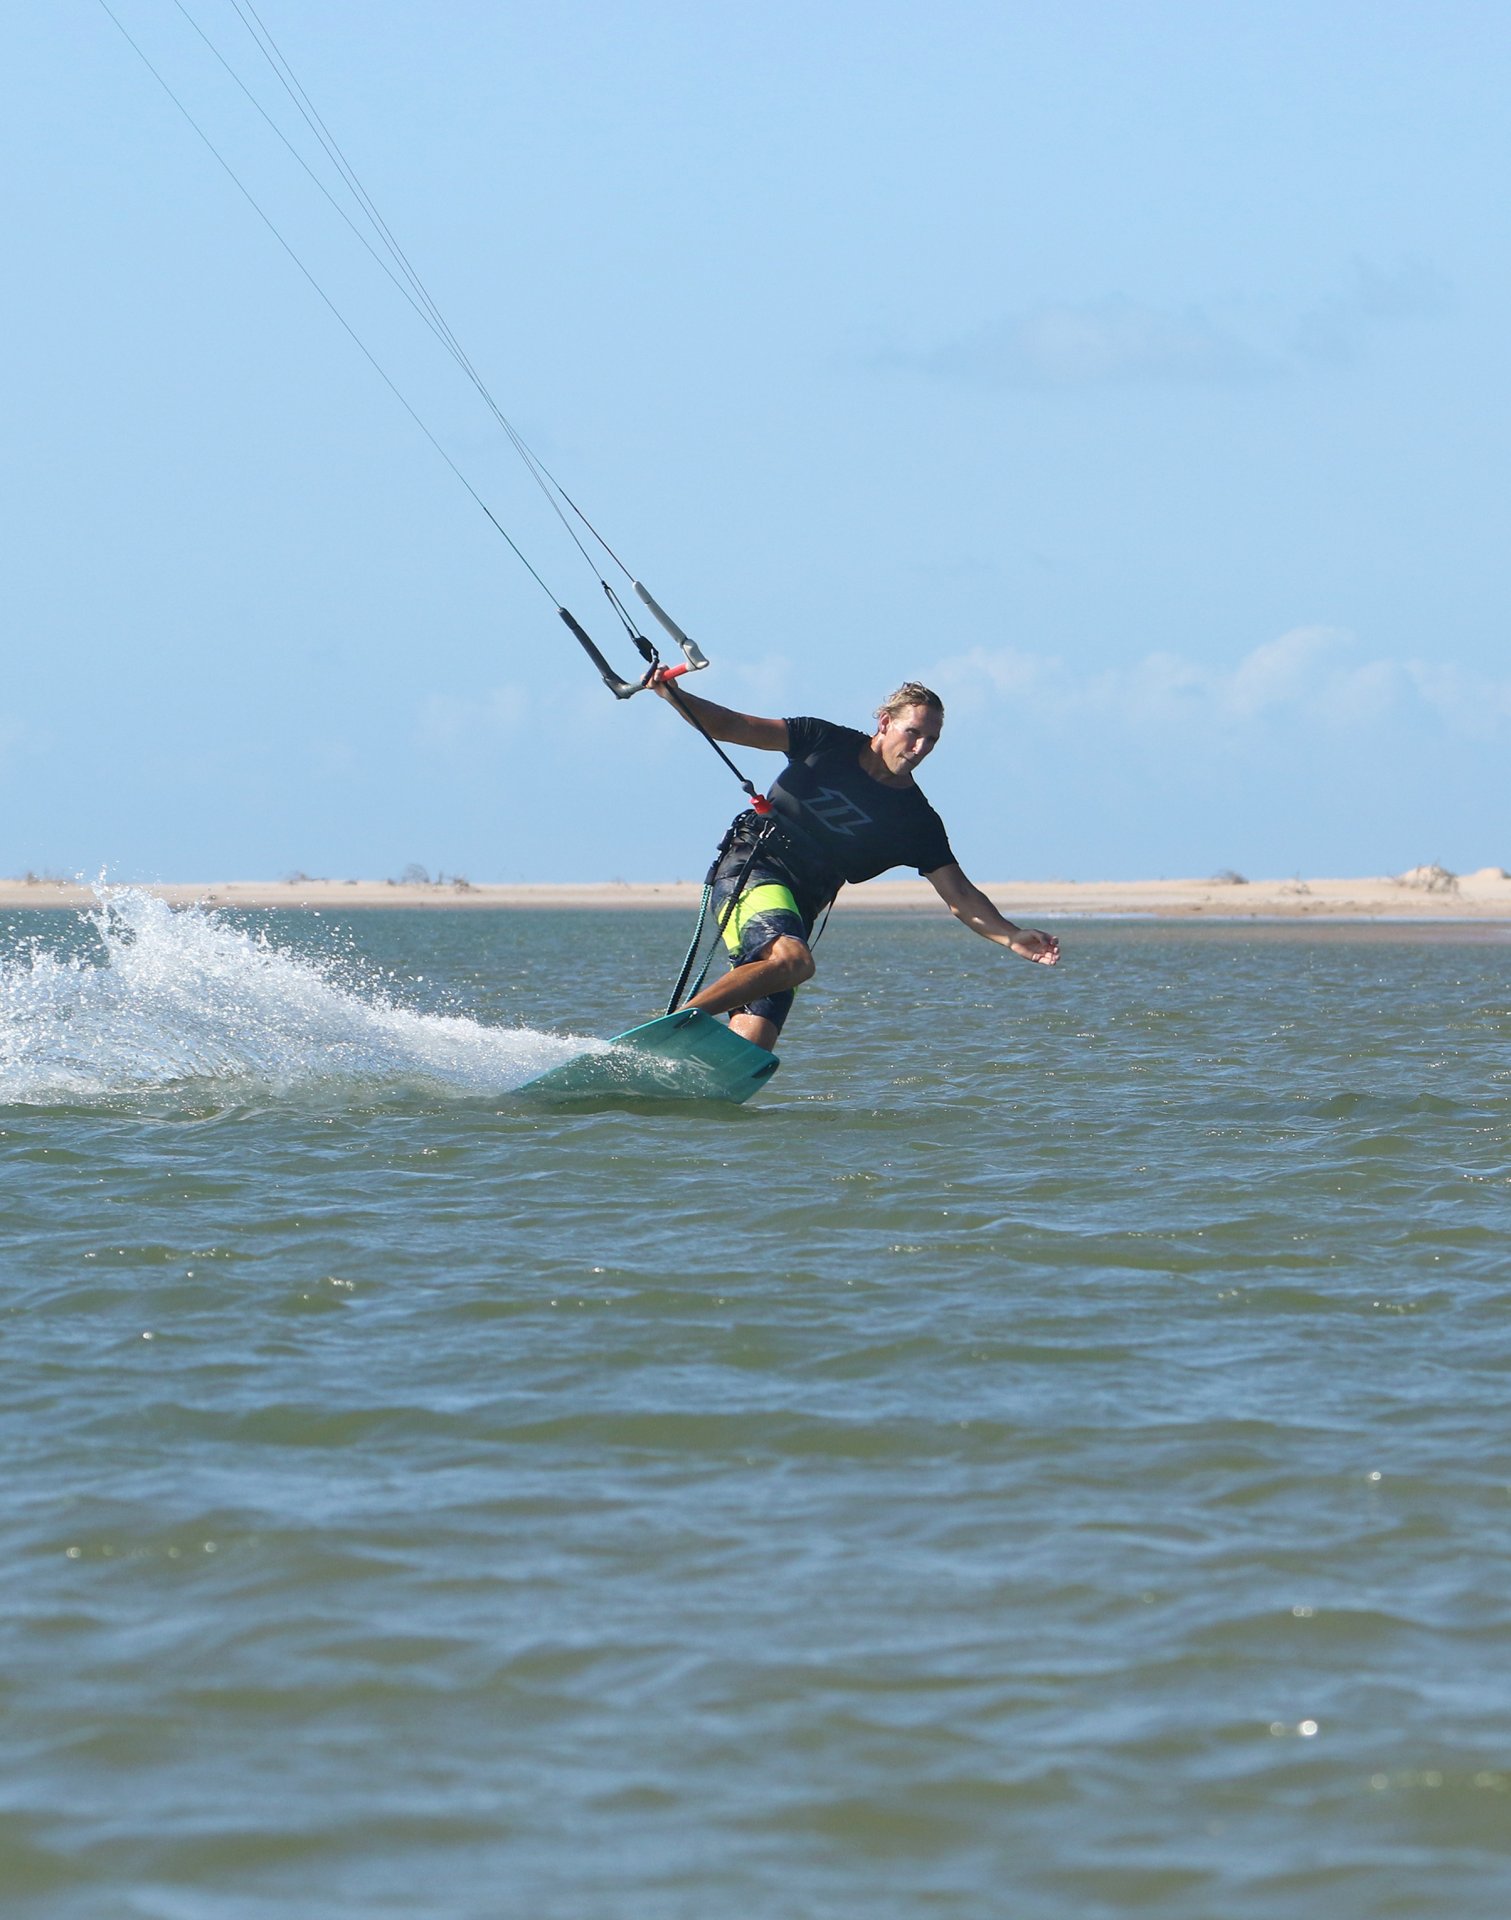
The Carve Pic A.
With your weight low, your sweet spot not too far out and your back hand centred on the bar you can now start to drift the up. As it rises gently feather the bar out so that it doesn’t pull you up and flatten the board. Try to compress, dropping down with your knees, flexing your ankles whilst carving the board back upwind. If you hold the bar in, you won’t carve an inch. Christian is low, with his weight driving against the board, hips and shoulders facing forwards, and free hand extended out in front of him. This position will allow you to maintain speed and also keep weight on both feet. If you weight drops too far back, you won’t be able to pop.
Pop First Pic B.
Once you’ve got a decent carve up, it’s time to explode. Ideally you’ll be stamping off just before the kite reaches 12 o’clock. Don’t wait for the kite’s lift, as once you feel it, you’ll have missed the moment. Better early than late. After all you should be leaving the water from pop and not from send! To take off, stamp vigorously off against your back foot, extending the back leg with the aim of planting your extended hand into the water. You can see that Christian has effectively kicked himself forwards towards the water. However, note that although his head and shoulders are going forwards, his legs, hips, shoulders and board are all on the way up. The rotation will come but a smidgen of height is your first priority. Final point is that his bar is fully out, as Christian doesn’t want his kite interfering with his pop.
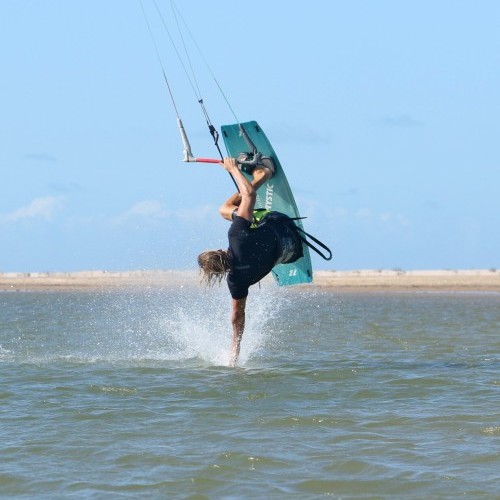
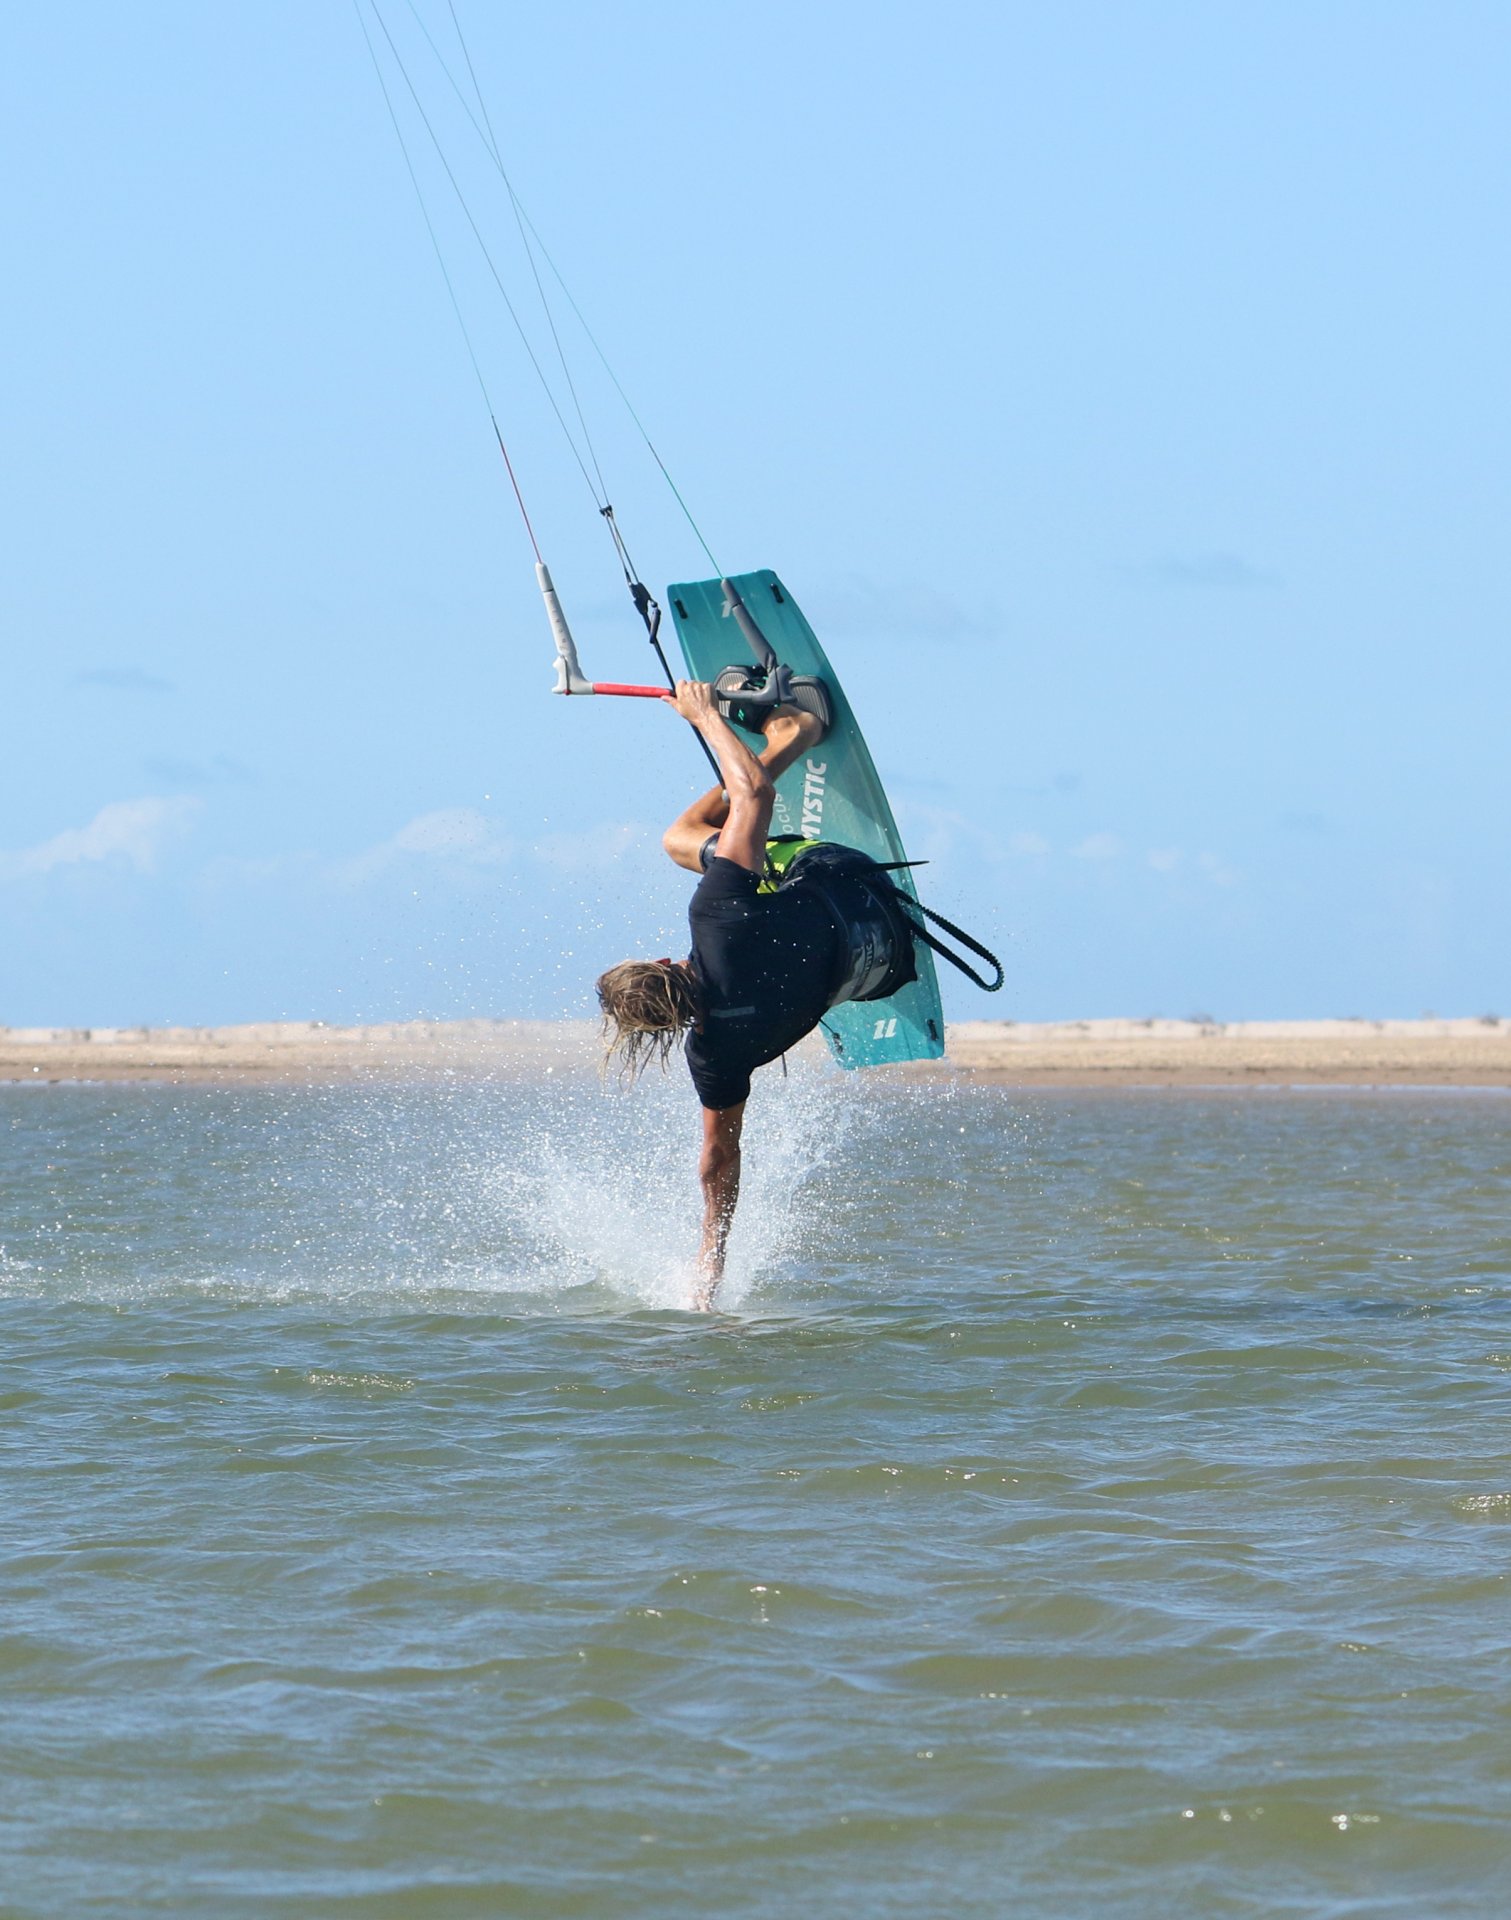
The Wash Pic C.
Not only is the wash for looks, it also serves a purpose. By digging your mitt into the ocean, it will slow you, and this resistance will help you rotate. Up until now Christian has not thrown his head into the rotation as his, and your, sole intention is to get the hand down into the drink and get the board up. Hence head down and feet up. Christian is looking at the water, willing himself towards it. This will only be possible with some support from the kite, so now is the time to get the bar back in and some tension back on all the lines. Ideally, you’ll do this without steering the kite, although unfortunately it’s quite feasible that as you pull the bar in the kite will steer back. If you popped early, it won’t matter as much.
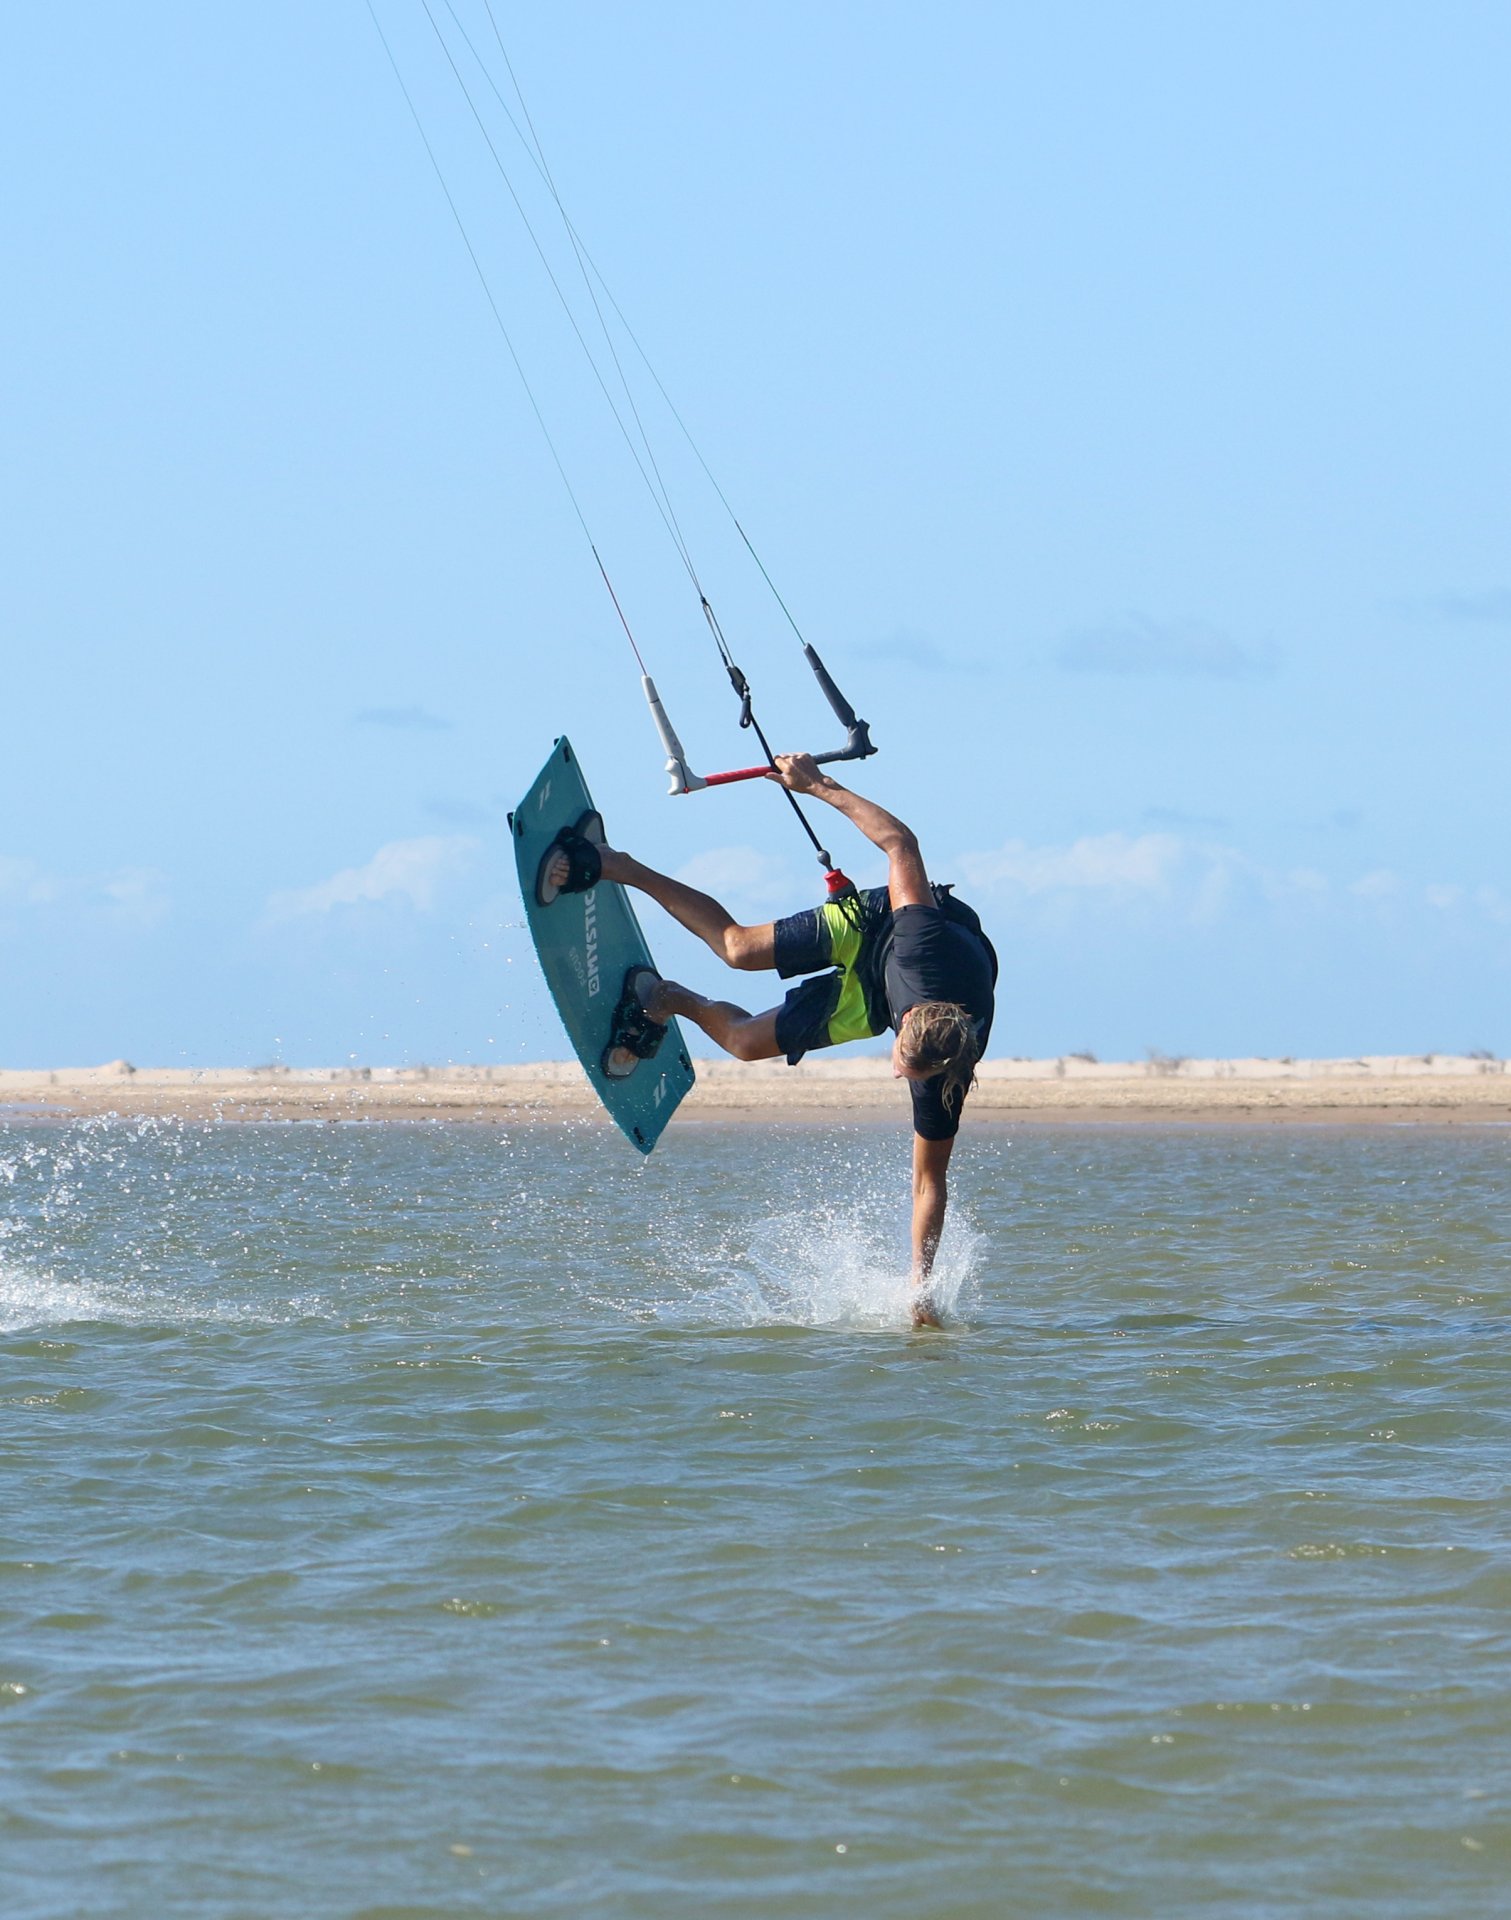
Rotation Part 1 Pic D.
This is where you want to be. If the hand is dragging, your feet are up and the kite is supporting you from above you will rotate. We’re sure Galileo didn’t give this much thought, but you can. Your arm is the axis around which your planet will now rotate. The speed and momentum that you approached with, keeps you moving, but by the very nature of slowing down around your axis you will start to spin. This is of course a fine balancing act and assumes that your kite is pleasantly above you, so if your hand is the South Pole, your kite should be the North Pole;) With practice you’ll assume the correct equilibrium between kite drift and entry speed. Here Christian has his hand firmly planted 90 South, his bar is in on the sweet spot, kite above him and he’s started to rotate.

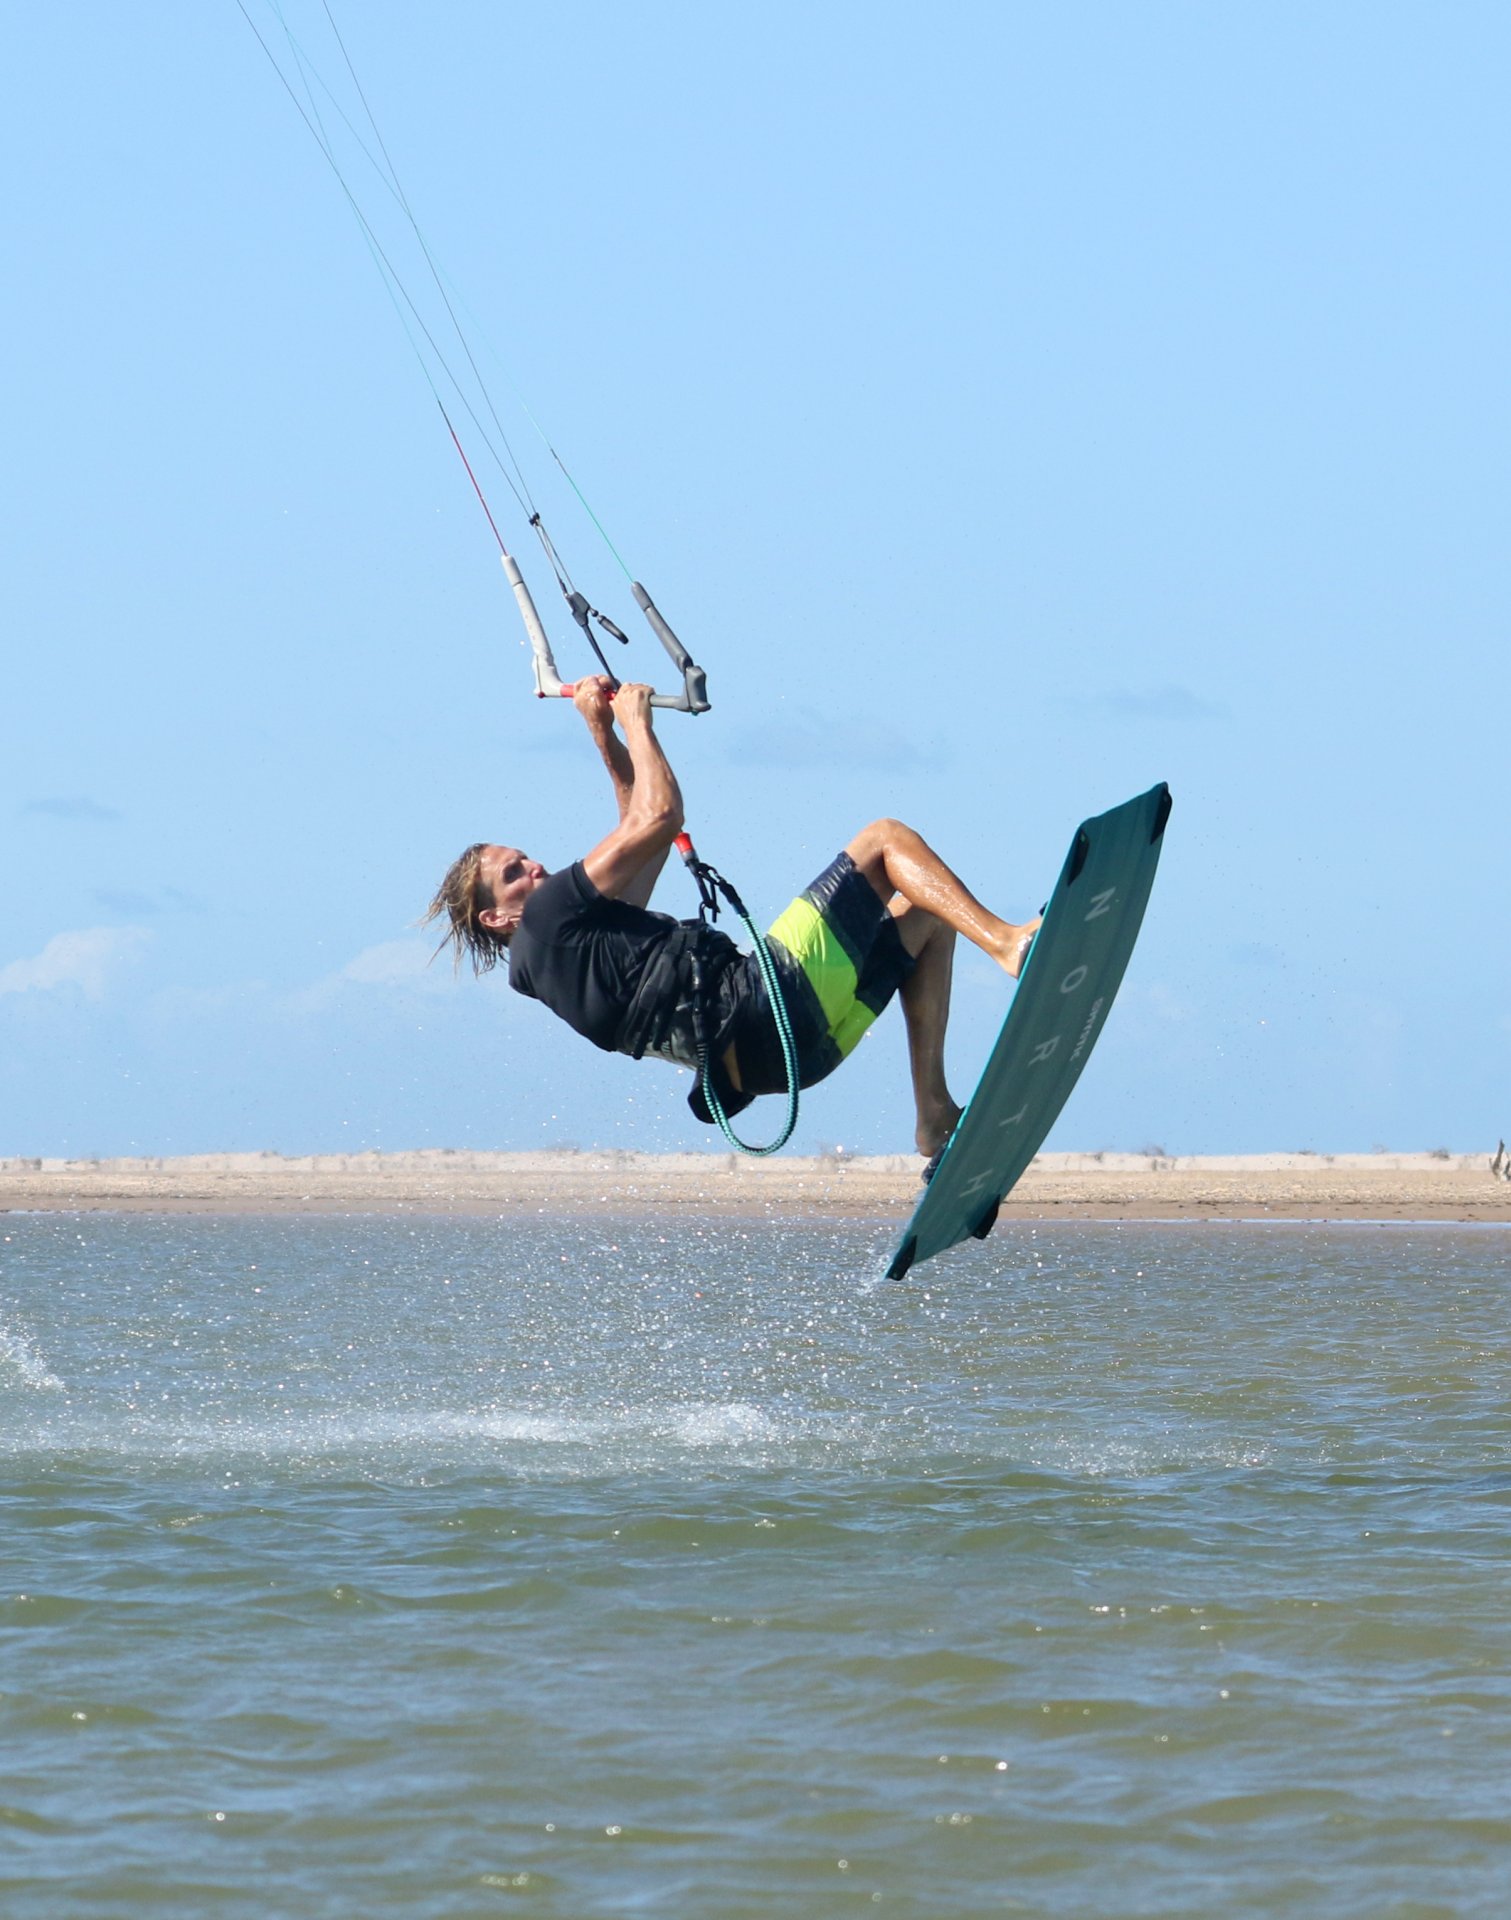
Rotation Part 2 Pic E.
The next part of your rotation will be the defining moment of your transition. As the kite continues to drift and/or you pendulum out from under it, the kite will start to pull you back. You need to harness this pull to help you round. As soon as you sense that you’re not daintily floating under the kite get your free hand back on the bar and look over your shoulder to go with the rotation that you already have. You need to get just far enough around that you can use the pull from the kite to pull your harness hook, and therefore your hips around to face forwards. If you’re greedy with the hand wash, your kite will travel too far back and you won’t stand a chance. Looking at the pic, Christian has both hands back on the bar, he’s looking over his shoulder and is hoping that he’ll get the help from the kite whilst it’s still high in the sky.
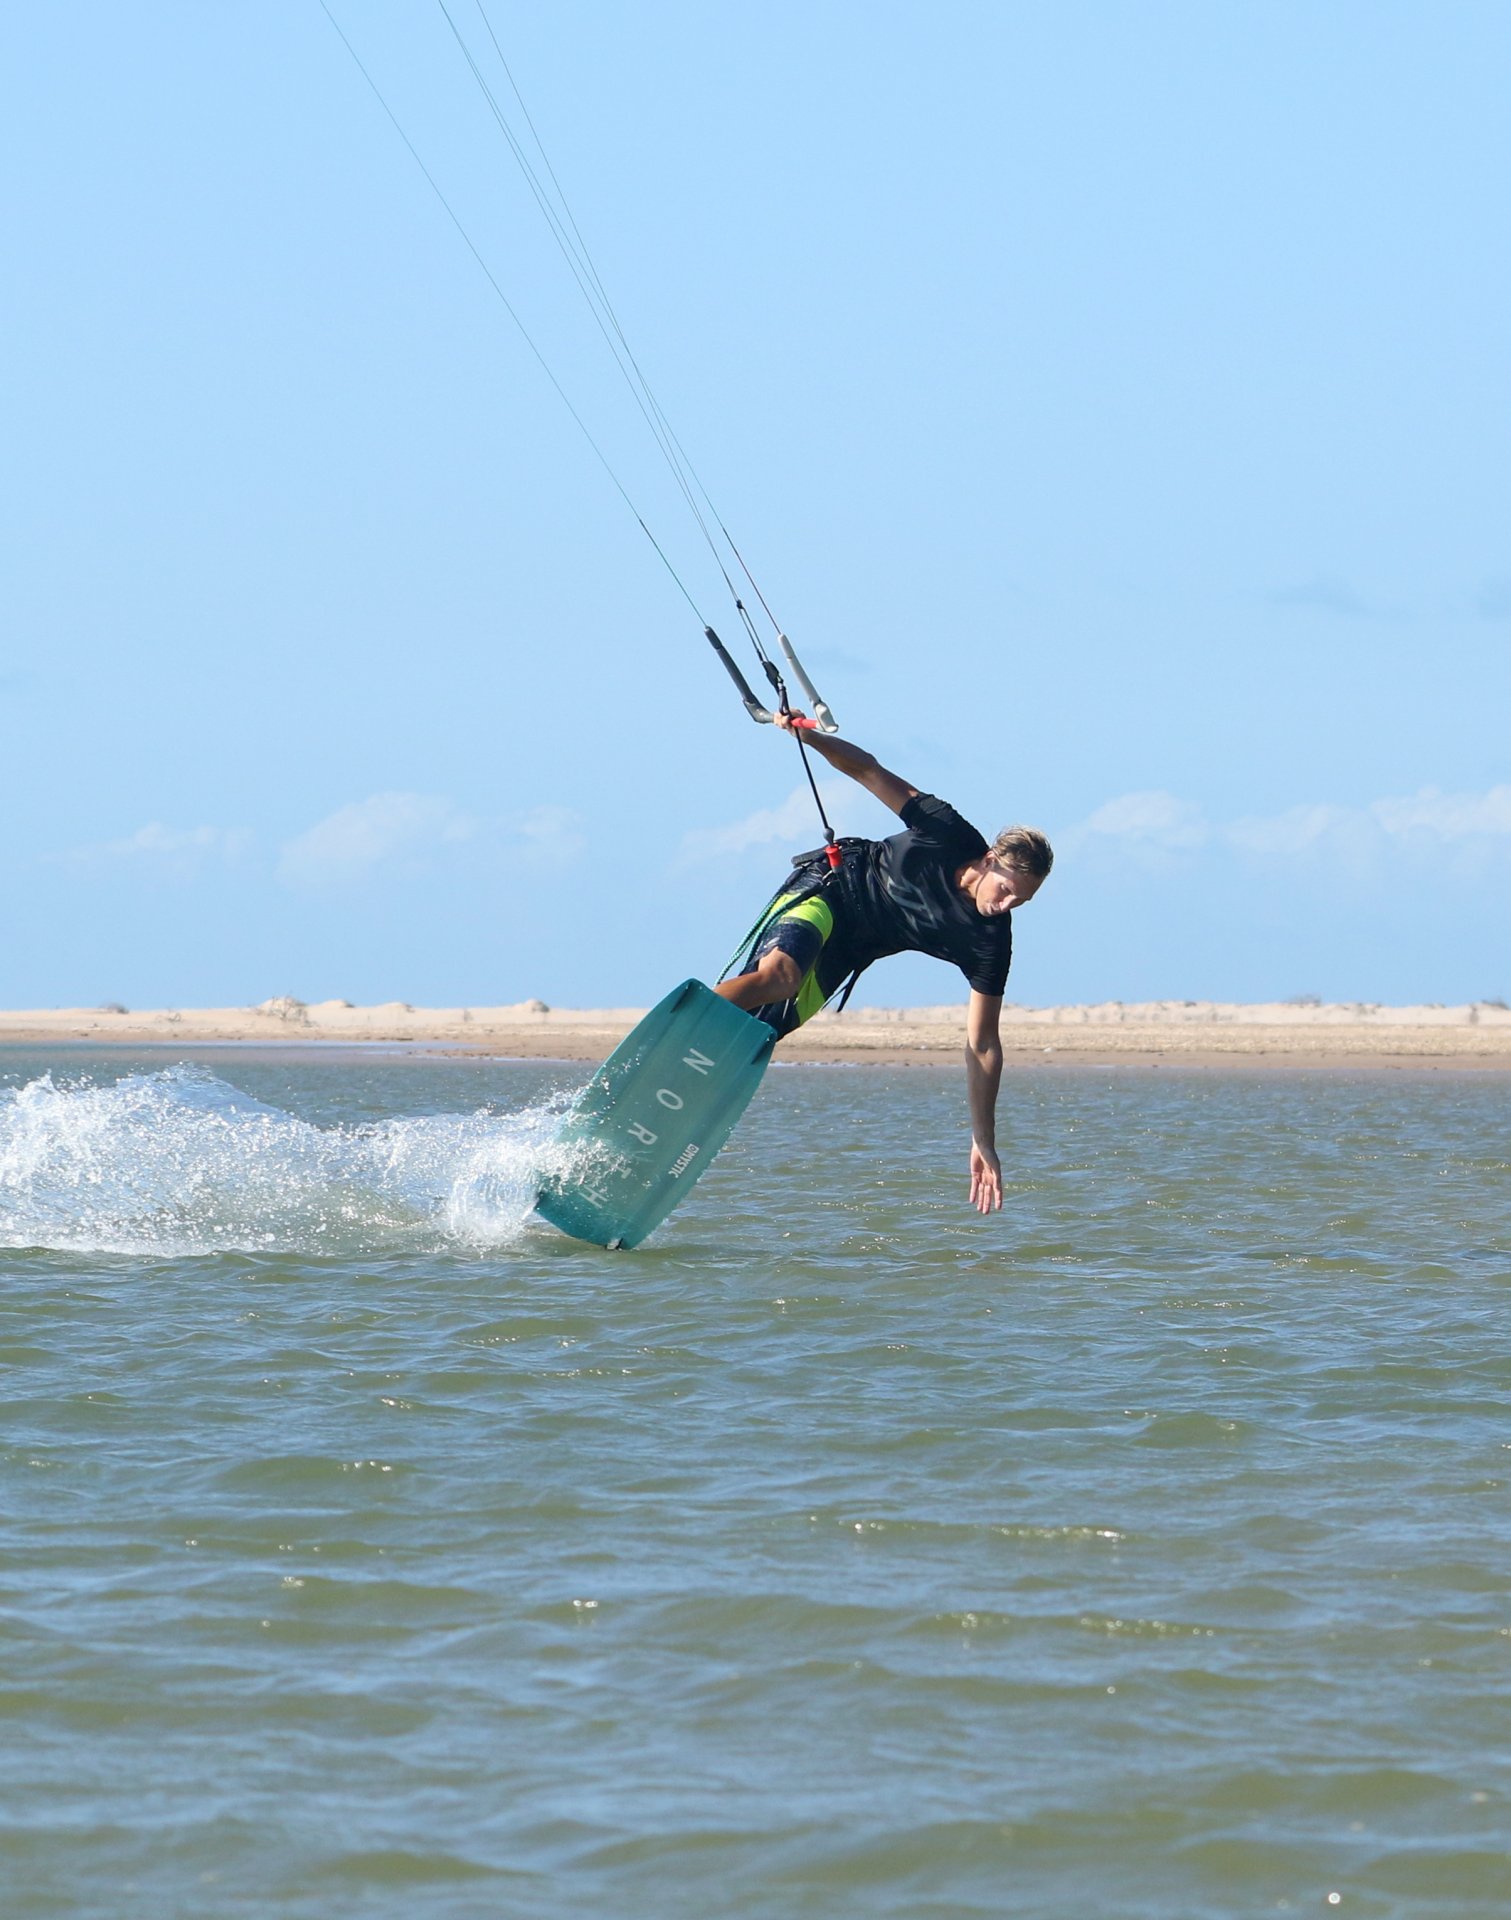
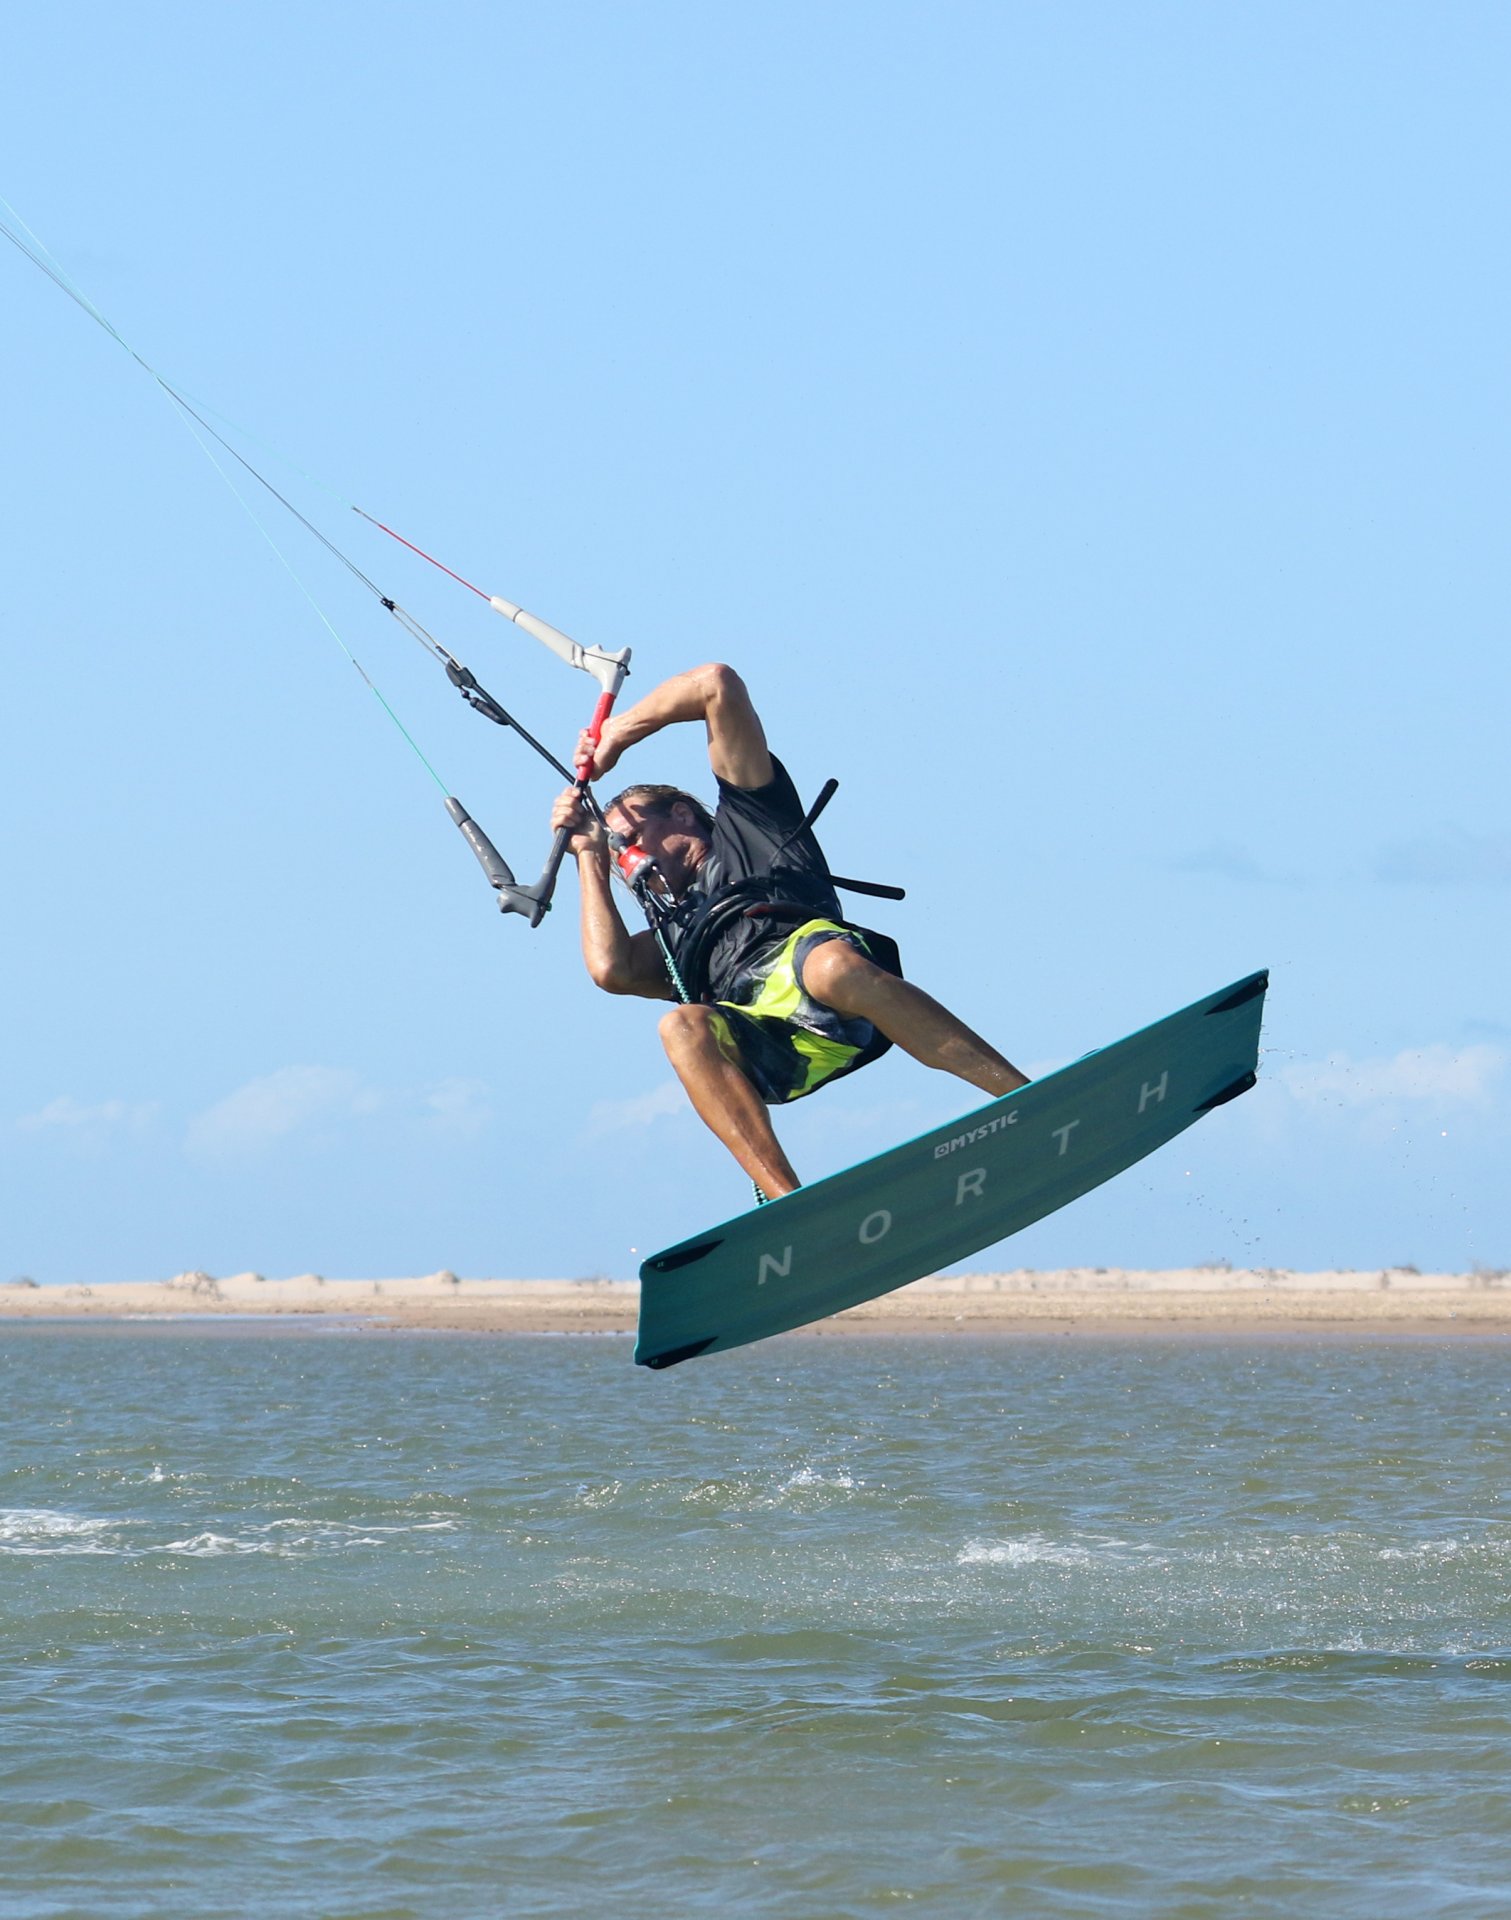
The Commitment Phase Pic F.
If you were too late the party in the last part of your rotation you’ll merely stop and drop, so nothing too untoward. However, if you’ve got the rotation the only way to nail this bad boy in the box is to give it 100%. In a perfect world a decent dive would suffice, but as you used speed and pop the chances are that the kite will have drifted a bit too far over into the other side of the window. The only way that you’ll generate enough pull to land smoothly is to continue the dive into a late loop. This is not to be confused with a kite loop, as you’re not consciously trying to loop the kite, you’re merely continuing the dive which results in a loop! If you’re a dark-slider or have any other support moves under your belt, you’ll be familiar with the idea of using a late loop to lift you out of a seemingly unsalvageable position. Here is no different. You can see the Christian, with no feline gifts, appears destined for impact. However, by biting down harder on his gumshield, metaphorically speaking, and giving the bar a decent push pull, he’s asking the kite to go round and back up, which will hopefully put him back down over the board.
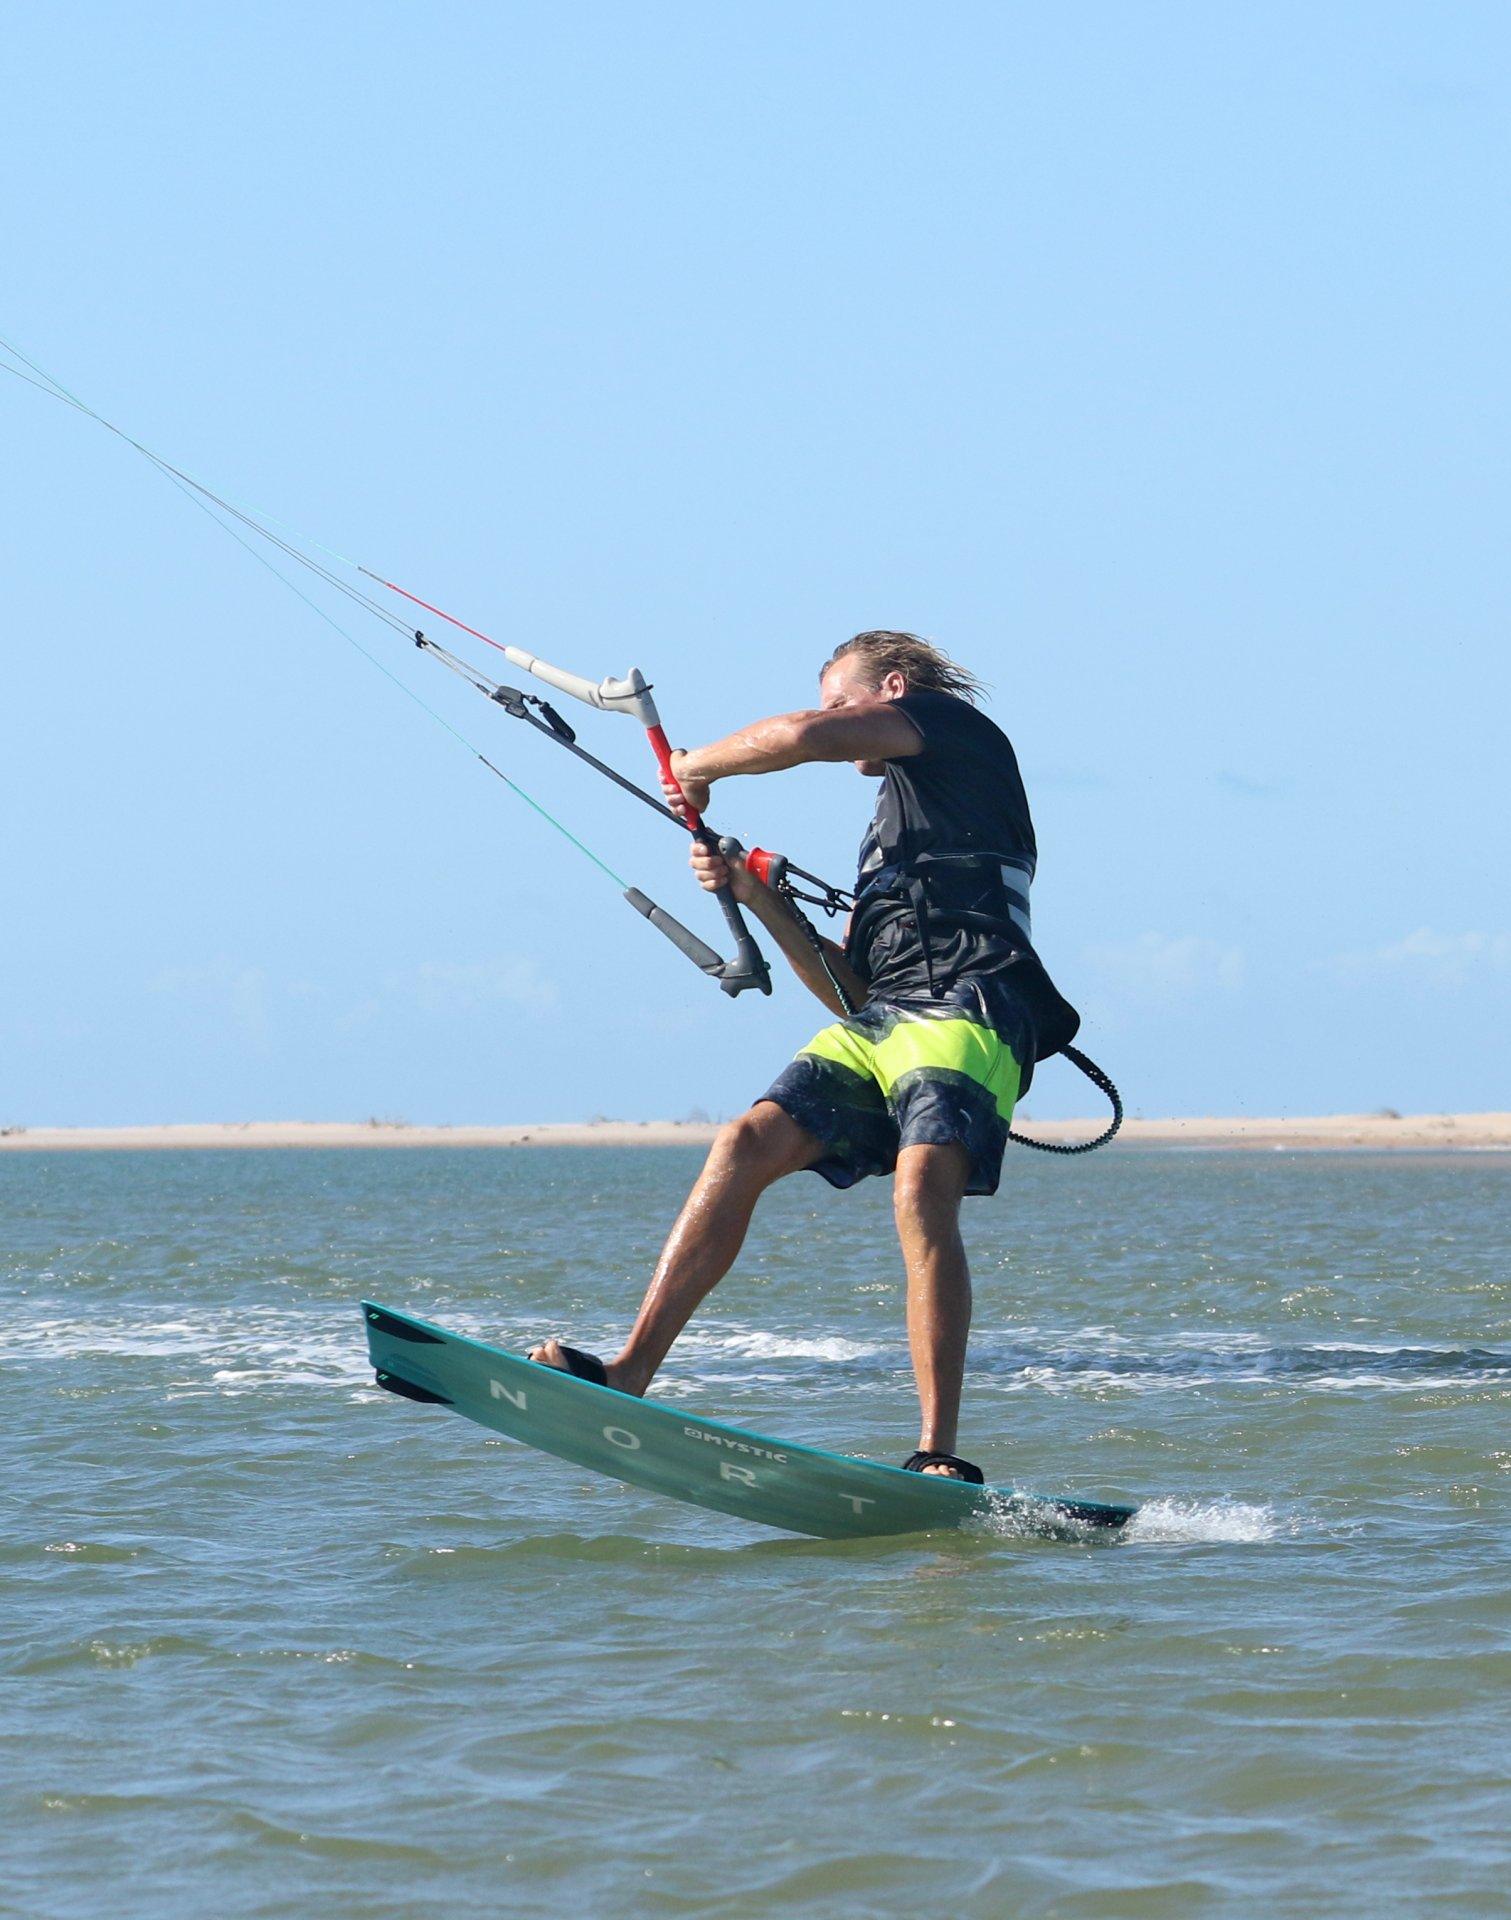
Fortune Favours the Brave Pic G.
The landing of this should be like any other pop transition. That is to say that you will be landing tail first but with your weight dropped to the “inside”, in a perfect position to carve through and head back from whence you came. It’s important to keep steering the kite until it’s back up, as this will give you balance and reduce the pull. Ideally the late loop should be a short turbo of power, not a long enduring diesel chug. Christian touches down tail first, ready to carve, both hands on bar. Job done.
Top Tips
Assuming that you can bang out a popped front roll transition, adding a grab and then changing it up to a from toeside will be the best progression. From then on, it’s about not getting any height so that you can concentrate on the hand wash. This will be so much easier to learn on a bigger kite. And finally break it down into bite size chunks. If you can get a wash and a roll but not ride away at least you know it’s in the post.
Have a look at the sequence and watch the videos to see this move play out in real time.


Common Problems
Not washing. If you’ve got the idea but you can’t get your fingers wet, it’s all about using the kite less. Try trimming the sweet spot in so that when you drift the kite you can dump any lift. Resist the urge to pull the bar in as you pop and make sure that you’re staring at the water.
If the kites drifted way too far across the window. This can be a result of doing as we just asked, letting the bar out as you drift the kite. It’s important to do, but only because you shouldn’t be waiting for any help, but rather popping into the move. If you let the bar out and wait for the kite to pull it’ll already be miles across. So, remember to go early. Set the kite in motion, carve and pop.
Not enough rotation. Couple of potential issues here. As already mentioned, being too greedy with the wash can mean that you let the kite go too far and therefore can’t get any support and pull to finish your front roll. At first go for a quick dip rather than the full eco 30 programme. Another factor can be your approach. If you come in too slowly, you’ll not get any help from your hand, which will either force you to throw more on take-off and miss the wash, or result in a few back slaps. So speed up a tad.
The dreaded low kite loop to power rinse. Although we encouraged you to commit, there is also place for prudence. If the kite has drifted too far it’ll be low at the side of the window and no matter how bold you are, it’s unlikely to lift you, but it will still power you. If you notice that the kite is way off it’s better to bail.
Keystones
- Approach with speed, edge and weight forward
- Drift, carve and explosively extend with bar out
- Follow hand and throw head forwards whilst looking at water
- Wash for drag, board up, turn head, bar in, kite high
- Both hands on, dive hard and follow through
This technique article was in Issue 80 of IKSURFMAG.
Related


By Christian and Karine
Christian and Karine have been working together as a coaching team, running improver to advanced kitesurfing clinics since 2003.
