
Front Roll from Blind
Technique / Intermediate


Introduction
Gosh, it has been a long time since we featured a move from blind. Last time around it was the back roll from blind, so it seems only right to bring the front roll out of the bag now. These are great tricks to have in your armoury whether you’re a freestyle veteran or an old school flag bearer. The beauty lies in the fact that you won’t see too many riders banging these out and as it’s a hooked move, you can still get away with some low level showing off regardless of wind strength. Any blind move is usually the domain of Karine, but as she’s still recovering from an injury you’ll have to put with Christian instead!
To make sure you know what’s going on, this will be a sent front roll, using the kite, taking off from blind and landing heelside. It goes without saying that a good ability to ride blind is a must, although we’ll give you a few tips there too, and of course having a standard front roll off-pat is essential. Finally, this will be easier to learn in straps, as you’ll be able to adapt your feet position to edge well and take off more easily.


Without further ado let’s look at the parts that make this move a whole...
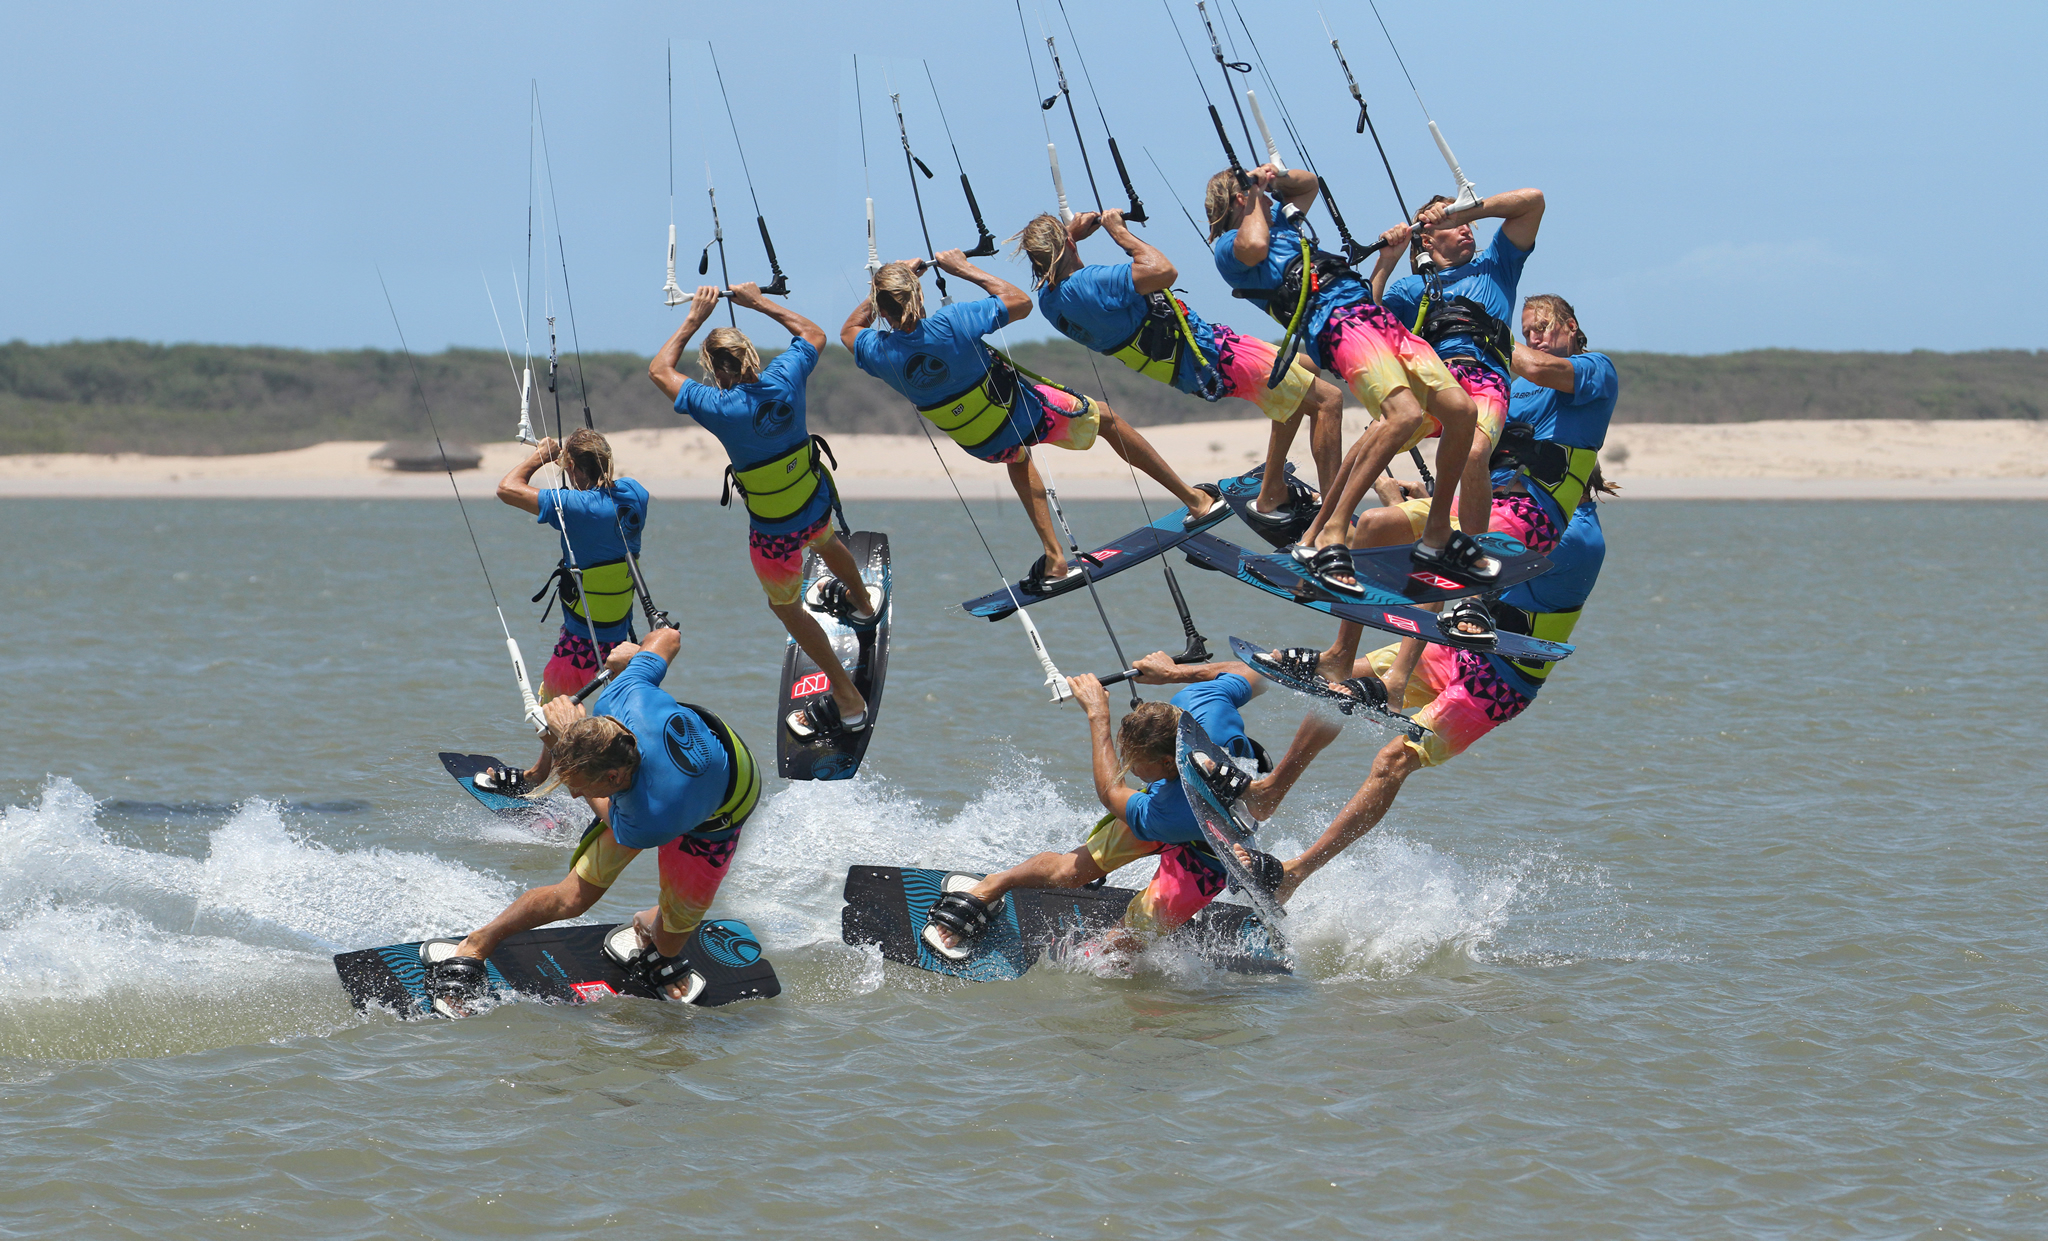
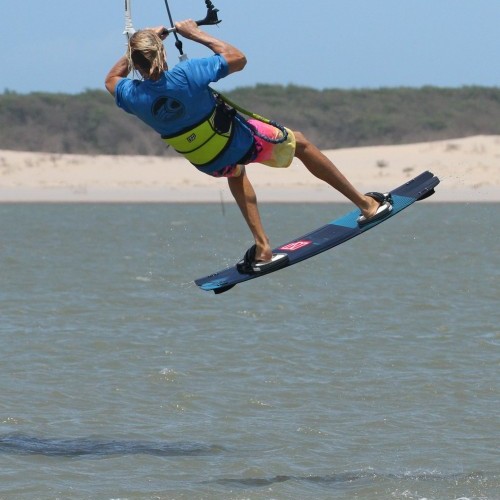
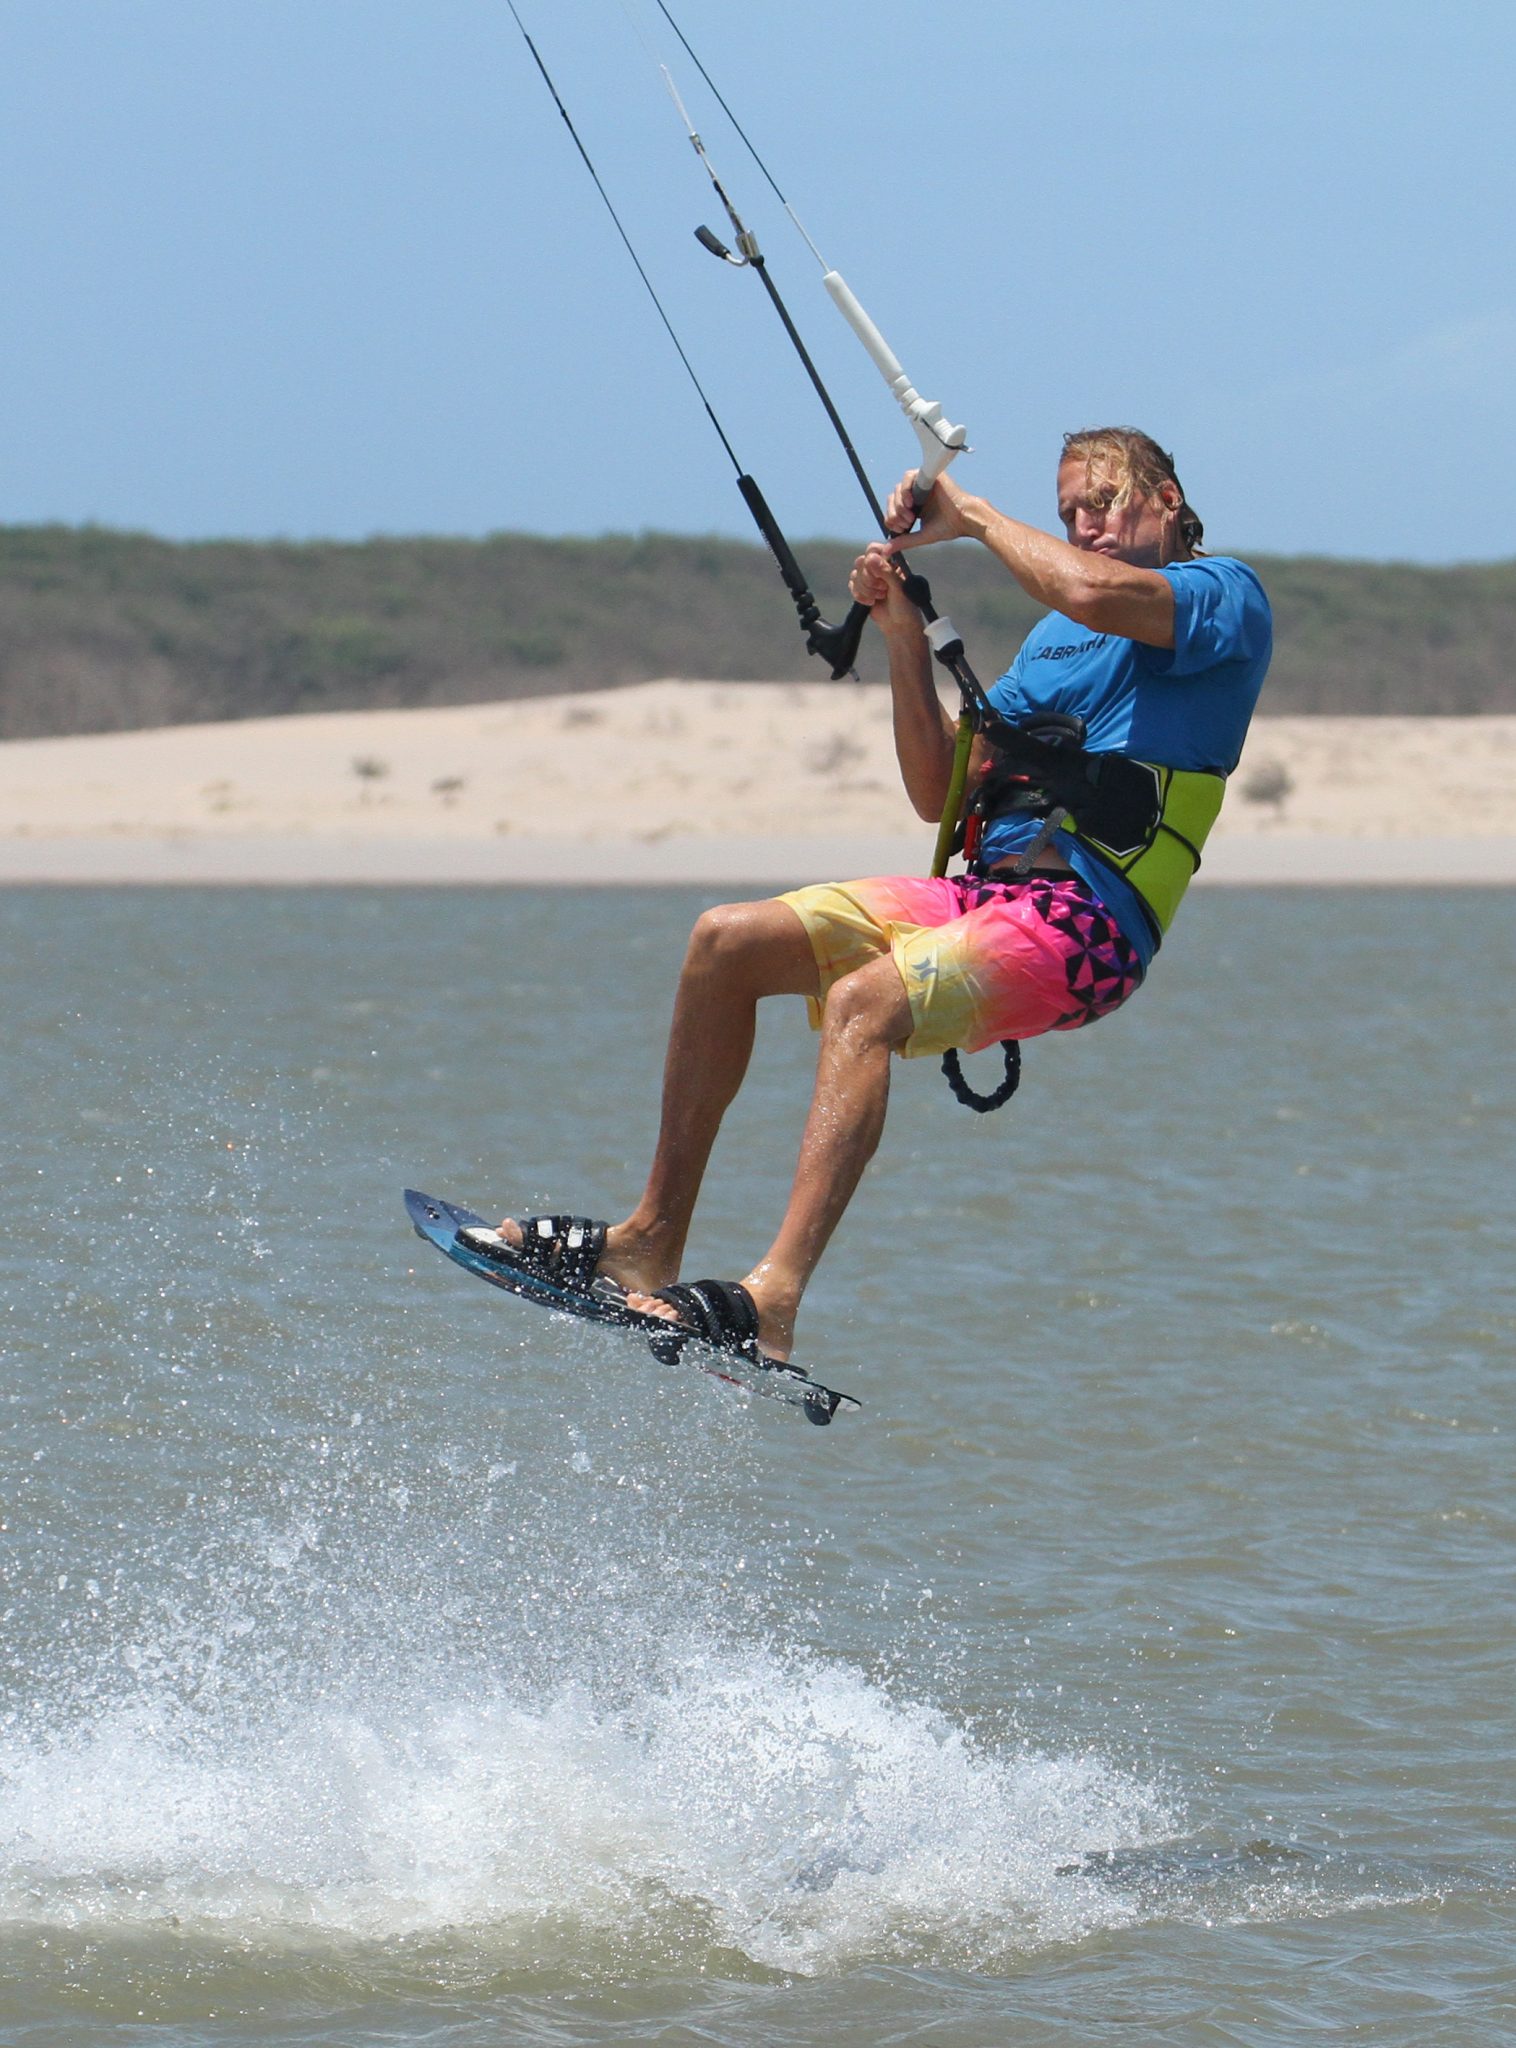
Riding into this move Pic A.
Best to repeat what we’ve said before as there are a few pointers that will give you a better chance. You’re intending to perform a jump, so a modicum of speed is essential. The simplest way to carry speed into this is to pop to blind with a bit of velocity so that you can use the momentum for your take off. The tricky bit for most is getting into an effective blind position with both hands on the bar. We’ve all seen the rider that casually cruises across the bay, steering the kite with both hands whilst looking totally at ease.
No doubt if you’ve tried to emulate this relaxed look it’s resulted with you tied up in hernia inducing knots. How to make it more comfortable? You’ll never reach the bar whilst blind unless you trim your sweet spot down towards you, so this is THE place to start. Twisting your shoulders down and around will have the magical effect of lengthening what would normally be your free arm. Grabbing the bar near the end, not centred will also help, and loosening your straps a tad so that your new front foot can twist in the strap, should avoid anything going “ping”.
Once you’re in position, edging, balanced and have both hands on the bar you can contemplate the take off. Much like a normal sent front roll you will still need to give a little bit of pop to help you get off the water before the kite travels too far. This means that you need to alter your position ready to pop whilst you send the kite. Your aim is to get more weight onto what is your back foot. You need to do this whilst sending. If you do it before you’ll carve up and slow down.
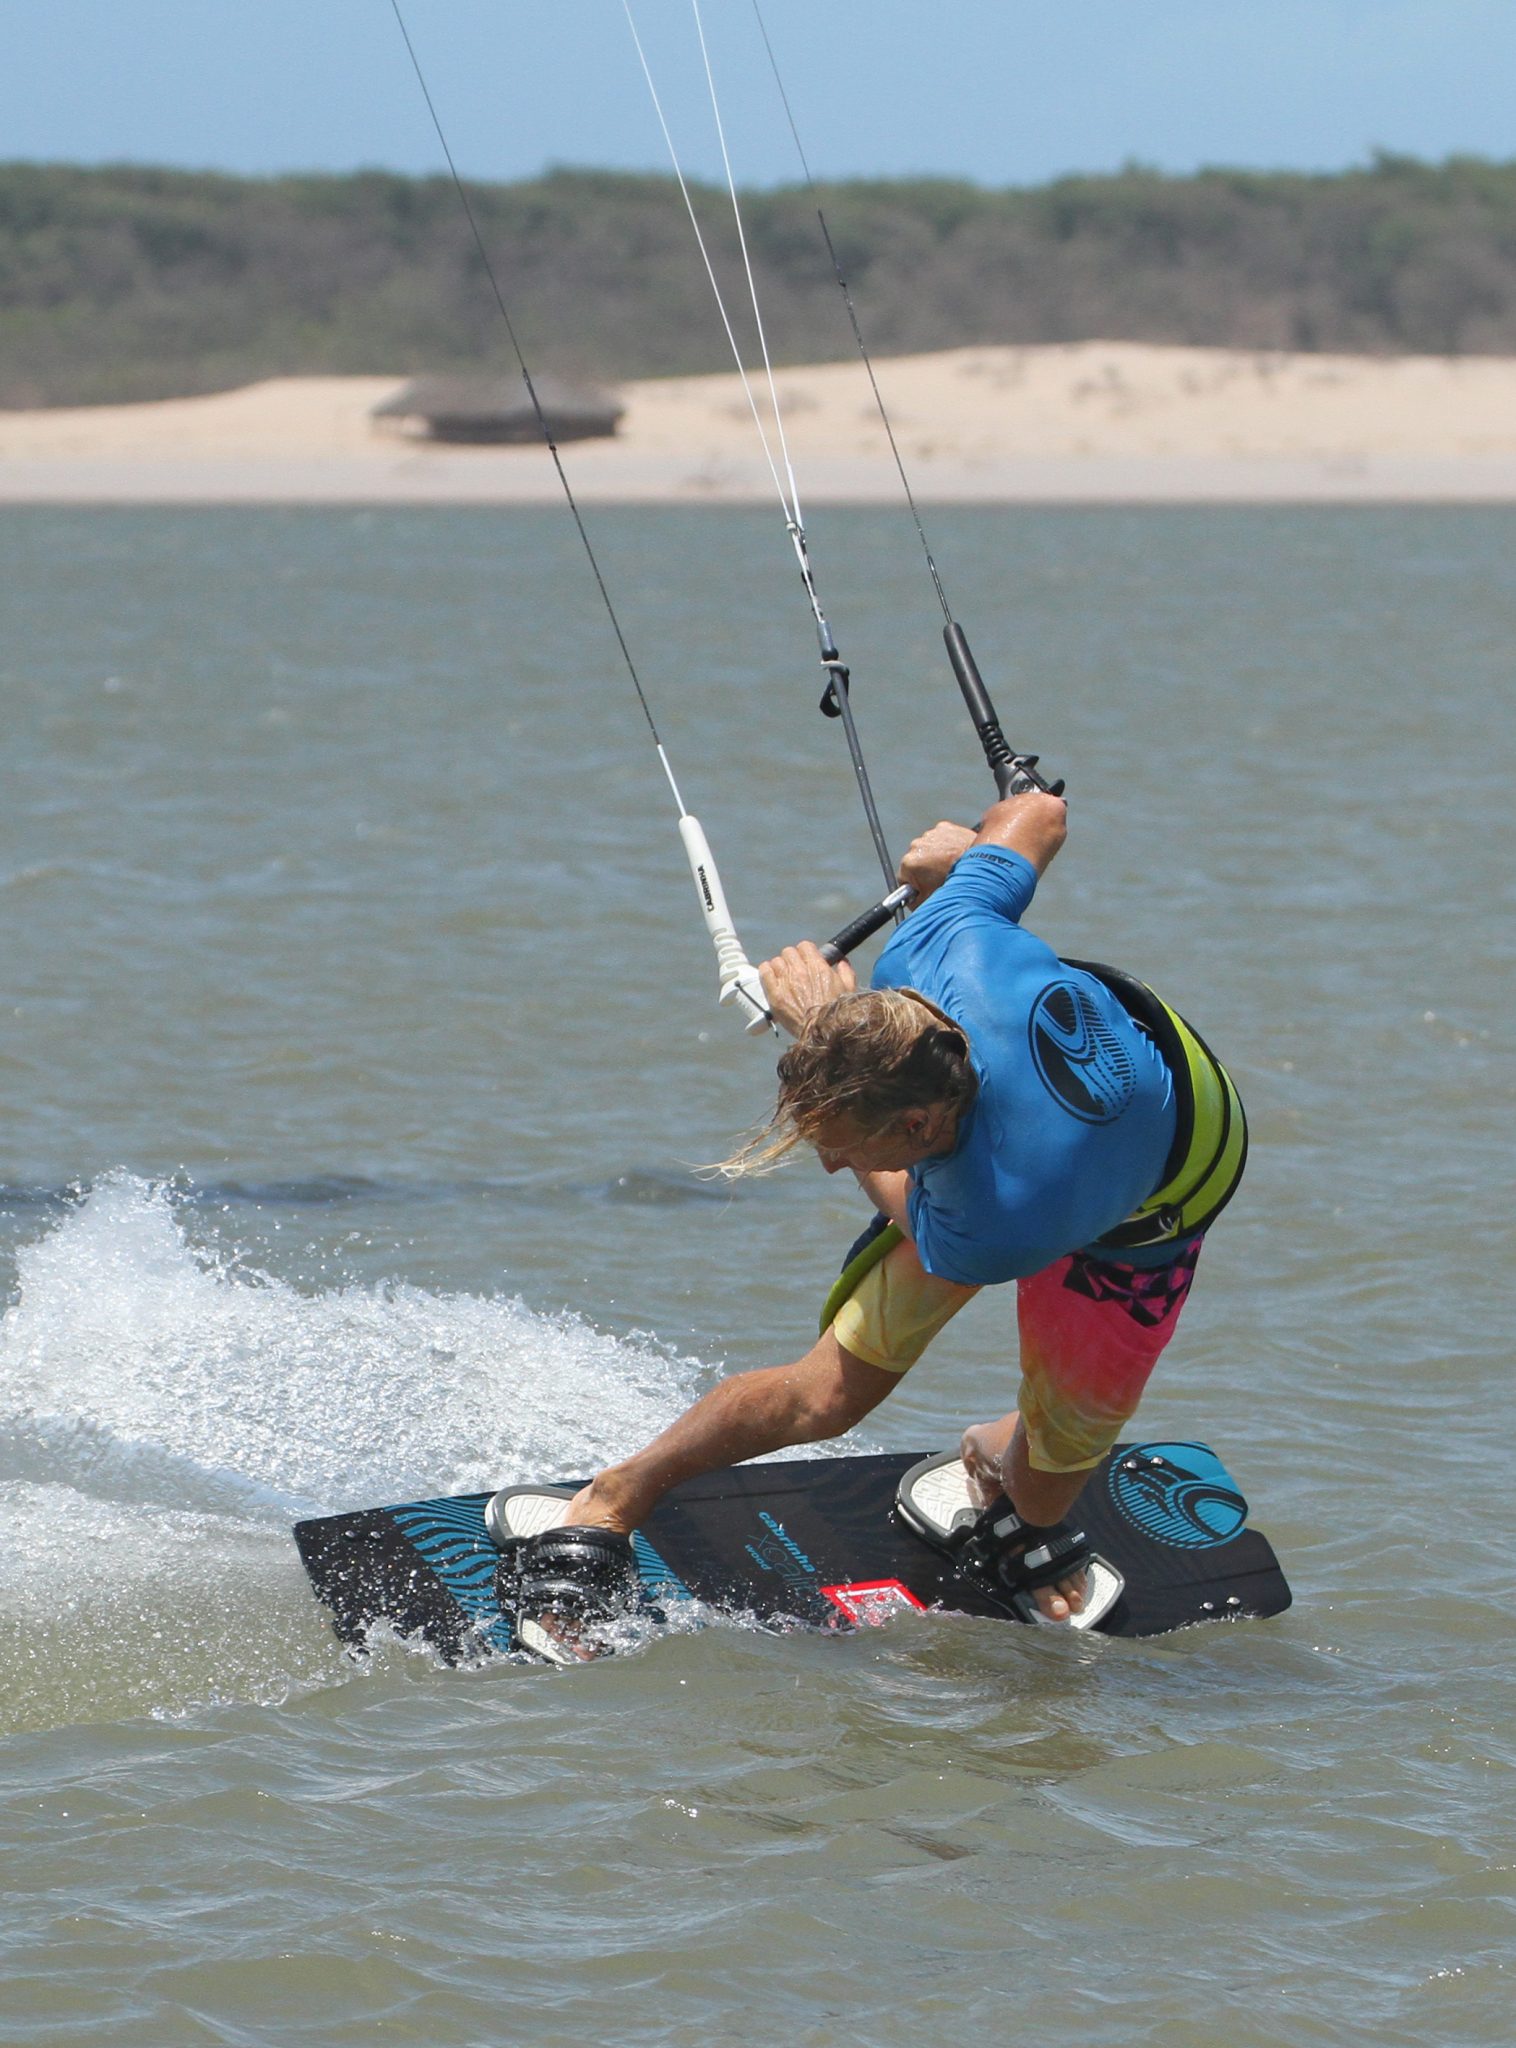
To move your weight, you can extend your front leg, pushing your hips over the tail of the board. At the same time, you should be steering the kite, a tad more gently than for a normal jump, but sure enough that the kite moves positively. This is another reason to have your sweet spot close. You can’t easily push and pull with opposing hands from this position, so you’ll be relying on back hand pull. If your sweet spot is out, you’ll stall the kite and get yanked off your edge.


Here you can see Christian pushing his hips back, straightening his front (left) leg slightly whilst pulling to steer the kite. He keeps his shoulders twisted to maintain weight on the edge and keeps his head down to keep as much weight over the tail of the board as possible, which is essential for what’s to come in the front roll.
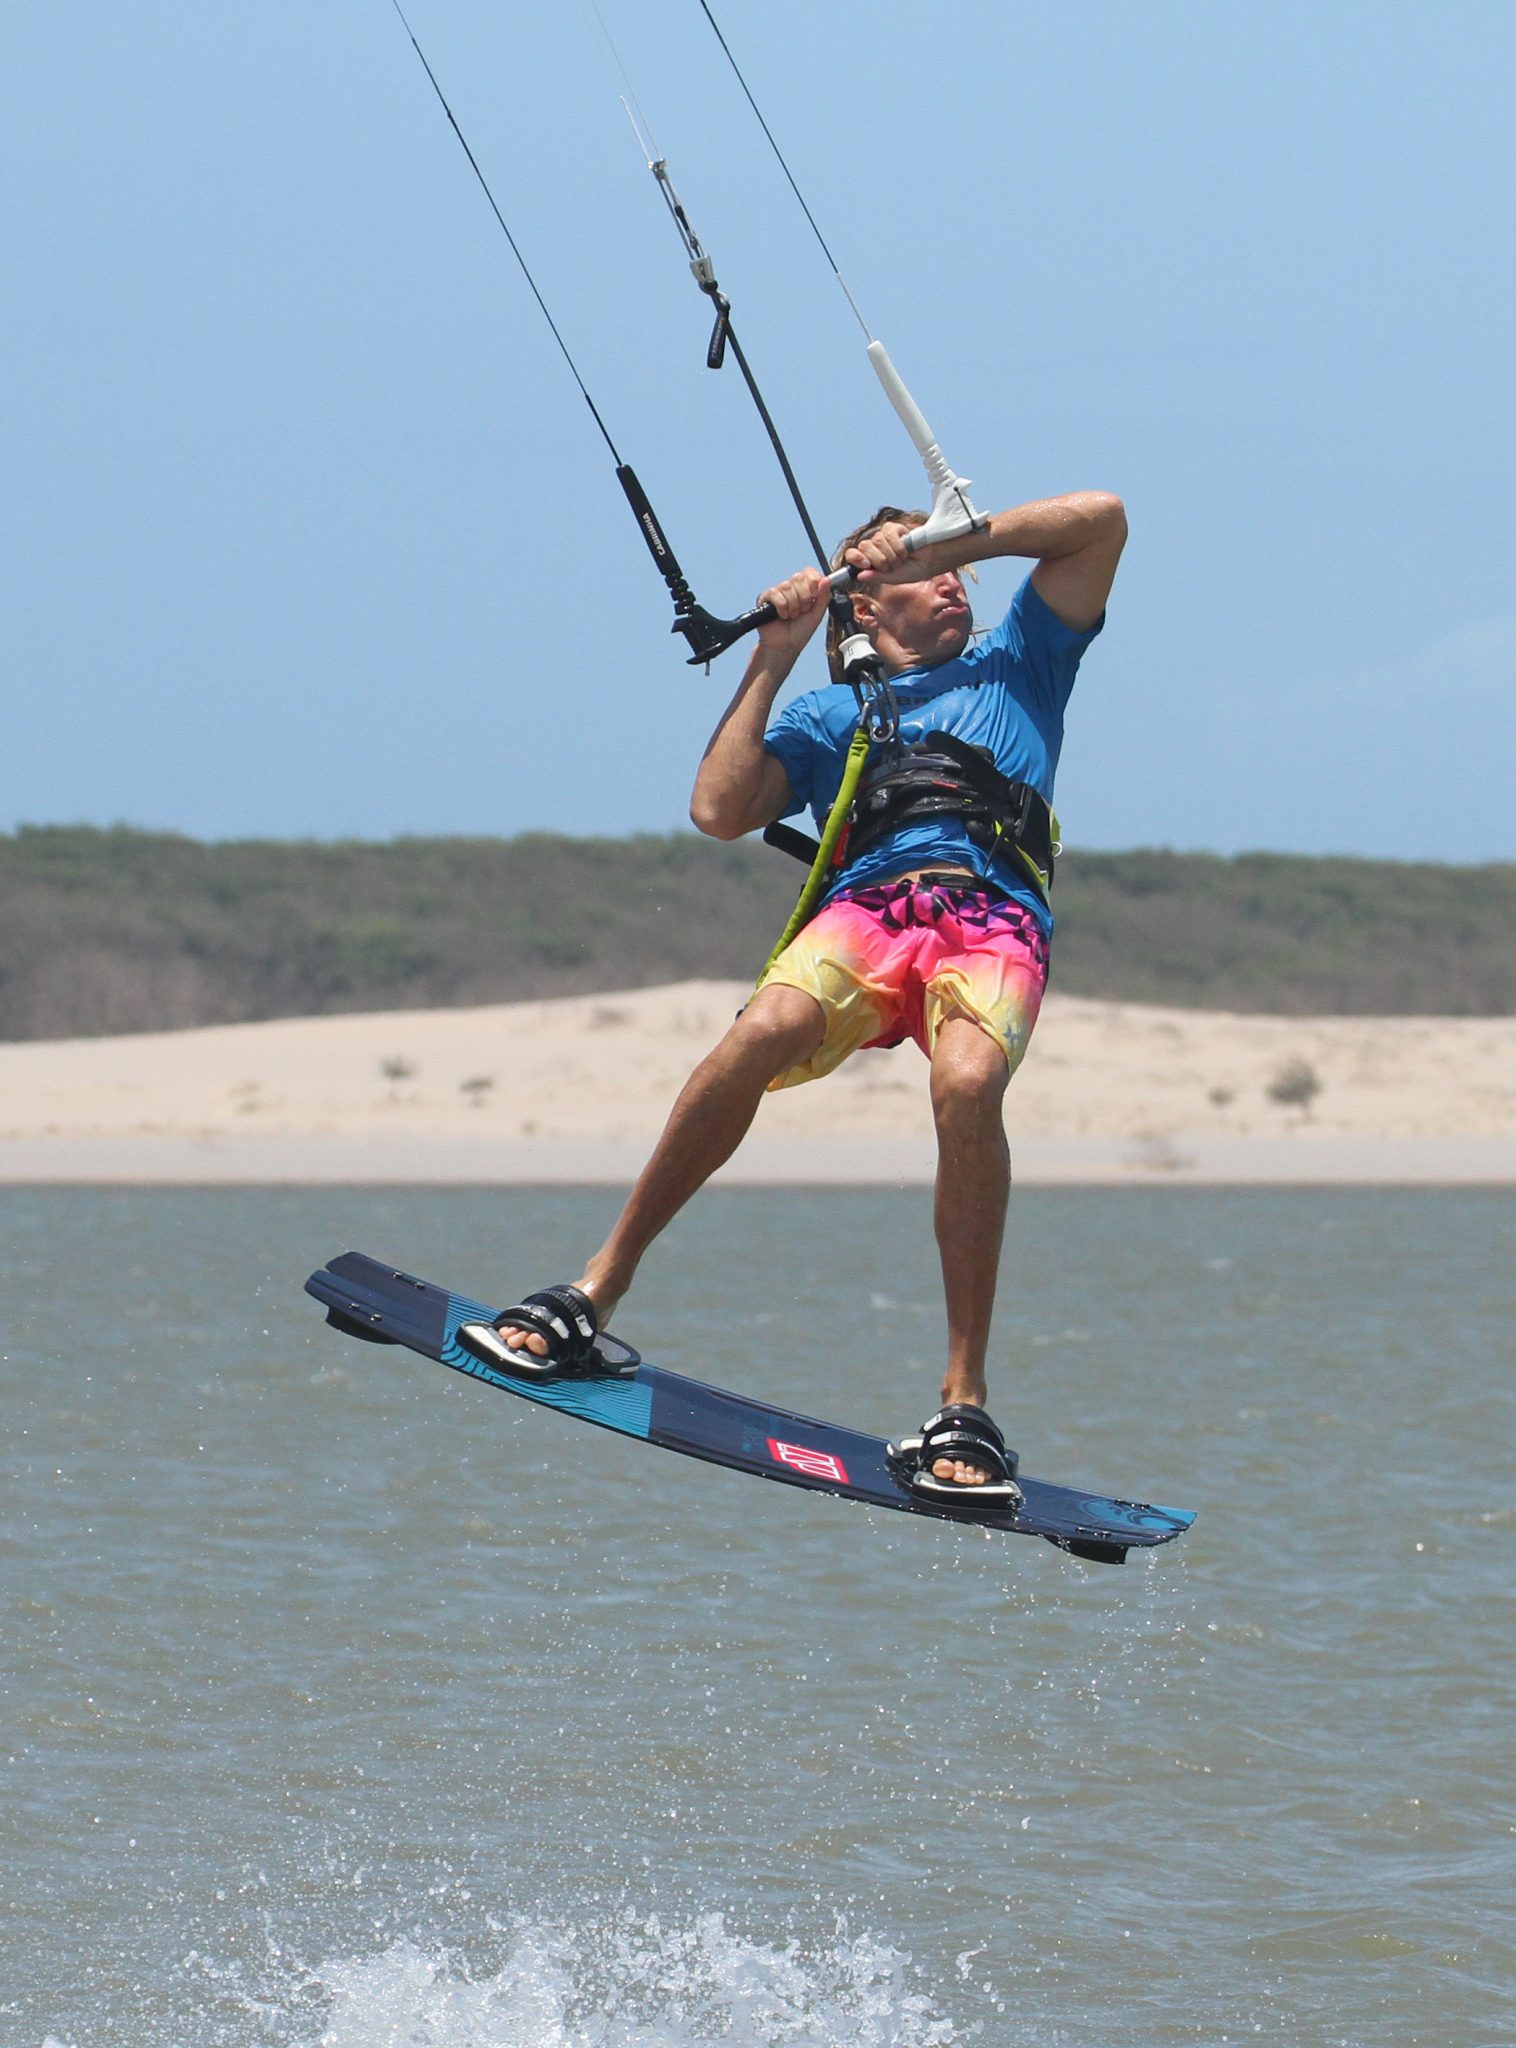
The Take Off Pic B.
The take-off is probably the hardest part, as you’re trying to resist the urge to turn back towards the kite. As with every move you need to be kicking off your back leg, against the tail of the board. And as per every front roll you need to kick yourself forwards, towards the nose of the board. When heelside this movement naturally lifts and bends the front knee, but from blind this just won’t happen. As you stamp off the tail and throw yourself forwards you will push the front of the board down towards the water. Hence the head down approach.
With more weight over the tail, you’ll be able to kick harder without actually burying the front of the board as you try to initiate the roll. If you look at the photo you can see that Christian is standing tall having kicked off his back leg. As the board leaves the water it will turn momentarily against the rotation as your hips and therefore board will try to align with your shoulders. After all, your upper body is facing the bar. You really don’t need to worry about this, however whilst you’re aligned with your bar, this is the perfect opportunity to level it in order to stop the kite travelling any further behind, and give it a little pull in for tad more lift.
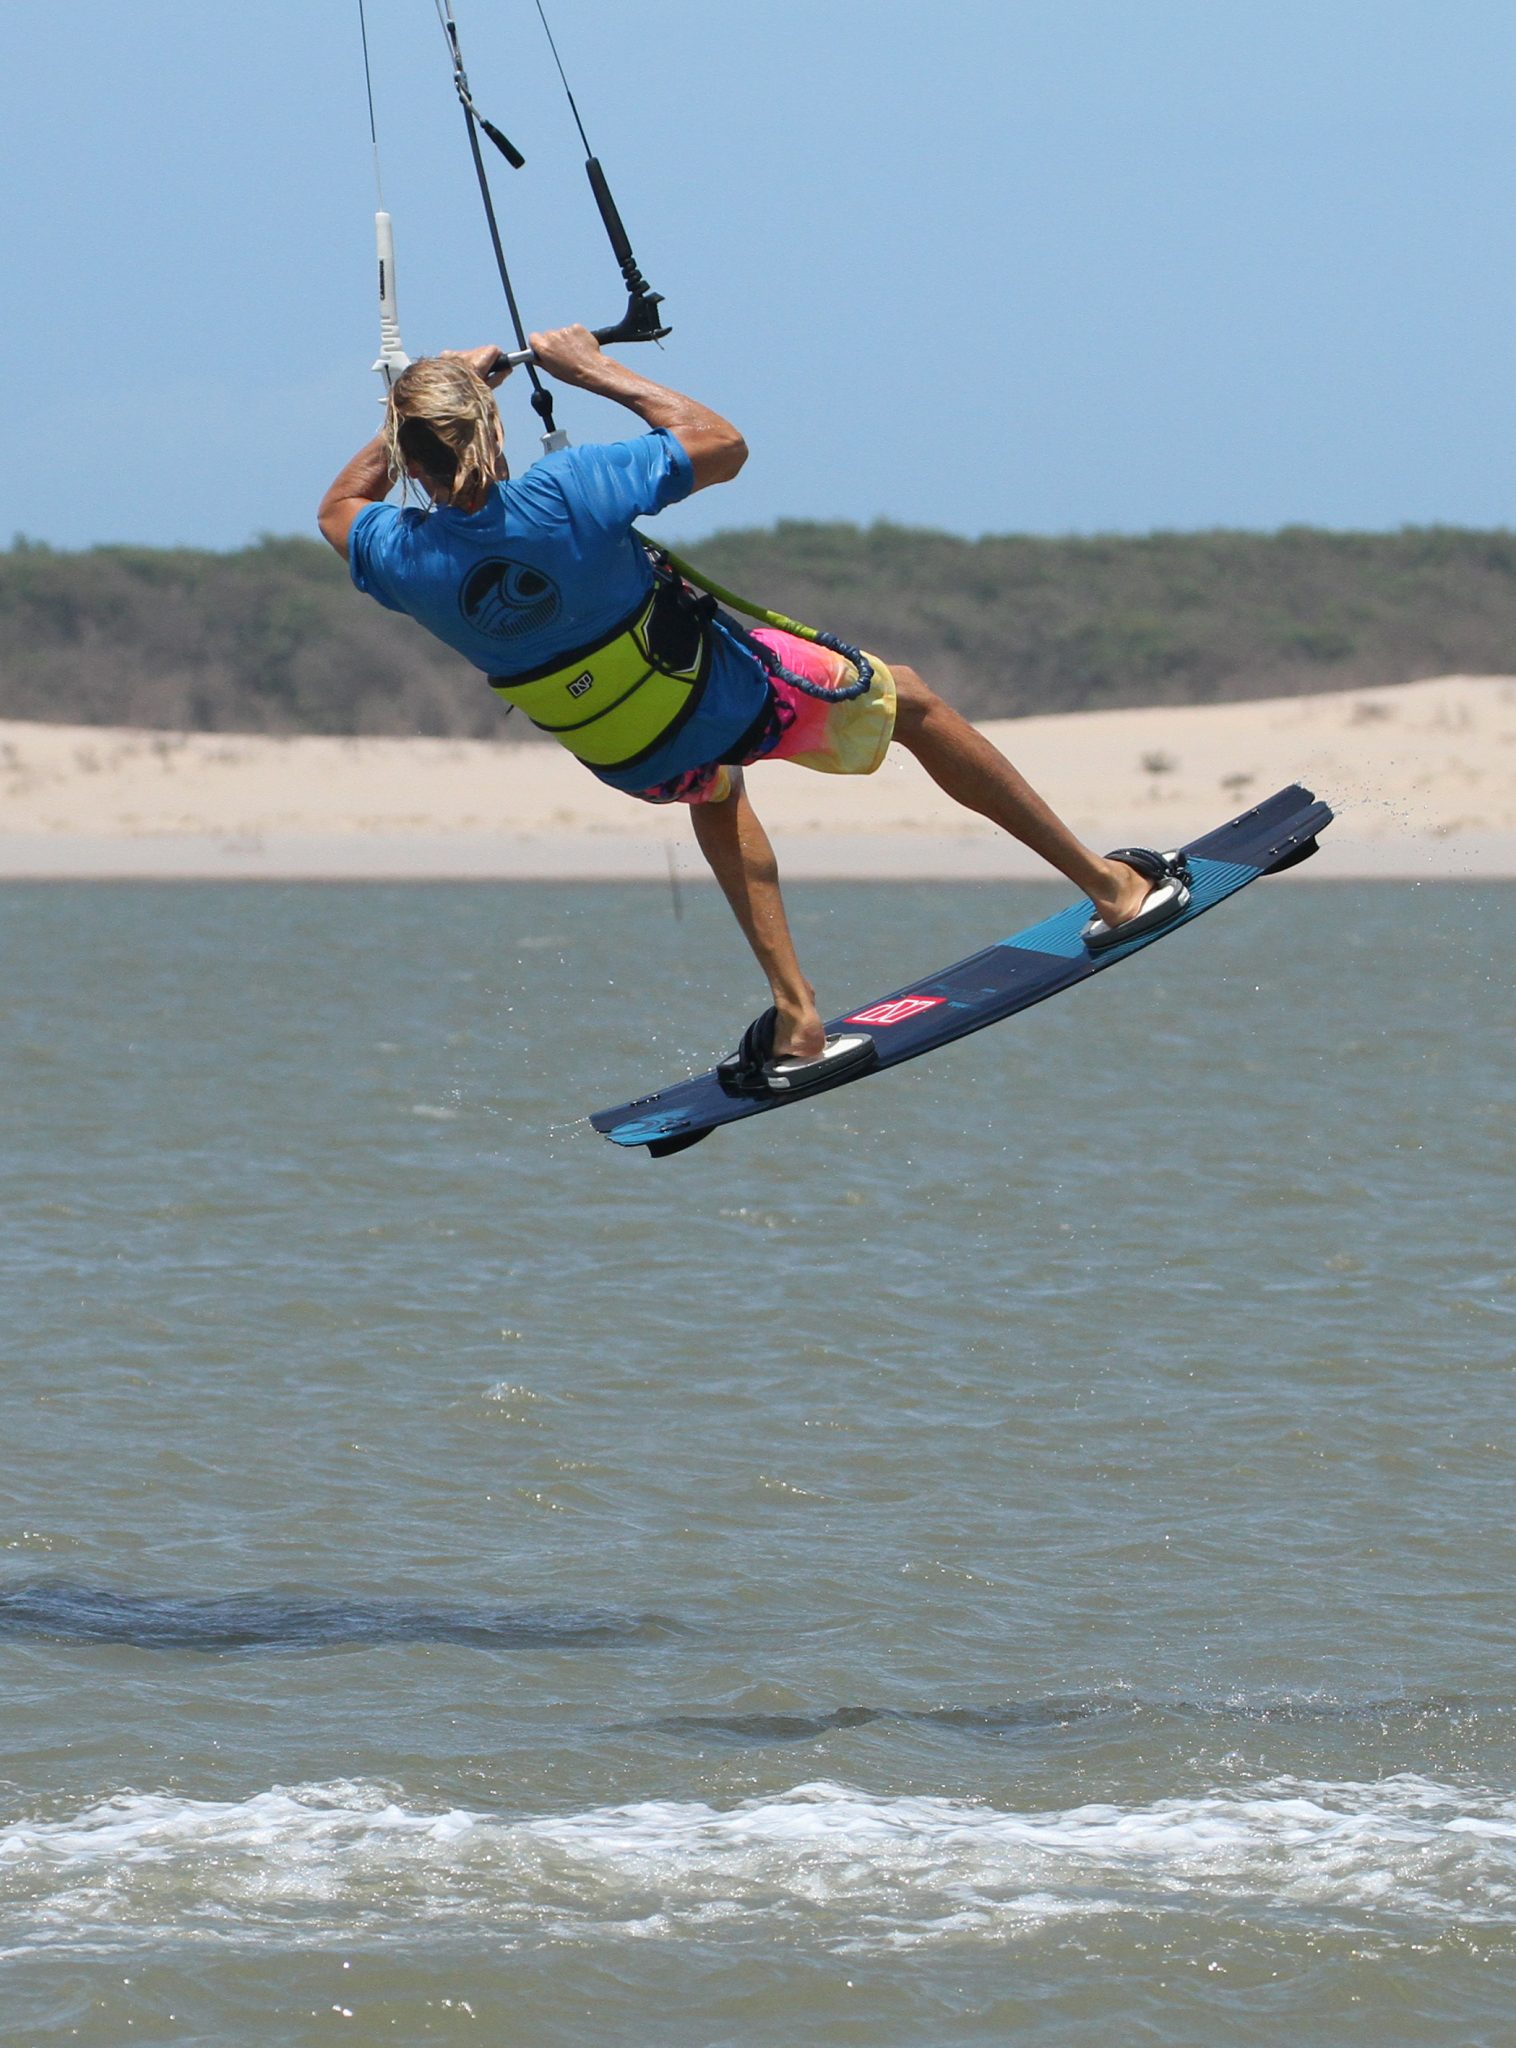
Front Roll Part 1 Pic C.
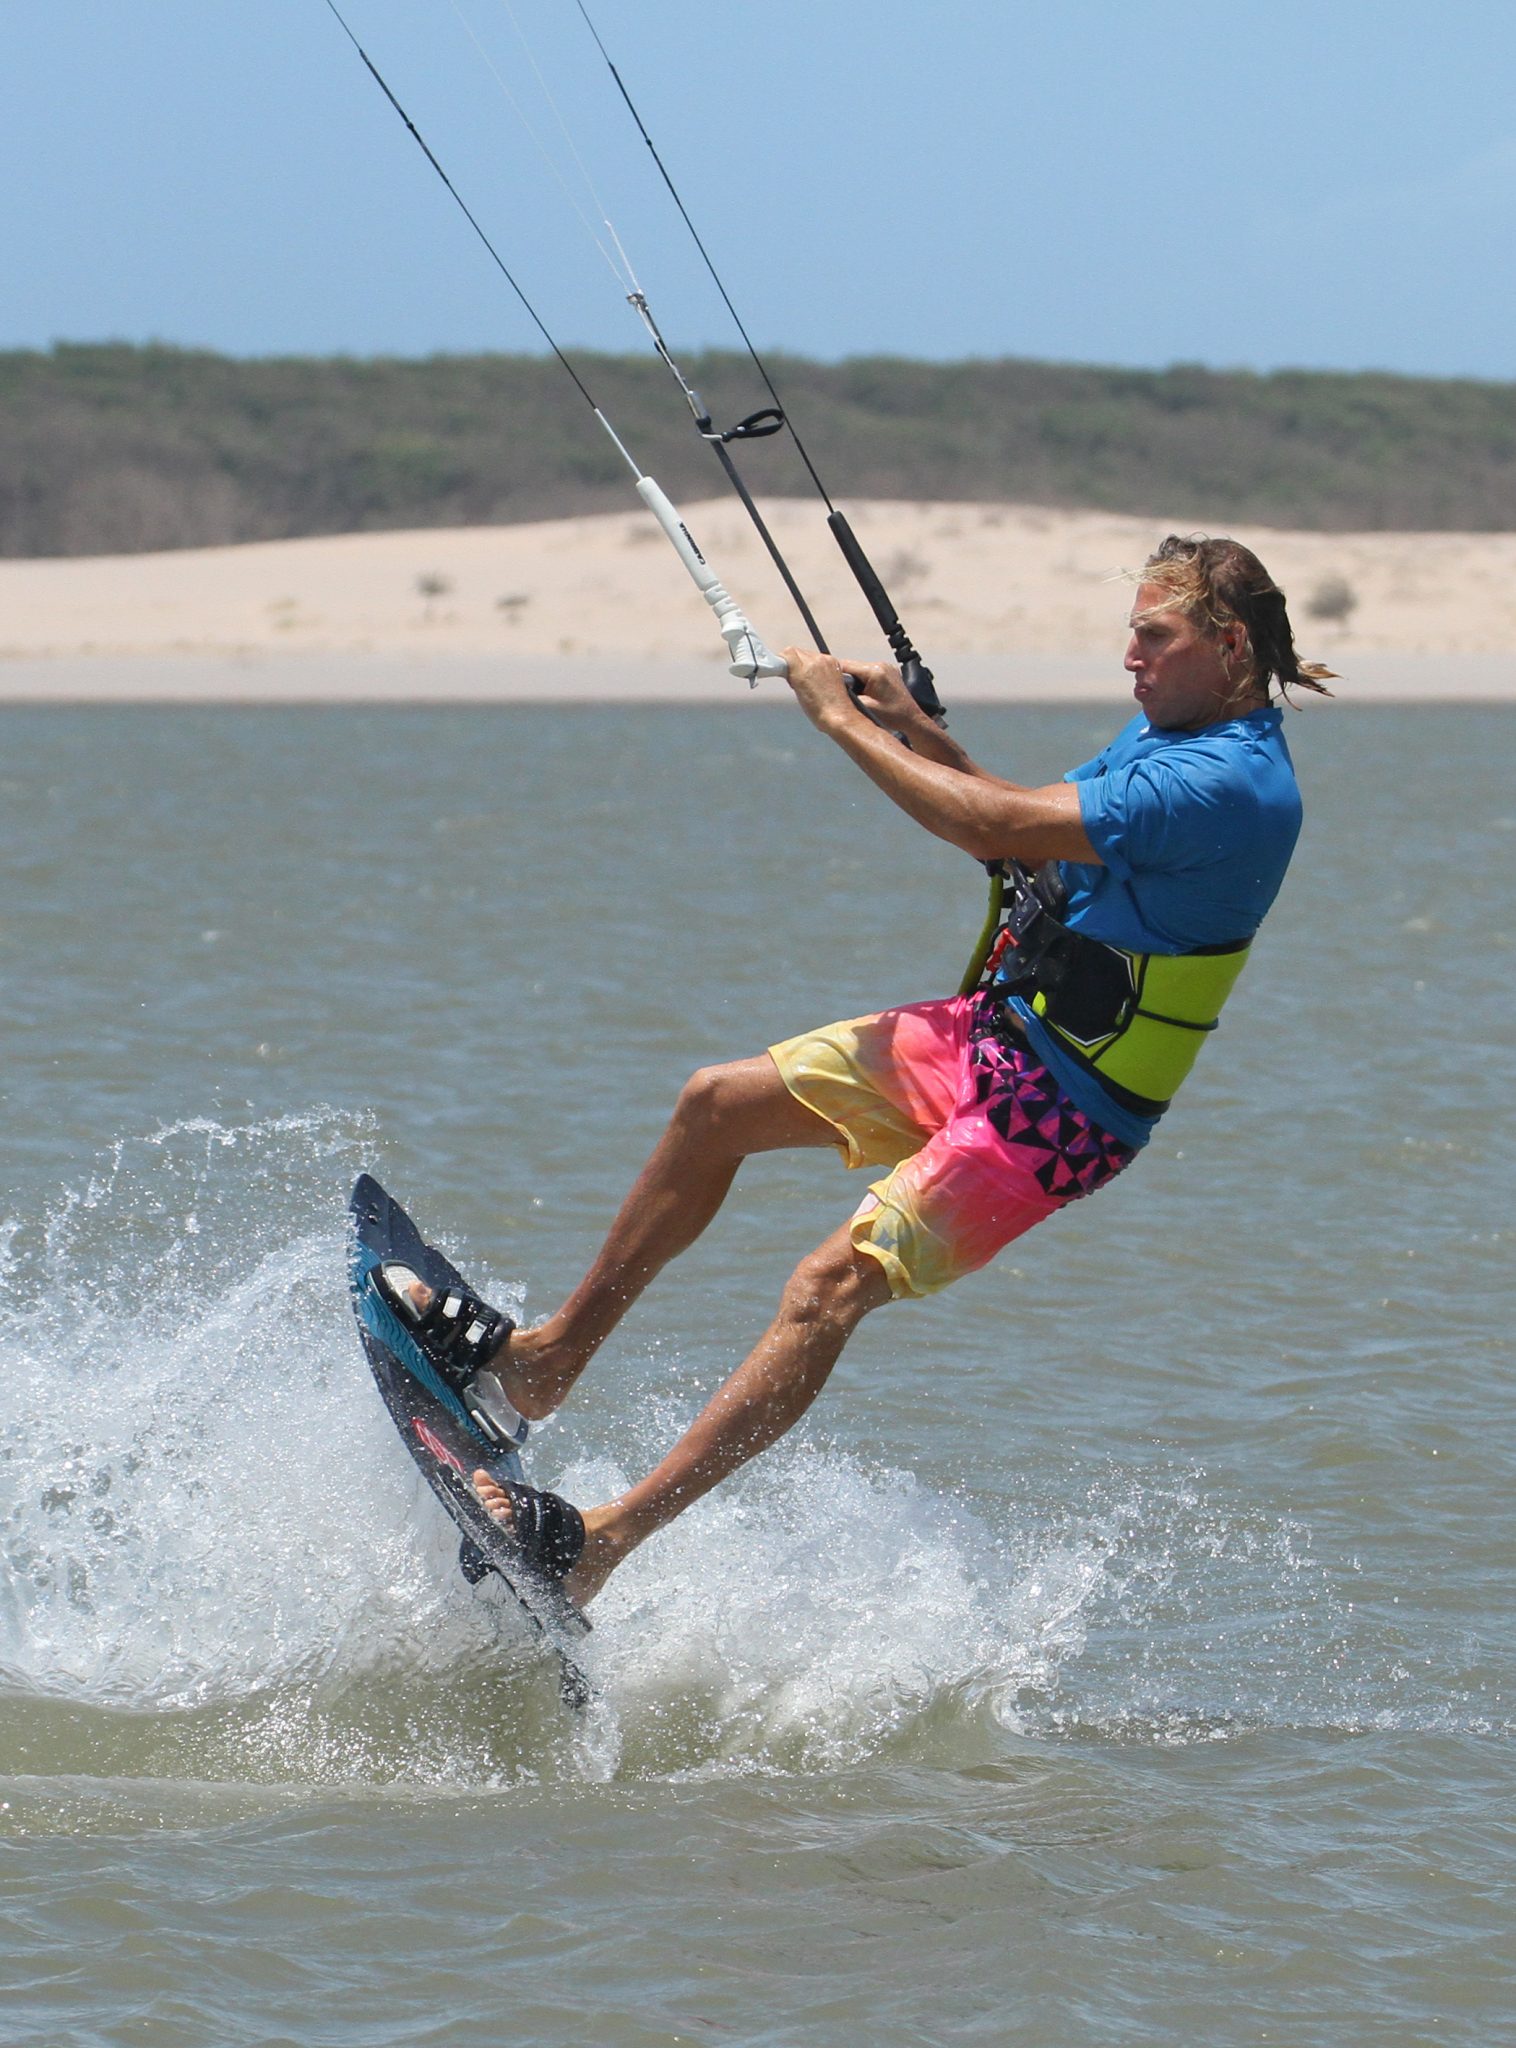
Once you’re off the water and standing tall, assuming that you haven’t buried the nose, you’re set to continue into the crux of the rotation. The beauty here is that because every part of your body tries to revert to a normal position as you take off, you’ll now be in a position similar to which you’d experience in a bog standard, from heelside, front roll.
As such if you get to this point it should be relatively plain sailing! First port of call is to keep your weight forwards towards the nose of the board. Looking at Christian you can see that he’s dropped, actually thrown his head over his front shoulder, tipping his weight forwards in the harness, which will help keep the rotation rolling. Christian has also brought his knees up, which will help him rotate quicker and he’s redirecting the kite forwards.

Front Roll Part 2 Pic D.
Once you’ve got your weight forwards, the second part of the front roll is to get yourself turning. Nothing too fancy here, just some good old fashioned use of the head and shoulders. Christian has turned his head back, looking over his back shoulder, whilst lifting his back arm, in an effort to turn further around the rotation. It’s worth noting from Christian’s kite face in the last few photos how much effort is involved. This is all down to the fact that you can’t kick yourself into the rotation with the same force as you can from heelside.
Front Roll Part 3 Pic E.
Once you’ve got your head and shoulders turning, the final part of the front roll is all about the legs, or more specifically your knees. If all has gone well and you’re leading with your head and shoulders, you’ll be able to come around enough to see the water. Once you do, you need to pull your knees around to swing the board out in front of you, whilst keeping tension in the lines and the kite above your head so that you can anticipate when it’s time to land. Looking at the photo, Christian has spotted his potential landing zone, he’s got the bar in for tension and control and he’s bringing his knees and therefore board through to complete his rotation.
Touch Down Pic F.
This is really the sum of all the previous parts. Landing, as ever, is all about diving the kite to pull you out of your rotation and downwind, whilst landing over the board, slightly tail first pointing down towards the kite. Job done!
Top Tips
Yet again there is no denying that flat water will make this a lot easier, you’ll be able to carry more speed and edge more efficiently. Seat harnesses, especially those with a low hook position won’t make it any easier to contort either, but on the flip side you will be able to get the bar nearer.
If you struggle with the position at first, aim to pop into blind and then get into the move asap.


And finally work on your blind position. It’s the building block upon which all the others are stacked. Think of the position as coming from your shoulders, not from reaching and stretching for the bar. By rolling and twisting your chest around towards the bar you can reach it.
As pointed out earlier, this move requires a lot of physical effort in the rotation stage, as you’ll be pulling yourself around. Really tense your body once you’re up and try to get everything moving in unison around the rotation. You probably won’t look pretty, but the end result will be sweet.
Now have a look at the videos and sequence, paying close attention to the take-off and initiation of the rotation.
Common Problems
If your board is skipping as you send the kite. This will happen whenever your sweet spot is too far. To get both hands on the bar you’re having to pull it in towards you and as such you’re stalling the kite. As a result, the kite doesn’t go up to 12 as you send it, but it chops a bit off the top of the window and tries to pull you downwind. Trim!

If you’re digging the nose in on take-off. This is generally one of two things and more often than not a combination of both of them. If you’re not sending the kite enough it won’t pull you up and away from the nose, so you’ll push it down too easily. If you’re too keen to take off and kick too early the kite won’t have travelled far enough, and you’ll have the same result. However, do ponder why, is it your trim, are you lacking edge, how is your body position?


If you’re getting the take-off but rather than rotating, you end up just performing a normal jump. This is often a result of always stuffing the nose in. So rather than kicking yourself forwards on take-off, you hang back to make sure you don’t catch the nose. Get yourself forwards again but to counteract the dropping nose, give the kite a bit more send to pull you back.
Keystones
- Trim and speed
- Roll Shoulders
- Push hips back as send kite with head down
- Let kite move past 12 o’clock and kick upright
- Head down onto shoulder, before turning and then bringing knees through
This technique article was in Issue 73 of IKSURFMAG.
Related


By Christian and Karine
Christian and Karine have been working together as a coaching team, running improver to advanced kitesurfing clinics since 2003.
