
Surfboard Dismount
Technique / Beginner


Surfboard Dismount
The surfboard dismount is one of those moves that works, it really is as stylish and practical as a well-tailored, colourful hat. Fun and functional, nonchalantly plucking your board from the air obviously has its aesthetics, but it also trumps fumbling around in the shallows as the backwash bulldozes your board and fins against your shins or the shore break shipwrecks your prized blank against the solitary rock further up the beach. In case you need further justification to devote some time towards this, the movements are also a productive precursor for the strapless air gybe.
A couple of points to get out the way before we get started. The idea of protecting both yourself and your trusty steed means that your intention is not to spring out of the water and land on dry ground. You need enough water to save yourself from the abject sound of fins grinding through the seabed or bouncing against rock, especially when you sink the tail as you pop, and you need a flattish sub aqua landing pad, that’s not slippery, covered in urchins or pocked with holes. We appreciate that many beaches offer the perfect sandy bottom required, but it’s always worth considering what lies beneath. Might have learnt this the hard way!! Let’s begin with a breakdown of the necessaries.


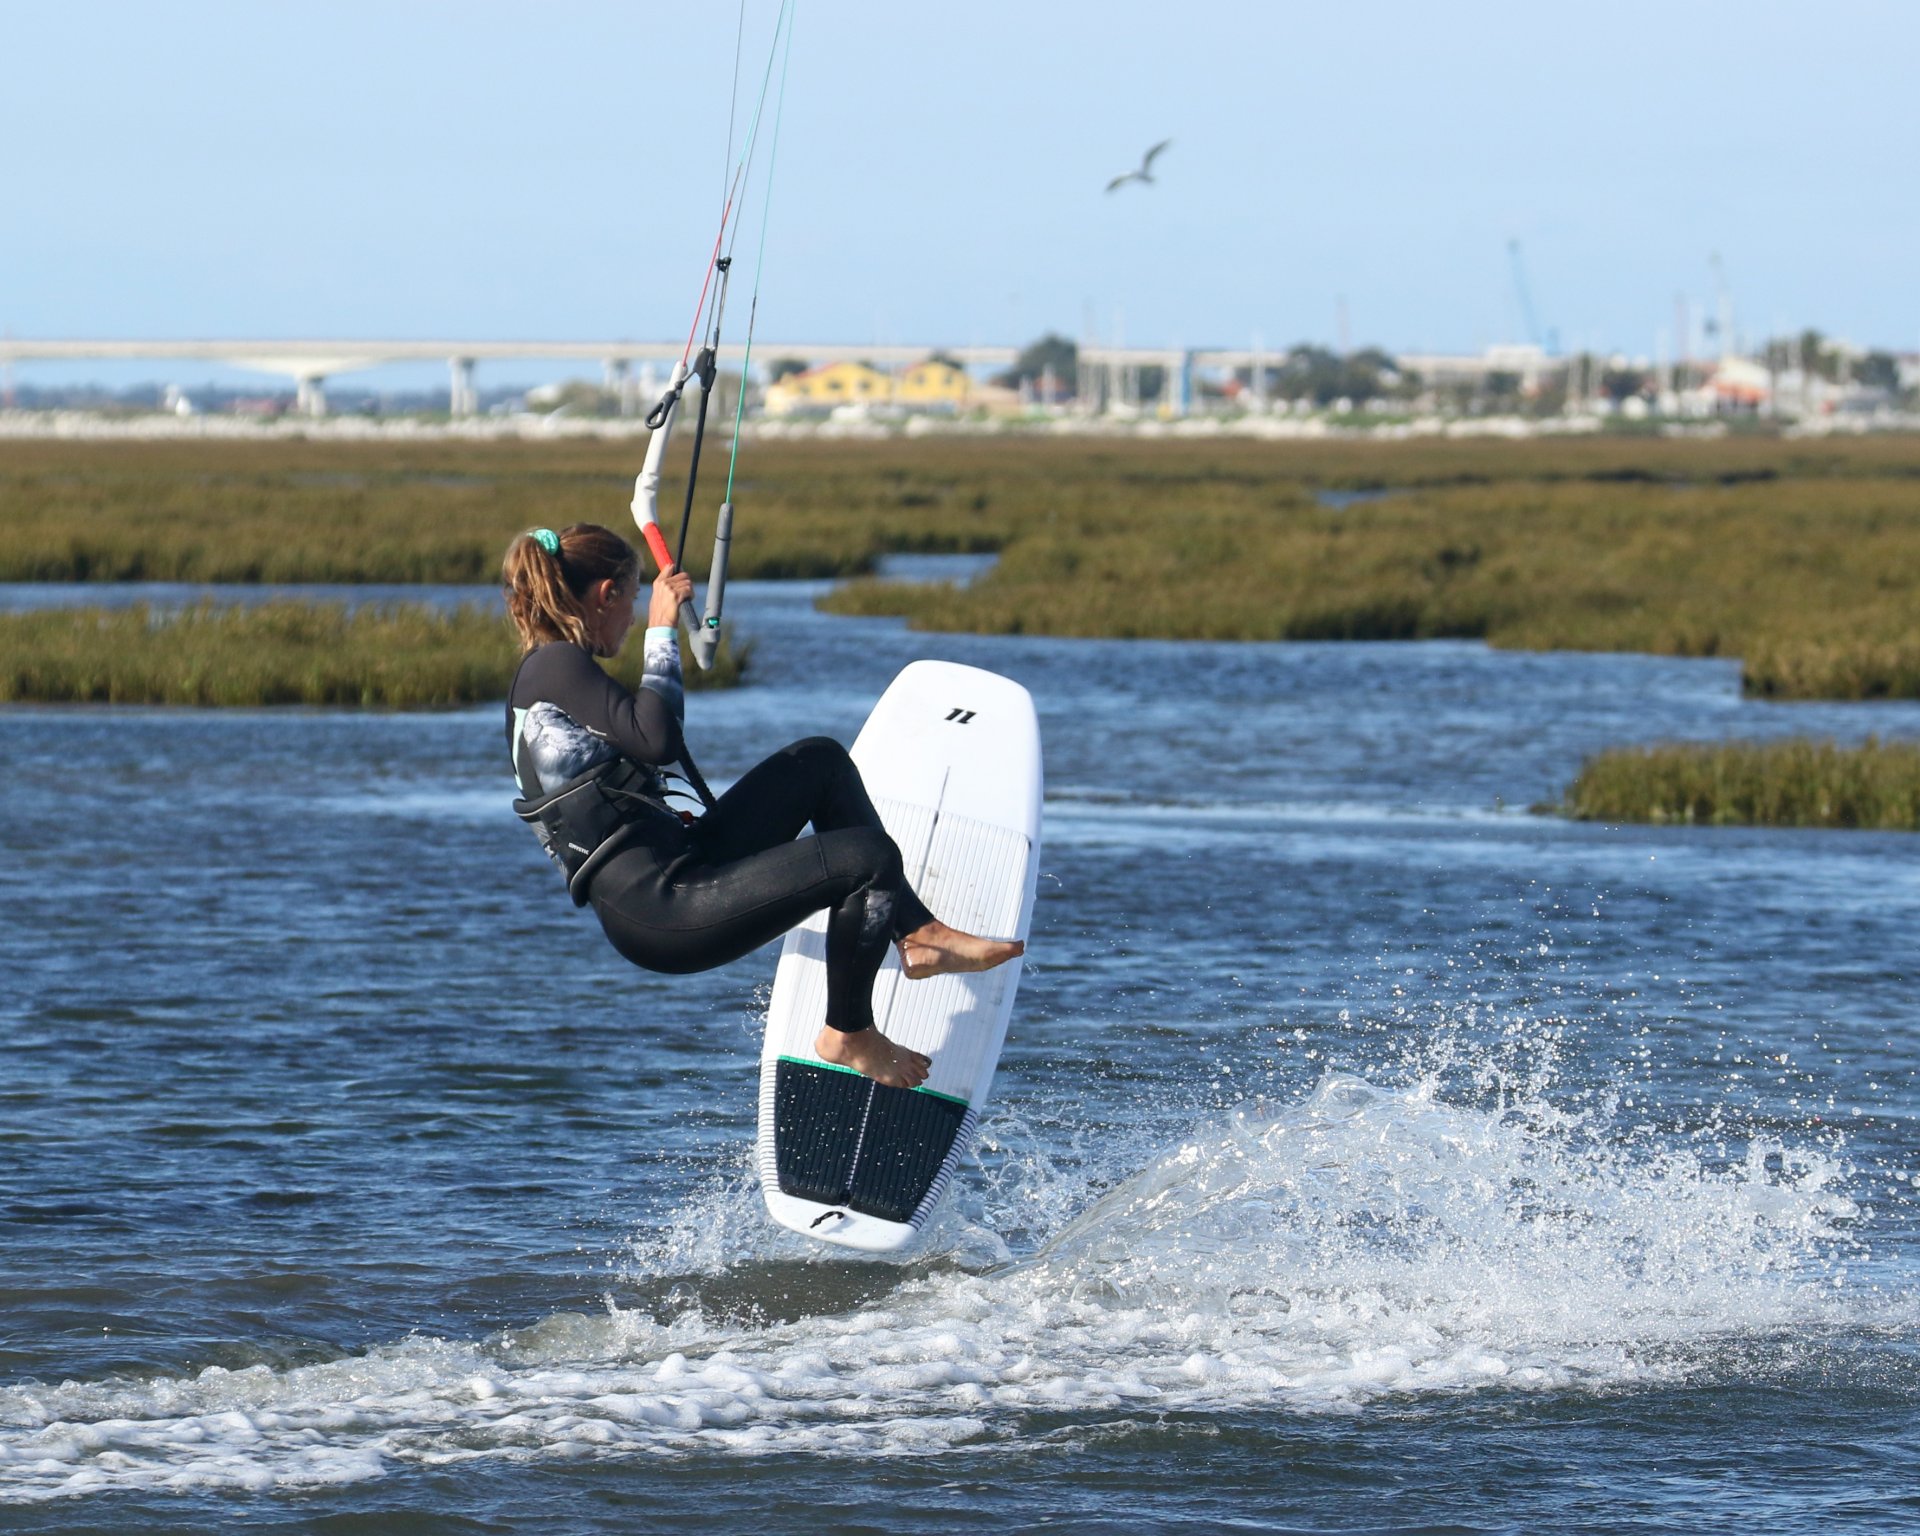
Set Up Pic A.
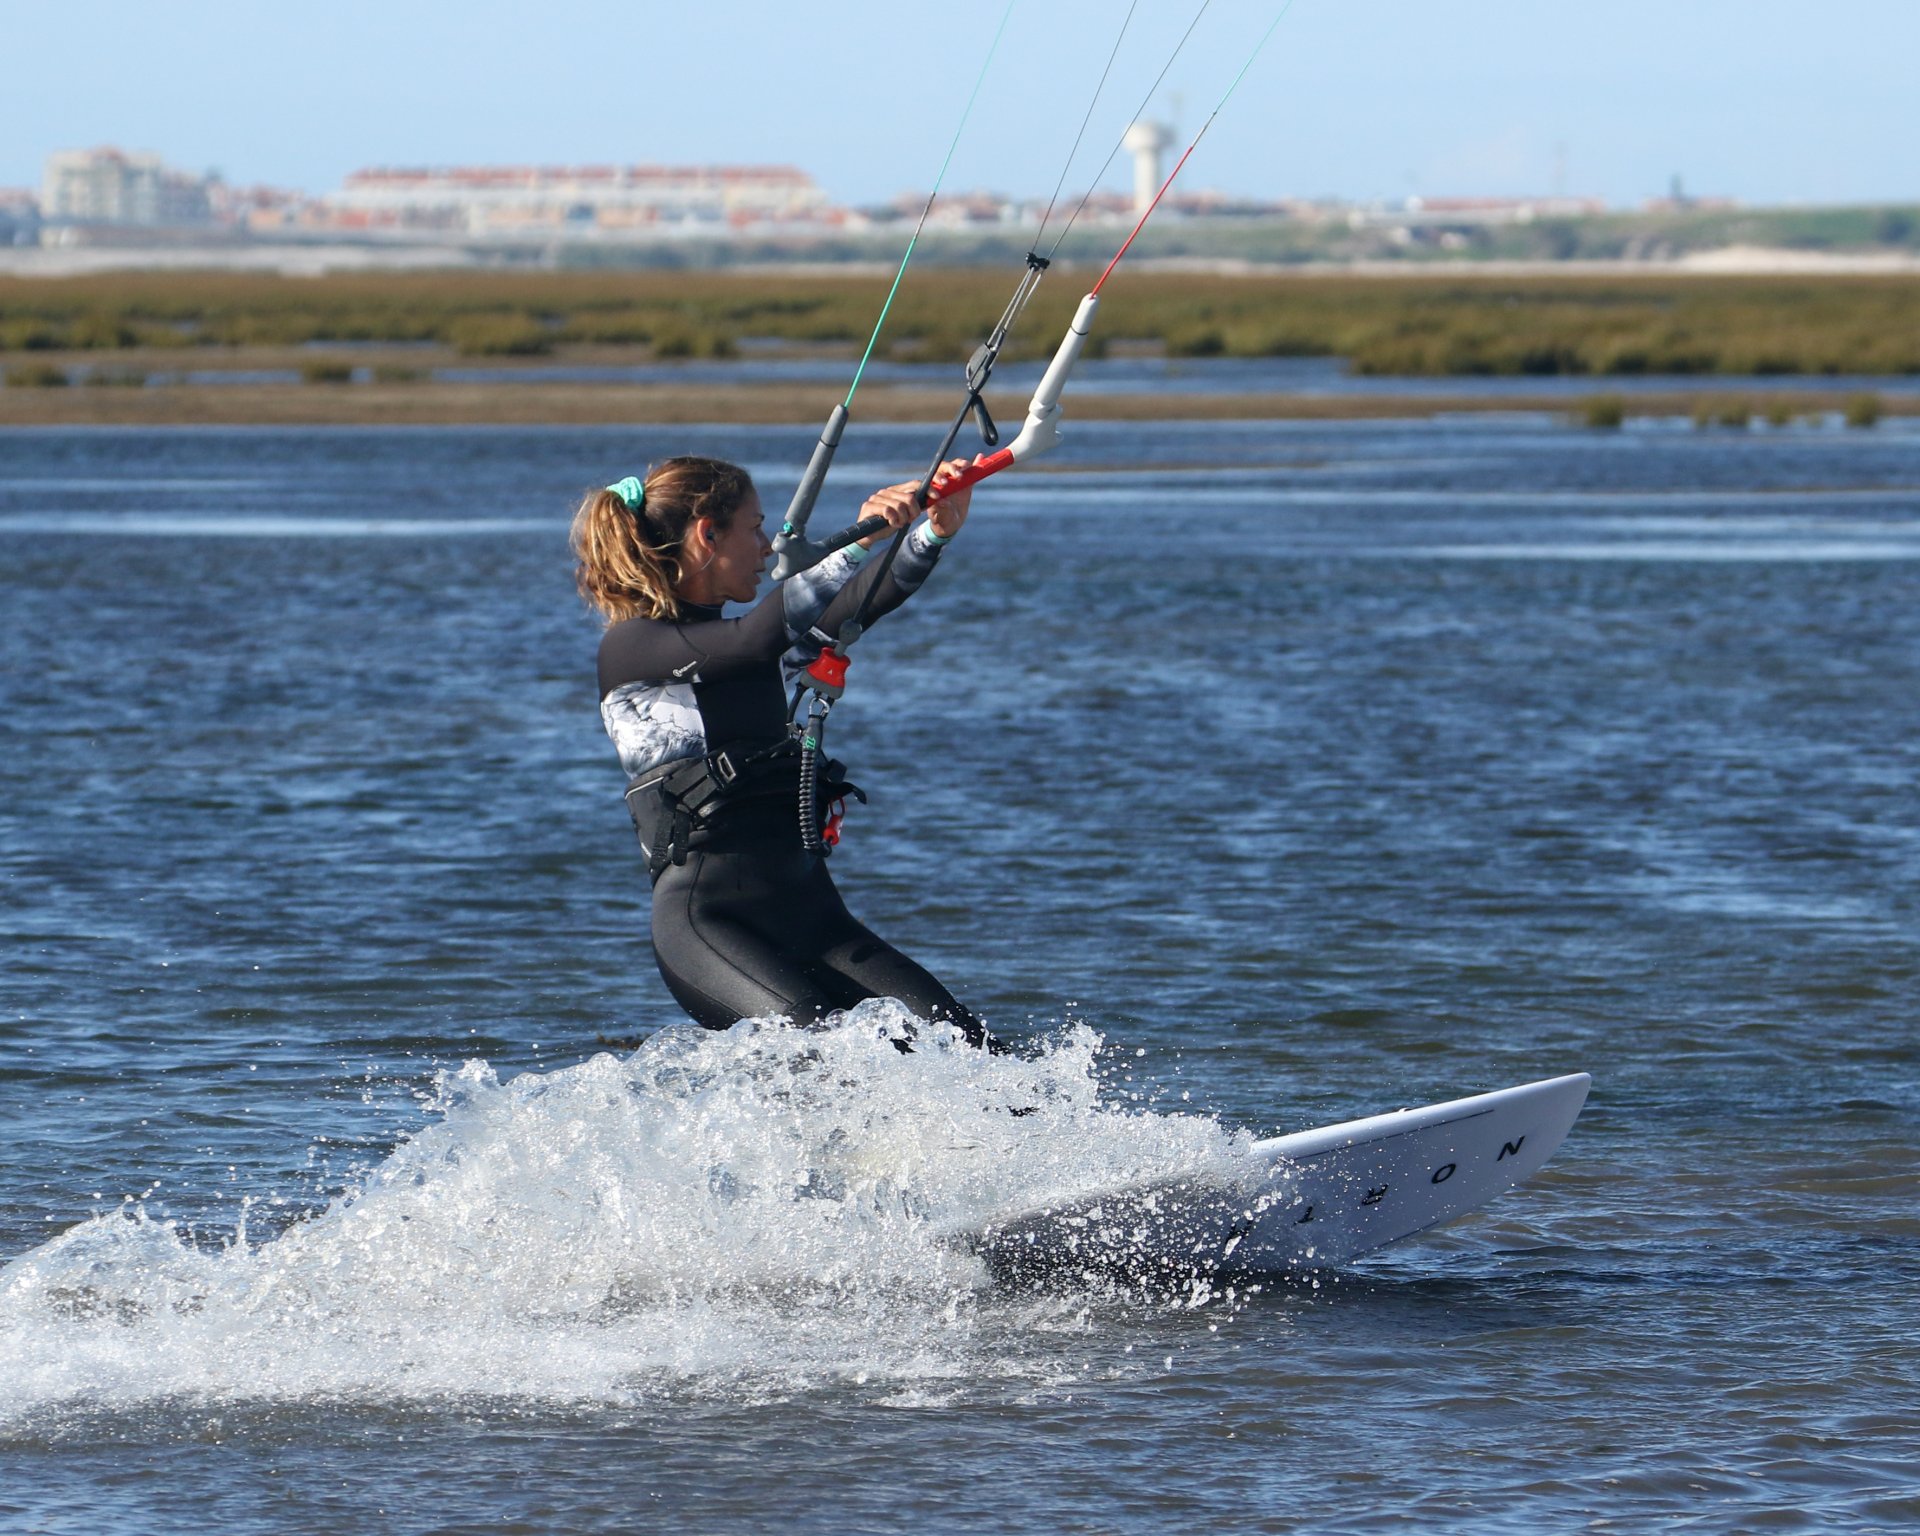
Where you stand on the board will have a bearing on how easily the board lifts off the water. You need to be comfortable, riding on an edge upwind as per usual, with both feet on the upwind side of the board. From here just inch your front foot back a touch, so that the nose becomes a little bit nervous, without you losing control. This way the wind can get underneath your board when you carve. Your back foot doesn’t need to be extremely far back, but at least back over the front fins, so that you have the ability to push the tail down. Too far forwards and you won’t be able to sink it due to all the volume and it’ll be tricky to carve up. Getting your hands centred on the bar will help you control the kite once you’re one handed. If you’re riding a bigger kite just centre your back hand, you can leave the front one wherever it’s comfortable to help you steer the kite. Think of this more as a transition, in the fact that you need to slow down. If you come haring in like a bat out of hell, at the very least your feet, knees and back won’t thank you for it as they come to a sudden halt. Rather coast in, happily planing and with enough power in your kite that it’ll steer on command and your sweet spot trimmed out. You can see that Karine is edging upwind, her feet are only shoulder width apart and the nose of her board is riding high. With her back hand centred on the bar Karine has started to steer the kite up towards 12 o’clock.
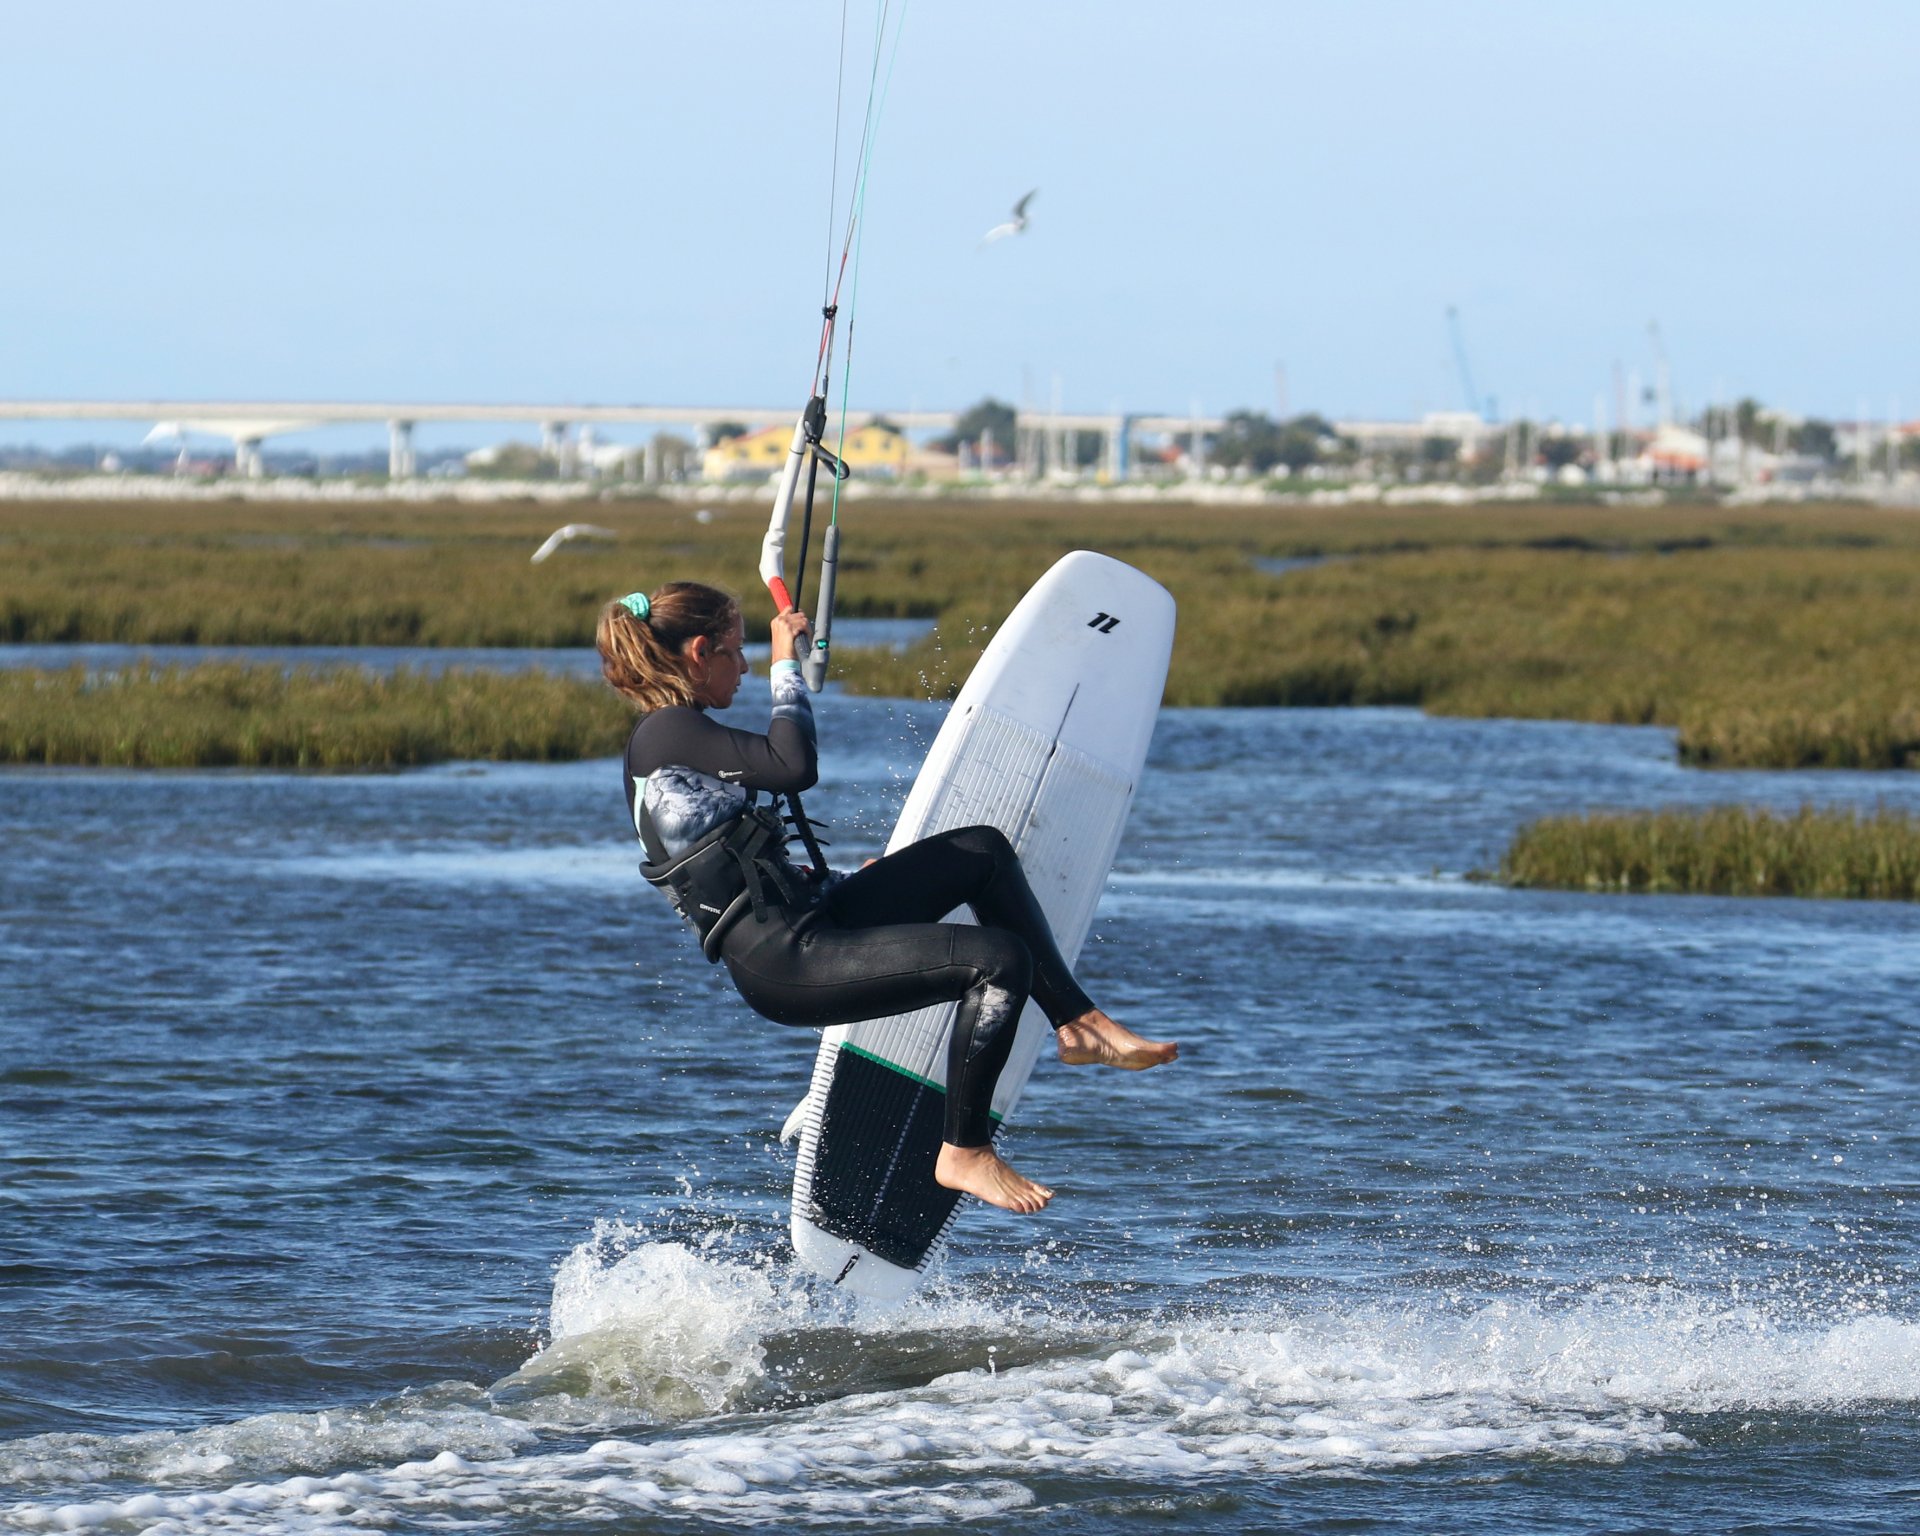
Carve Pic B.
Once your kite has started to move up it’s time to carve your board up into the wind. Couple of reasons for this. Firstly, carving into the wind from your upwind course will slow you down that extra bit. Secondly the carve will get the nose of your board facing into the wind, presenting more of its underbelly to the breeze which will help lift it once you give it the green light. To carve the board drop your weight onto your heels by sitting your bum down a touch and look over your front shoulder. It doesn’t need to be dramatic, just enough to get you turning. In fact, if you turn too sharply, you’ll get into the eye of the wind too quickly and surprise yourself. As the kite rises it’ll do its best to lift you and stop you carving, so let the bar out as you turn. With little tension on the lines you should now carve up relatively easily. In preparation of what’s to come take your front hand off the bar. The added bonus is that it’ll be easier to let the bar out with only your back hand holding it. Glancing over to Karine, she’s twisting her head and shoulders to look upwind, she’s sat down a little, keeping her shoulders upright, her front hand is off the bar and she’s eased it out to allow her to carve up into the wind.
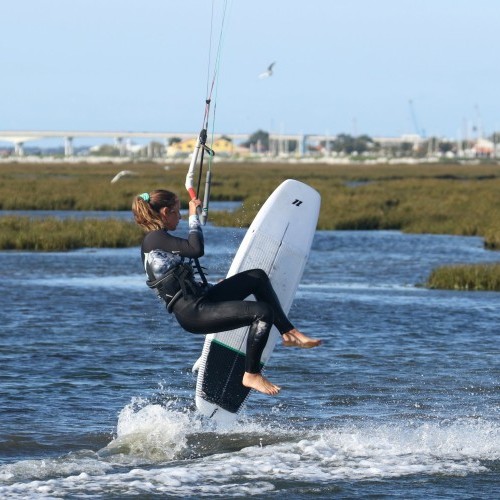
What are your legs? Pic C.
Springs, steels springs!(To borrow from Archy in Gallipoli). We need to find some energy to start the ball rolling. To get the best out of your springs we need to compress them first. Even though you’ve sat slightly to carve you will be driving against the board. To get it up off the water you momentarily need to compress down, so that you can push back up. As you compress and your weight lifts off the board slightly, it will flatten. However, as long as you’ve carved far enough, this will only benefit you as it’ll stop the wind getting on the deck side and encourage it under your board. In the pic, Karine’s kite is at 12 o’clock and her board has carved up into the wind. She’s still got the bar out and as such can drop her weight, compressing her legs and loading the springs.
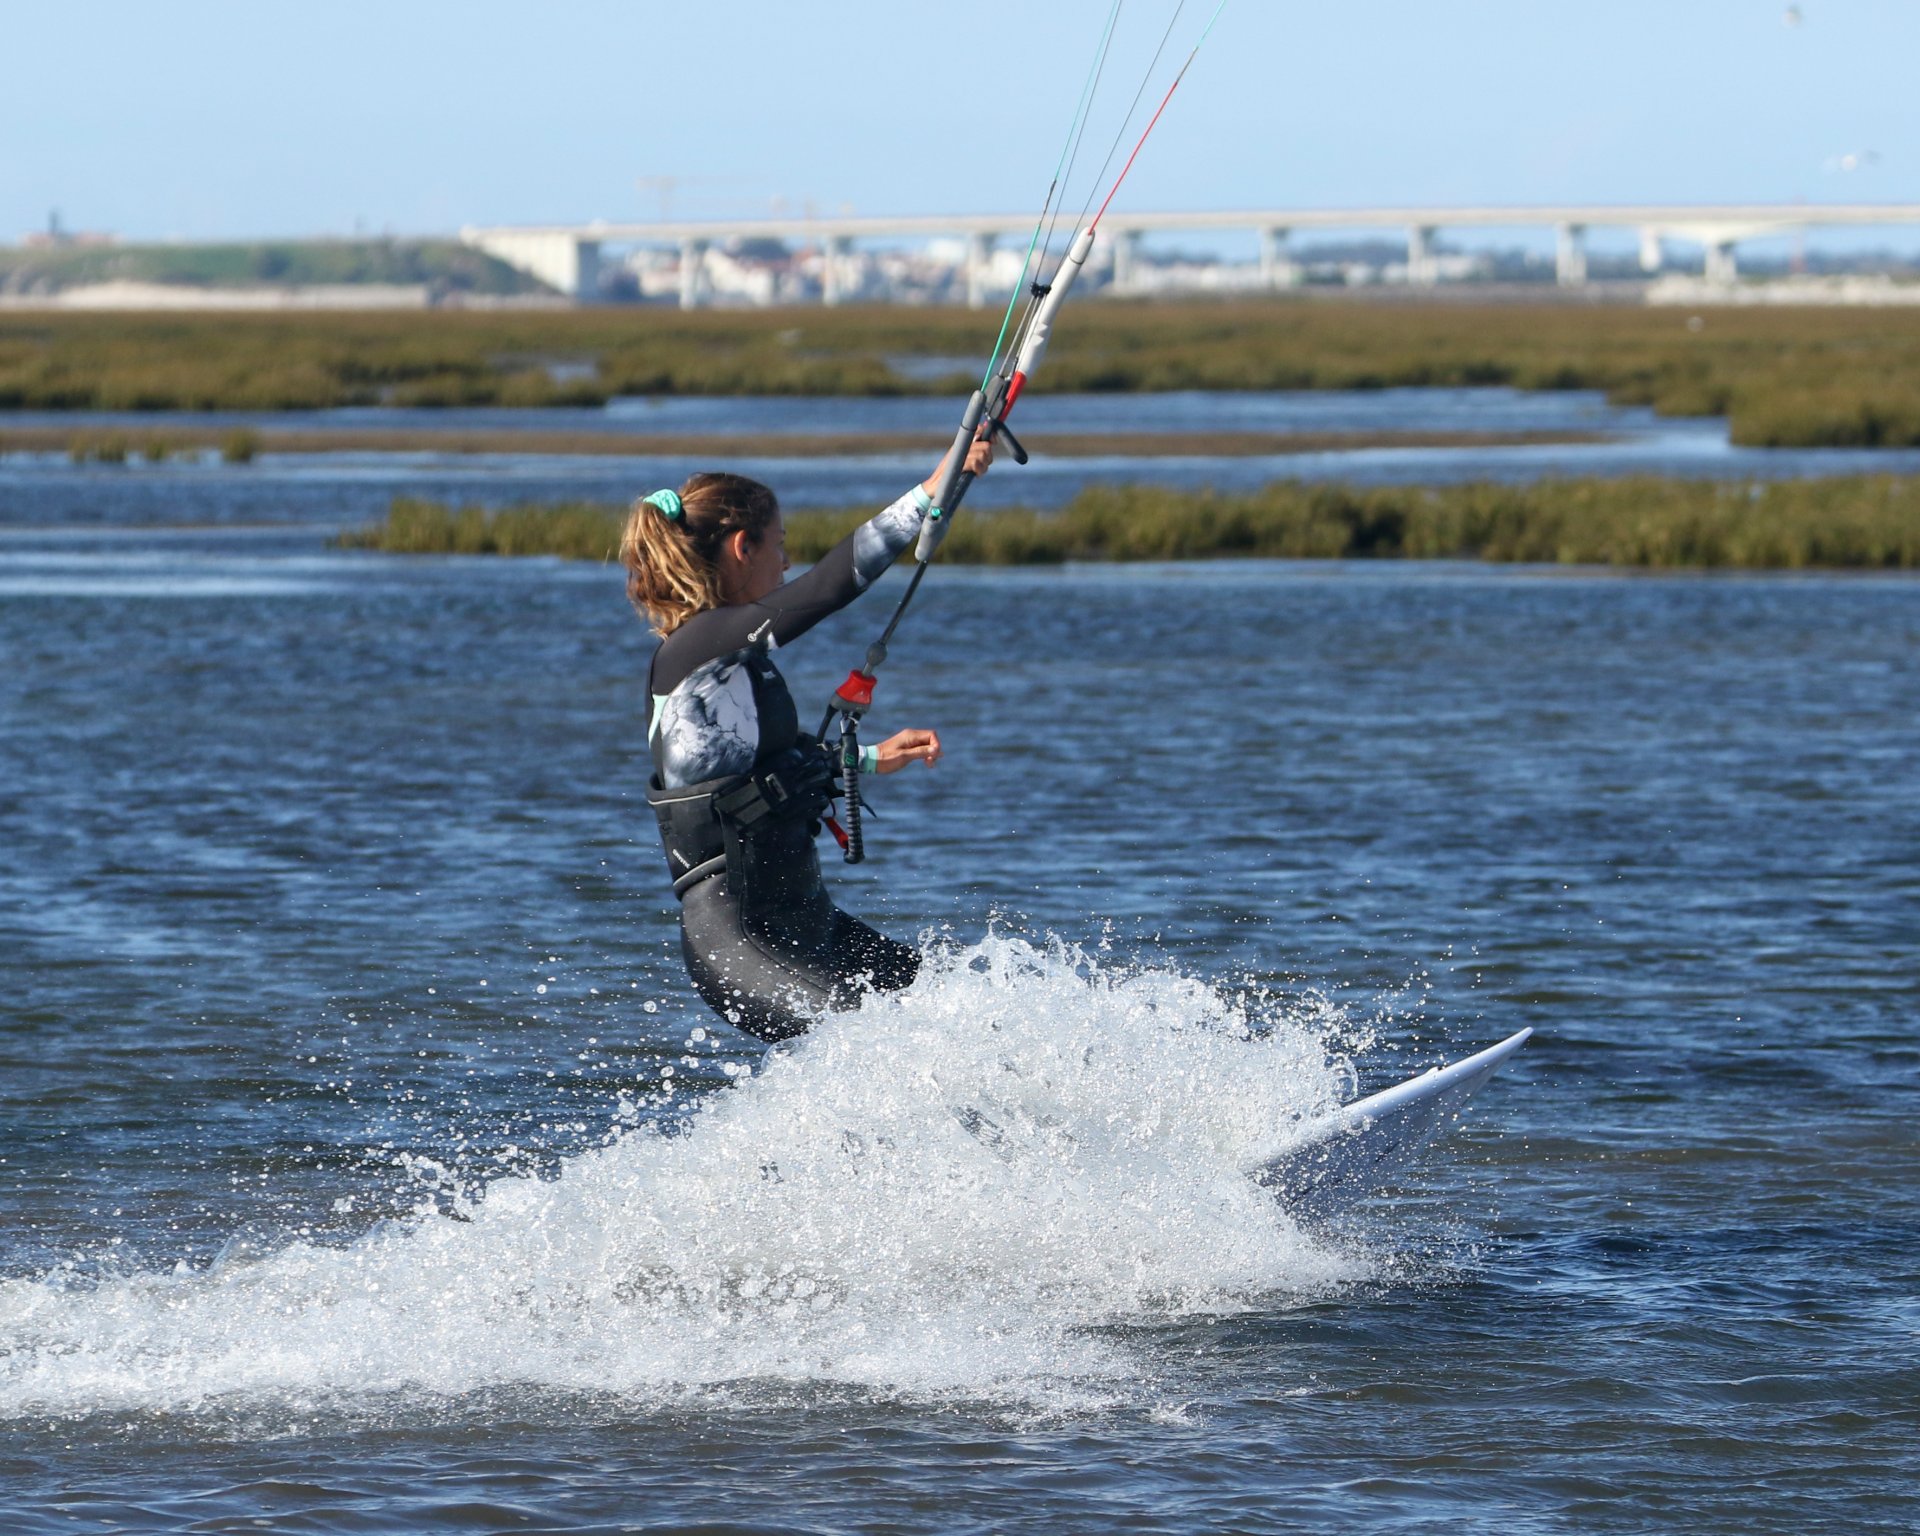
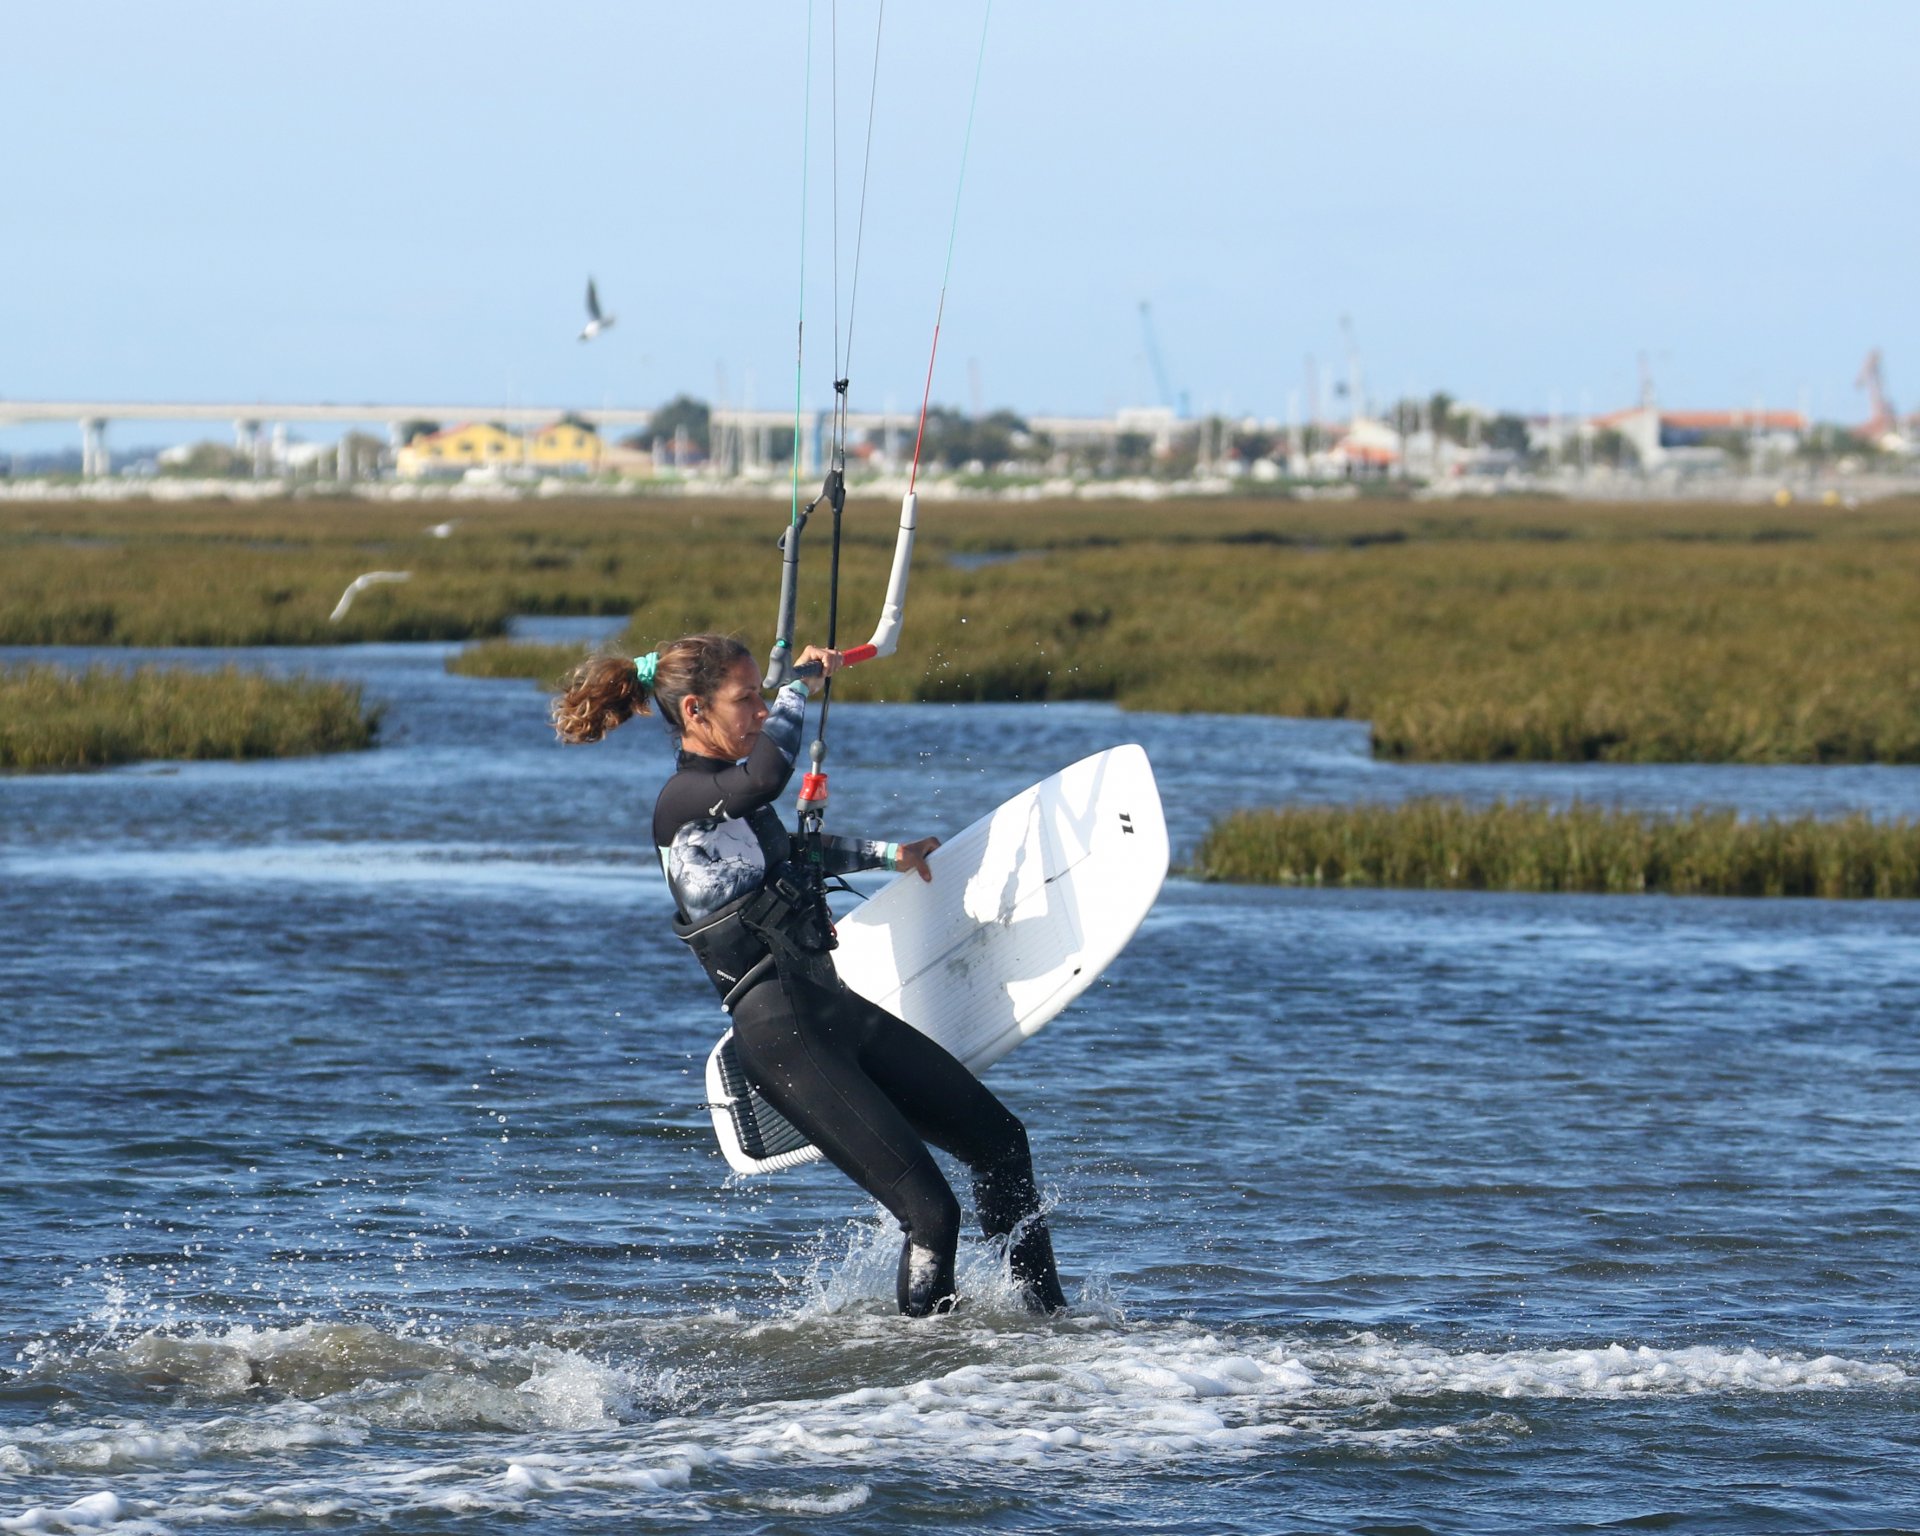
Launch Pic D.
From this position you’re now ready to coax the nose of the board up off the water. What you’re actually trying to do is stamp down on your back foot whilst lifting your front foot up, raising the nose of the board. If there is sufficient breeze, this will be enough to get the wind under your board and dutifully lift it towards you. The lighter the breeze, the more dynamic the movement. This is also why it helps to be over the board, as you can quite literally kick down with your back foot, extending it, uncoiling the spring. It’s imperative that as you stamp with your back leg that you lift your front leg. If you need to concentrate on what to do with it, think about lifting your knee up towards your chest. You’ll find that your foot will naturally move back towards your other leg, leaving plenty of room for the board to lift. Looking at Karine, her back leg has extended, front knee is pulling up, and the nose of her board is lifting, presenting a huge area to the wind. It’s worth noting that Karine is looking forwards at her board, towards the rail where her front foot was, as this is where she’ll like to grab it.
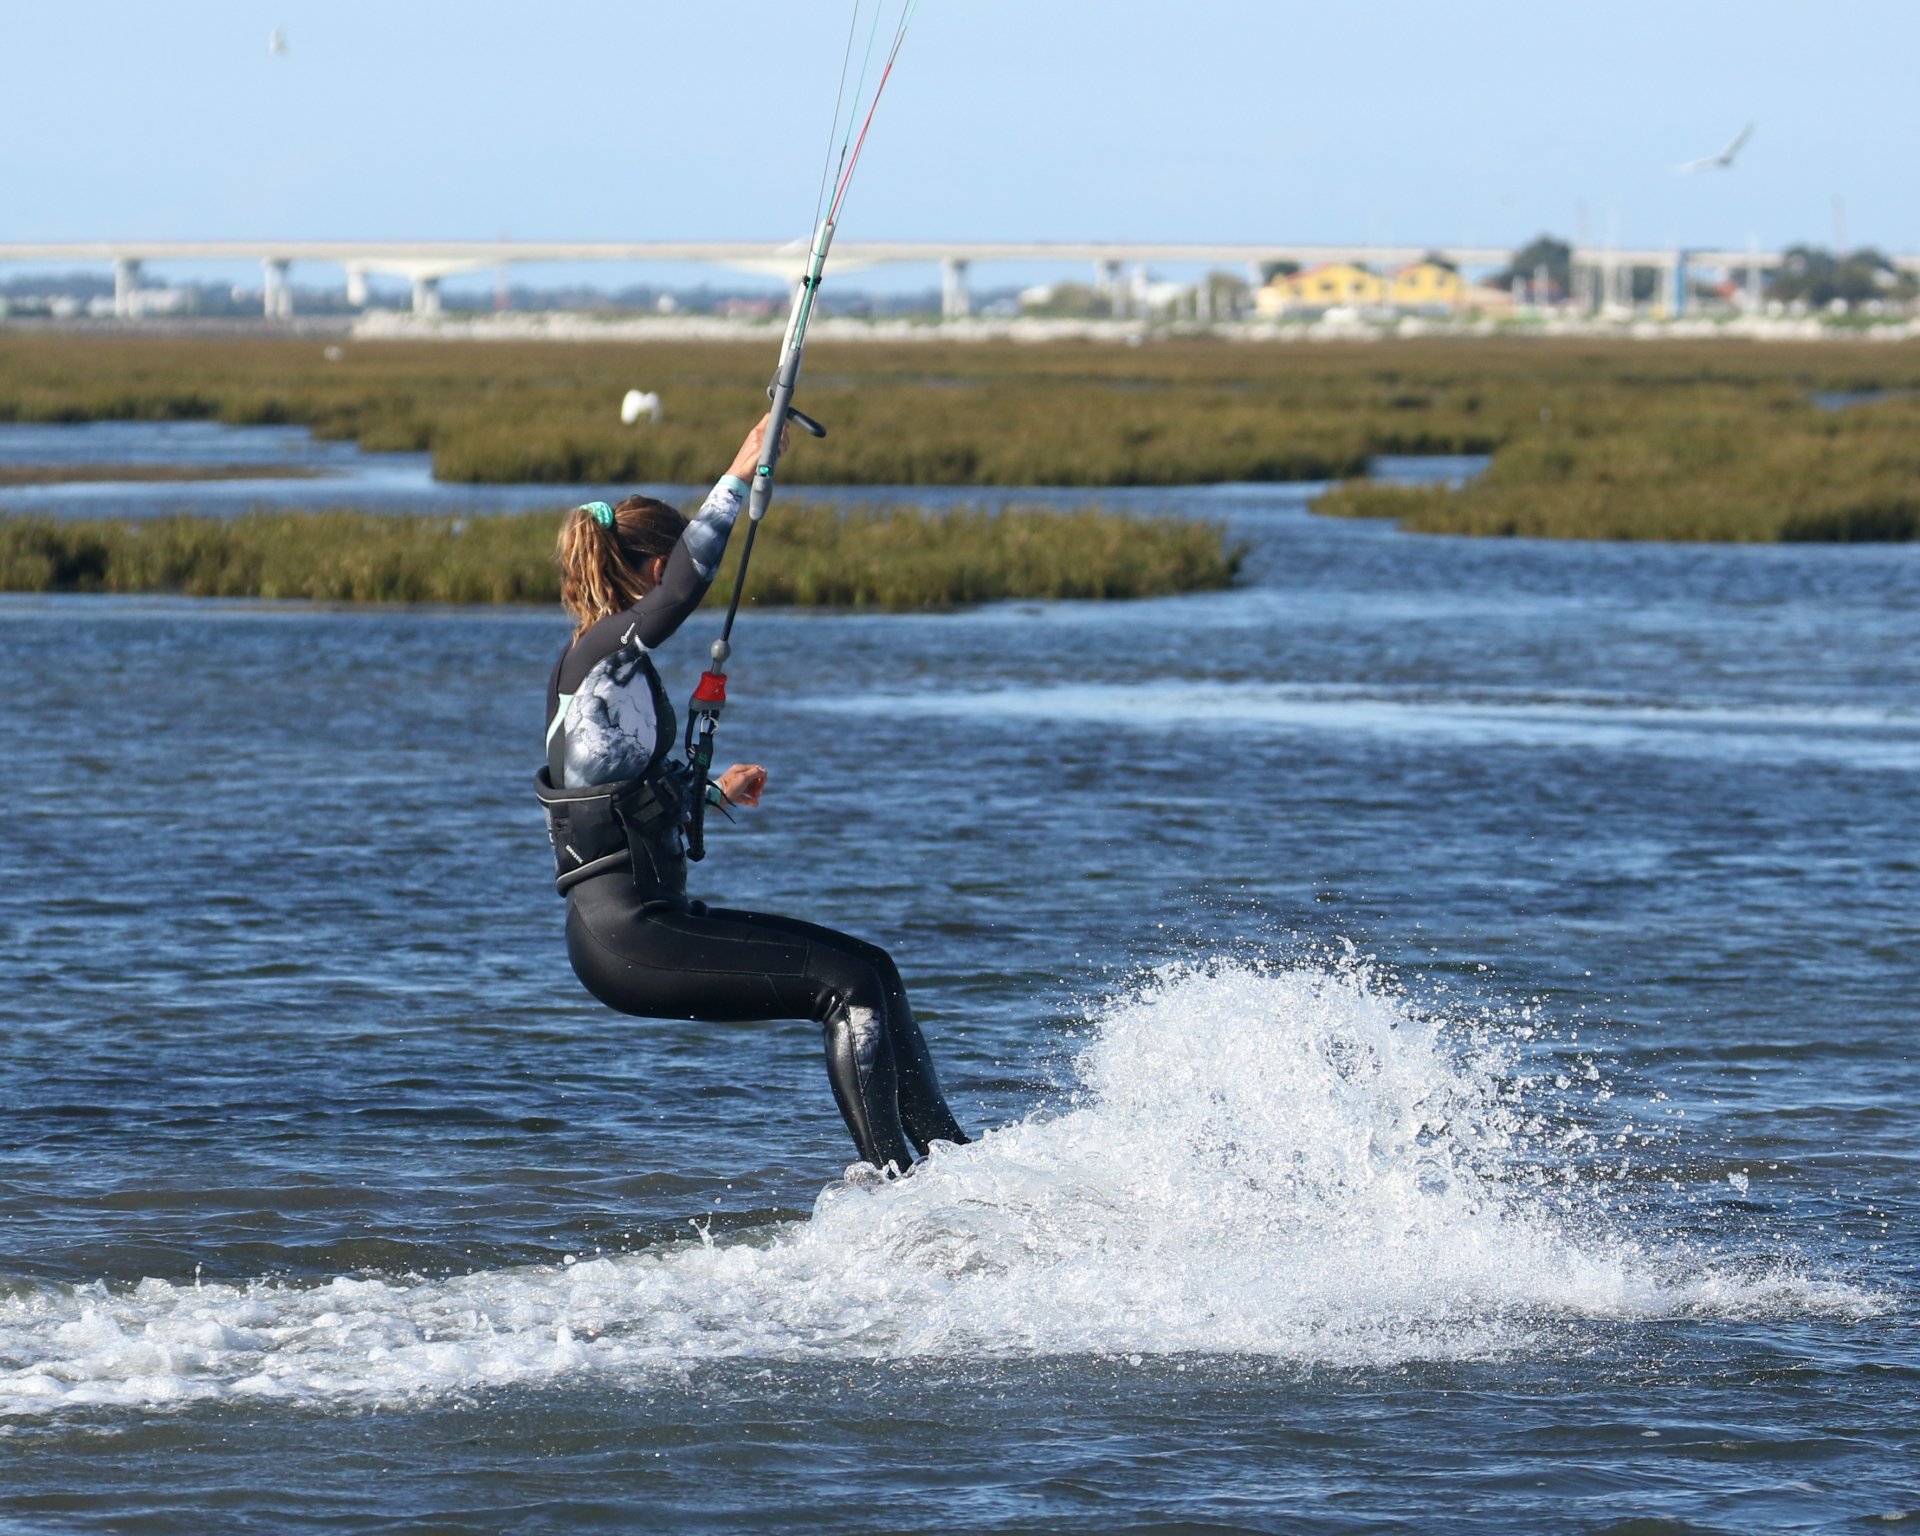
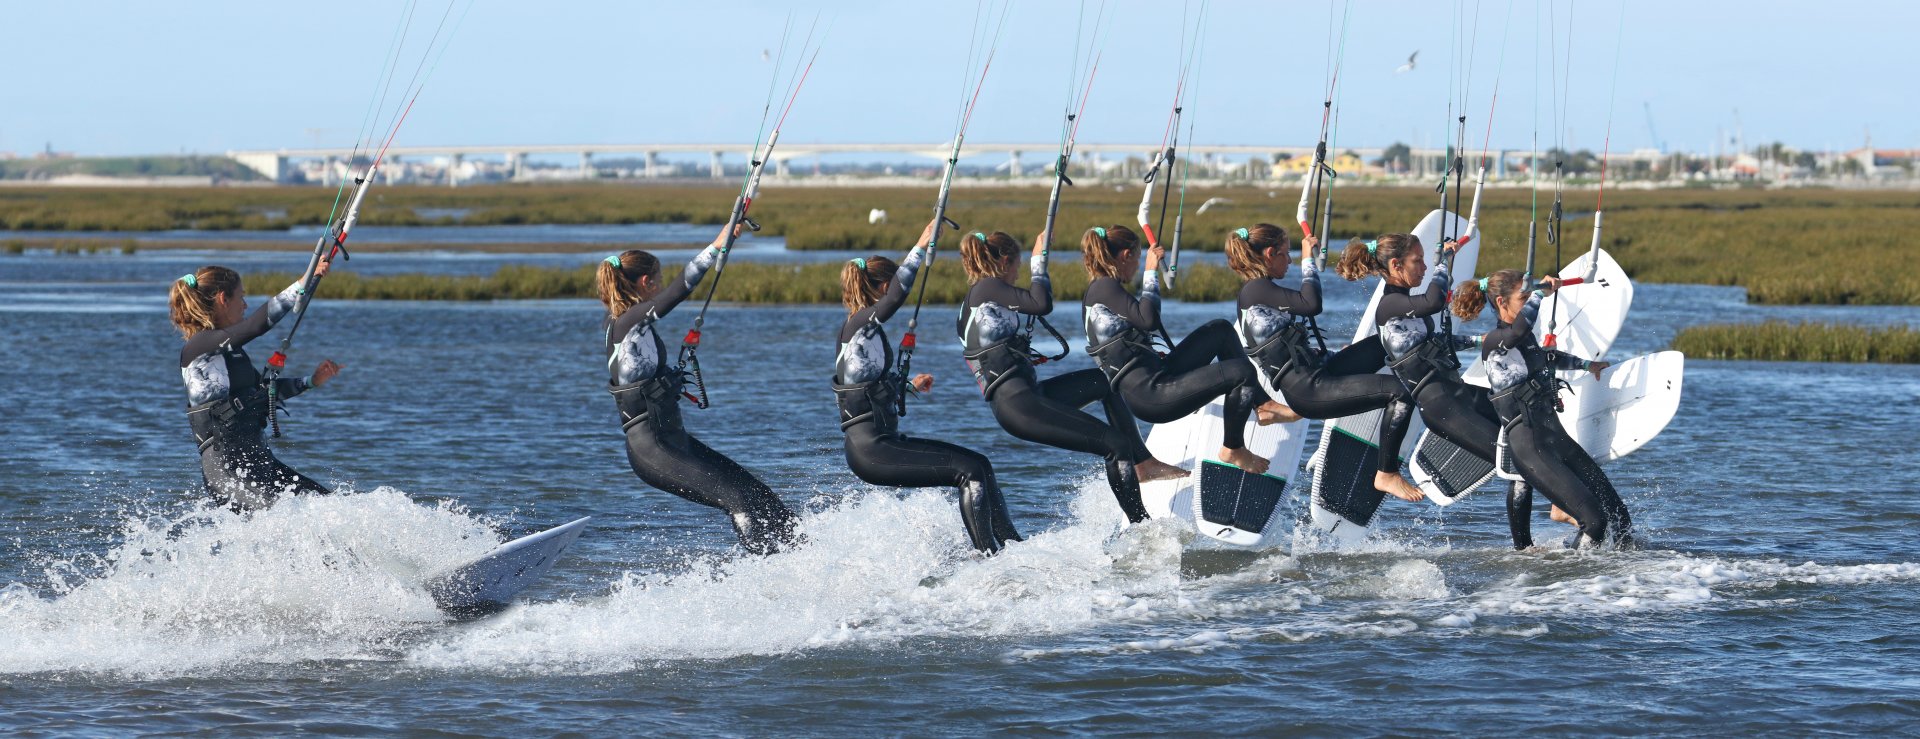
Juggling Pic E.
Can’t have a move that doesn’t require a modicum of multi-tasking:) Actually everything has its order so it’s more of a choreography that will get simpler with each attempt. Once you’ve stamped and the nose is rising you have three things to do. First job, pull the bar in. This will give you some float and time. However, you don’t want the kite to steer off behind you, hence the centred hand and the kite hopefully being at 12. Second job is to aim for the grab. There are in fact two ways to catch the board. The method that we’re using here, to catch the board in your hand. Or you can use your arm and clamp the board between your side. We like catching it as it’s secure, stops the board hitting you or your harness and leads to the air gybe. However, if you’ve got an old heavy tanker or sore knackered thumbs you can give the clamp a go. Third and final job is to get your feet up and out of the way so that the entire board can lift of the water and move towards you. In the pic, Karine has pulled the bar in for lift, she’s reaching forwards for the grab and with her weight held in the harness she’s lifted her back knee up to join the front one, so that her legs are out of the way.


How’s that? Pic F
A well held catch. Another huge advantage of using your hand to catch the board is that you have more chance of making it. Your hand is mobile, so you can move it as the board moves towards you. Sometimes it may pop away in front, whilst at other times it may disappear behind you. With your hand primed, you can focus on the board and pluck it from the sky. Here Karine’s feet are out of the way, the board is completely out of the water and she’s grabbed it in the middle of the rail with her front hand. Karine has her bar in and is gently floating down.
The Kite Pic G.
As you touch down into the water it’s easy to gloat in self-satisfaction, however you mustn’t forget your kite. You’ve caught your board, you’ve put your feet down with slightly flexed knees to absorb any impact from landing, but you’ve got to get your kite fully under control. This means 2 things. Firstly, you want to get it back above you, or ever so slightly in front of you. This means levelling the bar, using the same wrist action you would when moving the kite down whilst body dragging, pushing your thumb into the centre line whilst lifting the heel of your palm. Secondly you don’t want your kite to overfly. Modern kites are not as susceptible to Hindenburging as those of a bygone era, but letting too much tension off the lines is never a great idea. To prevent this, keep your bar on the sweet spot, so that some tension is on the back lines. A final look at Karine, as her feet touch down, her legs are soft, she’s levelled the bar to stop the kite going back and her bar is in on the sweet spot. Now she can tuck the board under her arm and walk happily in.
Top Tips
Water depth. Realistically you’re looking for knee deep or just a little shallower to learn this dismount. Even though you shouldn’t be going quickly you can still get it wrong, and some good old H2O is a preferable buffer.
Having your front foot that little further back on the board prior to carving will do wonders for getting the nose up. At first the board may seem nervous, but that’s what you want.
Make sure that you start with your kite around the classic 11 or 1. This way you can edge upwind and be in control. Lifting it from here means that you’ll get the lift by 12 and have more chance of success.


If the wind is very strong, be aware that rather than lifting your board, it may well hurl it at you.
Have a look through the sequence and videos...
Common Mistakes
The classic for this move is getting pulled back by your kite, whether you’ve got the board or not. This is because your kite has travelled too far back into the other side of the window. Most likely because you started with it too high, and or you waited too long before stamping. Start the kite a little lower and be ready to stamp. Anticipate the kite rising and your carve so you can go early.
Jumping off the board, rather than it lifting. This is when you’re too keen on the bar, so as you stamp, you’re already pulling in on the bar. The result is that the kite lifts you before you’ve had a chance to use the springs. Stamp first, then pull the bar.
Board flying off in front of you. This is a result of leaning back as you carve. Keep your shoulders parallel to the water and break at the waist so that you’re over the board

Board flying up behind you. Very likely a result of not carving enough. With too much speed as a result and therefore forward momentum, the board pops up as it should, but you’re overrunning it. Slow down a tad and make sure you drop your weight onto your heels as you carve.
Keystones
- Back hand centred, front foot back
- Steer kite from 11 or 1
- Carve with bar out
- Stamp, lift then pull and grab
- Don’t forget the kite!
This technique article was in Issue 86 of IKSURFMAG.
Related


By Christian and Karine
Christian and Karine have been working together as a coaching team, running improver to advanced kitesurfing clinics since 2003.
