
Heel to Toe Carve with Spray
Technique / Beginner


Introduction
Everyone loves a decent toe to heel carve, pushing against the back foot, throwing up a wall of spray like Andy Mapple on the slalom course. Funnily enough, we don’t often witness people wanting to light it up heel to toe. Odd when you compare it to other sports where toe edge carving is the dream, a searing frontside bottom turn at lined up J-Bay, flying backcountry powder in the mountains and of course the afore mentioned biceps behind the boat. Well, we were recently inspired by one of our guests, Dr Wolfi, who had the badest, most radical hell to toe that we’ve seen. He may by chance be good going downhill on a snowboard in hard boots! Not sure if we’ll do him justice but as a result here is the Radical Carve (read spray) a la Wolfi. And yes, it was on a twin tip.
The attraction of this move is that it is fully achievable; it can be worked on to become more and more extreme, more lean, more spray, more stoke. All you need is a flattish piece of water, a board and a kite – simples. Let’s have a look at what is involved...


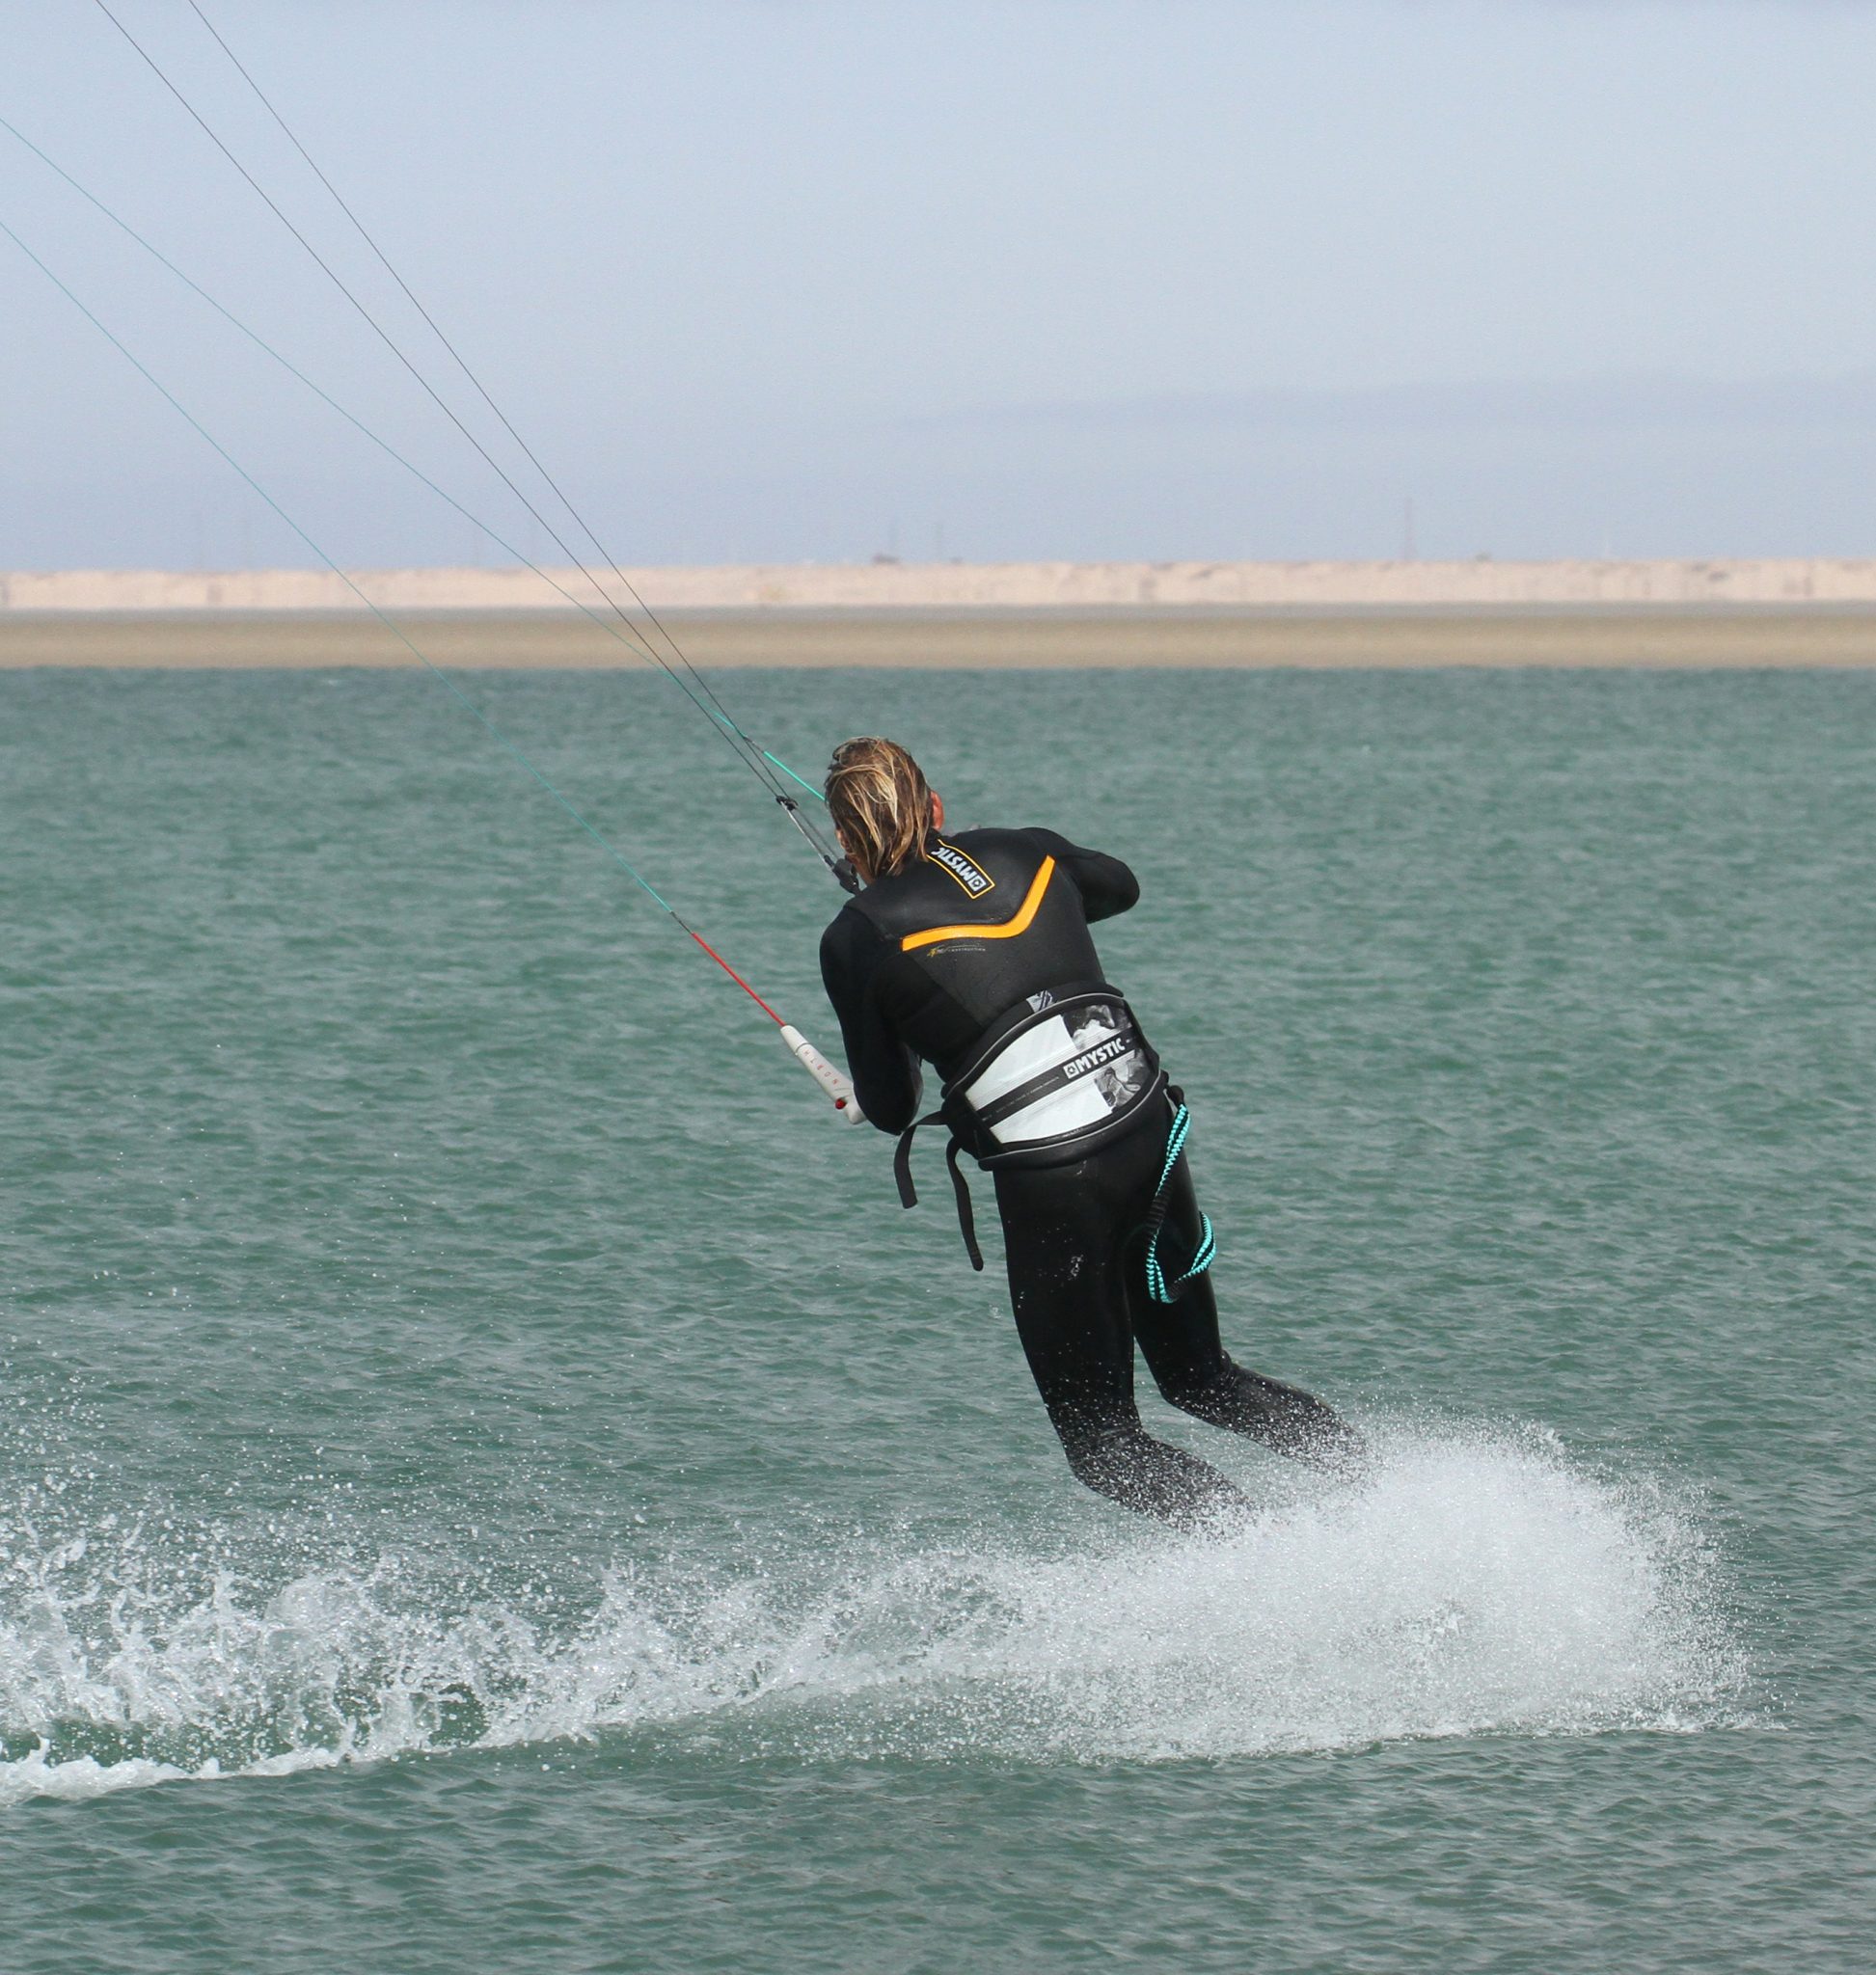
The Set-Up – Think Low Pic A.
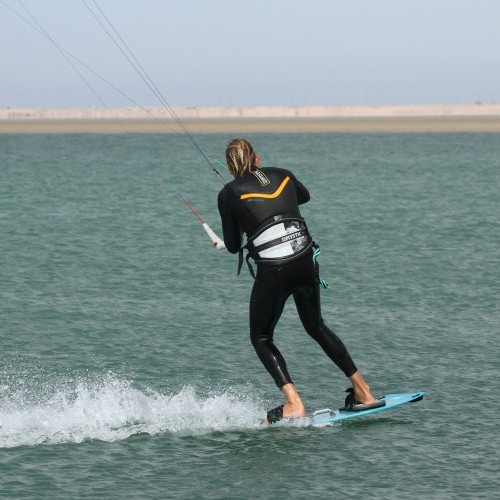
If you want to throw some spray and commit into a good carve, you do need power in your kite. Although the timing is important, even good timing in marginal conditions, underpowered with feel underwhelming, and to be candid, smaller kites, with their quicker turning response will also help. With this in mind, you’ll also be hunting out some smooth water, which will help at first. Kite position wants to be quite low, so let’s start at about 45 degrees. You aim to cut the top off your wind window, and if you start high, it’ll be tricky. The ideal height will depend on how powered you are and how strong your carve becomes. Too high and the kite will lift and take a shorter route, which may lead to slack lines as you finish your turn. Throwing it from too low may overpower you if you’re not yet carving solidly, but in most cases, this will give you more pull at the end when you need it. Sweet spot wants to be in a manageable position, out slightly as per jumping. Hands can be centred on the bar to help once you release a hand, but bear in mind that the kite will be less responsive when you throw it with your hands together, so again, find a balance that suits you. You need to drop your hips, sitting down slightly, so that your knees are bent, but you’re still edging. And finally, you need your weight over your back foot. Most twin tips, unless wakestyle rockered, will slide out if you carve with weight towards your front foot. Christian is approaching upwind, on the edge, with speed, kite low at about 45, both hands on the bar, weight dropped low upwind of his board and onto the back foot and knees bent.
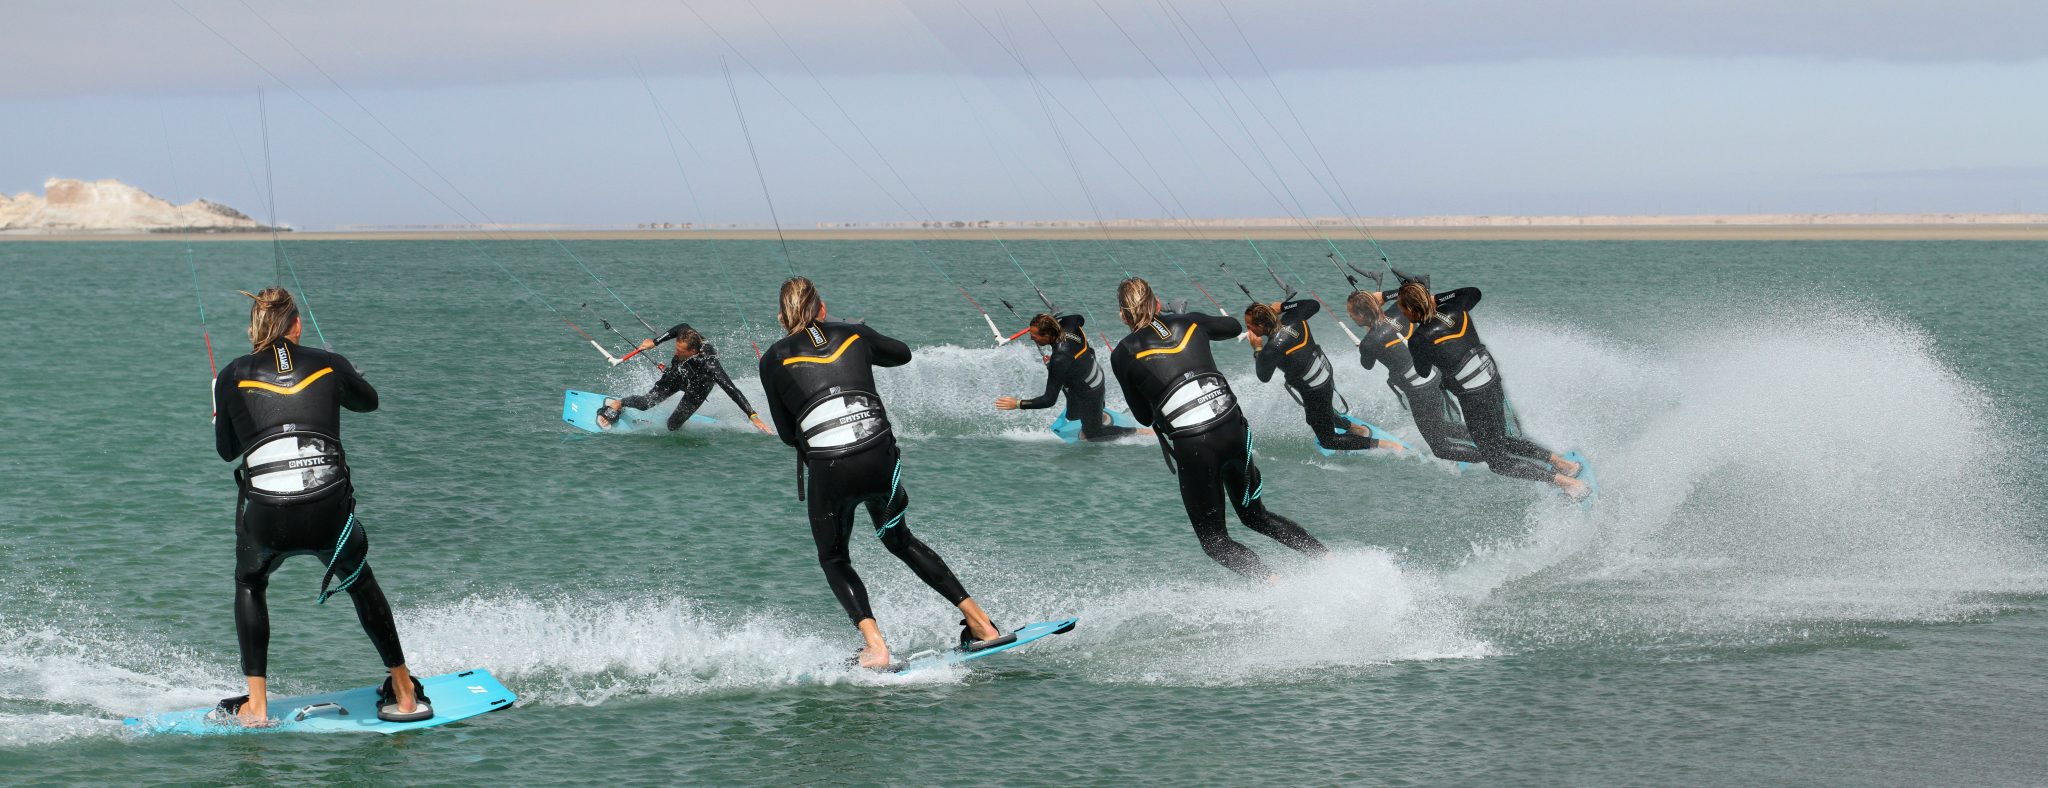
Kite First Pic B.
If you’re not versed in the arts of strapless but are used to carving onto your toes on a twin tip, this is likely the biggest difference and most needed change. Gone are the days of flattening the board off, getting yourself carving and then moving the kite. Here you’ll be getting the kite set on its path first, and only then getting the board off your heelside edge and into a carve. To cut the window you need tension on the lines, hence the edge. And to guarantee that the kite turns quickly and cuts across you need to be aggressive with the bar, using both hands to push and pull, on the sweet spot, so that the kite turns as quickly as possible. You can see that Christian is still low, still on an edge and still has his weight back. He’s now given the bar an almighty push-pull to turn the kite back the other way in the smallest radius possible.
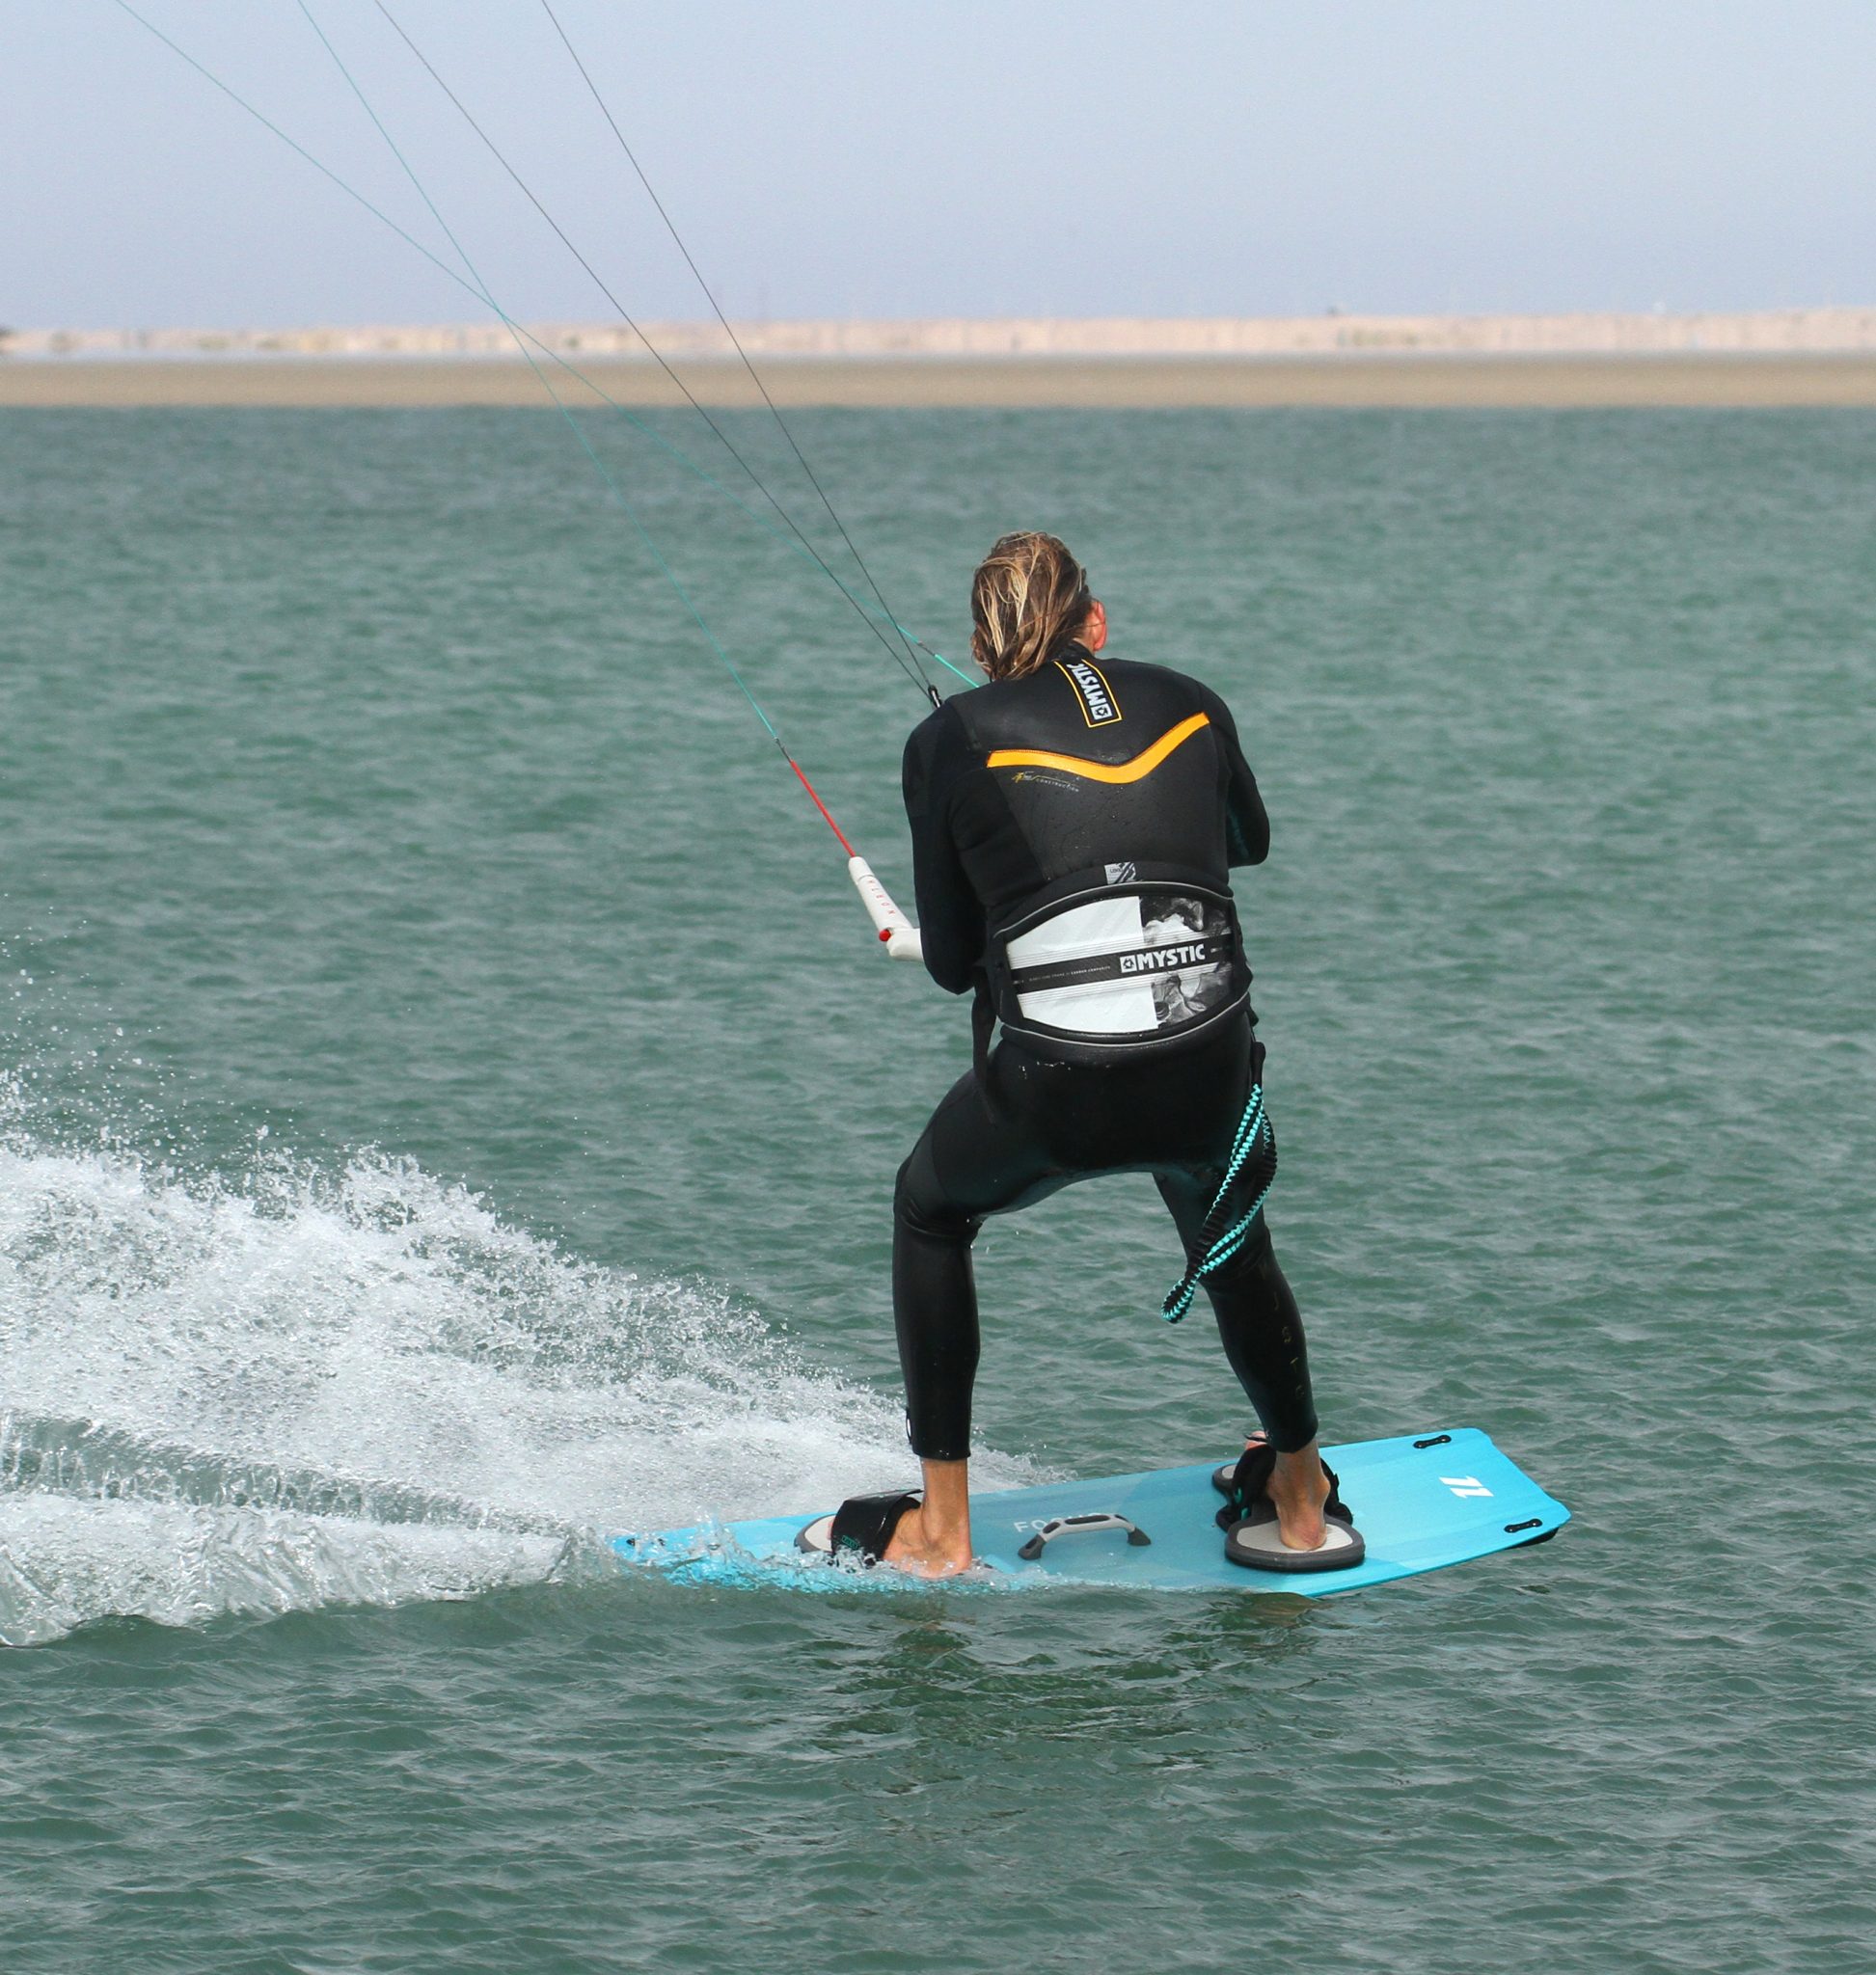
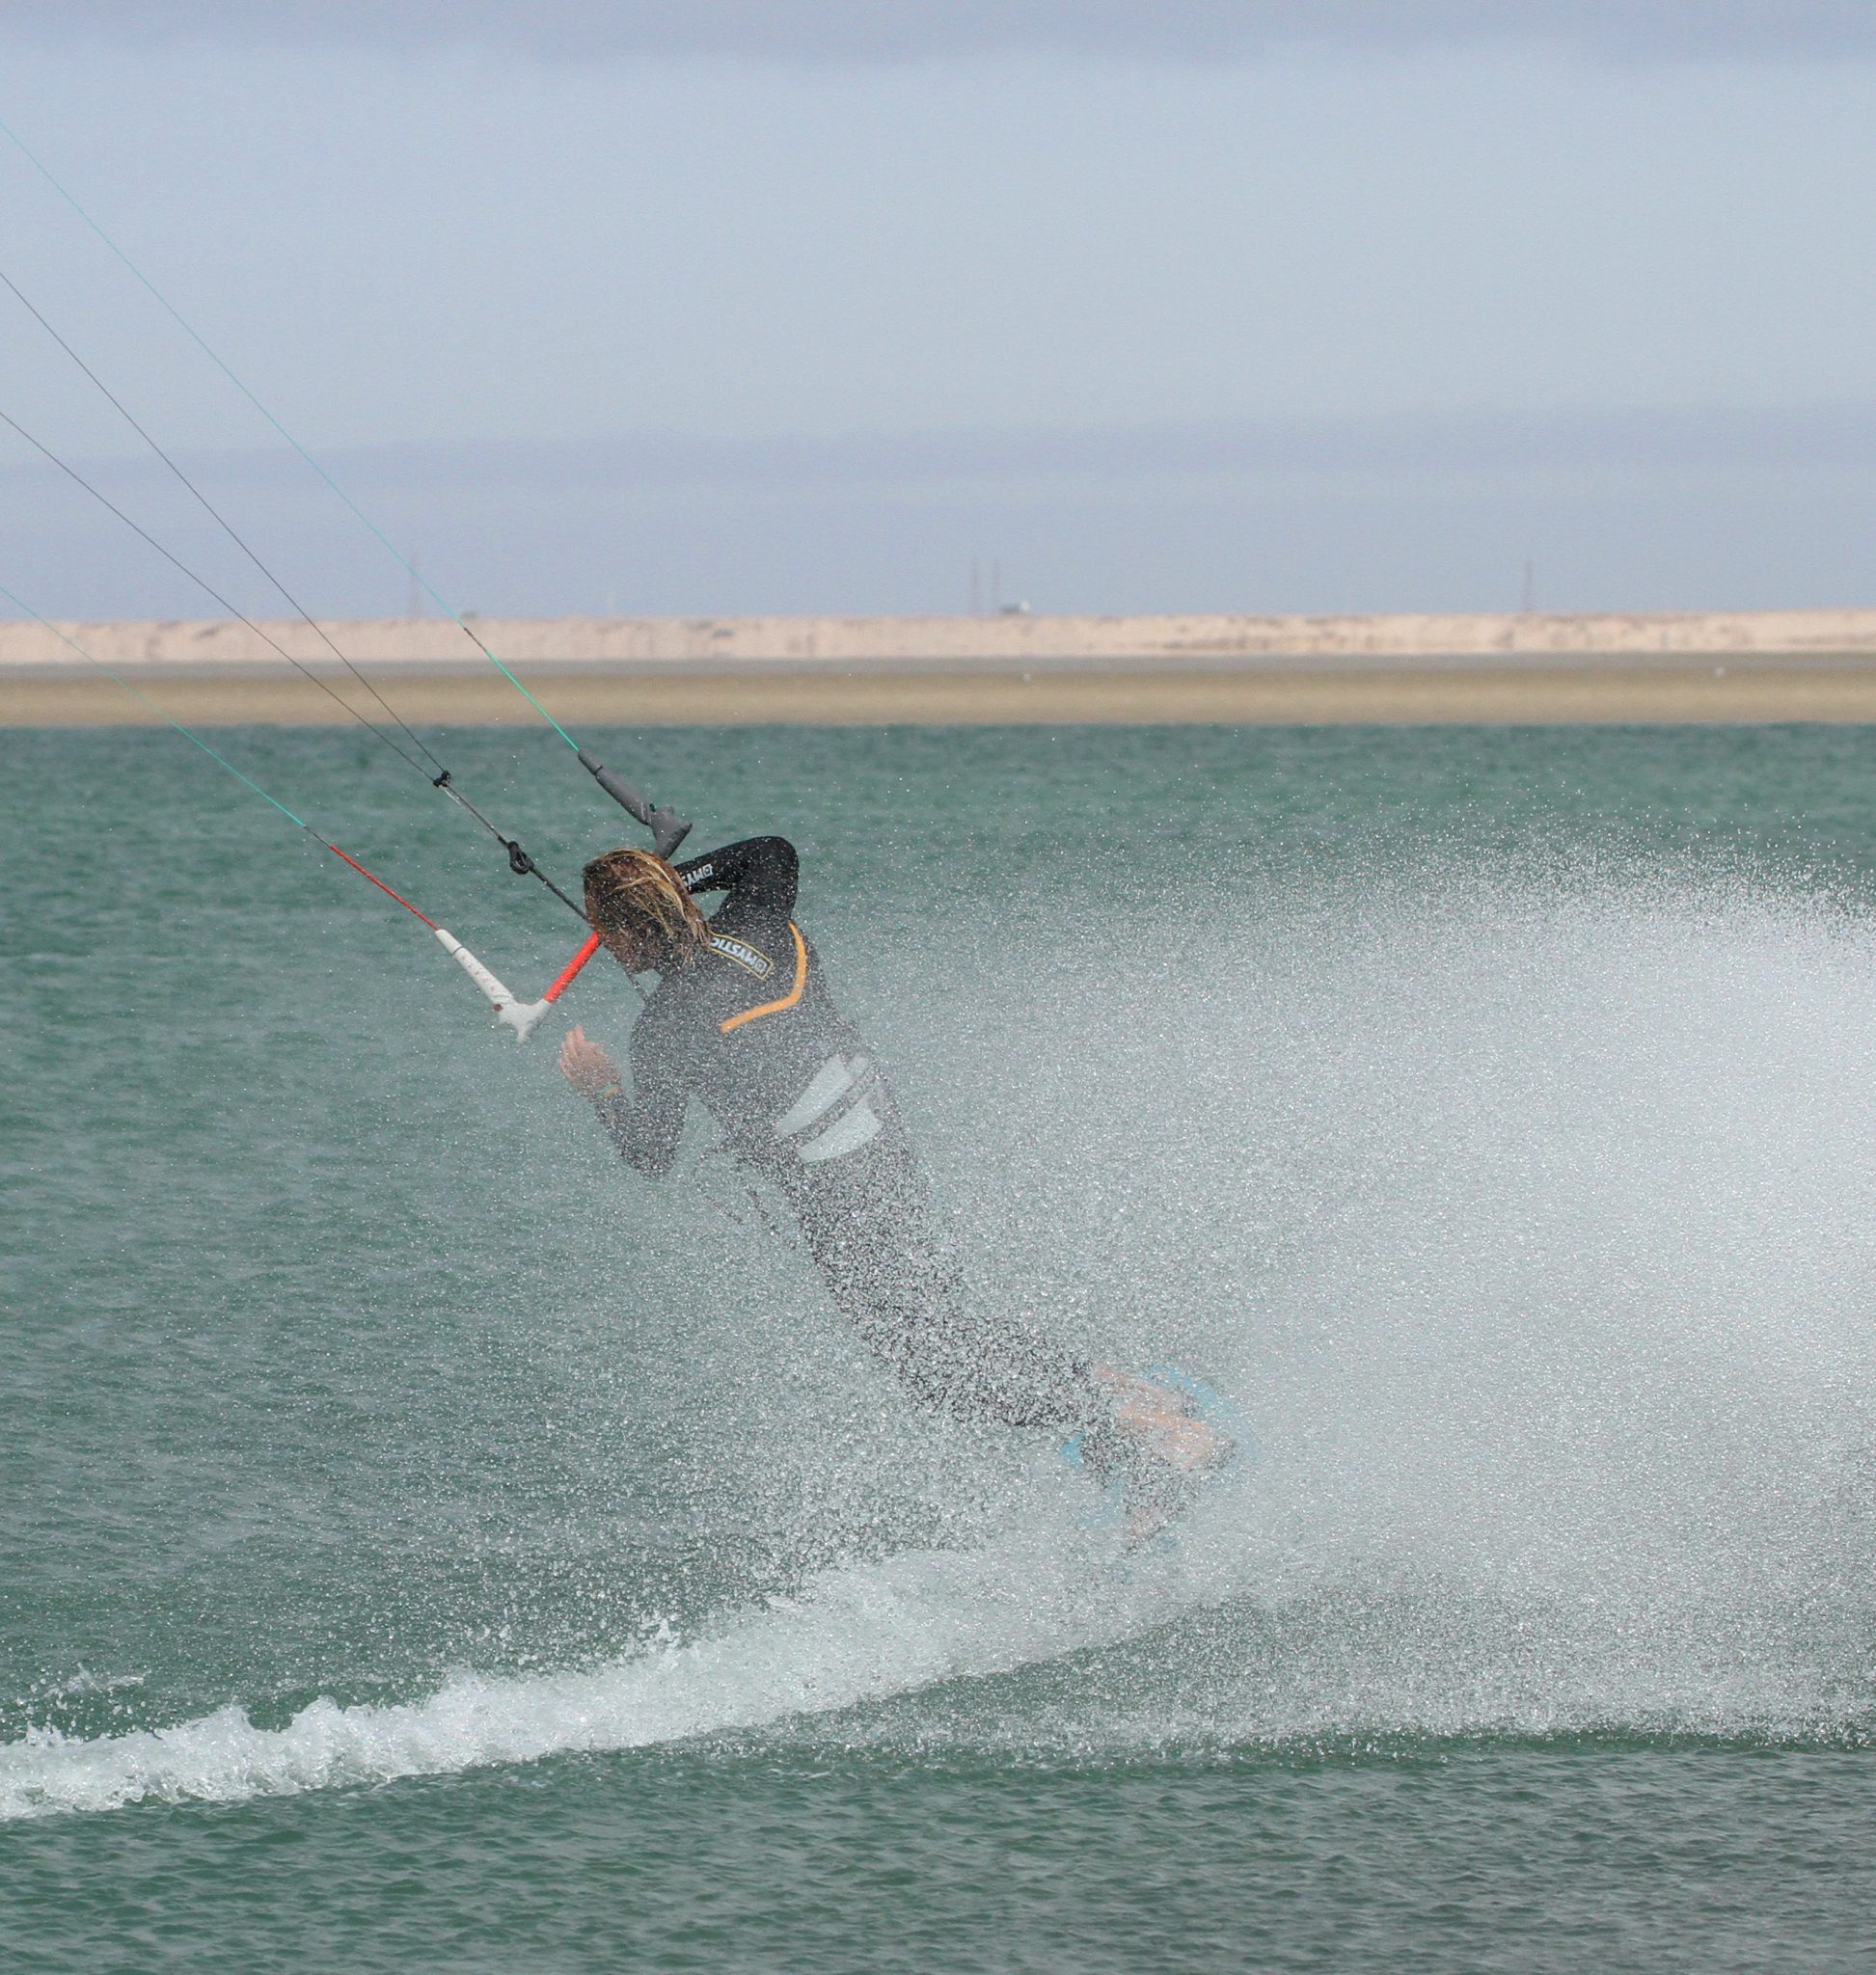
Carve On Pic C.
Once you’ve sent the kite and it turns to go back through the window, you can get your carve on. However, it is worth taking a moment to reflect which way we carve! You carve in a semi-circle, which means that even though you plan to turn and go back the other way, first you must carve forwards to your downwind point. Momentarily your kite will be flying one way, and you’ll be going the other. As long as it’s cutting deep through the window, you’ll be fine. If it goes up over the top, you’ll lose tension. To get the carve in motion, keep your weight over your back foot and allow the pull of the kite to pull your hips and body up over the board, which will flatten it, from here you can push your knees across which will set the toeside edge and get you tracking around the semi-circle. Don’t be too aggressive at first, as you want to place your edge in, not force it. Here Christian has shifted his weight across the board, flexing his rear ankle and pushing his knees towards the centre of the turn. He is still turning the bar, in on the sweet spot. Most importantly, he’s still looking forwards, not back towards where he will go, but downwind towards the apex of his turn.
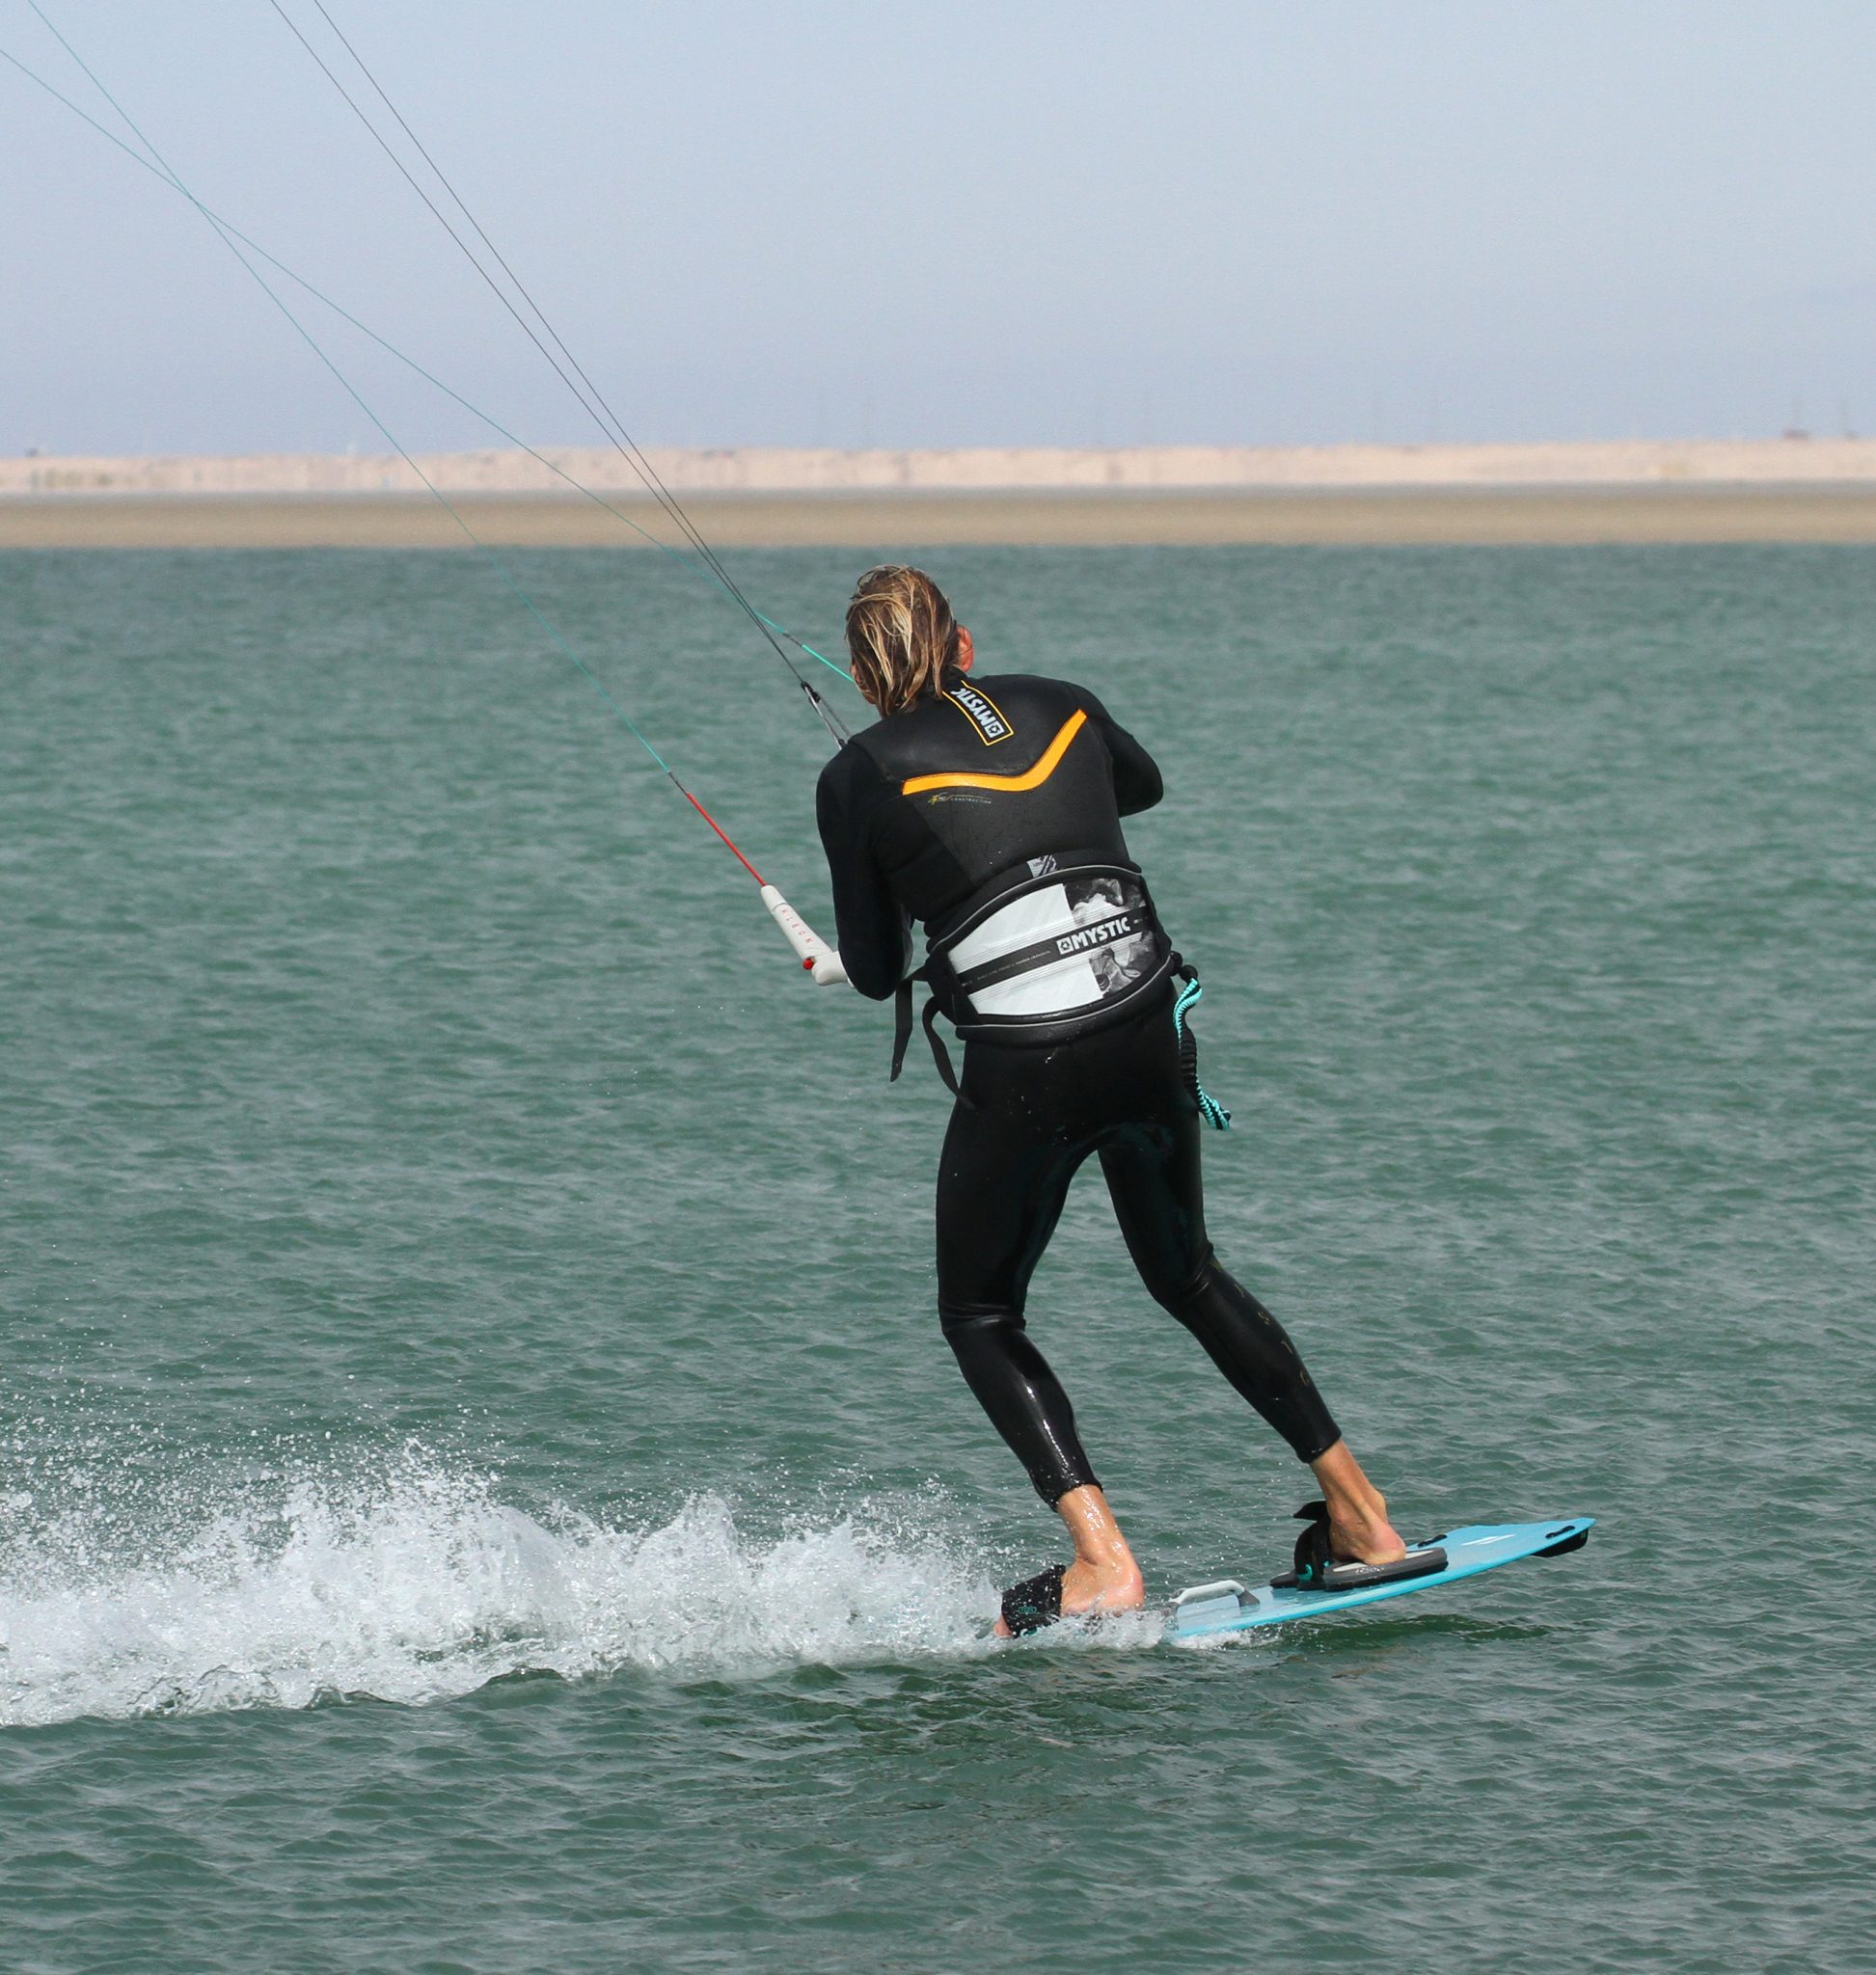
Commit Pic D.
Now that you’re carving happily, the board is set, the kite is flying across the window, you can commit more weight and edge to carve tighter and throw more spray. This all comes from the ankles, knees and hips. Think of your body as being a pole attached onto the deck of the board, perpendicular, so that if the board is flat, you are vertical. The more you bank the board, the more your body needs to lean. And the more you lean your body, the more the board will bank. Bending at the waist, however, is not committing into the turn, your lower body will be left where it was, and you’ll end up off-balance. Looking at Christian, his ankles are flexed; both his knees are pushing across the board, and working together, so that both knees are pointing forward. This is a result of his hips and shoulders, which are still open, facing forwards along with his head. He’s still steering the kite across, and the bar is still on the sweet spot.

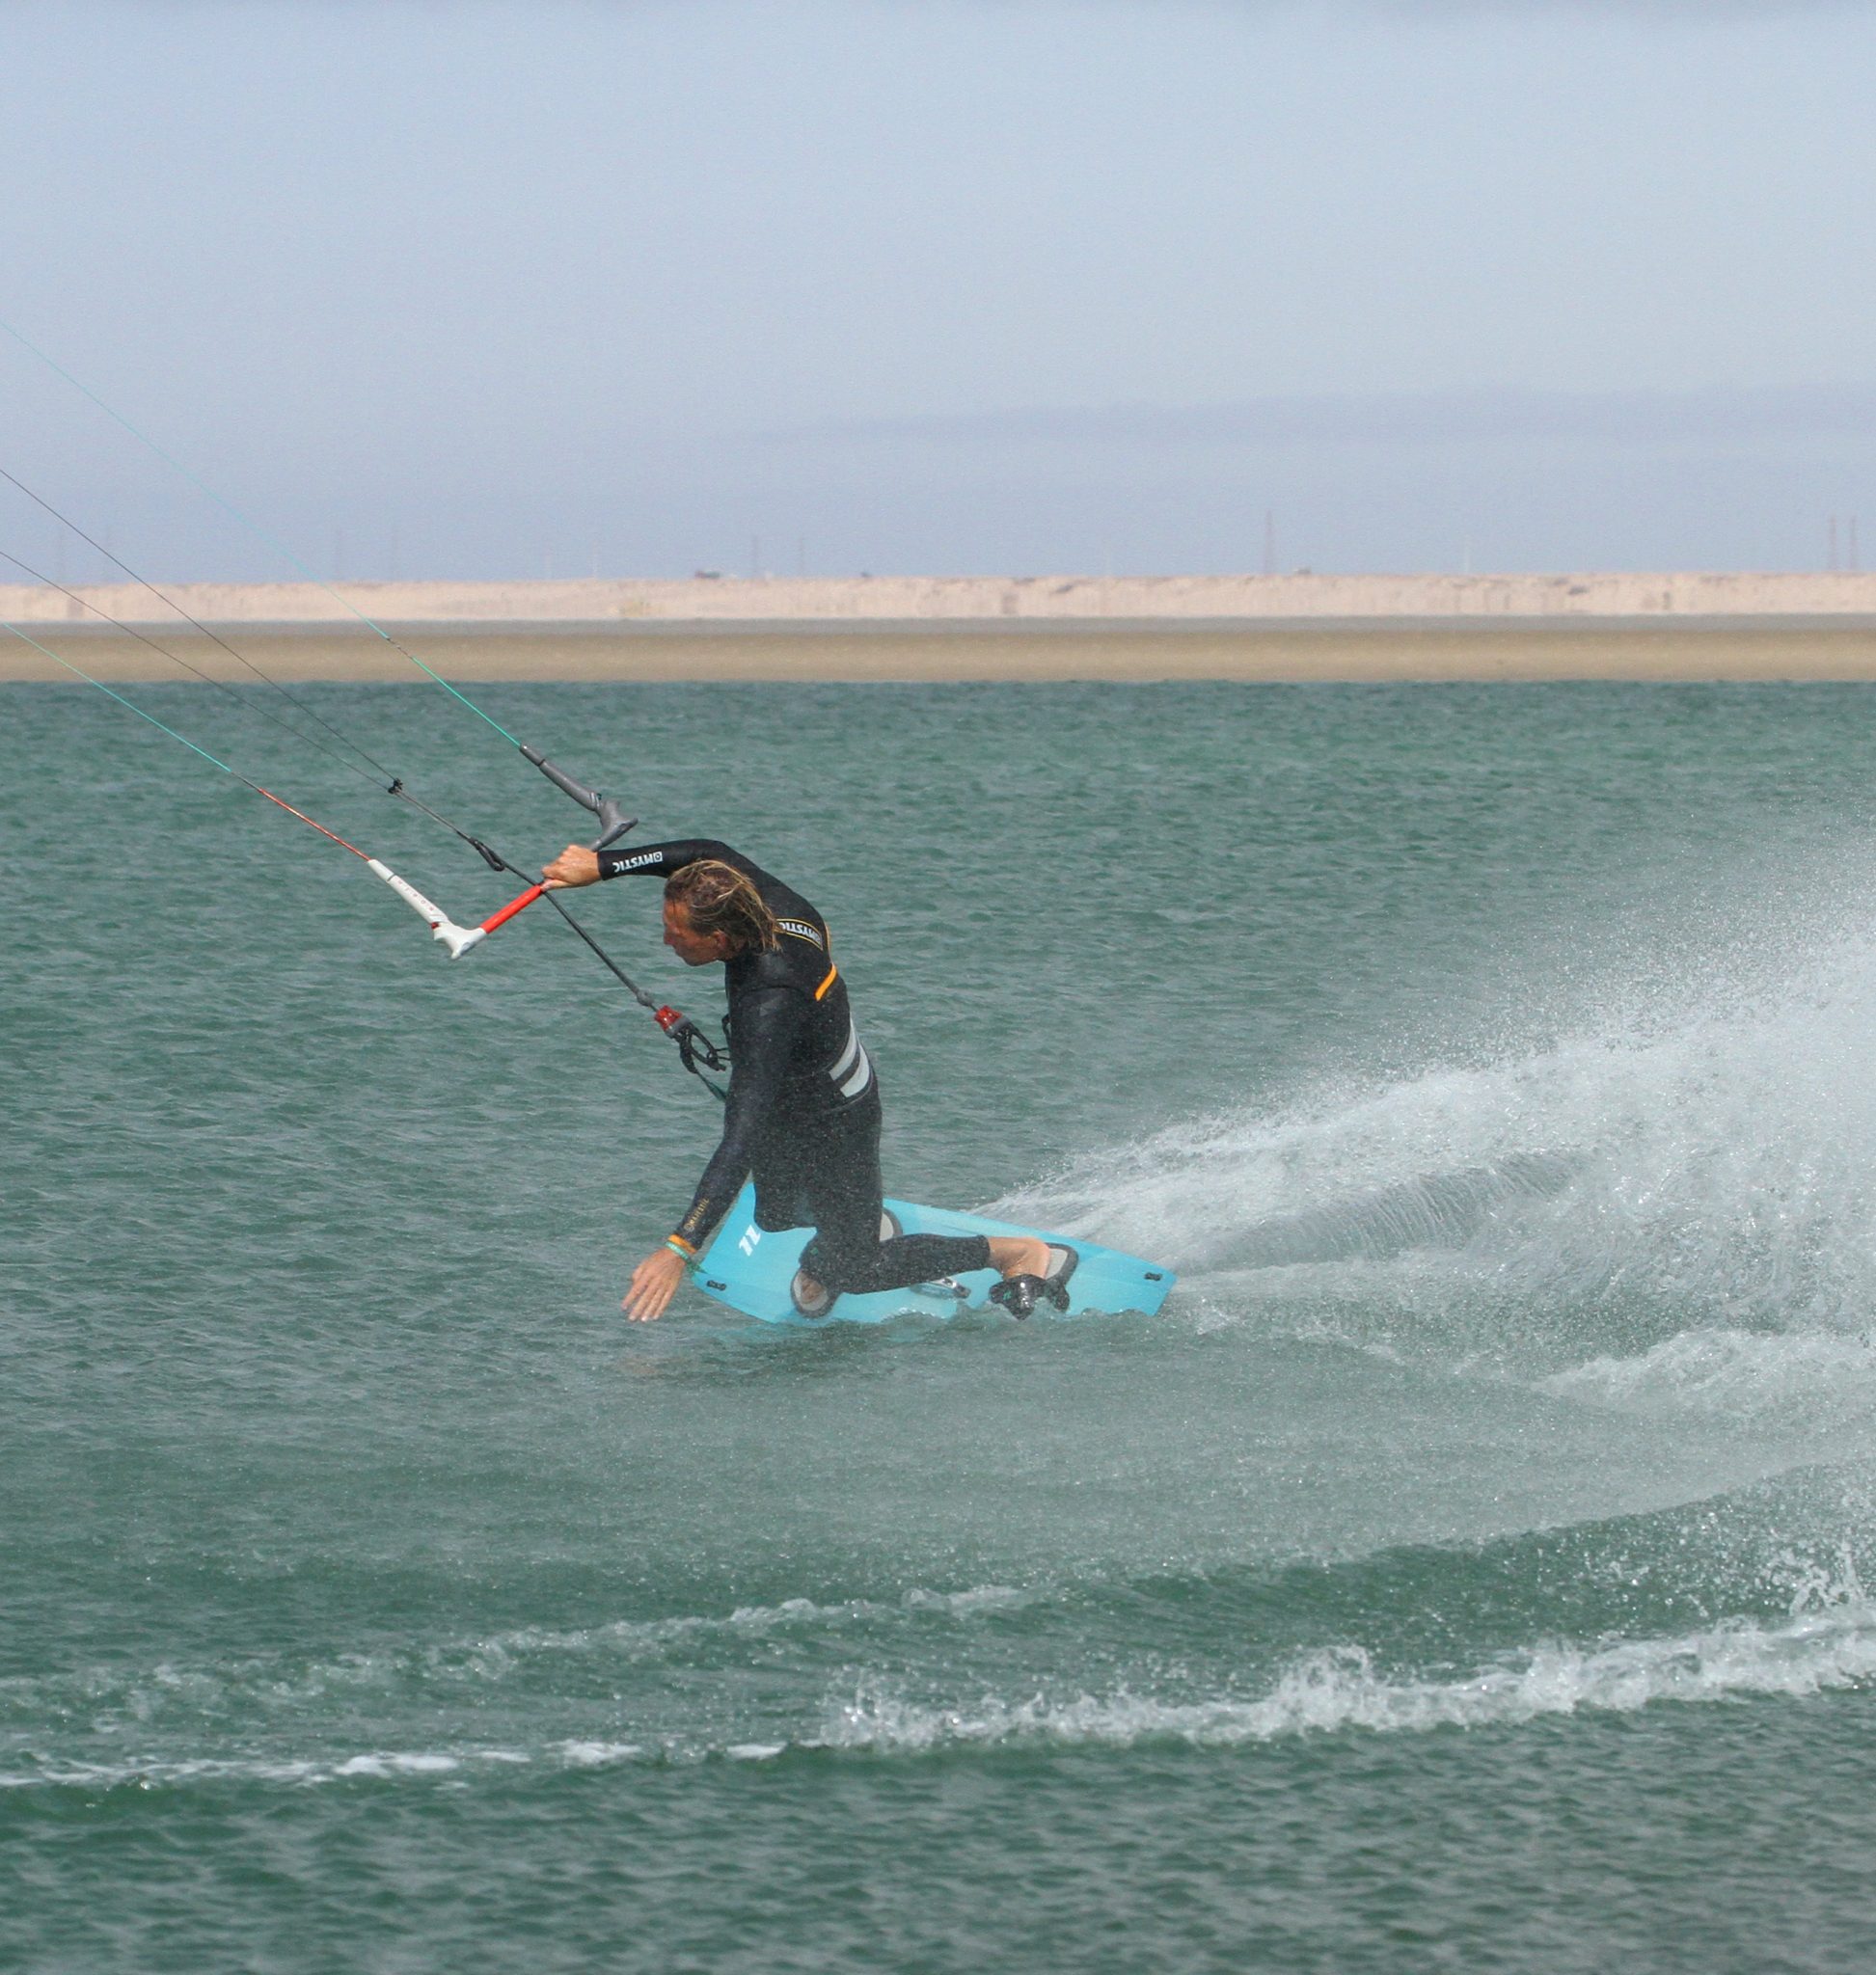
Lean and Drive Pic E.
As you round through the downwind point of your carve, you may need to sheet out if you feel too much power from the kite. If you don’t, the kite will pull you downwind and stop you carving. This is the point when you must concentrate on carving and not worry about the kite, your aim is to finish the turn, so if it’s too much let the bar out. With the board turning you can lean more into the centre of the turn, release your inside hand, and then drive the board by extending your legs and body, pushing yourself against the board, which will add power and speed, but even more importantly, it’ll add to the spray factor:) You can see that Christian is leaning in, but standing up, pushing his weight onto the edge, driving the board around the turn and forcing water into the air.

Wings Pic F.
To keep carving with speed, it’s essential not to sink the tail of the board too much. You need to keep your weight forwards, without actually pushing down on your front foot, which could then slide the tail out. The secret here is to keep your chest open, facing forwards. Picture your arms as wings, with one each side of the board. This way, your body and hips will stay open, your knees will continue to drive together, and you’ll keep carving. Try and keep your free hand forwards, don’t let it drift back behind you as it will then pull your weight back. In the pic Christian’s body is open, and even though the bar is out and there’s a bit of slack in the lines, he can still drive around the carve. Rather than thinking of pulling the bar in for tension, Christian is aiming to turn his board back upwind and regain tension using his edge.
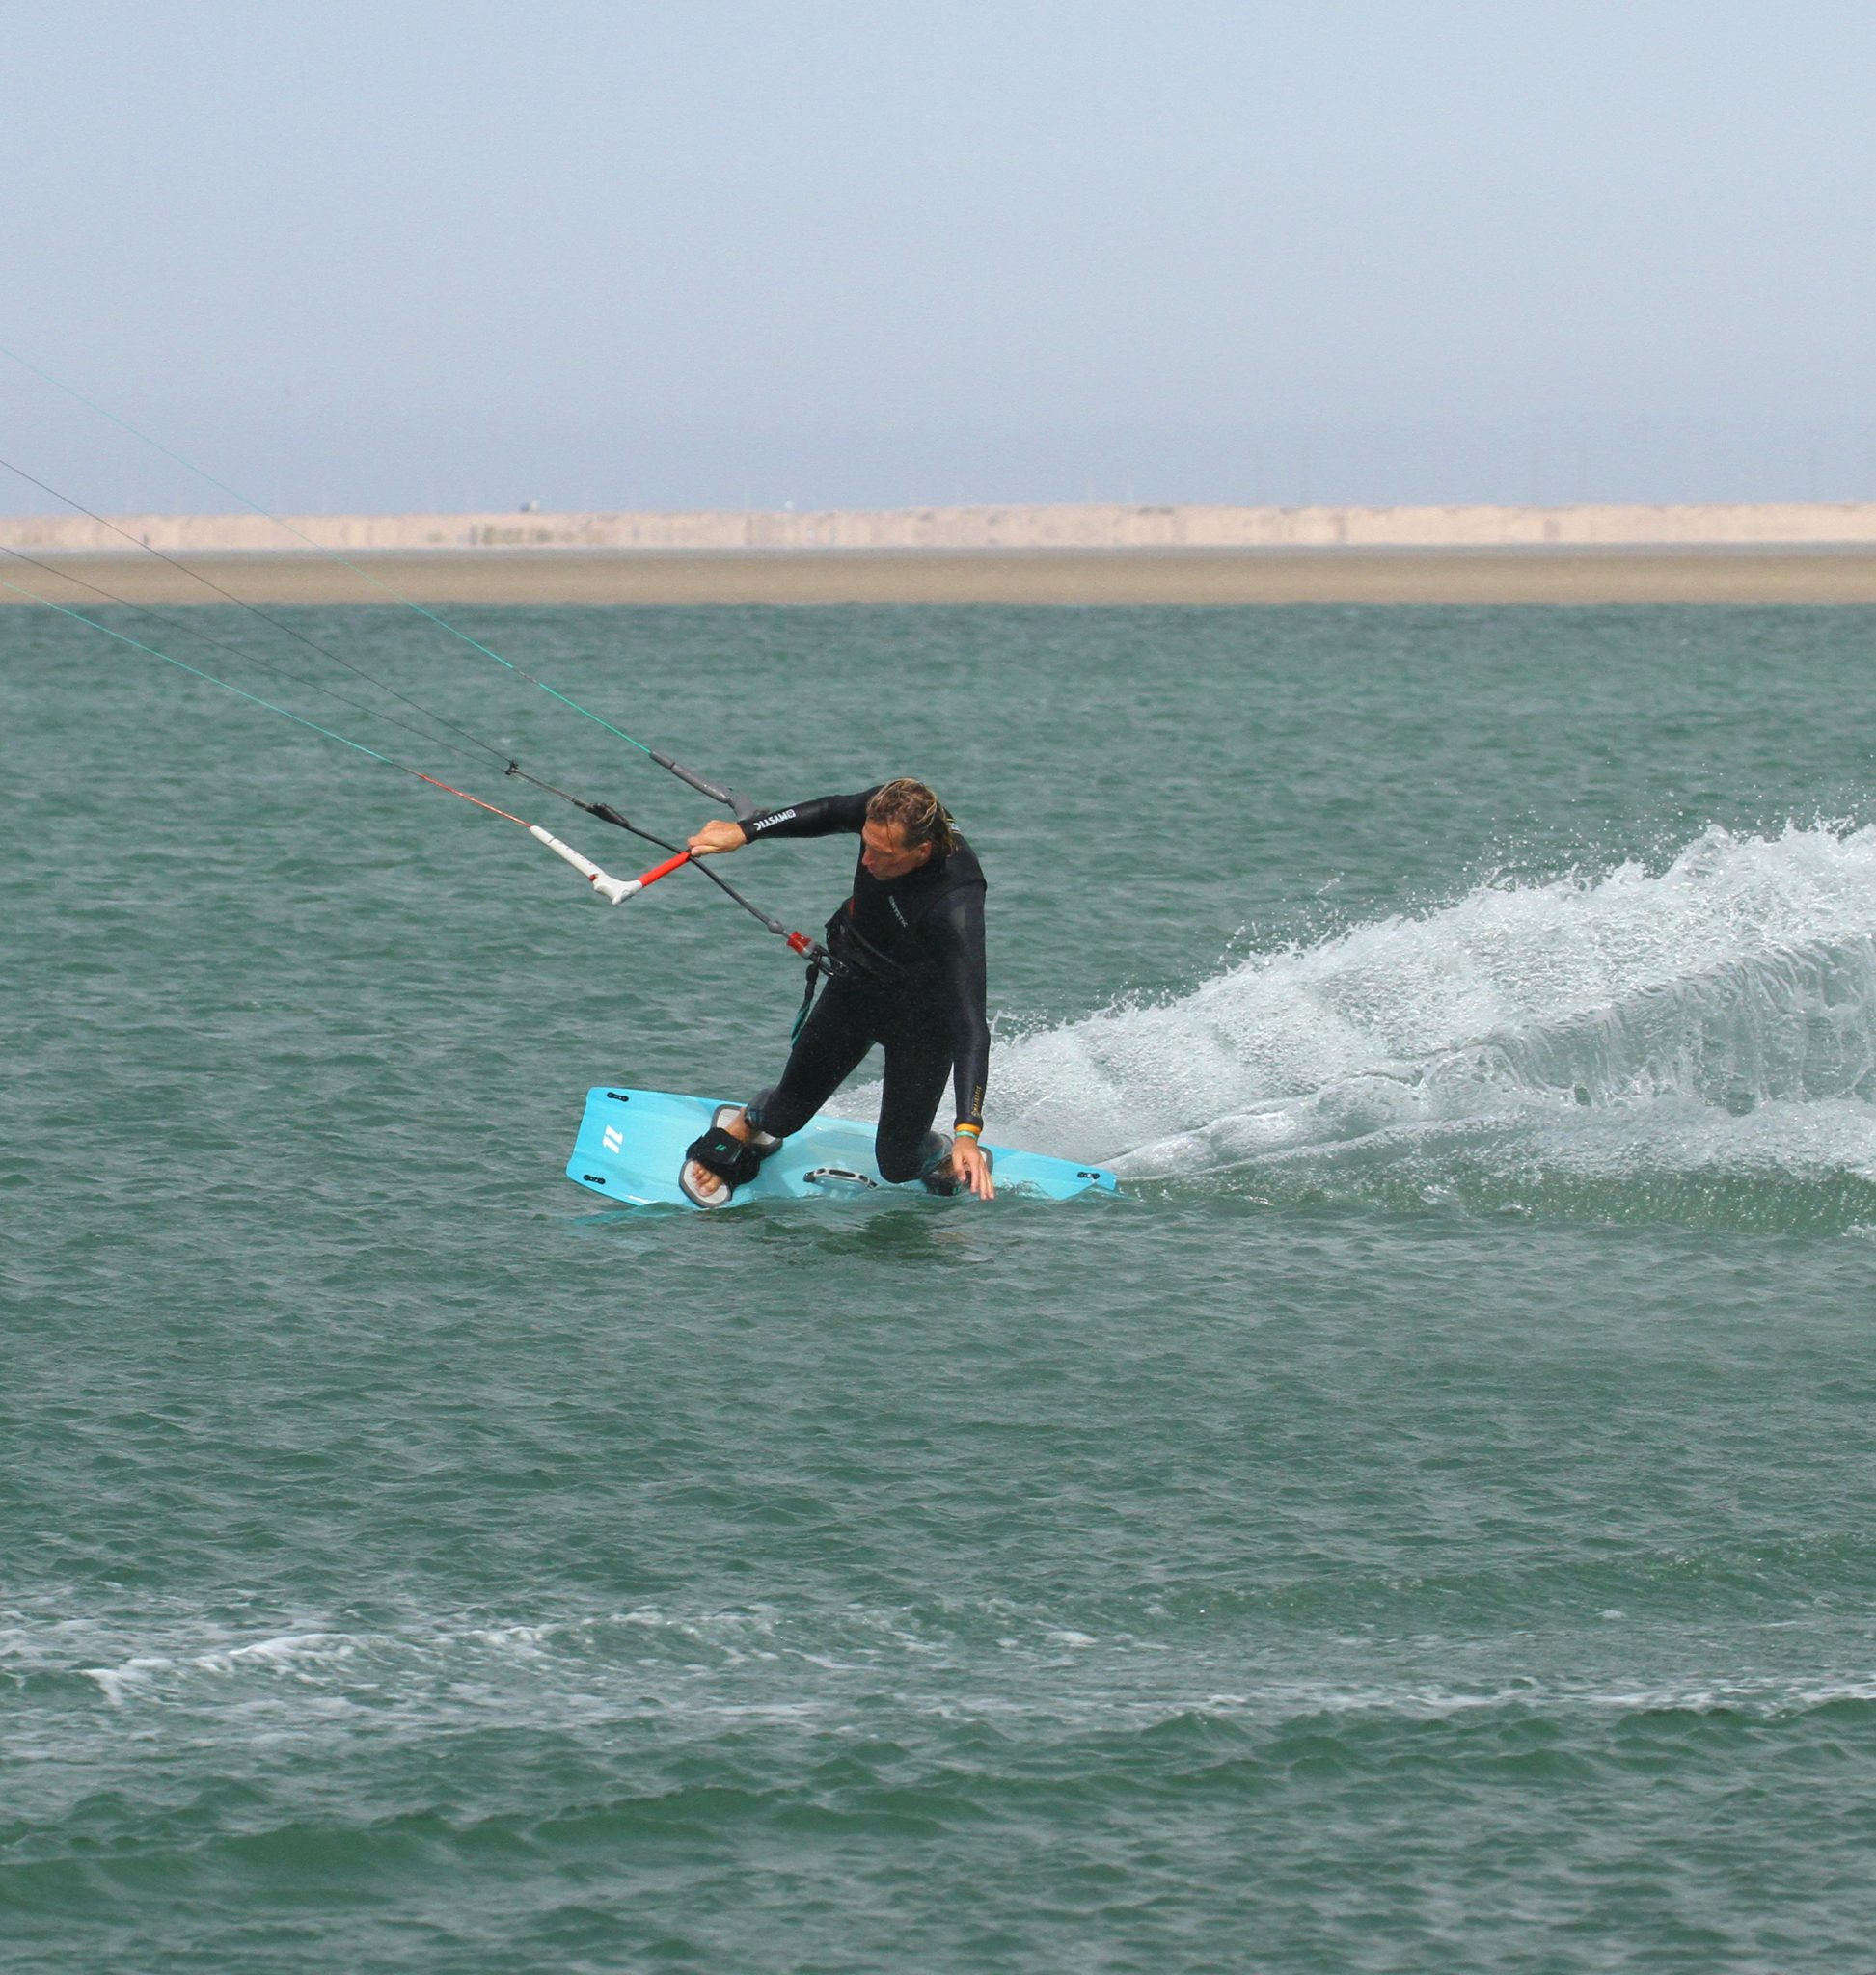
Back on It Pic E.
The final push for the summit, finishing your turn. By completing your turn, we mean that it should end with you being back on your edge, riding upwind, and aiming to cross your approach wake. Christian is now finishing the carve by getting back onto his edge, he’s turning his shoulders more upwind, he’s reaching upwind with his free hand, and he’ll start to pull the bar back in onto the sweet spot. The point to note here is Christian’s knees; they’re almost knocking together. This is a good thing, as the back knee is still driving forward. The legs akimbo heelside stance is not welcome here. Think back to carving snowboards, or surfboards, the back foot will be angled forwards to help keep the knee in this position.
Top Tips
As with all moves you want to build up to this. Your first port of call is getting used to steering the kite while still edging. You’ll also want to concentrate on getting low on your approach. Many of us kiters struggle with this as we spend most of our time pushing and extending, not squatting down in a dynamic carver stance. If anything at the beginning make sure you start the kite moving while on your edge, but to make life less dramatic you can be more gentle with the bar so that the kite doesn’t move too quickly.
Have a good look at the sequence and videos to see how you’ll be doing it. And apologies to Wolfi for not getting as low as he’d deem necessary;)
Common Problems
The first problem that you’re likely to encounter is feeling overpowered by the kite when you steer it while still edging. The beauty is that even though you can get it turning with two hands, as soon as you feel too much power, you can sheet the bar out to regain control. However, do remember that if you mistakenly stall the kite while steering it, and you then let the bar out the kite will pull even harder as it breathes.


There may be times when you feel that the board is sliding out when you start to carve. Some boards by nature carve better than others, but as long as you have more weight on the back foot, anything will go. Remember not to stamp your edge in, come across onto it from the back foot and feel it in, don’t just throw yourself across.
If you find that there is too much slack in the lines as you come around to toeside. Two possibilities. Either you took the kite too high and over 12 o’ clock, which means that the kite flies up above you as you carve underneath. In this case, be more aggressive with the bar. Or you’re leaving the bar out too long. Yet again depending on the style of kites, some will fly off to the edge of the window very quickly if you sheet out. If so, make sure you sheet out when the power is too much, but then pull back into the sweet spot as soon as you recover.
And finally, if you’re getting no spray! This can be a speed issue, but more often than not, it’s because you’re pivoting and not carving. When you turn your head and shoulders to look back where you want to go, it throws all your weight over the tail, and you stall, sink and pivot in a tight radius. Keep your body open and look forward towards the apex of the turn, not back, and you’ll get your carve on for sure.
Keystones
- Low, on an edge, kite 45
- Kite first, two hands
- Flex ankles, knees across and engage edge, looking forwards
- As carve drive knees and release front hand
- Extend against the board to finish turn
This technique article was in Issue 76 of IKSURFMAG.
Related


By Christian and Karine
Christian and Karine have been working together as a coaching team, running improver to advanced kitesurfing clinics since 2003.
