

Fix Your Toeside
Technique / Beginner

Introduction
Toeside is wonderful. It's an enjoyable skill and an absolutely fundamental part of kitesurfing. It opens the door to a myriad of tricks and other playful worlds such as carving, wave riding, surfboards, and even foils. Being able to use, enjoy and ultimately harness the benefits of both sides of your trusty steed can only make your time on the water better. That said, however easy your local toeside legend makes it look, there are a few challenges on the way that often lead to a literal sinking feeling or disappearing on an uncontrollable downwind death run when it's super windy.
As such, it's not uncommon to grab Hercules' broom and brush your toeside under the carpet for another day. If you have been giving toeside a wide birth of late, today is the day to rediscover your toeside mojo and rekindle your love affair with this feel good and look good move.


Before we delve into technique, we'll have a look at what's preventing you from toe side brilliance, and then we'll give you some tools to find your perfect toeside.
Along with all the photos and sequences, we also have a video to go with this article, so once you've read through this, please click play, throw the metaphorical broom away and welcome your toeside with open arms.
How You'll Get There
To keep all our and your focus on the toeside, we'll be concentrating on switching to toeside. In simple terms, this means changing the board and your stance to toeside whilst riding along in one direction. This is not to be confused with carving to toeside, which requires some previous toeside know-how, quite a bit of kite flying, and involves changing direction.
Your Objective
Toeside!? The essence of toeside in kiting is edging against your kite using your toeside edge. By its very name, it is easy to concentrate so much on your toes that you ignore everything else that's required. When you're riding heelside, it's not just about your heels, but rather everything working in unison from the kite all the way down through the harness, you and into the board. It's no different here. In actual fact, what you're aiming to do is mimic what you do heelside.
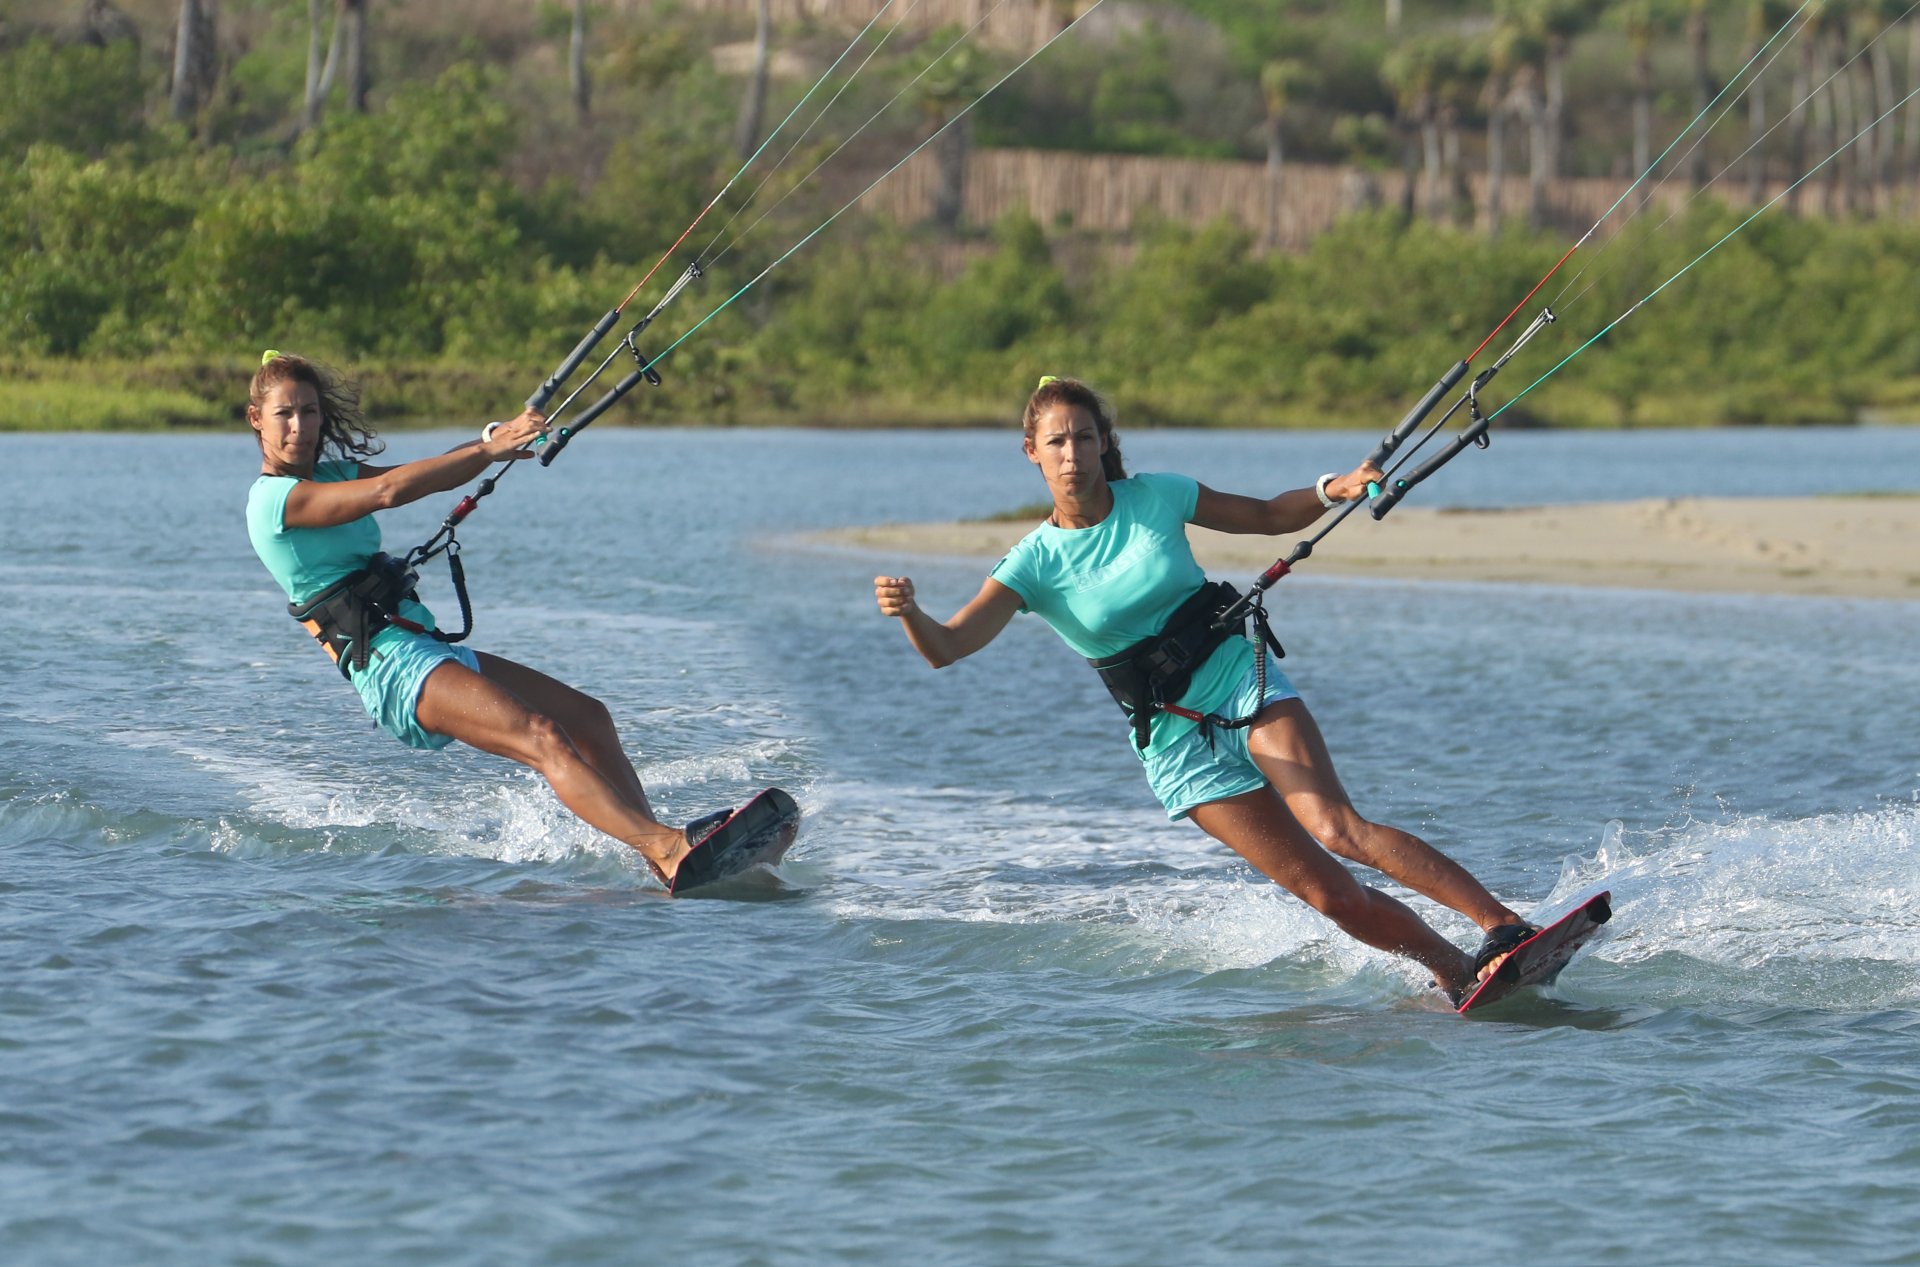
Pic 1. Here you can see Karine before going into toeside on the left, and once she got onto her toeside edge on the right. The kite is in the same place, the bar is doing the same thing, Karine's body is committed at the same angle in the harness, and the result is that she has a solid edge, and her board is doing the same thing too. This is what you're after, hardly the opposite of heelside, but really rather similar, just riding on the other edge of your board. Keep this in mind, and it'll stand you in good stead as we move forward.

Best Foot Forward?
One question remains, which foot forward for your preferred toeside? Experience states that everyone has a preferred front foot. For those with a strong, noticeable difference (ourselves included), you'll know from skidding on ice which shoulder you'd dip into contact in other sports such as skating, surfing, wakeboarding or snowboarding. It can be as simple as which foot you prefer forward heelside. If you prefer going left/port tack, then your left foot could be your preferred front foot. As such, you're stronger toeside will be left foot forwards, which means coming to the right, just as Karine is in this article. Here, Karine is right foot forward, but she switches to a left foot forward toeside. However, and but, this is not a given, so you'll need to experiment. There are many people who skate and surf with different stances, and some of you may be lucky enough to favour both.
The Usual Suspects
Know your enemy. If you've been trying but struggling to keep the power and find your toeside edge, let's line the usual suspects up. Knowing what to avoid can really help you focus on what you need to be doing, and help you realise when you're not. There are basically two main culprits that will have a ginormous effect on your toe side, and it's resulting quality. Let's have a quick look.
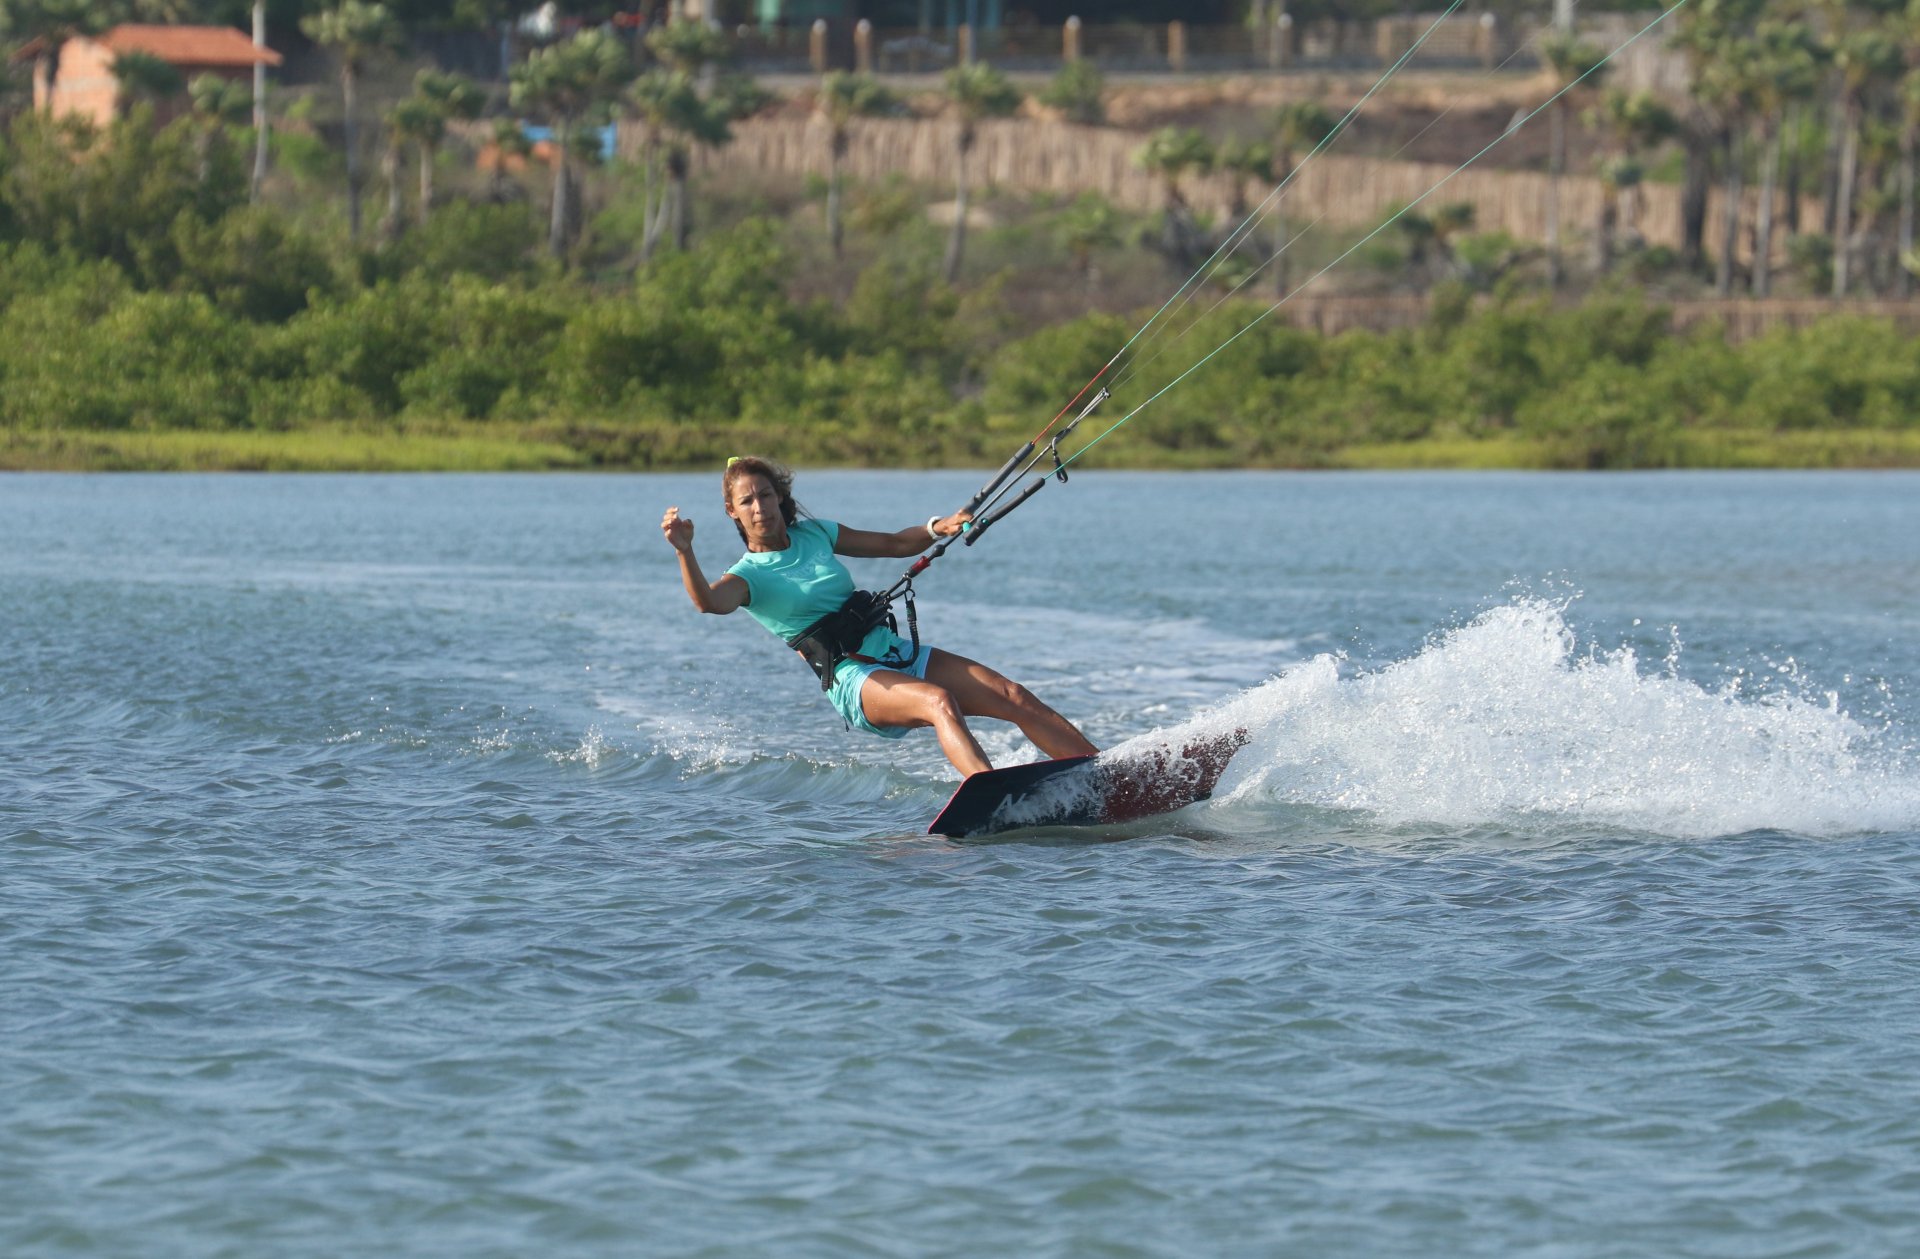
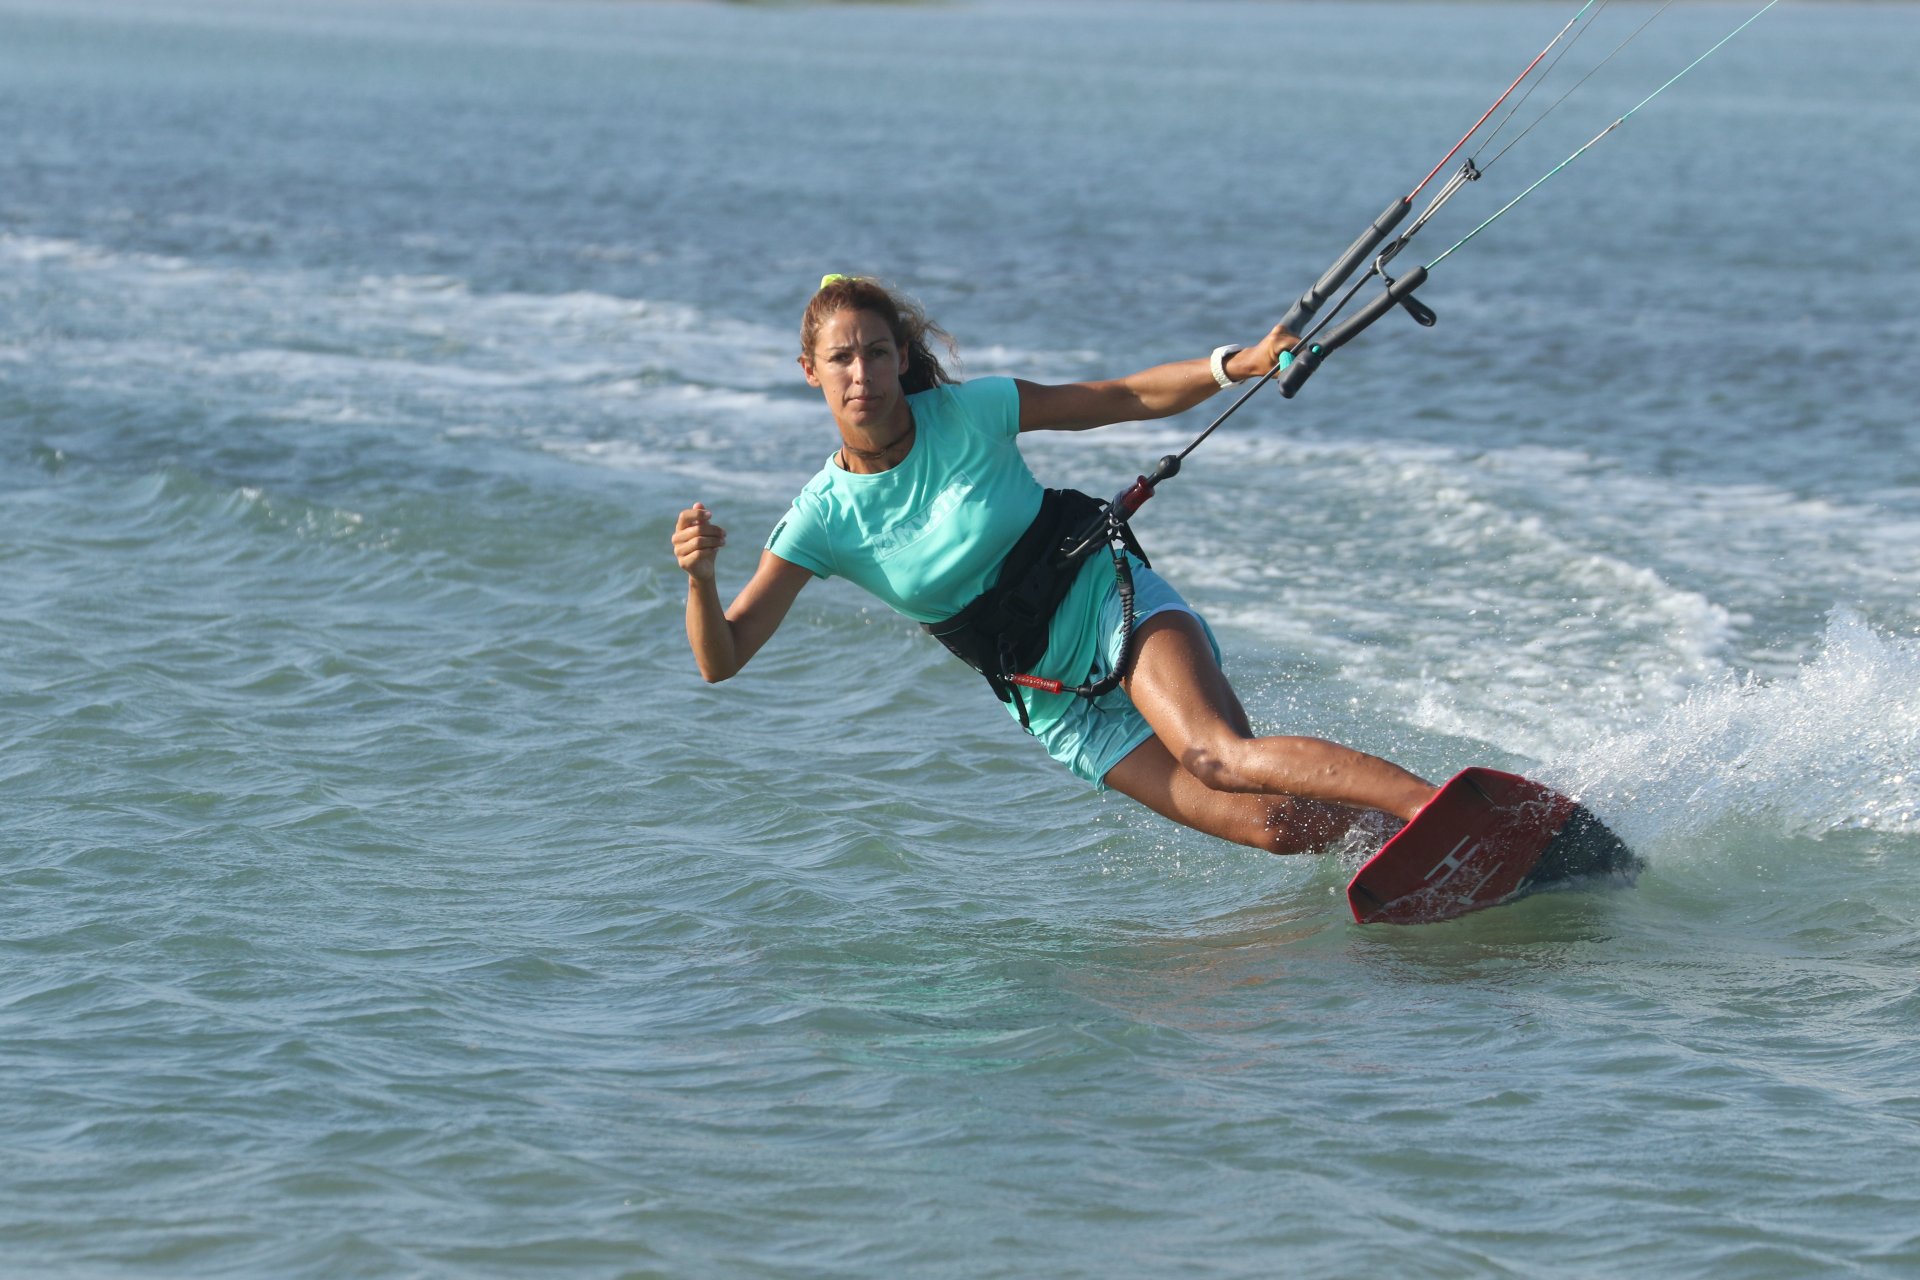
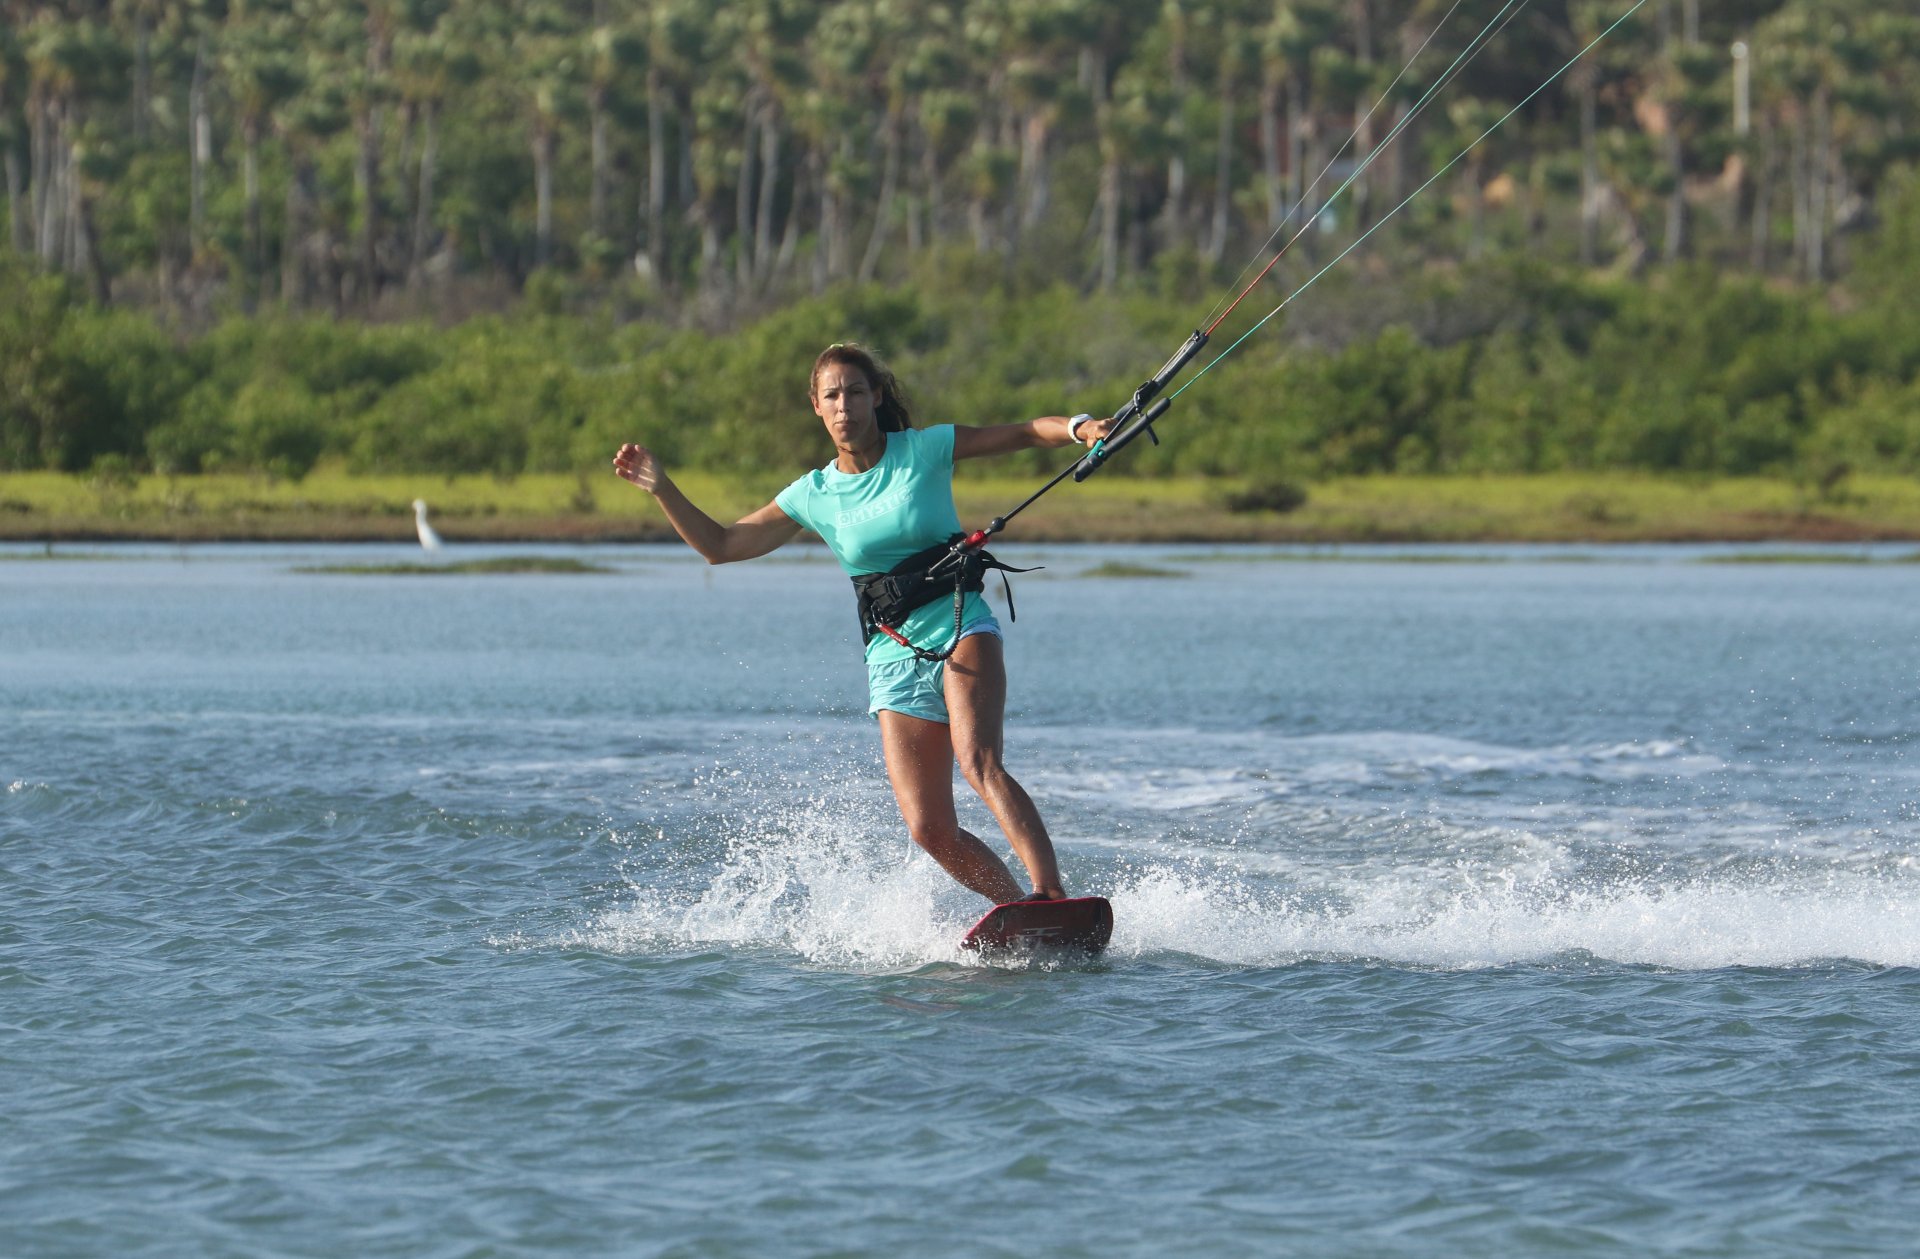
Pulling on the Bar Pic 2.
Dare we say it, nothing new here. Pulling on the bar is potentially one of the major obstacles in all of kiting. Whether you're looking for support, balance, power, whatever, as soon as you pull on the bar too much, you stall the kite and strangle it. This has so many adverse consequences that it's like googling a headache. First and foremost, when you stall your kite, you kill the power, so it stops pulling. You're effectively pulling the plug and slamming the brakes on, which is far from ideal when you'd like to keep moving. Should you not kill all the power, the kite will at the very least fall deeper into the window, more downwind of you. As such, it'll pull you downwind and make it hard to edge upwind, even with perfect technique. If this isn't enough to put you off, it will also pull you up off your edge and bring your shoulders forwards, meaning that you have little chance of transferring power from the kite into your board. In short, you need to keep tension in your lines, but you don't want to be yanking on the bar. This applies throughout the toeside. From getting around to getting on your edge, any brutality on the bar will be punished. Here Karine is using the bar to pull herself around to toeside. The result is that she'll slow down and be pulled downwind, all the while sinking slowly.
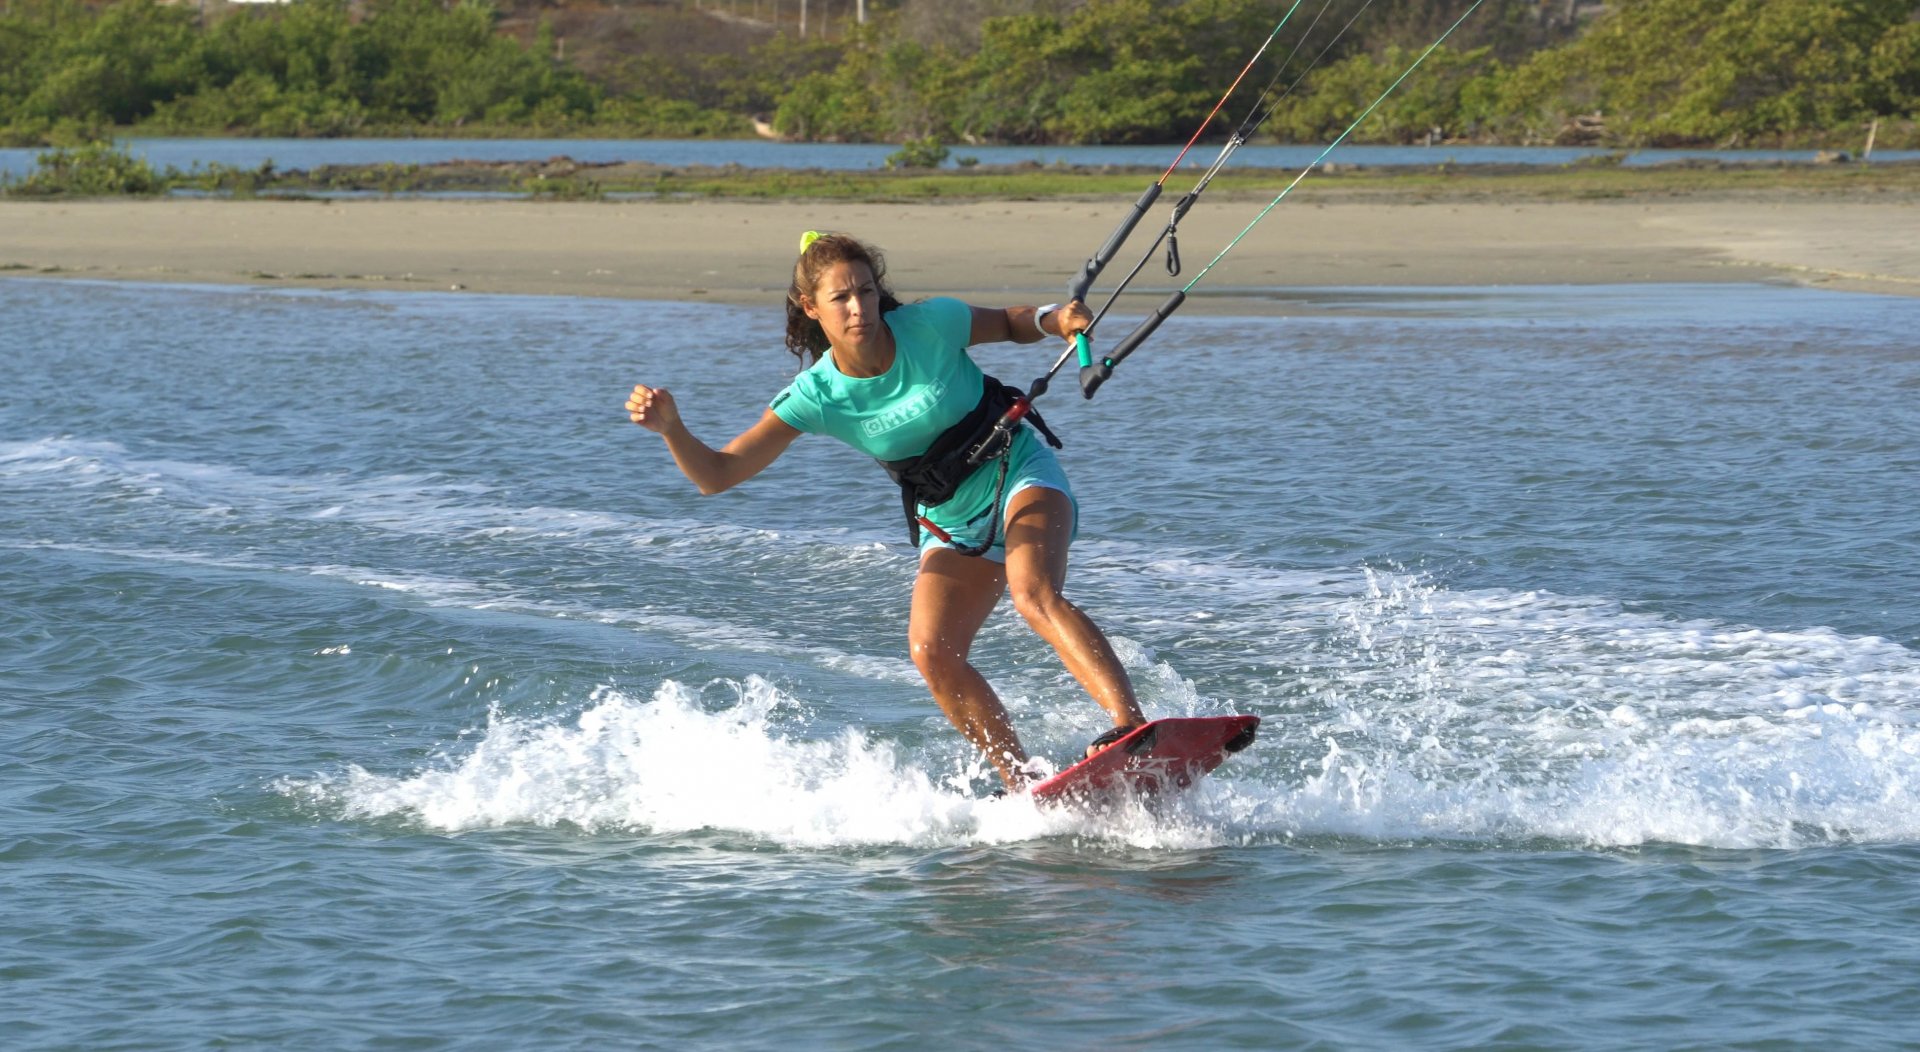
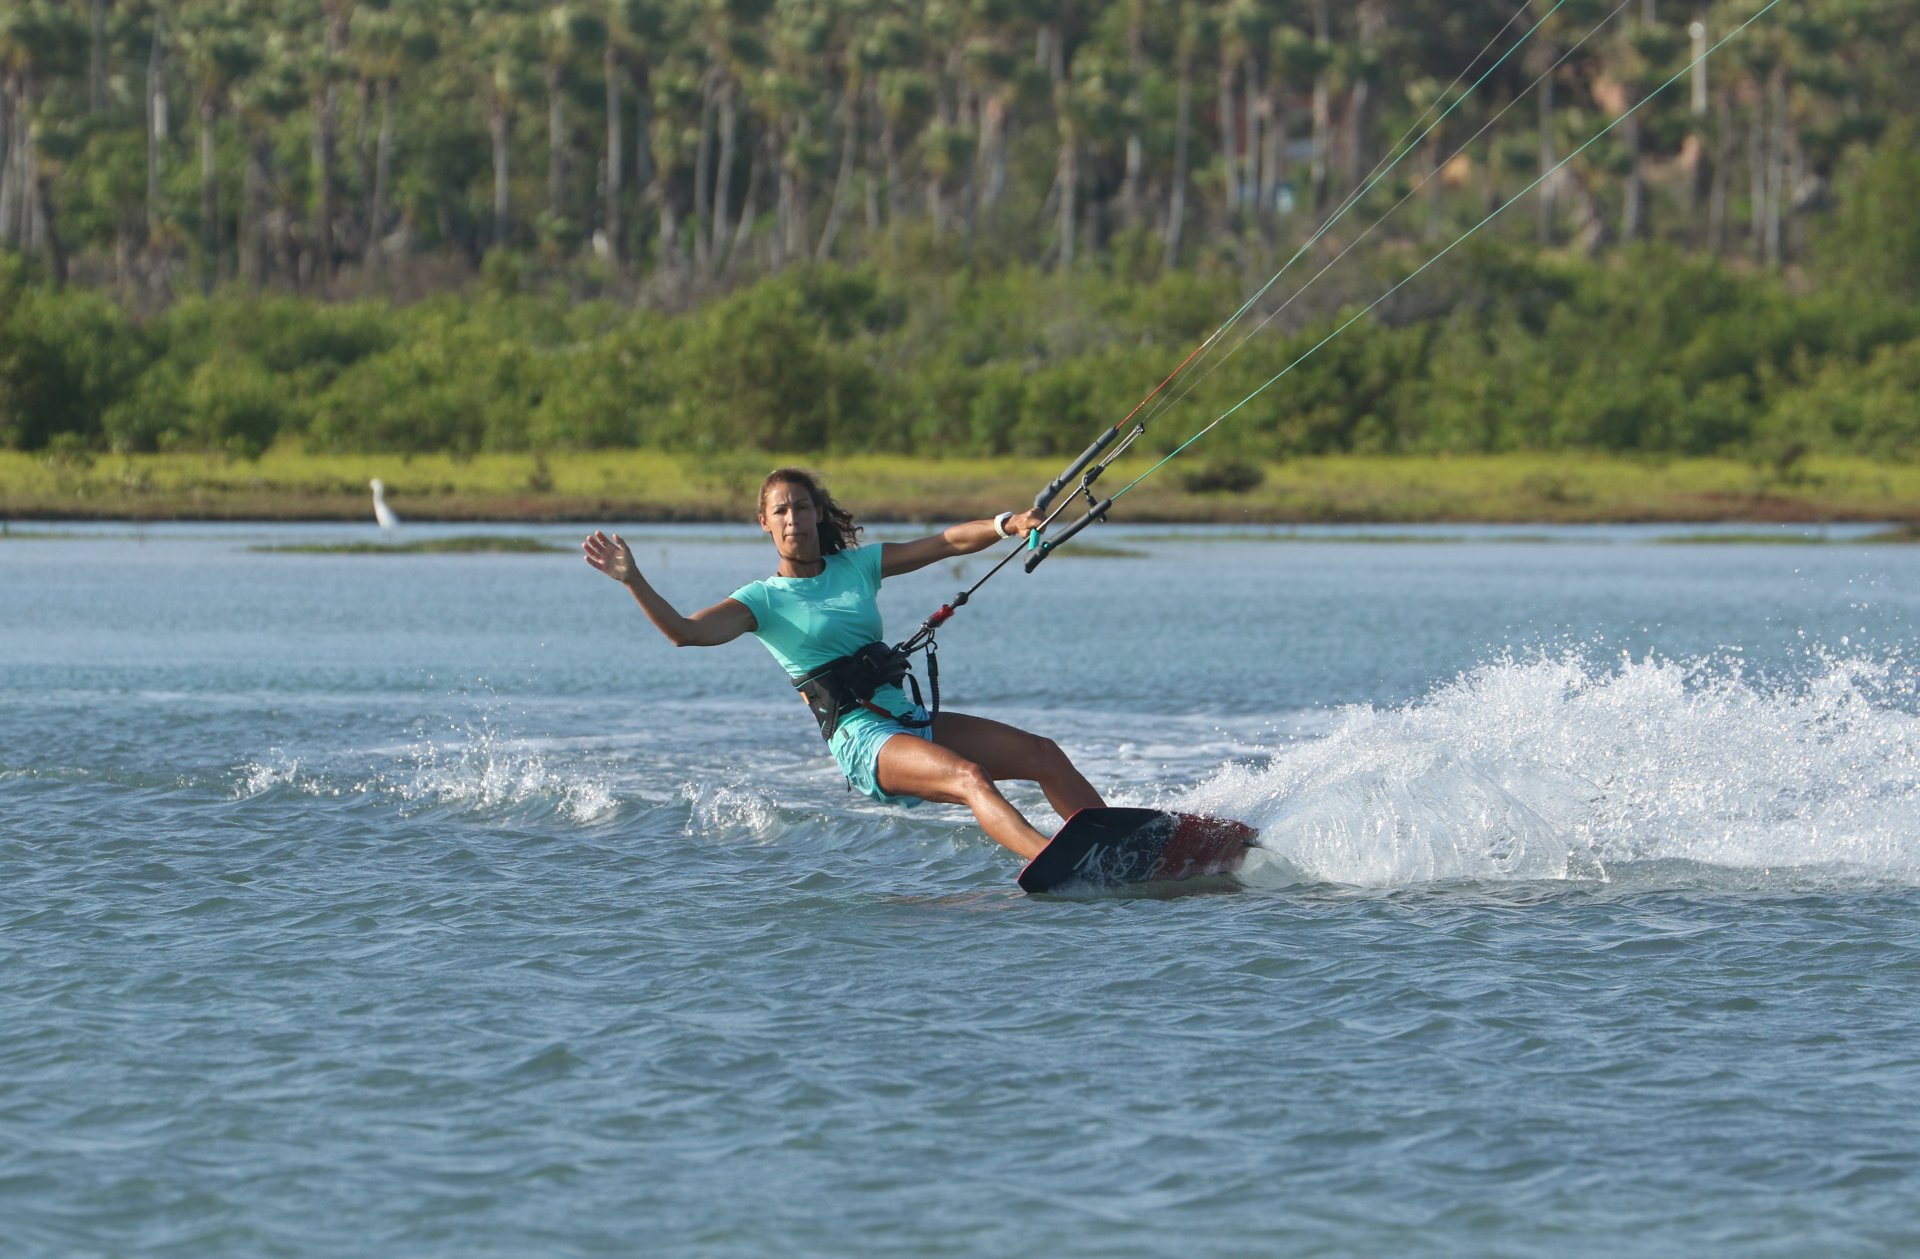
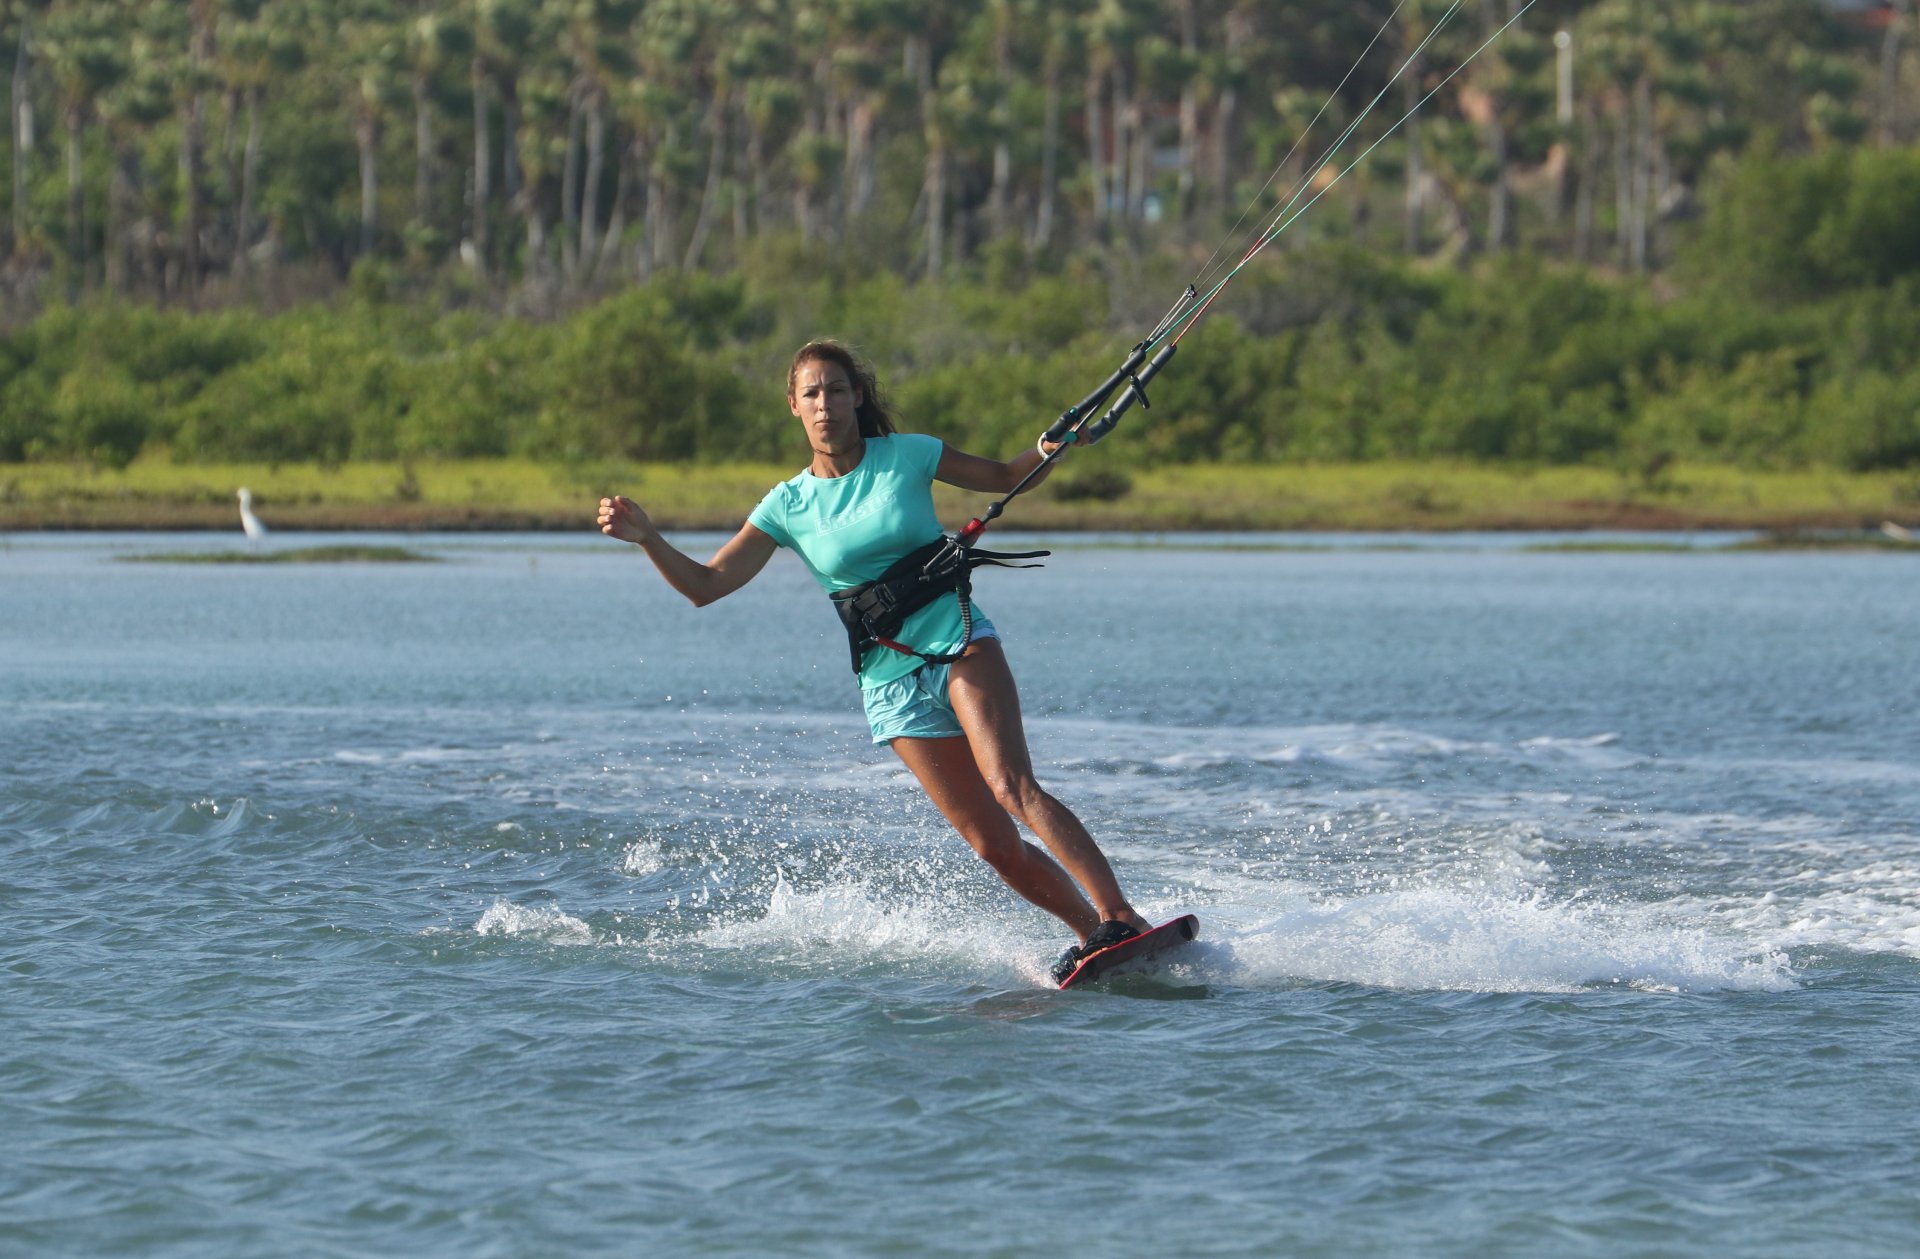
Bending Over Pic 3.
Once again, this can work against you in all stages of toeside. It's always important to transfer power; That's how you keep moving. However, when you first go to toeside, one tends to bend over as your body thinks it's resisting, edging on your toes. Unfortunately, you're not. As you bend over, your derriere drops closer to the kite and moves your weight onto your heels, steering the board downwind and towards the kite. Depending on wind conditions, you'll either accelerate like mad and go flying downwind, or if it's light, you'll lose tension, then power and grind to a standstill.
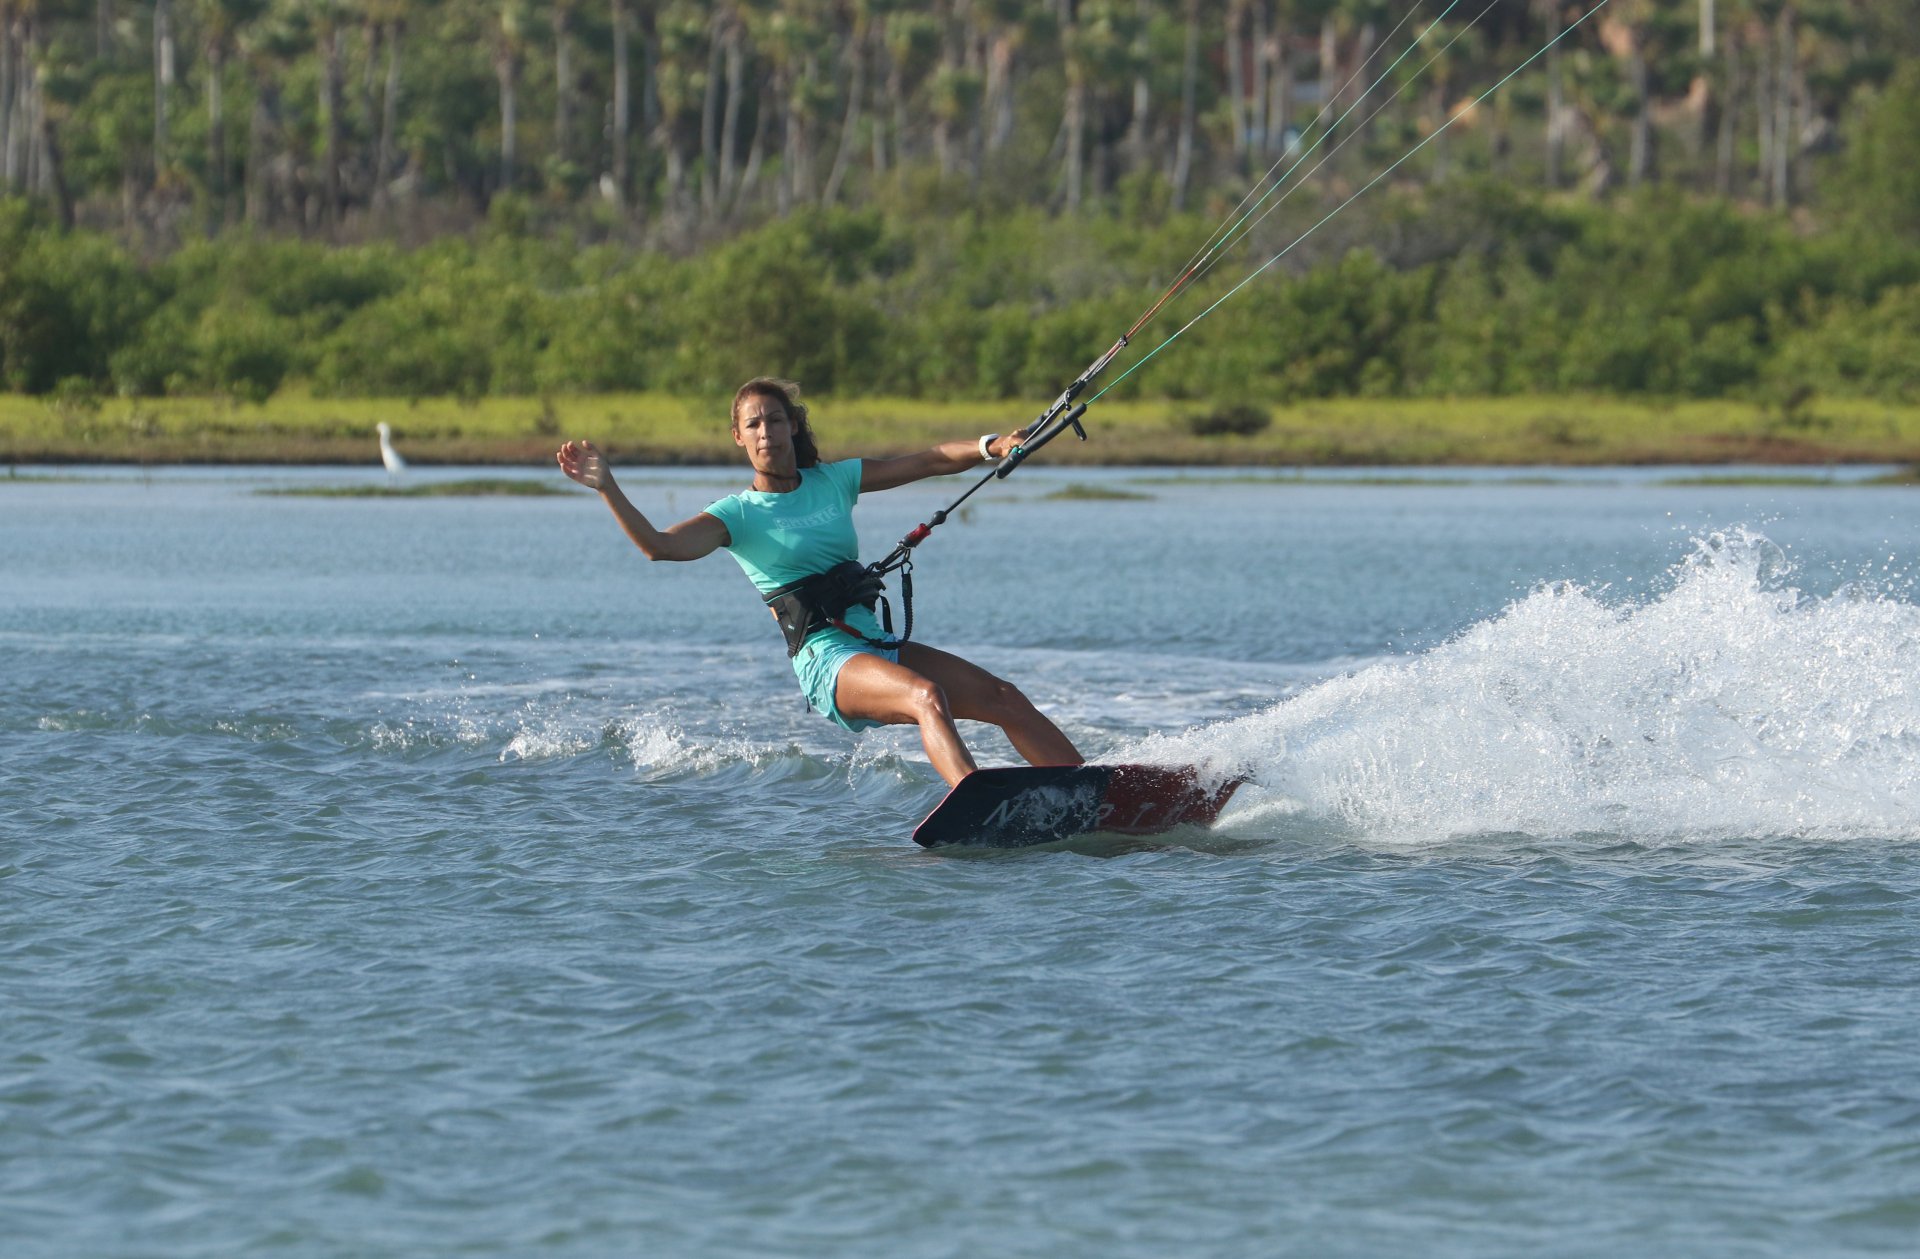
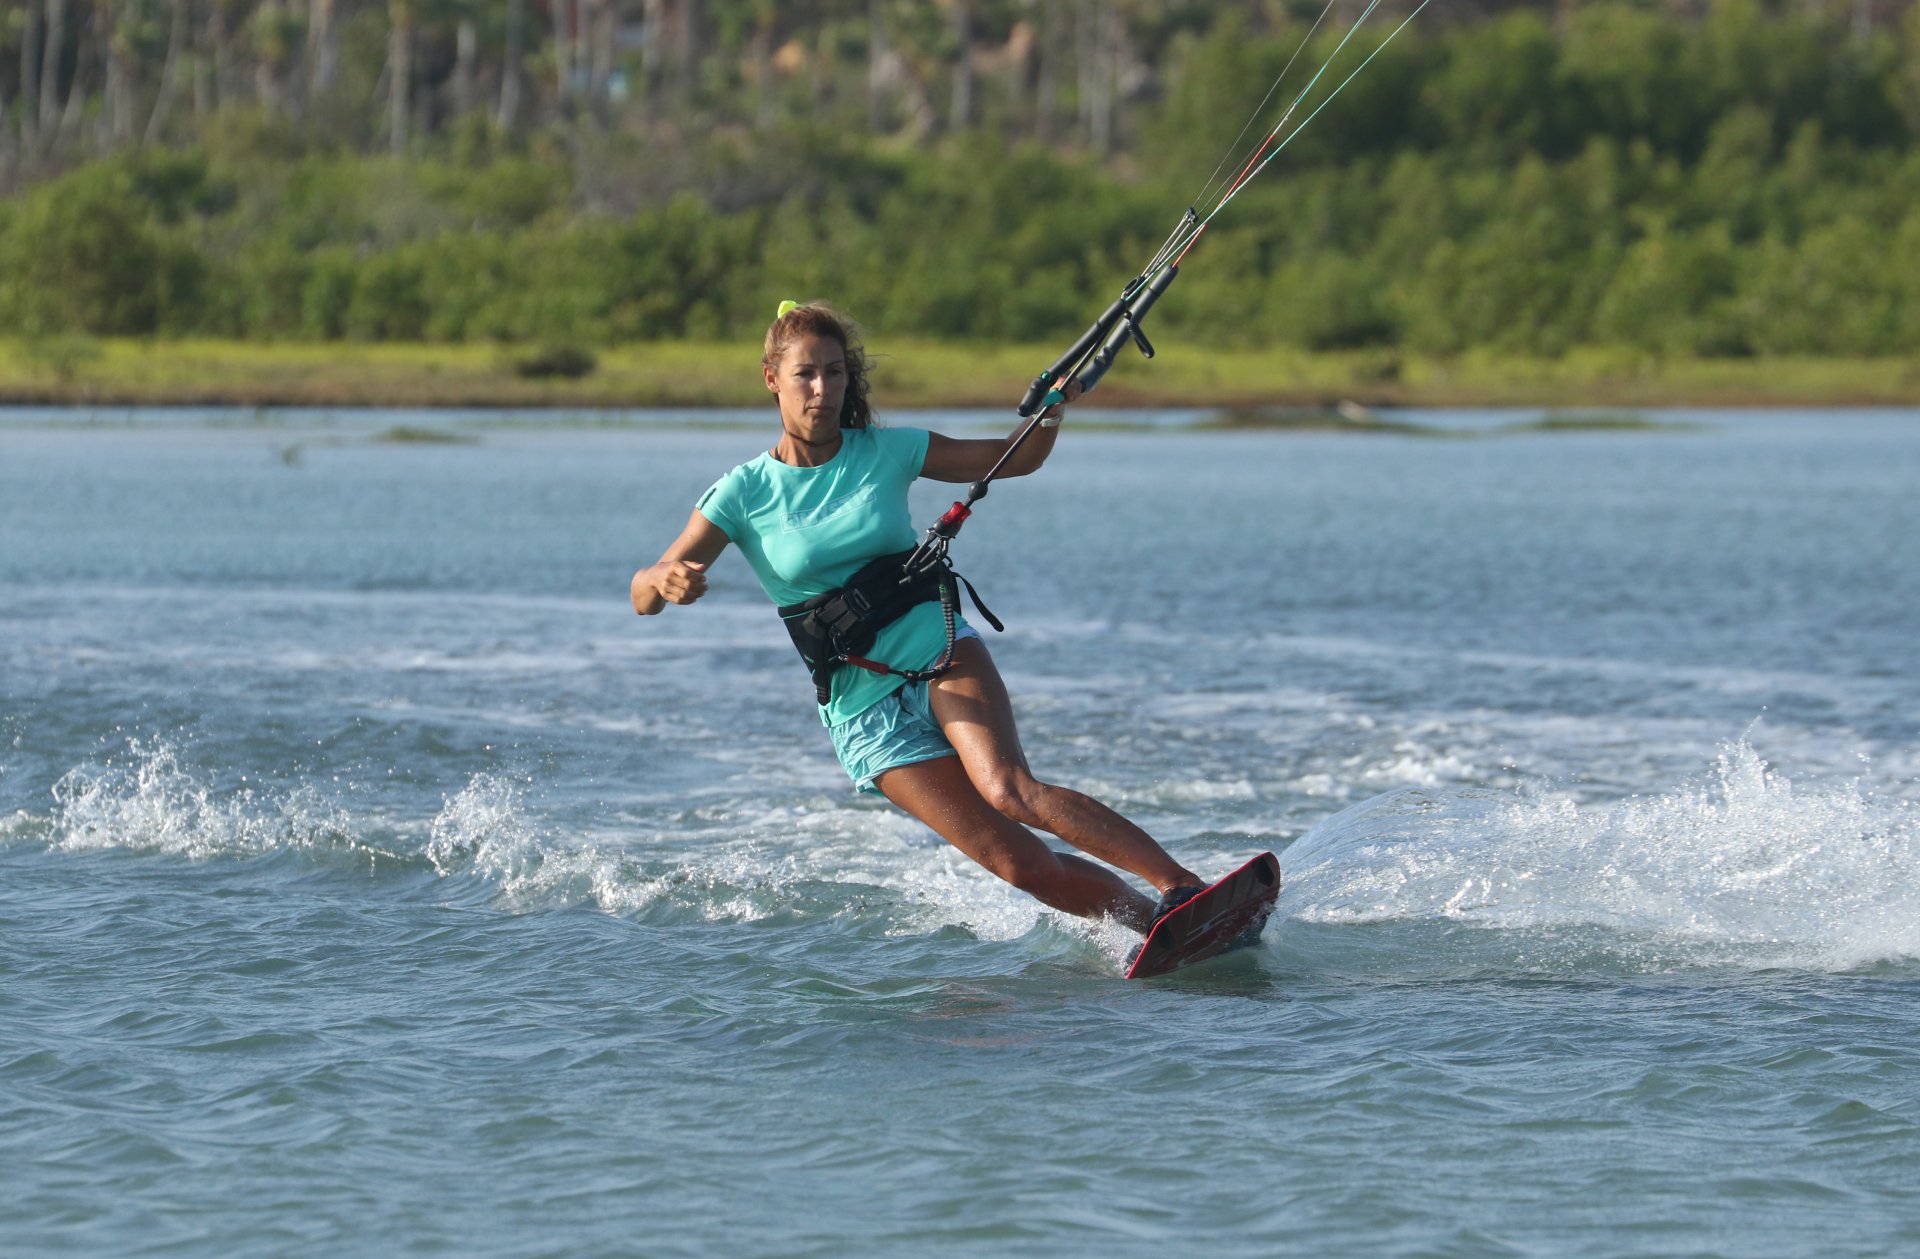
The Vicious Circle Pic 4.
If this isn't bad enough, there is a terrible catch 22 that evolves and manifests regardless of which hurdle is tripping you up. If you pull, you'll likely bend; If you bend, you'll likely pull. Then as you move downwind, you'll lean back, which in turn creates drag, and you stop. The good news is, we're going to forget the doom and gloom and concentrate on how to achieve a magnificent toe side edge.


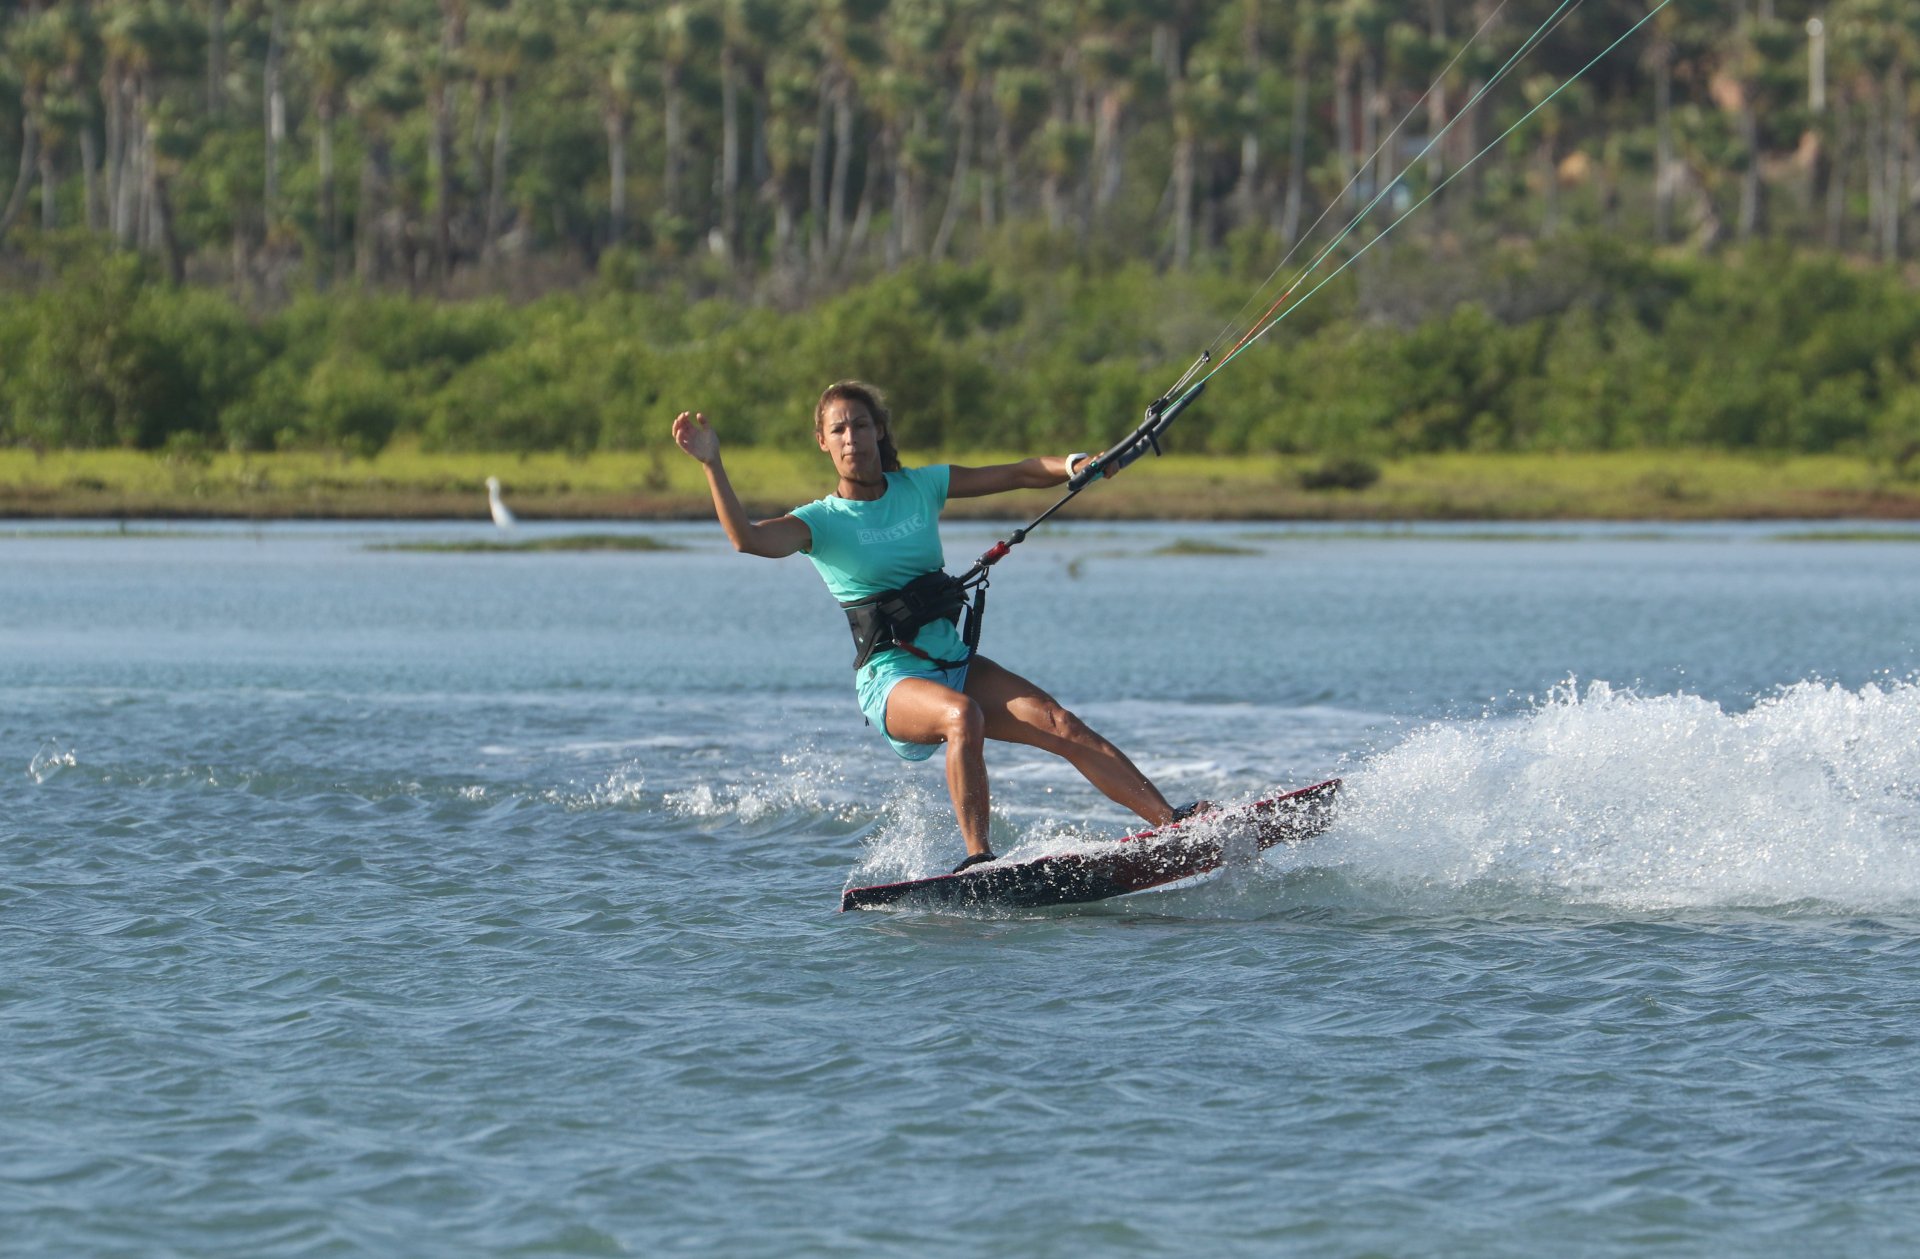
What is Toeside?
So, what are you aiming for? If you know where you're going, it's a darned sight easier to get there. With that in mind, if you already know the position that you'd like to get into, it'll help unfathomable amounts. Let's have a look at Pic 5.
As previously mentioned, toeside is no different from heelside; You aiming to transfer the power from the kite to the edge. Just this time, it's to the toeside edge through the balls of your feet. Whichever way you're edging, it boils down to the same basic principle, keeping your board between you and the kite, edging! This keeps tension on the lines and powers you forward and upwind. This is your Modus Operandi – keeping an edge throughout by keeping the board between you and the kite throughout.
Tools
Brilliant, you know what you want, but how do you get it? To do this, we'll go through the stages from heel to toe and see how best you can keep the board between you and the kite. In essence, if you want to keep the board between you and the kite, then you need to keep your torso stiff and upwind of both your hips and your board.
Approach Pic 6.
If you start with the board between you and the kite on an upwind edge, you've got a better chance of ending up in the same order, so your approach is equally important as all the fancy bits to come.
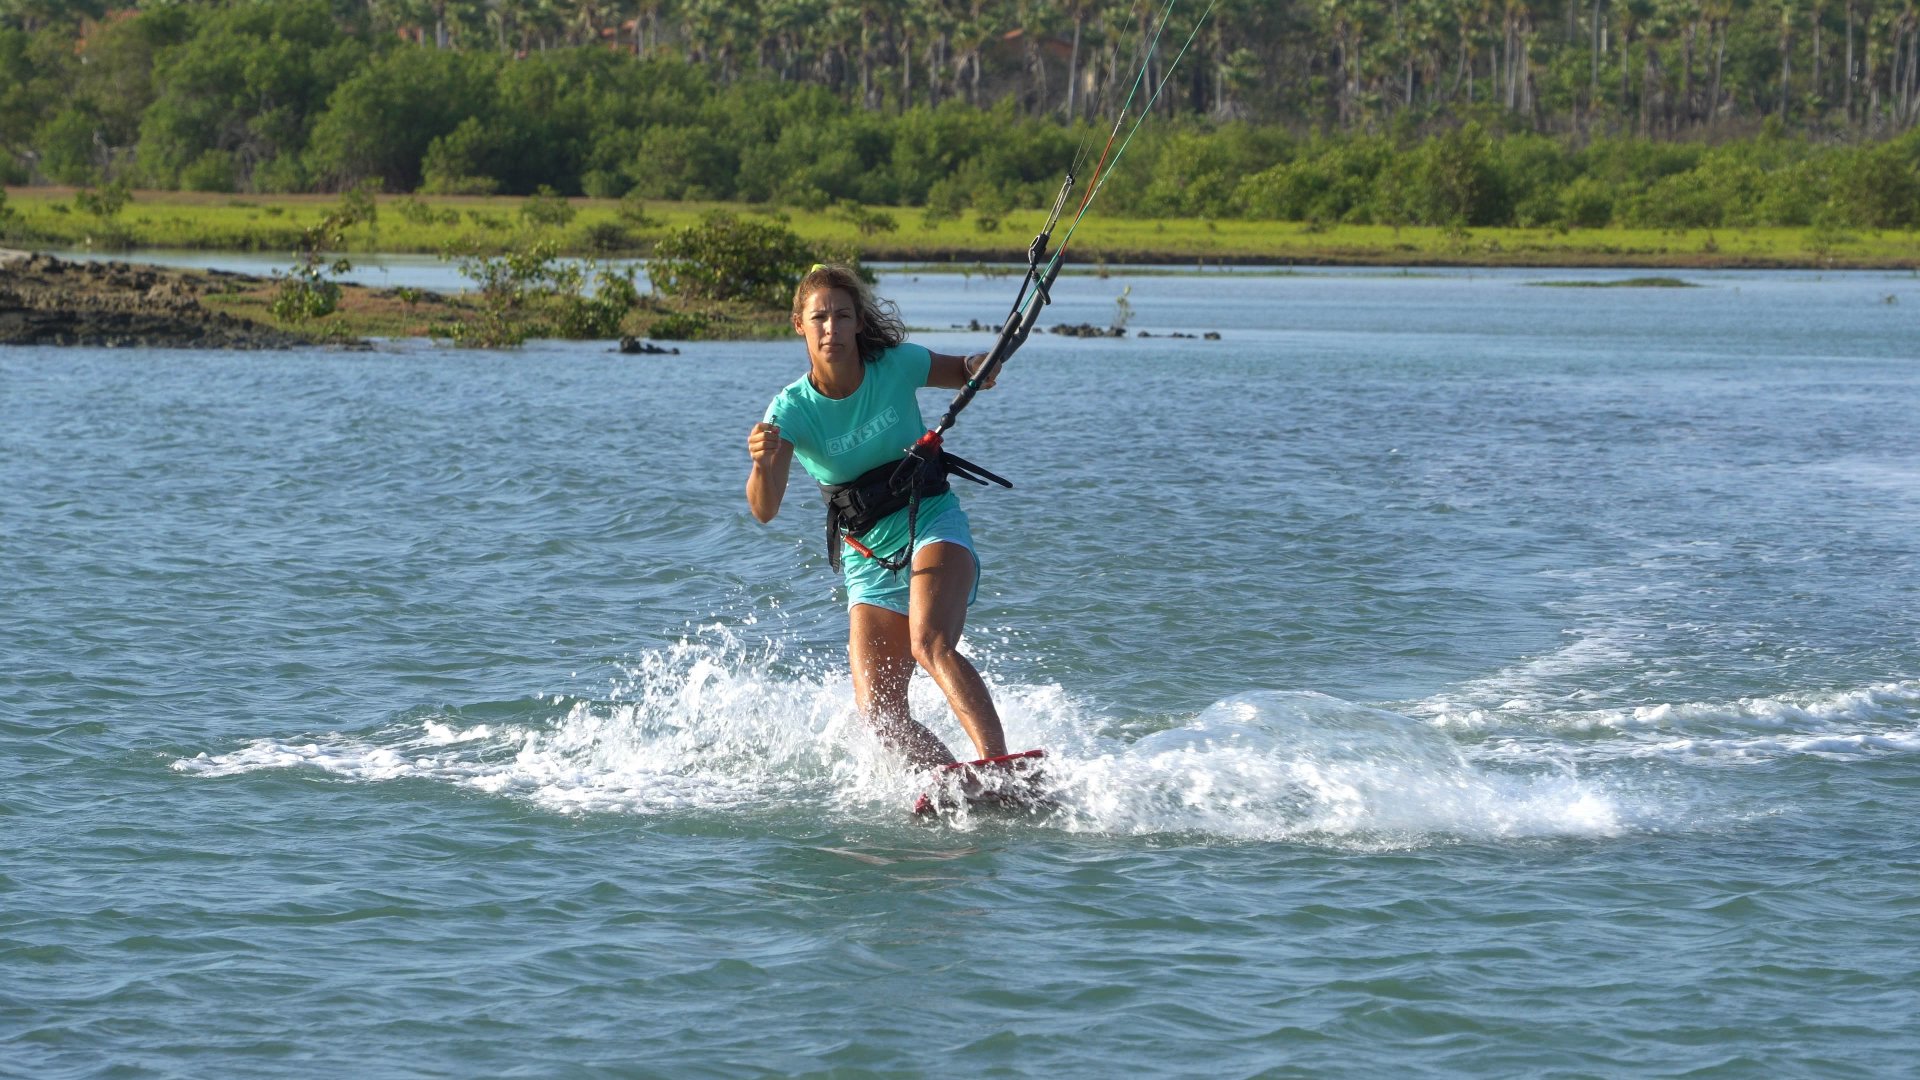
Looking at Karine, she's on a comfortable edge. This is made possible as her kite is no higher than 1 o'clock, so she can easily edge against it. Her bar is trimmed close enough that she can reach it with both hands, and her backhand is right up against the centreline, centred on the bar as if she were body dragging. She's looking where she's going and has her hips fairly centred between her feet, keeping plenty of board in the water. Her shoulders are upwind of her hips, and as such, the power transfers simply through her harness and into the board via her heels. And yes, the board is very much between her and the kite.
Big Hand & The Terminator Pic 7.
There's possibly a small demographic reading this that remembers Brother Lee from the late great Kenny E. Whether you do or not, you do need a big raised front hand for your toe side, just like Karine has in the photo. Holding your front hand up and in front of you is your guide. This is the position that your upper body starts in and finishes in. It really helps you stay stiff and prevents you from bending over. This, in turn, will help you pivot the board all the way from toeside to heelside whilst preventing you from turning your body too far upwind. You can see that on her approach, Karine releases her front hand and holds it up on a bent elbow in front of her. To compliment your big hand and maintain your position, it's also time to play Arnie. We've all seen the movie, and it's not unfair to say that his rather strong Terminator didn't spend much time on the yoga mat. Here, you're going to do the same. Your torso should be stiff as Arnie's delivery so that your upper body doesn't change position at any stage throughout the move.
Relax Your Grip Pic 8.
We've already mentioned that one of the prime suspects is pulling in on the bar. To prevent this, try easing it out a touch before switching to toeside. Not only will this prevent the kite from pulling you up over the board, but it will also turn your board a tiny bit further upwind as the kite flies more towards the edge of the window. Yet again, the more upwind your board points to start with, the more upwind it should end up once you've switched to your toes. You have less far to turn. However, you're not dumping power or sheeting out, just relaxing your grip so you're not holding on or supporting yourself. Karine eases the pressure off her bar, which has the knock-on effect of turning her board slightly further upwind. Note how her body position doesn't change.
Weight Shift Pic 9.
To be able to switch the board and your feet to toeside, you need to get all your weight onto your front foot. You're going to do this in the stiffest of fashions whilst keeping your body and arm stiff and your hand up. If you look at Karine in Pic D, she moves her hips forward toward the front of the board whilst staying on her edge. By doing this, her weight is directed through the edge towards her front foot. This means that even though her front leg bends, she is pushing down through it.
The Switch Pic 10.
With all your weight on your front foot, you can compress your knee, shifting your weight even further forwards. This will literally start to push the nose of the board down into the water. With your weight so far forward and supported on your front leg, you can lift your back leg through, lifting the tail of your board off the water with your back foot and whilst twisting your hips to bring the tail and back foot forward. See how Karine is almost sinking the nose of her board as she lifts the tail. Note how her body, arm and hand haven't moved. They are all still where they started, committed upwind and facing forwards. Most important of all, resist the urge to pull yourself around on the bar.
All the Way Pic 11.
This is where you're going. Your board around a full 180, your body hasn't moved, the kite is still pulling from the same place, and you have forward momentum and pull from the kite. Using your guiding hand and Terminator stiffness will allow you to get here, as long as you don't pull on the bar. In the photo, Karine is not yet on her toeside edge, but because she has turned her board all the way and still has her weight committed upwind, true to her Modus Operandi, she still has tension in her lines and will keep moving.
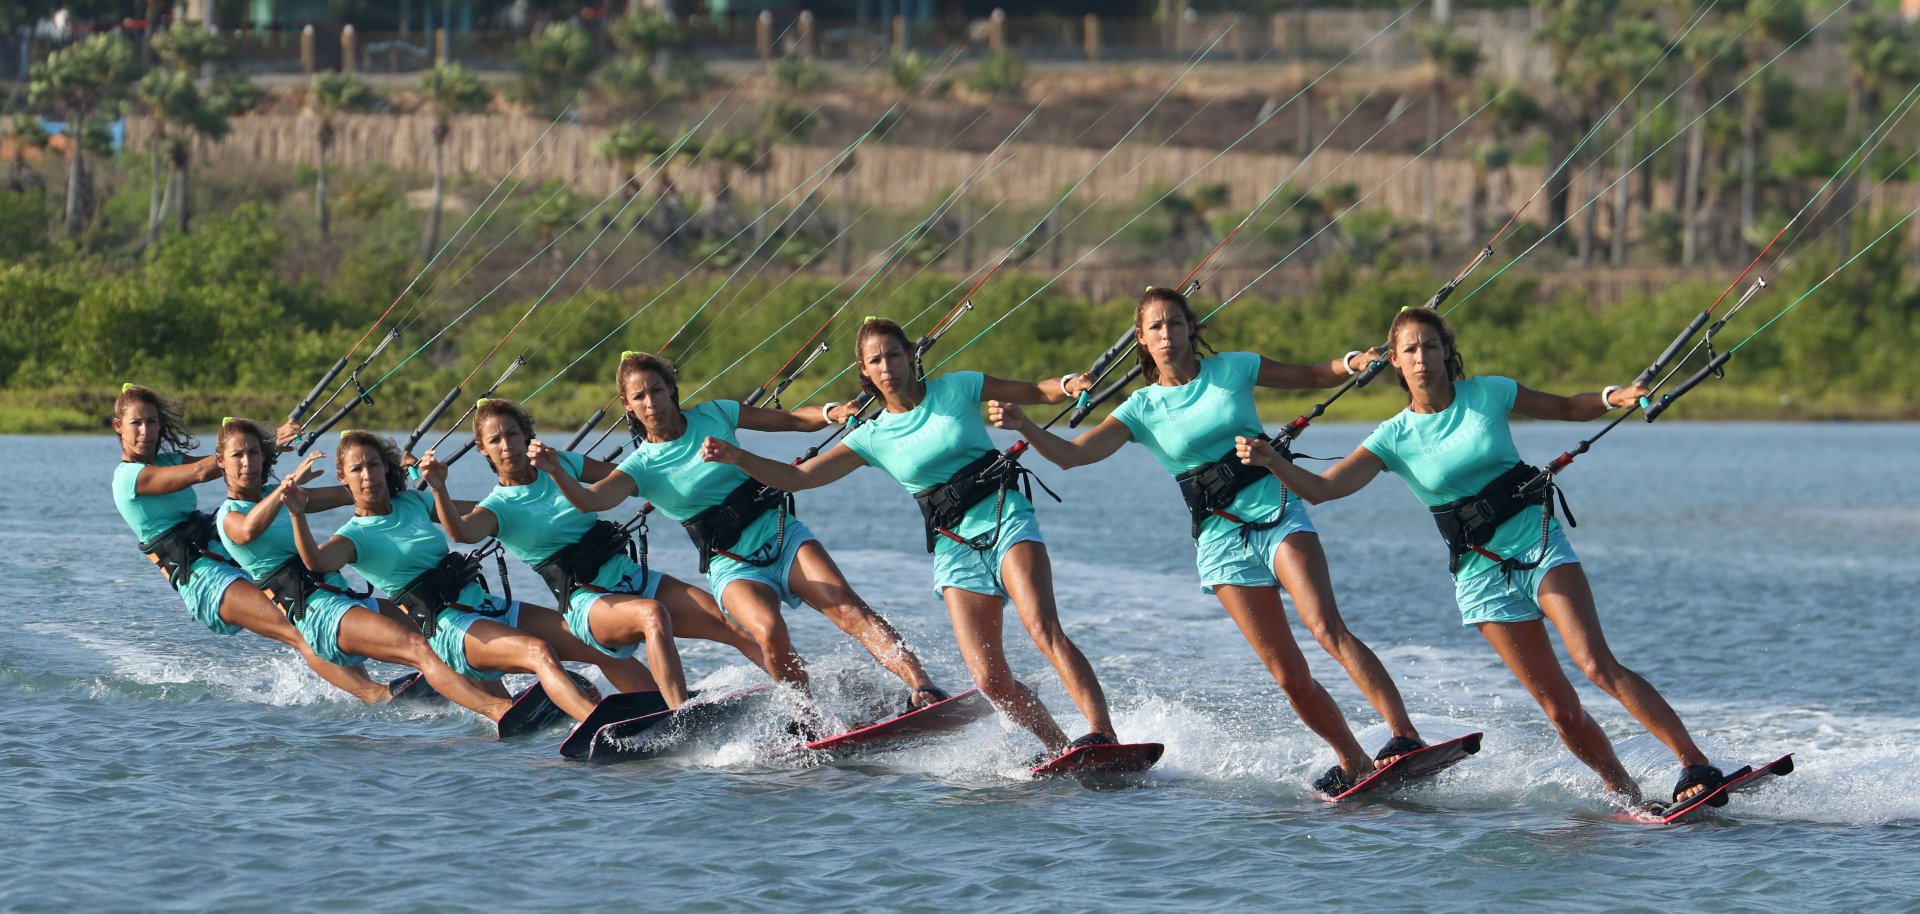
Have a look at Sequence 1 to see the switch to toeside step by step.
Stand Up Pic 12.
The final piece of the puzzle won't be too hard to place if all the other pieces are already in place. If everything has gone to plan, you're still holding your big hand up and tensing your Terminator Torso. Your ultimate job is to get some weight forwards onto your new front foot so that you can engage your toeside edge. To do this, you're going to stand up on your back leg, pushing your hips forwards as you do so. Sounds simple enough! Look at Karine and compare this pic with the previous one. The difference is that her back leg is pushing her forwards as it straightens. This works because her body and hips are facing forwards, not upwind. This means that you're shifting your weight in the direction that you're facing.
The Seagull Pic 13.
A timely reminder of your toeside stance. We often compare it to surfers racing down the line or snowboarders in hard boots screaming down a slalom course, and in the same vein, it's not a million miles away from a slalom water-skier on a mono ski. The common denominator in all of these positions is that the chest and hips face forwards, shoulders up, arms like wings on either side of your board. Mark Richards was known and is still instantly recognisable as the seagull for his long extended "wings" whilst surfing. It won't do you any harm to imitate.
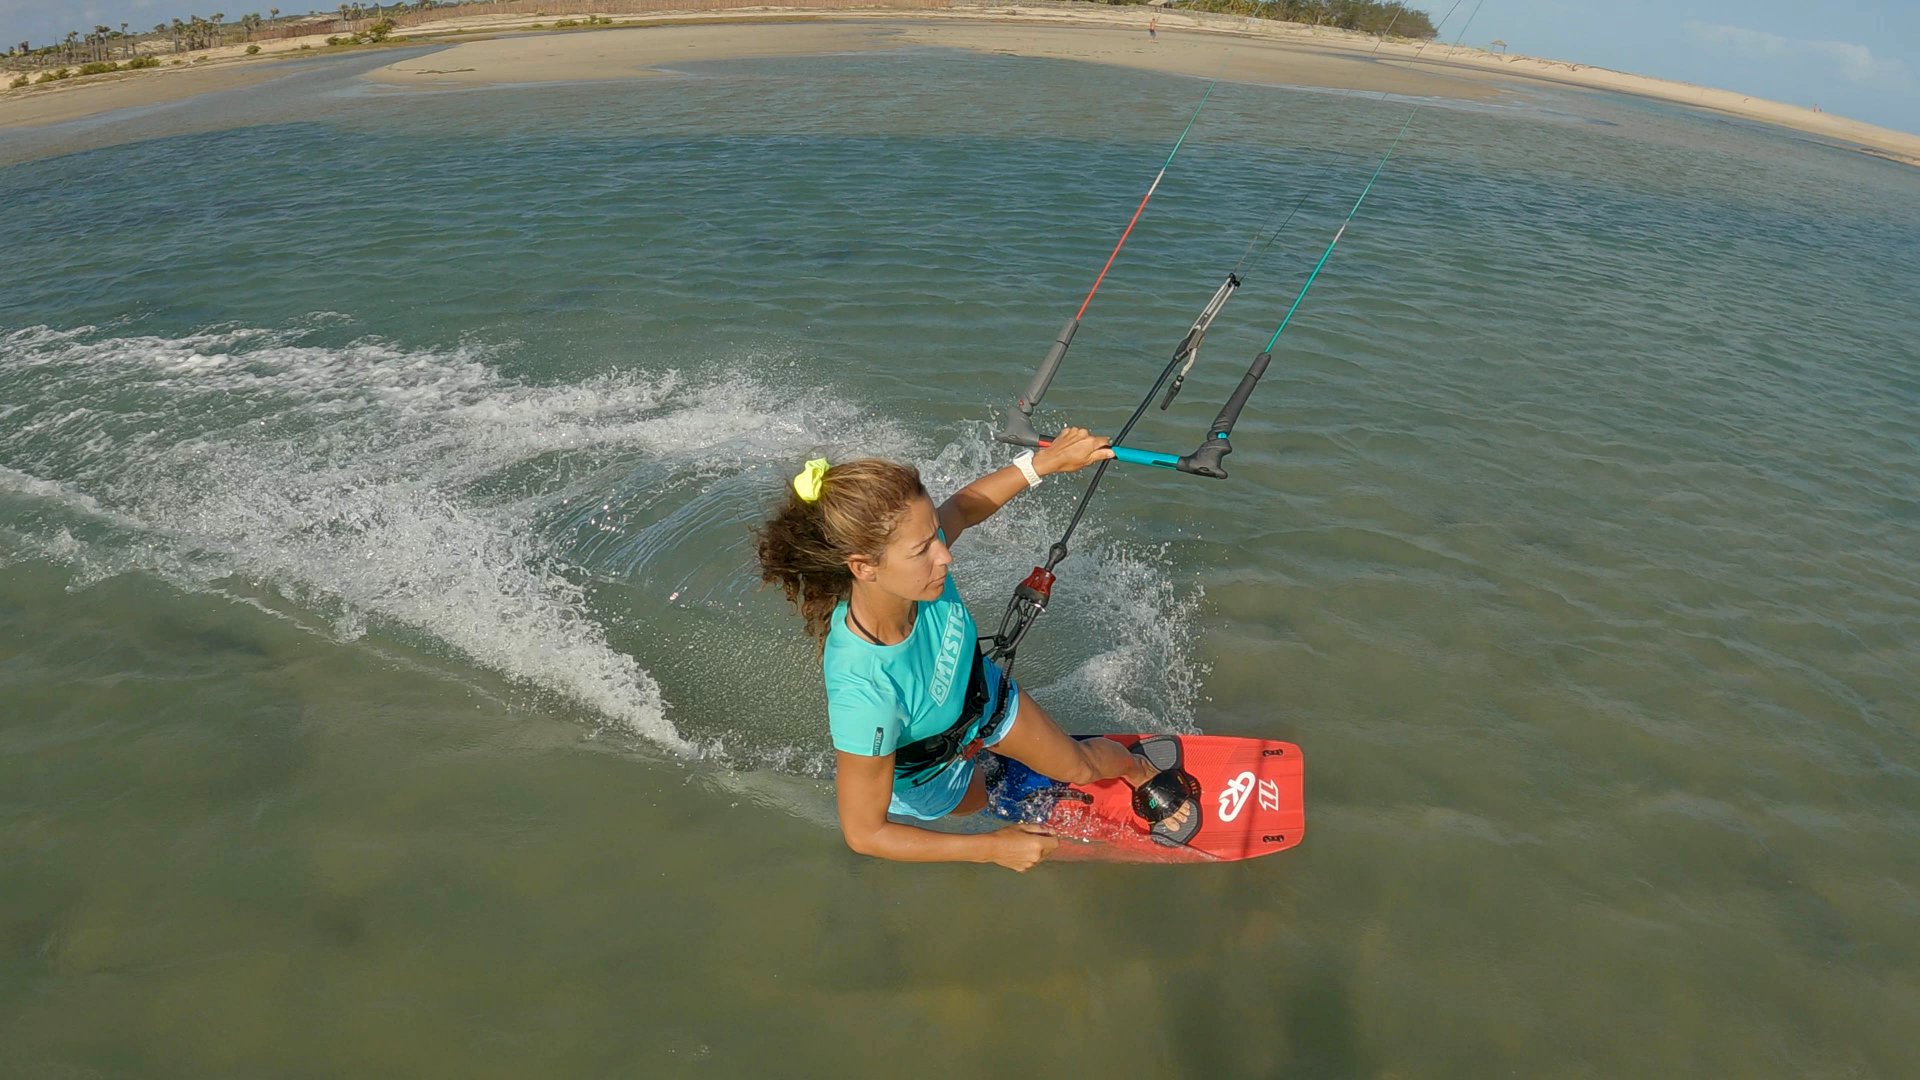
Cherry on the Cake Pic 14.
With your body sorted, your weight committed upwind, and hips forwards, you can now apply a bit of extra edge. This will come from your ankles. The more you flex your ankles, the lower and more forward you can drive your knees. With your knees driving, the board will bank more onto its edge, and you'll be able to push against it, adding force to your edge and tension on the lines. The more you push, the further upwind you can drive the board. This is really where the doors start to fly open to all those cheeky toeside tricks. The down shot of Karine really shows the final position. Karine's hand is centred on the bar, she's looking forwards, her chest and hips are open, facing the nose of the board, her free hand guides her forwards, whilst her knees and feet twist forwards, as she flexes her ankles and drives against the toeside edge of the board with the balls of her feet. Brilliant!
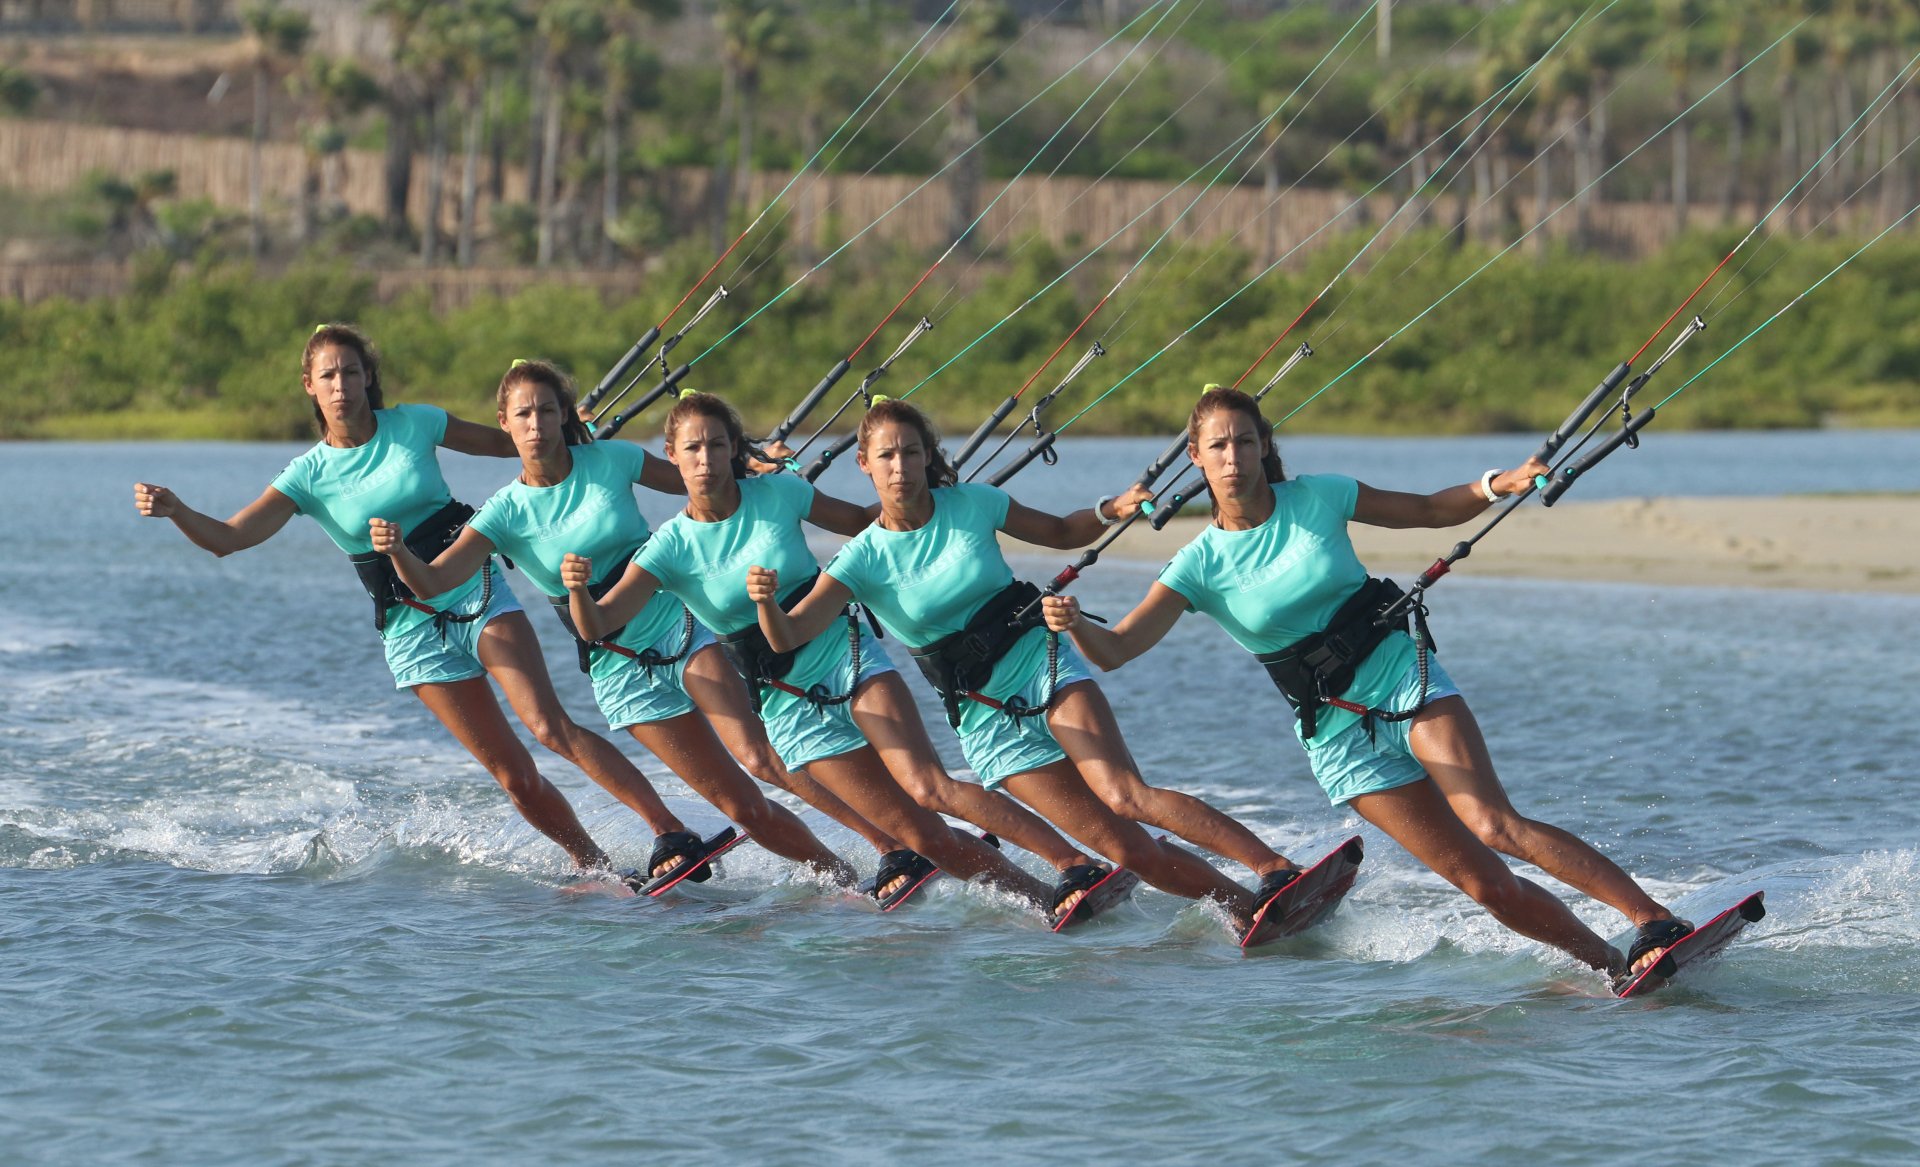
Have a butchers at Sequence 2 to get your weight forward, ankles flexed and on that toeside edge.

Final Considerations
Make it easy on yourself. It may well be stating the obvious, but it makes sense to wait for the right conditions. If you're fighting on heelside, you're more than likely to fight trying to get on your toes. You don't want to be hanging on for dear life, and neither do you want to be struggling for power. If and when you're lucky enough to get the perfect conditions, it'll be flattish water and park and ride wind. Also, make sure you've got space for it not to work, as this will give you time to find your perfect toeside even if it starts a tad downwind.
That's it, get out there, stay on an edge, lead with your big hand and harness your inner Terminator. Good luck, C&K.
This technique article was in Issue 90 of IKSURFMAG.
Related


By Christian and Karine
Christian and Karine have been working together as a coaching team, running improver to advanced kitesurfing clinics since 2003.
